SNMPv3 Configuration
Last updated on 25 October, 2023Enabling the SNMP Background Services
Enabling the SNMP background services is an essential step for configuring your device for monitoring. The following sections provide examples of how to set up SNMPv3 on RedHat/CentOS and Debian/Ubuntu. Depending on your distribution, additional adjustments may be necessary.
Note: To ensure you have sufficient permissions, you should become root or use the sudo command for the following configuration steps.
RedHat/CentOS
- Install the RPM
yum install net-snmpOptionally, you can install snmpwalk and other tools that can be useful for troubleshooting (these are not required for LogicMonitor to monitor the device):
yum install net-snmp-utils2. Stop the snmpd service:
service snmpd stop3. Create an SNMPv3 user:
net-snmp-create-v3-user -ro -A my_authpass -X my_privpass -a SHA -x AES myv3userNote the following:
The full command usage is:
net-snmp-create-v3-user [-ro] [-A authpass] [-X privpass] [-a MD5|SHA] [-x DES|AES] [username]This command will automatically add information to the /var/lib/net-snmp/snmpd.conf and /etc/snmp/snmpd.conf configuration files.
4. Start the daemon and set it to start on server boot.
For RedHat/CentOS 7.0, use the following commands:
systemctl restart snmpd.service
systemctl enable snmpd.serviceFor older versions of RedHat/CentOS, use the following commands:
service snmpd start
chkconfig snmpd onDebian/Ubuntu
- Install snmp, snmpd, and lbsnmp:
apt-get install snmp snmpd libsnmp-dev2. Stop the snmpd service so that we can add a user:
service snmpd stop3. Run the following command to add an SNMPv3 user:
- Change authpass to your authentication password.
- Change privpass to your private or crypto password.
- Change v3user to your SNMP v3 user name.
net-snmp-config --create-snmpv3-user -ro -A authpass -X privpass -a SHA -x AES myv3userThis command will automatically add information to the /var/lib/snmp/snmpd.conf and /usr/share/snmp/snmpd.conf configuration files.
For more information about editing the SNMP configuration file and testing it, see Setup SNMPv3 on Debian.
4. Depending on your configuration, use one of the following sets of commands to restart snmpd and set it to start on server boot:
systemctl restart snmpd
systemctl enable snmpdservice snmpd start
chkconfig snmpd onSetting SNMPv3 Properties on Devices
Any devices that use SNMPv3 must have a specific set of properties configured (within the LogicMonitor interface) in order for LogicMonitor to successfully communicate with them.
- Review the SNMPv3 properties that are required in Defining SNMP Credentials and Properties. The required properties vary depending upon whether you are communicating with authentication and privacy, referred to as authPriv security level, or authentication only, referred to as authNoPriv.
2. Select the device from the Device tree and navigate to the Info tab.
Note: Optionally, you can set the properties from the device’s parent group or the root group (i.e., account) level, depending upon how broadly they apply to other devices. For more information on determining the hierarchical level at which to establish properties for a device, see Resource and Instance Properties.
3. Scroll through the list of custom properties to see if the properties already exist on the device:
- If the SNMPv3 properties are present and accurate, no changes are necessary.
- If the SNMPv3 properties require different values (e.g., they are inaccurate, or they were inherited from a parent group and need to be overridden), click the Manage button.
- If the SNMPv3 properties aren’t present, click the Manage button.
4. From the Manage dialog that appears, scroll to the bottom Properties section to edit or add your SNMPv3 properties:
- If the SNMPv3 properties are listed here (which indicates the properties were previously assigned directly to this device), place your cursor in the Value column for each property and override the existing value with a new value.
- If the SNMPv3 properties are not listed here (which indicates they are either inherited from a parent group or were never present to begin with), click the + icon, enter the property name and value, and then click the Save button. Repeat for each SNMPv3 property. If you are overriding SNMPv3 properties inherited from a parent group or the root device folder, adding them here in this manner will serve to override them.
5. Click Save to save your changes and exit the Manage dialog.
Note: To verify that the correct credentials have been set, follow the instructions in Troubleshooting SNMP.
Using Special Characters in authToken and privToken for SNMP v3
You can use all special characters in authToken and privToken when you create an SNMP v3 user. However, when you add !, $, and \ in the authToken and privToken, you may get errors such as script failure due to wrong digest and authorisation errors. You can avoid these errors by adding the escape character backslash (\) before them. For example,
| Special Character | After Adding \ |
| ! | \! |
| $ | \$ |
| \ | \\ |
An example of adding \ before the special character $
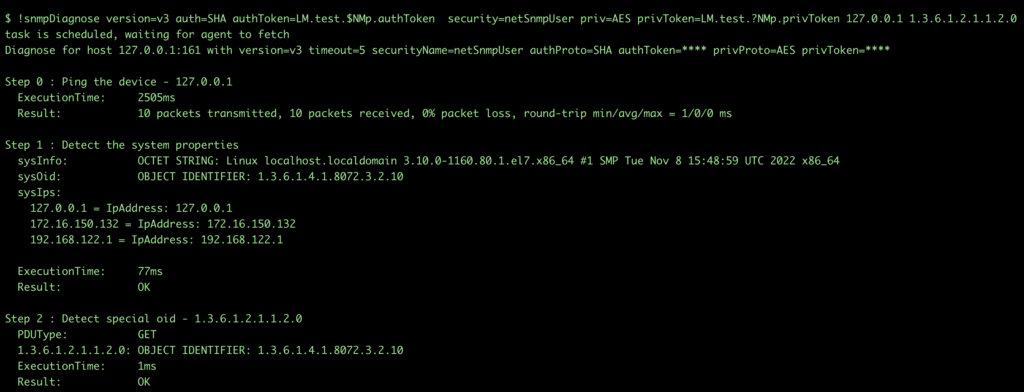
To set authToken=LM.test.$NMp.authToken when you create an SNMP v3 user in device, add a backslash (\) before $ –> LM.test.\$NMp.authToken
To verify if the netSnmp v3 user is properly created, check the createUser statement.

Note: When you run the !snmpDiagnose command in the collector debug terminal, you do not have to add a backslash (\). You have to use the backslash (\) only at the device level.