
Escalation Chains
Last updated on 04 October, 2023When a triggered alert is matched to an alert rule, it is assigned an escalation interval (defined in the alert rule), and then dispatched to an escalation chain. You can configure settings for an escalation chain directly in your LogicMonitor portal.
Note: It is possible that an alert could match an alert rule, but still not be routed. This scenario occurs if alert notification suppression is enabled using one of LogicMonitor’s AIOps features features to reduce alert noise. For more information, see Enabling Dynamic Thresholds for Datapoints and Enabling Root Cause Analysis.
When you configure an escalation chain you add recipients and contact methods specifying how recipients receive alert notifications. This allows LogicMonitor to route alert notifications to the recipients in the chain. For more information, see Alert Delivery Methods.
You can add the following types of recipients to an escalation chain:
- User accounts—You can deliver notifications to either the email address, SMS email address, or phone number stored in the user account. For more information, see Users.
- Recipient Groups—Recipient groups act as shortcuts when the same set of recipients needs to be notified of multiple types of alerts. Recipient groups can consist of user accounts, arbitrary email addresses, and other recipient groups. For more information, see Recipient Groups.
- LM Integrations—You can deliver alert notifications to any LM Integration defined in your LogicMonitor account. This allows you to direct alert notification delivery to third-party tools. For more information, see LogicMonitor Integrations Overview.
Recommendation: Create a dedicated user account to associate with the integration to add an LM integration as a recipient. For example, you can create a “Read Only” user account as the LM integration recipient to ensure that alerts are consistently routed to the dedicated user. Creating this type of user account also prevents the escalation chain from breaking if users change.
- Arbitrary Emails—You can add an email address that is not associated with an existing user account or recipient group. For example, you can use an arbitrary email address to represent a distribution list. Ensure that the distribution list is configured to allow external addresses.
Escalation Chain Stages
Escalation chains include stages that can contain recipients. An escalation chain must include at least one stage. Later stages of an escalation chain are notified if the alert is still in effect and prior stage recipients have not acknowledged or suppressed the alert within the escalation interval. For more information, see Alert Rules.
The following diagram illustrates an escalation chain with multiple stages:
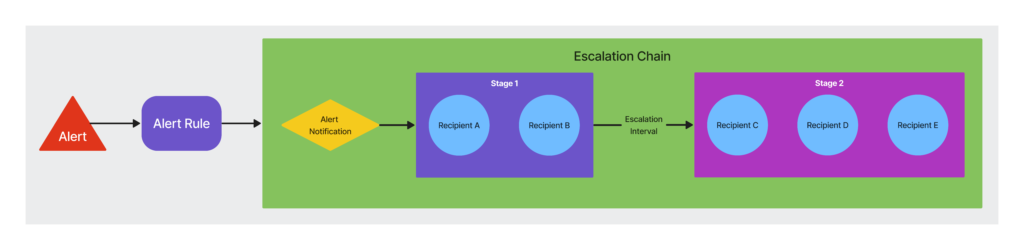
When an alert matches an alert rule, the notification is sent to Recipients A and B in stage 1 based on the contact methods defined for the recipients. If the alert is not acknowledged or cleared by the recipients in Stage 1, LogicMonitor routes alert notifications to the recipients in Stage 2. If the alert remains active for the escalation interval time period (defined in the alert rule) after the second stage, notifications are repeatedly sent to the second stage recipients at the period specified by the escalation interval until the alert clears or is acknowledged.
Recommendation: Create an escalation chain for each functional group in your organization that receives alert notifications (For example, on-call engineers, a network team, or a database team).
You can configure an escalation chain with an empty stage. This is useful for delaying alert notifications for a particular DataSource or EventSource without impacting timely delivery of all alert notifications. An empty stage delays notification for the duration of the escalation interval (defined in the alert rule), at which point the next stage is triggered.
The following diagram illustrates an escalation chain with an empty stage:
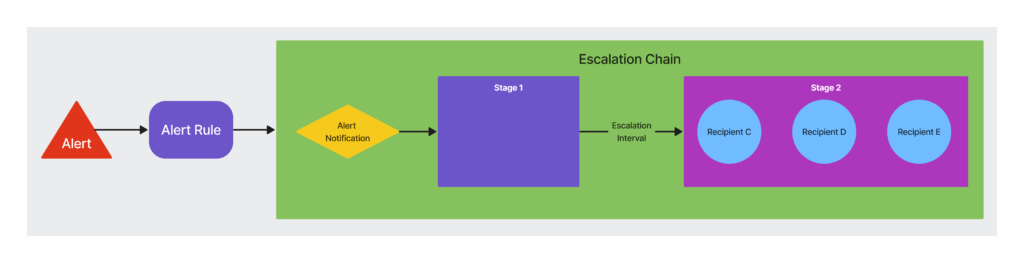
The first stage of the escalation chain has no recipients assigned to it. Recipients A, B, and C do not receive a notification until the time defined in the escalation interval passes and the alert is not acknowledged or cleared during the escalation interval (defined in the alert rule). If the alert remains active for the entirety of the second stage, the alert escalates and notifications are resent to the recipients in Stage 2.
Note: If a throttle message is sent to an escalation chain with an empty first stage, recipients of later stages do not receive the throttle message.
Time-Based Escalation Chains
You can create a time-based escalation chain that lets you route alert notifications to different recipients depending on the day and time that the alert is triggered. LogicMonitor treats the stages added to a time-based escalation chain as a subchain of recipients. When an alert is routed to a time-based escalation chain, the subchains are processed in order until a subchain has an effective time that matches the current day and time. If there is no matching subchain, the alert is not routed, but displays on the Alerts page.
The following diagram illustrates a time-based escalation chain:
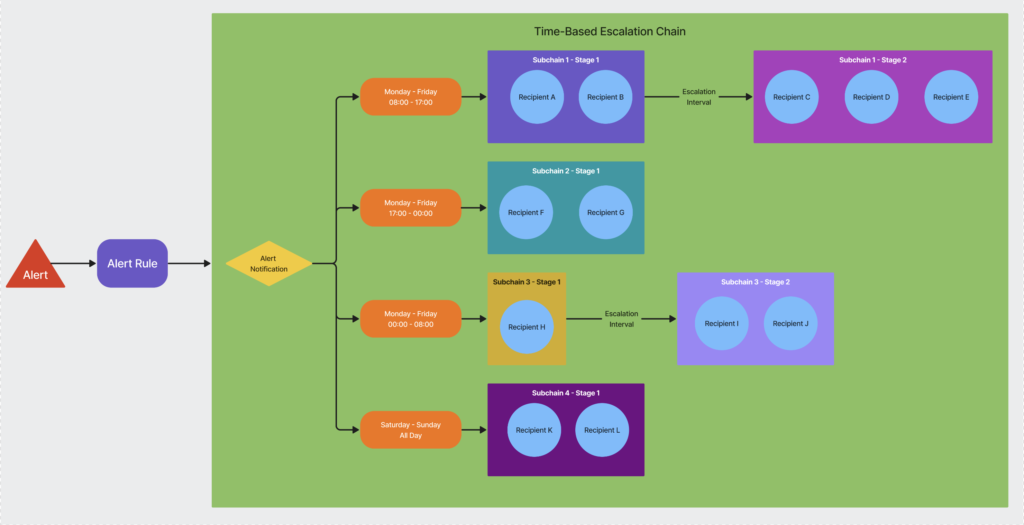
Depending on the time the alert is triggered Monday through Friday, LogicMonitor routes alert notifications to recipients in Subchains 1-3. Within each subchain, if the alert is not acknowledged or cleared within the escalation interval (defined in the alert rule), the alert escalates to the next stage. If the alert remains active for entirety of the last stage in each subchain, the alert escalates and notifications are resent to the recipients in last stage.
If an alert triggers any time on Saturday or Sunday, LogicMonitor routes alert notifications to the recipients in Subchain 4. If the alert is not acknowledged or cleared within the escalation interval, then the alert escalates and resends notifications to the recipients in Stage 1.
Recommendation: If your environment leverages LM Integrations, and you want to implement a time-based escalation chain, use a single integration across the subchains. For example, if you have a time-based escalation chain with two subchains (one for business hours and one for after hours), you must use the same integration as the recipient in both subchains.
Adding an Escalation Chain
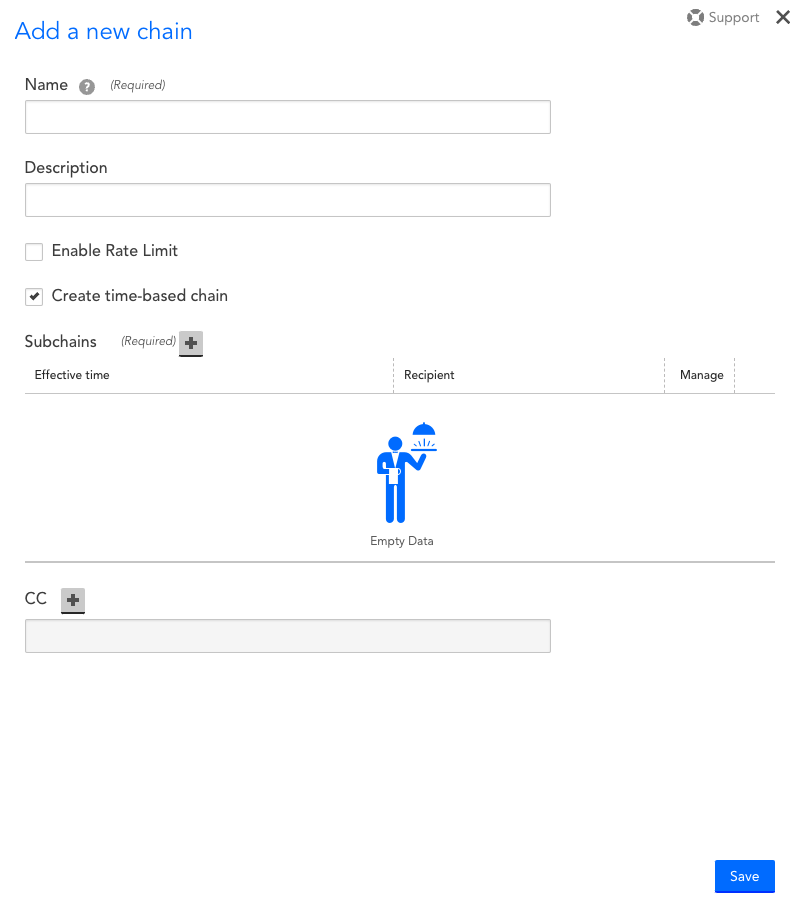
- Navigate to Settings > Escalation Chains.
- Select Add.
- Enter a name and description for the escalation chain.
- To set the maximum number of alerts that can be sent to a stage within this escalation chain during a specified time period, select Enable Rate Limit and configure the following options:
- In the Rate Limit period (min), enter an amount of time (in minutes) during which alert notifications can be delivered.
- In the Rate Limit alerts, enter a number for the maximum number of alert notifications that can be delivered during the specified Rate Limit Period.
Alert notifications that are resent count towards this number.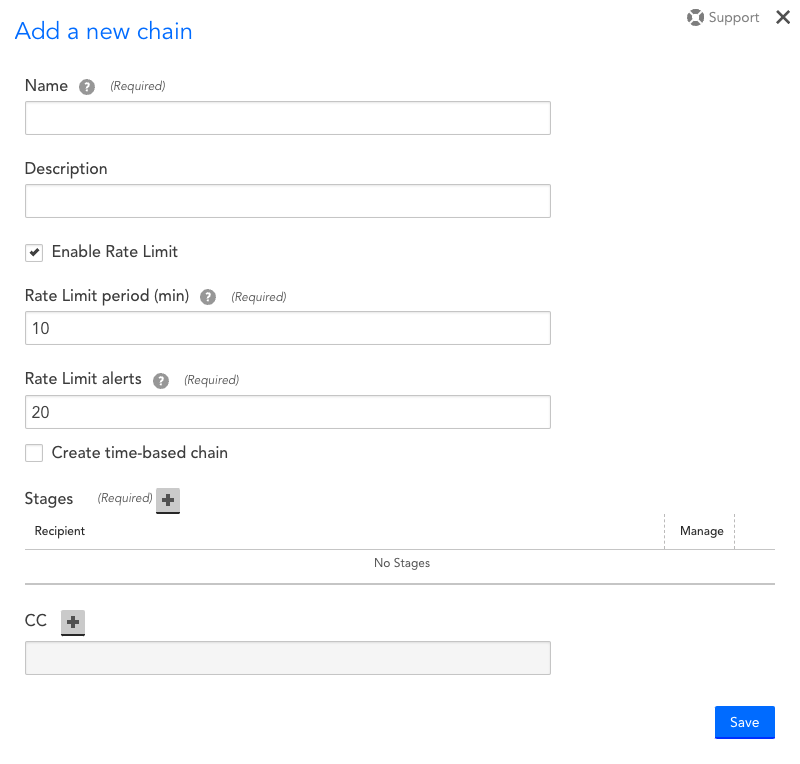
Note: If the number of alerts delivered to the chain’s initial stage exceeds the rate limit, then a throttle message is sent to the individuals assigned to that stage indicating that the number of alerts has exceeded the throttling level. Throttle messages are not escalated and are sent to the first stage. Recipients of later stages in an escalation chain with an empty first stage do not receive the throttle message.
Alert clear and acknowledgment notifications are still sent to all recipients, regardless of the escalation stage.
- Add a stage to your escalation chain. For more information, see Adding a Stage to an Escalation Chain.
- Select Save.
Adding a Stage to an Escalation Chain
When you configure a stage in an escalation chain you add recipients and their contact methods. You can also add an empty stage.
Your level of permissions determine which users or recipient groups are available for selection when adding recipients. You must have view permissions for each recipient or recipient group you want to add to the stage. In addition, you can add an LM Integration as a recipient.
Recommendation: Create a dedicated user account to associate with the integration to add an LM integration as a recipient. For example, you can create a “Read Only” user account as the LM integration recipient to ensure that alerts are consistently routed to the dedicated user. Creating this type of user account also prevents the escalation chain from breaking if users change.
You can add as many stages to an escalation chain as your environment needs.
- From the escalation chain settings, select add (+) for the Stages settings.
- Select add (+) to add recipients.
- Enter a recipient in the Add User field and choose a contact method from the Contact Method drop-down menu.
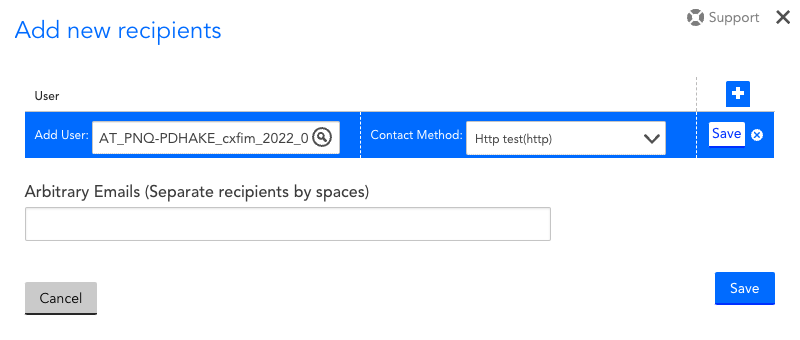
Note: To add an LM Integration as a recipient, you must enter a user account and the name of the integration.
- Select Save for the recipient entry.
- Repeat step 3 to add additional recipients as necessary.
- (Optional) In the Arbitrary Emails field, enter one or more email addresses that are not associated with existing user accounts or recipient groups.
- Select Save.
- To copy in recipients to receive a notification for every stage of the escalation chain, select + for the CC settings, and repeat steps 2-7.
Adding a Time-Based Escalation Chain
- Navigate to Settings > Escalation Chains.
- Select Add.
- Enter a name and description for the escalation chain.
- To set the maximum number of alerts that can be sent to a stage within this escalation chain during a specified time period, select Enable Rate Limit and configure the following options:
- In the Rate Limit period (min), enter an amount of time (in minutes) during which alert notifications can be delivered.
- In the Rate Limit alerts, enter a number for the maximum number of alert notifications that can be delivered during the specified Rate Limit Period.
Alert notifications that are resent count towards this number.
Note: If the number of alerts delivered to the chain’s initial stage exceeds the rate limit, then a throttle message is sent to the individuals assigned to that stage indicating that the number of alerts has exceeded the throttling level. Throttle messages are not escalated and are sent to the first stage. Recipients of later stages in an escalation chain with an empty first stage do not receive the throttle message.
Alert clear and acknowledgment notifications are still sent to all recipients, regardless of the escalation stage.
- Select Create time-based chain and configure the following settings for the subchain:
- Select add (+) for the Subchains settings.
- From the Days settings, select which days to route the alert notification.
- From the Time settings, configure the time range to route the alert notification.
Alternatively, you can select All day to allow an alert to be routed at any time during the specified days. - Select TIME ZONE, and choose the time zone.
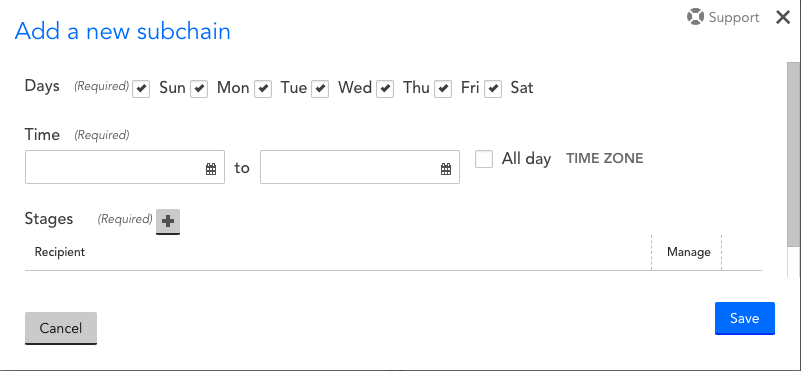
- Add a stage to the subchain. For more information, see Adding a Stage to an Escalation Chain.
- Select add (+) for the Subchains settings.
- Select Save.