
ConnectWise Integration
Last updated on 23 August, 2022Overview
Your LogicMonitor account comes pre-configured to integrate with your ConnectWise platform. Using this integration, you can set LogicMonitor to open, update, and close tickets within ConnectWise (using HTTP POST and PATCH requests) in response to alerts generated by LogicMonitor.
Note: In addition to integrating alert notifications with ConnectWise, LogicMonitor also provides extensive ConnectWise monitoring. For more information on configuring monitoring for your ConnectWise platform, see ConnectWise Monitoring.
Opening, Updating, and Closing Tickets in ConnectWise
You can use the LogicMonitor ConnectWise integration to create, update and close ConnectWise tickets in response to alerts triggered in your account. This consists of the following steps:
- Enable REST API access in your ConnectWise account
- Enable the ConnectWise integration in your LogicMonitor account
- Configure an alert rule and escalation chain to deliver alert data to ConnectWise
When a triggered alert matches the alert rule and is routed to the escalation chain with the ConnectWise integration, a ticket is created in your ConnectWise account. You can update or close the ticket when the alert is acknowledged, escalated, de-escalated, or cleared.
1. Enable the REST API Access in your ConnectWise Account
Enabling REST API Access in your ConnectWise account allows LogicMonitor to access the account.
- In ConnectWise, create a “LogicMonitor Role ID” role. For more information, see ConnectWise’s Security Roles documentation.
- Use the following privilege sets for the “LogicMonitor Role ID”:
- Companies Module
Description Add Edit Delete Inquire Company Maintenance None None None All Company/Contact Group Maintenance None None None All Contacts None None None All - Project Module
Description Add Edit Delete Inquire Project Tickets All All None All - Service Desk Module
Description Add Edit Delete Inquire Service Tickets All All None All - System Module
Description Add Edit Delete Inquire Table Setup None None None All
- Companies Module
Note:In most cases, the “Inquire” permission is required to configure the integration in your LogicMonitor portal (For example: service boards, companies, ticket types, priorities, statuses).
You must save the generated Public and Private keys to set up the ConnectWise Integration in your LogicMonitor platform.
Warning: You cannot access the keys after navigating away from ConnectWise.
2. Enable the ConnectWise Integration in your LogicMonitor Account
You can enable the integration from the Settings | Integrations area of your account. Select Add and then ConnectWise to open the Manage Connectwise Delivery Integration dialog, shown (and discussed) next.
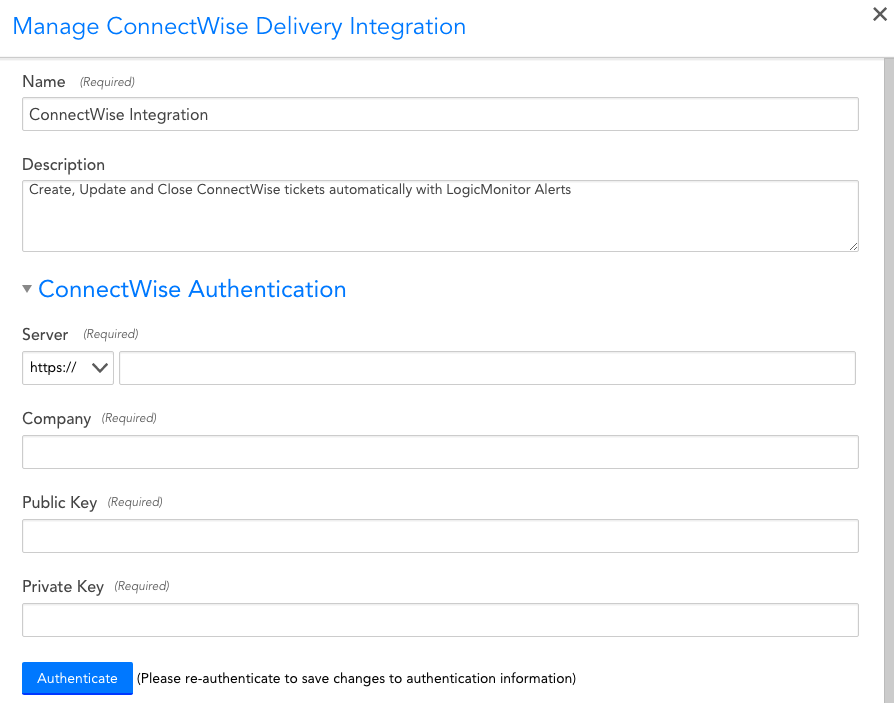
Name
The name to be associated with the ConnectWise integration.
Description
The description to be associated with the ConnectWise integration.
Server
Your ConnectWise server URL (for example, “connect.logicmonitor.com”). Note that when integrating with a ConnectWise sandbox account you will need to use the production URL, rather than the sandbox URL. For example, “company.myconnectwise.net” and not “sandbox-company.myconnectwise.net”. Use the name of your sandbox company in the Company field and the API keys for the sandbox in the key fields.
Company
Your ConnectWise company.
Public/Private Keys
The ConnectWise Public and Private API Keys used to authenticate into your ConnectWise API. These can be generated from your ConnectWise Account | My Account | API Keys | + (add Keys)
Authenticate
Once you have completed the ConnectWise Authentication section, click Authenticate. The Authenticate button will test for a valid connection. If successful, it will enable LogicMonitor to monitor Service Boards as well as create, update, and delete tickets. Once LogicMonitor has successfully authenticated using the information provided, you will be prompted to fill out the ConnectWise Ticket Defaults section.
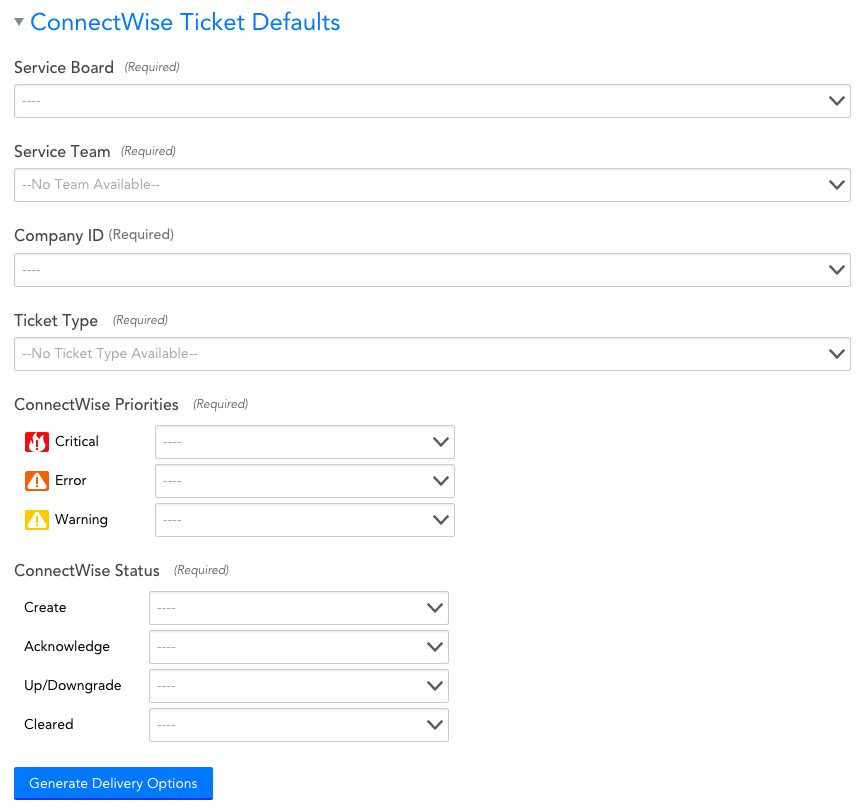
Service Board
The Service Board in which tickets should be created.
Note: If you would like to create, update, and delete tickets across multiple ConnectWise Service Boards, you can do so by setting the following property on a device that has alerts which will trigger a new ConnectWise ticket or change an existing one:connectwise.serviceboardid
When an alert is triggered and routed to the ConnectWise Integration, LogicMonitor will first check to see if this property exists for the device associated with the alert. If it does exist, its value will be used instead of the value set in the Integration form.
Service Team
Designate the Service Team responsible for handling the associated Service Board.
Company ID
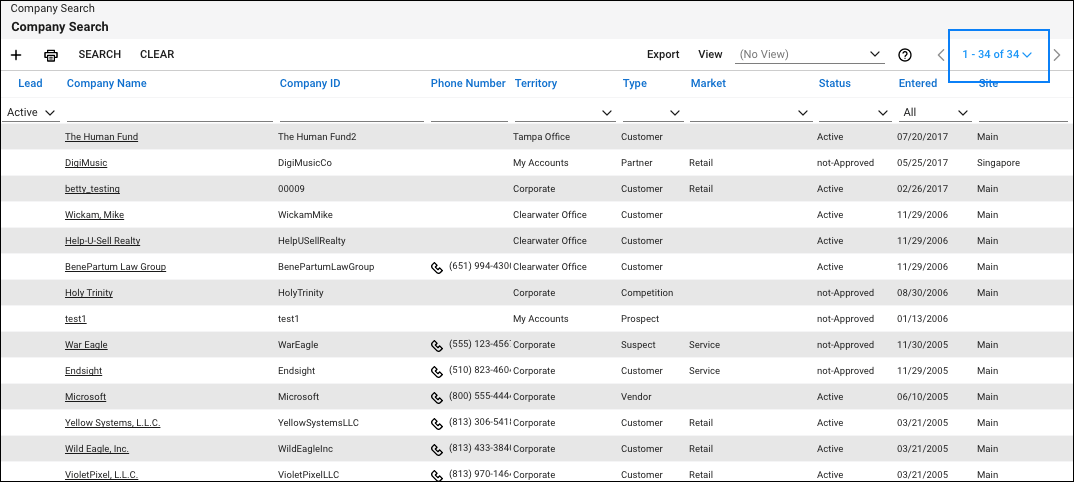
In the Company ID field, enter the company ID for the company with which the created tickets should be associated. This ID corresponds to the ConnectWise Company_RecID value. It is always an integer.
The underlying Company_RecID values associated with companies are often hidden in the ConnectWise interface. There are a couple of methods you can use to expose the Company_RecID, including running a report that includes this value or making this value visible from the company list view. The following set of steps illustrates the latter method:
- In ConnectWise, navigate to Companies.
- In the top right corner of the company listing, click the down arrow to open the List View Configuration dialog.
- From this dialog, move the Company_RecID from the Hidden Columns box into the Visible Columns box.
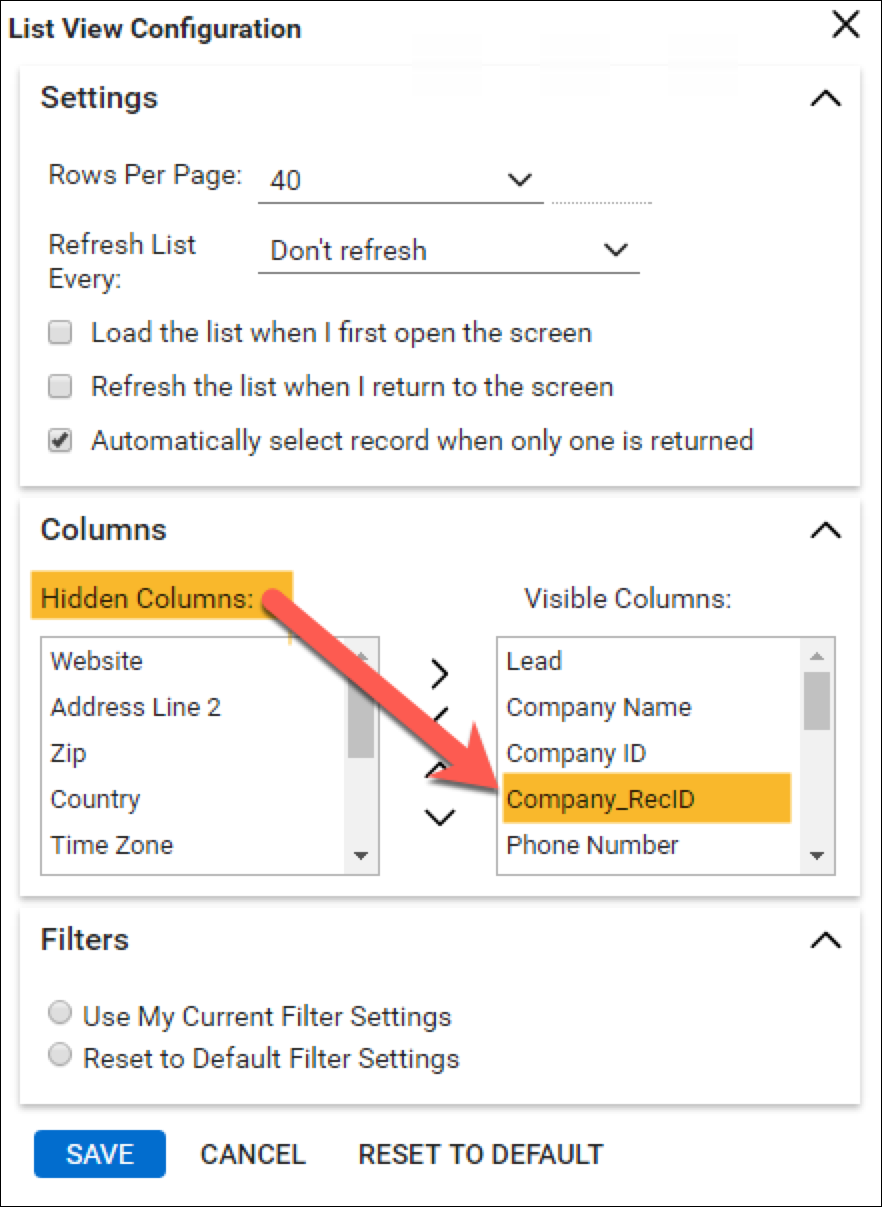
- Click the Save button and, upon returning to the company listing, you’ll now see the Company_RecID displayed for each company.
If you would like to create, update, and delete tickets across multiple ConnectWise companies using the ConnectWise REST API, you can do so by assigning the Company_RecID as a property on the various devices that may trigger new or updated ConnectWise tickets. The property should be named:
- Connectwisev2.companyid
When an alert is triggered and routed to the ConnectWise Integration, LogicMonitor will first check to see if the connectwisev2.companyid property exists for the device associated with the alert. If it does exist, its value will be used instead of the value set in the integration form. For more information on setting device properties, see Resource and Instance Properties.
Ticket Type
The type of tickets that should be created.
Note: If you’d like to create, update and delete tickets with multiple ConnectWise Ticket Types, you can do so by setting the following property on the device whose alerts should trigger a new or change to existing ConnectWise ticket: connectwise.tickettypeid
When an alert is triggered and routed to the ConnectWise Integration, LogicMonitor will first check to see if this property exists for the device associated with the alert. If it does exist, its value will be used instead of the value set in the Integration form.
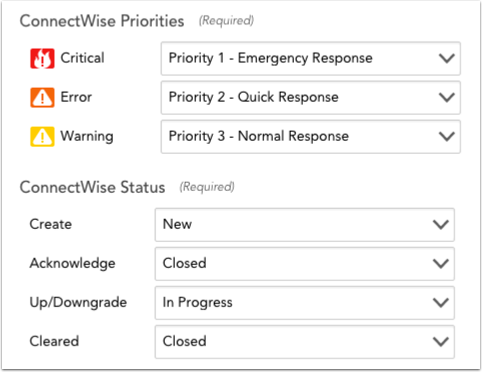
ConnectWise Priorities
Select what priority ConnectWise tickets should be created with for each LogicMonitor alert severity level.
ConnectWise Status
Correlate ConnectWise Status with LogicMonitor alert stages.
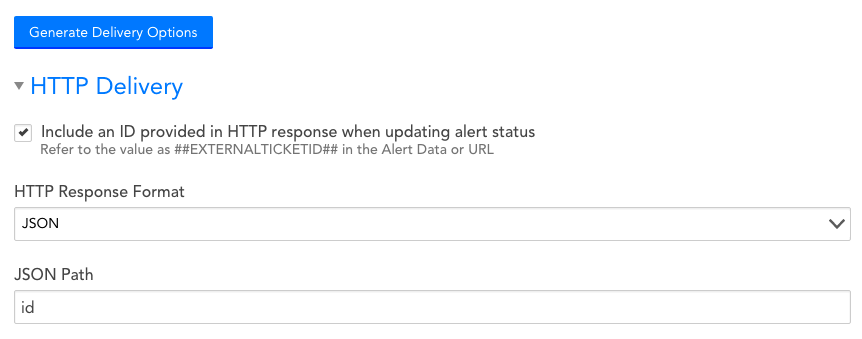
Generate Delivery Options
Once you have selected the default Service Board, Company and Ticket type, select Generate Delivery Options to choose how LogicMonitor formats and sends the HTTP POST and PATCH requests to create, update and/or close tickets. Note that the HTTP Response format is defaulted to JSON and all alert stages payloads will be JSON, as well.
Will Requests be Sent to Different URLs?

Select whether HTTP requests for alert acknowledgments, clears and escalations/de-escalations should be sent to the same URL that HTTP requests for new alerts should be sent to, or with different alert data in the request. If ‘Use the same URL and data to notify on various alert activity’ is selected, all HTTP requests will be sent to the same URL (you can choose what alert updates prompt an HTTP request) and the same alert data format will be used each time. If ‘Use different URL or data format to notify on various alert activity’ is selected, you can map out which alert status updates should trigger an HTTP request to which URLs and how the alert data should be formatted for each request. The configuration fields for each HTTP request are the same for both options.
By default, LogicMonitor will pre-populate four different requests, one for each of:
- New alerts (Active)
- Acknowledged alerts (Acknowledged)
- Cleared alerts (Cleared)
- Escalated alerts (Escalated)
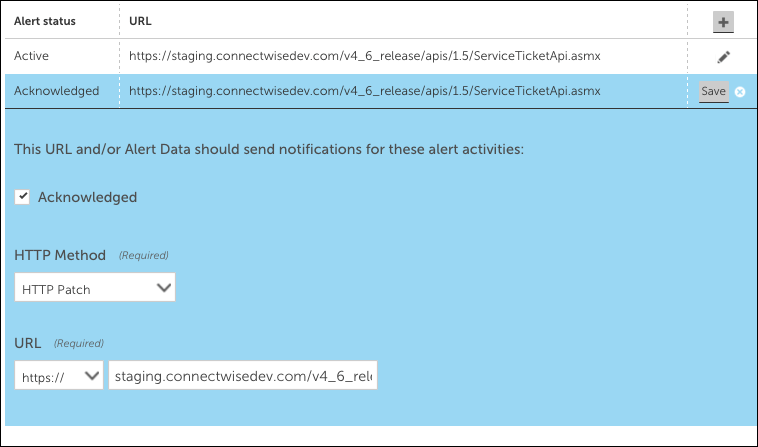
For each request, you can select which alert statuses trigger the HTTP request. Requests are sent for new alerts (status: Active), and can also be sent for alert acknowledgements (status: Acknowledged), clears (status: Cleared) and escalations/de-escalations/adding note (status: Escalated).
Note: If the escalated status is selected and a note is added to the alert, an update request is sent whether the alert is active/cleared. If the escalated status is not selected and a note is added to the alert, a request is not sent.
HTTP Method
The HTTP method for ConnectWise integrations is POST for new alerts (status: Active) and PATCH for alert acknowledgements (status: Acknowledged), clears (status: Cleared) and escalations/de-escalations (status: Escalated).
URL
The URL that the HTTP request should be made to. This field is auto-populated based on information you’ve provided.
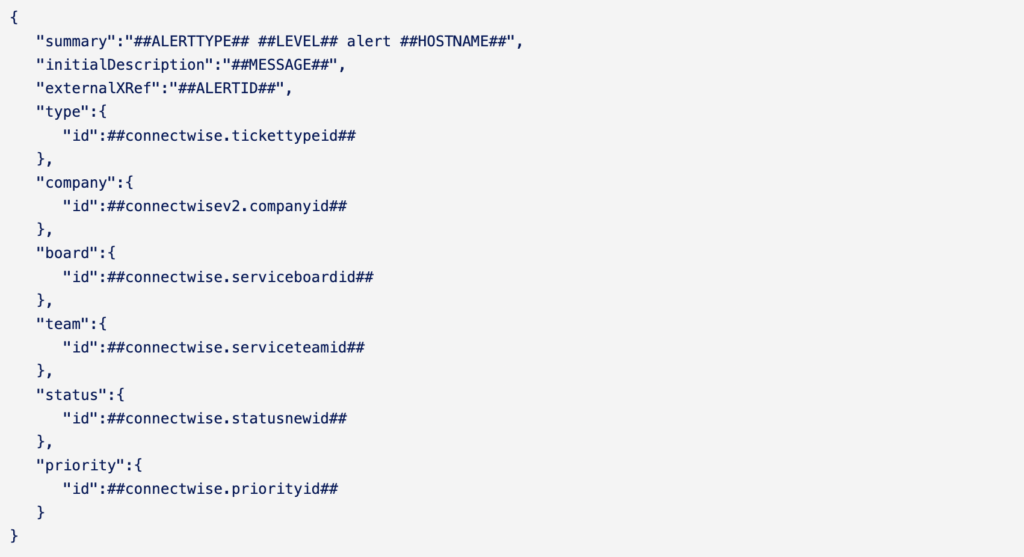
Alert Data
The custom formatted alert data to be sent in the HTTP POST or PATCH request. This field will be auto-populated for you. If desired, you can customize the alert data field using tokens and custom ConnectWise fields.
Include an ID Provided in HTTP Response When Updating Alert Status
Check this option if you’d like LogicMonitor to find the ConnectWise ticket ID returned in the response to the HTTP request associated with a new alert, and use the ID in any subsequent requests for alert acknowledgements, clears, and escalations/de-escalations. By default, this option will be selected.
HTTP Response Format
If LogicMonitor is to use the ID provided in the response, select the format the response will be in.
Test Alert Delivery
This option sends a test alert and provides the response, enabling you to test whether you’ve configured the integration correctly.
Tokens Available
The following tokens are available:
- LogicModule-specific alert message tokens, as listed in Tokens Available in LogicModule Alert Messages.
- ##ADMIN##. The user the alert was escalated to.
- ##MESSAGE##. The rendered text of the alert message. This token will also pass all relevant acked information (e.g. the user that acknowledged the alert, ack comments, etc.).
- ##ALERTTYPE##. The type of alert (i.e. alert, eventAlert, batchJobAlert, hostClusterAlert, websiteAlert, agentDownAlert, agentFailoverAlert, agentFailBackAlert, alertThrottledAlert).
- ##EXTERNALTICKETID##. The ConnectWise ticket ID.
ConnectWise Status Tokens
The following tokens reference the selected actions in the ConnectWise Status settings:
- ##connectwise.statusnewid## References the selected action in the Create setting.
- ##connectwise.statusackid## References the selected action in the Acknowledge setting.
- ##connectwise.statusclearid## References the selected action in the Cleared setting.
- ##connectwise.statusupdateid## References the selected action in the Up/Downgrade setting.
ConnectWise Field Reference
If you wish for LogicMonitor to include additional information when creating and updating ConnectWise tickets, you can do so via the alert data of your ConnectWise integration. You will need to know the field names so that LogicMonitor sets the right ConnectWise ticket fields. The following table includes a list of fields that can be used by the ConnectWise Integration, and the name that must be used to reference them.
You can view ConnectWise’s full list of API calls for ticket creation here.
Example use of ConnectWise Field references:
| Field Name | Description |
| summary | The summary of the service ticket. Max string character limit of 100. |
| company | The name of the company associated with the ConnectWise companyID |
| status | The cross-referenced Ticket Status ID of the service ticket. Note that Ticket Statuses can be unique for each service board. You can use this API call to return the ticket status IDs for the desired board. |
| priority | The priority assigned to the ticket (must match the description of an entry in the Priority setup table) |
| team | Designates the Services Team responsible for handling the associated Service Board. Teams are set in your ConnectWise Service Board Setup Table. |
| type | This denotes the type of service you are performing for this service ticket. Service types are designated via the Types Tab of the Service Board Setup Table. |
| item | The service team assigned to the ticket. Items are selected from the Items tab of the Service Board Setup Table and are meant to provide more information than what is provided by the service types. |
| serviceLocation | The location assigned to the ticket (must match the description of an entry in the Location setup table). |
| addressLine1 | The first address line of the service ticket site |
| addressLine2 | The second address line of the service ticket site |
| city | The city |
| stateIdentifier | The two character state ID |
| Account | The zip code |
| contactName | This tag should be used if it is desired that the default company contact is overridden. This will not create a contact in ConnectWise. This is only for Service Ticket display purposes. Max string character limit of 62. |
| contactEmailAddress | If this tag is passed with no value, the email field will be blank on the Service Ticket. If this tag is not passed at all, the ticket email address field will default to the company’s default contact email address. If a value is passed, this will display in the email field of the Service Ticket and override the default email address of the Contact record. Max string character limit of 250. |
| contactPhoneNumber | If this tag is passed, this value will display in the phone number field of the Service Ticket. If nothing is passed, the default contact’s phone number will be included in the Service Ticket. Max string character limit of 20. |
| contactPhoneExtension | If this tag is passed, the value will display in the phone extension field of the Service Ticket. If nothing is passed, the default contact’s phone extension will be included in the Service Ticket. Max string character limit of 15. |
| initialDescription | The ticket problem description. Only available for POST, will not be returned in the response. |
| source | Where the service ticket derived from. Defined in the Source Setup Table. |
| opportunity | The opportunity associated with this service ticket. Only one opportunity can be associated with each ticket. |
| requiredDate | The required start date for the service ticket. The SLA timer will begin with this date. |
| budgetHours | Number of hours budgeted for this service ticket. |
| initialResolution | Description of the steps taken to resolve the service ticket. |
3. Configuring Alert Rule and Escalation Chain
Alert rules and escalation chains are used to deliver alert data to your ConnectWise integration. When configuring these, there are a few guidelines to follow to ensure tickets are opened, updated, and closed as expected within ConnectWise. These guidelines are discussed in LogicMonitor Integrations Overview.