
Slack Integration
Last updated on 15 February, 2023LogicMonitor offers an out-of-the-box alert integration for Slack via the LogicMonitor app for Slack. The integration between LogicMonitor and Slack is bi-directional, supporting the ability to:
- Route LogicMonitor alert notifications to Slack
- View and acknowledge alerts from Slack
- Put the resource triggering the alert into scheduled downtime (SDT) from Slack
- Open alerts in LogicMonitor from Slack
- Configure the conditions (alert rule, escalation chain, recipient group) under which alerts are routed to Slack—from Slack or LogicMonitor
Setting Up the LogicMonitor App for Slack
Setup of LogicMonitor’s alert integration solution for Slack involves four primary steps:
- Installing and configuring the app
- Routing alerts to Slack
- Adding/inviting the app to a Slack channel
- Configuring additional Slack channels (optional)
Installing and Configuring the Slack App
Installation and configuration of the LogicMonitor app for Slack can be initiated from either your LogicMonitor portal or Slack workspace.
Note: A LogicMonitor user must have manage-level permissions for integrations in order to configure any aspect of a Slack integration. For more information on this level of permissions, see Roles.
Installation and Configuration from LogicMonitor
Follow these steps to initiate installation and configuration of the LogicMonitor app for Slack from within LogicMonitor:
- In LogicMonitor, navigate to Settings > Integrations.
- Select Add. The Start New Integration pane appears.
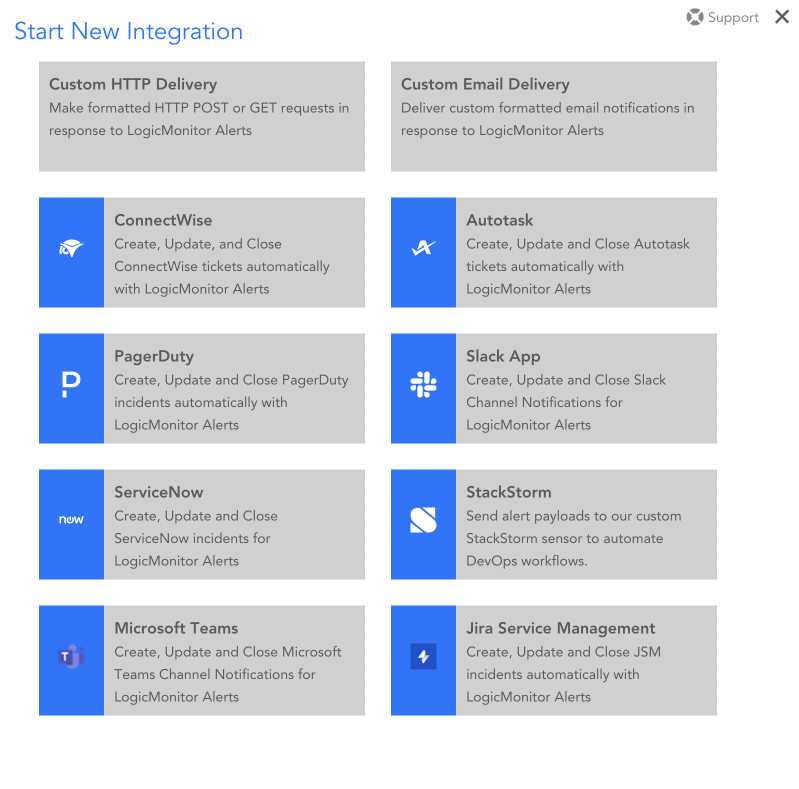
- Select Slack App. The Add Slack-2 Integration dialog box appears.
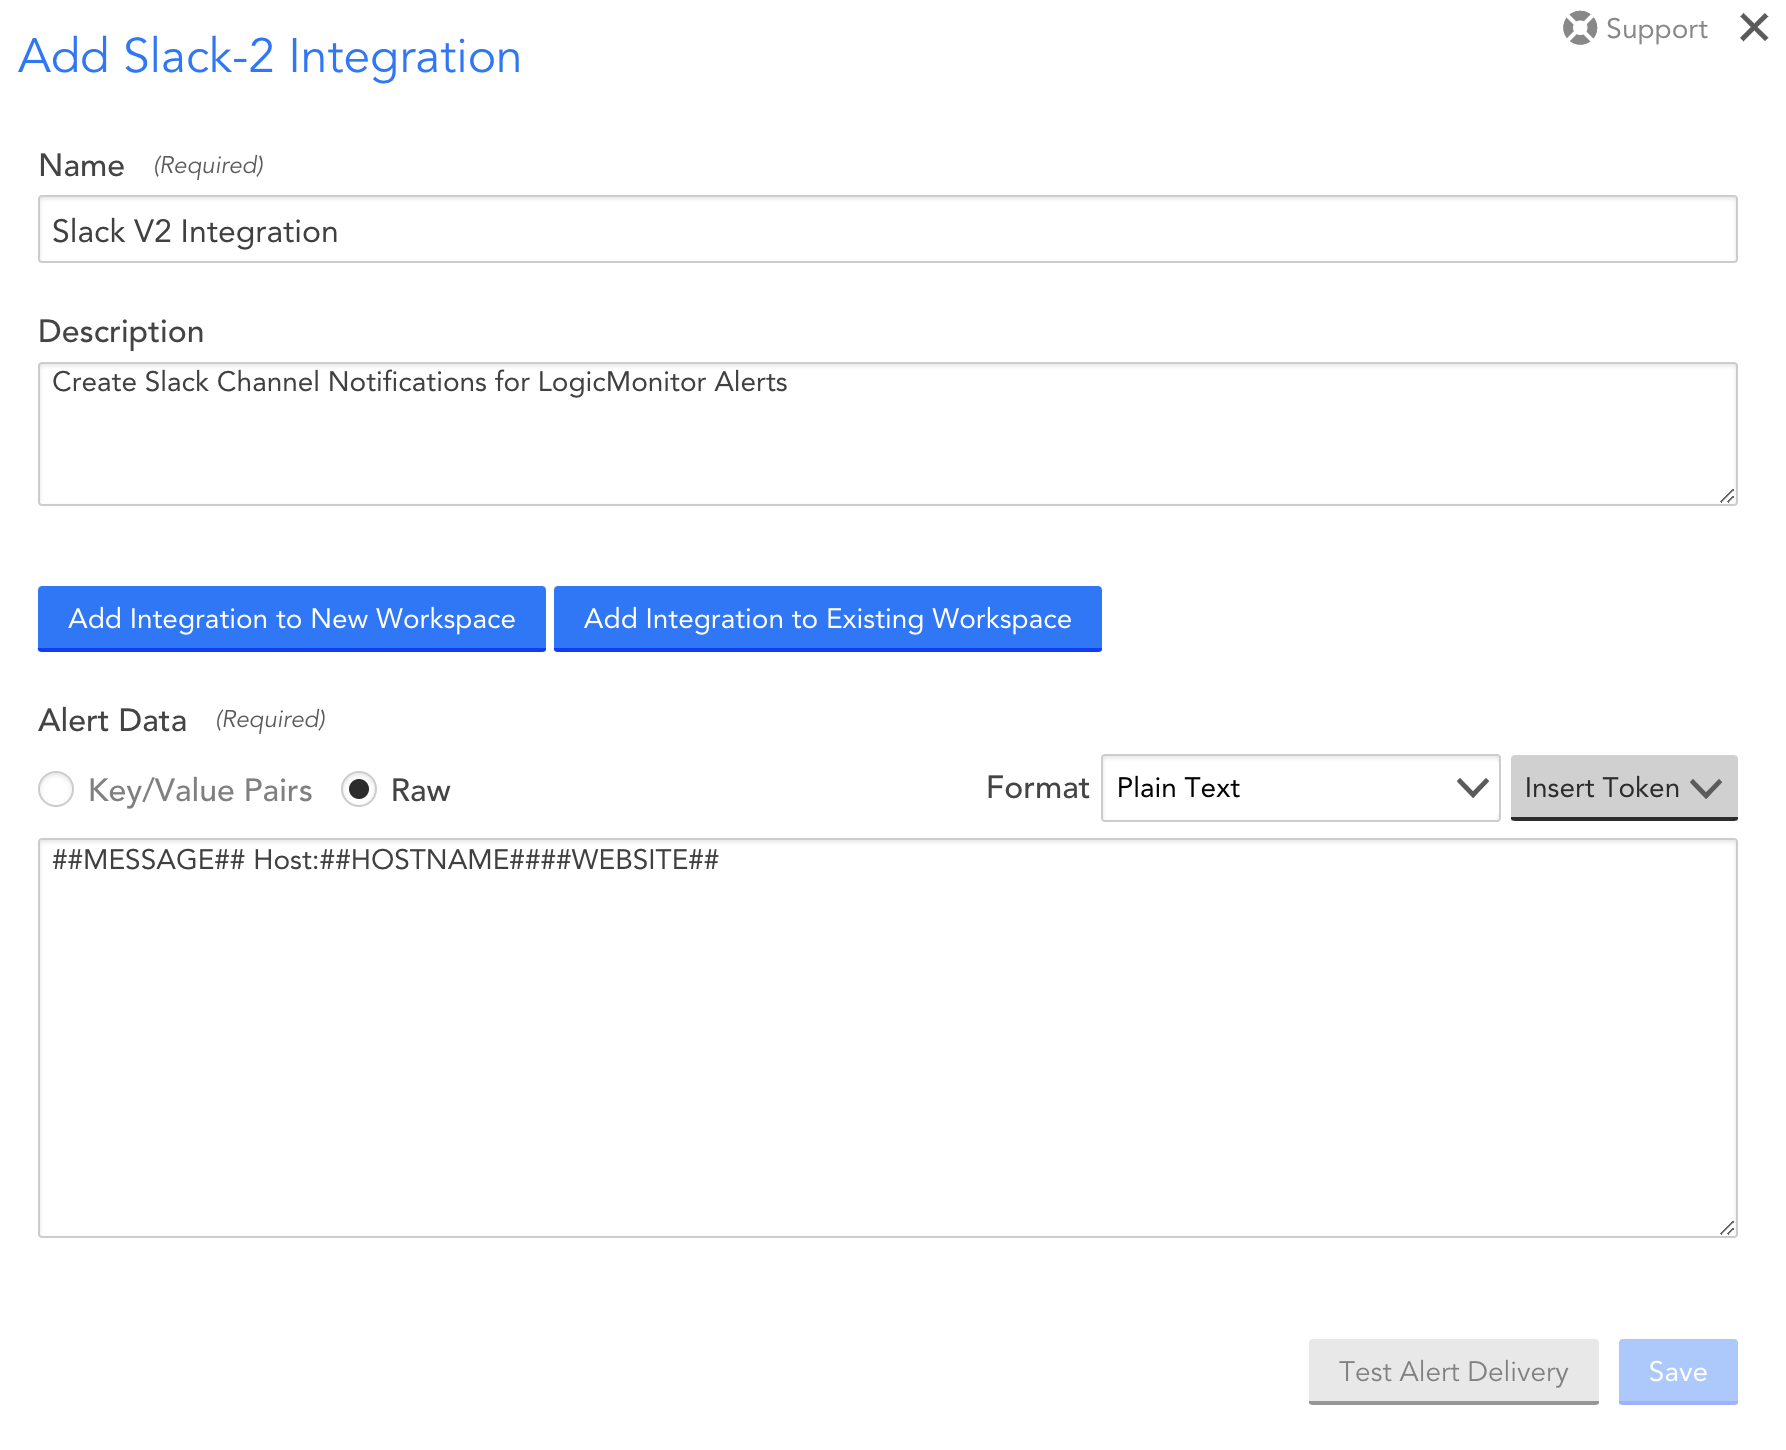
- Enter a unique name and description for the Slack integration. The value you enter for Name displays in the list of integrations.
Note: If the configuration dialog box that displays prompts for an incoming Webhook URL, you are looking at the configuration dialog box for LogicMonitor’s legacy Slack integration solution. Reach out to your CSM to ensure the new beta Slack integration is enabled for your portal.
- Select any of the following options to install and configure the LogicMonitor app:
- Add Integration to New Workspace to install and configure the LogicMonitor app for a Slack workspace that doesn’t yet have the app installed.
- Add Integration to Existing Workspace to create additional channel integrations for a Slack workspace that already has the LogicMonitor app installed. To know more about configuring additional integrations for a Slack workspace, see the Configuring Additional Slack Channels section of this support article.
- Depending on the level of permissions you have for your Slack workspace, the following Slack options appear:
- If you have the permissions to install apps to your Slack workspace, click the Allow button to grant the LogicMonitor app access to your Slack workspace and proceed to the next step.
- If you do not have the permissions to install apps to your Slack workspace, enter a note and click Submit to request install approval from a Slack app manager. Once permission has been granted, begin this set of steps again.
Note: If you are a member of multiple workspaces and need to select a workspace other than the one LogicMonitor initially presents, use the dropdown in the upper right corner to select (or log into) an alternate workspace. Consequently, you can install the app on a workspace that already has the LogicMonitor app installed. Installation (or reinstallation in this case) will proceed as usual, but we recommend you select the Add Integration to Existing Workspace button when wanting to create an integration for a workspace that already has the LogicMonitor app installed.
- You are redirected back to LogicMonitor where additional configurations are now available.
- From Alert Data, select Insert Token, and select the tokens you want for customizing the alert message. To know more about tokens, see Tokens.
Note:
- You can use only plain text format for the alert data message.
- The order of the tokens that you add in the Alert Data section determines how the alert message is displayed in Slack.
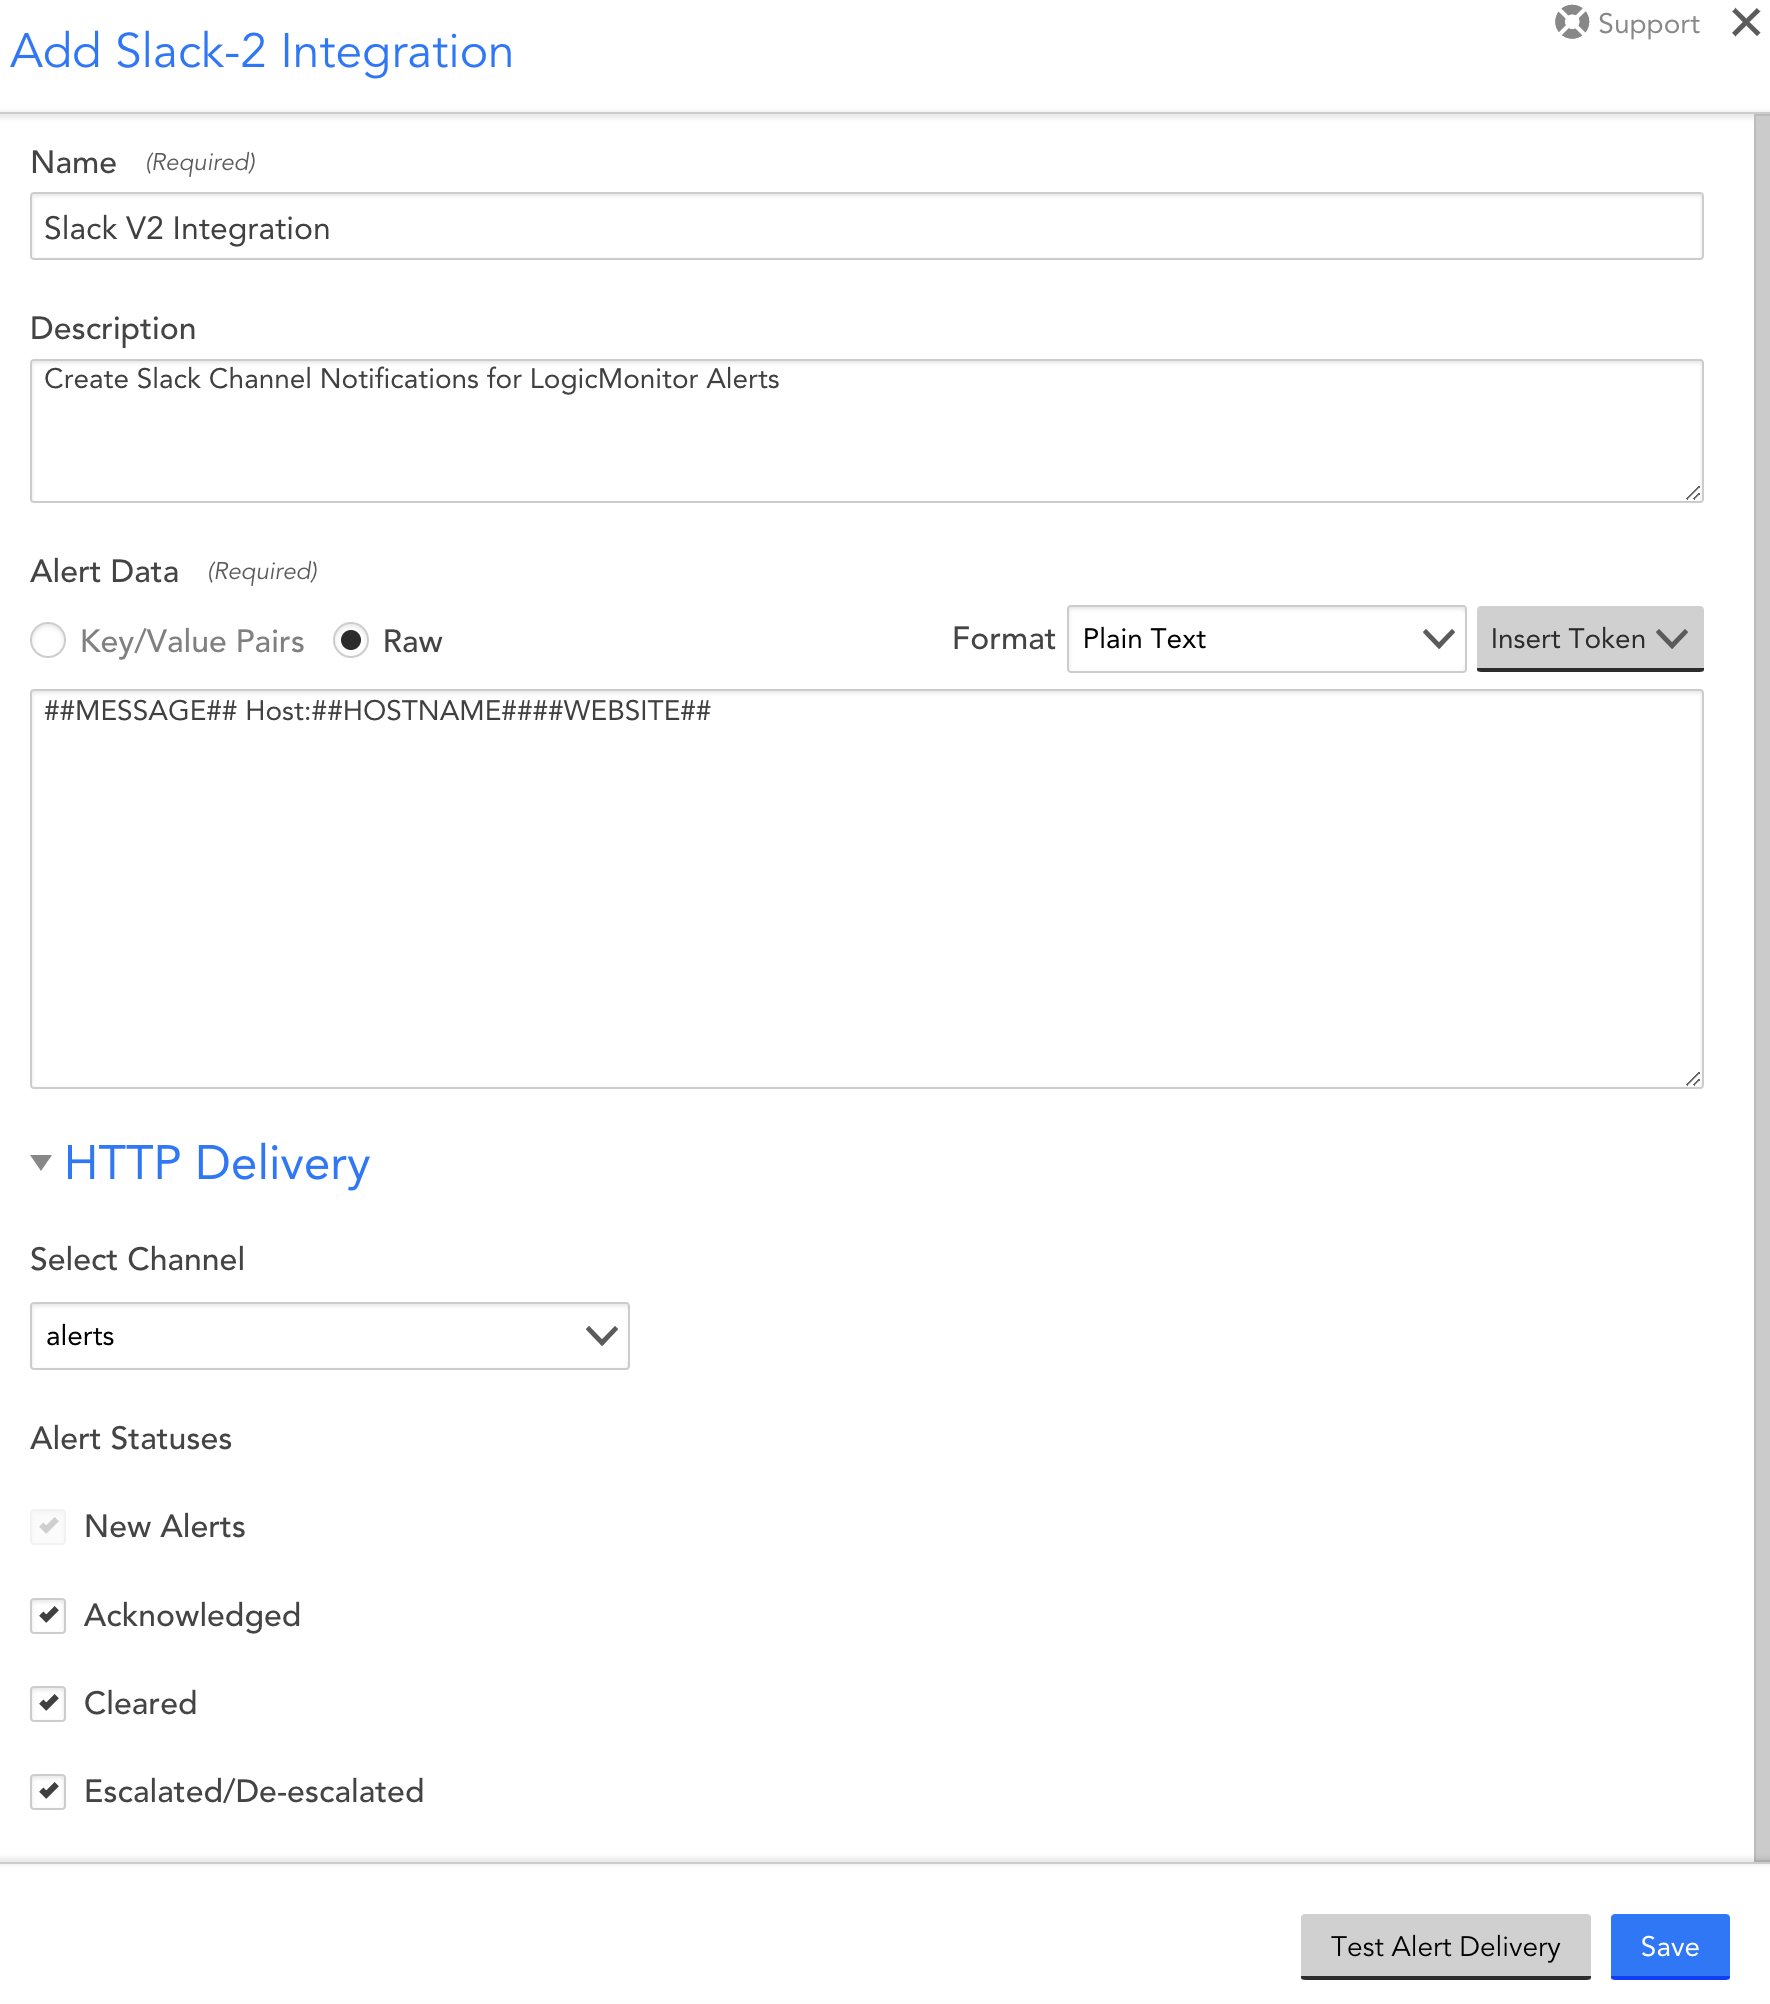
- Select the HTTP Delivery section to format and send the HTTP Post requests to create, update and/or close incidents.
By default, LogicMonitor will pre-populate four different HTTP requests, one for each of the following alert statuses:- New alerts (Active)
- Acknowledged alerts (Acknowledged)
- Cleared alerts (Cleared)
- Escalated alerts (Escalated)
- From the Select Channel dropdown menu, select the Slack channel to which LogicMonitor alert notifications will be routed. Only public channels are initially available from the dropdown; once set up, you could change a public channel to a private channel and it would persist as an option here.
Note: There is a one-to-one relationship between Slack integration records in LogicMonitor and Slack channels. To enable alert notifications to go to multiple channels in your Slack workspace, you must create additional integration records. For more information, see the Configuring Additional Slack Channels section of this support article.
- Select the alert statuses you would like routed to Slack. Receipt of new alerts is mandatory, but updates on the current alert status (escalated/de-escalated, acknowledged, cleared) are optional.
Note: For each request, you can select which alert statuses trigger the HTTP request. Requests are sent for new alerts (status: Active), and can also be sent for alert acknowledgements (status: Acknowledged), clears (status: Cleared) and escalations/de-escalations/adding note (status: Escalated). If the escalated status is selected and a note is added to the alert, an update request is sent whether the alert is active/cleared. If the escalated status is not selected and a note is added to the alert, a request is not sent.
- Select Save.
Note: The Test Alert Delivery button is not operational until after the initial LogicMonitor app installation process has been completed. If you’d like to send a synthetic alert notification to your new integration, open the record in edit mode after its initial creation. As discussed in the Testing Your Slack Integration section of this support article, you can come back to this dialog at any time to initiate a test.
Installation and Configuration from Slack
Follow these steps to initiate installation and configuration of the LogicMonitor app from within Slack:
- From the Slack App Directory, install the LogicMonitor app to your workspace.
- Depending on the level of permissions you have for your Slack workspace, Slack presents you with one of the following options:
- If you have the permissions necessary to install apps to your Slack workspace, click the Allow button to grant the LogicMonitor app access to your Slack workspace and proceed to the next step.
- If you do not have the permissions necessary to install apps to your Slack workspace, enter a note and click Submit to request install approval from a Slack app manager. Once permission has been granted, begin this set of steps again.
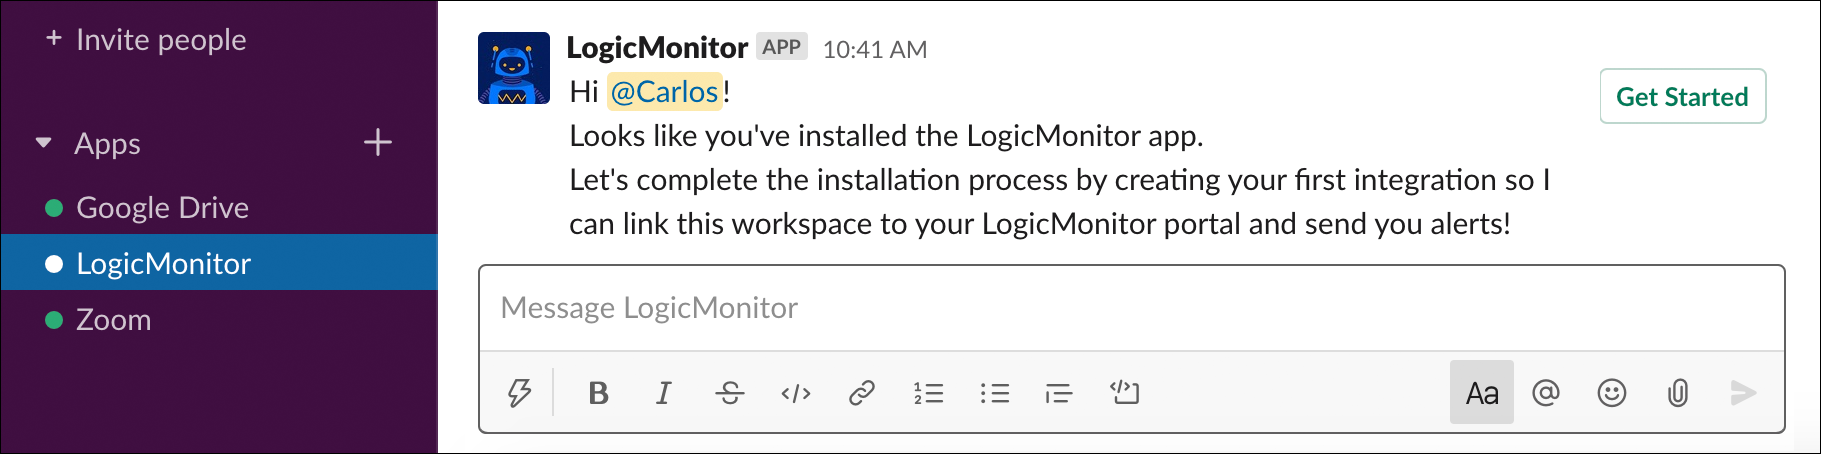
- You are redirected back to your Slack workspace. Open the LogicMonitor app from the left-hand menu where a direct message is waiting. Click the Get Started button from the direct message to configure the alert integration.
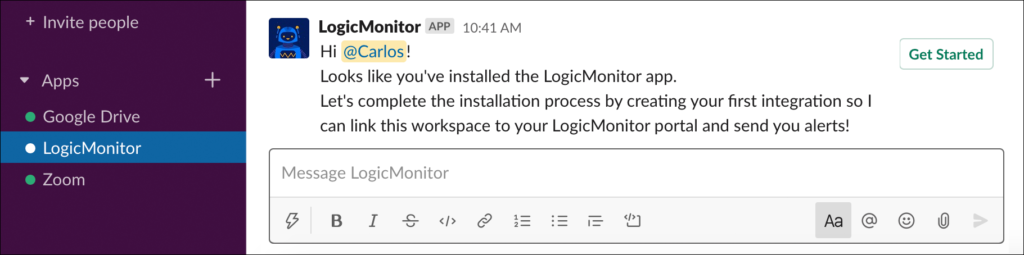
Note: This direct message is only available to the Slack user that performed the previous installation steps.
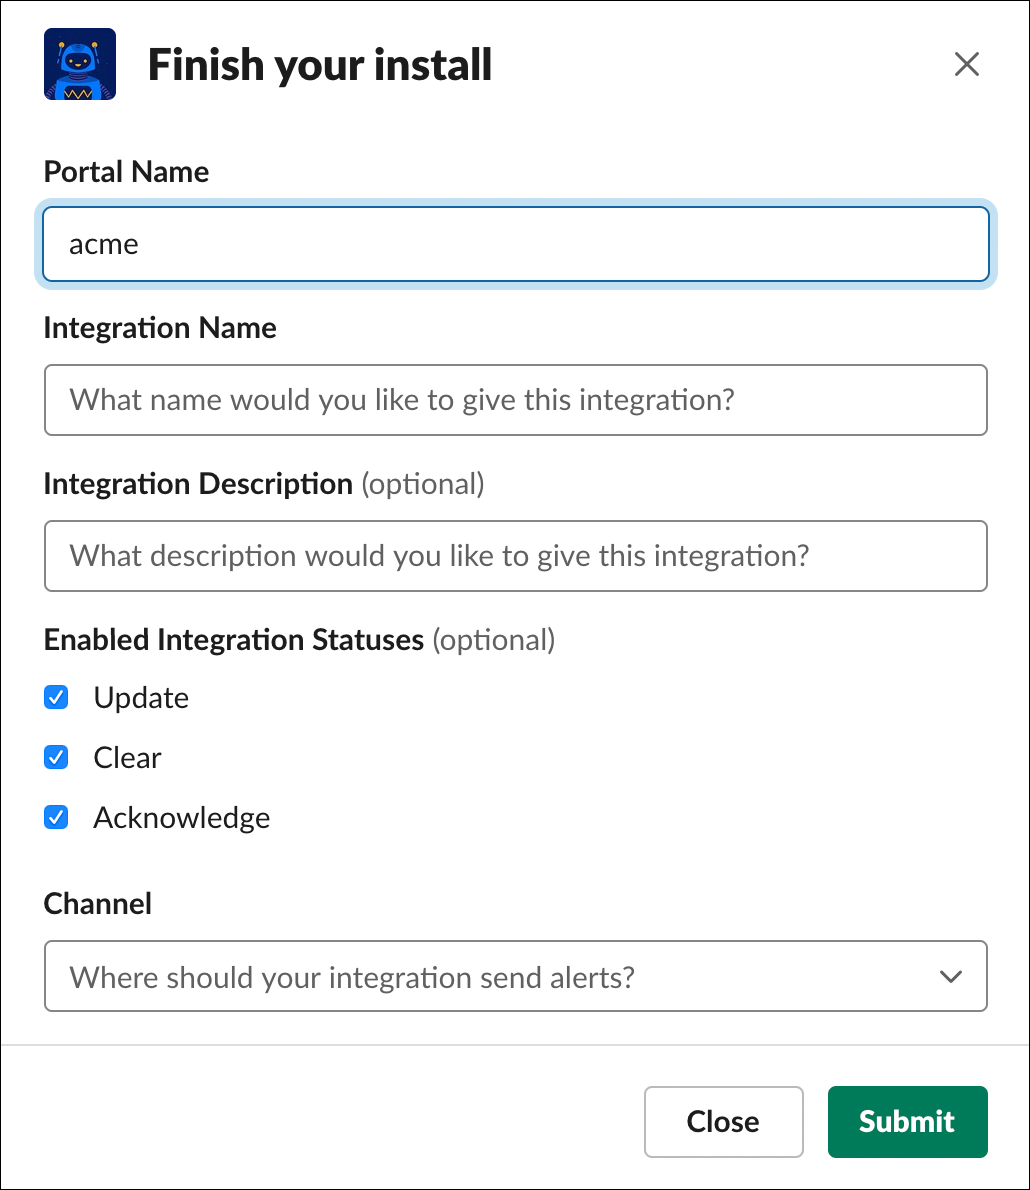
- At the Finish Your Install dialog, enter the name of your LogicMonitor portal into the Portal Name field. Your portal name can be found in the first portion of your LogicMonitor URL (for example, https://portalname.logicmonitor.com).
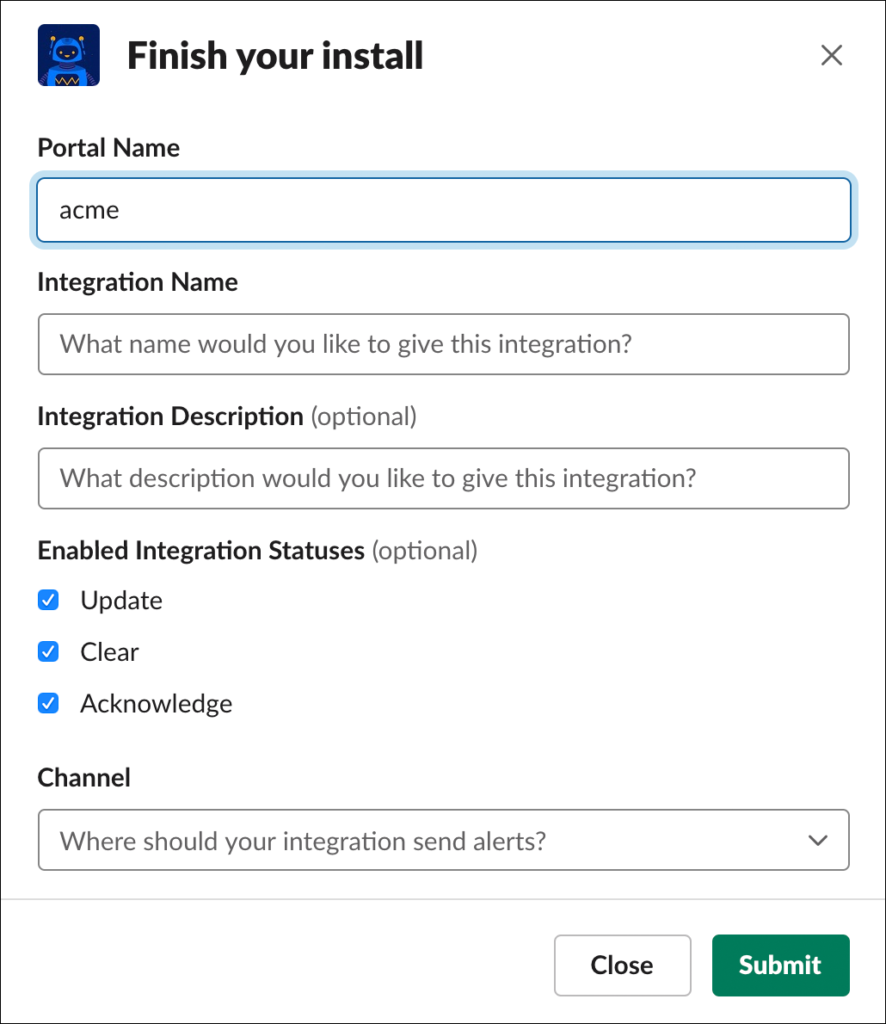
- In the Integration Name and Integration Description fields, enter a unique name and description for your Slack integration. The name entered here will be used as the title for the resulting integration record within LogicMonitor.
- Verify the alert statuses you would like routed to Slack. New alerts, which are not shown here for selection, are mandatory and part of the integration by default, but updates on the current alert status (escalated/de-escalated, acknowledged, cleared) are optional and can be disabled.
- From the Channel field’s dropdown menu, select the Slack channel to which LogicMonitor alert notifications will be routed.
- Click the Submit button. A new message displays to indicate successful creation of a LogicMonitor integration record for Slack. This new record can be viewed and edited in LogicMonitor by navigating to Settings | Integrations.

The success message also prompts you to optionally begin configuring alert routing conditions, which determines which alerts are delivered to the Slack channel that is associated with the integration. Because this workflow can be configured at a later time—via the LogicMonitor portal—you have the option to exit these configurations at any time by clicking the Exit Configuration Process button.
If you’d like to begin configuring alert routing conditions from Slack, you have two options from this dialog:
- Assign to Recipient Group. A recipient group is a single entity that holds multiple alert delivery recipients. Recipient groups are intended for use as time-saving shortcuts when repeatedly referencing the same group of recipients for a variety of different types of alerts. There is no requirement to make your Slack integration a member of a recipient group in order to have alerts routed to it; you can optionally directly reference the integration from an escalation chain if it doesn’t make sense to group alert delivery to Slack with other alert recipients. However, if a recipient group does make sense for your Slack integration, you can add your new Slack integration as a member of a new or existing recipient group. See the following Assigning Your Slack Integration to a Recipient Group section of this support article for more information.
- Assign to Escalation Chain. An escalation chain determines which recipients should be notified of an alert, and in what order. From Slack, you can add your new Slack integration as a stage in an existing escalation chain or you can create a new escalation chain. See the following Assigning Your Slack Integration to an Escalation Chain section of this support article for more information.

Assigning Your Slack Integration to a Recipient Group
There is no requirement to make your Slack integration a member of a recipient group in order to have alerts routed to it; you can optionally directly reference the integration from an escalation chain if it doesn’t make sense to group alert delivery to Slack with other alert recipients. For more information on the logic behind recipient groups, see Recipient Groups.
However, if a recipient group does make sense for your Slack integration, follow the next set of steps to add your new Slack integration as a member to a new or existing recipient group.
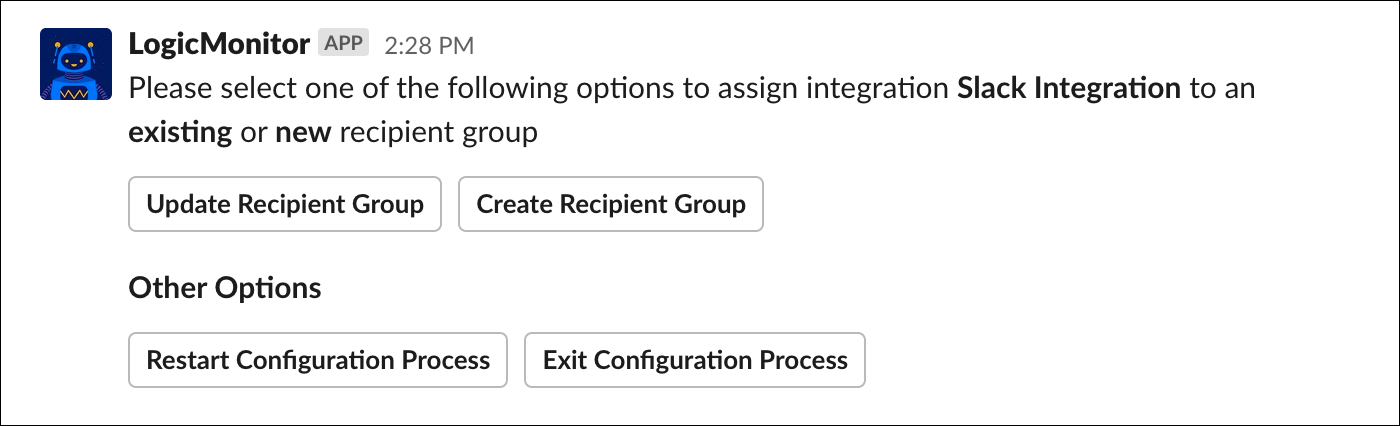
- Click the Assign to Recipient Group button to begin recipient group configuration.
- Indicate whether you’ll be adding this Slack integration as a member to an existing group or whether you’ll be creating a new recipient group.

- Update Recipient Group. To add this integration as a member to an existing recipient group, click the Update Recipient Group button and, from the Update a Recipient Group dialog that displays, select the recipient group from the provided dropdown. Slack limits dropdown menus to 100 selections, listed in alphabetical order; if your desired recipient group is not present due to this limitation, you can enter its name directly in the field below.
Note: By adding this integration to an existing recipient group, all escalation chains currently configured to route to that recipient group will automatically begin delivery to your Slack integration. This means that there may not be a need for any additional alert delivery configurations.
- Create Recipient Group. To add this integration as a member to a brand new recipient group, click the Create Recipient Group button. From the Add New Recipient Group dialog that displays, enter a unique name and description for the new recipient group.
Note: A brand new recipient group will eventually need to be assigned to an escalation chain in order for alerts to be routed to its members.
- Update Recipient Group. To add this integration as a member to an existing recipient group, click the Update Recipient Group button and, from the Update a Recipient Group dialog that displays, select the recipient group from the provided dropdown. Slack limits dropdown menus to 100 selections, listed in alphabetical order; if your desired recipient group is not present due to this limitation, you can enter its name directly in the field below.
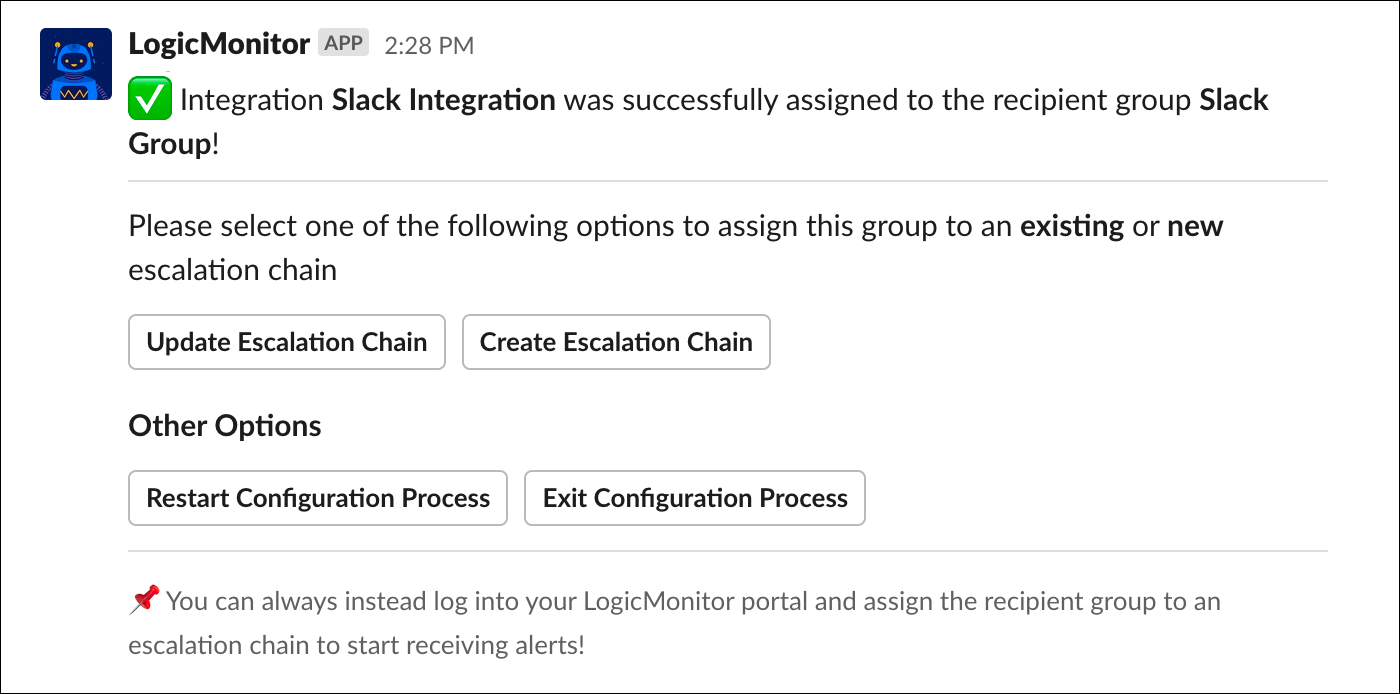
- Click the Submit button. A new message displays to indicate successful assignment of the Slack integration to the new or existing recipient group. The recipient group record you just created or updated can be further edited in LogicMonitor by navigating to Settings | Alert Settings | Recipient Groups.
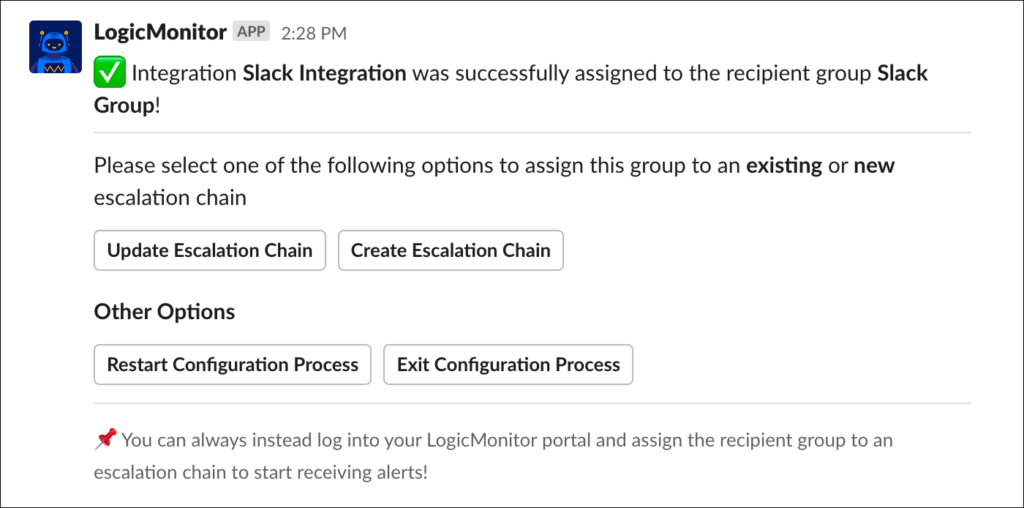
The success message also prompts you to optionally assign the recipient group you just edited/created to a new or existing escalation chain. Remember, if you just added your Slack integration to an existing recipient group, you may not necessarily need to perform any escalation chain configurations as all escalation chains currently configured to route to that recipient group will automatically begin delivering to your Slack integration. If you added your Slack integration to a brand new recipient group, the new recipient group will eventually need to be assigned to an escalation chain in order for alerts to be routed to its members.
If you’d like to assign your recipient group to a new or existing escalation chain, see the next section of this support article.
Assigning Your Slack Integration to an Escalation Chain
From Slack, you can add your new Slack integration (or a recipient group that contains your Slack integration) as a stage in an existing or new escalation chain. For more information on the role escalation chains play in alert delivery, see Escalation Chains.
The configuration of an escalation chain from within Slack can be arrived at in one of two ways:
- You chose to add your Slack integration directly to an escalation chain immediately after configuring a new Slack channel.
- You edited/created a new recipient group from Slack and are now adding that recipient group to an escalation chain.
Either way, whether you are adding your Slack integration directly to an escalation—or a recipient group containing your Slack integration as a member—the following set of steps is the same.
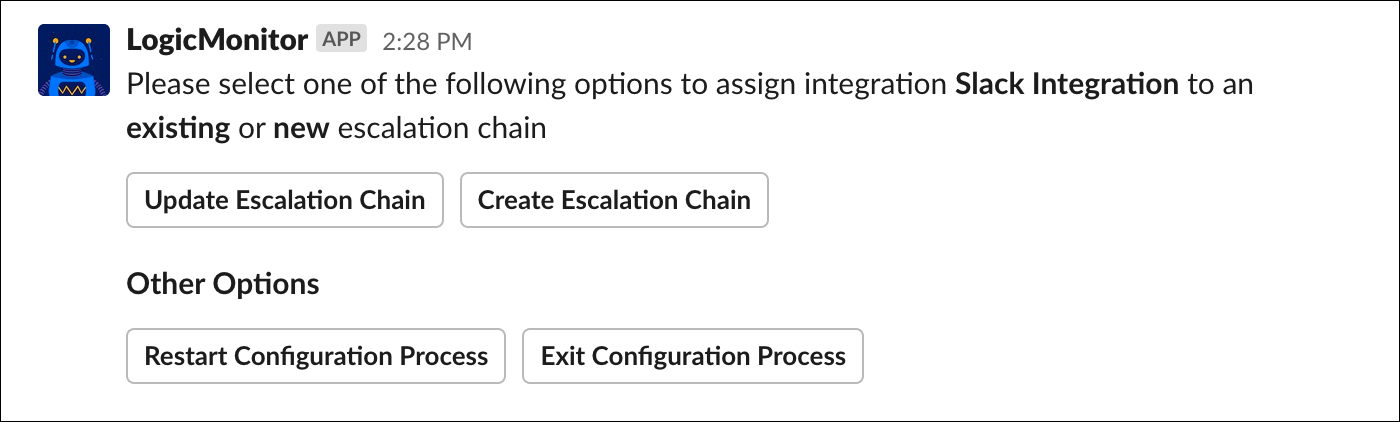
- Indicate whether you’ll be adding this integration/recipient group as a stage in an existing escalation chain or a new escalation chain.

- Update Escalation Chain. To add the integration/recipient group as a stage in an existing escalation chain, click the Update Escalation Chain button.
- From the Update a Chain dialog that displays, select the escalation chain from the provided dropdown. Slack limits dropdown menus to 100 selections, listed in alphabetical order; if your desired escalation chain is not present due to this limitation, you can enter its name directly in the field below. Click Next.
- Select the stage to which the integration/recipient group should be added from the provided dropdown.
Note: By adding this integration/recipient group to an existing escalation chain, all alert rules currently configured to route to that escalation chain will automatically begin delivery to your Slack integration. This means that there may not be a need for any additional alert delivery configurations.
- Create Escalation Chain. To add this integration/recipient group as a stage in a brand new escalation chain, click the Create Escalation Chain button and, from the Add New Escalation Chain dialog that displays, enter a unique name and description for the new escalation chain.
Note: The integration/recipient group is automatically assigned as the first stage of the new escalation chain. Escalation chains can have multiple stages and advanced configurations; to build on your new escalation chain, open it in LogicMonitor.
- Update Escalation Chain. To add the integration/recipient group as a stage in an existing escalation chain, click the Update Escalation Chain button.
- Click the Submit button. A new message displays to indicate successful assignment of the Slack integration or recipient group to the escalation chain. The escalation chain record you just updated/created can be further edited in LogicMonitor by navigating to Settings | Alert Settings | Escalation Chains.
The success message also prompts you to optionally assign the escalation chain you just edited/created to a new or existing alert rule. Remember, if you just added your Slack integration to an existing escalation chain, you may not necessarily need to perform any alert rule configurations as all alert rules currently configured to route to that escalation chain will automatically begin delivering to your Slack integration. If you added your Slack integration to a brand new escalation chain, the escalation chain will eventually need to be assigned to an alert rule in order for alerts to be routed through it.
If you’d like to assign your escalation chain to a new or existing alert rule, see the next section of this support article.
Assigning Your Escalation Chain to an Alert Rule
From Slack, you can assign your newly created/updated escalation chain to a new or existing alert rule using the following set of steps. (For more information on the role alert rules play in alert delivery, see Alert Rules.)
- From the success message that displays after editing/creating an escalation chain (see previous screenshot), indicate whether you’ll be assigning your escalation chain to an existing or new alert rule.
- Update Alert Rule. To assign the escalation chain to an existing alert rule, click the Update Alert Rule button and, from the Update an Alert Rule dialog that displays, select the alert rule from the provided dropdown. Slack limits dropdown menus to 100 selections, listed in alphabetical order; if your desired alert rule is not present due to this limitation, you can enter the name directly in the field below.
Note: Once this escalation chain is assigned to an existing alert rule, all alerts matching that alert rule will be delivered to your Slack integration.
- Create Alert Rule. To assign the escalation chain to a brand new alert rule, click the Create Alert Rule button and, from the Add New Alert Rule dialog that displays, configure the available settings.
Note: The settings available here (priority, alert level, escalation interval) mirror what is available within the LogicMonitor portal when creating a new alert rule. For a description of these settings, see Alert Rules.
- Update Alert Rule. To assign the escalation chain to an existing alert rule, click the Update Alert Rule button and, from the Update an Alert Rule dialog that displays, select the alert rule from the provided dropdown. Slack limits dropdown menus to 100 selections, listed in alphabetical order; if your desired alert rule is not present due to this limitation, you can enter the name directly in the field below.
- Click the Submit button. A new message displays to indicate successful assignment of the escalation chain to the alert rule.
- If you assigned the escalation chain to a brand new alert rule, you’ll need to open the alert rule in LogicMonitor (Settings | Alert Settings | Alert Rules) in order to additionally configure which resources/instances/datapoints will trigger alert rule matching.
Routing Alerts to Slack
Alert notifications are routed to Slack in the same way that all alert notifications are routed: via an escalation chain that is associated with an alert rule within LogicMonitor. Through these very flexible mechanisms, you have complete control over which alerts are delivered to the Slack channel that is associated with the integration.
If you installed the LogicMonitor app from Slack, you may have already configured the recipient group, escalation chain, and/or alert rule responsible for delivering alert notifications to Slack, as outlined in these three previous sections:
- Assigning Your Slack Integration to a Recipient Group
- Assigning Your Slack Integration to an Escalation Chain
- Assigning Your Escalation Chain to an Alert Rule
If you installed the LogicMonitor app from LogicMonitor (or if you installed from Slack but chose to exit out of these alert routing configurations), you can configure alert routing to Slack by creating escalation chains and alert rules in LogicMonitor, as discussed in Escalation Chains and Alert Rules respectively.
Adding/Inviting the App to a Slack Channel
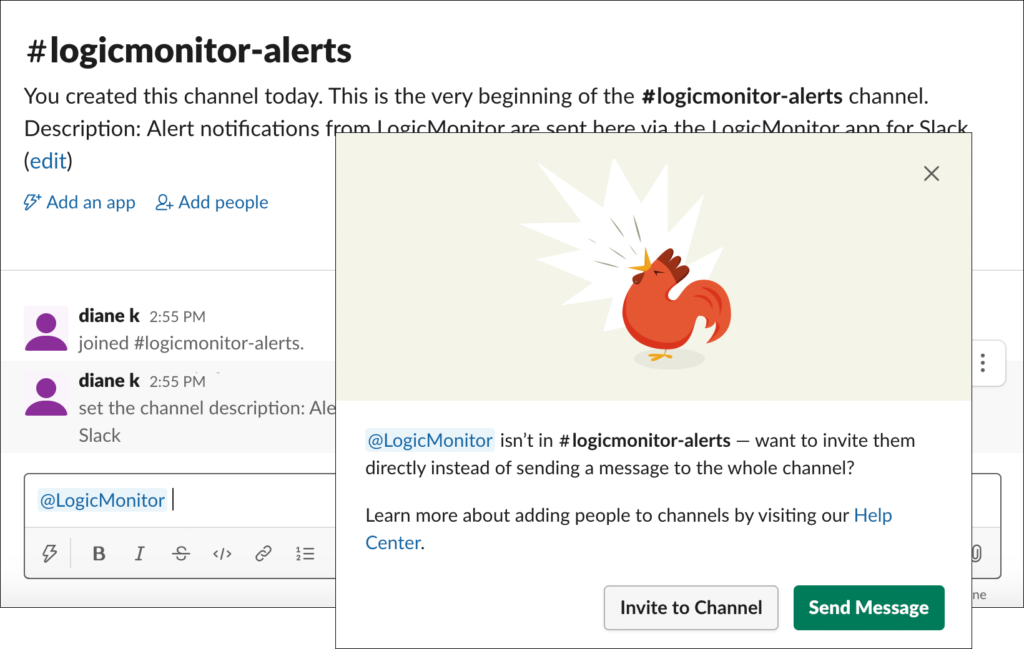
As with all Slack apps, the LogicMonitor app will not be allowed to send messages to your chosen Slack channel until it’s been added or invited to the channel. In the most cases, LogicMonitor will automatically add/invite the app to the Slack channel during install and configuration. The exception is if you’re creating an integration for a private channel that doesn’t already have the app added. In this rare instance, apps can be added to the private channel from the channel’s details or by opening the channel and mentioning the app (@logicmonitor) in a message, as shown next.
Configuring Additional Slack Channels (Optional)
As part of the app installation process, you will have configured one Slack channel to which alert notifications will be routed. This Slack channel is referenced by the resulting integration record that resides in LogicMonitor.
There is a one-to-one relationship between the integration records that reside in LogicMonitor and Slack channels. Therefore, if you’d like alert notifications to go to multiple channels within a single Slack workspace, you’ll need to create multiple integration records—one per channel. As with the installation process, this can be initiated from either your LogicMonitor portal or your Slack workspace.
Configuring Additional Slack Channels from LogicMonitor
To configure an additional Slack channel from LogicMonitor:
- Select Settings | Integrations | Add | Slack.
- In the configuration dialog, enter a unique name and description for your Slack integration.
- Click the Add Integration to Existing Workspace button.
- From the Select Workspace field’s dropdown menu, select the Slack workspace that will be assigned to the integration.
- From the Select Channel field’s dropdown menu, select the Slack channel to which LogicMonitor alert notifications will be routed.
Note: The channels available for selection correspond to the workspace selected in the previous field.
- Check the alert statuses you would like routed to Slack. Receipt of new alerts is mandatory, but updates on the current alert status (escalated/de-escalated, acknowledged, cleared) are optional.
- If you’d like to test your new integration before saving, click the Test Alert Delivery button to deliver a synthetic alert notification to the Slack channel specified on this dialog.
Note: As discussed in the Testing Your Slack Integration section of this support article, you can come back to this dialog at any time to initiate a test.
- Click Save.
- Don’t forget to configure alert notification routing to your new Slack channel (integration record), as discussed in the Routing Alerts to Slack section of this support article.
Configuring Additional Slack Channels from Slack
To configure an additional Slack channel from Slack:
- Open a Slack channel in the workspace in which the LogicMonitor app is installed and perform one of the following actions:
- Mention the LogicMonitor app (@logicmonitor) in a message and click the Get Started button from the direct message that the LogicMonitor app sends in response.
- Enter the slash command
/lm configure [integration name]. See the Slack Slash Commands section of this support article for more information on slash commands.
- Complete the fields presented on the Add a New Integration dialog.
Note: This dialog prompts you to complete the same fields requested when initially installing the LogicMonitor app (with the exception of the Portal Name field which is not necessary in this context). These fields are documented in the Installation and Configuration from Slack section of this support article.
- Click the Submit button. A new message displays to indicate successful creation of a LogicMonitor integration record for Slack. This new integration record can be viewed and edited in LogicMonitor by navigating to Settings | Integrations.
The success message also prompts you to optionally begin configuring alert routing conditions, which determines which alerts are delivered to the Slack channel that is associated with the integration. Because this workflow can be configured at a later time—via the LogicMonitor portal—you have the option to exit these configurations at any time by clicking the Exit Configuration Process button.
If you’d like to begin configuring alert routing conditions from Slack at this time, see the Installation and Configuration from Slack section of this support article where alert delivery configuration from Slack is documented in detail.
Testing Your Slack Integration
Once you’ve completed the required setup steps, you can test the connection between your Slack workspace and LogicMonitor portal by opening the integration record in LogicMonitor (Settings | Integrations) and clicking the Test Alert Delivery button. If successful, a synthetic read-only alert is sent to the Slack channel specified in the integration record.
Note: You can initiate a more thorough test, one that tests the entire chain of events from alert triggering to alert rule matching to alert delivery, from the resource or website whose alerts you want delivered to Slack. For more information, see Testing Alert Delivery.
Viewing and Responding to Alerts from Slack
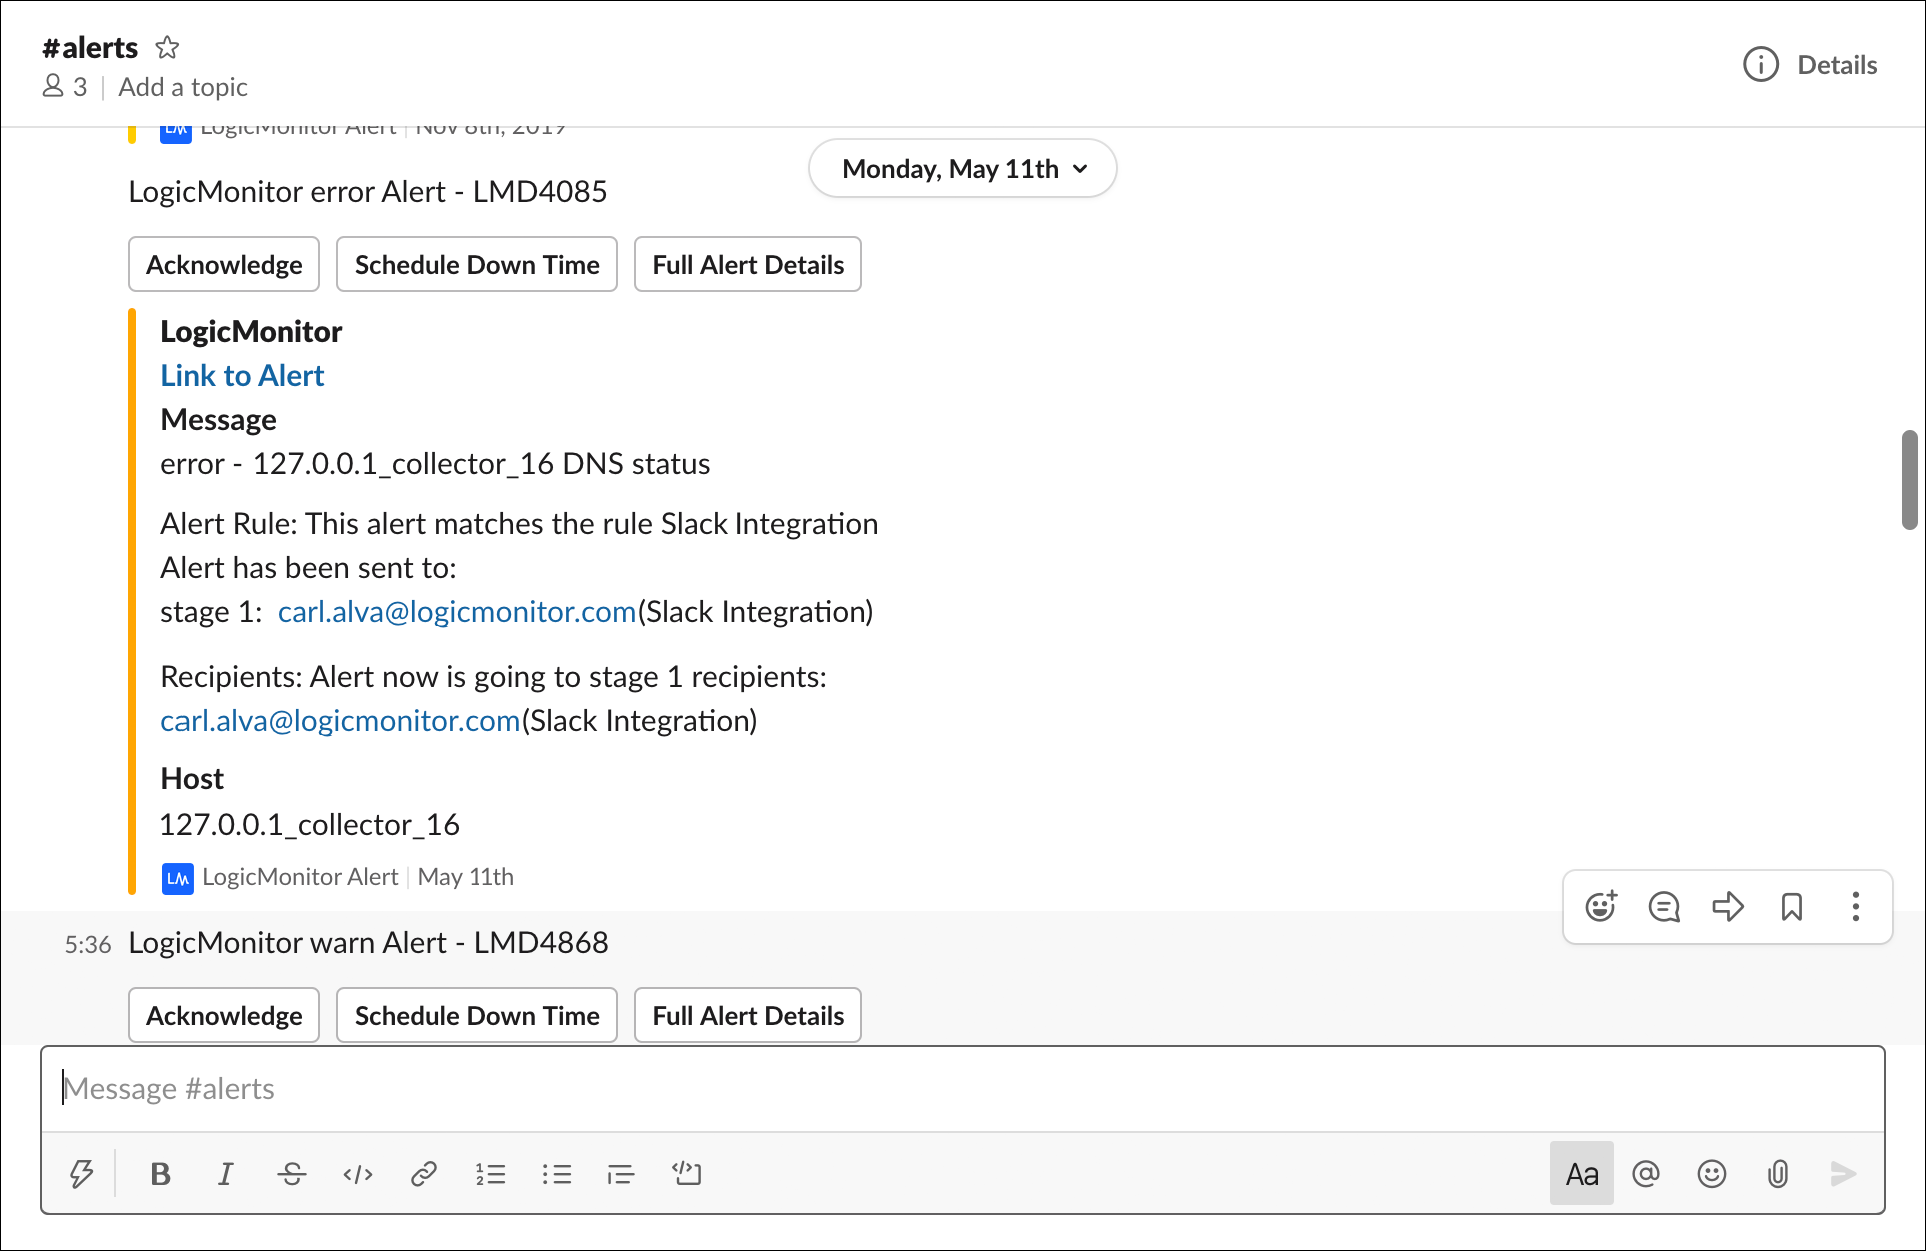
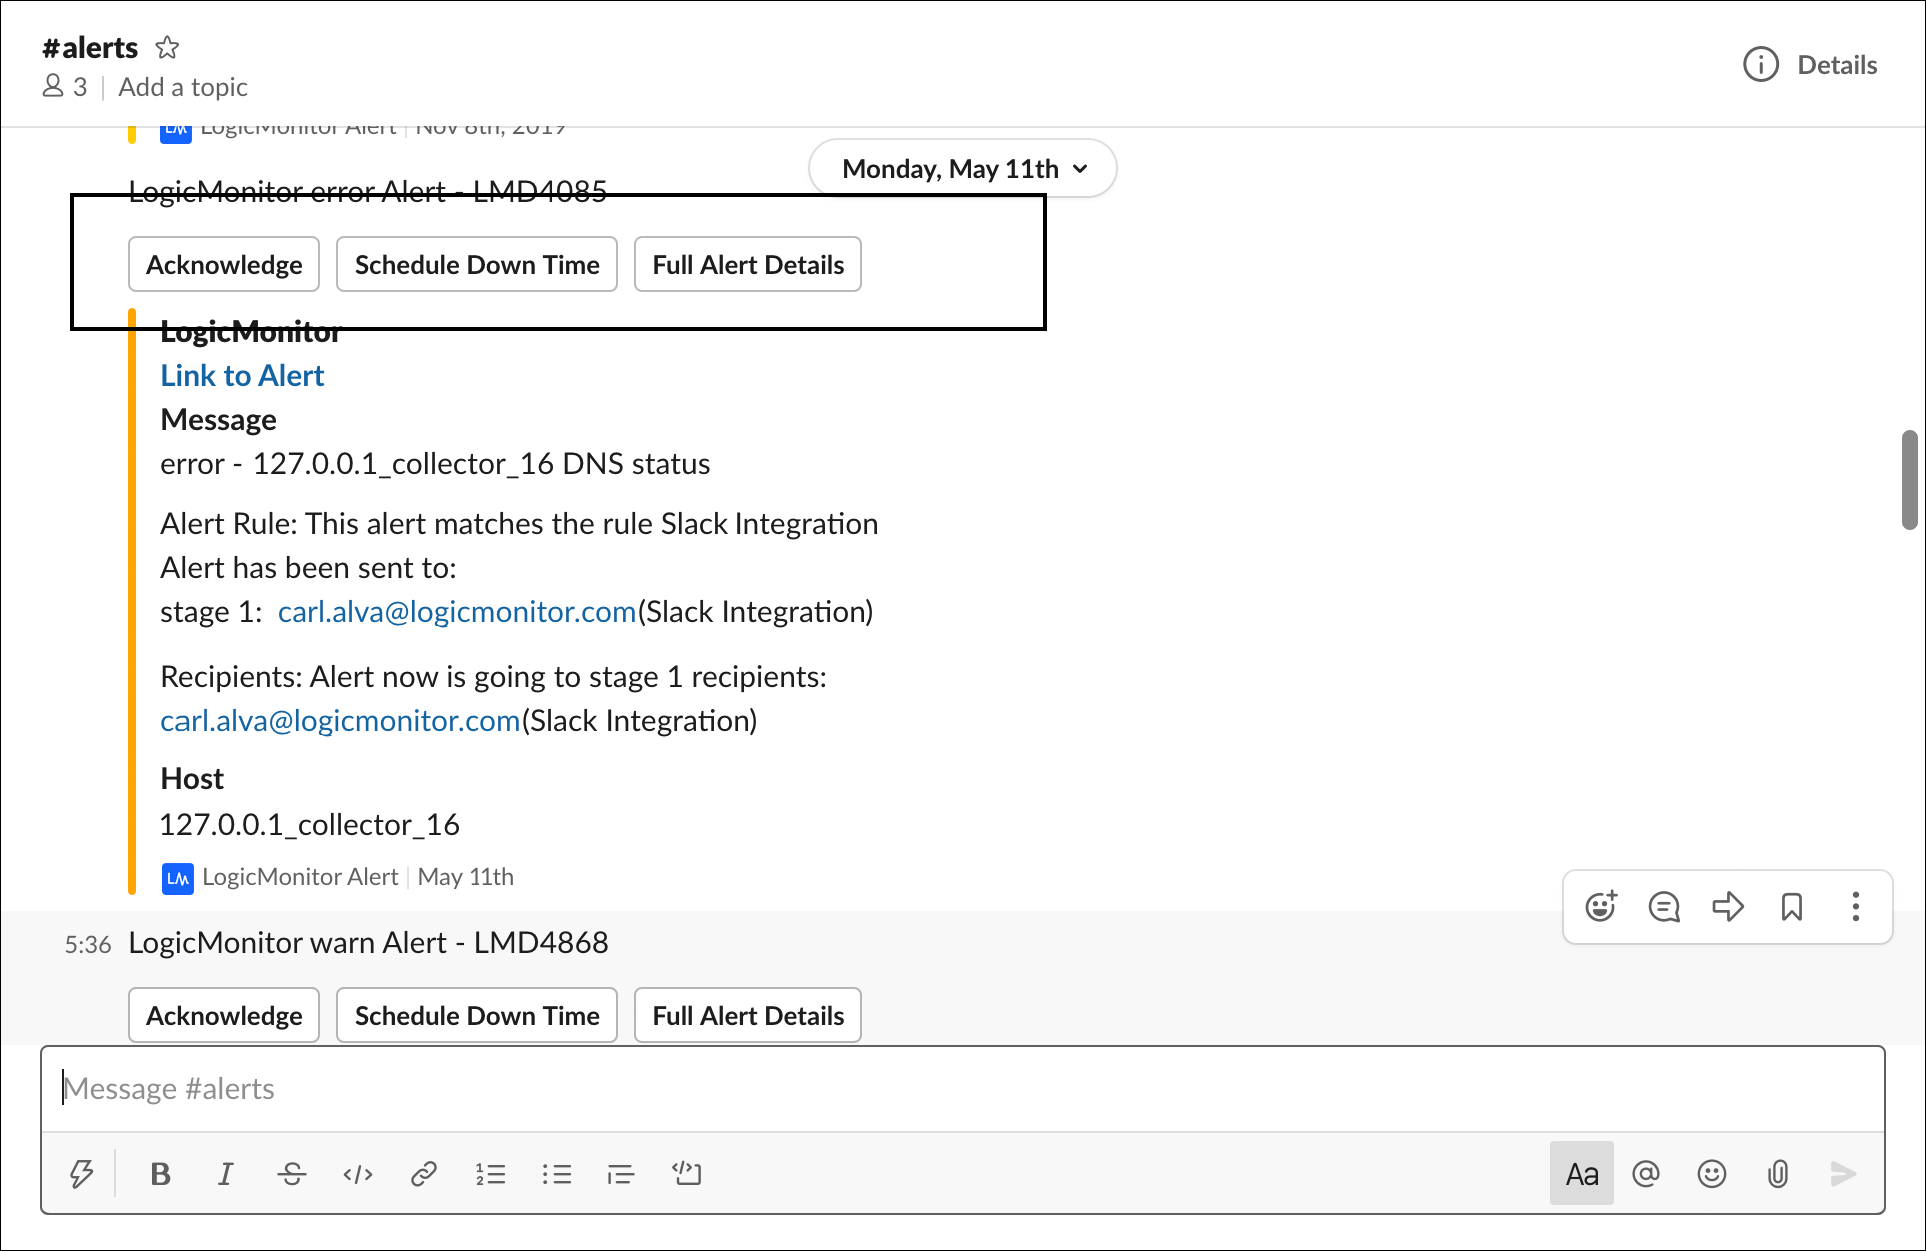
Alert notifications are posted to your Slack channel with summary information that includes alert severity level, alert ID, alert message, and other key pieces of information.
As discussed in the following sections, there are several actions you can perform from alert notifications in Slack, depending upon the type of alert.
Note: A user must have the appropriate acknowledge and SDT permissions (as assigned on a resource group or website group basis) in LogicMonitor in order to perform these actions. For more information on assigning this level of permissions for resource and website groups, see Roles.
Open the Alert in LogicMonitor
Any alert notification can be directly linked to and opened in LogicMonitor by clicking the “Link to alert” hyperlink that is provided immediately above the alert message. The alert opens in the Alerts page. You will be prompted to log into LogicMonitor if you are not currently logged in.
Acknowledge the Alert
If viewing an active alert, you have the option to acknowledge the alert using the Acknowledge button. As discussed in Guidelines for Responding to Alerts, acknowledging an alert suppresses further routing of notifications for that particular alert.
Note: You can optionally enter the slash command /lm ack [alert ID] [comment - optional] to acknowledge an alert. See the Slack Slash Commands section of this support article for more information on available slash commands.
Upon successful acknowledgement, you will receive a confirmation message in Slack that the alert was acknowledged. If you attempt to acknowledge an alert that has since cleared or is inactive or has already been acknowledged, an ephemeral error message displays (visible only to you) explaining why the alert couldn’t be successfully acknowledged.
Assuming your Slack integration configuration was set up to include routing of alert notifications with an acknowledged status, you’ll also receive a new alert notification indicating acknowledged status.
Put the Resource or Instance Triggering the Alert into Scheduled Downtime (SDT)
If viewing an active alert, you have the option to put the resource (including a Collector resource) or instance that is triggering the alert into SDT using the Schedule Down Time button. As discussed in Guidelines for Responding to Alerts, SDT suppresses the routing of alert notifications for that resource or instance for the duration of SDT.
Note: You can optionally enter the slash command /lm sdt [alert ID] [comment - optional] to SDT an alert. See the Slack Slash Commands section of this support article for more information on available slash commands.
Upon successful scheduling of SDT, you will receive confirmation in Slack that the resource or instance was placed into SDT. If your attempt to schedule SDT is unsuccessful, an ephemeral error message displays (visible only to you) explaining why the alert couldn’t be successfully placed into SDT.
View the Full Details of the Alert
If viewing an active alert, you have the option to view additional details that aren’t initially presented by the alert notification using the Full Alert Details button. Upon clicking this button, an ephemeral message displays (visible only to you) with the additional details.
Slack Slash Commands
The following slash commands can be entered to interact with LogicMonitor alerts and integrations. With the exception of the SDT command, all commands can be performed from any channel in the Slack workspace, regardless of whether the LogicMonitor app has been invited to the channel.
Help Slash Command
Returns a message offering useful information, shortcuts to common actions, and links to a list of currently available slash commands and this support page.
Command: /lm help
Acknowledge Slash Command
Acknowledges a LogicMonitor alert.
Command: /lm ack [alert ID] [comment - optional]
Examples:
/lm ack LMD001/lm ack LMD001 investigating now
Schedule Downtime (SDT) Slash Command
Schedules downtime for a LogicMonitor alert, and its associated triggering resource or instance.
Command: /lm sdt [alert ID] [comment - optional]
Examples:
/lm sdt LMD001/lm sdt LMD001 scheduled sdt for 30 minutes
Note: Unlike the other slash commands which can be performed from any channel in the Slack workspace, this command requires that the LogicMonitor app be explicitly invited to the channel from which it is performed.
Configure Slash Command
Creates a new Slack integration or edits an existing Slack integration. The Update Integration dialog opens if this command is entered with the name of an existing Slack integration. Otherwise, the Add New Integration dialog opens.
Command: /lm configure [integration name - optional]
Examples:
/lm configure/lm configure Slack Alert Integration
Note: This command should only be used once the initial app installation is fully complete, after the workspace has been linked to your company via creation of the first integration record.
Uninstall Slash Command
Completely uninstalls the LogicMonitor app from the Slack workspace along with all associated Slack integration records for the workspace. See the App Uninstallation section of this support article for more details on uninstalling the LogicMonitor app.
Command: /lm uninstall
Note: This command should only be used once the app installation is fully complete and at least one Slack integration record exists in LogicMonitor.
Troubleshooting
Overall, the error messages returned by Slack and/or LogicMonitor when working with the Slack integration are specific and self explanatory. However, there are a couple that may require action on your end in order to resolve; these are discussed next.
Slack Username Mapping
Error message: Sorry, we couldn’t map your Slack username to a LogicMonitor account and couldn’t complete the requested action. A workaround will be available soon!
Error condition: When receiving requests from Slack (for example, acknowledge an alert or create an integration record), LogicMonitor attempts to authenticate the Slack username. If authentication cannot be made and the above error message is returned.
Solution: Contact customer support for guidance. (As the error message implies, LogicMonitor is working on improving the user validation process between Slack and LogicMonitor.)
Insufficient Permissions
Error message: You don’t have permission in LogicMonitor to perform this action. Please contact a LogicMonitor admin to obtain the needed permissions to resolve this issue.
Error condition: The user attempting to perform the action from Slack (for example, acknowledge or SDT an alert), configure an integration), doesn’t have the necessary permissions in LogicMonitor to perform the action.
Solution: Obtain the appropriate LogicMonitor permissions. In order to configure any aspect of a Slack integration, a LogicMonitor user must have manage-level permissions for integrations. In order to acknowledge or SDT alerts from Slack, a user must have acknowledge-level permissions for the resource or website group from which the alert is being triggered. For more information on these permissions, see Roles.
App Uninstallation
The LogicMonitor app can be uninstalled from a workspace via your LogicMonitor portal or via a Slack channel.
Uninstalling from LogicMonitor
A dialog box that warns of imminent app uninstallation will appear when you attempt to delete the only remaining Slack integration record associated with a particular Slack workspace. Confirming the delete action will effectively uninstall the app from the Slack workspace associated with the deleted integration record.
Uninstalling from Slack
The LogicMonitor app can be uninstalled from Slack by entering the slash command /lm uninstall. (See the Slack Slash Commands section of this support article for more information on available slash commands.)
Upon uninstalling from Slack, the app will be deleted from your Slack workspace and all Slack integration records that reside in LogicMonitor that are associated with the workspace will also be deleted. Additionally, any escalation chains, recipient groups and alert rules that exclusively reference these integrations will also be deleted, with the exception of escalation chains configured to deliver Collector down alerts.