
LM Exchange
Last updated on 28 June, 2023Released in June 2020, LM Exchange provides a host of new capabilities and features for LogicModule management. Eventually, LM Exchange will support (and replace) all existing functionality currently available under Settings | LogicModules. However, this existing functionality is being deployed to LM Exchange in phases and, as of now, there are some LogicModule management functions that are not yet available in LM Exchange (for example, importing/exporting, cloning, and deleting LogicModules). Therefore, until full parity is achieved, all features and functions currently available from the Settings menu will remain enabled.
Overview
LogicMonitor offers an ever-expanding library of LogicModules to bring you out-of-the-box monitoring for the networking devices, applications, databases, services, and other systems and tools your enterprise relies on. LM Exchange, which is available in your portal via the Exchange page, is the interface from which you can manage this library.
The Exchange page provides a centralized view of LogicModules. This view includes not only those LogicModules that live locally in your portal, but all LogicModules available in LogicMonitor’s global repository—whether developed by LogicMonitor or a member of LogicMonitor’s user community.
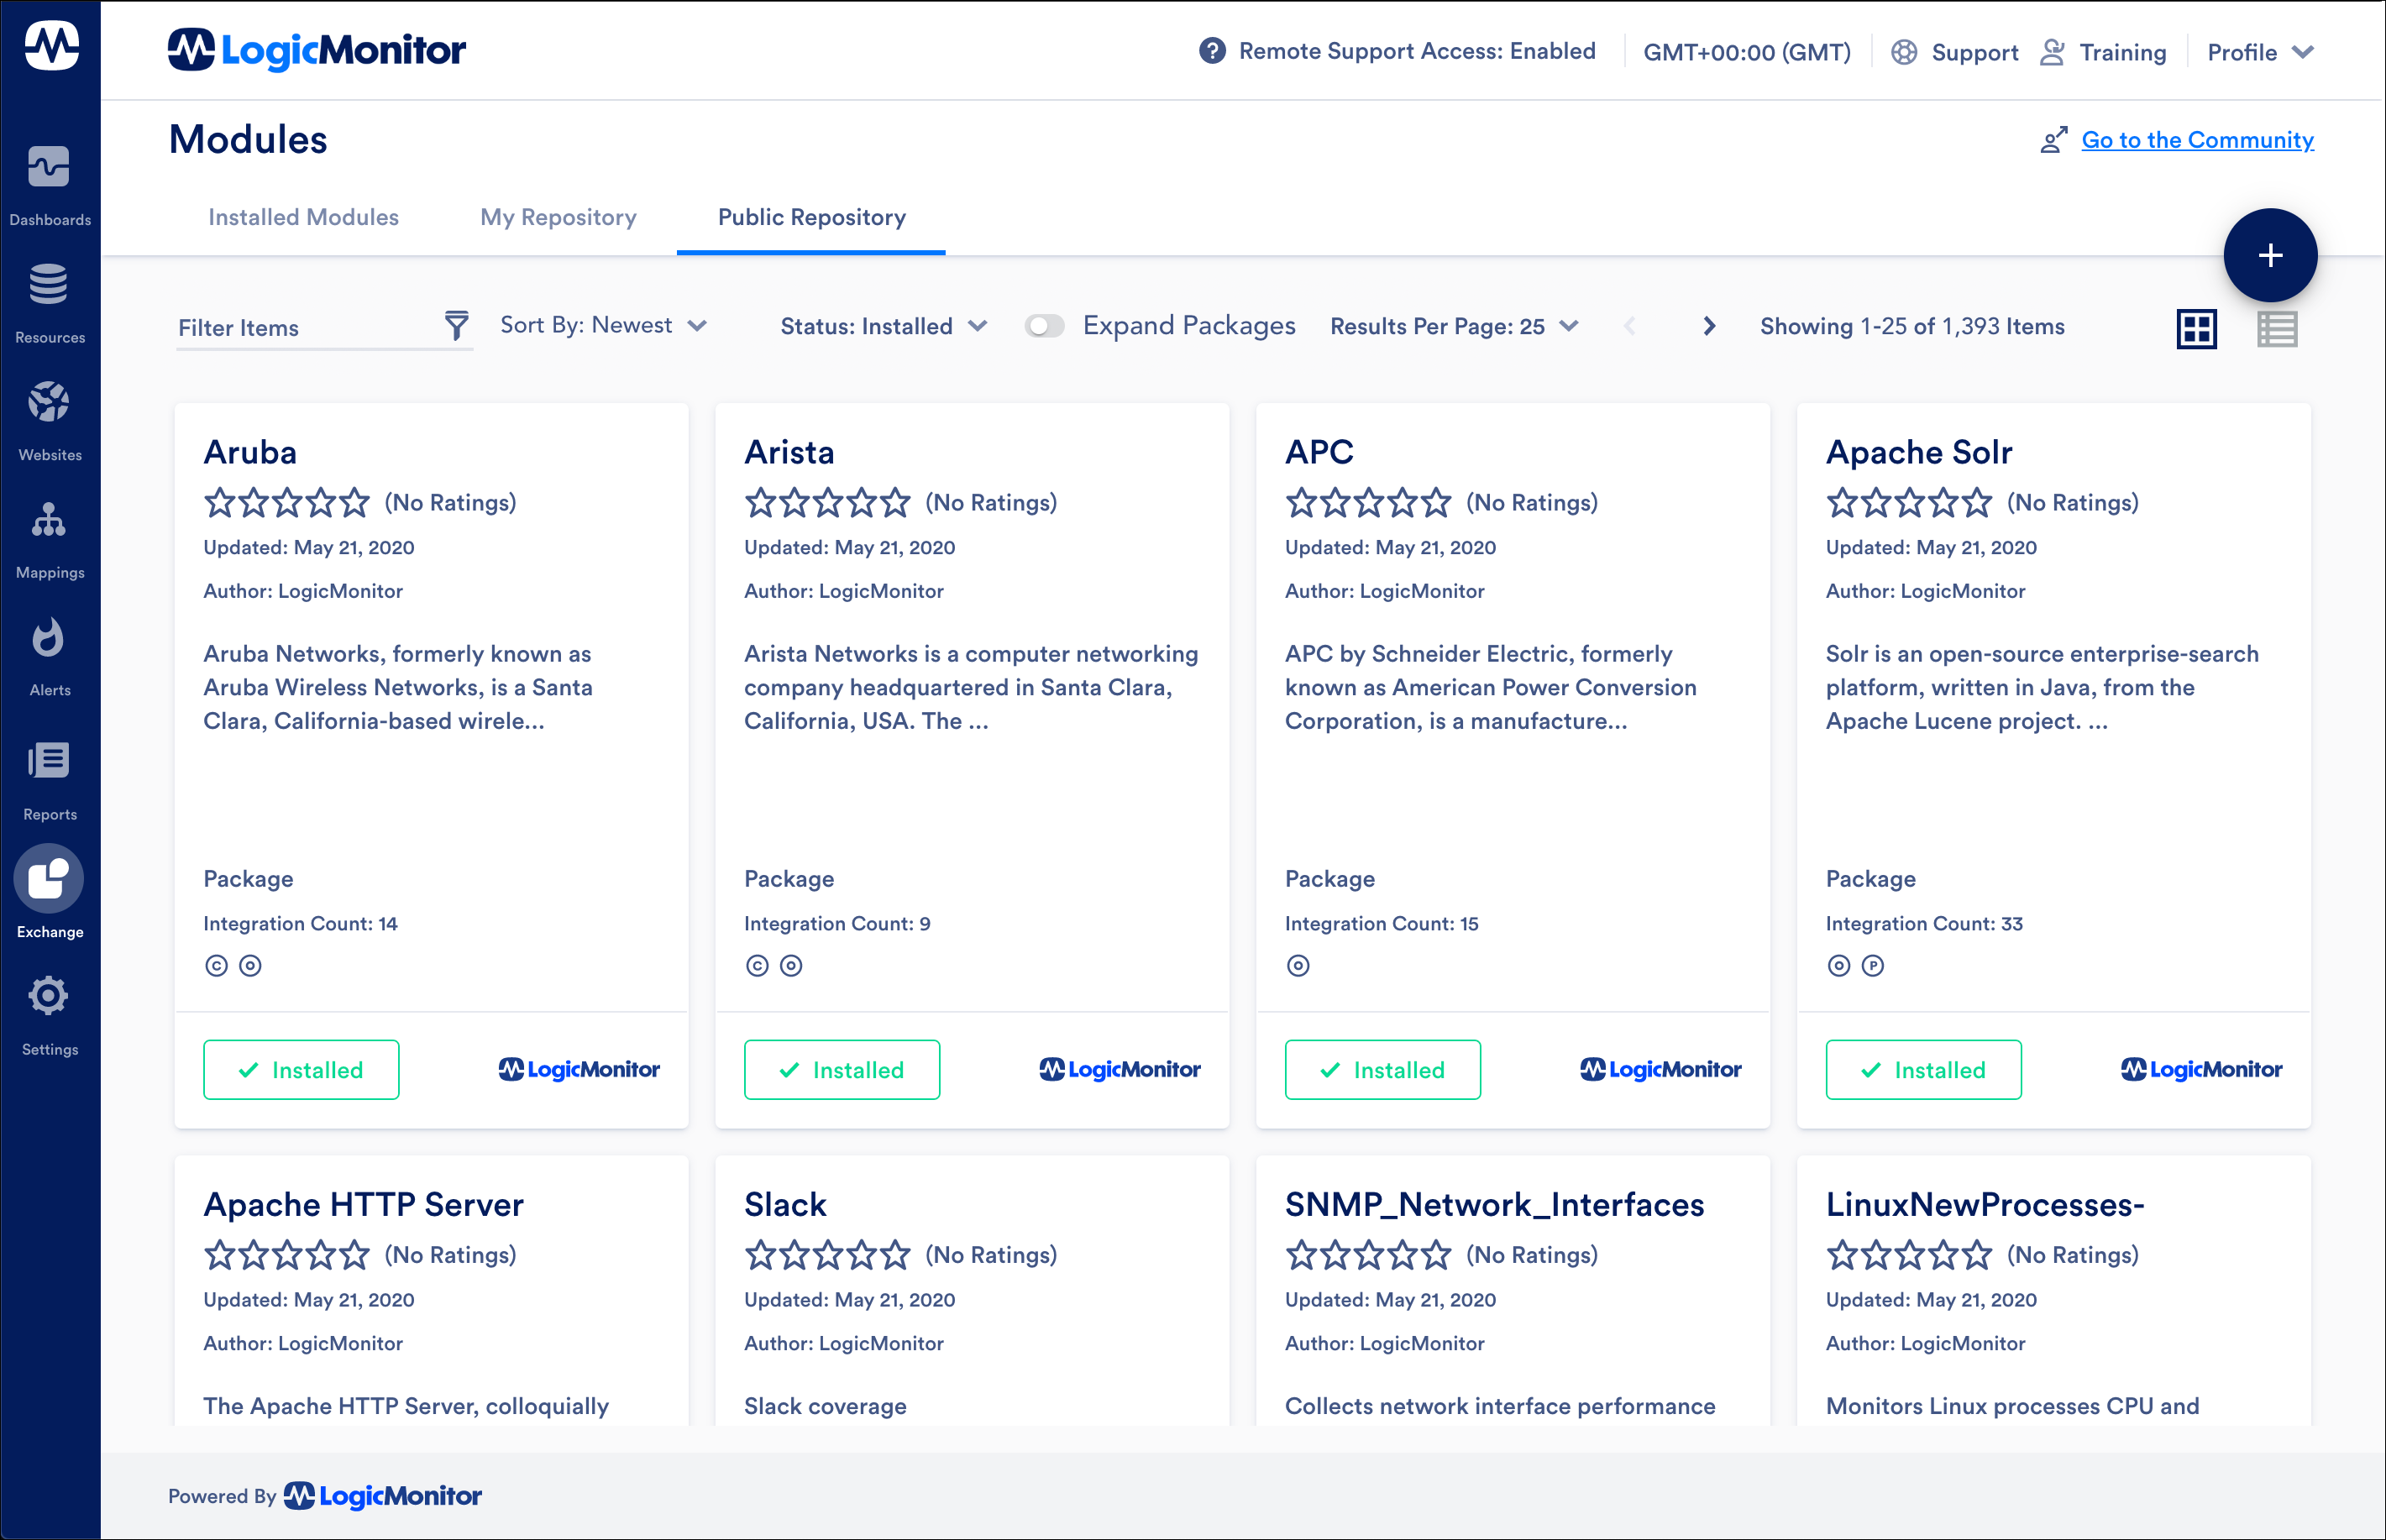
As discussed in the following sections, there are three primary areas of function (each designated by a tab) supported by the Exchange page:
- Installed Modules. The Installed Modules tab features all LogicModules that reside locally in your platform. This includes those LogicModules that the LogicMonitor platform came pre-populated with upon initial deployment, those that you have since manually imported from the public LogicMonitor repository, and those that you have created from scratch or customized.
- My Repository. The My Repository tab features all custom LogicModules that you have committed to your private (local) repository. From this tab, you can track versioning for your custom LogicModules as well as share these LogicModules with other LogicMonitor users.
- Public Repository. Modeled after an app store, the Public Repository tab features all LogicModules available for import. You will use this interface to import new and updated LogicModules that have been released by LogicMonitor—or by members of the LogicMonitor user community.
Installed LogicModules
The Installed Modules tab features all LogicModules (DataSources, EventSources, PropertySources, ConfigSources, and so on) that reside locally in your platform. These include:
- LogicModules that the LogicMonitor platform came pre-populated with upon initial deployment
- New LogicModules that you have since manually imported from the public LogicMonitor repository
- LogicModules that you have created
From this tab’s interface, you can manage (browse, view, edit, create) your locally installed LogicModules.
Managing Installed LogicModules
Note: At this time, the management functions listed next are only available for DataSources. If you’d like to view, edit, upgrade, or create other types of LogicModules, continue using the interfaces found under Settings | LogicModules | <LogicModule type>.
Once opened, LogicModules (DataSources only at this time) can be edited. Similarly, DataSources can be created by clicking the plus sign icon in the upper right corner of the Installed Modules tab.
Although the DataSource editor available from LM Exchange has a significantly different and enhanced UI than that available from the Settings page, the configurations are largely identical to those found under Settings | LogicModules | DataSources. Notably, however, you cannot configure dynamic thresholds for datapoints from the LM Exchange editor; this must be done from Settings | LogicModules | DataSources. For more information on DataSource configurations, see Creating a DataSource, which documents DataSource configurations as found in our alternate DataSource editor.
Public Repository
Modeled after an app store, the Public Repository tab features all LogicModules available for import. You can use this interface to import new and updated LogicModules that have been published by LogicMonitor—or by members of the LogicMonitor user community.
All LogicModules shared by community members undergo a thorough security review before being made publicly available on LM Exchange. During this review, the module is vetted by LogicMonitor to ensure its operations won’t impact the security or integrity of the Collectors on which it is run.
Note: Although LogicModules published by community members undergo a thorough security review, they are not otherwise qualified by LogicMonitor in terms of function and quality and, therefore, no support is available. Only LogicModules published (or subsequently endorsed) by LogicMonitor qualify for support.
The Public Repository is inherently aware of the differences between its state and the state of your local repository. Because of this, it is able to provide considerable guidance and functionality to help you keep your LogicModules current.
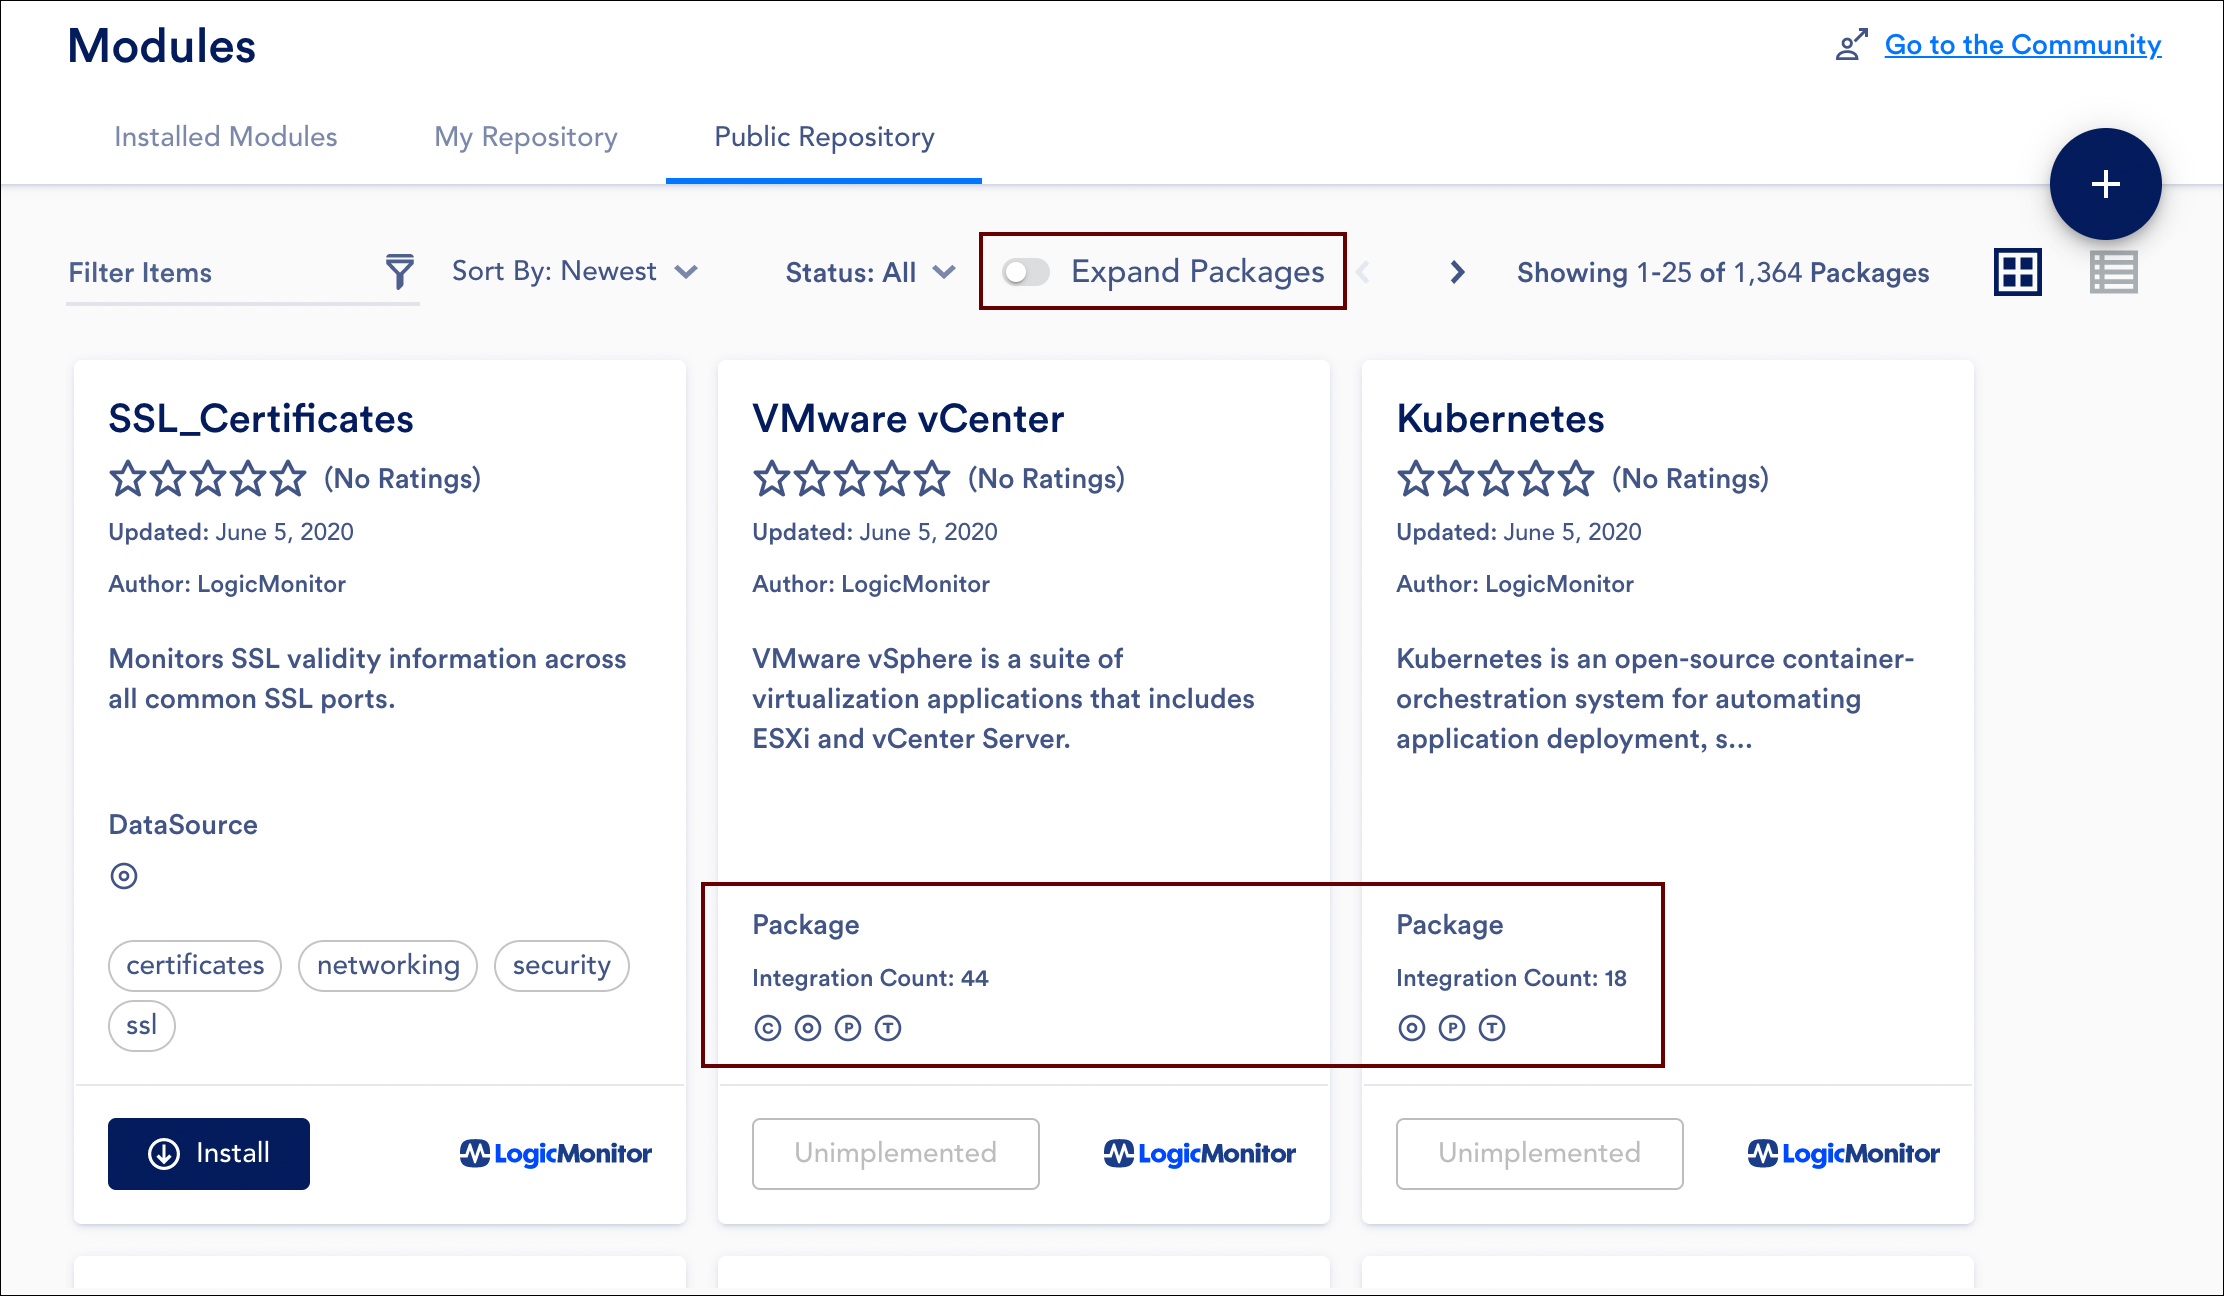
Understanding Packages
In the Public Repository, LogicModules can be grouped and displayed according to the technology monitored. These groups are called packages. Packages provide a birds-eye view of the LogicModules required to successfully monitor a particular technology and allow for efficient import of these LogicModules. For example, the Microsoft Office 365 package contains all DataSources, PropertySources, and ConfigSources that work together to provide full monitoring coverage for Office 365.
Viewing Packages
Use the Expand/Collapse Packages toggle to move between display of individual LogicModules or display of LogicModules as packages. Not all LogicModules are members of packages so package display will still show some single LogicModules among its results.
Viewing LogicModules in the Public Repository
Key summary details provided for LogicModules/LogicModule packages include:
- Name. The LogicModule (or package) name
- Updated. The date the LogicModule (or an update to the LogicModule) was committed to the Public Repository. If viewing packages, it’s the commit date of the member LogicModule most recently updated.
- Author. The name of the publisher. If published by LogicMonitor, the author will display as “LogicMonitor”. If published by a member of the LogicMonitor user community, the author will display as the portal name that is associated with the user.
- Description. The LogicModule description as it lives in the LogicModule definition. If viewing packages, this detail reflects the overview text in place for the package.
- LogicModule type(s). The LogicModule type (for example, DataSource, PropertySource, EventSource, and so on). If viewing packages, this summary detail indicates the number of modules within the package and displays icons to represent the various types of LogicModules found within the package.
- Status. The status button provides quick insight into the install status of a particular LogicModule or package.
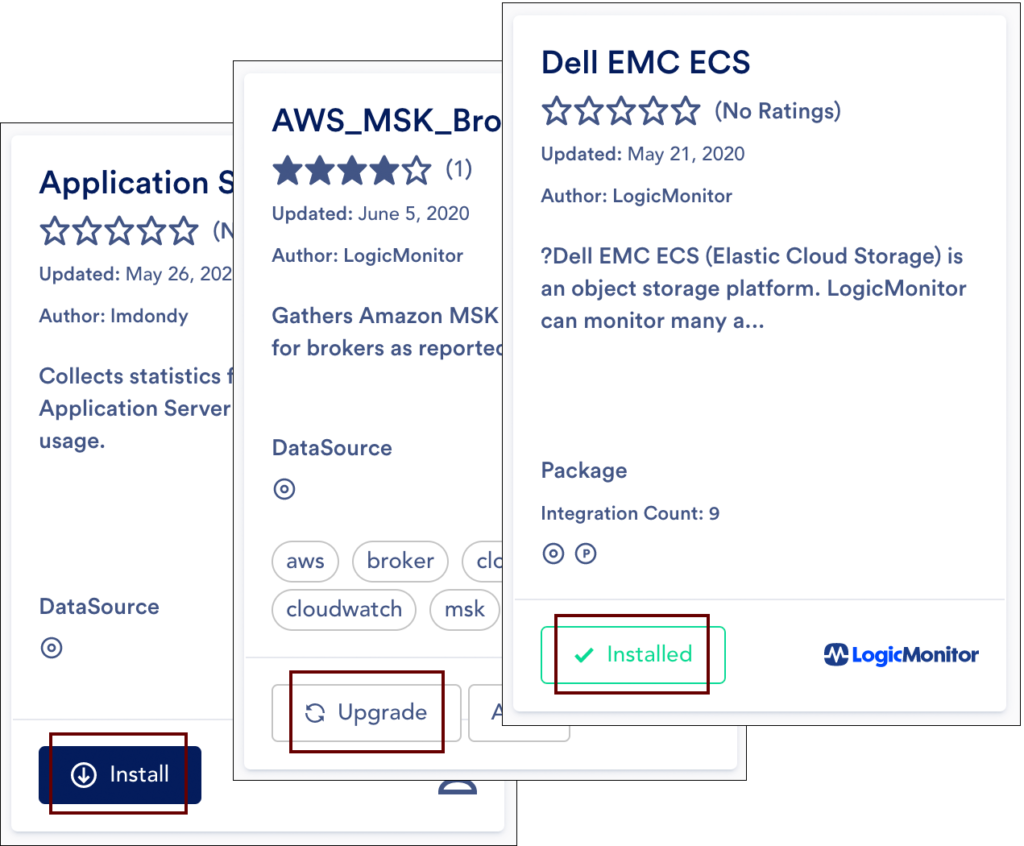
There are several statuses that could be assigned to a LogicModule or package:
- Install. The Install button displays when a brand new LogicModule is available for import (a LogicModule you have never before installed). When viewing packages, it displays when all members of the package have never been installed. You can click this status button to initiate import. See the Importing New LogicModules section of this support article for more information on installing new LogicModules from the Public Repository.
- Upgrade. The Upgrade button displays when a new version is available for a LogicModule that is currently installed locally. You can click this status button to initiate the upgrade. (The Audit button always accompanies that Upgrade button, allowing you to set a status of “Audited” in lieu of importing the update.) See the Importing New Versions of LogicModules and Auditing LogicModule Updates sections of this support article for more information on upgrading and auditing LogicModules from the Public Repository.
- Upgrade Each. The Upgrade Each button displays on packages, indicating that one or more members of the package have upgrades available. This button is not actionable; you must click the title of the package to view and initiate upgrades for package members.
- Audited. The Audited button displays on LogicModules that have been placed into an audited state (in other words, there is an upgrade available for the LogicModule that you have chosen to ignore). When viewing packages, it displays if one or more members are in an audited state and no other members are in a state whose designations supersede the audited designation (for example, an upgrade status for a package member will supersede the overall audited package designation). (The Upgrade button always accompanies the Audited button, allowing you to reverse the audited state and upgrade.) See the Auditing LogicModule Updates section of this support article for more information on auditing LogicModules.
- Customized. The Customized button displays for installed LogicModules for which you have the latest version in the lineage, but you have made changes that have not been committed to My Repository. When viewing packages, it displays if one or more members are in a customized state. Note that this status is superseded by the upgrade status if there is an upgrade available for the LogicModule (or, if viewing a package, if there is an upgrade available for one of the package members). See the Committing LogicModules to My Repository section of this support article for more information on committing customized LogicModules to My Repository.
- Installed. The Installed button displays for all LogicModules for which the local version is identical to the version in the Public Repository. It indicates that the LogicModule is currently installed locally with no available upgrades or uncommitted customizations, and is not in an audited state.
Note: As discussed in the Status Filter section of this support article, these status designations align with available filter status designations for the Public Repository, allowing you to isolate those that fall into a particular category.

Importing LogicModules from the Public Repository
All newly-released LogicModules are available for import via the Public Repository. You must explicitly initiate import; LogicMonitor never automatically pushes new versions of LogicModules to customer portals.
Importing New Versions of LogicModules (Updates)
LogicMonitor continuously releases updates to its existing LogicModules. An update is a new version of a LogicModule that references the exact same LogicModule name, meaning that, once imported, it will overwrite the existing installed version.
Note: At this time, you are only able to import updates for DataSources from the Public Repository. If you’d like to upgrade other types of LogicModules, continue using the interfaces found under Settings | LogicModules | <LogicModule type>.
When importing an update, LogicMonitor’s proprietary safe LogicModule merge (SLM) functionality acts as a version control system, highlighting the differences between your installed version and the new version and allowing you to manually reconcile each proposed change. During this reconciliation process, you can choose to preserve the configuration that currently exists in your local version or you can choose to accept the change.
Note: Currently, SLM is not identifying all differences between the new and local versions. For this reason, it is being released as an early access (EA) feature. EA features debut new functionality and are largely stable, but are not yet recommended for use in critical operations. To ensure you are seeing all changes carried by a new version, use the LogicModule import functionality available from the Settings menu, as described in Keeping Your LogicModules Up to Date.
If you have customized your local versions of LogicModule definitions, SLM is an especially helpful tool, allowing you to incorporate the enhancements that come with a new version while still preserving any important customizations previously made to suit your unique environment.
To import a LogicModule update:
- Navigate to Exchange | Public Repository.
- Browse (or filter) the repository to find the LogicModule you would like to upgrade.
- Click the Upgrade button. If viewing packages, you’ll need to first open the package by clicking the package name and then clicking the Upgrade button for the appropriate member LogicModule.
- Upon initiating the upgrade, you will enter the SLM interface.
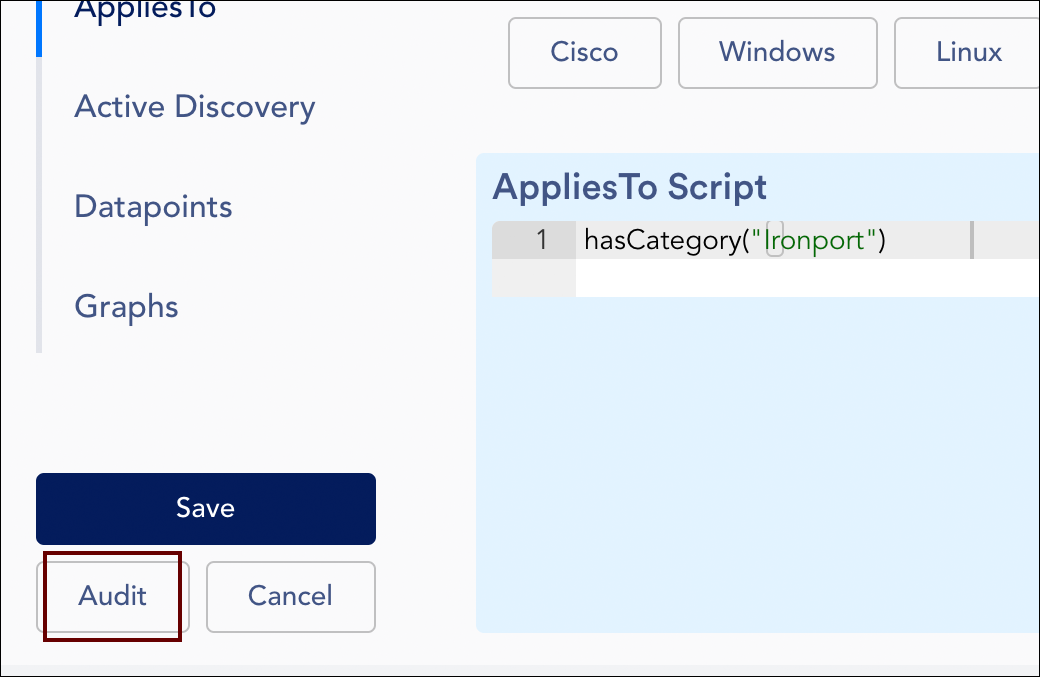
- In the upper left Upgrade Differences window, which lists all differences between the installed local version and the update version, select the first difference you would like to examine.
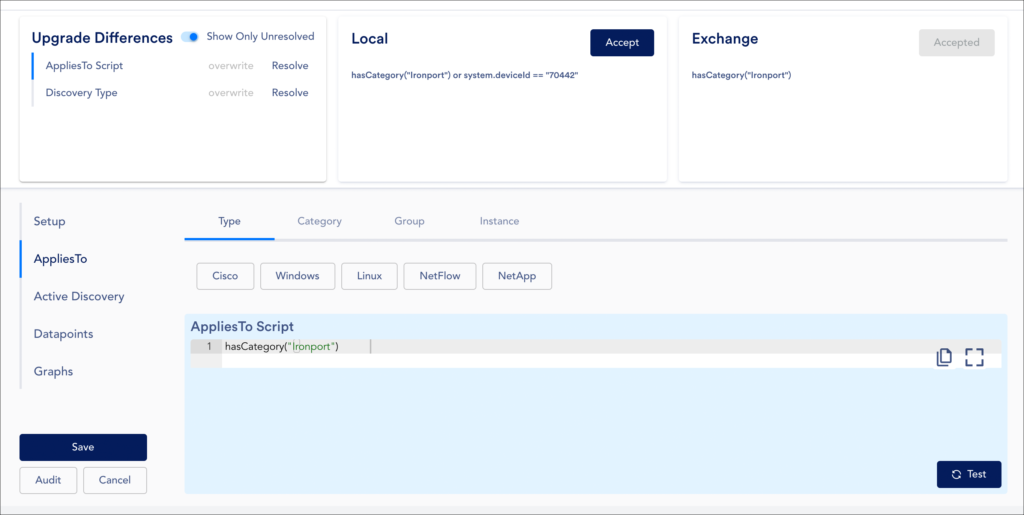
In this example, the AppliesTo script change is being examined. By default, LogicMonitor marks the public version as “Accepted” (meaning you would like to import the new AppliesTo statement), but you can override this default and preserve the current local configuration by clicking the Accept button from the Local window. - To the right of this window, two additional windows display: one that shows the configuration present in your local version for the difference selected in the Upgrade Differences window and one that shows the configuration in the new version. By default, LogicMonitor assumes you will want to accept the new configuration and has already marked the new version as “Accepted”, but if that is not the case, you can alternately:
- Click the Accept button that displays in the Local window to leave the local configuration in place.
- Use the editor pane below, which automatically focuses on the area of the LogicModule definition in which the selected difference resides, to manually enter a custom configuration.
- Once you have satisfactorily indicated how the difference should be handled, return to the Upgrade Differences window and click Resolve for the selected difference to remove it from the list.
Note: Clicking Resolve only removes the selected difference from the list of differences. It does not commit anything locally; the commit happens upon clicking Save.
- Repeat steps 5-7 for each difference listed in the Upgrade Differences window.
Note: It is not required that you step through (or mark as resolved) each difference listed in the Upgrade Differences window. Upon clicking Save, LogicMonitor will import whatever is currently accepted for each difference; therefore, if a difference wasn’t reviewed, the new version’s configuration would be imported by default upon saving.
- When you have reviewed all differences, click Save to import the update.
Importing New LogicModules
In addition to continuously enhancing existing LogicModules, LogicMonitor also continuously expands into monitoring capabilities with the release of new LogicModules. When importing a new LogicModule (a LogicModule not currently installed locally), it’s important to be aware that LogicModules are designed to automatically associate with relevant resources and, wherever possible, automatically begin monitoring activities. (For more information on how LogicModules automatically associate, see How DataSources Get Applied to Resources).
This means that resources will be queried, data will be collected, and, if alert conditions are pre-defined for the LogicModule, alerts will potentially be generated. If you require more time to ready your LogicModule (or environment) for production, you may want to consider disabling alerting for the newly imported LogicModule (or disabling the LogicModule itself), as discussed in Disabling Alerting and Disabling DataSources respectively.
To import a new LogicModule:
- Navigate to Exchange | Public Repository.
- Browse (or filter) the repository to find the LogicModule (or package) you would like to import.
- Click the Install button to initiate import.
Note: Clicking the Install button for a package will initiate import of all member LogicModules. If you are viewing packages, but you do not want to install all package members, click the title of the package to view the contents of the package and install each LogicModule individually.
- Upon successful import, the LogicModule’s status will change to “Installed” and the LogicModule becomes available for management from the Installed Modules interface.
Auditing LogicModule Updates
After reviewing the changes contained by an update, you may decide that you do not want to import it. At this point, you can simply cancel out of the SLM interface or, if you would like to indicate that the update is being deliberately ignored, you can click the Audit button. This action assigns the status of “Audited” to the LogicModule. This status will remain in place until the next new version of the LogicModule is committed to the Public Repository, at which time the status will update from “Audited” to “Upgrade”.
My Repository
One of the major advantages of LogicMonitor’s LogicModule design is the extensibility offered. From the Installed Modules interface, you have the ability to customize any LogicModule imported from the Public Repository (or create brand new LogicModules) to suit the unique needs of your monitoring environment.
The My Repository interface allows you to manage the versioning of your custom LogicModules and, optionally, share these custom LogicModules with other LogicMonitor user community members.
Committing LogicModules to My Repository
LogicModules are committed to My Repository from the Installed Modules interface.
To commit a LogicModule to My Repository:
- After saving customizations to a LogicModule from the Installed Modules interface, the Commit to My Repository button becomes available. Click this button.
Note: LogicModules published by LogicMonitor (as noted by “LogicMonitor” in the Author field) cannot be republished without modification.
- The Publish dialog appears. From this dialog, establish the following settings:
- If this LogicModule was previously published to My Repository, enter a description of the changes.
- If you’d like the LogicModule to be published in the Public Repository for other LogicMonitor community members to import, toggle the Publish as public slider to the right. You can also choose to make a LogicModule public at a later time from the My Repository interface.
Note: If your custom LogicModule contains code, it will undergo a security review before being published to the Public Repository. As discussed in the Viewing LogicModules in My Repository section of this support article, security review status will display as pending during this period.
- If this LogicModule was previously published to My Repository and you’d like to indicate that this newest version represents a major change, toggle the Mark as major change slider to the right. When marked as a major change, LogicMonitor will increment to the major version number (for example, from 1.1 to 2.0) rather than increment to the next minor version number (for example, from 1.1 to 1.2).
- Click Publish.
- Upon successful publish, you will see that the LogicModule displays updated versioning information relevant to the lineage you’ve established via this (and prior) commitments of the LogicModule. If you made this LogicModule available publicly, this is the versioning information potential users would see.
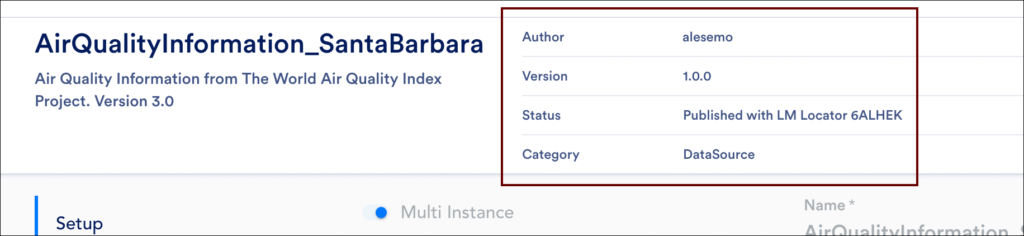
Author is assigned using the name of your portal ([portalname].logicmonitor.com). - It is recommended that you make note of the LM Locator code provided as part of the publish status (consider documenting the code assigned to each version in the Technical Notes field). The LM Locator code permanently links you to this version of the customized module from the Exchange, regardless of the current version you may have installed.

Using the LM Locator Code
While all LogicModules feature an LM Locator code as part of their version stamps, these codes are most useful for tracking custom LogicModules created by you or other members of the LogicMonitor user community.
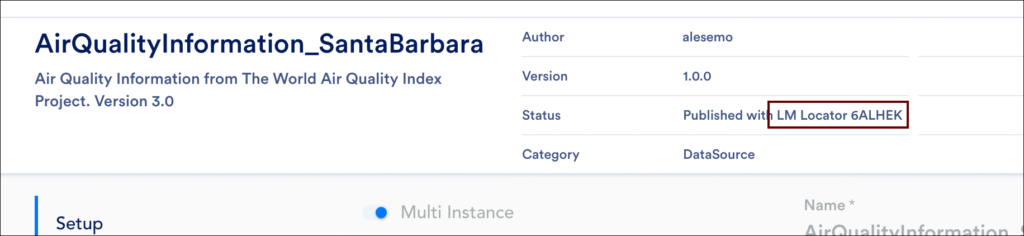
Every LogicModule that you commit to My Repository (whether you make it public or leave it private to your portal) is assigned an LM Locator code. LogicMonitor stores the version associated with each LM Locator code, allowing you to review prior versions, regardless of the current version installed.
Note: At this time, LogicMonitor does not provide built-in lineage tracking so we recommend you manually take note of the LM Locator codes assigned to each version in a lineage. You may want to consider storing that information in the LogicModule’s Technical Notes field.
To locate a LogicModule using its LM Locator code, enter the code into the Find Locator field that displays in the upper right of the LM Exchange interface. LogicMonitor opens the detail view of the LogicModule. This view cannot be edited.
Depending upon the version of the LogicModule currently installed, you may be presented with the Install button, allowing you to import the LogicModule into your portal.
Viewing LogicModules in My Repository
When viewing the summary information for a committed LogicModule, the summary details are largely the same as what you find for LogicModules listed in the Public Repository. See the Viewing LogicModules in the Public Repository section of this support article for more information on these summary details.
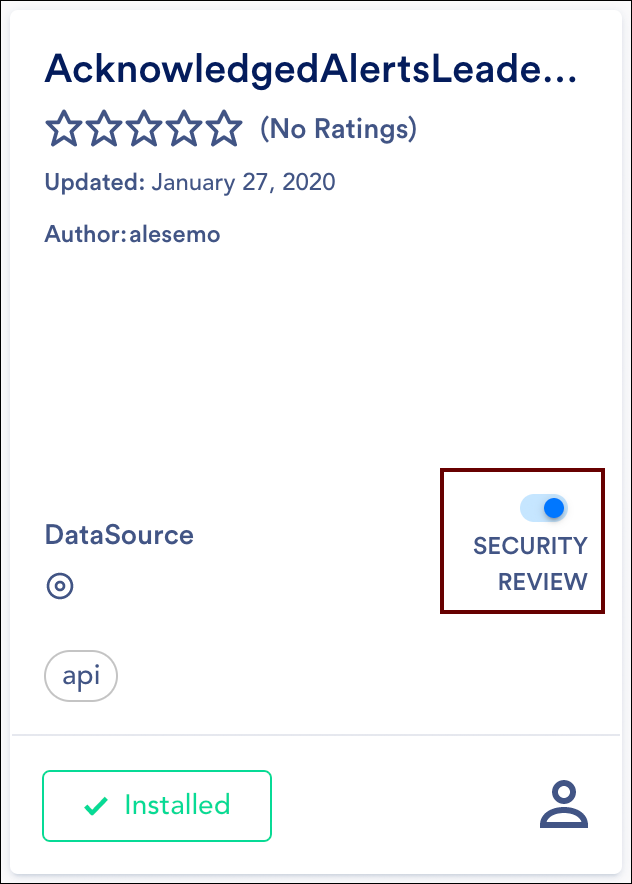
One summary detail unique to My Repository is the PRIVATE/SECURITY REVIEW/PUBLIC slider. Only available when viewing LogicModules using the grid view, this slider serves to indicate current availability of the LogicModule in the Public Repository, as well as provide a means to toggle between private and public availability.
There are three possible states for this slider:
- Private. Indicates that the custom LogicModule is not currently available to other LogicMonitor community member users from the Public Repository. Toggling the slider to the right publishes the LogicModule to the Public Repository (or, if the LogicModule contains code, triggers security review).
- Security Review. Indicates that the custom LogicModule will be published to the Public Repository pending security review. All LogicModules containing code must undergo a LogicMonitor security review before publishing is finalized. Toggling the slider to the left terminates the security review process and subsequent publishing of the LogicModule and returns it to a private state.
- Public. Indicates that the custom LogicModule is publicly available for import from the Public Repository. Toggling the slider to the left removes the LogicModule from the Public Repository and returns it to a private state.
Importing LogicModules from My Repository
If you delete a LogicModule that was previously committed to My Repository, an Install status button appears for the LogicModule when viewing it in My Repository. Click this button to reinstall it.
Filter and Display Options
The LM Exchange displays summaries of LogicModules across its various interfaces. You can filter these LogicModules to optimize relevancy, as well as use a variety of view options to customize the display to your liking.
Filtering LogicModules
When browsing LM Exchange, there are several filters available that allow you to focus on a particular LogicModule or a grouping of LogicModules with characteristics in common. With the exception of the criteria entered into the Find Locator filter, which offers a shortcut for jumping to a specific LogicModule version, criteria specified across filters is joined using an AND operator.
Keyword Filter
The keyword filter is a simple text search that queries the LogicModule name, description, author, tags, and LogicModule type for a match.
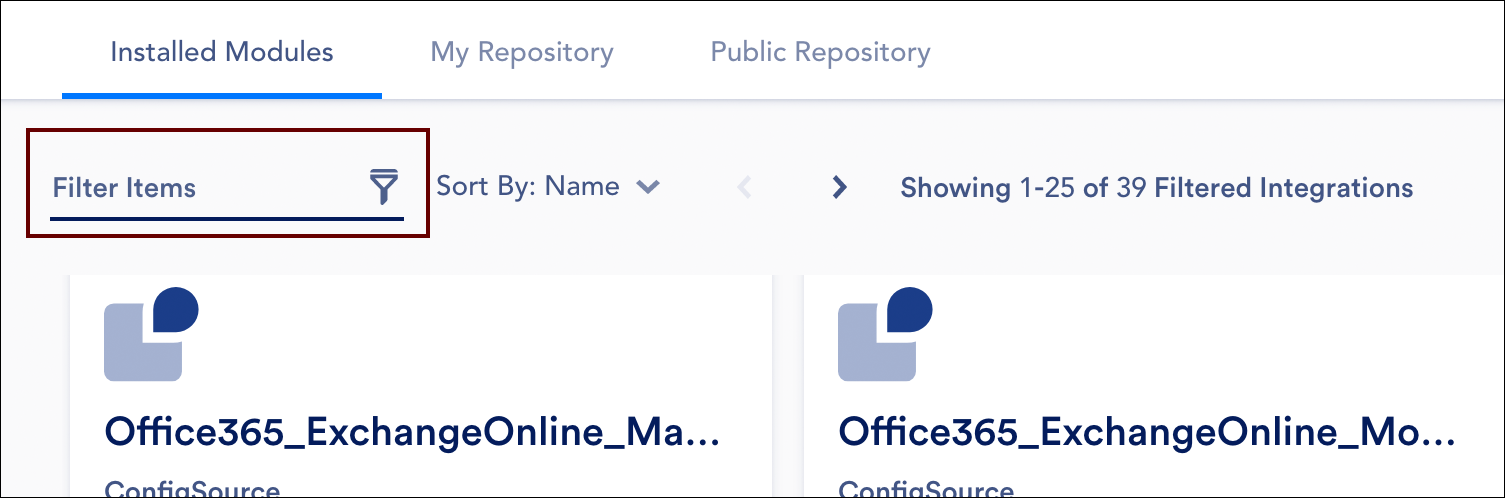
Common keyword filter use cases include:
- Filtering by technology name. For example, entering “Office 365” into the Filter Items field to return just those LogicModules that relate to Microsoft Office 365 in some way.
- Filtering by LogicModule type. For example, entering “PropertySource” into the Filter Items field to return only PropertySources.
Note: If you are viewing packages, the keyword filter will return any packages with members that match the keyword search.
Status Filter
The Status filter allows you to restrict returned LogicModules (or packages) according to their statuses. Both the My Repository and Public Repository interface offer this filter.
Status Filter for Public Repository
The following table illustrates how each status filter criterion maps to a LogicModule or package’s assigned status.
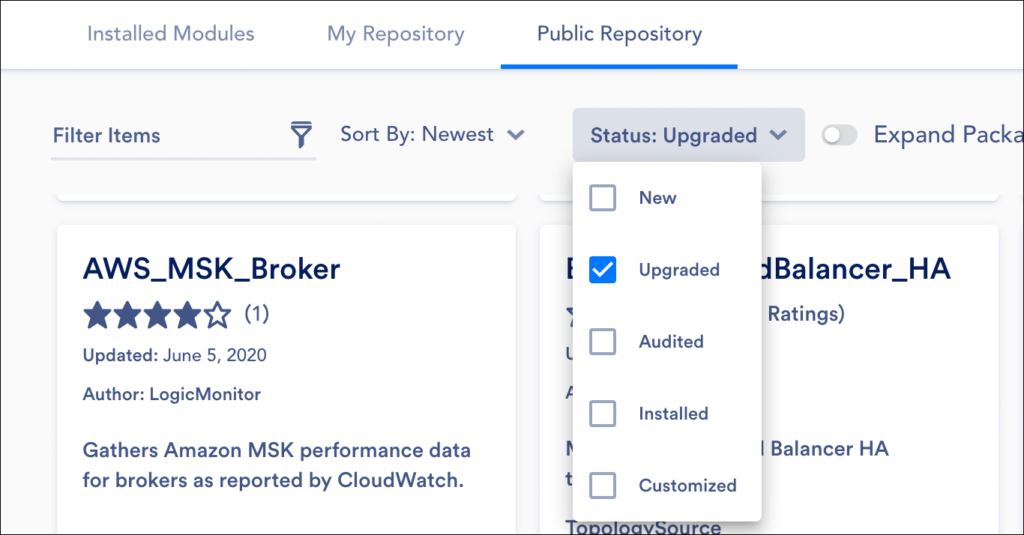
| This status filter… | …returns LogicModules with this assigned status |
| New | Install |
| Upgraded | Upgrade or Upgrade Each |
| Audited | Audited |
| Customized | Customized |
| Installed | Installed |
For more information on how statuses are assigned, see the Viewing LogicModules in the Public Repository section of this support article.
Note: If filtering the Public Repository while package display is enabled, only packages whose overall status match the filter will be returned, even if the package has members with a differing status. For example, if a package has two member modules that represent upgrades, this will be the status of the package, even if other members have a status of audited. This is because the status of upgrade supersedes that of audited. Depending on your use case, it may be best to only use the Status filter when packages are expanded (that is, when each LogicModule is listed individually in the results rather than collapsed into packages).
Status Filter for My Repository
There are several criterion available for this filter:
- Community. Returns all LogicModules you’ve published to the Public Repository that are currently assigned community status. Community status indicates that the LogicModule was published by a member of the LogicMonitor user community. By default, all LogicModules you make public are initially assigned this status.
- LM Endorsed. Returns all LogicModules you’ve published to the Public Repository that LogicMonitor has formally recognized as standout community LogicModules.
- Security Review. Returns all LogicModules that require security review before publishing to the Public Repository. If one of these LogicModules is set to public status, this setting flags it for review. If a LogicModule is never set to public status, it will never be reviewed and will remain flagged for security review.
Visibility Filter
Only available in the My Repository interface, the Visibility filter provides a quick view of those customized LogicModules currently available in the Public Repository. You can use this filter to restrict returned LogicModules to just those that are public—or just those that are private. The “Only Public” criterion also returns LogicModules pending security review.
Find Locator Filter
This filter allows you to jump directly to a particular version of a LogicModule using an LM Locator code. For more information on these codes, see the Using the LM Locator Code section of this support article.
Display Options
LM Exchange supports several options for displaying and organizing LogicModules across its various interfaces.
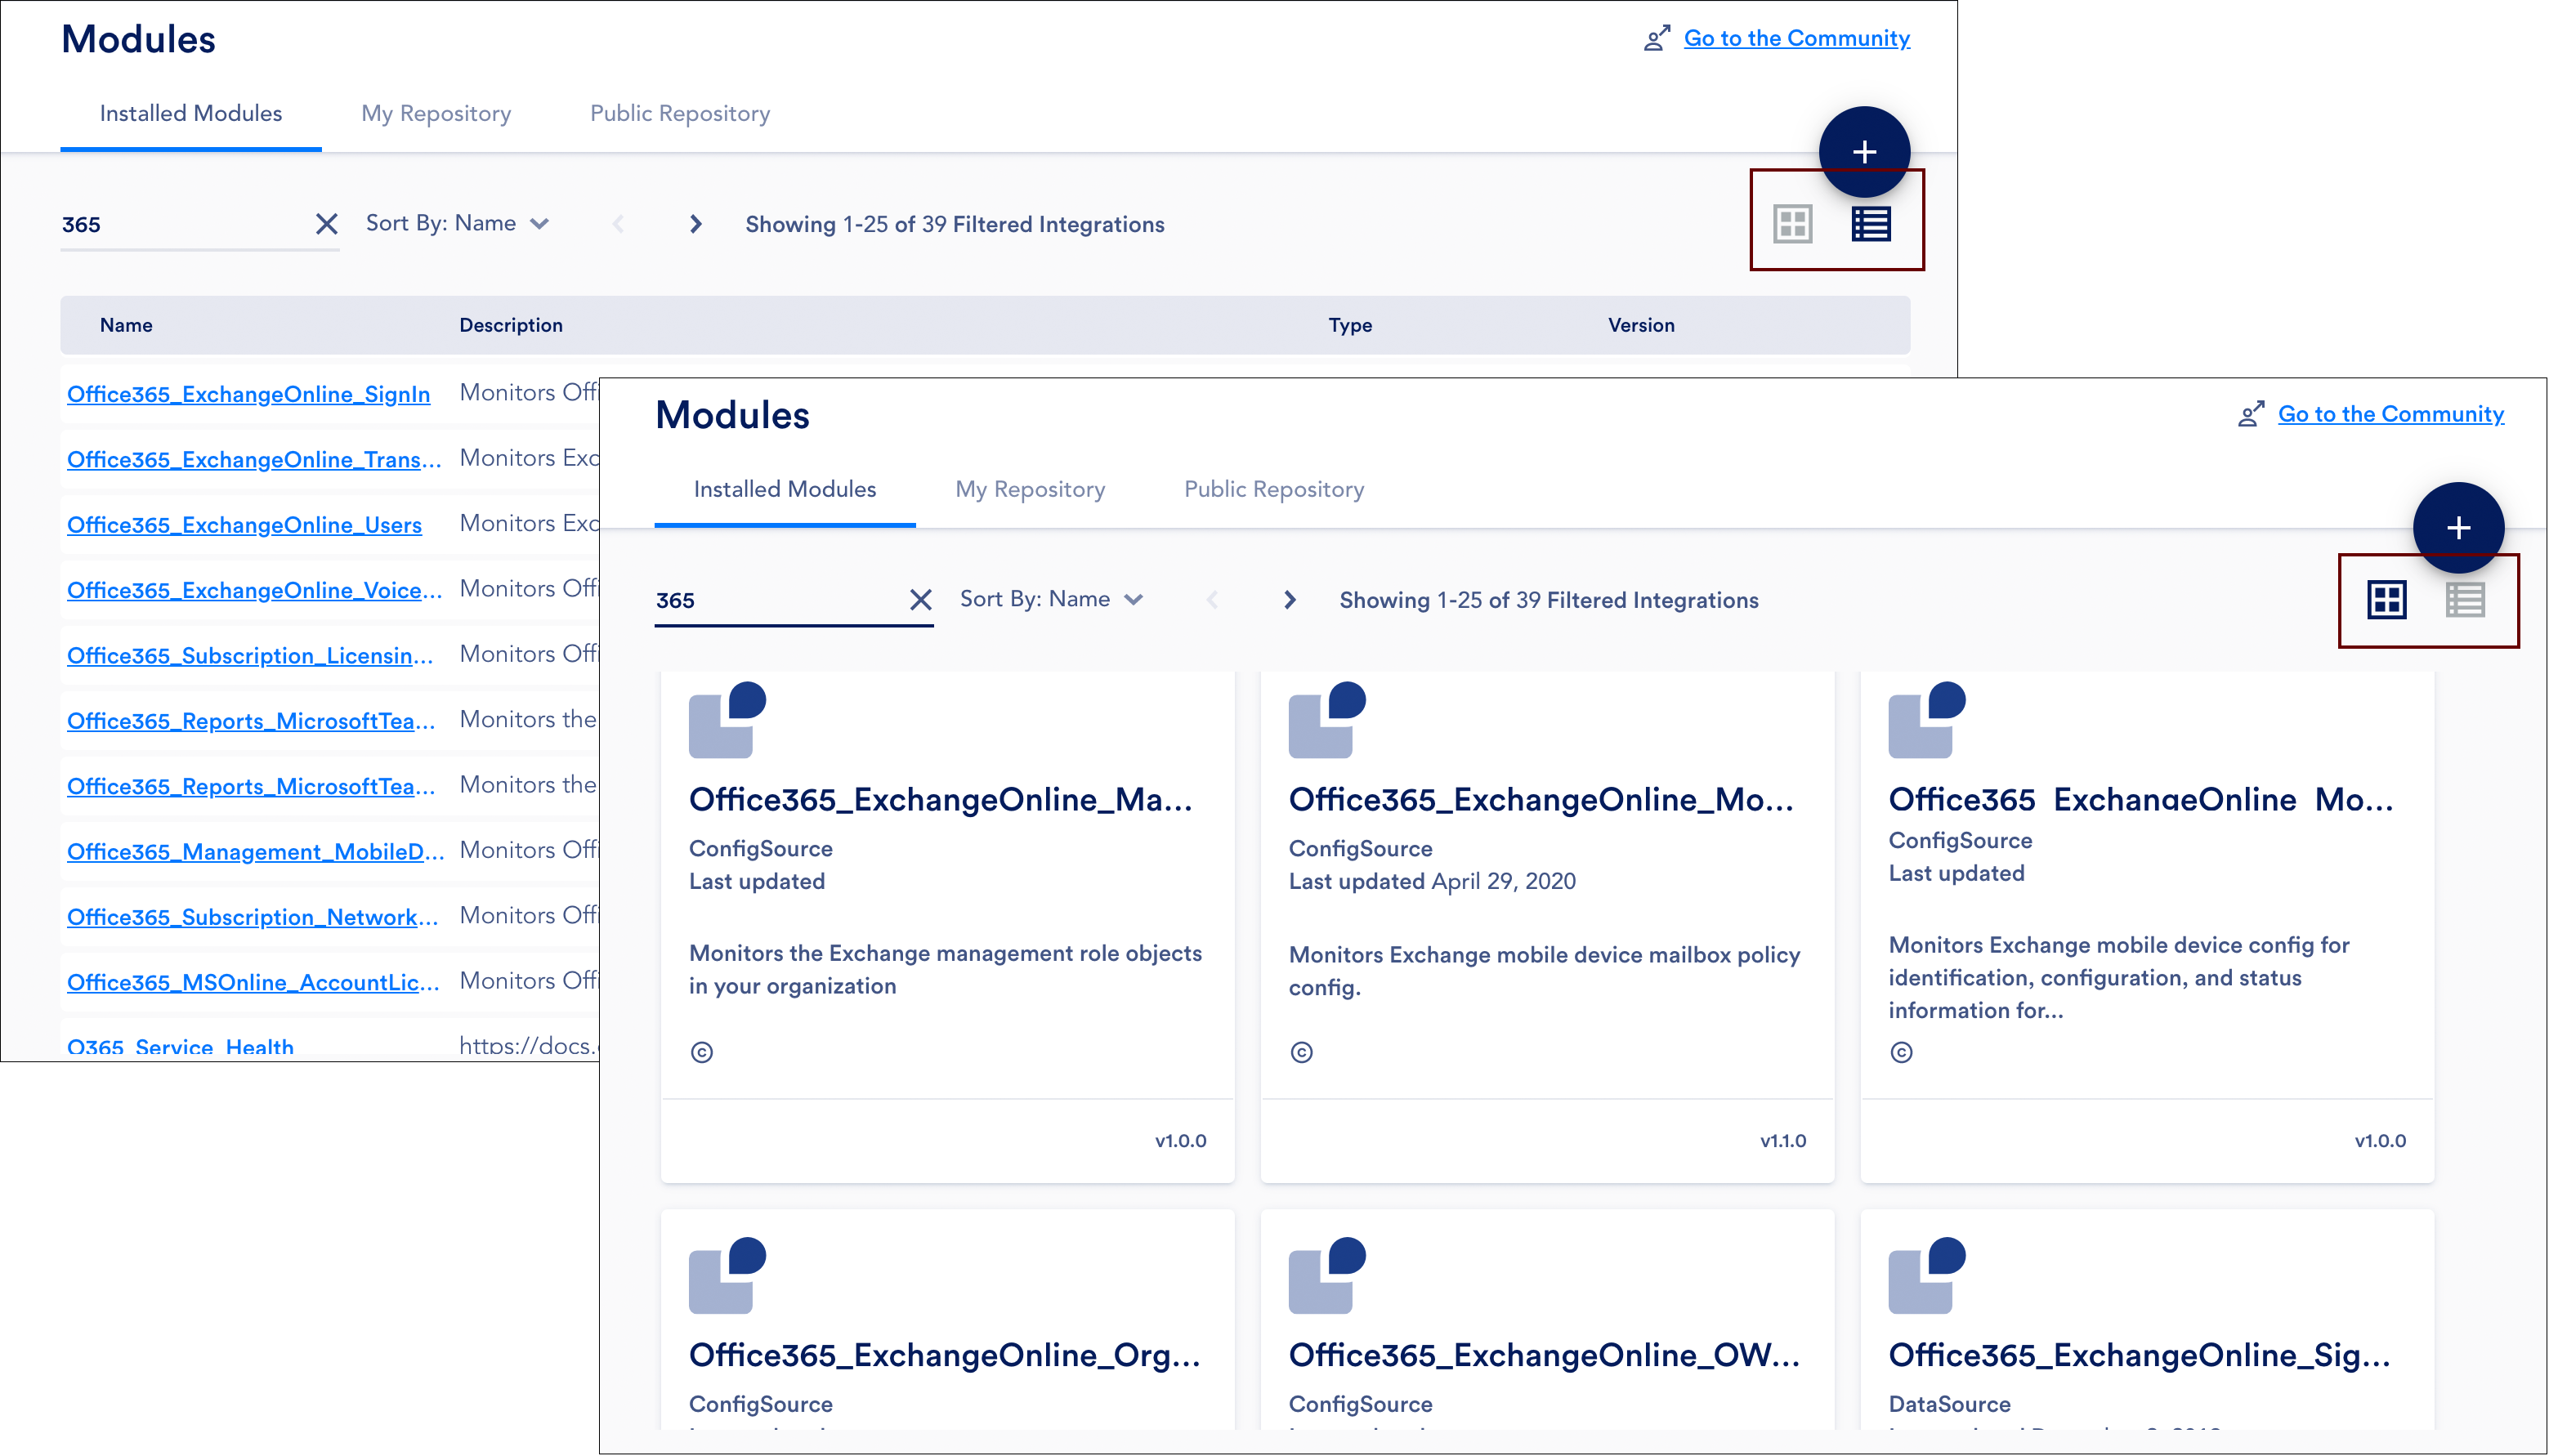
Table/Grid View
LogicModule results can be displayed using one of two views: the grid view or list view. Both views display summary information for each LogicModule and both views allow you to click the name of the LogicModule for additional details.
Expand/Collapse Packages
Only available in the Public Repository interface, the Expand/Collapse Packages toggle allows you to move between display of individual LogicModules and display of LogicModules as packages. For more information on packages, see the Understanding Packages section of this support article.
Results Per Page
All three interfaces feature a Results Per Page setting that allows you to change the default number of paginated results from 25 to 50 or 100, depending on the interface. Updates to this setting persist on a per-interface, per-user basis.