
Creating NetScans
Last updated on 01 April, 2024NetScans are processes in which LogicMonitor Collectors periodically look for and automatically discover devices in your network. NetScans streamline the adding of devices to your LogicMonitor account, which helps ensure your entire environment is properly monitored.
When setting up a NetScan, you can create a basic NetScan or advanced NetScan. A basic NetScan is simplified and intended for use during initial set up and by new users. An advanced NetScan has more options and supports additional methods for discovering devices.
Creating a Basic NetScan
To create a basic NetScan, select Settings | NetScans | Add | Basic NetScan. As shown (and discussed) next, there are several settings that must be established in order to create a basic NetScan.
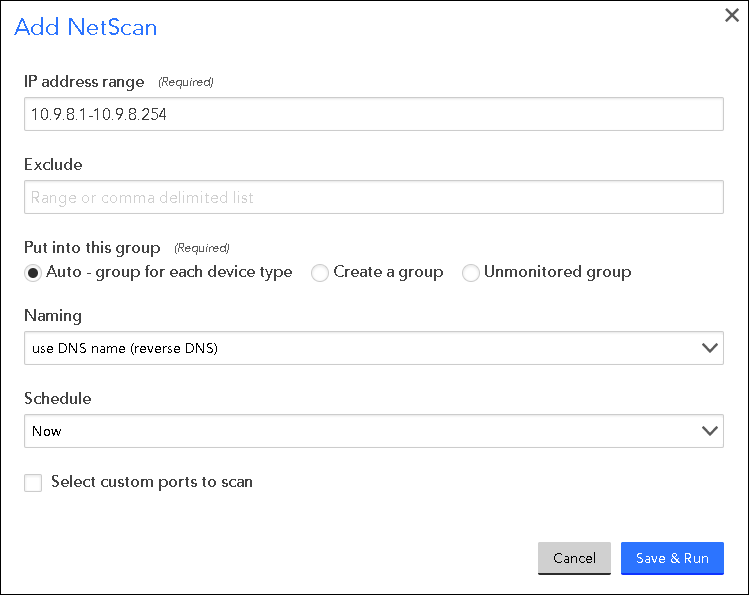
IP address range
In the IP address range field, enter the IP address range. The accepted syntax for this field is as follows:
- Hyphenated range like this: 10.9.8.2-10.9.8.240
- CIDR notation like this: 192.168.1.0/24 (i.e. 192.168.1.1 through 192.168.1.254)
- Comma separated list like this: 10.9.8.4, 10.9.8.8
- Mixture separated by commas like this: 10.9.8.2, 10.9.7.2-10.9.7.22, 10.9.6.0/24
Exclude
Optionally, use the Exclude field to specify a range and/or comma separated list of IP addresses to exclude.
Put in this group
Choose how you want LogicMonitor to group the devices (in the Device Tree) that it discovers using this NetScan. There are three options for auto-assigning discovered devices to designated groups:
- Auto – group for each device type. Recommended for new users, this option allows you to dynamically group devices based on the following types: Windows, Linux, VMware, Hyper-V, Network, SQL databases, Misc., NetApp, and EMC. These dynamic groups use AppliesTo scripting. As discussed in AppliesTo Scripting Overview, you can modify these script statements to suit your needs. The grouping process is tied to the Devices By Type parent resource group which contains the default dynamic groups. If you deleted these groups, they are restored if you select this option.
- Create a group. This option prompts you to create a new device group. All devices discovered via this NetScan will be placed into this group, regardless of their properties.
- Unmonitored group. This option places all discovered devices into the “Unmonitored Devices” group. Available from both the Device Tree and Settings | Unmonitored Devices, this group acts as a holding area from which you can decide which devices to add to monitoring.
Note: In addition to the device group option selected here, LogicMonitor will also automatically place newly discovered devices into any previously-created dynamic device groups with matching criteria. Devices cannot be manually added to dynamic groups, and are automatically removed when they no longer meet the auto-assign criteria. For more information on dynamic device groups, see Device Groups Overview.
Naming
From the Naming field’s dropdown menu, you can choose to either name discovered devices using DNS name (reverse DNS) which uses your DNS resolution, or IP address. If you choose the former, for best results, make sure your DNS is clean and accurate before starting a NetScan.
Schedule
For a basic NetScan, scheduling is greatly simplified. Choose either “Now” to run once, manually, or “Now and daily at 1am” to set a daily schedule. If you require a more sophisticated schedule, you’ll need to create an advanced NetScan.
Collector Group
Optionally selecting a Collector group here filters the following field to just those Collectors in the selected Collector group.
Collector
Select the Collector that will run the NetScan.
Note: The results of a NetScan can show the manufacturer of network interface based on MAC address lookup. This feature requires NPCAP which is available as an option during install beginning with Collector 25.3xx, or can be obtained separately and installed along with your existing Collector.
Select custom ports to scan
Check the Select custom ports to scan option if you would like to modify the global default list of ports. Often, if you know what TCP ports are open, it helps you determine what type of device it is (e.g. Windows usually has port 135 and 3389 open while Linux does not.
Creating an Advanced NetScan
To create an advanced NetScan, select Settings | NetScans | Add | Advanced NetScan. As shown (and discussed) next, there are several settings that must be established in order to create an advanced NetScan.
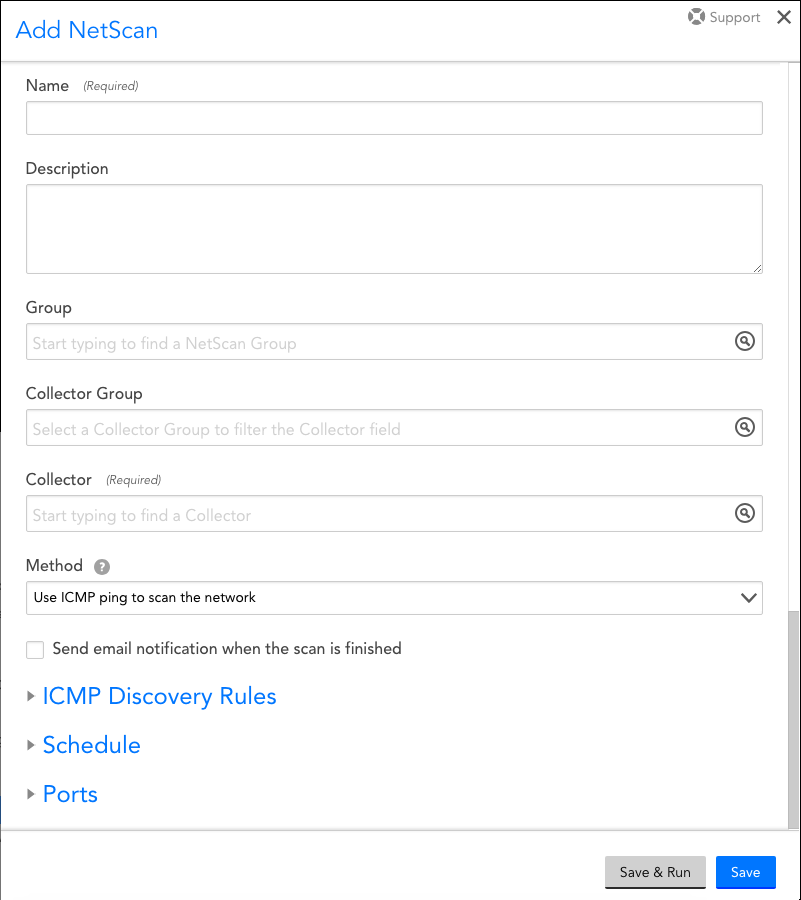
Name
Enter a unique name for your NetScan into the Name field. The search feature uses this field.
Description
Use the Description field to briefly describe the purpose and breadth of the NetScan
Group
From the Group field’s dropdown menu, indicate the NetScan group you would like your new NetScan to be a member of. You can select a group from a list of existing NetScan groups or you can select “Add new policy group” to create a NetScan group on the fly. If you leave the Group field blank, LogicMonitor will automatically classify it under the “@default” group.
Note: The group selected here does not impact the device group that discovered devices get assigned to in the Device Tree. Device group is determined further down in this dialog when you establish which discovered devices to include or exclude in monitoring.
Collector Group
Optionally selecting a Collector group here filters the following field to just those Collectors in the selected Collector group.
Collector
Select the Collector that will run the NetScan.
Method
From the Method field’s dropdown menu, select the discovery method you would like your advanced NetScan to use. There are three methods available:
- ICMP ping. The Internet Control Message Protocol (ICMP) method scans all IP addresses in the specified IP range for a ping response.
- AWS (EC2). This method discovers EC2 instances based on your AWS credentials.
- Script/CSV. This method uses the output of a script or the contents of a comma separated value file to add devices.
Upon selection, each of the above methods has unique configurations that dynamically display. These unique configurations are discussed in the final Unique Configurations Required for ICMP, AWS, and Script/CSV Discovery Methods section of this support article.
Send email notification when the scan is finished
Select the Send email notification when the scan is finished option if you would like someone to be alerted when the NetScan finishes. When this option is selected, another field appears allowing you enter one or more recipient email addresses.
Exclude duplicate IP addresses
Using one of the options available in the Exclude duplicate IP addresses dropdown menu, you can broadly or more narrowly exclude duplicate IP addresses:
- Matching any monitored Devices. This option automatically excludes any discovered devices from monitoring that have the same IP addresses as devices that are already being monitored in your portal.
- Matching Devices already discovered by this NetScan. This option excludes any discovered devices that have already been moved into monitoring via this particular NetScan.
- Matching Devices in these Device groups… This option excludes any discovered devices that have the same IP addresses as devices that are members of specific device groups. When this option is selected, an additional field displays allowing you to specify one or more device groups.
- Matching Devices currently assigned to these Collectors… This option excludes any discovered devices that have the same IP addresses as devices that are assigned to specific Collectors. When this option is selected, an additional field displays allowing you to specify one or more Collectors.
Rename Discovered Devices
For NetScans that employ either the ICMP or AWS discovery method, you can optionally choose to name discovered devices using a naming convention other than (or in addition to) LogicMonitor’s default DNS naming. To accomplish this, you can use a combination of text and tokens. The following tokens are supported:
- ##IPADDRESS##. The IP address of the device.
- ##SYSTEMNAME##. The system name, provided by the sysName OID if the device responds to SNMP. This requires that either the Inherit credentials from Device Group or Use custom credentials for this scan option is set in order to retrieve the SYSTEMNAME during the NetScan.
- ##REVERSEDNS##. The DNS name provided by your reverse DNS resolution (this is the default).
An example of using text and tokens in combination is adding a prefix to the devices IP address: Cisco_switch_##IPADDRESS##.
Note: When a NetScan adds unique devices with duplicate names, those devices will be added with display names set to IP_CollectorID.
Schedule
If you’d like to run the NetScan on a schedule (vs. running it ad hoc), check the Run this NetScan on a schedule option and, using the options that dynamically appear, designate an hourly, daily, weekly, or monthly schedule.
Ports
For NetScans that employ either the ICMP or AWS discovery method, you can modify the global default list of ports by selecting the Custom Ports for this NetScan option. Often, if you know what TCP ports are open, it helps you determine what type of device it is (e.g. Windows usually has port 135 and 3389 open while Linux does not.
Unique Configurations Required for ICMP, AWS, and Script/CSV Discovery Methods
While many of the NetScan configurations remain the same regardless of the type of discovery method chosen in the Method field, there are some configurations that are unique per method type. These unique configurations are discussed in detail in the following sections:
Unique Configurations for the ICMP Discovery Method
The ICMP ping discovery method pings and checks for specified open ports on all IP addresses you specify. As discussed next, there are several unique settings that must be configured, found under the “ICMP Discovery Rules” heading, when you use this method to perform NetScans.
Device Credentials
If you want to name your discovered devices using ##SYSTEMNAME## or you want to add only specified device types like Cisco, NetApp, etc then you must specify credentials that are used DURING the NetScan in order to detect device types.
Note: These properties/credentials are not set on the devices after the NetScan so it’s recommended that you also specify a destination group that already has the necessary credentials.
There are two options for specifying credentials used for detecting device types DURING the NetScan:
- Inherit credentials from Device Group. When this option is selected, select an existing device group whose properties/credentials will be used.
- Use custom credentials for this scan. When this option is selected, use the + button to add the properties/credentials that will be used.
- Add additional SNMP v3 Credentials
If there are large networks with different SNMP v3 credentials per device, and if the credentials and devices are not mapped, it is a time consuming task to match multiple devices with their credentials. In such scenarios, you can select Add additional SNMP v3 Credentials to let collector scan the device and identify the correct SNMP v3 credentials configured for it. You can add maximum 30 credentials per netscan. To use this feature the collector version must be EA 33.400 and later.
To add SNMP v3 credential set, select the Add button and add SNMP v3 credential details.

You have to enter valid details in the Display Name, snmp.security, and snmp.authToken mandatory fields. If the optional fields are kept empty, collector will populate them with the default values, such as SHA for snmp.auth and AES for snmp.priv.
When LogicMonitor performs netscan, the credentials are checked against every device found under the specified IP range. For example, you have added 30 credentials and specified an IP range for 10 devices. For every device, collector will check the 30 credentials. Note that at the device level, collector will exit the credential match operation when it finds the first match.
Warning: This process involves brute force to find matching credentials. For example, you have added 30 credentials. In cases where collector does not find a match during initial attempts, then in such cases collector will hit every device 30 times to check if the credentials match. This might impact your ongoing processes or your account might get blocked after crossing a set limit of attempts. We recommend that before using this feature, you check your infrastructure and firewall settings to allow collector to make multiple attempts.
Once found, correct credentials are reported and updated on respective device’s host properties. Collector will later use the credentials to perform SNMP based data collection on the devices.
Note: There is a possibility that all 10 devices can have 10 different credentials or 5 devices can have one credential which is common and rest of them can have different credentials. If the credentials do not match, it is noted in the logs. In cases where a device exists but there is no information about it, or we are unable to monitor it, the device is placed under minimal monitoring.
IP address range
In the IP address range field, enter the IP address range. The accepted syntax for this field is as follows:
- Hyphenated range like this: 10.9.8.2-10.9.8.240
- CIDR notation like this: 192.168.1.0/24 (i.e. 192.168.1.1 through 192.168.1.254)
- Comma separated list like this: 10.9.8.4, 10.9.8.8
- Mixture separated by commas like this: 10.9.8.2, 10.9.7.2-10.9.7.22, 10.9.6.0/24
Specify IP addresses to exclude from the Subnets range
Check the Specify IP addresses to exclude from the Subnets range option if you would like to exclude any IP addresses. You can exclude a single range of IP addresses and/or several IP addresses separated by commas.
Ignore system.ips when checking existing devices for duplicates
The Ignore system.ips when checking existing devices for duplicates option, when checked, allows for discovery of devices that share an IP with a device already in monitoring, as determined by the system.ips property. If this option is left unchecked, a device that shares the same IP as one captured for an existing device’s system.ips property is considered to be a duplicate and not discovered.
Exclude duplicate IP addresses
This configuration is not unique to the ICMP discovery method and, therefore, is discussed earlier in this support article. You can find details for the various exclusion options available from this field’s dropdown menu here.
Included/Excluded Devices
By default, LogicMonitor will include all discovered devices and automatically assign them to the “Unmonitored Devices” group, which is a default LogicMonitor group that acts as a holding area from which you can manually decide which devices to add to monitoring. But you can override this setting to change what devices are included, what groups these devices are assigned to, and/or specify what devices should be excluded.
Devices can be included or excluded based on device type (Cisco, Linux, Windows, NetApp) or using a custom query. The properties supported for custom queries are a subset of those typically available with AppliesTo scripting, including:
- system.devicetype
- system.hostname
- system.ips
- properties set by the LogicMonitor auto-properties feature: system.sysoid, system.sysinfo, etc.
You can create as many sets of inclusion and exclusion criteria as needed by clicking the + icon, as shown next.
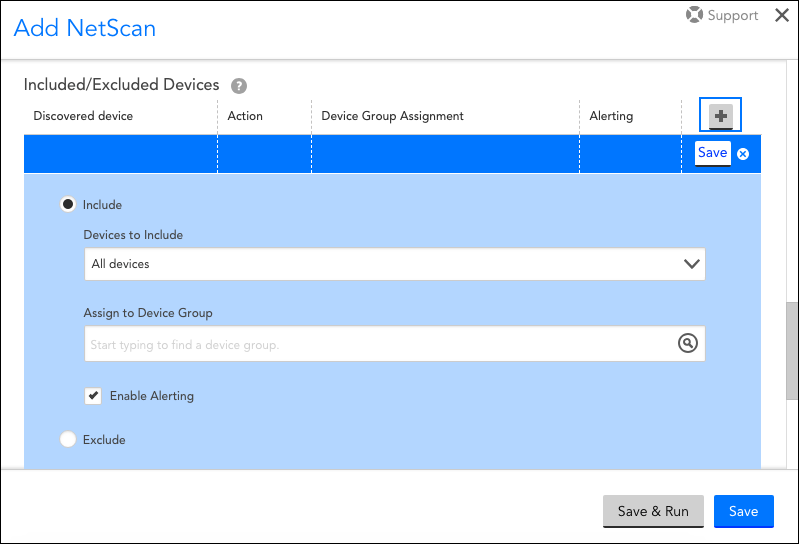
For each set of inclusion criteria you create, you’ll also specify which device group the discovered devices should be assigned to. Note that dynamic device groups are not available for selection here because discovered devices cannot be manually added to dynamic device groups. However, LogicMonitor will automatically place newly discovered devices into any previously-created dynamic device groups with matching criteria (in addition to the group selected here). For more information on dynamic device groups, see Device Groups Overview.
In addition to setting a device group for each set of device inclusion criteria, you also have the option of disabling alerting for that set by unchecking the Enable Alerting option.
Note: Rules for excluded devices will be prioritized over rules for included devices.
Rename Discovered Devices
This configuration is not unique to the ICMP discovery method and, therefore, is discussed earlier in this support article. You can find details for the various alternate naming convention options that are available here.
Unique Configurations for the AWS Discovery Method
The AWS discovery method discovers EC2 instances based on your AWS credentials. As shown (and discussed) next, there are several unique settings that must be configured, found under the “AWS (EC2) Options” heading, when you use this method to perform NetScans.
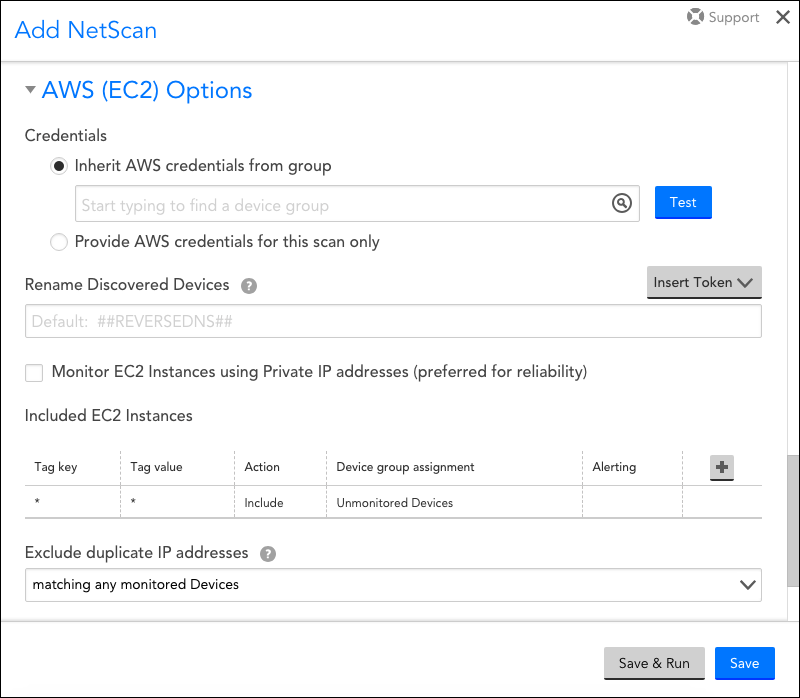
Credentials
There are two options for auto-assigning device credentials to devices discovered with this NetScan:
- Inherit AWS credentials from group. When this option is selected, select an existing device group that already has your AWS credentials assigned. The selected device group’s credentials will automatically be applied to the devices discovered by this NetScan, and will enable the discovery of EC2 tags and other resource information (e.g. instance state, type, etc.) if the associated Collector is version 22.142 or higher.
- Provide AWS credentials for this scan only. When this option is selected, you will be prompted to manually provide both your AWS access key ID and secret access key.
Note: Providing one-time credentials here will not result in the discovery of EC2 tags or other resource information, as this requires credentials set as device properties.
Rename Discovered Devices
This configuration is not unique to the AWS discovery method and, therefore, is discussed earlier in this support article. You can find details for the various alternate naming convention options that are available here.
Monitor EC2 Instances using Private IP addresses
If this option is checked, EC2 instances will be added into monitoring via their private IP addresses. Private (machine) IPs are preferred for reliability, but require a Collector to be running in the EC2 cloud.
Include EC2 Instances
By default, LogicMonitor will include all discovered devices and automatically assign them to the “Unmonitored Devices” group, which is a default LogicMonitor group that acts as a holding area from which you can manually decide which devices to add to monitoring. But you can override this setting to change what devices are included, what groups these devices are assigned to, and/or specify what devices should be excluded.
Devices can be included or excluded based on tag filters, which consist of a tag key and associated value. For example, as shown in the next screenshot, you could specify that all discovered devices with the tag key of “Billing” and tag value of “TechOps” be assigned to device group titled “SB Network”.
Notes about tag filters:
- You can use glob expressions with the tag filter (e.g. tag value = prod*)
- Multiple filters will be logically connected with an OR statement
- The tag filter is case sensitive
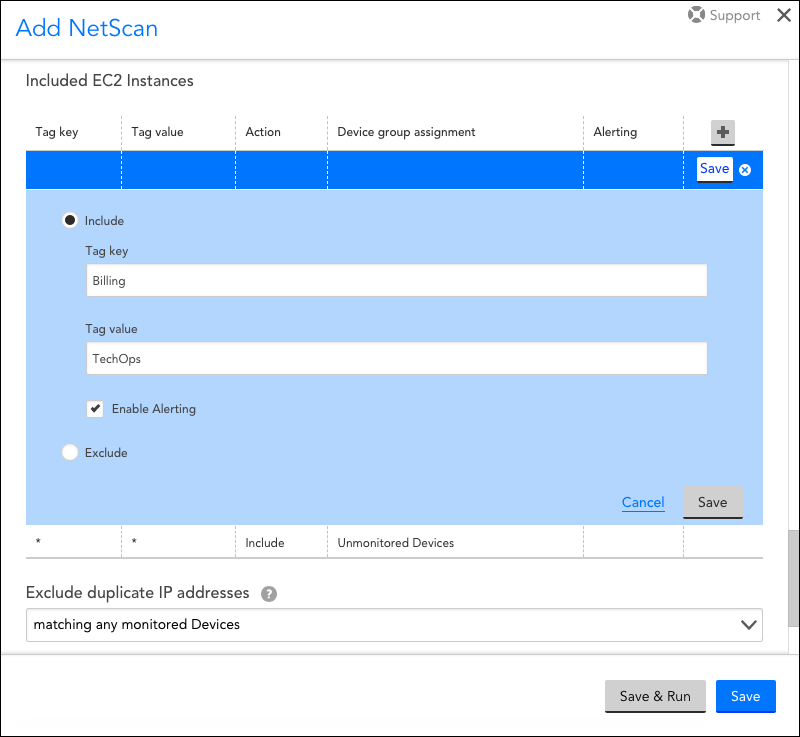
You can create as many sets of inclusion and exclusion criteria as needed by clicking the + icon. For each set of inclusion criteria you create, you’ll also specify which device group the discovered devices should be assigned to. Note that dynamic device groups are not available for selection here because discovered devices cannot be manually added to dynamic device groups. However, LogicMonitor will automatically place newly discovered devices into any previously-created dynamic device groups with matching criteria (in addition to the group selected here). For more information on dynamic device groups, see Device Groups Overview.
In addition to setting a device group for each set of device inclusion criteria, you also have the option of disabling alerting for that set by unchecking the Enable Alerting option.
Note: Rules for excluded devices will be prioritized over rules for included devices.
Exclude duplicate IP addresses
This configuration is not unique to the AWS discovery method and, therefore, is discussed earlier in this support article. You can find details for the various exclusion options available from this field’s dropdown menu here.
Unique Configurations for the Script/CSV Discovery Method
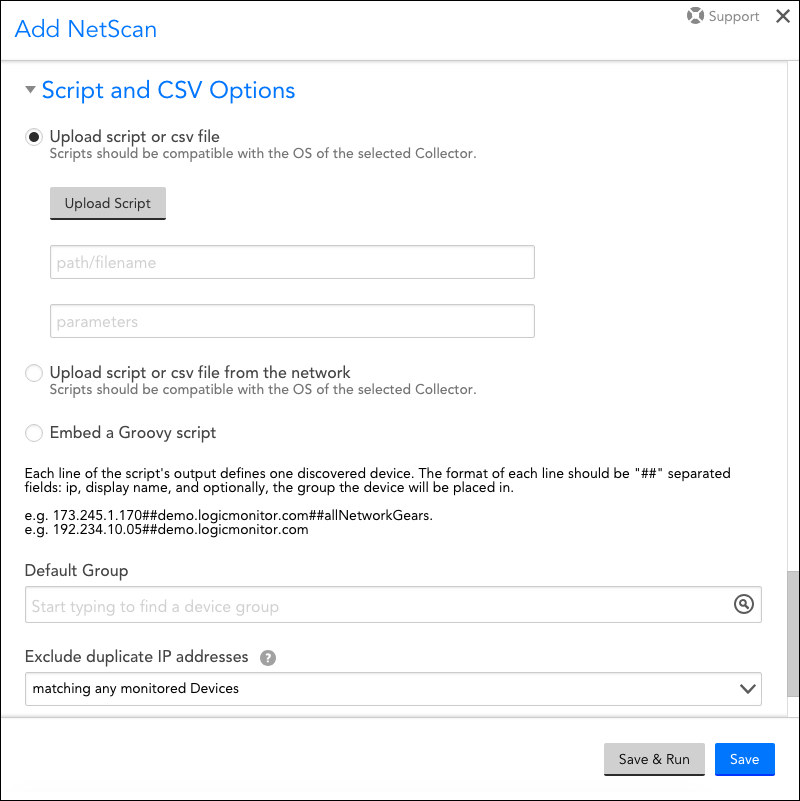
The script/CSV discovery method lets you use a script or CSV file to specify which devices are added. This allows you to retrieve devices from a configuration database or other repository. As shown (and discussed) next, there are several unique settings that must be configured, found under the “Script and CSV Options” heading, when you use this method to perform NetScans.
Note: If your script takes more than five minutes to complete and results in a Stream closed exception/Timeout exception, you can extend the script timeout value using the netscan.script.timeout.inSeconds Collector setting. This setting is set to 300 seconds by default. As discussed in Editing the Collector Config Files, this setting must be updated from the agent.conf file of the Collector assigned to the NetScan.
Script Requirements
The output of your script should list the devices in the following format, one line per device:
IP##DISPLAYNAME##[PROP_1=VALUE_1]##[HOST_GROUP]For script output, only IP and DisplayName are required. The script can optionally specify a set of properties and their values for each device, and optionally place the device into a device group. The group field, if present, must be the last field and must specify a device group that already exists in order to add the device to it. If the group does not exist, the device will not be added. For example, the following script output would add a device with the following attributes:
println "10.9.8.7##host1.somewhere.com##snmp.community=notpublic##location=Atlanta##testgroup"- IP: 10.9.8.7
- DisplayName: host1.somewhere.com
- Device Property 1: snmp.community=notpublic
- Device Property 2: location=Atlanta
- Device Group: testgroup
External Script Files
For an external script file, you must:
- Upload the script.
- Specify the path to the uploaded script to be used by Linux and/or Windows Collectors. The path must be local to the Collector using the script.
- Specify any parameters needed by the uploaded script. The parameters can be passed by a combination of positional arguments and named options. If both are used, options should be passed in first, then arguments (e.g. opt1=xxx opt2=yyy argument1 argument2).
Note:
Embed a Groovy Script
To embed a Groovy script:
- Enter the code for your Groovy script.
- Specify any parameters required by your script. The parameters can be passed by a combination of positional arguments and named options. If both are used, options should be passed in first, then arguments. (e.g. opt1=xxx opt2=yyy argument1 argument2).
CSV File Requirements
The process for running a NetScan that uses a CSV file is nearly identical to that of a script-based NetScan. Since most CSV files are static, you cannot schedule a CSV NetScan.
Your CSV files must meet the following requirements:
- The first line of the CSV file must be your column headers. There are four valid headers: “IP”, “displayname”, “hostgroup”, and “properties”. Both “IP” and “displayname” are required column headers.
- If hostgroup is specified, it must use the full group path.
- Multiple properties for any given resource can be added. These must be line-separated in the “properties” column and the entire property field enclosed in double quotes, as shown in the following example.
IP,displayname,hostgroup,properties 10.0.0.10,Device from CSV,New Target Group,"prop.one=firstproperty prop.two=secondproperty" 10.0.0.11,Another Device from CSV,New Target Group,"prop.one=firstproperties prop.two=secondproperties" - Within the key-value pairing, the value can contain “=”. For example, the notation “A=B=C” represents a key=value property in which “A” is the key and “B=C” is the value.
- As long as required headers “IP” and “displayname” are properly configured, a device will be added to your account even if properties are misconfigured.
- By nature of CSVs being separated by commas, if you want to include a comma within an individual CSV cell, you must surround that cell with double quotation marks.
- In the rare event that you need to include quotes within a cell, they must be escaped by surrounding the quotes with another set of double quotes per CSV standards, as shown in the following example.
IP,displayname,hostgroup,properties 10.0.0.10,Device from CSV,New Target Group,"prop.one=""firstproperty"" prop.two=""secondproperty""" - If a cell includes a multi-line string, the entire string should be surrounded by double quotes.
- Once added into your account, the prefix “system.” will be removed from the device’s properties. System auto-properties are the exception to this rule, including: system.ips, system.sysinfo, system.sysoid, system.db.mysql, system.db.mssql, system.db.oracle, system.db.db2, system.ec2.resourceid, system.ec2.region, and system.virtualization’. If the prefix “systems” is absent from these properties, it will be appended to them upon discovery.
Note: LogicMonitor provides a CSV NetScan template, available for download here.
Default Group
In the Default Group field, specify which device group the devices should be assigned to. Note that dynamic device groups are not available for selection here because discovered devices cannot be manually added to dynamic device groups. However, LogicMonitor will automatically place newly discovered devices into any previously-created dynamic device groups with matching criteria (in addition to the group selected here). For more information on dynamic device groups, see Device Groups Overview.
Exclude Duplicate IP Addresses
This configuration is not unique to the script/CSV discovery method and, therefore, is discussed earlier in this support article. You can find details for the various exclusion options available from this field’s dropdown menu here.