
Single Sign On
Last updated on 08 March, 2024LogicMonitor’s Single Sign On (SSO) solution enables administrators to authenticate and manage LogicMonitor users directly from their Identity Provider (IdP). This simplifies the login process and password management while providing the ability to take advantage of all of your IdP’s security features and efficiencies.
LogicMonitor’s SSO can work with any SAML 2.0 compatible IdP. In short, this enables LogicMonitor and your IdP to verify one another via a handshake, and to share user authentication information via SAML assertions. The exchange looks something like this (with LogicMonitor as the Service Provider):
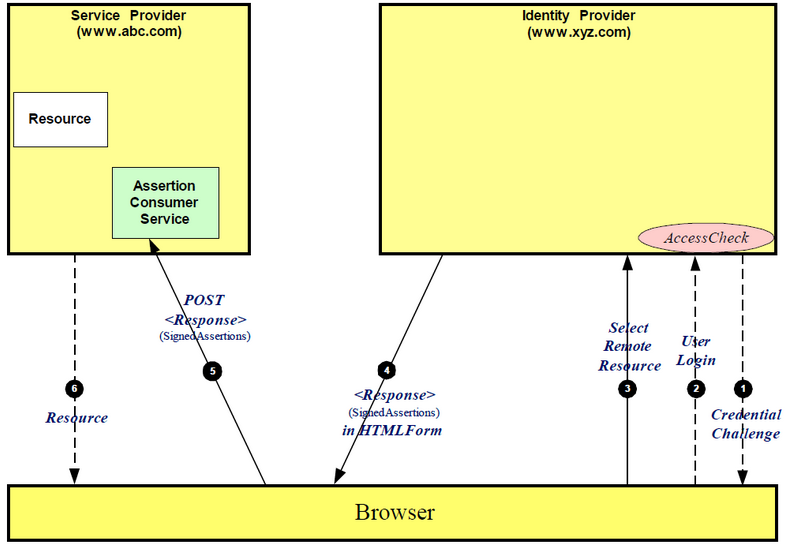
The exchange can also be initiated from LogicMonitor. In terms of the user experience, in IdP initiated the user will login to your IdP and launch LogicMonitor directly from there. In the Service Provider flow, users can go directly to company.logicmonitor.com and we will either verify they are logged in with the IdP or redirect them to do so.
Enabling SSO
Enabling SSO in your LogicMonitor account will not impact existing users, but will allow you to test the integration.
- Select the Enable Single Sign On setting from Settings > User Access > Single Sign On.
- Download the Service Provider Metadata. You will need to upload this to your IdP.
- Configure your IdP. All required information should be present in the Service Provider Metadata. See the “IdP Configuration” section for more details.
- Download your IdP metadata. You will need to upload this to your LogicMonitor portal.
After the IdP metadata has been uploaded to your LogicMonitor account, you can test the integration.
IdP Configuration
The following fields are common to IdP configuration:
- EntityID: https://companyname.logicmonitor.com
- LoginURL, Recipient, or Assertion Consumer Service: https://companyname.logicmonitor.com/santaba/saml/SSO/
- PostBack URL: https://companyname.logicmonitor.com/santaba/rpc/ssoSignIn?func=idpSso&c=testcompany
- Force Authentication: Yes
- Name ID Format: Email Address
- Group Name: https://www.logicmonitor.com/saml/roles
- Response: Signed
- Assertion: Signed
- Request: Compressed
- MaxAuthenticationAge: Some IdPs allow users to stay authenticated for a specified amount of time by setting a value (in seconds) for this field
From the user’s IdP, you can auto-populate the following attribute names:
- Email Address: The URI for a claim that specifies the email address of an entity, http://schemas.xmlsoap.org/ws/2005/05/identity/claims/emailaddress
- Given Name: The URI for a claim that specifies the given name of an entity, http://schemas.xmlsoap.org/ws/2005/05/identity/claims/givenname
- Surname: The URI for a claim that specifies the surname of an entity, http://schemas.xmlsoap.org/ws/2005/05/identity/claims/surname
- Phone: Phone
- For Roles, the following formats are accepted:
- “http://schemas.microsoft.com/ws/2008/06/identity/claims/role”
- “http://logicmonitor.com/saml/roles”
- “memberof”
- “groups”
- “group”
- “roles”
- “role”
Configuring Microsoft Azure AD Idp
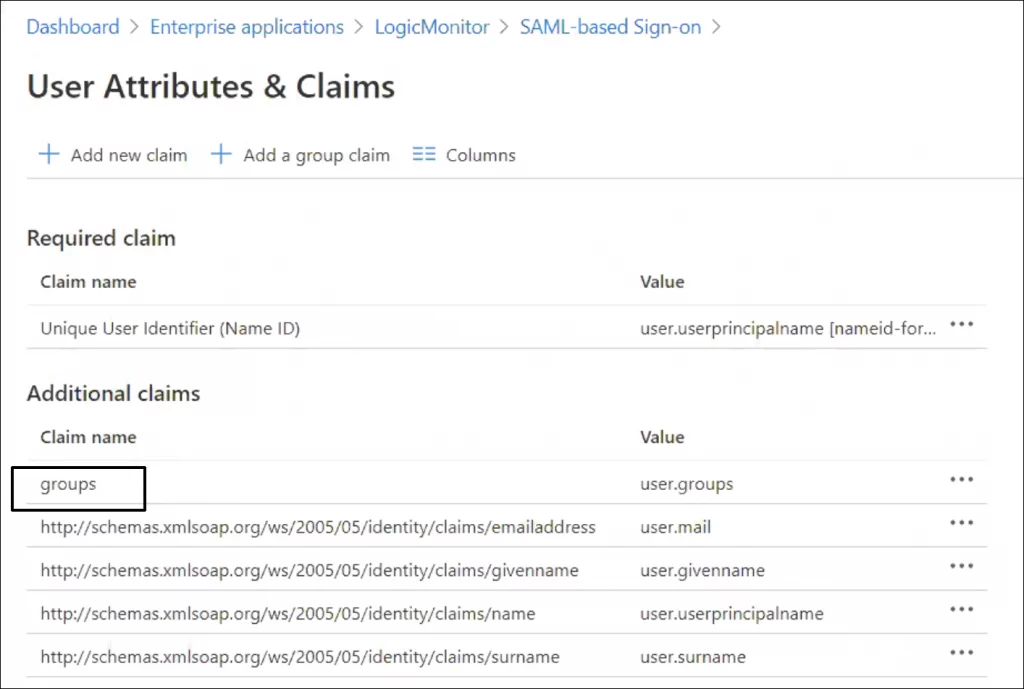
If you are using the Microsoft Azure Active Directory (AD) IdP, you must rename the outgoing group claim attribute name from “http://schemas.microsoft.com/ws/2008/06/identity/claims/groups” to “groups” to ensure the attribute is recognized by LogicMonitor and roles are assigned appropriately. This is done from the LogicMonitor application on Azure AD and is only available for on-premise environments with Azure AD Connect synchronization enabled.
After successful customization of the group claim attribute, the User Attributes & Claims display should look similar to the following:
Recommendation: The number of groups emitted in a token is limited to 150 for SAML assertions, including nested groups. In large organizations this number might be exceeded which can lead to issues when users log in to LogicMonitor. For more information, see this Microsoft Azure documentation.
Do the following to avoid issues with the SAML assertion limit imposed by Azure IdP: Use the option “Groups assigned to the application” and assign the groups that the application will be checking under the section “Users and Groups” for the application.
Configuring ADFS
The general procedure of the SSO configuration is the same for all Identity Providers (IdPs). The following describes how to configure ADFS.
- Confirm ADFS 2.0 is installed, the default ADFS version is 1.0. ADFS 2.0 can be downloaded here: https://www.microsoft.com/en-us/download/details.aspx?id=10909.
- For more information on installing and deploying ADFS, see https://technet.microsoft.com/en-us/library/dn486820.aspx.
- Download the SP metadata from your LogicMonitor account (Settings > Single Sign On > Service Provider Metadata > Download).
- In the Microsoft Management Console, select Add Relying Party Trust. Select Import data about the relying party from a file and select the SP metadata file. Click Next.
- Leave Open the Edit Claim Rules dialog option checked and finish the wizard.
- Select Add Rule, choose Send LDAP Attributes as Claims and click Next.
- Set any name as “Claim rule name” and choose Active Directory as Attribute store.
- Map the LDAP attributes with the LDAP Attribute and Outgoing Claim Type pairs. For attributes and type values, see mapping table in the following.
- Important-Open the provider by double-clicking it, select tab Advanced and change “Secure hash algorithm” to SHA-1 or higher.
- Upload your IdP metadata (downloaded from https://[NameOfYourADFSServer]/FederationMetadata/2007-06/FederationMetadata.xml) to your LogicMonitor account. Metadata files must be under 64KB. ADFS will occasionally include unnecessary information, if your file is over 64KB please remove any SPSRoleDescriptor and Role Descriptor information. The Entity information and IDPSSODescriptor section are required.
Mapping of LDAP Attributes and Outgoing Claim Type
Note: This configuration will have ADFS look for LogicMonitor usernames that match SamAccount-Name, so LM usernames need to be consistent with SAMAccount-Names. If you’d prefer to match email addresses instead, you can omit the SAMAccount-Name mapping and include a second E-Mail-Addresses rule with Name ID as the outgoing claim.
| LDAP Atribute | Outgoing Claim Type |
| SAM-Account-Name | Name ID |
| Token-Groups – Unqualified Names | Role |
| E-Mail-Addresses | E-Mail Address |
Note: There is a known issue with Chrome and ADFS authentication. To use Chrome for authentication, disable “Extended Protection” for the ADFS web portal. Do the following to turn off Extended Protections on your ADFS server:
1. Launch IIS Manager.
2. Select Sites > Default Web Site > ADFS > ls.
3. Double-click the Authentication icon, right-click Windows Authentication, and select Advanced Settings.
4. On the Advanced Settings dialog, choose Off for Extended Protection.
Enabling SLO
LogicMonitor’s SSO integration includes support for the SAML Single Logout (SLO) protocol. When SLO is enabled, a logout initiated from the LogicMonitor portal will not only trigger the IdP to sign out the user from LogicMonitor, but from all SSO application to which that user is currently signed on.
SLO functionality can be enabled from the same dialog in which SSO is configured by checking the Enable Single Logout option. This checkbox is only available for selection once accurate IdP metadata has been uploaded.
Note: SLO has been implemented in accordance with the SAML v2 specification. Although functionality has been validated with several standards-based IdPs, we cannot guarantee compatibility with all IdPs as some don’t support the SAML specification in its entirety.
Creating and Updating Users via SSO
LogicMonitor and SAML Roles
By default, a role is marked as a LogicMonitor role.
When a user logs in to LM with a role in SAML assertion and that role matches with the role in LM, then the role will be updated to a SAML role, if it is not updated earlier.
- In other words, a LogicMonitor role is considered as a SAML role when it matches exactly with a role present in IDP.
- Once a role is marked as SAML role, it cannot be reverted to LogicMonitor role.
For an existing user (SAML user), in addition to the roles coming from SAML assertion, the admin can assign roles that are specific to LogicMonitor.
Creating Users via SSO
A new user can initiate a user session in LogicMonitor in the following way:
- The user account does not exist and a role attribute (memberof, role, group, or groups) is included in the SAML assertion. The user is created with the corresponding role(s) as long as they are an exact match in LogicMonitor roles.
- For a new user where the user account does not exist and no role attribute is included in the SAML assertion, the user is created and the default role (configured in the SSO Settings) is assigned.

Note: New user accounts will be placed in the default “Ungrouped” user group.
Updating Users via SSO
An existing user (SAML user) can initiate a user session in LogicMonitor in the following way:
- The user account already exists in LogicMonitor. In this case, your identity provider (IdP) user matches a LogicMonitor SAML username. (If you set NameID format to email, then your LogicMonitor username will be an email address.)The user’s existing LogicMonitor roles are respected for the session. If an LM administrator manually changes the user’s LogicMonitor role, then both the new LogicMonitor role and the one from the SAML assertion will be present.
- For an existing user (SAML user) who does not have LogicMonitor roles, has existing SAML roles, and does not have role attributes included in SAML assertion, the default role (configured in the SSO Settings) is assigned to the user. See the image in Creating Users via SSO section.
- SAML roles in LogicMonitor are updated according to the IDP roles. As a result,
- The existing SAML user’s LogicMonitor roles will be retained.
- The previously existing SAML roles present in LogicMonitor but not coming in the current SAML assertion will be discarded.
- The existing SAML users will have the existing LogicMonitor roles and SAML roles coming from SAML assertion.
| Existing LogicMonitor roles | Existing SAML roles | Roles coming from current SAML assertion | Final role assigned | |
| Existing User (SAML user) | Role is retained. Example, Administrator role. | Discarded if not present in the current SAML assertion. Example, Role B | Role is assigned if it exactly matches with the SAML role present in LogicMonitor. Example, Role A and Role C | Administrator, Role A, and Role C |
| Existing User (SAML user) | None assigned | Assigned. Example, Role B | None | Default role (configured in the SSO Settings) |
| New User | NA | NA | Role is assigned if it exactly matches with the SAML role present in LogicMonitor. Example, Role C (matches), Role D (doesn’t match) | Role C |
| New User | NA | NA | Empty SAML assertion or none of the roles exactly match with the SAML role. | Default role (configured in the SSO Settings) |
Enforcing SSO
To force users to authenticate with your Identity Provider, select Restrict Single Sign On. If users visit https://companyname.logicmonitor.com, we will check to see if they have an active IdP session. If not, they will be redirected to login. There is an alternative way for administrators to access the account in the case there is an issue with your IdP. Contact support for details.
Note: Restricting Single Sign On disables the ability to enforce 2FA. In addition, when using LogicMonitor’s REST API, users are able to authenticate API requests via username/password or API tokens.

IdP Partners
You can integrate your LogicMonitor environment with a variety of SaaS Identity Providers, including Microsoft, OneLogin, PingIdentity, Centrify, Bitium and Okta.
Supported Role Formats
A role string from SAML assertion is parsed into roles. LogicMonitor supports three types of role formats:
- Simple format – The role string contains a simple role name. Multiple roles that are assigned to a user via SAML assertion are separated by a semicolon. For example,
admininstrator-Network;Manager - ADFS qualified group format – In the qualified role string, for example
domain\group1, the rolegroup1is parsed. - OneLogin
memberofformat – The role string is parsed into 4 roles:Administrators,everyone1,group1, andreadonlyCN=Administrators,CN=Builtin,DC=lmcddomain,DC=com;CN=everyone1,OU=Groups,OU=gawain-test,DC=lmcddomain,DC=com;CN=group1,OU=Groups,OU=gawain-test,DC=lmcddomain,DC=com;CN=readonly,OU=Groups,OU=gawain-test,DC=lmcddomain,DC=com;