Keeping your .NET Core versions in sync is key to avoiding build errors and deployment failures. It’s not only about what’s installed on your machine—your project file, runtime environment, and CI/CD pipeline all need compatible versions to work smoothly.
Even small mismatches between SDKs or runtimes may cause frustrating errors or unexpected behavior during development.
Different environments often default to different versions. And unless you’re explicitly managing them, those differences may go unnoticed until something disrupts.
In this article, we’ll show you how to check your current .NET Core version, use commands, and set up your environment to avoid version conflicts
TL;DR: Knowing your .NET Core latest version is essential, but managing it across every environment is what keeps your builds working.
As of mid-2025, the most recent stable releases are .NET 9.0.9 (STS) and .NET 8.0.20 (LTS). If you’re still on unsupported versions (e.g. .NET 5 or 3.1), it’s time to upgrade.
If you’re on unsupported versions (e.g., .NET 5 or 3.1), upgrade.
Align your development, CI/CD, and production environments to prevent build failures due to version mismatches.
Mastering versioning and upgrade paths prevents errors and accelerates deployments.
What Developers Get Wrong About .NET Core Versions
Just knowing your installed SDK version isn’t always enough. .NET uses a mix of SDKs, runtimes, and project target frameworks, each with its own version. And what your machine runs isn’t always what your project expects.
As a result, builds break, deployments fail, and commands to check the version don’t always show what’s actually being used.
Here are a few reasons version conflicts still catch developers off guard:
Your project might target a different version than what’s installed.
Runtimes and SDKs have separate versioning, and your system may have one but not the other.
global.json can silently pin your project to an older SDK.
In CI or production, the wrong runtime might get pulled by default.
Roll-forward behavior can change the SDK or runtime selected at build or run time.
To manage this, you need to understand what’s installed, what your project expects, and how the .NET CLI resolves it.
Let’s start with checking what SDKs and runtimes are actually available on your system.
.NET Core Latest Version Overview
The latest stable release of .NET (formerly known as .NET Core latest version) is .NET 9, released on November 12, 2024. It’s classified as a Standard Term Support (STS) version, not LTS.
.NET 10 is currently in Release Candidate (RC) status and not recommended for production use yet.
.NET Core was first introduced in 2016 as a cross-platform, open-source alternative to the .NET Framework. It enabled developers to build and run apps on Windows, macOS, and Linux, and laid the foundation for modern cloud-native and containerized development.
Starting from .NET 5, Microsoft unified the branding under a single “.NET” name, dropping the “Core” suffix. Despite the change, the ecosystem still supports apps built on older versions like .NET Core 3.1, which remains common in legacy projects, even though it’s now out of support.
Developers often run into issues when trying to execute older projects on newer SDKs, or vice versa.
For example:
Installing .NET Core 3.1 while running a project built for .NET Core 2.2 might result in SDK errors.
If the right SDK isn’t installed, the CLI may throw messages like “The SDK ‘Microsoft.NET.Sdk’ specified could not be found.”
This is why it’s critical to:
Use dotnet –list-sdks to view what SDKs are installed
Pin SDKs with a global.json file to maintain consistent behavior across local and CI environments
Understanding how .NET Core evolved and why SDK compatibility matters helps reduce time spent debugging version mismatches, especially in enterprise or DevOps environments.
.NET Core Versioning Scheme
.NET’s versioning follows a structured and predictable model designed to clearly communicate the scope and nature of changes in each release. This is particularly helpful in enterprise environments, CI/CD pipelines, and collaborative dev teams.
Major, Minor, Patch overview
Major version is incremented annually. It signals major product changes, new features, and possibly breaking changes. Even-numbered major versions (e.g., .NET 6, .NET 8) are LTS; odd-numbered ones (e.g., .NET 7, .NET 9) are STS.
Minor version indicates feature additions or non-breaking changes, often tied to newer dependency versions.
Patch version is reserved for maintenance updates, security patches, and small fixes that don’t affect the API surface.
The .NET runtime adheres to Semantic Versioning (SemVer), using the format:
MAJOR.MINOR.PATCH[-PRERELEASE-BUILDNUMBER]
This is also reflected in how NuGet packages are versioned and managed. Understanding this structure helps organizations plan upgrades, evaluate stability, and anticipate the level of effort needed when migrating between versions.
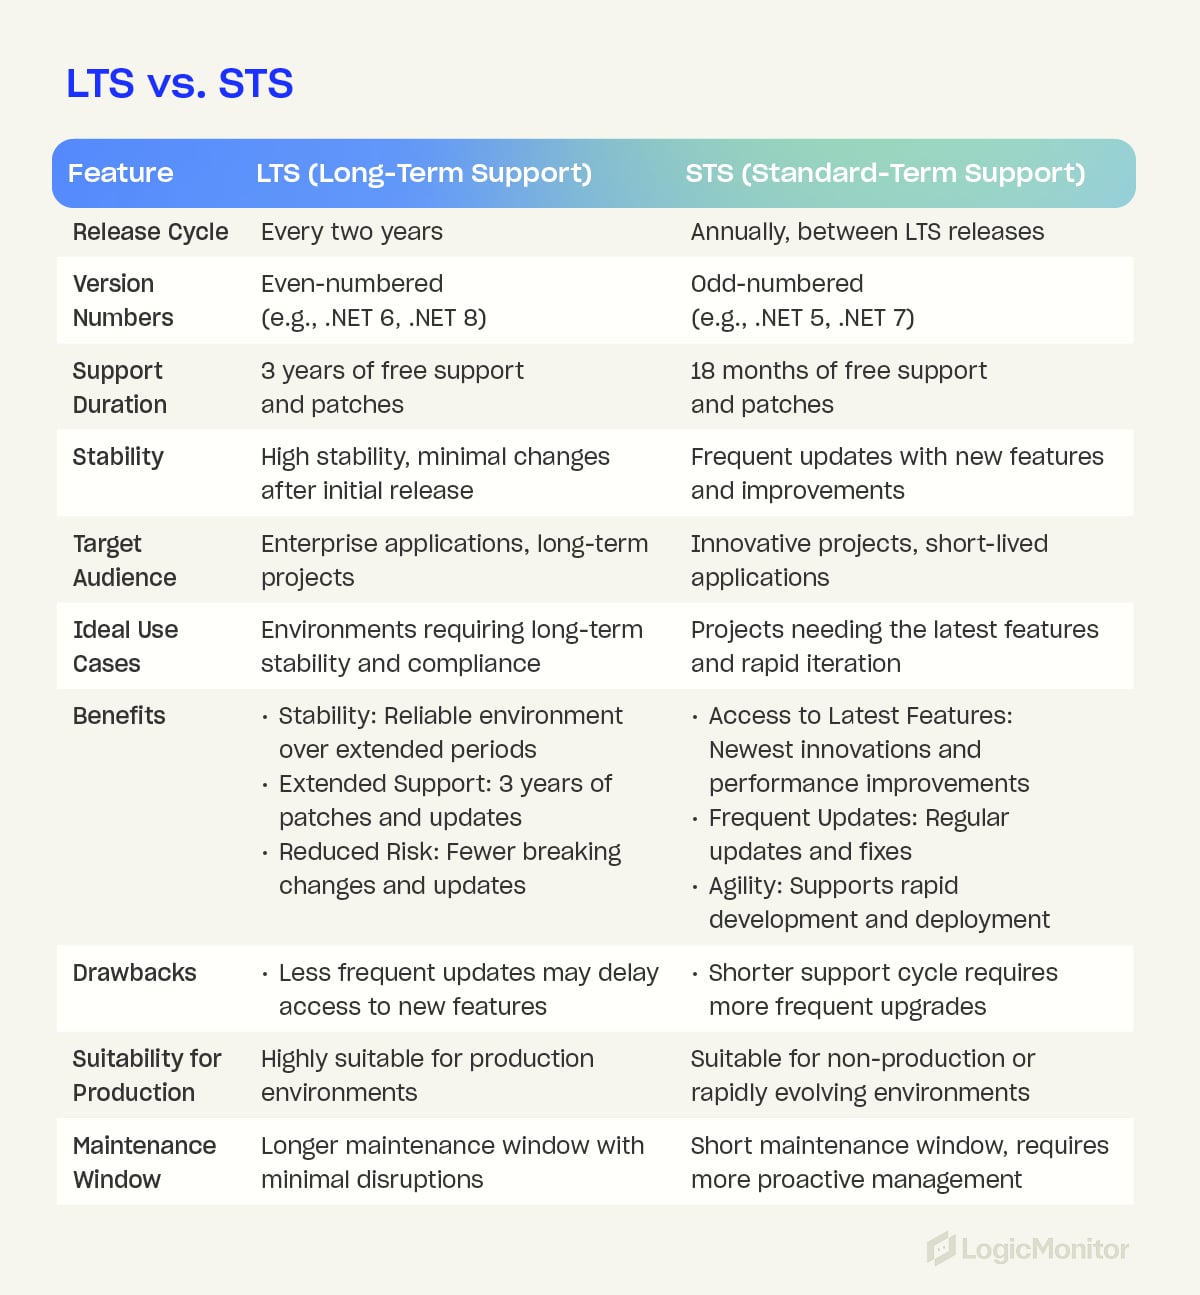
LTS vs STS: What’s the Difference?
.NET uses two support models. These models help developers choose between long-term stability and fast access to innovations:
1) Long-Term Support (LTS) LTS (Long-Term Support) versions are designed for environments where reliability, stability, and extended maintenance are priorities. These versions:
Are released every two years
Receive 3 years of support with patches and security updates
Use even-numbered versions (e.g., .NET 6, .NET 8)
Are ideal for enterprise, regulated industries, and long-running applications
Some of the main benefits of LTS include:
Stability: Minimal breaking changes post-release
Extended Maintenance: 3 years of support
Production Ready: Perfect for mission-critical applications
2) Standard-Term Support (STS)
STS (Standard-Term Support) versions are meant for faster-paced development cycles and innovation. These versions:
Are released in between LTS cycles (odd-numbered like .NET 5, .NET 7, .NET 9)
Get 18 months of support
Prioritize advanced features and performance enhancements
Some of the main benefits of STS include:
Access to Latest Features: Get new capabilities first
Frequent Updates: Stay up to date with minor fixes and performance boosts
Agility: Ideal for modern, rapidly evolving apps
Recommendation
Use LTS versions for enterprise and production use. Choose STS only if you need advanced features and can commit to frequent upgrades.
When Should You Upgrade?
Upgrade if:
Your current version has reached the end of support
You need new OS/platform support, APIs, or performance boosts
You’re migrating apps to the cloud, containers, or CI/CD pipelines
Step-By-Step: How to Upgrade to .NET Core Latest Version
Upgrading to a newer .NET version involves multiple steps, starting from your development tools and ending with your deployment environment. Here’s how to handle each phase effectively.
Step 1. Update Your Development Environment
The first step is to check whether your development setup is ready for the latest .NET SDK. This includes installing the SDK, CLI tools, and verifying version consistency.
Download the installer: Visit the .NET download page and choose the correct SDK for your OS.
Run the installer: Follow the on-screen setup to complete installation.
Use a package manager (optional):
macOS: brew install –cask dotnet-sdk
Ubuntu: sudo apt install dotnet-sdk-8.0
Visual Studio users: Upgrade to the latest version of Visual Studio. It includes the most recent SDK version automatically.
Verify installation:
dotnet --list-sdks

# to check installed runtimes:

dotnet --list-runtimes
Step 2. Change Project Target Framework And Upgrade Source Code
Once your development environment is set up, upgrade your project files to target the new .NET version.
Open the project file: Locate and open your project file (e.g., .csproj, .vbproj, or .fsproj).
Update the target framework: Change the <TargetFramework> property to the desired version. For example:
<TargetFramework>net6.0</TargetFramework>
becomes:
<TargetFramework>net8.0</TargetFramework>
Use Upgrade Assistant (optional): Microsoft’s .NET Upgrade Assistant can automate this change and resolve compatibility issues.
Build the project: Rebuild using the updated SDK:
dotnet build
Restore workloads: If your project uses additional workloads, restore them with:
dotnet workload restore
Step 3. Modify CI/CD Configs
Next, check whether your CI pipeline is configured to use the new .NET SDK. This keeps automated builds consistent with your updated development environment.
Modify configuration files: Update the .NET SDK version in your CI pipeline config files (e.g., GitHub Actions, Azure Pipelines) to match your upgraded target.
Run CI pipelines: Execute your build pipeline to verify that all build and test steps succeed using the new SDK version.
Note: Update versions in Azure Pipelines or other CI services similarly.
Step 4. Update Hosting Runtimes
Now, update your hosting environment to support the new .NET version. This step verifies that your production environment can run the upgraded application reliably. Here’s how to do it:
Install new .NET runtime: Make sure your server or container image includes the latest .NET runtime. You may need to update environment variables, deployment scripts, or Dockerfiles.
Use official container images: For containerized apps, update your base image like this:
FROM mcr.microsoft.com/dotnet/aspnet:8.0
Verify hosting readiness: Ensure the runtime is present using:
dotnet --list-runtimes
Deploy your application: Push the updated app to your hosting environment and verify it starts up without compatibility issues.
How to Check Which SDK a Project Uses
Understanding which SDK your project uses is essential for smooth builds, reliable deployments, and consistent behavior across teams and environments.
The current SDK alone won’t help unless it matches the one your project expects. That’s why you need to trace version targeting back to the project’s source and structure.
Here are a few options to do this:
If you’re using an IDE like Visual Studio, check the project settings to see the target .NET Core SDK version.
In C# projects, the .csproj file acts like the DNA of the app. It defines the <TargetFramework> and includes metadata about how the app should be built.
For deeper visibility, use the msbuild /bl command. It will create an msbuild.binlog file, which can be viewed using the Microsoft Build Log Viewer. This file reveals the NETCoreSdkVersion property used during the build process.
If the SDK version listed in your project isn’t installed, head to the official .NET downloads page to install the correct one.
Pro Insight: Tight version control empowers faster troubleshooting, clearer DevOps automation, and fewer release blockers, especially in complex environments with multiple services or team handoffs.
To have compatibility and avoid frustrating build errors, you should know which SDK version your project targets and whether it’s installed on your local environment, CI/CD system, and hosting platform.
Option 1: Inspect the .csproj File
Open your project’s .csproj file to find the <TargetFramework> declaration.
<TargetFramework>net8.0</TargetFramework>
This shows you which runtime and SDK the application expects.
Option 2: Use msbuild /bl For Deep Inspection
Run this command to produce a detailed build log:
msbuild /bl
This creates a msbuild.binlog file. Open it with MSBuild Structured Log Viewer to identify the exact NETCoreSdkVersion in use during compilation.
Option 3: Check From Visual Studio
In Visual Studio, navigate to the project’s Properties window to view and edit the target framework using a dropdown UI. No manual XML editing required.
Pro Tip: If a project isn’t building as expected, verify that the SDK version listed in .csproj or in the build logs is actually installed using:
dotnet --list-sdks
This step is critical when:
Cloning older repositories
Restoring archived projects
Working across teams or machines with different SDKs
Diagnosing CI/CD pipeline inconsistencies
Using the Command-Line Interface (CLI)
All installations of the .NET SDK come with a Command Line Interface (CLI) to help you manually enter commands related to building, developing, and running your apps. If you’re unsure whether you have access to the .NET CLI, follow these steps:
Open a command window by pressing Windows + R, typing cmd, and pressing Enter. Type dotnet and press Enter.
dotnet --version

You can also use:

dotnet --list-sdks       # Shows installed SDKs and versions

dotnet --list-runtimes   # Lists installed runtime instances
Note: Installed SDKs are typically located under C:\Program Files\dotnet\sdk
Common Errors + Fixes
Even with the right SDK installed, version mismatches and configuration issues may lead to confusing errors. Here are some of the most common problems developers run into and how to fix them quickly.
Error 01
The SDK ‘Microsoft.NET.Sdk’ specified could not be found.
Fix:
Use dotnet –list-sdks to confirm it’s installed.
Install the missing SDK or update your global.json
Error 02
It was not possible to find any compatible framework version.
Fix:
Ensure the correct runtime is installed using dotnet –list-runtimes.
error NETSDK1045: The current .NET SDK does not support targeting .NET [version]
Fix:
Make sure your SDK supports the target framework in your .csproj.
Consider upgrading your SDK to match your target version.
Error 04
The project targets a preview version of .NET that is not installed.
Fix:
Use the preview SDK or update your project to a supported stable version:
{

  "sdk": {

    "version": "8.0.100"

  }

}
.NET Core vs. .NET vs. Framework vs. Standard
If you’re confused by the different flavors of .NET, Framework, Core, Standard, and the unified .NET 5+, here’s a quick breakdown to help you choose the right one for your app or library.
Feature
.NET Framework
.NET Core (≤3.1)
.NET (5 and later)
.NET Standard
OS Support
Windows only
Cross-platform
Cross-platform
All .NET platforms
Status
Legacy (maintained)
Superseded
Current (unified platform)
Frozen (still supported)
Ideal Use
Existing desktop apps
Apps on .NET Core 3.1 or earlier
Modern apps, libraries, services
Compatibility layer for shared libraries
Need clarity on compatibility? See Microsoft .NET Core official docs.
Tips for Working With the .NET Core Latest Version
Working with the .NET Core latest version isn’t only about staying up to date; it’s about staying in sync. Here are some tips for this:
Keep your development, CI/CD, and production environments on the same version to prevent issues and simplify debugging.
Choose LTS versions of the .NET Core latest version when you need long-term support, and stay aware of support timelines to avoid unexpected disruptions.
Keep your development, CI pipelines, and hosting environments aligned with the same SDK version to avoid runtime surprises.
Choose LTS releases to reduce upgrade overhead and maintain long-term stability, especially for production workloads.
Be mindful of shorter support timelines and more frequent changes if you’re working with STS releases.
Review changelogs between major versions and prepare for potential breaking changes.
Monitor support expiration dates to stay ahead of forced upgrades or security risks.
Need Visibility Into Your .NET Stack?
LogicMonitor provides full-stack observability for .NET web applications, including ASP.NET Core services, containers, cloud deployments, and CI/CD performance, all from a single platform.
If you need visibility into your .NET stack, this gives you the end-to-end insights to catch issues early and resolve them fast. It brings hybrid observability powered by AI to help you prevent issues before they impact users or the business.