LogicMonitor stores sensitive information including credentials, secrets, etc for hosts, devices, services. The LogicMonitor Collector provides the integration with CyberArk as a vault solution. For more information, see CyberArk documentation.
To integrate the CyberArk Vault with LogicMonitor Collector, see Integrating with Credential Vault.
Prerequisites
- The CyberArk Vault Integration requires EA Collector versions 29.108 or higher. Note that support for the vault integrations are not yet available in GD Collector versions.
CyberArk Application Authentication Methods
The CyberArk Credential Provider provides multiple methods to authenticate applications. For more information, see CyberArk documentation on Application authentication methods and Add applications.
LogicMonitor Collector and CyberArk integration support the following methods for the application authentication:
1. Allowed Machines
2. Path
3. Hash
4. Client Certificates
Note: We recommend configuring Dual Accounts in CyberArk for widely-used, frequently rotated credentials to avoid account lockouts during rotation.
Authentication to Privileged Access Security (PAS) Solution
The CyberArk AIMWebService application is deployed on the IIS Server. LogicMonitor Collector and CyberArk integration uses Basic Authentication to the IIS Server.
You can log on to the Vault by using the password that is provided to you. After logging into the Vault, we recommend that you change your password.
CyberArk Collector Agent Configuration Settings
The following table contains the collector agent configuration related to the vault:
| Name | Type | Default | Details |
| vault.bypass | Boolean | True | If the value is set as true, the vault API will not be called. If the value is set as false, the vault API would be called. |
| vault.credentials.cache.expirationtime | Integer | 60 minutes | Expiration timeout (in minutes) for credentials in vault cache. After this time, the credentials in the vault cache expires and would have to be re-fetched from the Vault. |
| vault.credentials.refresh.delay | Integer | 15 seconds | The amount of time delay (in seconds) after credentials cache expiration time. Refresh the task after the cache expiration time.Note: You may customize the amount of time delay while installing the collector. For more information, see agent.conf Collector Settings. |
Vault Properties
Vault properties, such as Vault Metadata and Vault Keys for the collector, can be configured at the device or device group level.
Note: CyberArk does not allow special characters, such as \ / : * ? ” < > , to be used in Safe names and object names.
Vault Metadata
The following table lists the Vault Metadata properties.
| Vault Metadata | Description |
| vault.meta.url | URL of the vault. This URL must contain the folder and application id only. |
| vault.meta.safe | Safe (Applicable only in case of CyberArk). A device can have only a single safe. |
| vault.meta.type | The type of the Vault. Currently, only the “CyberArk” vault integration is supported in the Collector. |
| vault.meta.header | The headers required for HTTP Get Request. The value for this custom property would be the header separated with “&“ the header key value would be separated with “=” as shown in the below example:vault.meta.header – Content-Type=application/json&Accept-Encoding=gzip, deflate, br |
| vault.meta.keystore.type | Type of the key store. If the key store type is not specified, the default type for the key store is JKS. |
| vault.meta.keystore.path | Path of the Keystore file. |
| vault.meta.keystore.pass | Password for the Keystore. |
Vault Keys
Vault keys need to be specified at the device level with suffix .lmvault. For example, ssh.user information should have the key specified as ssh.user.lmvault.
| Vault Keys | Description |
| Property suffixed with .lmvault | The custom property for which value must be retrieved from the Vault and must be specified at the device level by adding suffix .lmvault. The value of such property would be the path of the key in the Vault.For example: ssh.user.lmvault = ssh\ssh.userFor ssh.user.lmvault, the property should be retrieved from the Vault. The value of this property “ssh\ssh.user” represents the path in the Vault where the credential is stored. |
| Property suffixed with .lmvault : Multi-Safe | The multi-Safe approach allows fetching the values for lmvault properties from different safes within the Vault. The LM vault property value should be specified in the format safe:path.For example, the property referring to the safe sshcreds and object path as ssh\ssh.user can be specified as: ssh.user.lmvault = sshcreds:ssh\ssh.userThe Safe specified at the property level would override the value specified at the device level through the “vault.meta.safe” property. |
Collector and CyberArk Vault Integration
1. Multi-Safe support: Specify the multiple safes under a device to retrieve the credentials from Multiple Safe.
2. Multi-Vault support: You can use multiple vaults for the devices under the collector. Each of the devices can point to a single Vault.
3. You can call Vault API over HTTP or HTTPS. However, if you are calling the Vault APIs over HTTPS, you must configure the RootCA cert. For more information, see RootCA cert.
4. You must complete the CyberArk Authentication. For more information, see CyberArk Application Authentication Methods section.
Note: Device-specific cache is implemented at the collector to avoid frequent requests to the Vault API.
Configuring CyberArk Certificates
You must configure the following CyberArk files at the requesting application side:
- RootCA cert
- client.pfx file
- client.cert and client.pem files
RootCA cert
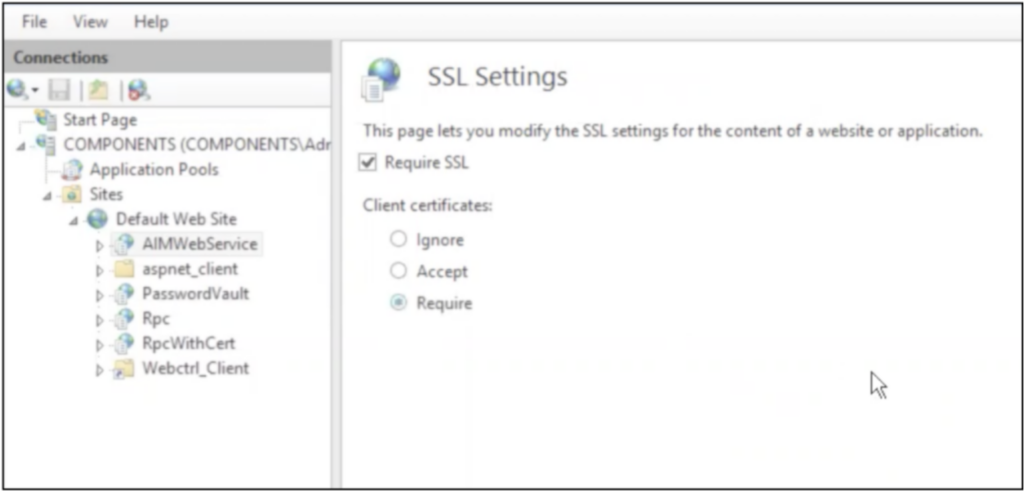
You must enable the Require SSL checkbox for including the RootCA cert file in the trust store of the requesting application’s server.
To import RootCA cert for the collector, complete the following steps:
- Windows: RootCA cert must be imported in the collector’s trust store in JRE within the Collector installation folder. By this, the CyberArk endpoint will be considered a trusted source.
- Collector’s installation directory. The default file path is:
- Linux Collectors: /usr/local/logicmonitor/agent/conf /agent.conf
- Windows Collectors: C:\Program Files (x86)\LogicMonitor\Agent\conf\agent.conf
To import RootCA certificate in the collector’s jre default trust store, use the command:
keytool -importcert -file Path_For_Root_CA_Folder/RootCA.crt -alias CyberArkRootCA -keystore /usr/local/logicmonitor/agent/jre/lib/security/cacert -storepass Store_Passwordclient.pfx file
CyberArk provides client.pfx file which is a pkcs12 file containing the client certificate and client key. The client certificate and client key must be present in the HTTP request to authenticate the application request to IIS. As the client.pfx is a key store containing the client certificate and client key, this file can be directly used to authenticate the collector’s request with Vault Service deployed on IIS.
To use the client.pfx file, set the below properties at the device/device group level at the Santaba:
vault.meta.keystore.path=Path_For_Client_Keystore_Folder/client.pfx
vault.meta.keystore.pass=Password_For_Client_KeystoreNote: The default keystore password for client.px store is CyberArk 1. We recommend that you change this password.
client.cert and client.pem files
Though CyberArk provides the client.pfx key store containing the client certificate and client key, it still provides the client.cert and client.pem files. These files can be used to create the custom key store. Such a custom key store can be used to authenticate the applications/collector’s request to the IIS server on which Vault Credential Service is deployed.
To create the key store using client.cert and client.pem files, use the below command.
openssl pcks12 -export -in Client_Cert_Folder/client.crt -inkey Client_Key_Folder/client.pem -out myclient.pfx -passout pass:Password_For_Generated_KeystoreThe Credential Vault integration with the collector allows storing and managing sensitive information (including credentials and secrets for hosts, devices, services, etc.) in an external credential vault.
Collector supports the following vault integrations:
Note: Support for the Credential Vault Integration was added in EA Collector 29.108. Please take a look at the relevant vault integration topics for supported collector versions.
Integrating Credential Vault Properties
To integrate the collector with Credential Vault, follow these steps.
1. In LogicMonitor, navigate to Resource Tree > required Collector > Info tab.
2. Select  Manage properties to add or edit vault metadata properties to the collector. For more information, see Adding Vault Properties.
3. Navigate to Settings > Collectors.
4. Under the Collectors tab, select the collector you want to configure.
5. In the details panel, under the Info tab, select ![]() More.
More.
6. Select Collector Configuration.
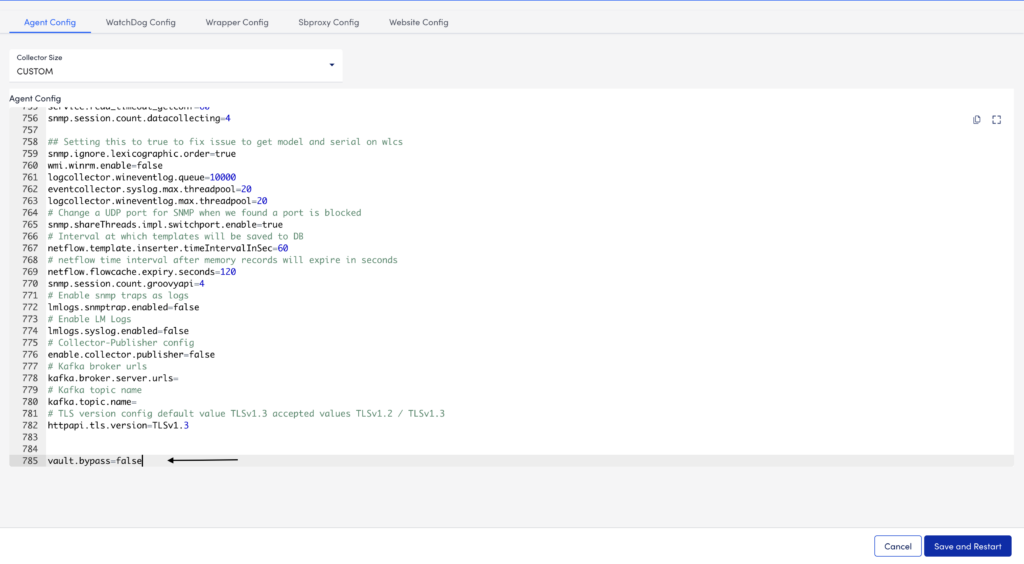
7. Ensure to set the vault.bypass value to false in agent.conf.
In addition, you can add the required agent configuration properties to set the Collector. For more information, see Collector Configurations.
Collector Configurations
The following table lists the configuration properties to set in the collector agent.conf.
| Property | Type | Default | Description |
| vault.bypass | Boolean | TRUE | If the value for the property is true, the vault API calls won’t happen. Note: You must set the property to false, to enable the vault API calls. |
| vault.credentials.cache.expirationtime | Integer | 60 | The property specifies the value in minutes for the expiry of the credential in the vault cache on the collector. After this time, the credentials in the vault cache will expire. |
| vault.credentials.refresh.delay | Integer | 15 | Controls the Credential Vault integration cache expiration refresh delay in seconds. |
| vault.url.cache.enabled | Boolean | FALSE | The property specifies whether the URL cache is enabled or not. By default the property is set as false; however, if the property is set to true the collector caches the URL and secret value. If the URL for lmvault property is found in the URL cache, the respective secret value is returned, else the API call is made to fetch the secret from the vault. Setting this property to ‘true’ should resolve API rate-limiting issues. |
| vault.url.cache.max.size | Integer | 1000 | The property defines the number of URLs that will be stored in the cache. |
Adding Vault Properties
You can add vault properties such as vault metadata and vault keys.
Vault Metadata
The following table lists the Vault Metadata properties.
| Property | Description |
| vault.meta.url | The URL of the vault. |
| vault.meta.type | The type of vault. |
| vault.meta.header | The headers are required for HTTP Get Request. The value for this custom property would be the header separated with & and the header key value separated with = as shown in the below example: vault.meta.header – Content-Type=application/json&Accept-Encoding=gzip, deflate, br |
Vault Keys
Vault keys need to be specified at the device level with suffix .lmvault.
| Property | Description |
| .lmvault | The custom property for which value should be retrieved from the Vault must be specified at the device level by adding suffix .lmvault. The value of such property would be the path of the key in the Vault. For example: ssh.user.lmvault = ssh\ssh.user |
Note: To migrate the Docker collector to non-root user, see Running a Linux Collector in a Docker Container as a Non-Root User.
Initially, you could run Linux Collectors using root credentials. Later, we extended this support to users with non-root credentials to install Collectors.
We have now enhanced the migration process to enable users to migrate Collectors running as root to run under non-root users without uninstalling Collector or losing any data. You can follow both prompt based and silent migration processes to migrate Collectors running as root to run under non-root user.
You must run the script updateToNonRoot.sh. The default path is, /usr/local/logicmonitor/agent/bin/updateToNonRoot.sh
Requirements
- Users with root credentials can execute the script.
- Ensure that the Collector is installed as a root user.
Points to Consider
- In case of silent migration, you must place the parameters in the following sequence:
-q -u -d. - When migrating Linux Collector using the silent migration method, to access help you can enter the parameter
-hafter the script./updateToNonRoot.sh. The following parameters are displayed:
| Parameter | Description |
| -h | Provides help. |
| -q | Indicates to the installer that the migration should be done in Silent mode. |
| -u | Provide name of the non-root user under whom you want to migrate the Collector service. |
| -d | Indicates the path where the Collector is installed. By default, the Collector is installed at /usr/local/logicmonitor. If the Collector is not installed at the default path, then enter the custom path where you have installed the Collector. |
Migrating Linux Collectors
You can migrate Linux Collector from root to non-root user using the silent or prompt based migration method. Note that when you install Linux Collector using any of the two installation methods, LogicMonitor creates a default non-root user ‘logicmonitor’. When migrating Linux Collector from root to non-root user, if the non-root user that you specified for migration does not exist, the ./updateToNonRoot.sh script will create that non-root user.
Silent Migration
In the command prompt, run the following commands:
- Log in to the machine with root credentials.
- Navigate to the agent/bin folder of your Collector.
- Enter and run the command
./updateToNonRoot.shfollowed by the parameters for silent migration. The format and sequence is-q -u[non-root username]-d[custom path, if any]

After you run the script, the Linux Collector is migrated from root to non-root.
Prompt based Migration
In the command prompt, run the following commands:
- Log in to the machine with root credentials.
- Navigate to the agent/bin folder of your Collector.
- Run the script
./updateToNonRoot.sh.
The system will prompt you to specify the user to migrate the Collector to non-root. - The script will create a default non-root user ‘logicmonitor’ and use it. You can create and use your own non-root user account, if necessary.
- By default, the Collector is located at /usr/local/logicmonitor. If the Collector is located at some other directory, then specify that path.
After you run the script, the Linux Collector is migrated from root to non-root.

Verifying Migration
To verify if the Collector has successfully migrated from root to non-root, follow these steps 10 minutes after the migration is complete:
- Navigate to Settings > Collectors.
- Under the Collectors tab, select the collector that you migrated to non-root user.
- Select the More option and then select Collector Status.

You can view that the collector has successfully migrated to non-root user.
Rolling Back Migration
In case the updateToNonRoot.sh script fails to migrate Linux Collector from root to non-root, or if you face any issue after migration, you can run the revertToRootUser.sh script to roll back migration. The script is available in the agent/bin folder.
Note:
- The destination path must be the path where the Collector is currently installed.
- The rollback script is available in EA Collector 32.400 and later.
- If you want to rollback migration for Collector version prior to 32.400, you can copy the script given below to create the script file.
#!/bin/sh

# get the name of init process
get_init_proc_name() {
    file_name="/proc/1/stat"
    cat $file_name|cut -f1 -d')'|cut -f2 -d'('
}

# get a string as answer from the stdin
get_input() {
    prompt_msg=${1:?"prompt message is required"}
    default_value=${2}
    if [ "$default_value" != "" ];then
        prompt_default_value=" [default: $default_value]"
    fi
    read -p "$prompt_msg$prompt_default_value:" value
    if [ "$value" = "" ];then
        value=$default_value
    fi
    echo $value
}

help() {
    echo "Usage : [-h] [-y] [-u install user] [-d install path]
            -h        help           - show this message
            -y        silent-update  - update silently
            -d        install path   - installation path of collector(default: /usr/local/logicmonitor)"
    exit 1
}
OPTS_SILENT=false
DEST_USER="root"
DEST_DIR="/usr/local/logicmonitor"
DEST_GROUP="root"

while getopts "hqu:d:" current_opts; do

    case "${current_opts}" in
        h)
            help
            ;;
        q)
           OPTS_SILENT=true
            ;;
        d)
           DEST_DIR=${OPTARG}
            ;;
        *)
            help
            ;;
    esac
done


if [ "$OPTS_SILENT" != "true" ]; then
  DEST_DIR=`get_input "Enter the directory under which collector is installed" "$DEST_DIR"`
fi

if [ -d "$DEST_DIR/agent" ]; then

    service logicmonitor-watchdog stop
    service logicmonitor-agent stop

    systemctl disable logicmonitor-agent.service
    systemctl disable logicmonitor-watchdog.service

    CUR_USER=$(stat -c '%U' $DEST_DIR)

    if [ "$CUR_USER" != "root" ]; then
     LM_WATCHDOG_SERVICE="$DEST_DIR/agent/bin/logicmonitor-watchdog.service"
     sed -i.bak "s#User=$CUR_USER#User=root#g" $LM_WATCHDOG_SERVICE
     sed -i.bak "s#Group=$CUR_USER#Group=root#g" $LM_WATCHDOG_SERVICE
     rm -f $LM_WATCHDOG_SERVICE.bak
     LM_AGENT_SERVICE="$DEST_DIR/agent/bin/logicmonitor-agent.service"
     sed -i.bak "s#User=$CUR_USER#User=root#g" $LM_AGENT_SERVICE
     sed -i.bak "s#Group=$CUR_USER#Group=root#g" $LM_AGENT_SERVICE
     rm -f $LM_AGENT_SERVICE.bak
    fi

    $ldconfig

    chown  $DEST_USER:$DEST_GROUP $DEST_DIR/
    chown -R $DEST_USER:$DEST_GROUP $DEST_DIR/agent

    INIT_PROC=`get_init_proc_name`

    if [ "$INIT_PROC" = "systemd" ];then
      mkdir /etc/systemd/user
      cp $DEST_DIR/agent/bin/logicmonitor-agent.service /etc/systemd/system
      cp $DEST_DIR/agent/bin/logicmonitor-watchdog.service /etc/systemd/system
      chown $DEST_USER:$DEST_GROUP /etc/systemd/system/logicmonitor-agent.service
      chown $DEST_USER:$DEST_GROUP /etc/systemd/system/logicmonitor-watchdog.service
      chmod 0644 /etc/systemd/system/logicmonitor-agent.service
      chmod 0644 /etc/systemd/system/logicmonitor-watchdog.service
      systemctl enable logicmonitor-agent.service
      systemctl enable logicmonitor-watchdog.service
      rm -f /etc/systemd/user/logicmonitor-watchdog.service
      rm -f /etc/systemd/user/logicmonitor-agent.service
      systemctl daemon-reload
      echo "Succesfully reverted collector services to run under $DEST_USER"

    else
      ln -sf ./bin/logicmonitor-agent /etc/init.d/logicmonitor-agent
      ln -sf ./bin/logicmonitor-watchdog  /etc/init.d/logicmonitor-watchdog
      chown $DEST_USER:$DEST_GROUP /etc/init.d/logicmonitor-agent
      chown $DEST_USER:$DEST_GROUP /etc/init.d/logicmonitor-watchdog

      /sbin/chkconfig --add /etc/init.d/logicmonitor/logicmonitor-agent 2>/dev/null
      /sbin/chkconfig --add /etc/init.d/logicmonitor/logicmonitor-watchdog 2>/dev/null

      #if update-rc.d exists, let's run it to install our services
      if which update-rc.d 2> /dev/null;then
        # We found update-rc.d, let's use it ...
         update-rc.d logicmonitor-agent defaults 2>/dev/null
         update-rc.d logicmonitor-watchdog defaults 2>/dev/null
      fi
      echo "Succesfully reverted collector services to run under $DEST_USER"

    fi


 $DEST_DIR/agent/bin/logicmonitor-watchdog start

else
  echo "The agentPath is not $DEST_DIR or is not provided. Please provide correct path where collector is installed and run the script again."
fiThis article describes the steps to reinstall a collector onto the same device. Reinstalling a collector requires you to shut down the collector and its services, download and install a new collector, and remove the old collector.
If you are reinstalling the collector onto a different device (or replacing a collector), we recommend that you download and install a new collector onto the new device and then transfer the monitored resources from the old collector to the new collector. See Moving Collector to Another Machine.
Re-downloading Collector
When reinstalling the collector, you may re-download the collector’s installer file from its listing:
- Navigate to Settings > Collectors.
- Under the Collectors tab, select the collector that you want to redownload.
- Select the More option and then select Download Collector.

The Download Collector page is displayed.
- Select the OS, version, and size of the collector.
- Download and install the collector.
- Select Finish.
Note:
- Each installer file has a unique identifier string. Make sure that you install the executable that you have just downloaded or the installation will fail.
- During installation, LogicMonitor checks for the existence of a duplicate collector (for example, if this collector is not already running on another device). Because of this, the old collector must be stopped for at least 5 minutes before you can install the new collector.
Reinstalling Windows Collector
1. (Optional) Put the collector you want to reinstall into SDT to prevent unwanted alerts during this process. See, Adding SDT to Collector.
2. On the local collector machine, remove LogicMonitor Collector from the Control Panel\Add or Remove Programs menu.
3. Rename the directory C:\Program Files\LogicMonitor to C:\Program Files\LogicMonitor_OLD.
4. In services.msc, verify that both logicmonitor-watchdog and logicmonitor-agent are not present.
a. If the services still exist, open cmd with admin priveleges and run the following commands to remove them:
sc delete logicmonitor-watchdog
sc delete logicmonitor-agentb. Restart the collector machine and verify that the services have been removed.
Note: To make sure that the collector reinstalls successfully, LogicMonitor must have enough time to recognize that the old collector is down. This may take up to 5 minutes.
5. Re-download the collector installer executable file from the list in Settings > Collectors. For more details see, Re-downloading Collector.
6. Run the installer file. (We recommend using the installation wizard.)
7. If there are logs or jar files in the old collector install directory, confirm that they are no longer required or have been backed up if needed.
8. Delete the old collector directory: C:\Program Files\LogicMonitor_OLD
Reinstalling Linux Collector
1. (Optional) Put the collector you want to reinstall into SDT to prevent unwanted alerts during this process. See, Adding SDT to Collector.
2. As a root user on the local collector machine, run the sbshutdown script to stop the collector and Collector Watchdog services. By default, this script is located in /usr/local/logicmonitor/agent/bin.
[root@collector-host ~]# cd /usr/local/logicmonitor/agent/bin/
[root@collector-host bin]# ./sbshutdown3. Uninstall the collector by running the uninstall script or manually removing the collector directory and all its contents:
a. (Recommended) Uninstall the collector using uninstall.sh:
[root@collector-host bin]# ./uninstall.shb. Remove the logicmonitor collector directory (user/local/logicmonitor) and all its contents using the command:
[root@collector-host bin]# rm -rf usr/local/logicmonitorIf there are symbolic links for logicmonitor.collector and logicmonitor.watchdog, those should be removed from /etc/init.d or /etc/rc.d/init.d.
4. Change to the directory where you want to install the collector.
5. Re-download the collector installer executable file from the list in Settings > Collectors. For more details see, Re-downloading Collector.
If you are working from a command line, you may copy the curl or wget commands to download the collector onto the host machine.
6. Change the permissions for the installer so that it is executable and run it:
[root@collector-host ~]# chmod +x LogicmonitorCollector64_[COLLECTOR_ID].bin
[root@collector-host ~]# ./LogicmonitorBootstrap64_[COLLECTOR_ID].bin7. When the installation completes, verify that the Collector and Watchdog services are running:
[root@collector-host bin]# ./logicmonitor-watchdog status
[root@collector-host bin]# ./logicmonitor-agent statusTo avoid downtime when moving your collector to another machine, we recommend that you install a new collector on a new machine and then transfer the monitored devices from the old collector to the new collector.
Note: You should ensure that the new collector has the same privileges as the collector it is replacing. Verify the following:
- If the devices and networking gear configured to allow snmp access from the new collector device, or are they restricted to the old collector device’s IP address.
- If the database permissions allow the new collector device’s IP to query them with sufficient access.
Once you have installed a collector on the new machine, you can transfer monitored devices to the new collector.
- Navigate to Settings > Collectors.
- Under the Collectors tab, select the collector you want to move.
- Under the Resources tab, select the checkbox to select the resources that you want to move.
- Select the Actions dropdown and then select Change Preferred Collector.

- Search and select a different preferred collector and then select Change.

In addition to the standard interactive collector installation process, there is also a non-interactive “Silent” installation mode. The Silent mode is convenient if you are automating installation and are not around to manually answer prompts about user and proxy details.
In this article, we have explained the steps to install Windows and Linux collectors. We recommend that you read the support article Installing Collectors to understand all the details about collector installation.
Installing Windows Collectors
Before you install Windows collectors, you must consider the following points:
- Ensure to specify the collector to run as a privileged user. If you do not, the collector will install and run as a local system. The local system may not have sufficient permissions to monitor other Windows hosts remotely.
- Ensure that there is no space following any colon when you specify the parameters.
For example, /p:’L0g1cM0n‘ is acceptable but /p: ‘L0g1cM0n‘ is not. - Ensure to use single quotes if the system password or the proxy password has special characters. For example, /p:’Mycroft+Holmes‘
- These parameters can be passed either after the collector installer .exe or after the PowerShell installation URL (either bootstrap or full package installation). Ensure that the PowerShell window is open in the Administrator mode.
- The parameter /s: can be included if the collector version is 30.102 or higher.
To install Windows collectors in Silent mode, follow these steps:
- Navigate to Settings > Collectors.
- Under the Collectors tab, select the Add Collector Options
 dropdown.
 - Select Add Collector.
- Under Select a Collector, select Windows 64-bit OS and specify the version and size details.
- Under Download and Install, select _PowerShell and copy the PowerShell URL.

- Launch PowerShell in Administrator mode and paste the copied URL to append the parameters.
[powershell URL or .exe] [/k] [/r:] [/d:] [/q] [/s:] [/a:] [/p:] [/m] [/PROXYHOST:] [/PROXYPORT:] [/PROXYUSER:] [/PROXYPASS:]Example:
LogicMonitorSetup_6207.exe /q /a:Administrator /p:'Mycroft+Holmes' /PROXYHOST:10.55.21.60 /PROXYPORT:3128 /PROXYUSER:SherlockHolmes /PROXYPASS:'221_B@BakerStreet'
For Windows Collector, the following parameters are supported:
| Parameter | Description |
| /q | Indicates to the installer that the installation should be done in Silent mode. |
| /k | (Optional) Ignores ssl errors when downloading a file. |
| /r: | (Optional) Sets the retry attempt when downloading a file. Default = 2 retry attempts. |
| /d: | (Optional) Indicates the path to install a collector. It defaults to C:\Program Files\LogicMonitor\Agent |
| /s: | (Optional) Installs custom collector size (nano, small, medium, large, extra_large, and double_extra_large). It defaults to the collector size selected in the LogicMonitor portal. |
| /a: | (Optional) Indicates the account the Windows service will run as. It defaults to LocalSystem. The installer requires a Domain\User format. For example, /a:’Domain\User’ |
| /p: | (Required if /a: is given) Indicates a password of the specified user account. For example, /p:’p@$$w0rd’ |
| /m | (Optional) If this is set, the installer does not check if the total physical memory meets the minimum memory requirement. |
| /np | (Optional) If this is set, the installer does not install the Npcap module. Npcap is a packet capturing module which monitors raw packets needed for NetScan detection. |
| /NAP | (Optional) When using the /a: with a non-admin account, if this parameter is set, permissions are assigned to a non-admin account to run the collector. |
| /PROXYHOST: | (Optional) Indicates the proxy server address. For example, /PROXYHOST:”proxy.net” |
| /PROXYPORT: | (Optional) Indicates the proxy server port. |
| /PROXYUSER: | (Optional) Indicates the username to authenticate the proxy server, if any. |
| /PROXYPASS: | (Optional) Indicates the password to authenticate the proxy server, if required. |
Once the installation is complete, a message confirming successful installation is displayed on the PowerShell terminal.

Installing Linux Collectors
Before you install Linux collectors, you must consider the following point:
- The parameters work for both bootstrap and full installation methods. Ensure that you first make the binaries executable (using chmod) before passing the parameters.
- The parameter -s can be included if the collector version is 30.102 or higher.
To install Linux collectors in Silent mode, follow these steps:
- Navigate to Settings > Collectors.
- Under the Collectors tab, select the Add Collector Options dropdown.
- Select Add Collector.
- Under Select a Collector, select Linux 64-bit OS and specify the version and size details.
- Under Download and Install, select _Get cURL cmd and copy the URL.

- In the terminal, paste the copied URL and append the necessary parameters to the installation URL.
./LogicmonitorSetup123.bin [-n] [-h] [-y] [-m] [-s size] [-d install path] [-u install user] [-p proxyHost:port] [-U proxyUser] [-P proxyPass]Example:
sudo chmod +x LogicmonitorSetup123.bin
sudo ./LogicmonitorSetup123.bin -y -p 10.55.21.60:3128 -U SherlockHolmes -P 221BBakerStreet
For Linux collectors, the following parameters are supported:
| Parameter | Description |
| -h | (Optional) Indicates help. It displays a list of flags, their defaults, and their options. |
| -n | (Optional) Displays the collector’s release version number. |
| -y | (Optional) Installs the collector silently (does not prompt any questions). Default = false |
| -d | (Optional) Indicates the installation path for the collector. Default = /usr/local/logicmonitor |
| -s | (Optional) Installs custom Collector size (nano, small, medium, large, extra_large, and double_extra_large). It defaults to the collector size selected in the LogicMonitor portal. |
| -u | (Optional) – Installation user or root, defaults to logicmonitor. |
| -p | (Optional) – Indicates the proxy server (proxyAddr:port) in the form of address:port. For example, 127.0.0.1:8080 |
| -U | (Optional) Indicates the username (proxyUser) to authenticate the proxy server, if any. |
| -P | (Optional) Indicates the password (proxyPass) to authenticate the proxy server, if required. |
| -m | (Optional) If this is set, the installer does not check if the total physical memory meets the minimum memory requirement. |
Once the installation is complete, a message confirming successful installation is displayed on the terminal.
Verifying Installation
The steps to verify the installation for both Windows and Linux are similar. On the Add Collector page, select Verify connection. A message confirming successful installation is displayed. This message indicates that the collector is connected to your portal.
You can manage Scheduled Down Time (SDT) of your collectors just as you can for your LogicMonitor resources. The SDTs for your collector suppresses alert notifications for any collector down alerts triggered during the SDT (these alerts will still be displayed in your LogicMonitor account). You can schedule SDT for your collectors during maintenance windows or other periods of anticipated downtime. Note that if a collector goes down while it is in SDT, it will still failover all assigned devices to the backup collector, if one is assigned, and you will still be notified of this failover.
Collector SDTs are kept separate from general host/group SDTs in order to prevent unintended alert suppression stemming from your SDT’d collector.
You can add an SDT that applies to a single collector or multiple collectors.
Adding an SDT to a Collector
- Navigate to Settings > Collectors.
- Under the Collectors tab, select the collector for whom you want to add an SDT.
- Select the SDT tab and then select Add SDT.

A dialog box to collect SDT details is displayed. - Enter SDT note in the text box to provide context for other users in the account.
- Specify SDT frequency. You can schedule a one-time SDT, or schedule a daily, weekly or monthly SDT.
- Specify the date and time when the SDT should start and end.
- Specify the timezone.

- Select Add SDT. Once the SDT is successfully added, the status of that collector turns In SDT
 .
.
Adding an SDT to Multiple Collectors
- Navigate to Settings > Collectors.
- Under the Collectors tab, select the checkbox before the collectors for whom you want to add an SDT.
- Select the Actions dropdown and then select Put selected items in SDT.

A dialog box to collect SDT details is displayed. - Enter SDT note in the text box to provide context for other users in the account.
- Specify SDT frequency. You can schedule a one-time SDT, or schedule a daily, weekly or monthly SDT.
- Specify the date and time when the SDT should start and end.
- Specify the timezone.

- Select Add SDT. Once the SDT is successfully added, the status of that collector turns In SDT .
You can control how much information is logged by your collector and how long the log files are retained.
Adjusting Log Level
You can adjust log levels to increase how much information is logged to debug an issue, or to decrease how much information is logged to save disk space.
- Navigate to Settings > Collectors.
- Under the Collectors tab, select the collector whose log level you want to adjust.
- Select the Logs tab and then select Manage Collector Logs.

The log levels on a per component basis for that collector are displayed.
The log level for each collector component controls what information is logged for that component. Available log levels are:
- Trace – This log level is the most verbose, and logs every action of the collector in full detail. Note that this can use a significant amount of disk space if your collector is actively monitoring a large number of devices, and as such is typically only recommended for debugging purposes.
- Debug – Logs detailed information about collector tasks (not as much information as trace log level). The debug log level can make it easier to identify an issue and track down the root cause.
- Info – It is the default log level. It logs basic information about collector tasks.
- Warn – Information is only logged when something is not right, but it may not be causing an issue yet.
- Error – Information is only logged when something is wrong.
- Disable – No information is logged.
For example, you might write a script datasource and your collector is getting no data, but you can’t figure out the problem. You could increase the log level for the collector.script component to debug or trace and then look at the logs (either using the collector debug facility or on the collector machine itself) to troubleshoot the issue.
Modifying Log File Retention Property
Collector log files are rotated based on size, and not date. By default, there are 3 log files of 64M each. If you’d like to change these numbers, you can do so in the wrapper.conf file (in the conf directory) where the collector is installed. You can edit the wrapper.conf file in the conf directory on the collector machine itself, or you can edit the file directly from your LogicMonitor account UI.
- Navigate to Settings > Collectors.
- Under the Collectors tab, select the collector whose log file retention property you want to modify.
- Select the More option and then select Collector Configuration.
- Select the Wrapper Config tab and locate the Wrapper logging properties and
- Modify the values in the
wrapper.logfile.maxsizeandwrapper.logfile.maxfilesproperties.
- Select Save and Restart to apply the changes.
Sending Logs to LogicMonitor
You can send logs to LogicMonitor support. It can be useful if you are collaborating with our support team and would like them to be able to look through your collector log files.
- Navigate to Settings > Collectors.
- Under the Collectors tab, select the collector whose logs you want to send.
- Select the More option and then select Send Logs to LogicMonitor.

Logs that you’ve sent to LogicMonitor support are displayed under the Logs section for that collector. You can filter them based on time range to limit what is displayed.
If your environment does not allow the Collector to directly connect with the LogicMonitor data centers, you can configure the Collector to communicate through an HTTP proxy.
Updating SSL and Proxy Settings
By default, collectors are not configured to use proxies. To communicate with HTTP proxies, you need to make updates to several proxy settings located in the collector’s agent.conf file. For detailed instructions on editing the agent.conf file, see Editing the Collector Config Files.

Once updated, the new settings should look similar to these:
# SSL & Proxy settings
ssl.enable=true
proxy.enable=true
proxy.host=10.0.0.54
proxy.port=8080
proxy.user=domain\username
proxy.pass=password
proxy.exclude=
proxy.global=false
proxy.pass.isencrypted=falseThese new settings designate the following:
ssl.enable=trueIndicates that the collector will make outbound connection using SSL.proxy.enable=trueIndicates that the collector will use these settings.proxy.host=Indicates the IP address of the proxy server.proxy.port=Indicates the port the proxy server uses.proxy.user=Indicates the username the collector uses when connecting to the proxy.proxy.pass=Indicates the password the collector uses when connecting to the proxy.proxy.pass.isencrypted=Indicates if the proxy password is encrypted or not.
Note: The settings specified above reflect a Windows-based proxy requiring authentication. Linux collectors support only basic authentication. Windows collectors support NTLM and other native windows authentication methods.
Changing Proxy Password
If a proxy server has password-based authentication, its credentials are stored in the proxy.user and proxy.pass fields. The proxy password is encrypted. To indicate the encryption, the proxy.pass.isencrypted is set to true. You can set proxy.pass.isencrypted= false if you want to change the proxy password.
Note: This setting is available in collector version 30.104 or later.
- Navigate to Settings > Collectors.
- Under the Collectors tab, select the collector you want to configure.
- Select the More option and then select Collector Configuration.

On the Collector Configuration page, settings under the Agent Config tab are displayed. - Scroll to locate the SSL and Proxy settings.
- Enter a new password in plain text in the
proxy.passfield. - Set the
proxy.pass.isencryptedvalue tofalse.
- Select Save and Restart.
After the restart, observe that the password is encrypted and theproxy.pass.isencryptedfield is set totrue.
Troubleshooting Collector Proxy Configuration
We have highlighted some common issues experienced (and how to resolve them) when configuring collectors to be used with HTTP proxies.
Issue: Proxy Authentication Required
When the collector is configured to use a proxy that requires basic authentication, the collector may throw the following exception:
[MSG] [WARN] [main::controller:main] [Controller2._initConfiguration:461] Unexpected status encountered from server. Will retry., CONTEXT=retry=30s, statusCode= 500, errMsg=Unable to tunnel through proxy. Proxy returns "HTTP/1.1 407 Proxy Authentication Required"In this case, you will want to add the following configuration to the collector’s wrapper.conf:
wrapper.java.additional.16=-Djdk.http.auth.tunneling.disabledSchemes=Issue: Invalid SSL Certificate
If a collector does not get a valid SSL certificate issued directly from LogicMonitor, it will fail to properly start. In the below example, all SSL certificates in the client environment were being intercepted and reissued using special security software (example, Blue Coat Proxy).
[03-26 15:53:03.222 EDT] [MSG] [INFO] [statusmonitor:::] [StatusListener$1.run:106] Receive peer request, CONTEXT=command=keepalive, charset=windows-1252, peer=/***.***.***.***:******
[03-26 15:53:03.268 EDT] [MSG] [WARN] [statusmonitor::scheduler:] [PropertyFilePersistentHandler._load:94] task file not found, CONTEXT=filename=C:\Program Files (x86)\LogicMonitor\Agent\conf\persistent_task.conf, EXCEPTION=C:\Program Files (x86)\LogicMonitor\Agent\conf\persistent_task.conf (The system cannot find the file specified)
java.io.FileNotFoundException: C:\Program Files (x86)\LogicMonitor\Agent\conf\persistent_task.conf (The system cannot find the file specified)
at java.io.FileInputStream.open0(Native Method)
at java.io.FileInputStream.open(FileInputStream.java:195)
at java.io.FileInputStream.<init>(FileInputStream.java:138)
at java.io.FileInputStream.<init>(FileInputStream.java:93)
at com.santaba.common.util.scheduler.impl.PropertyFilePersistentHandler._load(PropertyFilePersistentHandler.java:88)
at com.santaba.common.util.scheduler.impl.PropertyFilePersistentHandler.<init>(PropertyFilePersistentHandler.java:30)
at com.santaba.common.util.scheduler.Schedulers.newPersistentScheduler(Schedulers.java:17)
at com.santaba.agent.collector3.CollectorDb._newScheduler(CollectorDb.java:172)
at com.santaba.agent.collector3.CollectorDb.<init>(CollectorDb.java:68)
at com.santaba.agent.collector3.CollectorDb.<clinit>(CollectorDb.java:65)
at com.santaba.agent.agentmonitor.StatusListener._getAgentStatusResponse(StatusListener.java:279)
at com.santaba.agent.agentmonitor.StatusListener$1.run(StatusListener.java:117) /
[03-26 15:53:03.947 EDT] [INFO] [1] [default] [controller] [Controller2._initHttpService:469] Agent starting with ID - 00baae57-3971-4239-9610-b512aae9c21csbagent
[03-26 15:53:04.232 EDT] [MSG] [INFO] [main::controller:main] [SSLUtilities.checkCertificates:160] Invalid or wrong SSL Certificates found, CONTEXT=info=Found total 2 certificates:
Subject: CN=*.logicmonitor.com, OU=Domain Control Validated
Issuer: CN=SSLInterception87
Type: X.509
SHA1: 9a:a6:ff:33:85:cc:13:4c:3a:13:11:77:5c:ef:5e:a7:74:65:6b:de
MD5: 61:35:08:b5:ec:71:a2:ae:05:c4:7f:54:f1:aa:6f:ad
Valid from: 2017-04-19 10:02:01 -0400
Valid to: 2020-06-18 17:33:09 -0400Subject: CN=SSLInterception3
Issuer: CN=BillyBob's-CA, DC=slhn, DC=org
Type: X.509
SHA1: 6b:a8:1f:61:7b:5d:f0:e4:ee:7e:6a:1b:bb:18:de:67:be:5c:44:1d
MD5: d0:fc:64:da:6f:9b:1f:8d:1a:52:64:dc:41:da:e7:1c
Valid from: 2017-08-09 15:08:18 -0400
Valid to: 2021-10-03 08:53:12 -0400 */
[03-26 15:53:04.232 EDT] [MSG] [WARN] [main::controller:main] [Controller2._initConfiguration:322] SANTABA SERVER ceriticates not trusted, CONTEXT=Host=generic-customer.logicmonitor.com, port=443Solution A (Preferred)
Have the local administrator add the SSL certificate to your allow list so that it comes into the network unmodified by a proxy/firewall. This is the preferred option because it preserves security.
Solution B
Change the collector configuration setting from:
EnforceLogicMonitorSSL=trueto:
EnforceLogicMonitorSSL=falseRemoving SSL enforcement lowers the security of the connection between your collector and LogicMonitor and, for this reason, should be carefully considered before implementing.
When you delete a collector from your LogicMonitor account, the collector and Watchdog services stop and the collector uninstalls itself. If it does not happen, you can manually stop the collector and Watchdog services and uninstall the collector from the device.
Prerequisite
Before you delete a collector, you must re-assign the devices monitored by that collector to a different collector. To re-assign devices in bulk, follow these steps:
- Navigate to Settings > Collectors.
- Under the Collectors tab, select the collector you want to delete.
- Under the Resources tab, select the checkbox to select all the resources monitored by that collector.
- Select the Actions dropdown and then select Change Preferred Collector.

- Search and select a different preferred collector and then select Change.

Deleting Collector from LogicMonitor Portal
To delete a collector, follow these steps:
- Navigate to Settings > Collectors.
- Under the Collectors tab, select the collector that you want to delete.
- Select the More option and then select Delete Collector.

- Once you confirm deletion, the collector is deleted.
Manually Deleting Collector from Host Resource
In some cases you might need to manually stop the collector services and then remove/uninstall the collector from your host resource.
Windows
Navigate to the Services Control panel for your Windows machine and stop the LogicMonitor Collector and LogicMonitor Collector Watchdog services. You can then uninstall the collector using the standard Windows Add or remove programs controls.
Linux
Navigate to [LogicMonitor Collector Directory]/agent/bin and run the sbshutdown script to shut down both the collector and Watchdog services. For example:
# cd /usr/local/logicmonitor/agent/bin
# ./sbshutdownThen you can uninstall the collector by calling:
# ./uninstall.shAlternatively, you can do a recursive removal of the LogicMonitor collector directory and all its contents (there are symbolic links in /etc/init.d for logicmonitor.collector and logicmonitor.watchdog, and those should be removed to ensure the services do not keep running in memory). For example:
# rm -rf /usr/local/logicmonitor