Overview
The Auto-Balanced Collector Groups Update Set for LogicMonitor’s ServiceNow CMDB Integration application makes it possible for you to provision devices to Auto-Balanced Collector Groups (ABCGs). Without this Update Set, a device can only be provisioned to a single, static Collector.
As discussed in Auto-Balanced Collector Groups, an ABCG is a group of Collectors that share device load. ABCGs bring more efficient Collector management and monitoring through auto-balancing of device load, improved scalability, and streamlined device creation.
Components Included in the Update Set
- New business rules
- LM – Device Provision ABCG. This is a replacement device provisioning rule that supports provisioning to ABCGs or individual Collectors.
- LMb – Clear ABCG Value. Removes the ABCG value on a CI when the device is deprovisioned using the LogicMonitor Enable flag.
- New scheduled jobs
- LM – Collector Import (with Group Id). This is an updated Collector import job that includes the Collector’s group ID. Note: In a later step you will disable the old one and schedule this new one.
- LM – Collector Groups Import. New Collector group import job that will import your ABCGs as CMDB groups.
- LM – Standard Device Import – ABCG. New Import Script that will import the autoBalancedCollectorGroup field as part of the import.
- Provision Devices to ABCG. A new provisioning form that supports the selection of an ABCG and assigns new devices to an ABCG.
- Other supporting components:
- New Script Include for Device Imports
- New import set and transform maps for ABCGs
- Maps to CMDB groups
- Additional mapped field in Base Device Transform Map for ABCG ID
- Additional fields that extend the CMDB Group table to encompass ABCG groups support.
Setup
This Update Set requires the 1.1.3 version or later of the LogicMonitor ServiceNow CMDB Integration application. If you haven’t updated your installed version of the application, you must do so prior to installing this Update Set.
Getting the Update Set
- Navigate to LogicMonitor’s GitHub repository.
- Click the Clone or Download button.
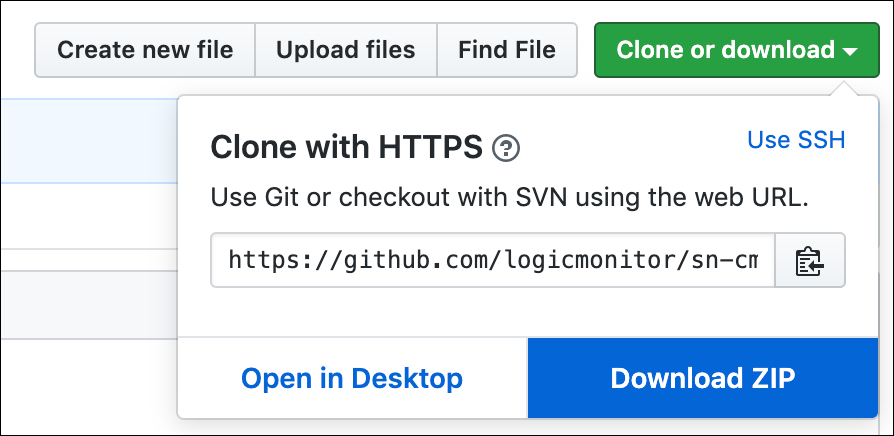
- Click the Download ZIP button.
- Save the ZIP file to your local machine and extract the contents.
Installing the Update Set
- In your ServiceNow instance, navigate to System Update Sets | Retrieved Update Sets.
- Click the link that reads “Import Update Set from XML”.
- Select the sn-cmdb-autobalancedcollectors.xml Update Set file and click Upload.
- Select the “Auto Balanced Collectors” Update Set from the list.
- Click the Preview Update Set button. No errors or conflicts should be returned. If any are, please contact LogicMonitor’s customer support.
- Commit the Update Set to complete the installation.
Finalizing Setup
Prior to using the features of this Update Set, you should have ABCGs configured in your LogicMonitor portal. For more information on configuring ABCGs, see Auto Balanced Collector Groups.
- Run the included “Auto Balanced Collectors – Setup” Fix Script to disable the out-of-the-box provisioning business rule and enable the new one provided:
- Navigate to https://.service-now.com/nav_to.do?uri=%2Fsys_script_fix.do%3Fsys_id%3D1d498247db933300ed7e9b81ca9619ea
- Click the Run Fix Script button.
- Click the Proceed button.
- After running the Fix Script, run the scheduled jobs listed below. We recommend that you schedule them to run on a regular basis. The frequency will depend on how frequently your Collectors or Collector Groups change.
- LM – Collector Import (with Group Id)
- LM – Collector Groups Import
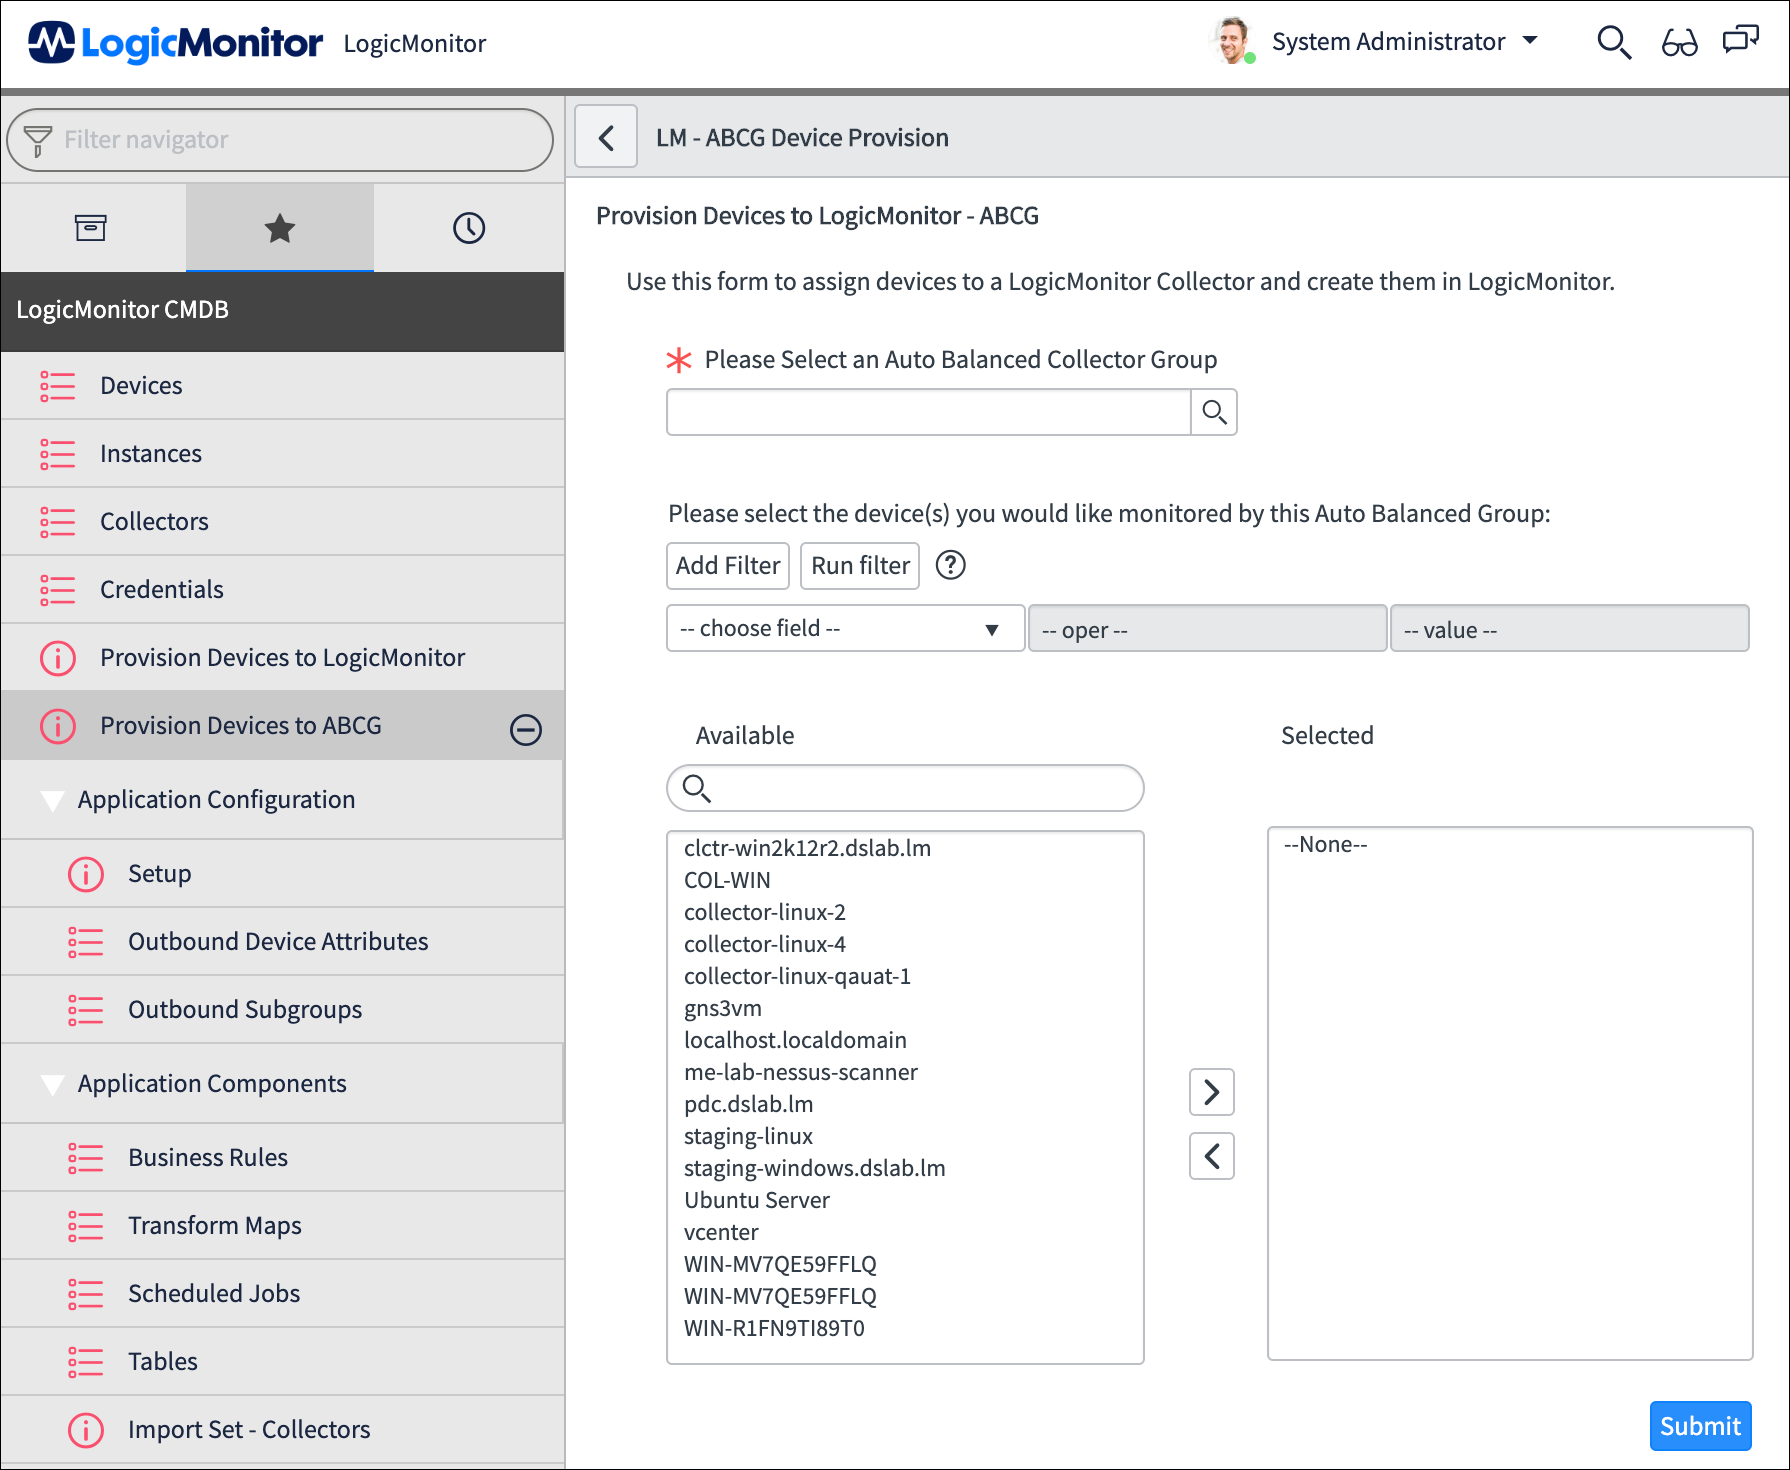
Manually Provisioning Devices to ABCGs
To manually provision devices to ABCGs, navigate to the “Provision Devices to ABCG” module and use the displayed form to select the ABCG to which you are provisioning device(s), as well as the device(s) you want to provision.
How Provisioning to ABCGs Works
A new field titled LM Auto Balanced Collector Group ID is added with the Update Set. If this field’s value is set to 0 (or empty) at the time the CI is provisioned, the device will be created using the original Collector association method. If there is a value in that field, device creation is attempted using that value as the autoBalancedCollectorGroupId value in the create payload.
If you are looking to automate the creation of LogicMonitor devices and assignment to ABCGs, write the desired ABCG value to x_lomo_lmcmdbint_lm_abcg_id before changing the LogicMonitor Enable field to true.
A Configuration Management Database (CMDB) contains all relevant information about the hardware and software components used across an organization’s IT environment and defines the relationships and interdependencies between those assets. This enables you to understand, manage, and report on the service being delivered. A CMDB is valuable if you are working with reliable data. With thousands of devices being added across distributed systems, it’s easy for a business-impacting issue to slip through the cracks.
The LogicMonitor ServiceNow CMDB Integration eliminates the typical time-consuming data sifting across systems so you can understand how the entire ecosystem is working, from infrastructure to applications, and be immediately notified when changes occur.
Note: By default, this integration does not synchronize out of the box. Out-of-the-box bi-directional data synchronization could be detrimental to your LogicMonitor resource or CMDB data, which is why the application was designed with deliberate safeguards. The code to synchronize devices needs to be enabled, scheduled, triggered or told when to run.
The LogicMonitor ServiceNow CMDB Integration is available as an application in the ServiceNow Store. Setting up the application involves the following:
- Installing the LogicMonitor CMDB Integration application to your ServiceNow instance
This application is available from the ServiceNow Store, and you install it within your ServiceNow instance. - Configuring the LogicMonitor CMDB Integration Application
This involves using values from your LogicMonitor portal and entering them into the application in your ServiceNow instance.
After you set up the integration, you can also test it to ensure a successful connection is established between your LogicMonitor portal and the ServiceNow CMDB.
Recommendation: Test implementation in non-production environments. CMDB data is important and LogicMonitor resources and monitoring data are equally important. Implementation of this application should be thoroughly tested using your non-production instances of ServiceNow and your LogicMonitor sandbox accounts prior to rolling out to production.
Requirements for Setting up the LogicMonitor ServiceNow CMDB Integration
To set up the LogicMonitor ServiceNow CMDB integration, you need the following:
- Access to a ServiceNow account with the “admin” role
- API only user in LogicMonitor configured with the username as “cmdb_sync” and an associated role that provides the appropriate permissions based on use case
Note: For full functionality, the account needs the following permissions:
- “View” for Collectors
- “Manage” for all resources
- “Manage” for all resource groups
Additional permissions may be needed based on your use case and environment.
For information on adding an API only user in LogicMonitor, see Adding an API Only User.
For more information about the current application version and release notes, ServiceNow release compatibility, and ServiceNow licensing and dependency requirements, see LogicMonitor CMDB Integration in the ServiceNow Store.
Installing the LogicMonitor CMDB Integration Application to your ServiceNow Instance
To install the LogicMonitor CMDB Integration application, navigate to the ServiceNow Store and request the LogicMonitor CMDB Integration application. To request the application, see the LogicMonitor CMDB Integration application in the ServiceNow Store.
After you request the application, reach out to your Customer Success Manager so that LogicMonitor can approve the app installation for you.
For more information about installing an application from ServiceNow, see the applicable version of Install a ServiceNow application from ServiceNow.
Important: Depending on your environment, this application can take up to 30 minutes to install. Do not attempt to install the application more than once. You can check the progress of your installation in ServiceNow. For more information, see How to check the progress of a committed update set documentation from ServiceNow.
Configuring the LogicMonitor CMDB Integration Application
- In ServiceNow, navigate to the LogicMonitor CMDB application.
- In the application’s properties, set the following values:
- LogicMonitor Account Name
- API Access ID
Note: This is the value for the Access ID for the API only user you created.
- API Access Key
Note: This is the value for the Access Key for the API only user you created.
- Save the application.
Testing the LogicMonitor ServiceNow CMDB Integration Connection
Recommendation: Test implementation in non-production environments. CMDB data is important and LogicMonitor resources and monitoring data are equally important. Implementation of this application should be thoroughly tested using your non-production instances of ServiceNow and your LogicMonitor sandbox accounts prior to rolling out to production.
To test the LogicMonitor ServiceNow CMDB Integration connection, navigate to the LogicMonitor CMDB application in ServiceNow, and execute the scheduled script for the “LM-Collector Import” Scheduled Job.
For more information, see the Testing Schedule Script Executions documentation from ServiceNow.
You can confirm the connection is successful by navigating to Collectors within the application and verifying the collectors imported. If the collectors have not imported, check the error logs. For more information, see the applicable version of the View error logs documentation from ServiceNow.
