Microsoft Entra ID, formerly known as Azure Active Directory, is Microsoft’s enterprise cloud-based identity and access management (IAM) solution. It provides secure access to resources like Microsoft 365, syncs with on-premises Active Directory, and supports authentication protocols such as OAuth, SAML, and WS-Federation. Entra ID enhances security through features like Multi-Factor Authentication (MFA), Conditional Access, and Identity Protection, making it a comprehensive tool for managing user identities and access in a cloud-first environment.
In July 2023, Microsoft rebranded Azure Active Directory to Microsoft Entra ID to improve consistency with Microsoft’s other cloud products. The goal was for Microsoft to offer a comprehensive identity management solution beyond just traditional directory management services. Microsoft Entra includes other products like identity governance, privilege access management, and decentralized identity solutions. Unifying these services under the Entra brand allows Microsoft to offer a more integrated and holistic approach to identity management.
What was Azure Active Directory?
Azure Active Directory was a directory service built by Microsoft in 2000 and released in the Windows 2000 Server edition. As later versions of Windows Server were released, the directory was improved, and additional services were tacked on (like Active Directory Federation Services). Teams with subscriptions to Microsoft 365, Office 365, or Dynamics CRM already had access to an edition of Azure AD.
First and foremost, Azure AD helped organizations manage identities. Rather than team members connecting to many different components directly, they could connect to Azure AD instead. This freed companies from the burden of on-premise security management. Instead of spending time and money on in-house security measures that may not be foolproof, enterprises used Azure for free or at a very low cost. They received state-of-the-art security that had been perfected over time. In addition to identity management, Azure’s other big claim to fame was user access management.
As Azure became more complex and multifaceted, oversight and management became more challenging. However, with Azure monitoring, teams could track all Azure metrics and ensure maximum ROI for their Azure spending. This gave teams a robust, lean system to help them grow and conserve time, money, and resources.
Microsoft Entra ID key features
Now, there’s Microsoft Entra ID, a comprehensive cloud-based identity management solution. It provides a robust set of features that helps businesses manage and secure user identities across modern digital environments, including:
- Single Sign-On (SSO): Allows users to access multiple applications and servers with one set of credentials instead of multiple login credentials, improving the user experience.
- Multi-Factor Authentication (MFA): Enhances security by requiring users to use two verification methods (email/text access codes, authenticator application codes, and hardware authentication) before accessing data.
- Granular access controls: Allows organizations to set granular or conditional access policies based on user, device, location, and real-time risk detection.
- Identity Protection: Helps prevent identity-based risks by using machine learning algorithms to detect suspicious sign-ins and other fraudulent activity.
- Privileged Identity Management (PIM): Allows organizations to use just-in-time privileges with approval workflows to minimize the number of people accessing sensitive data.
The Entra ID product suite offers more than great features for businesses. It also has security features built into the core offering, helping businesses secure data, protect customers, and comply with regulations.
It does this in a few ways:
- Customizable access controls to help organizations limit access to data and the scope of potential data breaches
- Features to help businesses comply with regulatory requirements like GDPR
- Encryption of data at rest and in transit
- Detailed logging for security analysis
- Regular security audits and penetration testing
One big benefit of working with Entra is that you can use other software in the Microsoft ecosystem. Entra integrates seamlessly with other Microsoft products, such as Microsoft 365, Azure Services, Dynamics 365, and the Power Platform.
Microsoft Entra also works well for developers, allowing them to build applications and authenticate seamlessly. It supports:
- Industry-standard protocols like OAuth 2.0 and OpenID Connect
- SDKs and APIs to integrate custom applications with Entra ID
- B2C capabilities for managing customer identities
Businesses that use Microsoft Entra get this comprehensive set of features—and more—that allow them to streamline identity management in their organization. It helps improve security, streamline access management, and enhance the overall cybersecurity posture.
Active Directory vs. Azure AD vs. Entra ID
While often used interchangeably, there is a difference between Active Directory and Azure AD. Azure Active Directory evolved from the cloud-based identity and access management solutions of its time. First released in 2000, Microsoft built Active Directory Domain Services to offer enterprises more control over infrastructure management. Single users could log in and manage various infrastructure components from one place, marking a turning point in directory management technology.
Azure AD was like an upgraded version of Active Directory, providing Identity as a Service (IaaS). IaaS is a cloud-based authentication service operated by an offsite provider that ensures that users are who they say they are.
Entra ID is the evolution of Azure AD. It takes the benefits of IaaS and adds features that help businesses integrate with modern cloud resources and hybrid environments. It has the capabilities of Activity Directory and Azure AD (user logins, user roles) and adds modern tools like OAuth for developer access, risk-management features, identity protection, and privileged access.
Entra ID is new and offers more flexibility and features than Azure AD and Active Directory, making it the clear solution for businesses that want a reliable service that offers more. But it’s important to understand what extra it offers. Here are a few ways it stands apart from traditional directory services.
Scope and vision
Azure AD and Active Directory were primarily focused on on-prem and cloud-based identity and access management. Entra ID is more comprehensive and is included in the entire Entra product family. It has other features like Entra Permissions Management and Entra Verified ID to help businesses build a more comprehensive identity management solution.
Product features
Azure AD and Active Directory contained many features that help businesses manage user identity by assigning IDs and roles to users. Entra ID offers a more comprehensive set of features and improvements in decentralized management, multi-cloud features, and advanced security and compliance capabilities.
Integrations
Active Directory was an identity management solution, and Microsoft Azure AD added to that by offering integrations with Microsoft’s cloud services. Entra ID has more flexibility. It not only integrates with Microsoft’s cloud services but also extends beyond Microsoft’s ecosystem to offer better support in multi-cloud and hybrid environments.
Security approach
Azure AD’s security approach was based on cloud-based identity security, and Active Directory used Lightweight Directory Access Protocol (LDAP) to manage on-prem authentication. Entra ID is broader and includes security features like threat detection, identity governance, and risk-based conditional access for different scenarios.

What are the benefits of Microsoft Entra ID?
Many teams operate in an increasingly hybrid model, which means companies must be able to move fluidly between onsite and remote resource management. Each team member must be empowered to access what they need regardless of location, which raises new security concerns. When many devices attempt to gain access, how do admins know whether they are legitimate users or rogue cyber attackers?
As infrastructure diversity grows, organizations need to uplevel their authentication methods and make sure privileges are in the hands of only those who need them. Entra ID offers precisely this, along with other key benefits, for modern organizations that want to prioritize both flexibility and safety. Rather than a traditional network access security perimeter, Microsoft provides authentication at the layer of organizational identity.
Access to various applications is simplified
With features like single sign-on, IT administrators can access many different apps from the same login. This is done either through authentication or federation. Entra ID also provides a more granular level of control compared to Azure AD, which helps in multi-cloud environments.
Users save time with self-service features
Team members can reset passwords by responding to extra security questions. This means authority isn’t required to unlock user accounts whenever something happens. Users can also create and manage new groups and associated memberships. Dynamic groups are groups where membership is automatically given according to a user’s attributes.
Security is achieved through multiple features
Entra ID provides a two-step verification process for users. Different users may be granted conditional access according to device type, network, user roles, and even the risk level of signing in. Extra protection is also available through advanced detection of identity risks and enhanced PIM.
Collaboration for B2B and B2C is streamlined
Teams can add partners to various projects and share pertinent information. If a business has its own app, customers can log in, and Entra ID will manage their identities.
Detailed reports give more control over user activity
Administrators are never in the dark with real-time data and access to high-quality reporting. They can access accounts that might be in danger and identify spam accounts. Activity logs are given in tenant reports.
How to set up Microsoft Entra ID
Organizations can set up Microsoft Entra ID using a few simple steps:
- Sign in to the Azure portal to access your Microsoft account
- Create an Entra ID tenant by searching for Entra ID and selecting “create Tenant”
- Configure basic settings like organization name and domain
- Set up a custom domain if available
- Create new user accounts in Microsoft Entra (or sync existing Active Directory accounts if coming from an on-prem installation)
- Set up groups and user roles to restrict access to only what’s needed
- Configure security settings like MFA for enhanced security
These steps will allow you to set up a simple Entra ID solution. Depending on your needs, additional steps are available, such as integrating pre-existing applications like Office and custom apps and creating reporting to gain insights into the Entra environment.
Microsoft Entra ID editions
Microsoft Entra ID is available in four versions: Free, Entra ID P1, Entra ID P2, and Microsoft Entra Suite.
Free
The free version is accessible once a business signs up for a Microsoft service, such as an Office 365 subscription. Users of the free Entra ID get a taste of the platform’s capabilities and how it provides value in the era of cloud-based technology. These capabilities include:
- Scalability: Free Entra ID supports up to 50,000 objects (users, roles, and assignments) and up to 300,000 for verified domains.
- Registration of Devices: Devices can be registered in Entra ID’s free version to support work-from-home employees or those who bring their own devices to work.
- Security Reports: While not the most comprehensive reports available in Entra ID, the free version includes standard reports that help teams monitor security.
- Microsoft Entra Connect: This is available in all editions.
- PowerShell: A command environment that utilizes cmdlets to automate things in the management of systems
The free edition is ideal for testing but not for a live environment because it doesn’t have key security features. Many teams get comfortable with the free version and upgrade to the premium as their needs advance.
Premium 1 and Premium 2
There are two premium versions of Entra ID, known as P1 and P2. P1 opens users up to an entire realm of new controls, like:
- Advanced Security Reports
- Advanced Application Use Reports run by machine learning
- Self-Serve Group Management
- System for Cross-domain Identity Management support
- Multi-factor Authentication
- User Licenses for Microsoft Identity Manager
Premium 2 is a step up for advanced enterprise technology management. P2 has all the basic functions of P1, with eight added functions. These additional functions fall under the categories of threat protection and identity governance. With P2, users can:
- Receive tailored recommendations to boost security
- Calculate levels of risk
- Provider greater capability to investigate risks when detected
- Set up limited timeframes for specific resource access
- Receive an audit history
- Manage access to groups and apps for both internal and external users
- Implement risk-based access controls
- Enable privilege identity management
Entra ID Governance
Entra ID governance is an advanced set of features for P1 and P2 customers. It contains additional features like:
- Lifecycle workflows
- Identity governance dashboard
- Advanced entitlement management
Office 365 is free, and extra features are included in the following editions: E1, E3, E5, F1, F3. Premium 1 costs $6 per user per month, Premium 2 costs $9 per user per month, and ID Governance costs $12 per user per month. Both Premium editions come with a 30-day free trial. Get more visibility and insight into your Azure Cloud costs.
The future of cloud computing
Microsoft Entra ID is anything but static. Features are added and updated regularly for superior functionality. Security needs are changing quickly as cyberattacks become more sophisticated and companies transition to remote work flexibility. As the second-largest cloud-based service provider, Entra ID and Microsoft Entra External ID equip teams to get ahead of their competition in cloud computing.
Interested in maximizing Azure ROI, gaining visibility, and sealing security vulnerabilities? Monitoring your company’s entire Entra ID infrastructure can give you a single-pane view of all your critical business operations.
Azure Stack HCI (hyperconverged infrastructure) is a robust solution that integrates Windows and Linux virtual machines (VMs) or containerized workloads. It can do this with seamless connectivity to Microsoft Azure for enhanced cloud-based services, comprehensive monitoring, and streamlined management.
This hybrid solution modernizes on-premises data centers by integrating them with cloud services for improved performance, scalability, and security.
How Azure Stack HCI works in cloud computing
With a hybrid cloud approach, your business can take control of its cloud journey, seamlessly integrating on-premises hardware with cloud services at a pace that suits your unique needs and timelines. This is thanks to seamless integration with Azure services like Microsoft Entra ID (formerly Azure Active Directory), Azure Monitor, Azure Backup, and more.
This integration ensures a consistent experience across on-premise and cloud infrastructures. You use the same management tools as an administrator across all your services. As a result, Azure Stack HCI is one of the fastest ways to get up and running with cloud computing.
This also means there can be significant cost savings when using Azure Stack HCI instead of making a hard switch from on-premise hardware to the cloud. At implementation time, you can use existing servers or commodity hardware, and then you can gradually move to cost-effective cloud solutions.
Beyond these benefits, Azure Stack HCI offers robust security features. With hyper-converged infrastructure, you can easily achieve virtual machine encryption and network micro-segmentation. Compared to implementing the same functionality in hardware, you can more easily manage HCI solutions and be more cost-effective.
How does Azure Stack HCI work?
Azure Stack HCI works by combining the functionality of traditional hardware elements (computing, storage, networking) into a single HCI solution with virtualization. On a practical level, you can administer all of these components through the Windows Admin Center.
Windows Admin Center is a web-based management console for managing a complete IT infrastructure. Since components like networking and storage are virtualized in an HCI environment, it’s much faster and less expensive to get up and running compared to the old ways of buying hardware, installing it, and maintaining it.
So, if an IT administrator wants to deploy a new instance of Microsoft SQL Server, creating a new virtual machine using storage from the Azure cloud is effortless. Similarly, you can quickly deploy a Docker application in a new Linux instance.
The tight integration with other Azure services simplifies the setup of other critical components, like authentication against Entra ID and defining network topology. With all the essential tasks of managing an IT environment available at a sysadmin’s fingertips, it empowers an organization to deploy new solutions rapidly.

Why choose Azure Stack HCI?
Azure Stack HCI offers a robust set of benefits that make it an excellent choice for organizations looking to modernize infrastructure and take advantage of hybrid cloud computing. Here are a few of the key benefits companies can expect to see:
- Hybrid cloud infrastructure: Offers seamless integration between on-premise infrastructure and cloud services, allowing organizations to maintain control over sensitive data while still taking advantage of cloud capabilities.
- Edge computing capabilities: Process data closer to the source, reducing latency and improving the performance of edge applications.
- Azure service integration: Get integration with various Azure services that make life easier, like Azure Backup, Azure Security Center, Azure Monitor, and others.
- Cost management and optimization: Allows organizations to use existing hardware to manage costs and a flexible pricing model that helps them grow into their cloud infrastructure.
- Robust security and compliance: Includes advanced security features like shielded virtual machines, encrypted networks, and Security Center integrations to help organizations protect their data and comply with regulations.
- Scalability and flexibility: Allows teams to easily scale their resource usage based on current needs and quickly adapt when the situation changes.
- Performance enhancements: Includes technology like Storage Spaces Direct and Software-Defined Networking to deliver high performance to both traditional and cloud environments.
The key features of Azure Stack HCI
HCI technologies greatly simplify security, scalability, and management. However, Azure Stack HCI’s hybrid cloud functionality makes it stand out from the crowd. With built-in integration with Microsoft’s Azure cloud service, you can easily transition from on-premise, hardware-defined infrastructure to a modern cloud-based environment.
Azure Stack HCI offers all the standard features of HCI solutions.
Virtualization
Two popular virtualization options Azure HCI offers are Hyper-V and containerization. Hyper-V allows for multiple virtual machines on the same server, while containerization allows teams to set up containerized workflows using the Azure Kubernetes Services (AKS) and similar software.
Software-defined infrastructure
Azure HCI also allows organizations to use software to define the infrastructure for networking and storage, where the configuration is abstracted away from the underlying hardware. These features allow teams to change infrastructure in real-time and programmatically based on current needs without investing in new hardware, licenses, and other expenses.
Edge computing
Edge computing allows the deployment and management of workloads closer to data generation points, reducing system latency and performance. Azure HCI includes Azure Arc, allowing organizations to connect their management services to on-premise, edge, and cloud services.
Security
Azure HCI comes secure out of the box, including consistent Secure Boot, UEFI, and TPM settings. It also contains security features that make things easier:
- Windows admin security tool
- Device and credential guard
- Bitlocker and SMB encryption
- Windows Defender antivirus
Azure HCI also has resources to help organizations comply with security standards, including PCI, HIPPA, and FIPS.
Simple management
Azure HCI offers an easy management portal for organizations to set up and modify their IT infrastructure. The Azure Portal gives an overview of HCI clusters, allowing teams to monitor systems at scale and manage Azure Services. Windows Admin Center is also available, giving teams the ability to manage individual virtual machines and edge services. Additionally, it provides many resources to collect resource metrics to see what resources your environment uses.
Performance optimization
Azure HCI offers many performance tools to help teams manage high-demand environments. It offers many solutions that help teams monitor performance across their infrastructure and increase performance. Some common performance tools available are high-performance disks for quick file access and data optimization and GPU partitioning for AI and machine learning jobs.
Azure Stack HCI management and deployment options
While the Windows Admin Center greatly simplifies IT deployments, Azure Stack HCI offers other flexible management options. Depending on your company’s existing cloud footprint and the abilities of your sysadmins, some of the other management and deployment options might be a better fit.
For example, organizations already using some Azure cloud services can use Azure Portal to manage their Azure Stack HCI components. Administrators experienced with Microsoft’s PowerShell can also use that environment to create programmatic and script deployment and management tasks.
Azure Stack HCI supports a specialized form of scripts known as Deployment Scripts, which provide advanced deployment automation options. This can be especially handy for larger organizations that want to scale their Azure Stack HCI footprint faster.
Companies that invest in virtualization solutions can also utilize some of their preexisting tools, including VMWare Center and System Center. The ability to use the tools that administrators are already familiar with is another reason that Azure Stack HCI can be a cost-effective way to migrate your organization’s infrastructure into the cloud.
Deploying Azure Stack HCI
Deploying Azure HCI will require some basic information:
- Server name
- Domain name
- Computer account names
- Organizational unit (OU)
- Static IP address
- RDMA networking
- VLAN ID
- Site names (for stretched clusters)
Steps to deploy Azure Stack HCI
There are several steps to deploy Azure HCI once you make a plan and gather the data for deployment:
- Initial setup: Install Windows on each node and configure the networking. Run the Azure HCI OS setup wizard to begin the installation.
- Cluster creation: Use Windows Admin Center to create the cluster and validate the configuration.
- Azure registration: Register the created clusters with Azure and set up Azure Arc for management.
- Integrate with existing systems: Configure Azure hybrid services and install Azure monitoring and management tools. Connect systems with pre-existing on-prem systems.
Deployment best practices
Deploying Azure HCI may be complex, especially if you have a large deployment. Several best practices are available that will help ensure a smooth installation.
- Thoroughly plan the deployment, including the network infrastructure, storage requirements, and software requirements.
- Document the deployment process to ensure you can repeat it in the future.
- Create a small-scale deployment to test before deploying at scale.
- Keep all systems updated with patches before deployment.
- Verify the minimum server requirements and that all servers have the same make and model (64-bit Intel Nehalem or AMD EPYC, minimum 1.4 GHz, 32 GB of RAM per node, 4 GB of RAM per TB of cache, high-bandwidth, low-latency network connection).
Use cases for Azure Stack HCI
In addition to the ability to quickly roll out IT infrastructure and applications, Azure Stack HCI has an almost unlimited number of use cases.
You can use Azure Stack HCI to create private clouds that offer a company the benefits of cloud computing with the security of on-premise installations. This is especially important for regulated industries like finance and healthcare. HCI allows organizations to store data securely, such as Electronic Health Records (EHR), financial data, and customer information.
You can also use it to make a high-performance computing cluster for demanding scientific and engineering applications by quickly creating virtual clusters. Doing this helps researchers create clusters to perform tasks like complex calculations, weather modeling, and genomic sequencing.
Azure HCI is also beneficial to any organization in the content distribution business. It can serve as the content delivery network, delivering text, images, and videos to customers worldwide using edge servers to manage delivery.
Adding remote offices to a corporate network with Azure Stack HCI is also easy. Using the Azure cloud as a bridge, remote workers can have the same experience as being on a corporate network, thanks to Azure Stack HCI’s virtualized networking solutions.
Azure Stack HCI is also well-suited to creating a DevOps environment for modern application development, testing, and deployment. It allows you to quickly deploy new apps and services and automate testing and debugging processes.
Learn more about Azure integrations
Are you ready to enhance your IT infrastructure by using Azure? Visit our Azure Monitoring Solutions page to learn more about how LogicMonitor can help you seamlessly integrate Azure with your current infrastructure.
Microsoft’s cloud object storage service, Azure Blob Storage, is designed for storing large amounts of unstructured data, like text, video, and audio. It provides scalable and cost-effective storage solutions for businesses that have large amounts of invaluable data that need to be stored but follow no organization.
Ensuring unstructured data is easily accessible and manageable is how Microsoft Azure Blob Storage provides solutions for companies that need to store large quantities of disorganized information.
What is Azure Blob storage?
Imagine two people—Paul and Lindsay—storing accessories. John arranges his accessories by color on shelves while Lindsay tosses hers into a pile. Lindsay’s approach is like Azure Blob Storage: she can throw any accessory into the pile without arranging anything. In this way, Lindsay can grow her stack almost exponentially, while Paul will eventually run out of shelf space.
Storing large volumes of data without hierarchy or organization is, unfortunately, a necessary evil for large companies, even though sifting through unorganized data is challenging. And that’s where Azure Blob Storage delivers more than alternative cloud storage options.
Blob is the shortened term for ”binary large object.” Azure Blob Storage is Microsoft’s cloud platform that allows developers to store large amounts of unstructured data or data that doesn’t fit into a specific data model or definition, like text or binary data.
One of the key features of Microsoft Azure Blob Storage is that it allows large file transfers through a file system network by splitting files into smaller pieces when uploaded. Once uploaded to the cloud server, the large files appear together in one file. Large files of unstructured data might include audio, video, text, and other data that is accessible through an Internet connection.
Key applications of Blob Storage
- Sharing videos, documents, or images through a browser
- Storing video and audio
- Updating and storing log files
- Data backup, restore, archiving, and disaster recovery
- Internet of Things (IoT) data storage
- Data analysis
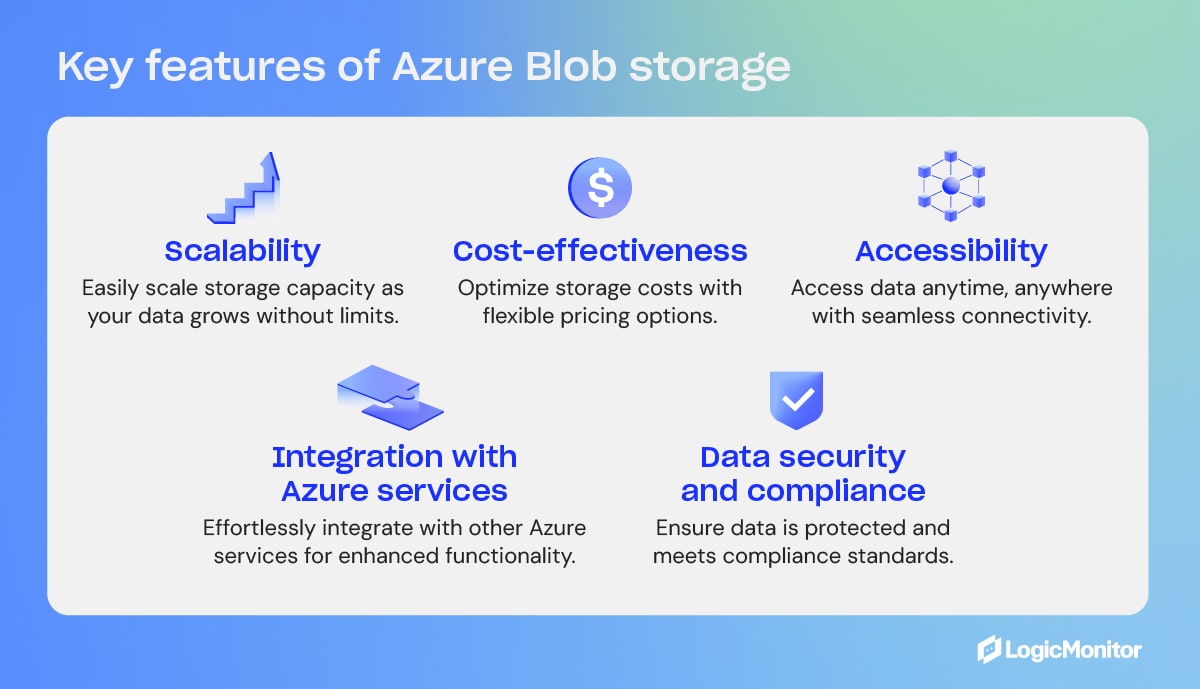
Key Features of Azure Blob Storage
- Scalability
- Cost-effectiveness
- Accessibility
- Integration with Azure services
- Data security and compliance
What is Blob Storage in Azure?
Blob Storage is not a stand-alone product but a feature within the broader Azure platform. Blob is one of the core storage solutions that Azure offers, designed to hold large amounts of unstructured data, such as text or binary data. As part of Microsoft’s Azure web services, Blob Storage integrates with other Azure services.
Access methods
Objects in Azure Blob Storage are accessible via HTTP/HTTPS anywhere in the world through Azure Storage REST API, Azure CLI, Azure PowerShell, or an Azure Storage client library. Client libraries are available in different languages, including .NET, Node.js, Java, Python, PHP, Ruby, and Go. Azure Blobs are manipulated with .NET code.
Blob containers
Blob containers work like drawers and make file management easier. One container can store audio files, while another stores video files. Furthermore, one storage account can include unlimited containers, and a container can keep unlimited blobs.
Containers are self-contained, and each container can hold up to 500 TB.
The names of containers must have a valid IP address in order to form a unique resource identifier (URI). Microsoft offers these guidelines when naming containers:
- Keep names between three and 63 characters long
- Start names with a letter (lowercase only) or number
- Use dashes (-) without spaces; do not use two or more dashes consecutively
Types of blobs in Azure Blob Storage
Microsoft Azure Blob Storage includes three types of blobs: block blobs, append blobs, and page blobs. Once a blob is created, its type cannot be changed. Blob updates are specific to appropriate operations. Here is an overview of the different types of blobs and what they do.
Block blobs
- Best for storing media files, text files, documents, and binary files. They can be different sizes (4000 MiB max.) and contain up to 50,000 blocks.
- Use case: Blocks uploaded to storage accounts are associated with specific block blobs and become part of blobs when a list of blocks, including new block IDs, is committed. Blocks remain uncommitted until they are saved or discarded. Uncommitted blocks can total up to 100,000.
Page blobs
- Collection of 512-byte pages used for random read and write operations.
- Use case: Page blobs are created by writing the maximum size a blob will grow on a page blob. Unlike block blobs, write-to-page blobs are committed directly to a blob. The total size of a page blob is 8 TiB.
Append blobs
- Designed for append operations like storage and log file updating.
- Use case: Add blocks to the ends of blobs using the “Append Block” operation. Existing blocks cannot be updated or deleted. Blocks can be different sizes, with a maximum of 4 MiB each, and include up to 50,000 blocks.
You can append blobs using the command line:
1. Install the Azure SDK for Python.
If you haven’t installed the Azure SDK, you can do so using pip.
pip install azure-storage-blog2. Set up the Azure Blob Storage connection.
You’ll need your storage account name, account key, and the container name of where your blob is located or where you want to create it.
from azure.storage.blob import BlobServiceClient, BlobClient, ContainerClient

# Replace with your values
account_name = "your_storage_account_name"
account_key = "your_storage_account_key"
container_name = "your_container_name"
blob_name = "your_blob_name"

# Create a BlobServiceClient
blob_service_client = BlobServiceClient(account_url=f"https://{account_name}.blob.core.windows.net/", credential=account_key)

# Get the ContainerClient
container_client = blob_service_client.get_container_client(container_name)

# Get the BlobClient for the Append Blob
blob_client = container_client.get_blob_client(blob_name)
3. Get or create an append blob.
If an append blob doesn’t exist, you can create one. If it already exists, you can append data to it.
# Create the Append Blob if it doesn't exist
blob_client.create_append_blob()
4. Append data to the blob.
You can now append, adding new data at the end of the blob.
# The data you want to append
data = "This is the data to append\n"

# Append data to the blob
blob_client.append_block(data)
5. Confirm the append operation.
You can take this additional optional step to verify that your data has been correctly appended to the blob.
# Download the blob's content
downloaded_blob = blob_client.download_blob()
print(downloaded_blob.readall().decode('utf-8'))
Alternatively, to perform the append operation using the command line, you can install Azure Portal or Azure Storage Explorer, which gives you the ability to perform the operations using a graphic interface.
Storage and pricing tiers
Data storage costs depend on two factors: transaction costs and storage costs. As a company’s data grows in the cloud, it can be organized based on how frequently it is accessed and how long it will stay in the cloud. Azure Blob Storage offers three access tiers to store blob data depending on use, with pricing options to match your needs.
- Hot tier: Best for storing operational use data that is frequently accessed or modified; good option for migrating prep data to cool access tier; online access; highest storage cost; lowest access cost.
- Cool tier: Best option for occasionally accessed data, like backup and disaster recovery files, infrequently used data that requires availability, and large data sets that need cost-effective storage. 30 days of storage are recommended, and online access is available. The cool tier has lower storage and access costs than the hot tier.
- Archive tier: Offline option for storing rarely accessed data (once in 180 days), like long-term backups, secondary backups, raw data, compliance data, and archival data; lowest storage cost but higher data retrieval costs and latency than the hot and cool tiers.
Changing storage tiers
Tiers can be changed by calling the REST API Set Blob Tier, which is the best option for switching from hot to cool, or by calling the Copy Blob operation, which is suggested for moving archival blobs online or switching from cool to hot. Changing from hot to cool (or vice versa) or to archive initiates changes instantly, but changing an archived blob to a hot or cool tier requires rehydration, which can take up to 15 hours.
Blob storage security
Cloud encryption encodes data as it travels between cloud-based storage units and their respective locations. All blobs, regardless of type, undergo encryption before being stored in Microsoft’s Azure Blob Storage cloud. In addition to cloud security, Azure Blob Storage offers ways to specify who can access data.
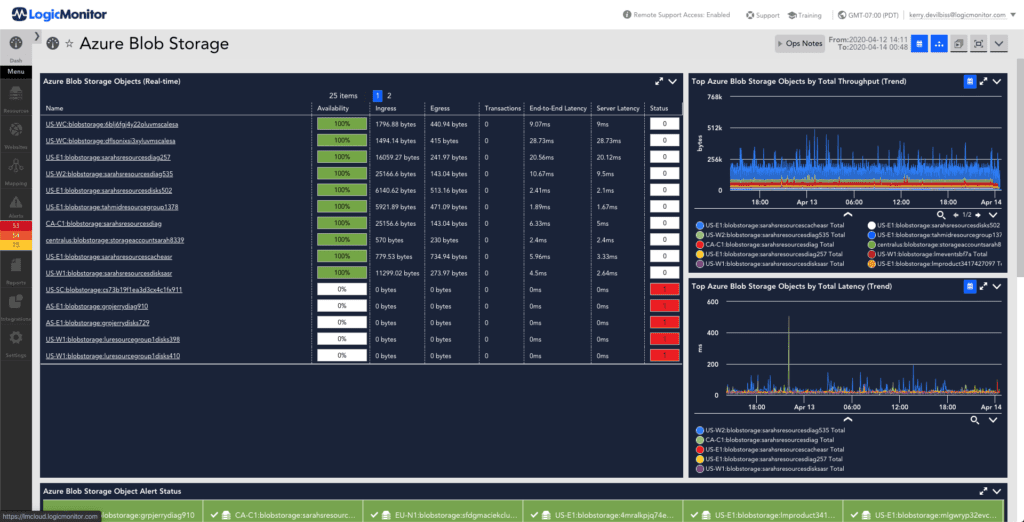
Getting started monitoring Azure Storage with LogicMonitor
LogicMonitor is an industry leader in monitoring networks and web services. These steps will help you apply LogicMonitor to Azure storage services.
- Your LogicMonitor setup for Azure storage begins with registering your LogicMonitor account with Microsoft Identity Access Management (IAM) and adding your Azure storage account and environment to LogicMonitor.
- Once you’ve given LogicMonitor access to your Azure storage, you’re ready to create and customize your data sources to fit your organization’s needs.
- With your storage options configured the way you like, consider your organization’s needs and size resources as necessary to optimize your storage performance.
Comparing Azure Blob storage with other top web services
Azure Blob shares the market with a number of other similar web services. Its fiercest competitors are Amazon Web Services’ Simple Storage Service (AWS S3) and Google Cloud Storage (GCS). AWS S3 and GCS are each designed to perform cloud-based web services, each with its own capabilities and drawbacks. When compared to Azure Blob, these features stand out.
Key similarities
Azure Blob, AWS S3, and Google Cloud Storage all utilize an object storage model in which data is stored as objects held in containers. All three services are scalable with high availability. Each web service offers strong zone and trans-regional redundancy and provides varied tiers of service to fit the needs and budgets of its clients.
Key differences
While they may seem quite similar on the surface, a deeper dive reveals some notable differences that make each more suitable than the others for different purposes.
Pricing structure
Each web service supports a free tier of service, each with its own special limitations.
- AWS S3 pricing includes storage costs, request costs, and data transfer costs. AWS also has charges for features like Glacier retrieval times and S3 Transfer Acceleration.
- Google Cloud Storage includes storage class costs, operation costs, data retrieval, and data transfer costs, with simplified pricing across different storage classes.
- Azure Blob Storage: Pricing is based on storage tier, read/write operations, data retrieval, and data transfer costs. Azure offers lower storage costs for the Cool and Archive tiers but has higher read and retrieval costs.
Object types
AWS S3 primarily focuses on a flat namespace for storing objects, and GCS uses a similar storage model. Azure Blob offers three types of blobs: block blobs, append blobs, and page blobs, each serving a different purpose.
Service integration
AWS S3, GSC, and Azure Blob each integrate best with services and infrastructures designed specifically for them.
Data management
AWS S3 and GCS support bucket policies for data access and management, while Azure Blob relies on Azure Active Directory (AAD) for identity management, RBAC (Role-Based Access Control) for access control, and Shared Access Signatures (SAS) for temporary access.
Who uses Azure and Azure Blob?
As an industry-leading web service, Azure boasts a robust clientele of well-known and respected organizations from around the world across all Azure platforms. Industries such as manufacturing, finance, and even video game creators rely on Azure to keep the flow of data steady and secure.
Given the scale of these companies that rely strongly on Azure services, they very likely utilize Azure Blob for many key functions in their operations.
- In Japan, the Kubota Corporation’s engine engineering department implemented Azure’s high-performance cloud computing, streamlining innovation and maintenance times.
- The National Bank of Greece built an Azure-powered AI solution that significantly reduced document processing times and dramatically improved documentation processing accuracy.
- In the U.S.A., the gaming company Hi-Rez Studios moved to Azure Kubernetes and Azure SQL, substantially expanding their scaling capabilities. Since these implementations in 2018, Hi-Rez has adopted numerous other Azure services that have improved its back-end services and enhanced its public-facing products.
Blob storage is optimal for storing data
Microsoft Azure Blob Storage is a scalable, cost-effective solution for storing large volumes of unstructured data. With an almost unlimited storage capacity, Azure Blob Storage offers excellent options for storing data that needs no hierarchy. Being cloud-native means companies can access data anywhere an Internet connection is available. Plus, Azure Blob Storage is cost-effective, providing tiered pricing according to data access needs.
In short, it’s the storage solution that gives companies an advantage over the competition when it comes to managing data efficiently in the cloud and meeting data storage needs.
Explore an array of LogicMonitor’s comprehensive cloud-monitoring solutions to dive into advanced features and integration options.
Cloud computing is vast. It encompasses a huge variety of computing systems of different types and architectural designs. This complex computing network has transformed how we work and is a crucial part of our daily lives. For organizations, there are many ways to “cloud”, but let’s start with the basics of cloud computing; the internet cloud. This is generally categorized into three types:
- Public cloud: Public cloud is a type of computing where resources are offered by a third-party provider via the internet and shared by organizations and individuals who want to use or purchase them.
- Private cloud: A private cloud is a cloud computing environment dedicated to a single organization. In a private cloud, all resources are isolated and in the control of one organization.
- Hybrid cloud: a combination of the two. This environment uses public and private clouds.
Cloud computing was created because the computing and data storage needs of organizations have become more business-critical and complex over time. Companies were beginning to install more physical storage and computing space, which became increasingly expensive and cumbersome. Cloud storage removes this burden.
Your confidential data is stored in a secure, remote location. It is “the cloud” to us, but it does live in a physical location. All this means is that it is housed by a third party, not on your premises. In most cases, you don’t know where this cloud is located. You can access programs, apps, and data over the internet as easily as if on your own personal computer.
The most common examples of cloud computing service models include Software as a Service (SaaS), Platform as a Service (PaaS), and Infrastructure as a Service (IaaS). In most cases, organizations will leverage a combination of IaaS, PaaS, and SaaS services in their cloud strategy.
Contents
- What is a public cloud and its benefits and drawbacks?
- Who are the largest public cloud providers?
- What is a private cloud and its benefits and drawbacks?
- Who are the largest public cloud providers?
- What is the difference between a public and private cloud?
- What is a hybrid cloud and its benefits and drawbacks?
- Security concerns of a hybrid solution
- What is multi-cloud and its benefits and challenges?
- Making the right cloud choice
What is a public cloud?
Anything said to live in the cloud refers to documents, apps, data, and anything else that does not reside on a physical appliance, such as your computer, a server, a hard drive, etc. It lives in a huge data warehouse and is accessed only over the Internet. A public cloud does not mean that just anyone can log in, but it is more accessible than other types of clouds, which makes it the most popular.
A common use in business is document collaboration. You can upload and edit your documents, and give your collaborators an access link. Organizations of all sizes like this format because it provides:
- High scalability and elasticity: You do not need to worry about “running out of space” as you would with on-prem storage solutions
- Low-cost tier-based pricing: You can pay for only what you use, instead of needing to pre purchase capacity for future use
Public cloud services offered to consumers are often free or offered as a freemium or subscription-based service. Public cloud services offered to businesses usually carry a per-seat licensing cost. Their computing functionality can range from basic services such as email, apps, and storage to enterprise-level OS platforms or infrastructure environments your team can use for software development and testing (DevOps).
What are the benefits of a public cloud?
Public cloud offerings carry many benefits, enabling organizations to make progress on key business initiatives more quickly and efficiently. Benefits of public cloud adoption include:
- Saves time: When you use a public cloud, you don’t have to worry about managing hosting. Your cloud solution provider is entirely responsible for managing and maintaining the data center. This means there is no lengthy procurement process, and you don’t have to wait for operations to enable your operating system, there is no need to configure or assemble servers, and you never have to worry about establishing connectivity. Additionally, the technology allows developers to employ Agile workflows, significantly reducing lead times when testing, deploying, and releasing new products and updates.
- Saves you money: The amount of money organizations can save with the public cloud depends on the size of the operation. Large enterprises save millions a year, but with improper management, cost savings may not be realized at all. Take a look at your IT environment to see how the public cloud can save you money.
- No capital investments exist: You don’t need expensive equipment or extra physical space. Public cloud subscriptions are inexpensive to set up, and you only have to pay for the resources you use. Your infrastructure is transformed capital expenses into more affordable operating expenses.
- Most public cloud components are maintained and updated by the host. You are not responsible for any additional costs; everything is included in the subscription’s cost.
- Pay only for what you use: This eliminates paying for unused resources, and you always have the flexibility to scale up or down, giving you just the computing capacity you need.
- Lower energy costs: Without powering internal servers, you save money on energy costs.
- Free up IT time: IT talent can concentrate on more revenue-generating activities, instead of spending all of their time managing a data center.
Operating in the cloud is the best step forward for organizations. In addition to the benefits listed above, the cloud provides greater agility, higher efficiency, and more room to grow. When you are ahead of your competition in these areas, you can also be ahead in the market.
A “public” cloud is only accessible to people with your permission. Security is very tight. As recent history has shown, the majority of data leaks actually originate in-house. The public cloud offers:
- Strong cyber security: Attracting the most talented engineers in the world takes money. Engaging large security teams and the best security tools available is not a viable option for the average company. Cloud computing solves this problem. You benefit from having highly skilled IT professionals solely responsible for the protection of your public cloud infrastructure.
- Advanced technology creates more security innovations: More modern technology has led to advanced security services. Security innovations in the cloud are designed specifically for cloud-based solutions.
- Stringent penetration testing: Public clouds undergo stringent penetration tests and are held to stiffer standards than on-premise solutions or private cloud options. Private clouds are regularly slack in penetration testing because in-house breaches are assumed to be unexpected.
- Controlled access: The majority of data breaches result from human error. Critics claim that keeping data in-house allows better control, but the opposite is true. Data stored in the public cloud has fewer chances of falling into the wrong hands due to an employee’s mistake. As human control of your information decreases, so does your risk.
It should be noted that cloud security is a shared responsibility. Your cloud service provider is responsible for the security of the cloud, and you are responsible for your security in-house. Customers using cloud services need to understand they play a large role in securing their data and should ensure their IT team is properly trained.
Drawbacks of a public cloud
While public clouds offer numerous benefits, they do come with certain limitations:
- Security and privacy concerns: All types of clouds can be vulnerable to data breaches and cyber attacks, as data is stored on third-party servers, which might compromise sensitive information.
- Limited control: Users have limited control over the infrastructure and resources, making it difficult to customize the environment to meet specific requirements.
- Reliance on internet connectivity: A stable and reliable internet connection is essential to access public cloud services, and any disruption can affect performance and availability. This can be especially important for business operations in remote locations.
- Service downtime: Public cloud providers may experience service downtime due to hardware failures or maintenance activities, resulting in temporary loss of access to applications and data.
- Compliance and regulatory issues: Public cloud services may not meet certain compliance or regulatory requirements, which can create legal or contractual issues for businesses.
- Cost overruns: Billing is typically on a pay-per-use basis, leading to potential cost overruns if usage exceeds anticipated levels, particularly affecting mid-size to large enterprises.
Who are the largest public cloud providers?
The top cloud computing service providers are Amazon and Microsoft, closely followed by Google, Alibaba, and IBM. Let’s take a closer look at each:
- Amazon Web Services (AWS): AWS is an Amazon company that launched in 2002. It is currently the most popular cloud service provider in the world. It is the most comprehensive and widely adopted cloud platform that offers more than 165 full-featured services stored and provided by data centers worldwide. Millions of customers use this service globally.
- Microsoft Azure: Microsoft Azure launched many years later than AWS and Google Cloud but quickly rose to the top. It is one of the fastest-growing clouds of all. Azure offers hundreds of services within various categories, including AI and Machine Learning, Compute, Analytics, Databases, DevOps, Internet of Things, and Windows Virtual Desktop.
- Google Cloud Platform (GCP): Google’s cloud is similar to AWS and Azure. It offers many of the same services in various categories, including AI and Machine Learning, computing, virtualization, storage, security, and Life Sciences. GCP services are available in 20 regions, 61 zones, and over 200 countries.
- Alibaba Cloud: Alibaba was founded in 2009. It is registered and headquartered in Singapore. The company was originally built to serve Alibaba’s own e-commerce ecosystem but is now available to the public. It is the largest cloud server provider in China and offers various products and services in a wide range of categories. Alibaba is available in 19 regions and 56 zones around the world.
- IBM Cloud (IBM): IBM was founded in 1911 and is one of the oldest computer companies in the world. Its cloud platform, developed by IBM, is built on a set of cloud computing services designed for businesses. Similar to other cloud service providers, the IBM platform includes PaaS, SaaS, and IaaS as public, private, and hybrid models.
What is a private cloud?
The private cloud is a cloud solution that is dedicated to a single organization. You do not share the computing resources with anyone else. The data center resources can be located on your premises or off-site and controlled by a third-party vendor. The computing resources are isolated and delivered to your organization across a secure private network that is not shared with other customers.
The private cloud is completely customizable to meet the company’s unique business and security needs. Organizations are granted greater visibility and control into the infrastructure, allowing them to operate sensitive IT workloads that meet all regulations without compromising security or performance that could previously only be achieved with dedicated on-site data centers.
Private clouds are best suited for:
- Highly sensitive data
- Government agencies and other strictly regulated industries
- Businesses that need complete control and security over IT workloads and the underlying infrastructure
- Organizations that can afford to invest in high-performance technologies
- Large enterprises that need the power of advanced data center technologies to be able to operate efficiently and cost-effectively
What are the benefits of a private cloud?
The most common benefits of a private cloud include:
- Exclusive, dedicated environments: The underlying physical infrastructure for the private cloud is for your use only. Any other organizations cannot access it.
- Somewhat scalable: The environment can be scaled as needed without tradeoffs. It is highly efficient and able to meet unpredictable demands without compromising security or performance; however, not as scalable as public cloud.
- Customizable security: The private cloud complies with stringent regulations, keeping data safe and secure through protocol runs, configurations, and measures based on the company’s unique workload requirements.
- Highly efficient: The performance of a private cloud is reliable and efficient.
- Flexible: The private cloud can transform its infrastructure according to the organization’s growing and changing needs, enabled by virtualization
Drawbacks of a private cloud
As effective and efficient as the private cloud may be, some drawbacks exist. These include:
- Cost: A private cloud solution is quite expensive and has a relatively high total cost of ownership (TCO) compared to public cloud alternatives, especially in the short term. Private cloud infrastructure typically requires large capital expenditures in comparison to public cloud.
- Not very mobile-friendly: Many private cloud environments are built with strict security compliance requirements in mind, which may require users to initiate VPN connections in order to access the environment.
- Limited scalability: The infrastructure may not offer enough scalability solutions to meet all demands, especially when the cloud data center is restricted to on-site computing resources.
What is the difference between a public and private cloud?
A public cloud solution delivers IT services directly to the client over the Internet. This cloud-based service is either free, based on premiums, or by subscription according to the volume of computing resources the customer uses.
Public cloud vendors will manage, maintain, and develop the scope of computing resources shared between various customers. One central differentiating aspect of public cloud solutions is their high scalability and elasticity.
They are an affordable option with vast choices based on the organization’s requirements.
In comparison to legacy server technologies, a private cloud focuses on virtualization and thereby separates IT services and resources from the physical device. It is an ideal solution for companies that deal with strict data processing and security requirements. Private cloud environments allow for allocation of resources according to demand, making it a flexible option.
In almost all cases, a firewall is installed to protect the private cloud from any unauthorized access. Only users with security clearance are authorized to access the data on private cloud applications either by use of a secure Virtual Private Network (VPN) or over the client’s intranet, unless specific resources have been made available via the public internet.
What is a hybrid cloud?
A hybrid cloud is a computing environment that combines a physical data center, sometimes referred to as a private cloud, integrated with one or more public cloud environments. This allows the two environments to share access to data and applications as needed.
A hybrid cloud is defined as a mixed computing, storage, and services environment comprising a public cloud solution, private cloud services, and an on-premises infrastructure. This combination gives you great flexibility and control and lets you make the most of your infrastructure dollars.
What are the benefits of a hybrid cloud?
Although cloud services are able to save you a lot of money, their main value is in supporting an ever-changing digital business structure. Every technology management team has to focus on two main agendas: the IT side of the business and the business transformation needs. Typically, IT follows the goal of saving money. Whereas the digital business transformation side focuses on new and innovative ways of increasing revenues.
There are many differences between public, private, and hybrid clouds. The main benefit of a hybrid cloud is its agility. A business might want to combine on-premises resources with private and public clouds to retain the agility needed to stay ahead in today’s world. Having access to both private and public cloud environments means that organizations can run workloads in the environment that is most suitable to satisfy their performance, reliability, or security requirements.
Another strength of hybrid cloud environments is their ability to handle baseline workloads cost-efficiently, while still being able to provide burst capacity for periods of anomalous workload activity. When computing and processing demands increase beyond what an on-premises data center can handle, businesses can tap into the cloud to instantly scale up or down to manage the changing needs. It is also a cost-effective way of getting the resources you need without spending the time or money of purchasing, installing, and maintaining new servers that you may only need occasionally.
Drawbacks of a hybrid cloud
While hybrid cloud platforms offer enhanced security measures compared to on-premises infrastructures, they do come with certain challenges:
- Complexity: Setting up and managing a hybrid cloud can be complex, requiring integration between different cloud environments. This often demands specialized technical expertise and additional resources.
- Cost: Implementing and managing a hybrid cloud can be more expensive than using public or private clouds alone due to the need for extra hardware, software, and networking infrastructure. Additionally, organizations maintaining multiple types of cloud environments must also maintain multiple areas of expertise among technical staff, adding to related costs.
- Security Risks: All types of clouds can be vulnerable to security risks, such as data breaches or cyber-attacks, especially when there is a lack of standardization and consistency between the different cloud environments.
- Data Governance: Ensuring compliance with regulations such as GDPR or HIPAA can be challenging when managing data across multiple cloud environments.
- Network Performance: The reliance on communication between different cloud environments can lead to network latency and performance issues.
- Integration Challenges: Ensuring compatibility between applications and services across various cloud environments can be difficult.
Security concerns of a hybrid solution
Hybrid cloud platforms use many of the same security measures as on-premises infrastructures, including security information and event management (SIEM). In fact, organizations that use hybrid systems find that the scalability, redundancy, and agility provided by hybrid cloud environments lends to improved cybersecurity operations.
What is multi-cloud?
Having multiple vendors is a common practice these days. A multi-cloud architecture uses two or more cloud service providers. A multi-cloud environment can be several private clouds, several public clouds, or a combination of both.
The main purpose of a multi-cloud environment is to reduce the risks associated with relying on a single provider, and to capitalize on the strengths of different providers. With resources being distributed to different vendors, minimizing the chance of downtime, data loss, and service disruptions is possible. This redundancy ensures that the other services can still operate if one provider experiences an outage. Furthermore, different cloud service providers have different strengths, and having a multi-vendor cloud strategy allows organizations to use different vendors for different use-cases, as aligned with their strengths. Multi-clouds also increase available storage and computing power.
Benefits of multi-cloud environments
Adopting a multi-cloud strategy offers numerous benefits:
- Increased availability and resilience: If one provider’s services experience downtime, the workload can be shifted to another, minimizing the risk of complete downtime.
- Optimized performance: Cloud providers excel in their own areas. A multi-cloud approach allows you to optimize its performance by using the best service from each provider.
- Avoid vendor lock-in: By not being tied to a single provider, you can avoid lock-in and gain competitive pricing benefits. Cheaper services can be used for the less important tasks.
- Advanced regulatory compliance: A multi-cloud strategy allows you to scale workloads while allowing you to run workloads in the environment that best suits you from the perspective of regulatory compliance.
- Innovative capabilities: Different cloud providers will invest in different innovative products. A multi-cloud strategy allows you to leverage these innovations from each provider.
Challenges of multi-cloud environments
While multi-cloud environments provide significant advantages, they also present challenges such as:
- Complexity in management: It can be difficult to manage multiple cloud environments. You need expertise in handling integrations and monitoring.
- Interoperability issues: You must be able to achieve seamless interoperability. Applications and data need to move freely between cloud environments without facing compatibility issues.
- Cost management: Tracking and managing your costs across multiple cloud providers can be challenging. You need an effective strategy in place to avoid unexpected expenses.
Making the right cloud choice
Understanding the differences between public, private, hybrid, and multi-cloud is crucial for selecting the best cloud strategy for your organization. Each strategy offers distinct advantages and challenges, from the scalability and cost-efficiency of public clouds to the security and customization of private clouds and the flexibility and control of hybrid clouds. By carefully evaluating your unique needs and objectives, you can make informed decisions that enhance your operations, bolster security, and drive innovation. As cloud technology advances, staying informed and adaptable will keep your organization competitive and efficient.
Ready to dive deeper into cloud computing?
Discover how hybrid observability can streamline your cloud migration strategies. Download “Agility and Innovation: How Hybrid Observability Facilitates Cloud Migration Strategies” and learn how to optimize your cloud journey confidently.
.NET Core is an invaluable platform for developers. This open-source development platform, maintained by Microsoft, is used to build cloud-native, cross-platform, and even apps specifically for use on Internet of Things (IoT) devices.
Problems can arise if a developer installs a newer version of .NET Core and then tries to run an older project. There are simple ways to check which .NET Core versions you have installed to prevent problems using the dotnet CLI (command-line interface).
What is the latest version of .Net Core?
The latest versions of .NET core are listed below, along with their release dates:

Understanding .NET core versions
The earliest version of .NET Core dates back to 2016, when it was created primarily to enhance support for cross-platform app development. Since then, there have been multiple versions, with the latest stable release being .NET 8.0, launched in June 2024. The .NET naming convention has shifted to simply ‘.NET’ from version 5 onward, streamlining the brand. Although .NET 8.0 is the most recent, .NET Core 3.1, released in December 2019, remains widely used by many app developers due to its long-term support.
While backward compatibility is a desirable quality in development tools, .NET Core has some limitations. For example, if you install .NET Core version 3.1 and try to run a previous project created using an earlier version, you may encounter an SDK error. SDK stands for software development kit, and without the correct .NET Core SDK installed, you won’t be able to run your older projects. The first step to overcome this issue is to use the dotnet –list-sdks command in the dotnet CLI to discover the .NET Core versions you have installed. Ensuring you have the required SDK for your project is crucial for maintaining compatibility.
.NET Core versioning scheme
The .NET Core versioning scheme follows a structured approach, which is essential for maintaining clarity and consistency across its releases. This scheme is crucial given the platform’s broad use for developing cloud-native, cross-platform, and IoT applications.
Major, minor, patch overview:
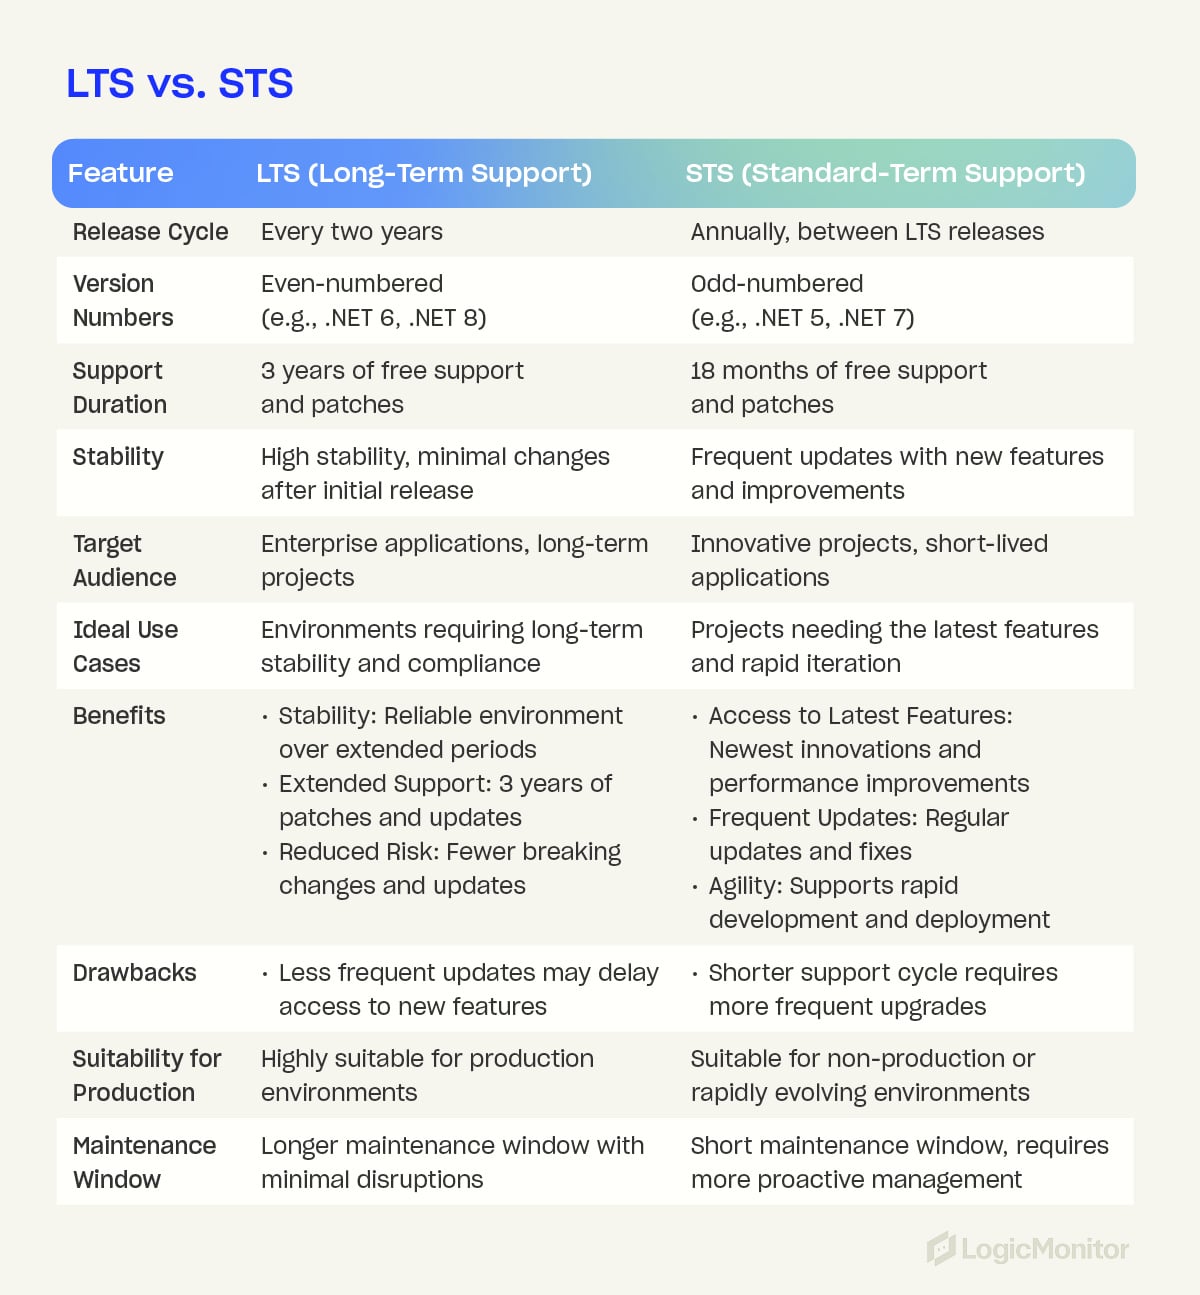
- Major version: Incremented annually, this version signals significant product changes, including new features, API-breaking changes, and major dependency updates. Notably, even-numbered major versions like .NET 6 and .NET 8 are long-term supported (LTS), providing three years of support. In contrast, odd-numbered versions receive standard-term support (STS) with 18 months of updates.
- Minor version: Increased when new behaviors or public APIs are introduced, along with non-breaking enhancements, this increment may also reflect the adoption of a newer minor version of an existing dependency.
- Patch version: Adjusted for bug fixes, new platform support, or minor updates in dependencies. It represents maintenance updates that do not alter the API surface area or introduce new features.
The .NET Runtime adheres to semantic versioning (SemVer), denoted as MAJOR.MINOR.PATCH[-PRERELEASE-BUILDNUMBER]. This method ensures each version number clearly communicates the extent and nature of changes, aiding developers in understanding the impact of upgrades.
LTS vs. STS
LTS (Long-Term Support):
Long-Term Support (LTS) versions of .NET Core are designed to provide extended stability and support. These versions are released every two years and offer three years of free support and patches.
LTS versions are typically even-numbered (e.g., .NET 6, .NET 8) and are essential for environments where long-term stability and reliability are critical. LTS versions are often chosen for enterprise applications due to their extended maintenance window, ensuring that applications remain secure and stable without frequent major updates.
Benefits of LTS:
- Stability: Provides a reliable and consistent environment over an extended period.
- Extended Support: Offers a three-year support window with patches and updates.
- Reduced Risk: Minimizes disruptions from major changes and breaking updates.
STS (Standard-Term Support):
Standard-Term Support (STS) versions are released in the years between LTS versions and are identified by odd numbers (e.g., .NET 5, .NET 7). They have a shorter support cycle and offer 18 months of free support and updates.
STS versions are ideal for applications that benefit from the latest features and improvements. They allow developers to quickly access cutting-edge innovations and performance enhancements, and they are suited for projects that prioritize rapid development and deployment cycles.
Benefits of STS:
- Access to latest features: Provides the newest innovations and performance improvements.
- Frequent updates: Offers regular updates and quicker access to fixes and new capabilities.
- Agility: Supports rapid development and deployment, fostering innovation and adaptation to new market demands.
Comparison: Differences and use cases
The primary difference between LTS and STS versions lies in their support duration and release cycles. LTS versions are designed for long-term stability, offering extended support and minimizing the need for frequent upgrades. This makes LTS ideal for enterprise applications, long-term projects, and industries where stability and compliance are essential.
In contrast, STS versions are geared towards innovation and agility, providing access to the latest features and improvements. These versions are suited for short-lived applications, innovative projects, and non-production environments where rapid iteration is essential.
Upgrade instructions
Upgrading to a new .NET Core version involves multiple steps to ensure your development environment, source code, continuous integration (CI), and hosting environment are all appropriately updated. Below are detailed instructions to guide you through the process.
Common reasons to upgrade:
- The current .NET version is no longer supported.
- The new version supports a new operating system.
- The new version includes important API, performance, or security features.
Step 1: Upgrade the development environment
The first step in the upgrade process is to ensure your development environment is ready for the new .NET version. The .NET SDK, which includes the .NET CLI, build system, and runtime, needs to be updated.
- Download the installer: Visit the .NET download page and download the installer for your operating system.
- Run the installer: Follow the on-screen instructions to install the new .NET SDK.
- Use package manager (optional): Some operating systems allow installation via a package manager (e.g., Homebrew for macOS, apt-get for Linux).
- Visual Studio users: If you use Visual Studio, upgrade to the latest version of Visual Studio, which will automatically include the latest .NET SDK.
Verify installation:
Open a command-line interface and run the following commands to ensure the new SDK is installed:
dotnet –list-sdks
dotnet –list-runtimes
Step 2: Upgrade source code
Next, you must update your project files to target the new .NET version.
- Open the project file: Locate and open your project file (e.g., *.csproj, *.vbproj, or *.fsproj).
- Update TargetFramework: Change the <TargetFramework> property value to the new version. For example:
<TargetFramework>net6.0</TargetFramework>
to
<TargetFramework>net8.0</TargetFramework>
- Use upgrade assistant: The .NET Upgrade Assistant tool can automate these changes.
- Build the project: Rebuild your project using the new SDK. The command-line command for this is:
dotnet build
- Restore workloads: If needed, restore workloads with the new SDK version using:
dotnet workload restore
Step 3: Update continuous integration (CI)
Ensure your CI pipeline is updated to use the new .NET SDK. Update the configuration files for your CI system (e.g., GitHub Actions, Azure Pipelines) to reference the new .NET version.
- Modify configuration files: Update the .NET version in your CI configuration files to match the new version.
- Run CI pipelines: Execute your CI pipelines to verify that the build and test processes work correctly with the new .NET version.
Step 4: Update hosting environment
Lastly, update your hosting environment to support the new .NET version. This step ensures that your production environment can run the upgraded application.
- Install new .NET runtime: Ensure the hosting environment has the new .NET Runtime installed. This might involve updating server configurations or using container images with the latest runtime.
Deploy application: Deploy your upgraded application to the hosting environment and verify that it runs correctly.
Using the Command-Line Interface (CLI)
All installations of .NET Core SDK come with a command-line interface (CLI), allowing you to manually enter commands related to building, developing, and running your apps. If you’re unsure whether you have access to the dotnet CLI, follow these steps:
- Open a command window by pressing the Windows key + R, typing “cmd”, and pressing enter
- Type “dotnet” and press enter
- You should see the following text:
Usage: dotnet [options]
Usage: dotnet [path-to-application]
Options:
-h|–help Display help.
–info Display .NET information.
–list-sdks Display the installed SDKs.
–list-runtimes Display the installed runtimes.
path-to-application:
The path to an application .dll file to execute.
This indicates that you can use .NET Core commands in the CLI. All commands start with “dotnet” and are easy to remember.
To check the currently installed .NET Core SDK version, use this command:
dotnet –version
This will immediately show you the exact version of .NET Core you are currently running.
You can also use the command:
–list-sdks
To see which SDKs are installed and their locations on your machine.
Checking Multiple .NET Core Installations
Developers may have installed and utilized multiple versions of .NET Core and .NET. The previously mentioned command:
–list-sdks
shows exactly which versions of the .NET Core SDK are available. This should help developers understand why an SDK error may be occurring.
You can also use:
dotnet –list-runtimes
To show all installed runtime instances.
Note: You can find all currently installed SDK versions under the file path:
C:\Program Files\dotnet\sdk
This is unless you have manually chosen to install them elsewhere.
Understanding project-based version checks
Understanding the current .NET Core versions only really helps if you know the version used to create the project you’re trying to run. There are a couple of ways to assess this. If you’re using an integrated development environment (IDE) like Visual Studio, you can access the .NET Core SDK version from the project settings.
It’s also possible to use a .csproj file for C# projects. This file acts like the DNA of the app you’re developing, holding key information on how .NET Core should build the app. This includes data on which instance of .NET Core SDK was used to create the project. You can use an “msbuild /bl” command on your .csproj file, which creates an msbuild.binlog file. You can open this file with a Microsoft Build Log Viewer to view all properties and values related to the project, including the NETCoreSdkVersion, which tells you the exact version used to create the project.
You can also check the target framework within the .csproj file, which states the version of the SDK your project is trying to use to run itself. What do you do if that version isn’t installed? Simple: Head to the .NET downloads page and ensure you have the correct version to run the relevant project.
Version control is critical in development, allowing for smarter and more efficient troubleshooting and a smoother shift towards a DevOps mentality within your organization. Understanding how to check which .NET Core version is associated with each project helps eliminate SDK errors and empowers you to dramatically reduce your time to market.
The integration of Azure’s event-driven model with LogicMonitor’s monitoring capabilities offers businesses a robust solution for real-time IT infrastructure monitoring. LogicMonitor’s cloud-based platform provides a comprehensive overview of an organization’s IT infrastructure, both on cloud and on-prem. It is designed to monitor a wide range of resources, including cloud and container resources, servers, networks, storage, and applications, and every critical telemetry signal from these resources. A key feature of the LogicMonitor platform is a powerful alerting engine that can be configured to notify users of critical events across their IT infrastructure.
In this article, you will explore how to leverage LogicMonitor’s logs product, LM Logs, and the alerting engine to monitor Azure resource events. By routing Azure resource events to LM Logs, businesses can achieve an even more comprehensive and real-time overview of their Azure infrastructure.
You will use Azure Event Grid and Azure Functions to develop this integration to ensure a scalable and streamlined data flow, enabling timely responses to critical events.
What are Azure Resource Events?
Azure resource events are specific occurrences related to Azure resources that signify state changes or operations. These events are generated when resources in Azure undergo modifications, such as when a virtual machine is started, a database is updated, or a storage blob is deleted. Azure resource events are integral to Azure’s event-driven architecture, allowing developers and IT professionals to monitor, react to, and automate responses to these events. By capturing and responding to Azure resource events, organizations can enhance operational efficiency, improve security through real-time alerts, and create dynamic, responsive cloud environments. Azure Event Grid, a key service within Azure, is specifically designed to handle and route these resource events to various endpoints or applications for further processing.
What is Azure Event Grid?
Azure Event Grid is a managed event routing service integral to Azure’s serverless infrastructure. Its primary functions include:
- Event Aggregation: Event Grid consolidates all events and routes them from any source to any destination both within and outside Azure.
- Efficiency: Event Grid eliminates the need for polling, reducing associated costs and latency.
- Decoupling: Event Grid uses the publisher/subscriber model to decouple event publishers and subscribers.
- Scalability: Event Grid is designed to handle a vast volume of events, and it can be scaled out to process millions of events per second without any additional configuration.
- Flexibility: Event Grid supports both built-in and custom events, catering to a wide range of applications.
Azure Event Grid can accept events from a variety of event sources, which can be configured to trigger specific events. These events can then be handled by various Azure services like Azure Functions, Azure Logic Apps, and Azure Event Hubs. Although Azure Event Grid can accept events from any source, it is primarily used to handle events generated by Azure resources. These events are published to Azure Event Grid by Azure services and can be routed to various endpoints or applications for further processing. For a complete list of supported Azure event sources and handlers, refer to the Azure documentation on event sources and event handlers.
Using System Topics to Send Events to LM Logs
System topics are a core component of Azure Event Grid. They represent events published by specific Azure services, such as Azure Storage and Azure Container Registry. When an event, like a blob upload, occurs in the storage account, the Azure Storage service publishes this event to the system topic in Event Grid. Subsequently, the event is forwarded to the topic’s subscribers. It’s important to note that only Azure services have the privilege to publish events to system topics, ensuring a standardized and secure flow of information. In addition, Azure supports system topics across a range of services, including Azure Blob Storage, Azure Event Hubs, and Azure Kubernetes Service, among others.
Following is the high-level architecture of the integration you will build in this tutorial.

The integration of Azure resources with LogicMonitor logs is a two-step process:
- Create an Azure Function: AzureEventBridge to route events from Azure Event Grid to LogicMonitor logs.
- Configuring Azure Storage (or another resource) to publish events to Azure Event Grid.
Here is a summary of the illustrated process. You will configure the desired Azure resources to send events to an Azure Event Grid System Topic. Through an Azure Function subscription to the Event Grid topic, the Azure Function app will parse the incoming event data, transform it into a format suitable for LogicMonitor logs, and send it to LogicMonitor logs using the LogicMonitor API, thus acting as a bridge between Azure Event Grid and LogicMonitor Logs.
Step 1: Create Azure Function: AzureEventBridge
Please follow the instructions in the Azure Function documentation to create an Azure Function named AzureEventBridge using the C# script programming language. If you prefer, you can use an IDE such as Visual Studio to create the Azure Function as well by following the instructions in the Azure Function documentation for VS Code. While creating the Function app, please remember to select Azure Event Grid as the trigger type for the Azure Function. Once you have created the Function app, you can use the following code to implement the logic.
#r "Azure.Messaging.EventGrid"

#r "System.Text.Json"

#r "System.Net.Http.Json"

using Azure.Messaging.EventGrid;

using System.Globalization;

using System.Net.Http.Json;

using System.Text.Json;

using System.Text.Json.Serialization;

public static async Task Run(EventGridEvent eventGridEvent, ILogger log)

{

    using (var httpClient = new HttpClient())

    {

        // Prepare the HTTP request to send data to LogicMonitor

        httpClient.DefaultRequestHeaders.Clear();

        var lmBearerToken = System.Environment.GetEnvironmentVariable("LMBearerToken", EnvironmentVariableTarget.Process);

        httpClient.DefaultRequestHeaders.Authorization = new System.Net.Http.Headers.AuthenticationHeaderValue("Bearer", lmBearerToken);

        httpClient.DefaultRequestHeaders.UserAgent.Add(new System.Net.Http.Headers.ProductInfoHeaderValue("AzEventBridgeFx", "1.0.0"));

        var payload = new Payload[]

        {

            new Payload(){

                // Payload attributes are indexed by LogicMonitor and can be used to create custom alert rules

                Message = JsonSerializer.Serialize(eventGridEvent),

                EventTime = eventGridEvent.EventTime.ToString("o", CultureInfo.InvariantCulture),

                EventType = eventGridEvent.EventType,

                Topic = eventGridEvent.Topic,

                Subject = eventGridEvent.Subject

            }

        };

        var response = await httpClient.PostAsJsonAsync("https://<your-account-name>.logicmonitor.com/rest/log/ingest", payload);

        response.EnsureSuccessStatusCode();

    }

}

// LogicMonitor requires the payload to be in a specific format. You can add additional attributes to the payload as needed.

public class Payload

{

    public string Message { get; set; }

    public string EventTime { get; set; }

    public string EventType { get; set; }

    public string Topic { get; set; }

    public string Subject { get; set; }

}
The Function uses the LogicMonitor Logs Ingestion API and a simple Bearer authentication to send the event data to LogicMonitor logs. To generate a bearer token for your application, please follow the instructions in the LogicMonitor documentation and add the bearer token as an Application setting named LMBearerToken to the Azure Function, as shown in the following screenshot.

You will now configure Azure Storage to publish events to Azure Event Grid and configure Azure Event Grid to forward these events to the AzureEventBridge function.
Step 2: Configure Azure Storage to Publish Events to Azure Event Grid
Please follow the Azure learn guide to configure Azure Storage to publish events to Azure Event Grid. Once you have configured Azure Storage to publish events to Azure Event Grid, you will need to configure Azure Event Grid to forward these events to the AzureEventBridge function.
The following video shows how you can build the integration with just a few clicks in the Azure portal:
With the integration in place, you can now set up alert conditions in LogicMonitor logs to ensure that you are notified of critical events such as blob deletion.
Set Up Alert Conditions in LM Logs
Perform a few test operations on your Azure Storage account to generate some events. You can immediately see the events in LogicMonitor logs as shown in the following screenshot:

To ensure that you are notified of critical events, set up alert conditions in LogicMonitor logs to notify users when a blob is deleted from Azure Blob Storage. To do this, you will need to create a new alert rule in LogicMonitor logs as follows:
First, create a new LM Logs pipeline using the following logs query:
_lm_user_agent = "AzEventBridgeFx/1.0.0."
Next, create a new alert rule in the pipeline with the following filter query:
eventType = "Microsoft.Storage.BlobDeleted"
You can now test the alert rule by deleting a blob from your Azure Storage account. Upon deleting a blob from any container in the storage account, you should receive an alert notification in LogicMonitor, as shown in the following screenshot:

Likewise, you can create additional Event Grid subscriptions to forward events from other Azure resources to the AzureEventBridge function and set up alert rules in LogicMonitor logs to notify users of critical events. Here are some examples:
- Container Image Deletion Alert: Set up notifications for the removal of a container image from Azure Container Registry.
- Virtual Machine Configuration Alert: Ensure that any configuration changes to virtual machines trigger an alert, maintaining regulatory compliance.
- Azure Kubernetes Service Alert: Notify administrators of any changes to Azure Kubernetes Service to ensure that the cluster is always up-to-date.
Conclusion
Integrating Azure resources with LogicMonitor Logs provides a comprehensive view of your infrastructure’s health and activities. By leveraging Azure Event Grid and Azure Functions, you can seamlessly forward events to LogicMonitor and set up alerts for critical incidents. This integration ensures that you’re always informed about significant changes and can take timely action when necessary. To get started with LogicMonitor, please schedule a demo via our friendly chatbot or sign up for a free trial.
As the future of hosting in the cloud continues to evolve and expand, LogicMonitor continues to work to empower admins with useful insights and valuable data to make smart business decisions. Azure Cost Management with LogicMonitor helps optimize cost when planning future rollouts, auditing others already in-flight, and capturing shareable items on a recurring basis or with live access for accounting or management teams to get quick insight into Azure costs.

How It All Started
Cloud services are the future of hosting. Having services and servers hosted is exciting and useful. However; there is no free ride to the future. As organizations move faster and more intelligently to the cloud and Microsoft-based organizations continue to depend on Azure services– keeping a close eye on what that new hosting is costing an organization is pivotal.
Beginning in late 2019 and early 2020, Microsoft started shifting customers and partners to newer billing standards (EA, CSP, and MCA). Alongside that shift, new billing data emerged that was intended to help organizations understand their cloud spend. In 2020 the Cost Management API became available to allow for those costs to actually be monitored. 2021 sparked the transition of customers to the new Microsoft Customer Agreement plans.
As this transition was occurring in 2021, LogicMonitor started working on a beta to help customers develop the collection and analysis of their Azure Cost Management data. As of 2022, LogicMonitor can pull, monitor, and visualize that cost data. Using three DataSources that have been developed, LogicMonitor can give powerful visibility and insight into Azure Cloud Costs per subscription ID, region, and per service.
Azure Cost Management for All LM Customers
As a result, customers who worked with LogicMonitor in the beta found the per service data a very useful insight to control and understand areas of high cost, as well as underutilization. Being able to find those areas is key to helping optimize cost when planning future rollouts and auditing others already in-flight.
Azure Cost Management is available to all LogicMonitor customers in your portal on versions 168 and up and DataSources are available in the Core Exchange. Being able to quickly sort by cost per service, subscription, and region per cloud account will give you visibility and useful insight into your Azure cloud costs. The dashboard is also a great shareable item on a recurring basis or with live access for accounting or management teams to get quick insight into Azure costs.
Get Started Today
We believe that this will become even more important as businesses continue on their digital transformation journeys. Learn more today about how LogicMonitor can help you understand your Azure cloud deployment, connect with your customer success manager, or sign-up here for a free trial.
Microsoft Azure and Microsoft, in general, has a history of being seen as designed for big enterprises only. Those days are in the past. Azure is working its way to the front of the pack for cloud services. It is easy to transition your workflows to Azure because it connects well with other Microsoft tools you use. Even though it is a smoother transition, it is just as complex and complicated as other large cloud providers. Keep reading to learn more about Microsoft Azure and how to better monitor your cloud infrastructure to provide business value and get the most out of what you pay for.
Microsoft Azure
Microsoft Azure offers everything from Infrastructure-as-a-Service (IaaS) through Platform-as-a-Service (PaaS) cloud services. Azure also provides many ways to connect through existing Microsoft applications and SaaS services. This continues to blur the line between infrastructure and services, but it also allows you to easily integrate other Microsoft offerings with your Azure cloud.
Azure offers replacements for the on-premise infrastructure and Infrastructure-as-a-Service (IaaS) that allows traditional IT infrastructure professionals to take advantage of the knowledge they already have. From simple Virtual Machines (VM) that have the ability to auto-scale and provide compute power when needed, to SQL and file storage options called SQL Database Service and Storage Service respectively. One thing to know about Azure is their naming tends to be straightforward.
As we continue down the stack to Platform-as-a-Service (PaaS), Azure provides options for application hosting (App Services) and Kubernetes hosting (Kubernetes Service also marked as AKS). These are just a few examples of stretching the legs of Azure as a full-service cloud platform. With Azure Monitor, you are able to monitor all of your services within Azure. This provides some visibility, but understanding the impact beyond these simple metrics requires a little bit of time or some help. Sometimes both.
Monitor your Azure
You need to fully understand your cloud infrastructure and know how it is performing to ensure you are able to provide business value and get the most out of what you pay for. Focusing on just Azure will require you to understand each service and what metrics provided by the service matter the most to performance and utilization. This ranges from simple understandings, like CPU utilization and storage or memory usage, to complexities that come with auto-scaling and serverless functions (helpfully called Functions in Azure). Aside from the complexities, you also need to understand what thresholds should be considered. Luckily, LogicMonitor has monitoring coverage for over 50 Azure services with more than 130 default alerting statistics.
To top it off, monitoring your cloud infrastructure with LogicMonitor allows you to leverage all of your infrastructures to monitor your critical business performance. LM grows with you, allowing you to have a single pane view of all the critical on-premises, cloud, and log monitoring to allow you to respond quickly to your infrastructure needs. With features like Dynamic Thresholds and Service Insights, you can modify LogicMonitor to provide clear insights on your Azure infrastructure and so much more.
To learn more about how LogicMonitor can help you monitor and understand your Microsoft Azure usage and infrastructure or to see it in action, sign up for a free trial.
The shift to cloud infrastructure does not remove the need for infrastructure management and administrators but rather necessitates a shift in their responsibilities. Cloud infrastructure has grown to be a ubiquitous part of the modern software industry. This is an amazing growth when you realize that Amazon did not announce Amazon Web Services, starting with Elastic Cloud Computing (EC2), until 2006. In under 15 years, a fledgling software infrastructure concept has grown to be an over $225 billion (USD) industry. This information comes before the current atmosphere has driven more companies to quickly adapt and accelerate their timelines to move to the cloud.
There are two ways to move to the cloud. The first is to use a simple “lift-and-shift” model which almost exactly mimics on-premise infrastructure. All of your applications, network, and storage infrastructure will be moved directly on to the cloud, replacing your on-premise infrastructure with cloud services designed to mimic said on-premise setups. For these, infrastructure management professionals simply transfer their knowledge of on-premise maintenance and monitoring to these cloud services. They are also able to hang up their wire cutters and crimpers to no longer walk into a server room like this:

The other way to transition to the cloud is more complete and asks more of an organization. Adopting a cloud-native approach to transitioning to the cloud will put a lot of pressure on an organization to change rapidly. The requirement is for all infrastructure engineers to start learning how to leverage cloud services to replace aging software infrastructure. They will be asked to help the software developers redesign and restructure the codebase. A good way to kick start this transition is to work with a Managed Service Provider (MSP) to help in the transformation.
The New Roles
As the shift to the cloud starts, infrastructure experts are asked to work hand in hand with development teams to think through the cloud infrastructure as it relates to developer and software needs. This growth continues during the transition and allows more ownership of the entire lifecycle of development to belong with the development team while also offering more early intervention for infrastructure professionals. The skills and expertise of running infrastructure on-premise will help these individuals understand the overall structure of a production environment and guide the decision making.
These new roles also offer greater understanding and visibility to the whole technology side of a business. The greater visibility often leads to streamlining and reducing costs by understanding inefficiencies and the needed scale. The clarity and awareness of this cloud infrastructure can be easily understood and improved upon by the existing infrastructure team as they grow in their new roles. Leaning on their experience, a company can start defining its operation goals and planning for growth.

Clear Understanding of Goals
Working with IT Operations and Development teams to determine the needs and goals of cloud infrastructure becomes the next main target. The experience and expertise of the infrastructure professionals will help to guide the error budgeting needs of critical infrastructure. Meanwhile, they can partner with the development teams to continue to define the processes of moving to cloud infrastructure. These goals will help drive the business in a maintainable and secure way to the cloud. Often these goals will lead to a desire for stability and flexibility, leading to the adoption of multi-cloud infrastructure.
Multi-cloud infrastructure comes out of the desire to not be locked into a single point of failure and the desire to leverage different offerings. Growth in a multi-cloud infrastructure necessitates the growth of infrastructure engineers, as well as the development teams, to learn these new technologies. This growth continues to motivate understanding of the whole software lifecycle and promote unity for the entire organization. As the operational goals are adopted, the next step becomes the ability to monitor the infrastructure’s performance around these goals.
Monitor Your Goals
The ability to monitor these performance goals and infrastructure becomes the main goal of infrastructure operators in the cloud. The ability to understand multiple environments and support all levels of cloud growth are vital. As the infrastructure teams reach further into the software development lifecycle, they will want an ability to track and help support the development team. Similarly, the development team will want to be able to understand the performance of their software development lifecycle as well as the production performance of their infrastructure. Having a unified platform to view all of this information and set and track goals become a joint responsibility.

The need is to have a simple, unified monitoring system for infrastructure on-premise that can grow with a company as it adds cloud infrastructure. As a company grows through hybrid on-premise and cloud infrastructure to a full multi-cloud infrastructure, being able to monitor it all is important. Setting maintaining and monitoring goals through the growth stages of a company is critical to the trust of cloud infrastructure and cross-team belief and growth.
If you are ready to discover truly helpful monitoring as your company goes through these growth stages, try LogicMonitor’s platform to gain insight into the performance of your environment. The multitude of infrastructure we monitor will help infrastructure engineers and development teams grow to fully scalable cloud teams. Try it free, or book a free demo today.
We all know that systems fail. We plan for this with failover partners and system backups. But can you really trust your backups? If you are using Azure monitoring, your backup and site recovery can be complicated. LogicMonitor provides clarity. Our Azure Backup monitoring service provides simple, secure, and cost-effective solutions for backing up and recovering your data using the Azure cloud. It allows recovery services for on-premise, Azure VMs, Azure File Shares, SQL Server, and SAP HANA databases in Azure VMs. Keep reading for a breakdown of which Azure backup and replication jobs you should keep tabs on.

Monitoring Backup Jobs
Monitoring your backups should be as easy as looking at a dashboard. LM Cloud will detect your recovery services vaults and show you their metadata so that you can monitor your backup and replication jobs. LogicMonitor now shows the status of the latest backup and replication jobs and time since the last successful jobs for your Azure resources. This allows you to have a quick understanding of the health of your backup services.
As a best practice, we recommend keeping tabs on the following for backup jobs:
- Status: This shows the status of your last backup attempt. It can be shown as a single big number or as a graph to track multiple resources. We recommend using a warning at 4 and an error at 5.
- Duration: This metric is reported in milliseconds. This can be shown as a single large number or as a graph of numbers that represent each of your resources. We recommend determining a threshold based on how frequent you have the backups set to run.
You can similarly see your replication jobs on a dashboard.

Monitoring Replication Jobs
As a best practice, we recommend keeping tabs on the following for replication jobs:
- State: This gives a numeric value that maps the result of the last replication attempt. It can be shown as a single big number or as a graph to track multiple resources. We recommend alerting if the state was 7 – Failed.
- Time Since Start: This shows the time elapsed since the last job was started. We recommend determining a threshold based on how frequent you have the backups set to run.
- Error Count: This metric lets you know there was an error in the last attempted replication job. We recommend alerting if the value is greater than 0.
Following these guidelines, you can move forward with confidence and know that your backup and recovery in Azure is working. Another benefit is that the time previously spent on this can now be allocated to other important tasks. Be secure in your cloud and on-premises monitoring with LogicMonitor’s insight into the performance of your environment. You can try it free, or book a free demo today.