Amazon Elastic Kubernetes Service (Amazon EKS) is a managed Kubernetes service that simplifies deploying, scaling, and running containerized applications on AWS and on-premises. EKS automates Kubernetes control plane management, ensuring high availability, security, and seamless integration with AWS services like IAM, VPC, and ALB.
This managed AWS Kubernetes service scales, manages, and deploys containerized applications. Through EKS, you can run Kubernetes without installing or operating a control plane or worker nodes — significantly simplifying Kubernetes deployment on AWS.
So what does it all mean? What is the relationship between AWS and Kubernetes, what are the benefits of using Kubernetes with AWS, and what are the next steps when implementing AWS EKS? Let’s jump in.
Importance of container orchestration
Container orchestration automates container movement, supervision, expansion, and networking. It can be used in every scenario where containers are used and will help you position the same applications across different environments. Today, Kubernetes remains the most popular container orchestration platform offered by Amazon Web Services (AWS), Google Cloud Platform, IBM Cloud, and Microsoft Azure.
As companies rapidly expand, the number of containerized applications they use also increases. However, managing them in larger quantities can become challenging. You’ll benefit from this process if your organization manages hundreds or thousands of containers. Data shows approximately 70% of developers use container orchestration tools.
Due to its automation properties, container orchestration greatly benefits organizations. It reduces manhours, the number of employees needed, and the financial budget for containerized applications. It can also enhance the benefits of containerization, such as automated resource allocation and optimum use of computing resources.
An overview of Kubernetes
Often called K8s, Kubernetes is an open-source container orchestration tool and industry standard. Google developed this system to automate containerized applications- or microservices- development, management, and scaling. This platform was created for several reasons but was primarily developed with optimization in mind. Automating many DevOps processes, which developers once handled manually, has significantly simplified the work of software developers, allowing them to focus on more pressing, complex tasks.
Based on its applications, Kubernetes is the fastest-growing project in open-source software history after Linux. Data shows that from 2020 to 2021, the number of Kubernetes engineers skyrocketed by 67%, reaching 3.9 million. This figure represents 31% of all backend developers.
One of the main reasons Kubernetes is so popular is the increasing demand for businesses to support their microservice architecture. Kubernetes makes apps more flexible, productive, and scalable by providing load balancing and simplifying container management.
Other benefits include:
- Container orchestration savings: Once Kubernetes is configured, apps run with minimal downtown while performing well.
- Increased efficiency among DevOps teams, allowing for faster development and deployment times.
- The ability to deploy workloads across several cloud services.
- Since Kubernetes is an open-source tool and community-led project, there is strong support for continuous improvement and innovation. A large ecosystem of tools has been designed to use with this platform.
What is EKS?
Data shows that of those running containers in the public cloud, 78% are using AWS, followed by Azure (39%), GCP (35%), IBM Cloud (6%), Oracle Cloud (4%), and Other (4%). AWS remains the dominant provider.
AWS offers a commercial Kubernetes service — Amazon Elastic Kubernetes Service (EKS). This managed service allows you to run Kubernetes on AWS and on-premises, benefiting from the vast number of available services. By integrating with AWS services, you’ll benefit from supply scalability and security for your applications. For example, IAM is used for reliability, Elastic Load Balancer for load distribution, and Amazon ECR for container image.
Adding a system like AWS EKS allows you to run Kubernetes applications on various systems, like AWS Fargate. Along with benefiting from greater performance, scalability, and reliability, you can integrate with AWS networking and security services such as AWS Virtual Private Cloud. It will enhance your Kubernetes system, which will optimize your business overall.
AWS EKS can help you gain greater control over your servers or simplify cluster setup.
Amazon EKS functionality
Amazon EKS simplifies Kubernetes management by handling the control plane while giving users flexibility over worker node configurations. Its architecture is designed for scalability, reliability, and seamless integration with the AWS ecosystem.
1. Core architecture
Amazon EKS operates through two primary components: the Kubernetes control plane and worker nodes.
- Kubernetes control plane: This plan is managed entirely by AWS and includes Kubernetes API servers and management services spread across multiple AWS Availability Zones, ensuring high availability.
- Worker nodes: These are deployed within a customer’s Amazon VPC, allowing full administrative control over scaling, upgrades, and security configurations.
2. Deployment options
Amazon EKS supports several deployment models to meet varying business needs:
- Managed node groups: AWS provisions, scales, and automatically manages worker nodes.
- Self-managed nodes: Users deploy and manage their own worker nodes with complete customization.
- Fargate: Serverless Kubernetes deployment where AWS manages both the control plane and the underlying infrastructure, enabling container execution without EC2 instances.
- Hybrid deployments: Kubernetes clusters can be extended to on-premises infrastructure using Amazon EKS Anywhere.
3. AWS service integrations
Amazon EKS integrates with a broad range of AWS services for enhanced functionality:
- Networking: Amazon VPC provides isolated networking environments, Elastic Load Balancing ensures traffic distribution, and AWS PrivateLink secures data exchange.
- Storage: Amazon EBS is used for persistent storage, Amazon S3 is used for object storage, and Amazon EFS is used for file storage.
- Security: IAM manages user access, AWS Key Management Service (KMS) secures sensitive data, and AWS Shield protects against DDoS attacks.
- Monitoring and logging: Amazon CloudWatch collects performance metrics, AWS CloudTrail tracks activity logs, and AWS X-Ray provides distributed tracing.
How does AWS EKS work with Kubernetes?
AWS EKS supplies an expandable and available Kubernetes control panel. For optimum performance, it runs this control panel across three availability zones. AWS EKS and Kubernetes collaborate in several different areas to ensure your company receives the best performance.
- AWS Controller lets you manage and control your AWS service from your Kubernetes environment. Using AWS EKS, you can simplify building a Kubernetes application.
- EKS can integrate with Kubernetes clusters. Developers can use it as a single interface to organize and resolve issues in any Kubernetes application implemented on AMS.
- EKS add-ons are pieces of operational software. These add-ons will increase the functionality of Kubernetes operations. When you start an AMS cluster, you can select any applicable add-ons. Some of these add-ons include Kubernetes tools for networking and AWS service integrations.
Benefits of AWS EKS over standalone Kubernetes
There are several benefits of AWS EKS when compared to native Kubernetes.
- Implementing AWS EKS will remove time-consuming processes like creating the Kubernetes master cluster. With standalone Kubernetes, your employees would have to spend many company hours designing and building different infrastructures.
- AMS EKS eliminates a singular point of failure as the Kubernetes control plane is spread across various AWS availability zones.
- EKS is embedded with a range of AWS monitoring services, which means it has scalability and can grow as your company expands. It makes features like AWS Identity Access Management and Elastic Load Balancing straightforward and convenient for your employees.
Amazon EKS use cases
Amazon EKS supports a variety of enterprise use cases, making it a versatile platform for running containerized applications. Below are some of the most common applications where Amazon EKS excels:
1. Deploying in hybrid environments
Amazon EKS enables consistent Kubernetes management across cloud, on-premises, and edge environments. This flexibility allows enterprises to run sensitive workloads on-premises while leveraging cloud scalability for other applications.
2. Supporting machine learning workflows
Amazon EKS simplifies the deployment of machine learning models by enabling scalable and efficient data processing. Frameworks like TensorFlow and PyTorch can run seamlessly on EKS, with access to AWS services like Amazon S3 for data storage and AWS SageMaker for model training and deployment.
3. Building web applications
Web applications benefit from Amazon EKS’s automatic scaling and high availability features. EKS supports microservices-based architectures, allowing developers to build and deploy resilient web applications using services such as Amazon RDS for databases and Amazon ElastiCache for caching.
4. Running CI/CD pipelines
Development teams can use Amazon EKS to build and manage CI/CD pipelines, automating software release processes. Integration with tools like Jenkins, GitLab, and CodePipeline ensures continuous integration and deployment for modern applications.
Amazon EKS best practices
To ensure smooth operation and maximum efficiency when managing Amazon EKS clusters, following best practices centered around automation, security, and performance optimization is essential. These practices help minimize downtime, improve scalability, and reduce operational overhead.
1. Automate Kubernetes operations
Automation reduces manual intervention and increases reliability. Infrastructure-as-code tools like Terraform or AWS CloudFormation can be used to define and deploy clusters. CI/CD pipelines can streamline code deployment and updates. Kubernetes-native tools like Helm can be used for package management, and ArgoCD can be used for GitOps-based continuous delivery.
2. Strengthen security
Securing your Kubernetes environment is crucial. Implement the following security best practices:
- Access control: Use AWS Identity and Access Management (IAM) roles and policies to manage access rights.
- Network security: Enable Amazon VPC for isolated network environments and restrict inbound/outbound traffic.
- Data encryption: Use AWS Key Management Service (KMS) for data encryption at rest and enforce TLS for data in transit.
- Cluster hardening: Regularly update Kubernetes versions and EKS node groups to apply the latest security patches.
3. Optimize cluster performance
Performance optimization ensures workloads run efficiently without overspending on resources. Consider the following strategies:
- Auto-scaling: Enable Kubernetes Cluster Autoscaler to adjust the number of worker nodes based on demand automatically.
- Right-sizing resources: Use AWS Compute Optimizer to recommend the best EC2 instance types and sizes.
- Monitoring and logging: Amazon CloudWatch and AWS X-Ray are used to monitor and trace application performance.
AWS EKS operation
AWS EKS has two main components — a control plane and worker nodes. The control plane has three Kubernetes master nodes that will be installed in three different availability zones. It runs on the cloud controlled by AMS. You cannot manage this control panel directly; it is managed through AMS.
The other component is worker nodes, which run on the organization’s private cloud and can be accessed through Secure Shell (SSH). The worker nodes control your organization’s containers, and the control panels organize and monitor the containers’ creation and place of origin.
As EKS operations are flexible, you can position an EKS cluster for every organization or use an EKS cluster from multiple applications. Without EKS, you would have to run and monitor the worker nodes and control panel, as it would not be automated. Implementing an EKS operation frees organizations from the burden of operating Kubernetes and all the infrastructure that comes with it. AWS does all the heavy lifting.
Here is how to get started with AWS EKS.
Amazon EKS pricing
Understanding Amazon EKS pricing is essential for effectively managing costs. Pricing is determined by various factors, including cluster management, EC2 instance types, vCPU usage, and additional AWS services used alongside Kubernetes.
Amazon EKS cluster pricing
All Amazon EKS clusters have a per-cluster, per-hour fee based on the Kubernetes version. Standard Kubernetes version support lasts for the first 14 months after release, followed by extended support for another 12 months at a higher rate.
| Kubernetes Version Support Tier | Pricing |
| Standard Kubernetes version support | $0.10 per cluster per hour |
| Extended Kubernetes version support | $0.60 per cluster per hour |
Amazon EKS auto mode
EKS Auto Mode pricing is based on the duration and type of Amazon EC2 instances launched and managed by EKS Auto Mode. Charges are billed per second with a one-minute minimum and are independent of EC2 instance purchase options such as Reserved Instances or Spot Instances.
Amazon EKS hybrid nodes pricing
Amazon EKS Hybrid Nodes enable Kubernetes management across cloud, on-premises, and edge environments. Pricing is based on monthly vCPU-hour usage and varies by usage tier.
| Usage Range | Pricing (per vCPU-hour) |
| First 576,000 monthly vCPU-hours | $0.020 |
| Next 576,000 monthly vCPU-hours | $0.014 |
| Next 4,608,000 monthly vCPU-hours | $0.010 |
| Next 5,760,000 monthly vCPU-hours | $0.008 |
| Over 11,520,000 monthly vCPU-hours | $0.006 |
Other AWS services pricing
When using Amazon EKS, additional charges may apply based on the AWS services you use to run applications on Kubernetes worker nodes. For example:
- Amazon EC2: For instance capacity
- Amazon EBS: For volume storage
- Amazon VPC: For public IPv4 addresses
AWS Fargate pricing: Charges are based on vCPU and memory resources from container image download to pod termination, billed per second with a one-minute minimum.
To estimate your costs, use the AWS Pricing Calculator.
Maximize your Kubernetes investment with LogicMonitor
AWS EKS is a system that can streamline and optimize your company. However, many need to be using it to its full potential. Monitoring will help you get the most out of your investment via key metrics and visualizations.
LogicMonitor offers dedicated Kubernetes monitoring dashboards, including insights into Kubernetes API Server performance, container health, and pod resource usage. These tools provide real-time metrics to help you detect and resolve issues quickly, ensuring a reliable Kubernetes environment. These insights help drive operational efficiency, improve performance, and overcome common Kubernetes challenges.
Learn more here:
- LogicMonitor & AWS: Maximize your Kubernetes Investment with Monitoring
- LogicMonitor’s Kubernetes Monitoring Overview
If you need a cloud monitoring solution, LogicMonitor can help you maximize your investment and modernize your hybrid cloud ecosystem. Sign up for a free trial today!
Since the revolutionization of the concept by Docker in 2013, containers have become a mainstay in application development. Their speed and resource efficiency make them ideal for a DevOps environment as they allow developers to run software faster and more reliably, no matter where it is deployed. With containerization, it’s possible to move and scale several applications across clouds and data centers.
However, this scalability can eventually become an operational challenge. In a scenario where an enterprise is tasked with efficiently running several containers carrying multiple applications, container orchestration becomes not just an option but a necessity.
What is container orchestration?
Container orchestration is the automated process of managing, scaling, and maintaining containerized applications. Containers are executable units of software containing application code, libraries, and dependencies so that the application can be run anywhere. Container orchestration tools automate the management of several tasks that software teams encounter in a container’s lifecycle, including the following:
- Deployment
- Scaling and load balancing/traffic routing
- Networking
- Insights
- Provisioning
- Configuration and scheduling
- Allocation of resources
- Moving to physical hosts
- Service discovery
- Health monitoring
- Cluster management
How does container orchestration work?
There are different methodologies that can be applied in container orchestration, depending on the tool of choice. Container orchestration tools typically communicate with YAML or JSON files that describe the configuration of the application. Configuration files guide the container orchestration tool on how and where to retrieve container images, create networking between containers, store log data, and mount storage volumes.
The container orchestration tool also schedules the deployment of containers into clusters and automatically determines the most appropriate host for the container. After a host has been determined, the container orchestration tool manages the container’s lifecycle using predefined specifications provided in the container’s definition file.
Container orchestration tools can be used in any environment that runs containers. Several platforms offer container orchestration support, including Kubernetes, Docker Swarm, Amazon Elastic Container Service (ECS), and Apache Mesos.
Challenges and best practices in container orchestration
While container orchestration offers transformative benefits, it’s not without its challenges. Understanding these potential pitfalls and adopting best practices can help organizations maximize the value of their orchestration efforts.
Common challenges
- Complexity in setup and operation
Setting up container orchestration can be daunting, especially for teams new to the technology. Configuring clusters, managing dependencies, and defining orchestration policies often require significant expertise. The steep learning curve, particularly with tools like Kubernetes, can slow adoption and hinder productivity. - Security risks with containerized environments
Containerized applications introduce unique security challenges, including vulnerabilities in container images, misconfigurations in orchestration platforms, and potential network exposure. Orchestrators need robust security measures to safeguard data and applications. - Vendor lock-in with proprietary solutions
Organizations relying on proprietary orchestration tools or cloud-specific platforms may find it difficult to migrate workloads or integrate with other environments. This can limit flexibility and increase long-term costs. - Performance bottlenecks
Resource contention, inefficient scaling policies, and poorly optimized configurations can lead to performance issues, impacting application reliability and user experience.
Best practices for successful container orchestration
- Simplify and automate with CI/CD pipelines
Automating workflows using Continuous Integration and Continuous Deployment (CI/CD) pipelines reduces manual intervention and ensures consistency in deployments. Tools like Jenkins or GitLab can integrate seamlessly with container orchestration platforms to streamline operations. - Proactively monitor and manage clusters
Monitoring tools like LogicMonitor can be used to track container performance, resource usage, and application health. Proactive alerts and dashboards help identify and resolve issues before they impact users, ensuring reliability and uptime. - Prioritize security from the start
Implement security best practices such as:- Regularly scanning container images for vulnerabilities.
- Enforcing Role-Based Access Control (RBAC) to restrict permissions.
- Configuring network policies to isolate containers and protect sensitive data. By building security into the orchestration process, organizations can mitigate risks and maintain compliance.
- Start small and scale gradually
Begin with a minimal setup to gain familiarity with orchestration tools. Focus on automating a few processes, then gradually expand the deployment to handle more complex workloads as the team’s expertise grows. - Optimize resource allocation
Regularly review resource usage and scaling policies to ensure efficient operation. Use orchestration features like auto-scaling to adjust resources based on demand dynamically. - Choose flexible, open solutions
To avoid vendor lock-in, prioritize tools like Kubernetes that support multi-cloud or hybrid deployments and integrate with a wide range of environments and services.
How does Kubernetes orchestration work?
Kubernetes is an open-source container orchestration platform that is considered the industry standard. The Google-backed solution allows developers and operators to deliver cloud services, either as Platform-as-a-Service (PaaS) or Infrastructure-as-a-Service (IaaS). It’s a highly declarative solution, allowing developers to declare the desired state of their container environment through YAML files. Kubernetes then establishes and maintains that desired state.
The following are the main architecture components of Kubernetes:
Nodes
A node is a worker machine in Kubernetes. It may be virtual or physical, depending on the cluster. Nodes receive and perform tasks assigned from the Master Node. They also contain the necessary services to run pods. Each node comprises a kubelet, a container runtime, and a kube-proxy.
Master Node
This node controls all the worker nodes and originates all assigned tasks. It does this through the control pane, which is the orchestration layer that exposes the API and interfaces to define, deploy, and manage the lifecycles of containers.
Cluster
A cluster represents the master node and multiple worker nodes. Clusters combine these machines into a single unit to which containerized applications are deployed. The workload is then distributed to various nodes, making adjustments as nodes are added or removed.
Pods
Pods are the smallest deployable computing units that can be created and managed in Kubernetes. Each Pod represents a collection of containers packaged together and deployed to a node.
Deployments
A deployment provides declarative updates for Pods and ReplicaSets. It enables users to designate how many replicas of a Pod they want running simultaneously.
How does Docker orchestration work?
Docker, also an open-source platform, provides a fully integrated container orchestration tool known as Docker Swarm. It can package and run applications as containers, locate container images from other hosts, and deploy containers. It is simpler and less extensile than Kubernetes, but Docker provides the option of integration with Kubernetes for organizations that want access to Kubernetes’ more extensive features.
The following are the main architectural components of Docker Swarm:
Swarm
A swarm is a cluster of Docker hosts that run in swarm mode and manage membership and delegation while also running swarm services.
Node
A node is the docker engine instance included in a swarm. It can be either a manager node or a worker node. The manager node dispatches units of work called tasks to worker nodes. It’s also responsible for all orchestration and container management tasks like maintaining cluster state and service scheduling. Worker nodes receive and execute tasks.
Services and Tasks
A service is the definition of a task that needs to be executed on the nodes. It defines which container images to use and which commands to execute inside running containers.
A task carries a container alongside the commands to run inside the container. Once a task is assigned to a node, it cannot move to another node.
How does container orchestration work with other Platforms?
Although Docker and Kubernetes are leading the pack when it comes to container orchestration, other platforms are capitalizing on their open-source software to provide competition.
Red Hat OpenShift is an open-source enterprise-grade hybrid platform that provides Kubernetes functionalities to companies that need managed container orchestration. Its framework is built on a Linux OS that allows users to automate the lifecycles of their containers.
Google Kubernetes Engine is powered by Kubernetes and enables users to easily deploy, manage, and scale Docker containers on Google Cloud.
Other platforms like Apache Mesos and Amazon ECS have developed their own container tools that allow users to run containers while ensuring security and high scalability.
Tool comparisons: Finding the right fit for your needs
When choosing the best container orchestration tool for an organization, several factors have to be taken into consideration. These factors vary across different tools. With a tool like Mesos, for instance, the software team’s technical experience must be considered as it is more complex than simple tools like Swarm. Organizations also have to consider the number of containers to be deployed, as well as application development speed and scaling requirements.
With the right tools and proper resource management, container orchestration can be a valuable approach for organizations looking to achieve improved productivity and scalability.
Below is a comparison of the most popular tools in the container orchestration space, highlighting their key features and ideal use cases.
| Tool | Scalability | Learning Curve | Supported Environments | Key Integrations | Best For |
| Kubernetes | Excellent for large, complex setups | Steep, requires expertise | On-premises, cloud (AWS, GCP, Azure) | CI/CD pipelines, monitoring tools, Istio | Enterprises requiring robust orchestration for multi-cloud or hybrid environments. |
| Docker Swarm | Moderate, ideal for small clusters | Low, easy for Docker users | On-premises, cloud | Docker ecosystem, Kubernetes (optional integration) | Small to medium teams seeking straightforward orchestration within the Docker platform. |
| Amazon ECS | Highly scalable within AWS ecosystem | Moderate, AWS-specific knowledge | AWS (native service) | AWS services (EKS, CloudWatch, IAM) | Businesses already leveraging AWS services for containerized applications. |
| Red Hat OpenShift | Enterprise-grade, highly scalable | Moderate, depends on Kubernetes base | Hybrid environments, Linux-based on-premise/cloud | OpenShift tools, Kubernetes integrations | Enterprises needing managed Kubernetes with robust security and enterprise-grade features. |
| Apache Mesos | Extremely scalable for large systems | High, requires advanced expertise | On-premises, private cloud | Marathon, custom integrations | Advanced users managing diverse workloads beyond containers, such as big data and microservices. |
Examples of container orchestration
Container orchestration provides a number of benefits for organizations, but what do those benefits look like in real-world work situations? We included a couple of common orchestration examples below:
First, consider a large e-commerce platform that experiences heavy traffic during the holiday season. In the past, that platform would have to manually provision additional servers to handle the increased holiday load, which is a time-consuming and error-prone process. With container orchestration, the platform can use an auto-scaling feature that automatically provisions additional containers as traffic increases and scales back down when traffic decreases. That way, increased traffic for the holiday rush can die down in January once everyone buys, returns, and exchanges their items.
Second, consider a company that has a website, a mobile app, and a back-end processing system that all runs on different servers in different environments. In the past, managing these different applications and environments would require much manual effort and coordination. With container orchestration, the company can use a single platform to manage all of its containers and environments, allowing it to easily deploy, manage, and scale its applications across different environments. This allows the company to adopt new technologies more easily and streamline its development process.
Monitor your containers with LogicMonitor today
Container orchestration is a critical component of modern application development, enabling teams to efficiently manage, scale, and secure containerized environments. By addressing the challenges of complexity, security, and resource management, and leveraging best practices like CI/CD pipelines and proactive monitoring, organizations can maximize the benefits of container orchestration while minimizing operational overhead.
To fully realize the potential of container orchestration, having a reliable monitoring solution is essential. LogicMonitor offers scalable, dynamic monitoring for ephemeral containerized resources alongside your hybrid cloud infrastructure. With LogicMonitor, you gain visibility into your Kubernetes and Docker applications through a single, unified platform that automatically adapts to your container resource changes.
OpenShift is a platform that allows developers, operations engineers, or even DevOps professionals to run containerized applications and workloads. It is best described as a cloud-based container orchestration platform, although an “on-prem” version is also possible.
Under the hood, it’s powered by Kubernetes, but an additional architectural layer makes life simpler for DevOps teams. OpenShift is from enterprise software specialist Red Hat and provides a range of automation options and lifecycle management, regardless of where you run your applications.
OpenShift architecture runs in any environment. The OS is usually Linux, but it also can use Centos. On top of that is the standard Kubernetes layer. However, there’s also an additional layer transforming Kubernetes into OpenShift.
OpenShift versions
Red Hat’s OpenShift container platform comes in a few different “flavors,” as IBM likes to call them. OKD or Origin Key Distribution powers an open-source version. OpenShift’s payable versions come with dedicated support, but only within the version lifecycle. For example, OpenShift 4.12 went live on January 17, 2023, and is supported until January 2025.
Why is OpenShift so popular?
OpenShift provides a range of enterprise-ready services straight out of the box. Plenty of other container orchestration services are available, such as Amazon EKS or the Google Kubernetes Engine (GKE). However, with any of these, businesses often need to invest in multiple additional services to make them useful as a full deployment and delivery solution.
OpenShift is a more desirable solution for enterprises that want to be able to build, deploy, and scale fast using a single platform.
How OpenShift differs from other container orchestration platforms
Other container orchestration platforms are aimed at everyone, from individual developers to SMEs, but OpenShift is marketed toward large enterprises. OpenShift empowers businesses to shift to cloud-native development and embrace continuous integration and delivery (CI/CD). Various levels of automation simplify day-to-day tasks and free up DevOps to spend time on other tasks. The platform includes features designed to facilitate faster deployment, plus a full suite of services.
Unlike many competitors, OpenShift provides extensive integrated services that support the full application lifecycle out of the box. Let’s examine a couple of popular OpenShift competitors.
- Docker Swarm is known for its simplicity and ease of use, appealing to smaller teams or projects that need straightforward container management without complex setup. However, it lacks the robust CI/CD capabilities and advanced security features that OpenShift offers.
- Amazon EKS and Amazon GKE provide scalable, cloud-native Kubernetes environments that are tightly integrated with their respective cloud platforms. While they offer powerful options for teams already using AWS or Google Cloud, they often require supplementary services. OpenShift’s all-in-one approach delivers built-in developer tools, automation for CI/CD, and strong multi-cloud and hybrid support.
Architectural components of OpenShift
OpenShift’s multi-layered architecture combines infrastructure and service layers with a structured node system to ensure flexibility, scalability, and performance across various environments.
Layer types
- Infrastructure layer: This foundational layer is the launchpad for deployment across physical, virtual, or cloud-based setups. Compatible with major public clouds like AWS, Azure, and GCP, it abstracts hardware quirks to provide a seamless environment for containerized apps.
- Service layer: Built on Kubernetes, the service layer powers OpenShift’s core. Packed with Red Hat’s integrated tools for monitoring, logging, and automation, it acts as a central command hub—managing networking, storage, and security. Plus, built-in CI/CD pipelines keep development and deployment fast and friction-free.
Node types
In OpenShift, nodes are the backbone of the cluster, working together to stay organized and efficiently manage workloads:
- Master nodes: The brains of the operation, master nodes handle API requests, coordinate workloads, and allocate resources across the infrastructure.
- Infrastructure nodes: Dedicated to essential service components, such as routing, image registries, and monitoring, infrastructure nodes free up worker nodes so they can focus solely on running your apps.
- Worker nodes: Running the containerized applications, worker nodes keep workloads balanced across the cluster to maintain high performance and ensure that reliability never wavers.
By combining these layers and nodes, OpenShift simplifies operational complexity without sacrificing scalability or security. This powerful mix lets enterprises confidently approach cloud-native development by utilizing built-in CI/CD, observability, and strong security practices to support every stage of the application lifecycle.
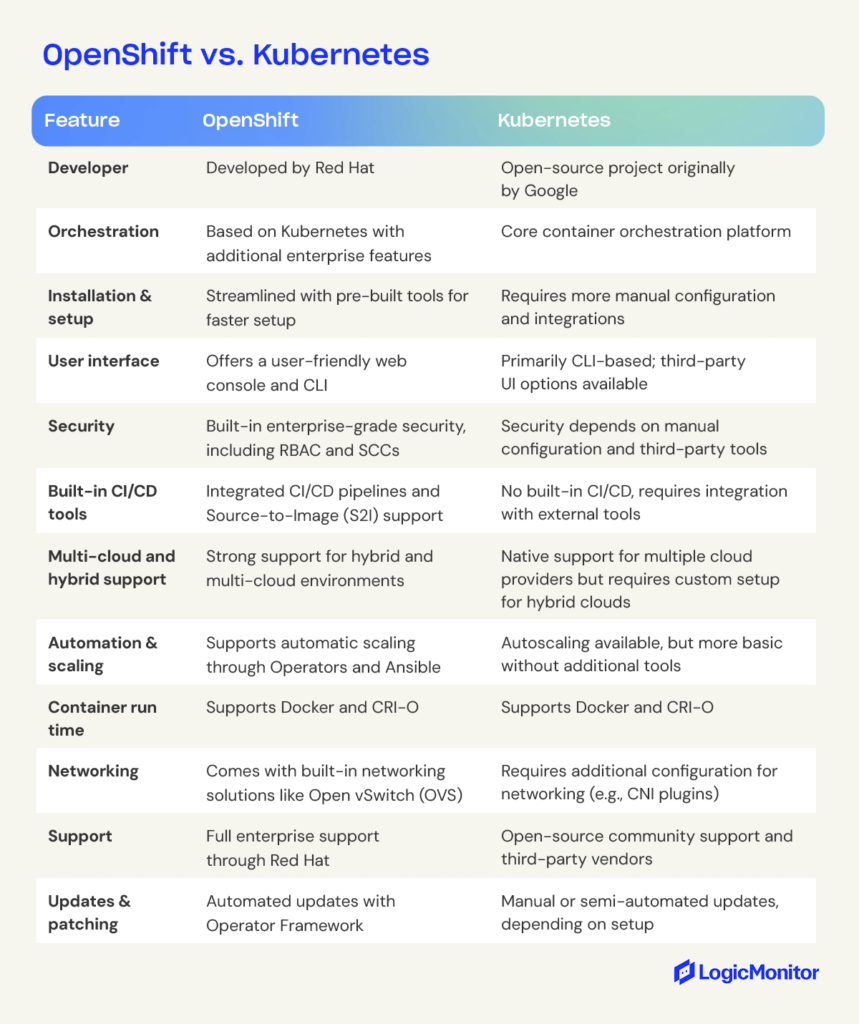
OpenShift vs. Kubernetes
Both OpenShift and Kubernetes offer powerful container orchestration, except OpenShift builds on Kubernetes with additional enterprise-ready features. Let’s take a closer look at how these platforms compare in terms of functionality, setup, and support.
Key features of OpenShift
OpenShift utilizes image streams to shift container images to the cluster. Image streams allow changes to occur via automation. Basically, as soon as any alteration occurs in the source code, an image stream allows a developer to push those changes through with minimal application downtime.
On the monitoring and automation side, OpenShift has some serious tools for streamlined management. Built-in monitoring dives deep into container performance, resource usage, and troubling issues you might encounter, helping DevOps pinpoint and remedy bottlenecks quickly.
On the automation side, OpenShift uses Operators and Ansible Playbooks to handle routine management tasks and scale infrastructure. Operators act like custom helpers that simplify deployment and maintenance, while Ansible Playbooks add scripting power, letting teams easily spin up new nodes or containers.
Since OpenShift is cloud-based, it plays well with any infrastructure, making it ideal for multi-platform development. Developers don’t have to constantly shift how they code to match different ecosystems. Plus, OpenShift includes upstream Kubernetes and Linux CoreOS, delivering an all-in-one solution right out of the box.
Best practices for monitoring
Built-in tools like Prometheus and Grafana are great for tracking container health and resource usage, while external tools like Dynatrace bring real-time insights and anomaly detection for enhanced observability. Dynatrace’s integration with OpenShift helps teams monitor app health, dependencies, and resource demands, giving them a proactive option for tackling issues.
With OpenShift 4.12, new features like IBM Secure Execution, pre-existing VPC setups, and custom cluster installations improve monitoring and automation capabilities, making it even better suited for the continual demands and unique needs of enterprise environments.
Benefits of OpenShift
One of OpenShift’s standout advantages is its support for hybrid and multi-cloud environments. This allows you to launch and manage applications seamlessly across a mix of on-prem, private, and public cloud environments. This flexibility helps avoid vendor lock-in, balance workloads between environments, and give you value for your cost with top-notch performance.
Seamless integration across platforms
OpenShift’s consistent Kubernetes-based foundation makes it easier to deploy, manage, and scale applications across cloud providers and on-premises data centers. With built-in automation tools like Operators and Ansible Playbooks, OpenShift maintains application consistency and performance across different platforms, providing users a uniform experience even in complex multi-cloud deployments.
Hybrid Cloud benefits
If your business embraces a hybrid cloud, OpenShift offers tools for optimizing resources and scaling applications between on-prem and cloud environments. Its hybrid support enables you to keep critical workloads on-prem while taking advantage of the cloud’s scalability and cost efficiency. OpenShift’s centralized management is all about simplicity and efficiency, giving DevOps cloud and on-prem resource management with a single console.
Streamlined operations
With its unified management console and automation features, OpenShift enables your team to deploy updates across multiple environments without needing custom solutions for each platform. This reduces operational overhead and helps you stay agile, making OpenShift a compelling option for organizations moving toward cloud-native development.
Use case example: financial services
A financial institution looking to maximize operational efficiency while meeting regulatory requirements could use OpenShift’s multi-cloud support to manage sensitive data in an on-prem environment while launching customer-facing applications in the cloud. This setup balances security with scalability, letting them respond rapidly to changing customer needs without compromising data protection.
Scaling with OpenShift
Scalability can be a challenge as apps acquire larger user bases or need to perform additional tasks. OpenShift supports the deployment of large clusters or additional hosts and even provides recommended best practices to assure persistent high performance even as applications grow. For example, the default cluster network is:
cidr 10.128.0.0/14
However, this network only allows clusters of up to 500 nodes. OpenShift documentation explains how to switch to one of the following networks:
10.128.0.0/12 or 10.128.0.0/10
These networks support the creation of clusters with more than 500 nodes.
OpenShift allows developers to create “stacks” of containers without reducing performance or speed.
OpenShift also utilizes other tools in its tech stack to support scaling, such as Ansible Playbooks. Ansible is an open-source infrastructure automation tool that Red Hat initially developed. By taking advantage of Ansible Playbooks, OpenShift allows developers to create a new host speedily and bring it into the cluster, simplifying scaling up or down.
OpenShift security
OpenShift is built with enterprise security in mind, supporting secure deployment and scaling while also protecting the development infrastructure. Considering cyberattacks surged by 30% year-over-year in Q2 2024, reaching an average of 1,636 attacks per organization per week, this is a key benefit for many developers.
With built-in support for Role-Based Access Control (RBAC) and Security Context Constraints (SCCs), OpenShift lets you enforce strict access control policies, giving only authorized users access to specific resources. OpenShift’s security framework also integrates seamlessly with many existing corporate identity management systems, providing Single Sign-On (SSO) capabilities that make user management even easier.
Automated security updates and patching
One of OpenShift’s most outstanding security features is its automated updates and patching. By making these tasks automatic, OpenShift reduces the possibility of security risks that tend to go along with outdated software versions or configurations. This reduces the likelihood of vulnerabilities in your production environments. Through frameworks like Operators, OpenShift manages updates for both the platform and applications it supports, enabling DevOps teams to keep security measures current with little to no manual intervention.
Network and data protection
OpenShift offers several powerful network security features, including encrypted communication between containers and stringent network traffic flow restriction policies to reduce exposure. It also offers data encryption both at rest and in transit, helping to keep sensitive information protected throughout its lifecycle.
Security across hybrid and multi-cloud environments
For organizations with hybrid and multi-cloud architectures, OpenShift ensures that security policies are consistent across environments, giving teams unified security protocols to manage applications. OpenShift’s multi-environment security supports compliance while retaining the flexibility of a hybrid cloud, making it especially valuable if your company handles sensitive data that has to comply with regulatory standards.
OpenShift use cases
OpenShift is ideal for modernizing existing apps as well as creating new ones. It transforms the deployment of upgrades and changes, allowing for effortless scaling. Because OpenShift runs on any cloud, it effectively future-proofs applications while ensuring they remain secure and stable. Use cases include:
- Lifting and shifting existing web apps into containerized environments
- Developing cloud-native applications
- Creating apps via distributed microservices
- Quickly add a new service or feature to an existing app
This last point is a key feature of continuous integration and continuous delivery (CI/CD) and is vital for retaining an engaged user base.
Industry use cases
OpenShift is widely adopted across industries, offering flexibility, security, and scalability that make it a top choice for diverse applications:
Financial services: Financial institutions benefit from OpenShift’s security features, ensuring compliance with GDPR and PCI DSS regulations. Banks can keep sensitive data secure on-premises by utilizing hybrid cloud capabilities while deploying customer-facing applications in the cloud. For example, a financial institution in Peru used OpenShift to regularly increase the number of services available to users, reducing the need for in-branch visits and cutting transaction costs by 3%.
Healthcare: Healthcare providers rely on OpenShift to maintain HIPAA compliance and secure patient data across on-premises and cloud environments. OpenShift’s RBAC, SCCs, and data encryption help keep patient data protected at all stages. Another helpful feature is OpenShift’s automated updating, which reduces the need for manual patching, freeing IT resources to focus on other critical tasks.
Retail: In retail, OpenShift empowers companies to build and scale e-commerce platforms quickly, providing a sturdy foundation for handling high traffic volumes during peak times. With CI/CD automation, retailers can update their online stores and integrate new features as often as necessary to keep up with market demands, giving their customers a more pleasant shopping experience.
Implementing continuous integration and delivery (CI/CD)
CI/CD is a growing development approach that uses automation to ensure app updates and adjustments happen as quickly as possible with minimal downtime. Containerized development environments already support continuous integration—the rapid testing and deployment of small code changes—by allowing tests to occur in isolation prior to deployment. Thanks to its simplified interface, OpenShift makes CI/CD pipelines even more efficient by reducing the risk of human error and helping developers maintain consistent processes.
Research shows that even though the benefits of CI/CD are clear, not all organizations are confident of their ability to make this shift. OpenShift could help businesses maximize their digital transformation efforts by empowering developers to embrace the CI/CD culture and get apps to users faster.
OpenShift provides templates for objects and utilizes Jenkins jobs and pipelines to improve automation and promote CI/CD for all application development and deployment. For those comparing Jenkins tools for CI/CD, this article on Jenkins vs. Jenkins X can help clarify which solution best fits your needs.
How to set up and deploy using an OpenShift cluster
Firstly, a developer or DevOps professional needs to get access to OpenShift. You can download and manage the free version yourself, but the fully managed version needs to be purchased from Red Hat. When you subscribe to a hosted version of OpenShift, you’ll get the secure credentials needed to deploy the OpenShift environment.
The simplest way to interact with OpenShift is via the web console. There is also an oc command-line tool.
Before deploying any application, you must create a “project.” This contains everything related to the application.
At this point, you can also use the web console to add collaborators.
You can deploy applications to OpenShift clusters via various methods, including:
- Using an existing container image hosted outside the OpenShift cluster
- Importing an existing container image into an image registry within the OpenShift cluster
- Using source code from a Git repository hosting service
OpenShift also provides templates to simplify the deployment of apps with multiple components. Within the template, you can set your own parameters to exercise complete control over the deployment process. To access these, use the console’s “Add to Project” function. There’s a whole section here dedicated to CI/CD.
To enter image stream tags, use the “Deploy Image” tab in the console or “oc new-app” in the CLI. You can monitor or even scale up from here by adding more instances of that container image.
Wrapping up
Red Hat provides extensive resources to support teams deploying and optimizing OpenShift, making it easier to get the best from this platform. With robust automation and security features and its support for hybrid and multi-cloud environments, OpenShift proves to be a powerful solution for modern app development and deployment. OpenShift enables you to confidently scale, secure, and streamline applications, creating an agile and resilient infrastructure that meets today’s evolving demands.
Microservices are the future of software development. This approach serves as a server-side solution to development where services remain connected but work independently. More developers are using microservices to improve performance, precision, and productivity, and analytical tools provide them with valuable insights about performance and service levels.
The argument for microservices is getting louder: Different teams can work on services without affecting overall workflows, something that’s not possible with other architectural styles. In this guide, we’ll take a deep dive into microservices by learning what they are, what they do, and how they benefit your team.
What are microservices?
In software development, microservices are an architectural style that structures applications as a collection of loosely connected services. This approach makes it easier for developers to build and scale apps. Microservices differ from the conventional monolithic style, which treats software development as a single unit.
The microservices method breaks down software development into smaller, independent “chunks,” where each chunk executes a particular service or function. Microservices utilize integration, API management, and cloud deployment technologies.
The need for microservices has come out of necessity. As apps become larger and more complicated, developers need a novel approach to development—one that lets them quickly expand apps as user needs and requirements grow.
Did you know that more than 85 percent of organizations with at least 2,000 employees have adopted microservices since 2021?
Why use microservices?
Microservices bring multiple advantages to teams like yours:
Scalability
Microservices are much easier to scale than the monolithic method. Developers can scale specific services rather than an app as a whole and execute bespoke tasks and requests together with greater efficiency. There’s less work involved because developers concentrate on individual services rather than the whole app.
Faster development
Microservices lead to faster development cycles because developers concentrate on specific services that require deployment or debugging. Speedier development cycles positively impact projects, and developers can get products to market quicker.
Improved data security
Microservices communicate with one another through secure APIs, which might provide development teams with better data security than the monolithic method. Because teams work somewhat in silos (though microservices always remain connected), there’s more accountability for data security because developers handle specific services. As data safety becomes a greater concern in software development, microservices could provide developers with a reliable security solution.
Better data governance
Just like with data security, where teams handle specific services rather than the entire app, microservices allow for greater accountability when complying with data governance frameworks like GDPR and HIPAA. The monolithic method takes more of a holistic approach to data governance, which can cause problems for some teams. With microservices, there’s a more specific approach that benefits compliance workflows.
Multiple languages and technologies
Because teams work somewhat independently of each other, microservices allow different developers to use different programming languages and technologies without affecting the overall architectural structure of software development. For example, one developer might use Java to code specific app features, while another might use Python. This flexibility results in teams that are programming and technology “agnostic.”
For example, see how we scaled a stateful microservice using Redis.
Did you know 76 percent of organizations believe microservices fulfill a crucial business agenda?
Microservices architecture
Microservice architecture sounds a lot more complicated than it is. In simple terms, the architecture comprises small independent services that work closely together but ultimately fulfill a specific purpose. These services solve various software development problems through unique processes.
A good comparison is a football team, where all players share the same objective: To beat the other team. However, each player has an individual role to play, and they fulfill it without impacting any of the other players. Take a quarterback, for example, who calls the play in the huddle. If the quarterback performs poorly during a game, this performance shouldn’t affect the other team members. The quarterback is independent of the rest of the players but remains part of the team.
Unlike monolithic architectures, where every component is interdependent, microservices allow each service to be developed, deployed, and scaled independently.
Did you know the cloud microservices market was worth 1.63 billion in 2024?
Microservices vs. monolithic architectures
When you’re considering a microservices architecture, you’ll find that they offer a lot of benefits compared to a traditional monolithic architecture approach. They will allow your team to build agile, resilient, and flexible software. On the other hand, monolithic software is inherently complex and less flexible—something it pays to avoid in today’s world of increasingly complex software.
So, let’s look at why businesses like yours should embrace microservices, and examine a few challenges to look out for.
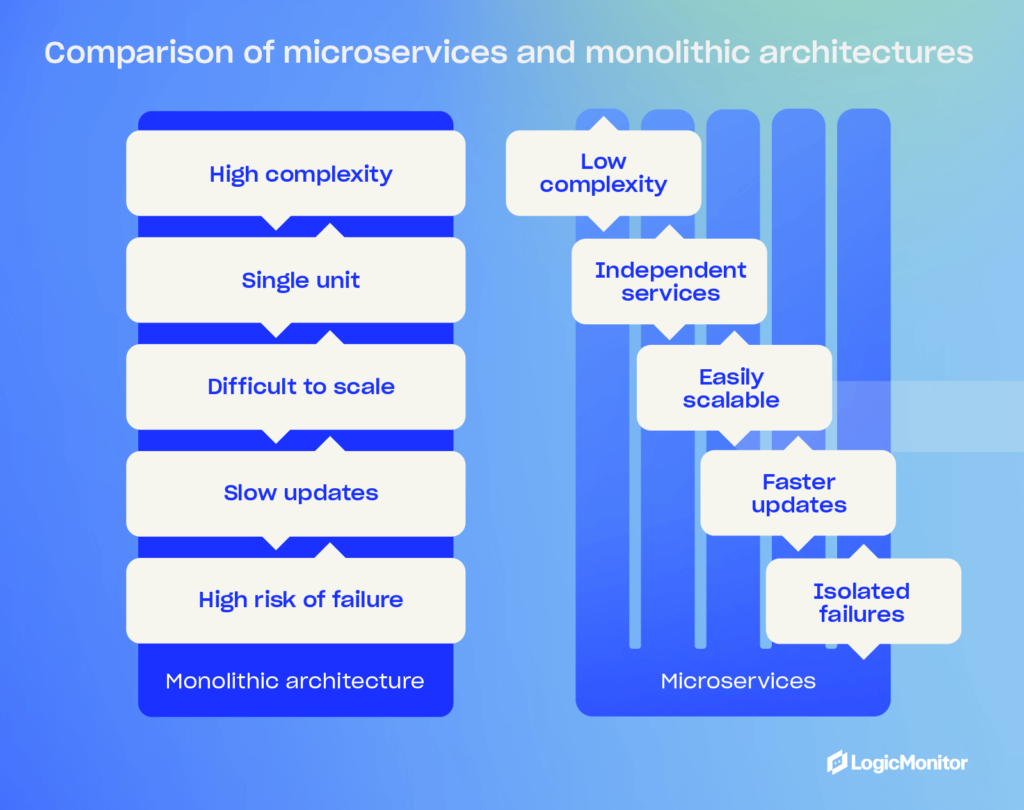
Microservices architecture advantages
- Agility and speed: By breaking your applications into smaller, independent services, you can speed up development cycles by allowing your teams to work on various services simultaneously, helping them perform quicker updates and release features faster.
- Resilience: Service independence and isolation improve your software’s overall stability since a service going offline is less likely to disrupt other services, meaning your application continues running while you troubleshoot individual service failures.
- Flexibility: Your team can use different technologies and frameworks for different services, allowing them to choose the best tools for specific tasks instead of sticking with a few specific technologies that may not be the right choice.
Monolithic architecture disadvantages
- Complexity and risk: When you build applications as single, cohesive units, your team needs to modify existing codes across several layers, including databases, front-ends, and back-ends—even when you only require a simple change. The process is time-consuming and risky, which adds stress to your team if they need to make regular changes, and a single change can impact entire systems.
- High dependency: When your application is made of highly dependent components, isolating services is more challenging. Changes to one part of a system can lead to unintended consequences across your entire application, resulting in downtime, impacted sales, and negative customer experience.
- Cost and inflexibility: Making changes to monolithic applications requires coordination and extensive testing across your teams, which means you’ll see a slower development process, potentially hindering your ability to respond quickly to problems and market demands.
Microservices in the cloud (AWS and Azure)
Perhaps the cloud is the most critical component of the microservices architecture. Developers use Docker containers for packaging and deploying microservices in private and hybrid cloud environments (more on this later.) Microservices and cloud environments are a match made in technological heaven, facilitating quick scalability and speed-to-market. Here are some benefits:
- Microservices run on different servers, but developers can access them from one cloud location.
- Developers make back-end changes to microservices via the cloud without affecting other microservices. If one microservice fails, the entire app remains unaffected.
- Developers create and scale microservices from any location in the world.
Various platforms automate many of the processes associated with microservices in the cloud. However, there are two developers should consider:
Once up and running, these systems require little human intervention from developers unless debugging problems occur.
AWS
Amazon pioneered microservices with service-based architecture many years ago. Now its AWS platform, available to developers worldwide, takes cloud microservices to the next level. Using this system, developers can break down monolithic architecture into individual microservices via three patterns: API-driven, event-driven, and data streaming. The process is much quicker than doing it manually, and development teams can create highly scalable applications for clients.
Azure
Azure is another cloud-based system that makes microservices easier. Developers use patterns like circuit breaking to improve reliability and security for individual services rather than tinkering with the whole app.
Azure lets you create APIs for microservices for both internal and external consumption. Other benefits include authentication, throttling, monitoring, and caching management. Like AWS, Azure is an essential tool for teams that want to improve agile software development.
Did you know the global cloud microservices market is expected to grow from USD 1.84 billion in 2024 to USD 8.33 billion by 2032, with a CAGR of 20.8%?
How are microservices built?
Developers used to package microservices in VM images but now typically use Docker containers for deployment on Linux systems or operating systems that support these containers.
Here are some benefits of Docker containers for microservices:
- Easy to deploy
- Quick to scale
- Launched in seconds
- Can deploy containers after migration or failure
Microservices in e-Commerce
Retailers used to rely on the monolithic method when maintaining apps, but this technique presented various problems:
- Developers had to change the underlying code of databases and front-end platforms for customizations and other tweaks, which took a long time and made some systems unstable.
- Monolithic architecture requires services that remain dependent on one another, making it difficult to separate them. This high dependency meant that some developers couldn’t change services because doing so would affect the entire system, leading to downtime and other problems that affected sales and the customer experience.
- Retailers found it expensive to change applications because of the number of developers that required these changes. The monolithic model doesn’t allow teams to work in silos, and all changes need to be tested several times before going ‘live.’
Microservices revolutionized e-commerce. Retailers can now use separate services for billing, accounts, merchandising, marketing, and campaign management tasks. This approach allows for more integrations and fewer problems. For example, developers can debug without affecting services like marketing and merchandising if there’s an issue with the retailer’s payment provider. API-based services let microservices communicate with one another but act independently. It’s a much simpler approach that benefits retailers in various niches.
Real-world examples of microservices in e-commerce
If you aren’t sure if microservers are the best choice for your company, just look at some of the big players that use microservices to serve their customers worldwide. Here are a few examples that we’ve seen that demonstrate how you can use microservices to build and scale your applications.
Netflix
Netflix began transitioning to microservices after a major outage due to a database failure in 2008 that caused four days of downtime, which exposed the limitations of its monolithic architecture. Netflix started the transition to microservices in 2009 and completed the migration to microservices in 2011. With microservices performing specific functions, such as user management, recommendations, streaming, and billing, Netflix can deploy new features faster, scale services independently based on demand, and improve the overall resilience of its platform.
Amazon
Amazon shifted to microservices in the early 2000s after moving to service-oriented architecture (SOA) to manage its large-scale e-commerce platform. Amazon’s microservices helped it handle different aspects of the company’s platform, such as order management, payment processing, inventory, and customer service. This helped Amazon innovate rapidly, handle massive traffic, and maintain uptime—even during peak shopping periods like Black Friday.
Spotify
Spotify uses microservices to support its platform features like playlist management, search functionality, user recommendations, and music streaming. Spotify’s approach allows the company to innovate quickly, scale individual services based on user demand, and improve the resilience of its platform against failures. Spotify implemented microservices between 2013 and 2014 to handle increasing user demand and feature complexity as it expanded globally.
Airbnb
Airbnb employs microservices to manage its booking platform services for property listings, user authentication, search, reservations, and payments. Implemented between 2017 and 2020, microservices helped Airbnb scale its services as the company experienced massive growth. Airbnb was able to improve performance based on user demand and deploy features more quickly.
PayPal
Since early 2013, PayPal has used microservices to handle payment processing, fraud detection, currency conversion, and customer support services. Microservices helps PayPal offer high availability, improve transaction processing times, and scale its services across different markets and geographies.
How do you monitor microservices?
Various platforms automate the processes associated with microservices, but you will still need to monitor your architecture regularly. As you do, you’ll gain a deeper understanding of software development and how each microservice works with the latest application metrics. Use them to monitor key performance indicators like network and service performance and improve debugging.
Here’s why you should monitor microservices:
- Identify problems quickly and ensure microservices are functioning correctly.
- Share reports and metrics with other team members and measure success over time.
- Change your architecture to improve application performance.
The best monitoring platforms will help you identify whether end-user services are meeting their SLAs and help teams drive an optimized end-user experience.
Tools like LM Envision provide comprehensive monitoring solutions that help you maintain high-performance levels across all your services.
Did you know the cloud microservices market could reach $2.7 billion by 2026?
Best practices for implementing microservices
As you’ve seen above, microservices will offer many benefits to your business. But they aren’t something you can just substitute in and expect to run flawlessly. Here are a few best practices that will help you implement microservices in your application:
- Start small: Switching to microservices isn’t something you should do all at once. Start small by breaking your application down into smaller components and do it a little at a time. This approach will allow your team to learn and adapt as they go.
- Use automation tools: Use CI/CD pipelines to automate the deployment and management of microservices. Automation reduces the chance of your team making mistakes and speeds up repetitive deployment processes to reduce development time.
- Ensure robust monitoring and logging: Implement comprehensive monitoring and logging solutions so your team can track the performance of each microservice and quickly identify any issues.
- Prioritize security: Each service can become a potential attack entry point with microservices and may be harder to secure and monitor for your team because of the more distributed architecture. Implement strong authentication, encryption, and other security measures to protect the system.
- Maintain communication between teams: Since microservices allow your team to work independently on different parts of the application, it’s crucial to maintain clear communication and collaboration to ensure that all services work together seamlessly.
What are the benefits of microservices? Why do they exist today?
Now that we’ve looked at microservices and a few primary benefits, let’s recap some of them to learn more about why they exist today.
- Greater scalability: Although microservices are loosely connected, they still operate independently, which allows your team to modify and scale specific services without impacting other systems.
- Faster development: Your team can move faster by working on individual services instead of a monolithic application, meaning you can focus on specific services without worrying as much about how changes will impact the entire application.
- Better performance: You can focus on the performance of individual services instead of entire applications, changing and debugging software at a smaller level to learn how to optimize for the best performance.
- Enhanced security and data governance: Using secure APIs and isolated services will help your team improve security by controlling access to data, securing individual services, and monitoring sensitive services—helping facilitate compliance with security regulations like HIPPA and GDRP.
- Flexible technology: You aren’t tied to specific programming languages, frameworks, databases, and other technologies with microservices, which means you can pick the best tool for the job for specific tasks.
- Cloud-native capabilities: Platforms like AWS and Azure make creating and managing microservices easier, which means your team can build, deploy, and manage software from anywhere in the world without having a physical infrastructure.
- Quick deployment: Software like Docker is available to make deploying microservices easy for your team, helping them streamline deployment and ensure microservices run in the exact environment they were built in.
The future of microservices
Microservices are a reliable way to build and deploy software, but they are still changing to meet the evolving needs of businesses. Let’s look at what you can expect to see as microservices continue to evolve in the future.
Serverless Architecture
Serverless architecture allows you to run microservices without managing any other infrastructure. AWS is already developing this technology with its Lambda platform, which takes care of all aspects of server management.
PaaS
Microservices as a Platform as a Service (PaaS) combines microservices with monitoring. This revolutionary approach provides developers with a centralized application deployment and architectural management framework. Current PaaS platforms that are well-suited for microservices are Red Hat OpenShift and Google App Engine.
In the future, PaaS could automate even more processes for development teams and make microservices more effective.
Multi-Cloud Environments
Developers can deploy microservices in multiple cloud environments, which provides teams with enhanced capabilities. This can mean using multiple cloud providers, and even combining cloud services with on-prem infrastructure (for cases when you need more control over the server environment and sensitive data).
“Microservices related to database and information management can utilize Oracle’s cloud environment for better optimization,” says technology company SoftClouds. “At the same time, other microservices can benefit from the Amazon S3 for extra storage and archiving, all the while integrating AI-based features and analytics from Azure across the application.”
Service mesh adoption
Service meshes are becoming critical for managing more complex microservice ecosystems. They will provide your team with a dedicated infrastructure for handling service-to-service communication. This infrastructure will help improve monitoring, incident response, and traffic flow.
DevOps and AIOps
The integration of DevOps and AIOps with microservices and ITOps will help streamline development and operations. For example, new DevOps tools will help developers automate many deployment tasks instead of manually configuring individual environments. AIOps will also help your team, as it uses AI and machine learning to improve monitoring and reduce the time your team needs to look through data to find problems.
Event-driven architecture
Event-driven architecture is gaining more popularity among microservices because it allows for more de-coupled, reactive systems that are easier to manage. It allows them to process real-time data and complex event sequences more efficiently.
Advanced observability
As multi-cloud environments become more common, more advanced tools are needed to monitor these environments. Hybrid observability solutions will help your team manage hybrid environments to gather performance metrics (CPU usage, memory usage) about your services in a central location and send alerts when something goes wrong. Advanced observability solutions also use AI to monitor environments to ensure your team only sees the most relevant events and trace information that indicates a potential problem.
Before You Go
Microservices have had an immeasurable impact on software development recently. This alternative approach to the monolithic architectural model, which dominated software development for years, provides teams a streamlined way to create, monitor, manage, deploy, and scale all kinds of applications via the cloud. Platforms like AWS and Azure facilitate this process.
As you learn more about software development and microservices, you’ll discover new skills and become a more confident developer who solves the bespoke requirements of your clients. However, you should test your knowledge regularly to make every development project successful.
Do you want to become a more proficient software developer? Microservices Architecture has industry-leading self-assessments that test your microservice readiness, applicability, and architecture. How well will you do? Get started now.
Helm is a powerful package manager for Kubernetes that automates application deployment, upgrades, and management. By simplifying the process of organizing microservices, Helm helps developers scale their applications more efficiently while reducing the complexity of managing Kubernetes manifests.
Anyone familiar with writing Kubernetes manifests knows how tedious creating multiple manifest files using YAML is. Even the most basic application has at least three manifest files. As the cluster grows, the more unwieldy the configuration becomes. Helm is one of the most useful tools in a developer’s tool belt for managing Kubernetes clusters. This article explores Helm’s basic features to give you an idea of how you might use it to help with your Kubernetes deployments.
What is Helm?
Helm package manager for Kubernetes applications includes templating and lifecycle management functionality. It is a package manager for Kubernetes manifests (such as Deployments, ConfigMaps, Services, etc.) grouped into charts. A chart is just a Helm template for creating and deploying applications on Kubernetes.
Charts are written in YAML and contain metadata about each resource in your app (e.g., labels, values, etc.). You can use a chart by itself or combine it with other charts into composite charts, which you can use as templates for creating new applications or modifying existing ones. Helm essentially allows you to manage one chart version for your different environments.
Helm architecture
The Helm uses a client/server architecture that consists of the following components:
- Helm client: The client is the user interface to Helm. It creates new charts, manages repositories, and releases packages. You can install the Helm client on macOS and Linux and it is available as a Chrome extension as well. Developers also use Helm to test upgrades before releasing them into production.
- Helm library: The Helm library is a set of client libraries that clients use to interact with the Kubernetes API server to install, upgrade, or roll back charts. The tool is installed on every node in the cluster and is a required component for installing any chart.
What are Helm charts?
Chart is the packaging format used by Helm. It contains the specs that define the Kubernetes objects that the application consists of, such as YAML files and templates, which convert into Kubernetes manifest files. Charts are reusable across environments. This reduces complexity and minimizes duplicates across configurations. There are three basic concepts to Helm charts:
- Chart: A Helm chart is a pre-configured template for provisioning Kubernetes resources.
- Release: A release represents a chart that has been deployed.
- Repository: A repository is a public or private location for storing charts.
When working with Helm, developers search repositories for charts. They install the charts onto Kubernetes clusters, which creates a release.
Helm Chart Structure
The files and directories of a Helm chart each have a specific function:
YOUR-CHART-NAME/
|
|- charts/
|
|- templates/
|
|- Chart.yaml
|
|- values.yaml
Charts: The charts directory contains other charts the main chart depends on. A single chart could depend on several charts. Thus, there might be multiple charts in this directory.
Templates: This folder stores the manifest being deployed with the chart. For example, you may deploy an application that needs a service, a config map, and secrets. In this case, the directory would contain a deployment.yaml, service.yaml, config.yaml, and a secrets.yaml. Each of these files would get its values from the values.yaml file.
Chart.yaml: This file holds meta information such as the version, name, search keywords, etc.
Values.yaml: Default configuration values for the chart.
Benefits of using Helm
Developers and DevOps teams appreciate Helm’s ability to automate complex Kubernetes deployments. The tool frees them up to focus on more value-added tasks. The tool is very user-friendly, so you don’t need special skills or knowledge. The user interface is intuitive, meaning you can easily manage your cluster deployments.
Strong security model
It is a very secure solution that ensures you can only install packages you trust in your cluster.
Flexible
It is a very flexible and customizable solution that makes installing different packages on your Kubernetes cluster easy.
Large package ecosystem
It has a very large ecosystem of packages, so you can find the package you are looking for.
Community support
Helm is an open-source tool supported by a large community of developers. That means there’s plenty of support and advice if you encounter challenges.
Helm simplifies deployments
Helm charts allow developers to provision Kubernetes resources with the “click of a button” (or via a command if using the command line interface). Additionally, the tool enables developers to perform complex deployments by including chart dependencies within other charts.
Automatic versioning and rollback capabilities
Keeping track of versions across deployments can be a challenge. Helm automatically handles this task. The tool keeps a database of all release name versions. That way, if something goes wrong, the developer can simply roll back to the previous version. Each deployment creates a new version, allowing for easy tracking of changes over time. If a deployment encounters issues, rolling back to a stable version is fast and straightforward, minimizing any potential system performance disruptions.
CI/CD Integration
DevOps engineers enjoy the tool’s seamless CI/CD pipeline integration. Helm provides integration hooks that you can configure to perform certain actions. For example, these hooks can be configured to act before installation begins or after installation. You can also use these hooks to run health checks on the Helm deployments and verify if the deployment was successful. Additionally, these hooks can trigger automated tests or rollbacks based on specific conditions, allowing teams to maintain a robust and streamlined deployment pipeline with minimal manual intervention.
Helm boosts developer productivity
As we mentioned, you can share helm charts. These templates mean you won’t need to spend time rewriting manifests for common tasks. You can also use them to quickly generate a new chart based on one of your existing templates. For example, if you want to generate a new Kubernetes application with a specific service account, you can do this with a single line of code. This makes it easier for your team to scale with Kubernetes, as you won’t need to rewrite manifests to handle the same tasks.
Helm smooths the Kubernetes learning curve
Kubernetes is a complex tool with many features and configuration options. The learning curve can be overwhelming. Using Helm removes the complexity and makes Kubernetes more approachable. You can begin using Helm with a single command to install a chart. It also has a user-friendly graphical interface. You can search for charts in the public repository to find one that meets your needs.
Private repositories also allow your company’s engineers to upload their charts for other employees to install. Where other tools may require configuration files, Helm uses a declarative approach. You can specify all of your desired settings in a single file and then install the chart. With Helm, you can also set up automated updates and deployment schedules to keep your cluster up to date with the latest software.
Application configuration during deployment
Another distinguishing feature is the ability to provide application configuration during deployment. Not only can you specify the Kubernetes resources (deployments, services, etc.) that make up your application, but also the environment-specific configuration for those resources. This allows the same Helm chart to be used across all of your environments.
Creating a basic Helm chart
To create a Helm chart, you first need to create a directory where the chart will live. Then, you can create the Helm file in that directory. The following example shows how to create a Helm chart that deploys an application to a Kubernetes cluster.
# mkdir my-app
# cd my-app
# helm init
# helm install --name my-app kubernetes/my-app
The –name flag tells Helm which name to give the chart when installed. The next step is to configure the Helm chart. You do this by creating a file called config/helm/my-app.yaml in the same directory as the Helm file. The following example shows how to configure the my-app chart to deploy an application named hello world.
apiVersion: apps/v1beta1
kind: Deployment
metadata: config/helm/my-app.yaml
     name: my-app
     labels:
     app: hello world
spec:
     replicas: 1
     template:
          metadata:
               labels:
                     app: hello world
spec:
     containers:
     -name: hello
     image: kubernetes/hello
     ports:
     - containerPort : 80
The first line in the example sets the API version for the my-app object to apps/v1beta1. The next line sets the kind of chart to be a Deployment. The metadata for the my-app chart will be stored in the file config/helm/my-app.yaml.
The labels field in this file will contain the name of the application being deployed, and the spec field will contain the application’s configuration. In this case, only one container will be deployed, and it will have port 80 open. The last line in this file sets up the template for the my-app chart, which tells Helm how to create and deploy the application.
To run the my-app chart, you can use the helm command.
# helm list
# helm deploy my-app
The first command lists all of the charts that are currently installed on your system. The second command deploys the my-app chart to a Kubernetes cluster. Helm provides developers with an elegant way of packaging and deploying applications in a Kubernetes cluster.
Streamline Your Kubernetes Workflows with Helm
Helm streamlines Kubernetes workflows by simplifying package management and automating deployments, pushing Helm upgrades and Helm rollbacks. With its reusable charts, Helm reduces complexity, integrates metrics, improves consistency across environments, and saves developers time, allowing them to focus on scaling applications rather than manual configuration. Whether you’re managing a single cluster or scaling across multiple, Helm’s automation capabilities make Kubernetes easier to manage while ensuring your applications are deployed efficiently and reliably. Integrating Helm into your DevOps pipeline will optimize workflows and enhance overall productivity.
Managing your IT infrastructure—whether it’s servers, databases, or applications—can feel overwhelming. That’s where container orchestration comes in. Simplifying complex environments helps you save time and operate more efficiently.
In this article, we’ll explain exactly what is Docker Swarm, how it works, its key features, and why it’s a popular choice for container orchestration.
What is Docker Swarm?
Docker Swarm is a native container orchestration tool developed by Docker. It simplifies the management and scaling of containers across several machines, helping optimize distributed systems. A swarm is a cluster of Docker hosts that function together as a single machine.
You can use a swarm to automate the deployment, scaling, and orchestration of containers, giving you the ability to function together in single virtual machines—allowing for streamlined resource management and workload distribution. Docker Swarm works well with minimal resources, so it’s great for small- or medium-sized projects that don’t need the features of other solutions.
Docker Swarm also connects to Docker through its API and CLI. This means a swarm is compatible with other Docker tools, making it easy for developers already familiar with the Docker ecosystem.
How does Docker Swarm work?
Docker Swarm works by orchestrating containerized applications across a cluster of machines, helping you easily maintain distributed systems. Its architecture and features are designed to simplify container management while ensuring high availability and scalability.
Docker Swarm breaks each swarm into a few parts:
- Nodes: The individual machines in a cluster, with manager nodes handling the overall management and worker nodes executing tasks directed by the manager.
- Service and task distribution: Docker Swarm distributes tasks in a cluster to ensure an even workload distribution and handle resource optimization. Services are the applications on worker nodes (container hosts) that execute those tasks.
- Load balancing: Docker Swarm includes built-in load balancing features that distribute incoming traffic across the running containers to ensure efficient resource use. The monitoring nodes watch worker health and reschedule tasks on healthy nodes to maintain availability.
- Networking: Docker Swarm has an overlay network to facilitate communication between nodes without requiring external port exposure and includes service discovery to ensure nodes can automatically discover each other.
- Monitoring and reporting: Docker Swarm includes monitoring and reporting tools that give real-time insight into a swarm’s health and notify you automatically to help diagnose and resolve problems quickly.
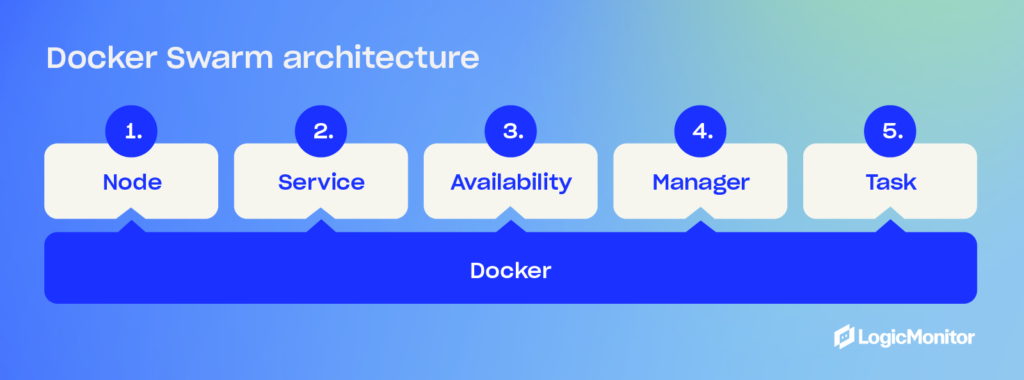
Key features of Docker Swarm
Docker Swarm has many powerful features that make it a great solution for container orchestration on operating systems like Linux. Here are some of the primary ones to consider:
Easy setup and configuration
You can easily set up, configure, and integrate with the API and CLI, meaning developers won’t need to worry about additional tools or configurations. Docker Swarm features declarative configuration to define the state of your application and system and ensure your cluster matches your needs.
Automatic load balancing
It automatically distributes your traffic to containers running in your containers. Developers don’t need to distribute traffic manually—Docker Swarm will handle this automatically based on their parameters to ensure optimal performance and resource usage.
Scalability
Docker Swarm offers flexible scalability to help you manage increasing and decreasing loads. It does this through horizontal scaling, where a Docker Swarm adds more nodes or increases the number of container instances as the workload changes. The declarative service model also makes it easy to add services to new nodes that perform as expected.
Fault tolerance
Swarm managers use a leader-election mechanism to ensure high availability. A new one is automatically elected to schedule tasks if the current leader fails. Task rescheduling mechanisms are also available in cases of worker node failure.
Security
It uses TLS encryption by default to secure node communication, ensuring data privacy and integrity. It also enables the “secure by default” approach, enabling security features like TLS and role-based authentication.
Rolling updates
Docker Swarm supports rolling updates, which allow you to deploy changes incrementally. This reduces downtime and ensures your system remains operational during updates. It also provides for rollbacks, enabling you to revert to previous configurations in case of problems.
Monitoring and insights
Built-in tools help you monitor your environment’s health. Docker Swarm monitors the health of nodes (workers and managers) and identifies potential issues you need to resolve. You can also find performance metrics that help you track performance over time to ensure you have consistent resource usage and performance.
Benefits of using Docker Swarm
Docker Swarm’s many features make it an attractive option for developers—especially in medium- to small-scale environments. Its simplicity and Docker integration make it quick to start with and get going, so let’s look at how that will help your team:
- Compared to more complex orchestration tools like Kubernetes, Docker Swarm is straightforward to learn and implement, making it accessible to teams of varying experience levels.
- It is a Docker-native tool that integrates well with the rest of the Docker ecosystem, meaning developers can easily move to Docker Swarm from other Docker configurations without changing tools.
- Built-in high availability through fault tolerance and load balancing allows you to maintain performance at all times.
- Simple and lightweight, Docker Swarm works great for resource-constrained environments and has minimal overhead.
- Docker Swarm’s flexibility means you can deploy it in both on-prem and single-cloud environments without requiring a complex multi-cloud configuration. It also offers scalability to accommodate growing workloads.
- It improves developer productivity and enables rapid prototyping and test applications, leading to faster development cycles.
Limitations of Docker Swarm
Docker Swarm has a lot of features that make it worth using in small environments, but there are a few drawbacks to consider. Let’s look at a few of them:
- Simple system for developers to use, but it struggles in more complex environments, like hybrid and multi-cloud environments, where advanced orchestration tools excel.
- Limited integration with external tools and plugins, which may not suit teams relying heavily on third parties.
- Declining popularity as Kubernetes has become the industry standard for Docker orchestration, which means there is less community involvement and support than with other tools.
- Limited advanced features like advanced networking capabilities, service meshes, and automatic scaling adjustments.
Docker Swarm mode and services
Docker Swarm operates in Swarm Mode, a built-in feature that allows the clustering and orchestration of Docker nodes. Swarm Mode introduces the concept of services and tasks that enable fine-grained control over container deployment.
Tasks
A task represents an instance of a running container. In Swarm Mode, tasks are assigned to worker nodes and are managed by the swarm. Each task is immutable and will be rescheduled if the node fails.
Services
A service defines how tasks are distributed across nodes. There are two types of services in Docker Swarm:
- Replicated services: You specify the number of task replicas, and the swarm manager ensures that the defined number of instances are running across the cluster.
- Global services: A task runs on every available node. This is useful for monitoring, logging, or network-related tasks.
Modes in Swarm mode
- Manager mode: Manager nodes make scheduling and orchestration decisions for the entire swarm. They also store cluster state and manage leader elections.
- Worker mode: Worker nodes execute tasks assigned by the manager node and report back on their status.
Docker Swarm vs. other orchestration tools
Container orchestration is not limited to just one tool. While Docker Swarm offers a simple and integrated solution, other tools like Kubernetes and Apache Mesos have unique strengths.
Docker Swarm vs. Kubernetes
Docker Swarm and Kubernetes are two leading players in container orchestration. Docker Swarm, a tool designed explicitly for Docker, is renowned for its user-friendly interface and straightforwardness. It comes with built-in features for load balancing and enables quick and seamless container deployment.
In contrast, Google’s open-source platform Kubernetes is highly regarded for its ability to automate containerized applications’ deployment, scaling, and management. Kubernetes can handle complex environments and allows for a variety of workload options, but its complexity makes setup and administration extra challenging.
These platforms stand out because of their ease of use. With its learning process and easier installation, Docker Swarm proves to be a choice for individuals already familiar with Docker commands or those working on smaller- to medium-sized projects. In contrast, Kubernetes benefits from a larger community and extensive third-party integrations, increasing support and access to various user tools.
Docker Swarm vs. Apache Mesos
Docker Swarm and Apache Mesos are powerful tools for effectively managing containerized applications. They both possess unique capabilities and commendable features that set them apart.
Docker Swarm is a simple yet powerful tool for clustering and scheduling Docker containers. It integrates with Docker services and offers key features such as load balancing, secure networks, service discovery, and scaling capabilities.
Apache Mesos is a versatile cluster manager that efficiently manages Docker containers and various workloads. It provides unparalleled flexibility.
Regarding usability, Docker Swarm excels with its user-friendly interface and simplified learning process. Users can seamlessly transition without learning new commands or concepts using the same API as Docker. On the other hand, Apache Mesos provides greater control over resources but may entail more complexity regarding setup and management.
Both tools excel in terms of scalability and performance. However, Apache Mesos is the best choice for managing extensive clusters because its efficient design is explicitly tailored for large systems.
Use cases for Docker Swarm
Docker Swarm’s efficiency makes it an excellent choice for many use cases. Let’s look at a few examples of what you can do.
Small to medium projects
Docker Swarm is a lightweight orchestration tool, making it an excellent choice for small and medium projects. If your project doesn’t need the advanced scaling and features of a Kubernetes installation, Docker Swarm can get you up and running more quickly. This is also good if your project requires minimal hardware resources (for microservices, for example) since Docker Swarm runs with minimal resources.
Temporary clusters and repaid deployment
Being able to deploy Docker Swarm quickly makes it a great choice for managing temporary clusters (testing and DevOps environments, for example) and rapid deployment scenarios for things like events, campaigns, and short-term projects. Your team won’t need to worry about complex Kubernetes setups or long-term maintenance.
Simple deployments
Using Docker Swarm provides straightforward solutions for teams needing simple container orchestration and not using complex environments (like multi-cloud solutions). It has a short learning curve and simple configuring, meaning your team can deploy quickly (without too much of a learning curve).
Docker-focused projects
As a native tool in the Docker ecosystem, Docker Swarm allows your team to manage containerized applications using familiar tools and workflows. Using a swarm means your team has less to learn to integrate new systems into your workflow.
How to get started with Docker Swarm
Getting started with Docker Swarm is a straightforward process. Below is an overview of the key set-up steps and a few resources for effective management.
Setting up Docker Swarm
Follow these steps to get started:
- Initialize the swarm:
Run the following command on the primary node to create your swarm:
docker swarm init - Add nodes to the swarm:
Add nodes to the swarm as worker nodes:
docker swarm join –token <TOKEN> / <MANAGER_IP>:2377 - Verify the cluster
Ensure proper setup by verifying your cluster:
docker node ls
Once set up, you can begin deploying services:
- Create a service:
docker service create —name new-service —replicas 3 nginx - Manage your service:
Scale your service and inspect its details
docker service scale new-service=5
docker service inspect new-service - Update your service:
Perform rolling updates to avoid downtime
docker service update —image nginx:latest new-service
Managing your Docker Swarm
Once you have set up Docker Swarm, you need guidelines to manage everything and keep it up and running. Use these tips to monitor your swarm cluster.
- Keep an eye on the health of your nodes by using the inspect and ls commands to get the details.
- Set up logging for troubleshooting tools like the Docker logging driver or other third-party solutions.
- Leverage third-party monitoring tools to monitor the status of your cluster to ensure resource allocation looks good and everything stays performant.
- Regularly back up your swarm configuration to safeguard against failure.
- Use constraints and placement preferences to assign tasks to certain nodes for resource optimization, for example:
docker service create –constraint ‘node.labels.type==high-memory’ –name memory-intensive-service nginx
For more information, check out the official resources from Docker:
Getting started with Docker Swarm
Docker Swarm offers a straightforward and efficient solution for container orchestration, making it an excellent choice for small- to medium-sized projects. It integrates into the Docker ecosystem, has built-in security, and offers essential features like load balancing to build a reliable foundation for containerized applications. Start building your cluster today to see the advantages of streamlined container management.
Are you looking for a solution to help monitor your containers? Read about our container monitoring to learn more.
Kubernetes allows DevOps teams to deploy containerized applications faster and makes managing containers at scale significantly easier. Obtaining visibility into these containerized applications is key to maximizing application/service performance and proactively preventing downtime. Because the availability of containerized workloads relies on Kubernetes orchestration, you should also monitor Kubernetes cluster resources. With LogicMonitor’s new Kubernetes Monitoring Integration you can comprehensively monitor your Kubernetes clusters and the containerized applications running within them, alongside your existing hybrid IT infrastructure in a single pane of glass.
LogicMonitor’s Kubernetes Monitoring integration relies on an application that can be installed via Helm and that runs as one pod in your cluster, which means there’s no need to install an agent on every node. This application listens to the Kubernetes event stream and uses LogicMonitor’s API to ensure that your monitoring is always up to date, even as the resources within the cluster change. Data is automatically collected for Kubernetes nodes, pods, containers, services, and master components (e.g. scheduler, api-server, controller-manager). Pre-configured alert thresholds provide meaningful alerts out of the box. Applications are automatically detected and monitored based on best practices, using LogicMonitor’s extensive library of monitoring templates. This means that you’ll get instant visibility into your containerized applications without the hassle of editing configuration files, having to rely on matching container image names, or manually configuring monitoring. Additionally, LogicMonitor retains this granular performance data for up to two years. Combined, these benefits enable LogicMonitor to monitor your Kubernetes clusters with fewer required tools and processes than alternative solutions.
To get started, simply select the ‘Add Kubernetes Monitoring’ option from the Resources page within LogicMonitor:

You’ll be prompted to enter in some information about how and where your monitored cluster will display in the LogicMonitor resource tree, as well as what API Tokens will be used, what namespace the integration application should run in, and how many LogicMonitor Collectors you want running:

The information you enter will be used in the next step to display the Helm commands you’ll need for installation:
You can copy and paste the helm commands directly to install the integration in your cluster:

After installing, you should be able to verify that everything was appropriately created in LogicMonitor:

In the last step of the wizard, you can create LogicMonitor Services based on Kubernetes label key-value pairs. This result is a logical service for each label key-value pair that groups together the Nodes and Pods with the label, and aggregates metrics across them to achieve cluster-wide statistics. This enables you to track aggregate health and performance for a specific label, regardless of changes in underlying resources:

After finishing the wizard you’ll see a new Resource Group in LogicMonitor that represents your monitored Kubernetes cluster, a Service Group that includes the services created based on label key-value pairs, and a Dashboard Group that includes automated dashboards that provide instant visibility into your cluster.
The Resource Group includes:
- nodes, grouped by worker-role
- pods, grouped by namespace
- services, grouped by namespace
Each of these resources are automatically monitored, and Containers are automatically discovered and monitored for each pod:

Additionally, containerized applications will be automatically discovered and monitored. For example, this cluster is running the Kubernetes example Guestbook application, and LogicMonitor has automatically applied monitoring for Redis on all Redis pods:

The dashboard shown is created automatically and provides comprehensive visibility into cluster health in an at-a-glance format, so you can easily assess the health of your cluster and even identify where applications are consuming too many resources.

It’s as easy as that! With LogicMonitor you get comprehensive visibility into your Kubernetes environments in minutes, and present it alongside the rest of your cloud and on-premisess infrastructure, all in a single pane of glass.
If you’re not a customer yet and want to check out LogicMonitor’s industry-leading hybrid monitoring capabilities, start your free trial today.
LogicMonitor is an agentless monitoring solution. What we really mean by “agentless” is that we don’t require an agent on every monitored server (physical or virtual). One LogicMonitor Collector – a lightweight application that takes just seconds to install – can monitor hundreds or even thousands of devices, including servers, virtual machines, network switches, storage systems, cloud resources, containers, and more. As an agentless solution, LogicMonitor is easier to set up than a traditional agent-based monitoring (because you only have one lightweight app to install), and takes fewer IT cycles to manage over time (e.g. because you don’t have to worry about maintaining consistent versions across agents). When it comes to monitoring Kubernetes, LogicMonitor’s agentless approach enables you to comprehensively monitor your cluster and the health and performance of the resources within without requiring an agent on every node.
LogicMonitor’s Kubernetes Monitoring relies on two primary applications for monitoring:
- An application, Argus, running in the cluster for discovery
- A Dockerized LogicMonitor Collector running in the cluster for data collection
The first application, Argus, runs as one pod and uses event-based discovery alongside LogicMonitor’s API to ensure monitoring is always up to date with what is running in the cluster. The second application, LogicMonitor’s Collector, collects data for Kubernetes nodes, pods, containers, and services via the Kubernetes API, as well as more traditional protocols like SNMP or JMX, to ensure that cluster resource performance and health are comprehensively monitored. In all, these two pods running in your cluster is all that is required to start monitoring Kubernetes with LogicMonitor.

A diagram of how LogicMonitor’s Kubernetes monitoring works, including components necessary for discovery and monitoring.
Although running an agent on every node in a Kubernetes cluster can be made easier, for example by using a daemon set, there are also disadvantages with using agent-based monitoring for cluster architectures relying on master and worker relationships. The Kubernetes Master handles orchestration and scheduling. It is important to monitor the master components (i.e. kube-apiserver, kube-scheduler, controller-manager), to ensure the desired state of the cluster is enforced. However, with agent-based monitoring, you’ll likely end up with multiple data collection requests to these master components – one for each agent. As a result, agent-based can be overly taxing on the Kubernetes Master, in addition to being more difficult to configure and manage.
In addition to being agentless, LogicMonitor has comprehensive metrics for Kubernetes nodes, pods, containers, services, master components, and common applications, so you get instant visibility into your cluster’s health and performance. Pre-configured alert thresholds mean you get out-of-the-box monitoring and alerting. Data is retained at the granularity at which it is collected for up to two years, which enables you to have long-term visibility into the performance of your applications.

A LogicMonitor Dashboard displaying metrics for Nodes, Pods, Containers, and Services in a Kubernetes Cluster.
With LogicMonitor, you can get comprehensive Kubernetes monitoring without the hassle of node-based agents. Sign up for a free trial today!