Definition
The WMI Provider Host (WmiPrvSE.exe) is a critical Windows process that acts as an intermediary between system hardware and software, allowing applications to access system information. You can view it in Task Manager to check its status. This process is part of the Microsoft Windows operating system. Microsoft built WMI management tools into each Windows version starting with NT 3.1.
What is WMI?
Windows Management Instrumentation (WMI) is the primary method for obtaining information from Windows for various systems. It provides specific data regarding configurations and overall performance to help DevOps and administrators monitor and automate tasks.
You might worry about network security and whether the WMI Provider Host (WmiPrvSE.exe) is safe. Yes, it is. Many aspects of your personal computer wouldn’t function without it. These are some general purposes that the WMI Provider Host fulfills for users:
- It gives information as a task manager to assorted applications without requiring direct action from the user.
- It offers information regarding event log entries, internal data storage status, and even the motherboard model number.
- It has a set of extensions in the Windows Driver Model. This includes an interface with components that provide notifications and other types of information.
- It allows third-party software to query operating information.
- It reduces the cost and maintenance of managing network components.
Security considerations
Potential security risks related to WMI provider host
While the WMI Provider Host (WmiPrvSE.exe) is an essential component of the Windows operating system, it can pose potential security risks if not properly managed. Malicious actors can exploit WMI for various types of attacks, such as:
- Unauthorized access: If a system’s WMI settings are not properly configured, unauthorized users may gain access to sensitive information or system configurations.
- Malware exploitation: Malware can leverage WMI to execute scripts or commands, retrieve system information, and perform other malicious activities without detection.
- Privilege escalation: Poorly configured WMI permissions can allow attackers to escalate their privileges on a system, potentially gaining control over critical components.
Best practices for securing the WMI provider host
To mitigate potential security risks, it’s important to follow best practices for securing the WMI Provider Host:
- Restrict WMI access
- Ensure that only authorized users and applications have access to WMI. Use Group Policy settings to manage and restrict WMI permissions.
- Review and update access control lists (ACLs) regularly to ensure they comply with the principle of least privilege.
- Monitor WMI activity
- Continuously monitor WMI activity logs for any unusual or suspicious behavior. Use tools like the Event Viewer to track and analyze WMI events.
- Implement a centralized logging system to consolidate and review WMI logs from multiple systems.
- Keep systems updated
- Apply security patches and updates regularly to your operating system and related components. This helps protect against known vulnerabilities that attackers could exploit.
- Enable automatic updates to ensure your system remains protected against the latest threats.
- Implement network security measures
- Use firewalls and network segmentation to limit access to WMI-enabled systems. This can help contain potential attacks and prevent lateral movement within your network.
- Configure network security groups and access control lists (ACLs) to restrict inbound and outbound traffic related to WMI.
- Use strong authentication and encryption
- Implement strong authentication methods, such as multi-factor authentication (MFA), for accessing WMI. This adds an additional layer of security to prevent unauthorized access.
- Ensure that WMI communications are encrypted to protect sensitive information from being intercepted during transmission.
What is a provider host?
A provider host allows third-party software to interact with and query operating system information. It’s important to note that, besides the Windows WMI providers, there are sometimes other providers on your system. Microsoft and third-party developers may install other apps on your computer that use different types of providers. If you experience problems with your system, you may need to use troubleshooting determine which WMI provider is causing the issue.
According to Microsoft, several hosting model values exist for providers operating within the Wmiprvse.exe process. These are a few examples of values in _Win32Provider.HostingModel.
- NetworkServiceHost: If the WMI provider’s hosting model is not specified, this is the default model beginning with Windows Vista. This type limits the possibility of privilege attacks.
- LocalSystemHost: If the provider is in process, it’s part of a shared host within LocalSystem.
- LocalServiceHost: If its implementation is in progress, the provider is part of the Wmiprvse.exe process under the LocalService account.
- SelfHost: Instead of using an in-process model, the provider works through a local server implementation.
Why is a provider host important?
A provider host enables different applications to request information about how your system is operating. The host will normally run in the background when supporting your computer. Some of the important features that a WMI provider host provides include the following:
- .Net Management Capabilities: The existing WMI provider and all its classes are available to every .NET application.
- Automation Capabilities: Automation interfaces are part of the WMI operating system and ready for use.
- Event Capabilities: Through the WMI, a subscriber can receive notifications for a variety of events. WMI uses query language to submit event queries.
- Remote Capabilities: WMI providers offer more than local COM ability. This includes DCOM transports and sometimes SOAP requests and responses.
Integration with system management tools
The WMI Provider Host integrates seamlessly with various system management and monitoring tools. These tools, such as Microsoft System Center, Nagios, and LogicMonitor, use WMI to gather detailed system information, monitor performance, and automate administrative tasks. This integration allows administrators to access real-time data and manage systems more efficiently.
Benefits of leveraging these integrations for better system management
- Improved monitoring: By leveraging WMI integrations, administrators can monitor system health, performance, and configurations in real time, allowing for quicker identification and resolution of issues.
- Enhanced automation: Integrating WMI with management tools enables the automation of routine administrative tasks, such as system updates, backups, and resource allocation, reducing manual workload and minimizing errors.
- Centralized management: WMI integration allows for centralized management of multiple systems from a single interface, simplifying complex environments and improving operational efficiency.
- Comprehensive reporting: Management tools using WMI can generate detailed reports on system performance, security, and compliance, helping organizations make informed decisions and maintain regulatory standards.
- Scalability: WMI integrations support the management of large-scale environments, making it easier to scale operations and maintain control over extensive IT infrastructures.
How do you access WMI events and manage WMI service configuration?
When you install Windows, the WMI automatically begins. If you’re looking for the WMI Provider Host on your system, you can find it by following these instructions:
- Press X and the Windows logo key at the same time (You can also right-click the start button on Windows 8 or 10). This is how you view verbose WMI activity events.
- Click the Event Viewer.
- Click the View button.
- Click Analytic and Debug Logs.
- Click on Applications and Service Logs (on the left side of the screen).
- Follow the path from Applications and Service Logs to Microsoft to Windows and then to WMI-Activity.
Another way to access the WMI Provider:
- Right-click the Windows logo/start and choose “Computer Management.”
- Then, click “Services and Applications.”
- Right-click on WMI Control.
- Select Properties.
What are some tips to keep your WMI provider host working effectively?
You may need these tips to keep your WMI provider running smoothly:
Monitor for High CPU Issues
To diagnose high CPU usage by Windows Management Instrumentation (WMI) on Windows, start by identifying whether WmiPrvse.exe or svchost.exe (hosting the Winmgmt service) is causing the issue.
Open Task Manager, enable the PID column, and locate the process-consuming CPU. Use Performance Monitor (Perfmon) for a graphical view of CPU usage per process. If svchost.exe is the cause, isolate the Winmgmt service by running sc config Winmgmt type= own in an elevated command prompt and restarting it, which allows tracking WMI independently.
Finally, investigate the specific WMI providers and client processes responsible using tools like Event Viewer, Process Explorer, or scripts, focusing on high-frequency queries and tasks tied to the identified process.
Disabling WMI
While turning off the WMI system is possible, you’re strongly advised not to do this. It is a crucial element of your Microsoft Windows 10 operating system, and if you deactivate it, most Windows software won’t operate correctly. Your WMI Provider Host is a system service that you shouldn’t turn off or disable.
How to Fix WMI Provider Host
To address high CPU usage by WMI Provider Host (WmiPrvSE.exe), it’s essential to run a thorough virus and malware scan to rule out any malicious software as a potential cause. Malicious programs often disguise themselves as system processes, like WMI, to avoid detection while consuming CPU and memory resources.
Start by updating your antivirus software and performing a full system scan. Additionally, use a trusted anti-malware tool to detect threats that antivirus might miss. If the scan identifies malware, follow the removal steps carefully and restart your system.
This step is crucial because resolving any underlying infections often restores normal CPU usage and protects your system’s performance and stability.
Safe Mode
If malware is detected and difficult to remove, restarting your computer in Safe Mode can help. Safe Mode runs only essential Windows processes, blocking most third-party programs and malware from starting up, making it easier to identify and remove persistent threats.
To enter Safe Mode, restart your computer, and press the F8 or Shift+Restart key (depending on your system) to access the advanced startup options. Choose Safe Mode with Networking to allow internet access if you need to download additional scanning tools.
Once in Safe Mode, rerun your antivirus and anti-malware scans. This environment often improves the effectiveness of removal tools, helping to clear out threats more completely and ensuring your system can run WMI Provider Host without interference from malicious software.
Conclusion
A WMI Provider Host is a necessary part of your operating system. It provides essential information, helps APIs run efficiently, and facilitates cloud computing. Keeping your WMI Provider Host running smoothly will help you successfully manage everything from operational environments to remote systems. While generally safe, it requires careful management to mitigate potential security risks. Restricting access, monitoring activity, and keeping systems updated can ensure an efficient and effective Windows environment supporting local and remote system management.
Microsoft’s cloud object storage service, Azure Blob Storage, is designed for storing large amounts of unstructured data, like text, video, and audio. It provides scalable and cost-effective storage solutions for businesses that have large amounts of invaluable data that need to be stored but follow no organization.
Ensuring unstructured data is easily accessible and manageable is how Microsoft Azure Blob Storage provides solutions for companies that need to store large quantities of disorganized information.
What is Azure Blob storage?
Imagine two people—Paul and Lindsay—storing accessories. John arranges his accessories by color on shelves while Lindsay tosses hers into a pile. Lindsay’s approach is like Azure Blob Storage: she can throw any accessory into the pile without arranging anything. In this way, Lindsay can grow her stack almost exponentially, while Paul will eventually run out of shelf space.
Storing large volumes of data without hierarchy or organization is, unfortunately, a necessary evil for large companies, even though sifting through unorganized data is challenging. And that’s where Azure Blob Storage delivers more than alternative cloud storage options.
Blob is the shortened term for ”binary large object.” Azure Blob Storage is Microsoft’s cloud platform that allows developers to store large amounts of unstructured data or data that doesn’t fit into a specific data model or definition, like text or binary data.
One of the key features of Microsoft Azure Blob Storage is that it allows large file transfers through a file system network by splitting files into smaller pieces when uploaded. Once uploaded to the cloud server, the large files appear together in one file. Large files of unstructured data might include audio, video, text, and other data that is accessible through an Internet connection.
Key applications of Blob Storage
- Sharing videos, documents, or images through a browser
- Storing video and audio
- Updating and storing log files
- Data backup, restore, archiving, and disaster recovery
- Internet of Things (IoT) data storage
- Data analysis
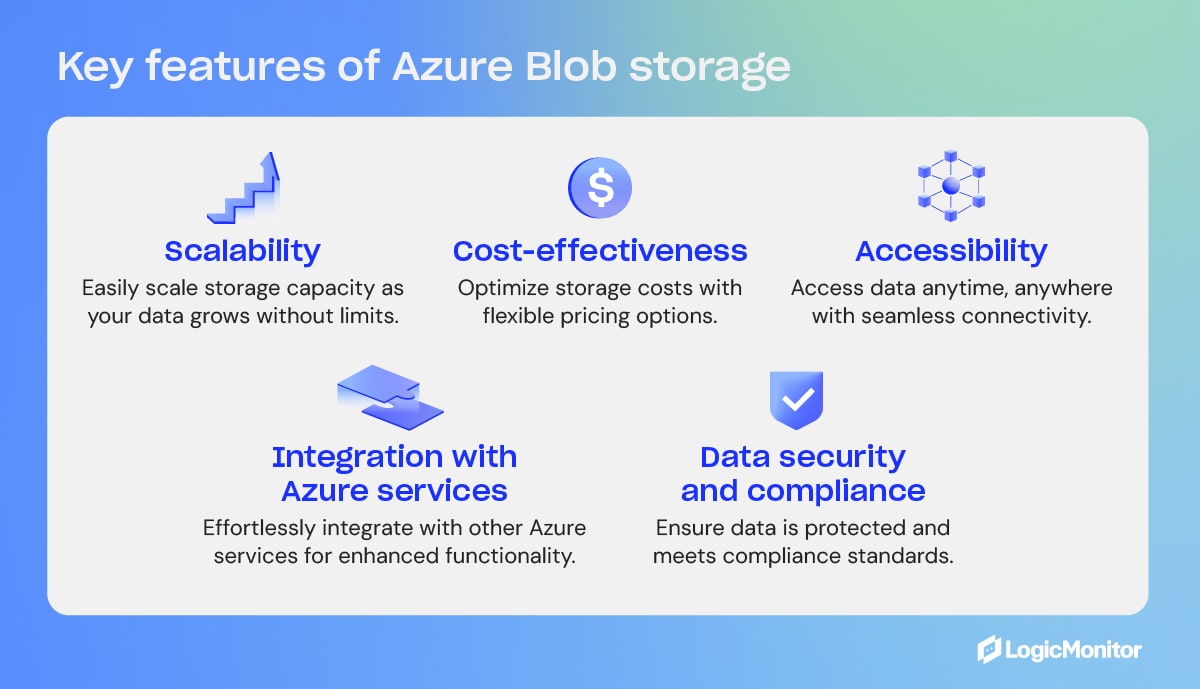
Key Features of Azure Blob Storage
- Scalability
- Cost-effectiveness
- Accessibility
- Integration with Azure services
- Data security and compliance
What is Blob Storage in Azure?
Blob Storage is not a stand-alone product but a feature within the broader Azure platform. Blob is one of the core storage solutions that Azure offers, designed to hold large amounts of unstructured data, such as text or binary data. As part of Microsoft’s Azure web services, Blob Storage integrates with other Azure services.
Access methods
Objects in Azure Blob Storage are accessible via HTTP/HTTPS anywhere in the world through Azure Storage REST API, Azure CLI, Azure PowerShell, or an Azure Storage client library. Client libraries are available in different languages, including .NET, Node.js, Java, Python, PHP, Ruby, and Go. Azure Blobs are manipulated with .NET code.
Blob containers
Blob containers work like drawers and make file management easier. One container can store audio files, while another stores video files. Furthermore, one storage account can include unlimited containers, and a container can keep unlimited blobs.
Containers are self-contained, and each container can hold up to 500 TB.
The names of containers must have a valid IP address in order to form a unique resource identifier (URI). Microsoft offers these guidelines when naming containers:
- Keep names between three and 63 characters long
- Start names with a letter (lowercase only) or number
- Use dashes (-) without spaces; do not use two or more dashes consecutively
Types of blobs in Azure Blob Storage
Microsoft Azure Blob Storage includes three types of blobs: block blobs, append blobs, and page blobs. Once a blob is created, its type cannot be changed. Blob updates are specific to appropriate operations. Here is an overview of the different types of blobs and what they do.
Block blobs
- Best for storing media files, text files, documents, and binary files. They can be different sizes (4000 MiB max.) and contain up to 50,000 blocks.
- Use case: Blocks uploaded to storage accounts are associated with specific block blobs and become part of blobs when a list of blocks, including new block IDs, is committed. Blocks remain uncommitted until they are saved or discarded. Uncommitted blocks can total up to 100,000.
Page blobs
- Collection of 512-byte pages used for random read and write operations.
- Use case: Page blobs are created by writing the maximum size a blob will grow on a page blob. Unlike block blobs, write-to-page blobs are committed directly to a blob. The total size of a page blob is 8 TiB.
Append blobs
- Designed for append operations like storage and log file updating.
- Use case: Add blocks to the ends of blobs using the “Append Block” operation. Existing blocks cannot be updated or deleted. Blocks can be different sizes, with a maximum of 4 MiB each, and include up to 50,000 blocks.
You can append blobs using the command line:
1. Install the Azure SDK for Python.
If you haven’t installed the Azure SDK, you can do so using pip.
pip install azure-storage-blog2. Set up the Azure Blob Storage connection.
You’ll need your storage account name, account key, and the container name of where your blob is located or where you want to create it.
from azure.storage.blob import BlobServiceClient, BlobClient, ContainerClient

# Replace with your values
account_name = "your_storage_account_name"
account_key = "your_storage_account_key"
container_name = "your_container_name"
blob_name = "your_blob_name"

# Create a BlobServiceClient
blob_service_client = BlobServiceClient(account_url=f"https://{account_name}.blob.core.windows.net/", credential=account_key)

# Get the ContainerClient
container_client = blob_service_client.get_container_client(container_name)

# Get the BlobClient for the Append Blob
blob_client = container_client.get_blob_client(blob_name)
3. Get or create an append blob.
If an append blob doesn’t exist, you can create one. If it already exists, you can append data to it.
# Create the Append Blob if it doesn't exist
blob_client.create_append_blob()
4. Append data to the blob.
You can now append, adding new data at the end of the blob.
# The data you want to append
data = "This is the data to append\n"

# Append data to the blob
blob_client.append_block(data)
5. Confirm the append operation.
You can take this additional optional step to verify that your data has been correctly appended to the blob.
# Download the blob's content
downloaded_blob = blob_client.download_blob()
print(downloaded_blob.readall().decode('utf-8'))
Alternatively, to perform the append operation using the command line, you can install Azure Portal or Azure Storage Explorer, which gives you the ability to perform the operations using a graphic interface.
Storage and pricing tiers
Data storage costs depend on two factors: transaction costs and storage costs. As a company’s data grows in the cloud, it can be organized based on how frequently it is accessed and how long it will stay in the cloud. Azure Blob Storage offers three access tiers to store blob data depending on use, with pricing options to match your needs.
- Hot tier: Best for storing operational use data that is frequently accessed or modified; good option for migrating prep data to cool access tier; online access; highest storage cost; lowest access cost.
- Cool tier: Best option for occasionally accessed data, like backup and disaster recovery files, infrequently used data that requires availability, and large data sets that need cost-effective storage. 30 days of storage are recommended, and online access is available. The cool tier has lower storage and access costs than the hot tier.
- Archive tier: Offline option for storing rarely accessed data (once in 180 days), like long-term backups, secondary backups, raw data, compliance data, and archival data; lowest storage cost but higher data retrieval costs and latency than the hot and cool tiers.
Changing storage tiers
Tiers can be changed by calling the REST API Set Blob Tier, which is the best option for switching from hot to cool, or by calling the Copy Blob operation, which is suggested for moving archival blobs online or switching from cool to hot. Changing from hot to cool (or vice versa) or to archive initiates changes instantly, but changing an archived blob to a hot or cool tier requires rehydration, which can take up to 15 hours.
Blob storage security
Cloud encryption encodes data as it travels between cloud-based storage units and their respective locations. All blobs, regardless of type, undergo encryption before being stored in Microsoft’s Azure Blob Storage cloud. In addition to cloud security, Azure Blob Storage offers ways to specify who can access data.
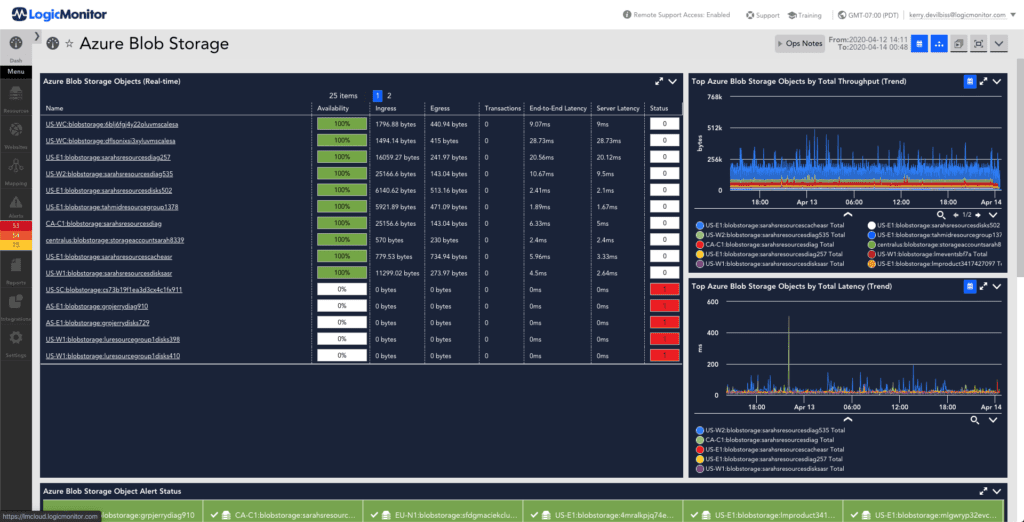
Getting started monitoring Azure Storage with LogicMonitor
LogicMonitor is an industry leader in monitoring networks and web services. These steps will help you apply LogicMonitor to Azure storage services.
- Your LogicMonitor setup for Azure storage begins with registering your LogicMonitor account with Microsoft Identity Access Management (IAM) and adding your Azure storage account and environment to LogicMonitor.
- Once you’ve given LogicMonitor access to your Azure storage, you’re ready to create and customize your data sources to fit your organization’s needs.
- With your storage options configured the way you like, consider your organization’s needs and size resources as necessary to optimize your storage performance.
Comparing Azure Blob storage with other top web services
Azure Blob shares the market with a number of other similar web services. Its fiercest competitors are Amazon Web Services’ Simple Storage Service (AWS S3) and Google Cloud Storage (GCS). AWS S3 and GCS are each designed to perform cloud-based web services, each with its own capabilities and drawbacks. When compared to Azure Blob, these features stand out.
Key similarities
Azure Blob, AWS S3, and Google Cloud Storage all utilize an object storage model in which data is stored as objects held in containers. All three services are scalable with high availability. Each web service offers strong zone and trans-regional redundancy and provides varied tiers of service to fit the needs and budgets of its clients.
Key differences
While they may seem quite similar on the surface, a deeper dive reveals some notable differences that make each more suitable than the others for different purposes.
Pricing structure
Each web service supports a free tier of service, each with its own special limitations.
- AWS S3 pricing includes storage costs, request costs, and data transfer costs. AWS also has charges for features like Glacier retrieval times and S3 Transfer Acceleration.
- Google Cloud Storage includes storage class costs, operation costs, data retrieval, and data transfer costs, with simplified pricing across different storage classes.
- Azure Blob Storage: Pricing is based on storage tier, read/write operations, data retrieval, and data transfer costs. Azure offers lower storage costs for the Cool and Archive tiers but has higher read and retrieval costs.
Object types
AWS S3 primarily focuses on a flat namespace for storing objects, and GCS uses a similar storage model. Azure Blob offers three types of blobs: block blobs, append blobs, and page blobs, each serving a different purpose.
Service integration
AWS S3, GSC, and Azure Blob each integrate best with services and infrastructures designed specifically for them.
Data management
AWS S3 and GCS support bucket policies for data access and management, while Azure Blob relies on Azure Active Directory (AAD) for identity management, RBAC (Role-Based Access Control) for access control, and Shared Access Signatures (SAS) for temporary access.
Who uses Azure and Azure Blob?
As an industry-leading web service, Azure boasts a robust clientele of well-known and respected organizations from around the world across all Azure platforms. Industries such as manufacturing, finance, and even video game creators rely on Azure to keep the flow of data steady and secure.
Given the scale of these companies that rely strongly on Azure services, they very likely utilize Azure Blob for many key functions in their operations.
- In Japan, the Kubota Corporation’s engine engineering department implemented Azure’s high-performance cloud computing, streamlining innovation and maintenance times.
- The National Bank of Greece built an Azure-powered AI solution that significantly reduced document processing times and dramatically improved documentation processing accuracy.
- In the U.S.A., the gaming company Hi-Rez Studios moved to Azure Kubernetes and Azure SQL, substantially expanding their scaling capabilities. Since these implementations in 2018, Hi-Rez has adopted numerous other Azure services that have improved its back-end services and enhanced its public-facing products.
Blob storage is optimal for storing data
Microsoft Azure Blob Storage is a scalable, cost-effective solution for storing large volumes of unstructured data. With an almost unlimited storage capacity, Azure Blob Storage offers excellent options for storing data that needs no hierarchy. Being cloud-native means companies can access data anywhere an Internet connection is available. Plus, Azure Blob Storage is cost-effective, providing tiered pricing according to data access needs.
In short, it’s the storage solution that gives companies an advantage over the competition when it comes to managing data efficiently in the cloud and meeting data storage needs.
Explore an array of LogicMonitor’s comprehensive cloud-monitoring solutions to dive into advanced features and integration options.
.NET Core is an invaluable platform for developers. This open-source development platform, maintained by Microsoft, is used to build cloud-native, cross-platform, and even apps specifically for use on Internet of Things (IoT) devices.
Problems can arise if a developer installs a newer version of .NET Core and then tries to run an older project. There are simple ways to check which .NET Core versions you have installed to prevent problems using the dotnet CLI (command-line interface).
What is the latest version of .Net Core?
The latest versions of .NET core are listed below, along with their release dates:

Understanding .NET core versions
The earliest version of .NET Core dates back to 2016, when it was created primarily to enhance support for cross-platform app development. Since then, there have been multiple versions, with the latest stable release being .NET 8.0, launched in June 2024. The .NET naming convention has shifted to simply ‘.NET’ from version 5 onward, streamlining the brand. Although .NET 8.0 is the most recent, .NET Core 3.1, released in December 2019, remains widely used by many app developers due to its long-term support.
While backward compatibility is a desirable quality in development tools, .NET Core has some limitations. For example, if you install .NET Core version 3.1 and try to run a previous project created using an earlier version, you may encounter an SDK error. SDK stands for software development kit, and without the correct .NET Core SDK installed, you won’t be able to run your older projects. The first step to overcome this issue is to use the dotnet –list-sdks command in the dotnet CLI to discover the .NET Core versions you have installed. Ensuring you have the required SDK for your project is crucial for maintaining compatibility.
.NET Core versioning scheme
The .NET Core versioning scheme follows a structured approach, which is essential for maintaining clarity and consistency across its releases. This scheme is crucial given the platform’s broad use for developing cloud-native, cross-platform, and IoT applications.
Major, minor, patch overview:
- Major version: Incremented annually, this version signals significant product changes, including new features, API-breaking changes, and major dependency updates. Notably, even-numbered major versions like .NET 6 and .NET 8 are long-term supported (LTS), providing three years of support. In contrast, odd-numbered versions receive standard-term support (STS) with 18 months of updates.
- Minor version: Increased when new behaviors or public APIs are introduced, along with non-breaking enhancements, this increment may also reflect the adoption of a newer minor version of an existing dependency.
- Patch version: Adjusted for bug fixes, new platform support, or minor updates in dependencies. It represents maintenance updates that do not alter the API surface area or introduce new features.
The .NET Runtime adheres to semantic versioning (SemVer), denoted as MAJOR.MINOR.PATCH[-PRERELEASE-BUILDNUMBER]. This method ensures each version number clearly communicates the extent and nature of changes, aiding developers in understanding the impact of upgrades.
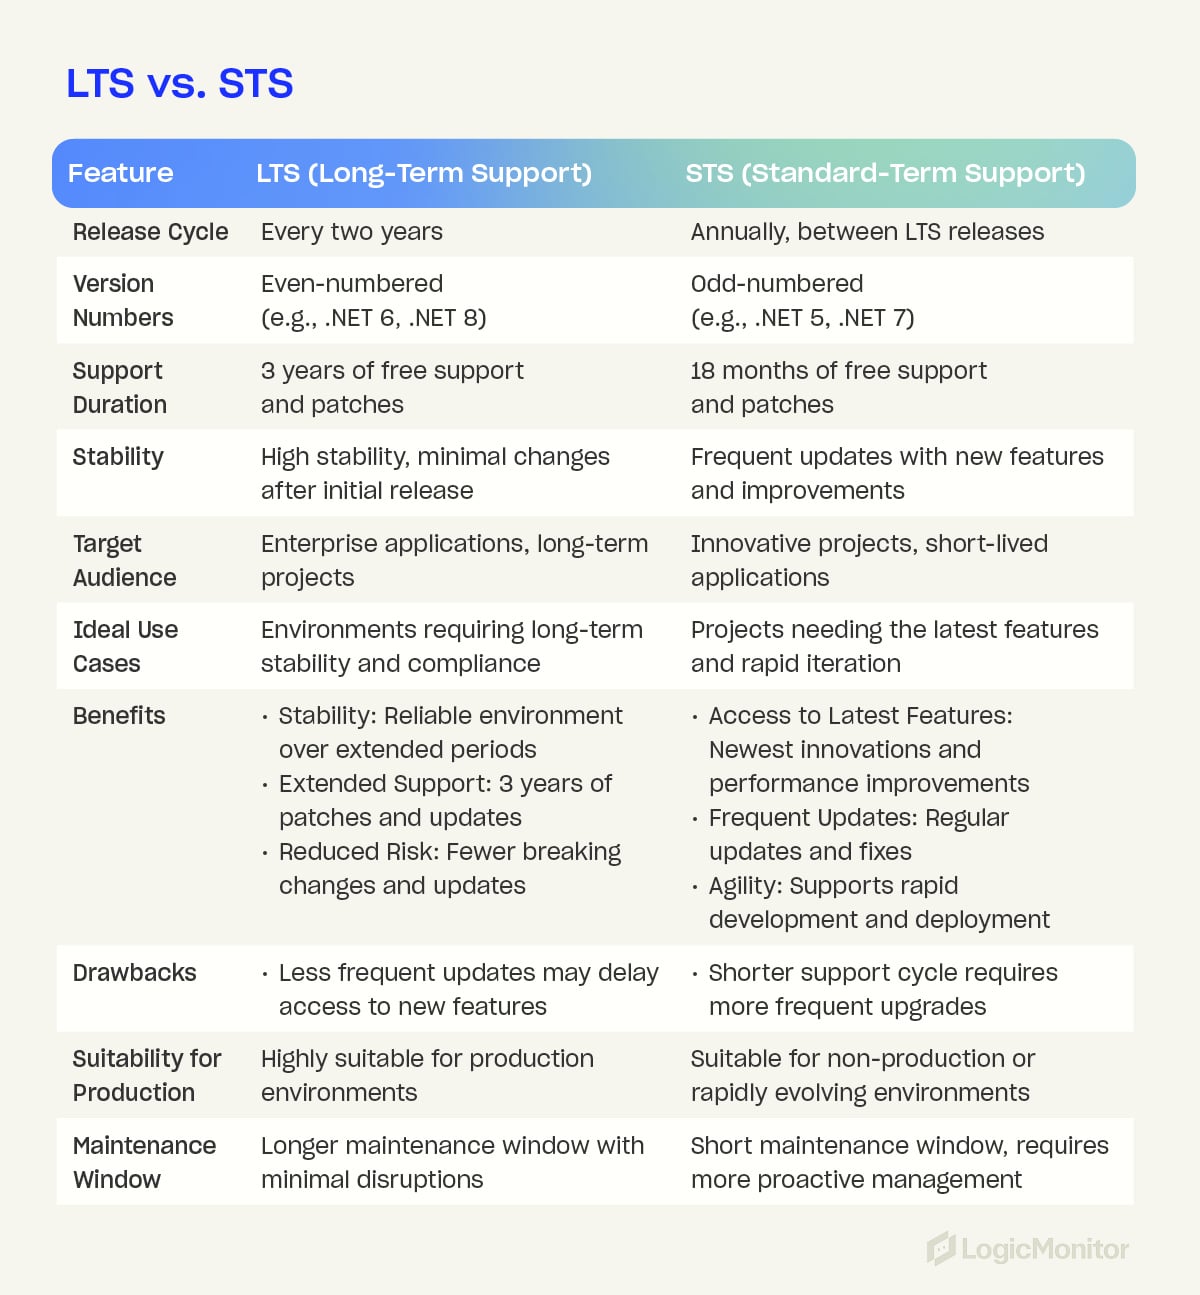
LTS vs. STS
LTS (Long-Term Support):
Long-Term Support (LTS) versions of .NET Core are designed to provide extended stability and support. These versions are released every two years and offer three years of free support and patches.
LTS versions are typically even-numbered (e.g., .NET 6, .NET 8) and are essential for environments where long-term stability and reliability are critical. LTS versions are often chosen for enterprise applications due to their extended maintenance window, ensuring that applications remain secure and stable without frequent major updates.
Benefits of LTS:
- Stability: Provides a reliable and consistent environment over an extended period.
- Extended Support: Offers a three-year support window with patches and updates.
- Reduced Risk: Minimizes disruptions from major changes and breaking updates.
STS (Standard-Term Support):
Standard-Term Support (STS) versions are released in the years between LTS versions and are identified by odd numbers (e.g., .NET 5, .NET 7). They have a shorter support cycle and offer 18 months of free support and updates.
STS versions are ideal for applications that benefit from the latest features and improvements. They allow developers to quickly access cutting-edge innovations and performance enhancements, and they are suited for projects that prioritize rapid development and deployment cycles.
Benefits of STS:
- Access to latest features: Provides the newest innovations and performance improvements.
- Frequent updates: Offers regular updates and quicker access to fixes and new capabilities.
- Agility: Supports rapid development and deployment, fostering innovation and adaptation to new market demands.
Comparison: Differences and use cases
The primary difference between LTS and STS versions lies in their support duration and release cycles. LTS versions are designed for long-term stability, offering extended support and minimizing the need for frequent upgrades. This makes LTS ideal for enterprise applications, long-term projects, and industries where stability and compliance are essential.
In contrast, STS versions are geared towards innovation and agility, providing access to the latest features and improvements. These versions are suited for short-lived applications, innovative projects, and non-production environments where rapid iteration is essential.
Upgrade instructions
Upgrading to a new .NET Core version involves multiple steps to ensure your development environment, source code, continuous integration (CI), and hosting environment are all appropriately updated. Below are detailed instructions to guide you through the process.
Common reasons to upgrade:
- The current .NET version is no longer supported.
- The new version supports a new operating system.
- The new version includes important API, performance, or security features.
Step 1: Upgrade the development environment
The first step in the upgrade process is to ensure your development environment is ready for the new .NET version. The .NET SDK, which includes the .NET CLI, build system, and runtime, needs to be updated.
- Download the installer: Visit the .NET download page and download the installer for your operating system.
- Run the installer: Follow the on-screen instructions to install the new .NET SDK.
- Use package manager (optional): Some operating systems allow installation via a package manager (e.g., Homebrew for macOS, apt-get for Linux).
- Visual Studio users: If you use Visual Studio, upgrade to the latest version of Visual Studio, which will automatically include the latest .NET SDK.
Verify installation:
Open a command-line interface and run the following commands to ensure the new SDK is installed:
dotnet –list-sdks
dotnet –list-runtimes
Step 2: Upgrade source code
Next, you must update your project files to target the new .NET version.
- Open the project file: Locate and open your project file (e.g., *.csproj, *.vbproj, or *.fsproj).
- Update TargetFramework: Change the <TargetFramework> property value to the new version. For example:
<TargetFramework>net6.0</TargetFramework>
to
<TargetFramework>net8.0</TargetFramework>
- Use upgrade assistant: The .NET Upgrade Assistant tool can automate these changes.
- Build the project: Rebuild your project using the new SDK. The command-line command for this is:
dotnet build
- Restore workloads: If needed, restore workloads with the new SDK version using:
dotnet workload restore
Step 3: Update continuous integration (CI)
Ensure your CI pipeline is updated to use the new .NET SDK. Update the configuration files for your CI system (e.g., GitHub Actions, Azure Pipelines) to reference the new .NET version.
- Modify configuration files: Update the .NET version in your CI configuration files to match the new version.
- Run CI pipelines: Execute your CI pipelines to verify that the build and test processes work correctly with the new .NET version.
Step 4: Update hosting environment
Lastly, update your hosting environment to support the new .NET version. This step ensures that your production environment can run the upgraded application.
- Install new .NET runtime: Ensure the hosting environment has the new .NET Runtime installed. This might involve updating server configurations or using container images with the latest runtime.
Deploy application: Deploy your upgraded application to the hosting environment and verify that it runs correctly.
Using the Command-Line Interface (CLI)
All installations of .NET Core SDK come with a command-line interface (CLI), allowing you to manually enter commands related to building, developing, and running your apps. If you’re unsure whether you have access to the dotnet CLI, follow these steps:
- Open a command window by pressing the Windows key + R, typing “cmd”, and pressing enter
- Type “dotnet” and press enter
- You should see the following text:
Usage: dotnet [options]
Usage: dotnet [path-to-application]
Options:
-h|–help Display help.
–info Display .NET information.
–list-sdks Display the installed SDKs.
–list-runtimes Display the installed runtimes.
path-to-application:
The path to an application .dll file to execute.
This indicates that you can use .NET Core commands in the CLI. All commands start with “dotnet” and are easy to remember.
To check the currently installed .NET Core SDK version, use this command:
dotnet –version
This will immediately show you the exact version of .NET Core you are currently running.
You can also use the command:
–list-sdks
To see which SDKs are installed and their locations on your machine.
Checking Multiple .NET Core Installations
Developers may have installed and utilized multiple versions of .NET Core and .NET. The previously mentioned command:
–list-sdks
shows exactly which versions of the .NET Core SDK are available. This should help developers understand why an SDK error may be occurring.
You can also use:
dotnet –list-runtimes
To show all installed runtime instances.
Note: You can find all currently installed SDK versions under the file path:
C:\Program Files\dotnet\sdk
This is unless you have manually chosen to install them elsewhere.
Understanding project-based version checks
Understanding the current .NET Core versions only really helps if you know the version used to create the project you’re trying to run. There are a couple of ways to assess this. If you’re using an integrated development environment (IDE) like Visual Studio, you can access the .NET Core SDK version from the project settings.
It’s also possible to use a .csproj file for C# projects. This file acts like the DNA of the app you’re developing, holding key information on how .NET Core should build the app. This includes data on which instance of .NET Core SDK was used to create the project. You can use an “msbuild /bl” command on your .csproj file, which creates an msbuild.binlog file. You can open this file with a Microsoft Build Log Viewer to view all properties and values related to the project, including the NETCoreSdkVersion, which tells you the exact version used to create the project.
You can also check the target framework within the .csproj file, which states the version of the SDK your project is trying to use to run itself. What do you do if that version isn’t installed? Simple: Head to the .NET downloads page and ensure you have the correct version to run the relevant project.
Version control is critical in development, allowing for smarter and more efficient troubleshooting and a smoother shift towards a DevOps mentality within your organization. Understanding how to check which .NET Core version is associated with each project helps eliminate SDK errors and empowers you to dramatically reduce your time to market.
Microsoft Azure and Microsoft, in general, has a history of being seen as designed for big enterprises only. Those days are in the past. Azure is working its way to the front of the pack for cloud services. It is easy to transition your workflows to Azure because it connects well with other Microsoft tools you use. Even though it is a smoother transition, it is just as complex and complicated as other large cloud providers. Keep reading to learn more about Microsoft Azure and how to better monitor your cloud infrastructure to provide business value and get the most out of what you pay for.
Microsoft Azure
Microsoft Azure offers everything from Infrastructure-as-a-Service (IaaS) through Platform-as-a-Service (PaaS) cloud services. Azure also provides many ways to connect through existing Microsoft applications and SaaS services. This continues to blur the line between infrastructure and services, but it also allows you to easily integrate other Microsoft offerings with your Azure cloud.
Azure offers replacements for the on-premise infrastructure and Infrastructure-as-a-Service (IaaS) that allows traditional IT infrastructure professionals to take advantage of the knowledge they already have. From simple Virtual Machines (VM) that have the ability to auto-scale and provide compute power when needed, to SQL and file storage options called SQL Database Service and Storage Service respectively. One thing to know about Azure is their naming tends to be straightforward.
As we continue down the stack to Platform-as-a-Service (PaaS), Azure provides options for application hosting (App Services) and Kubernetes hosting (Kubernetes Service also marked as AKS). These are just a few examples of stretching the legs of Azure as a full-service cloud platform. With Azure Monitor, you are able to monitor all of your services within Azure. This provides some visibility, but understanding the impact beyond these simple metrics requires a little bit of time or some help. Sometimes both.
Monitor your Azure
You need to fully understand your cloud infrastructure and know how it is performing to ensure you are able to provide business value and get the most out of what you pay for. Focusing on just Azure will require you to understand each service and what metrics provided by the service matter the most to performance and utilization. This ranges from simple understandings, like CPU utilization and storage or memory usage, to complexities that come with auto-scaling and serverless functions (helpfully called Functions in Azure). Aside from the complexities, you also need to understand what thresholds should be considered. Luckily, LogicMonitor has monitoring coverage for over 50 Azure services with more than 130 default alerting statistics.
To top it off, monitoring your cloud infrastructure with LogicMonitor allows you to leverage all of your infrastructures to monitor your critical business performance. LM grows with you, allowing you to have a single pane view of all the critical on-premises, cloud, and log monitoring to allow you to respond quickly to your infrastructure needs. With features like Dynamic Thresholds and Service Insights, you can modify LogicMonitor to provide clear insights on your Azure infrastructure and so much more.
To learn more about how LogicMonitor can help you monitor and understand your Microsoft Azure usage and infrastructure or to see it in action, sign up for a free trial.
While most may not see Microsoft as a ‘disruptive innovator’ anymore, they seem to be claiming exactly that role in the enterprise hypervisor space, just as they did in gaming with the Xbox. As noted in “VMware, the bell tolls for thee, and Microsoft is ringing it“, Hyper-V appears to be becoming a legitimate competitor to VMware’s dominant ESXi product. As described in the article, people reportedly now widely believe that “Microsoft functionality is now ‘good enough'” in the hypervisor – and it’s clearly cheaper (in license terms, at least.) So is this change in perception really turning into more enterprises choosing Hyper-V?
From LogicMonitor’s view of the situation, we can say that in our customer base, virtualization platforms have been almost entirely VMware in the enterprise and most private cloud providers, with some Xen and Xenserver in the cloud provider space. But, we have also been seeing more Hyper-V deployments being monitored in the last 6 months. Still a lot less in absolute numbers than the number of ESXi infrastructures being added to LogicMonitor: but the rate of growth in Hyper-V is certainly higher.
This sounds like a “low-end disruption” classic case study from the Innovator’s Dilemma (Clayton M. Christensen), except for the fact that the Innovator is a $250 billion company!
Right now, Microsoft seems to offer the ‘good enough’ feature set and enterprise features, and ‘good enough’ support, reliability and credibility, leading to some adoption in the enterprise datacenter. (From our biased point of view – the metrics exposed by VMware’s ESXi for monitoring are much better than those exposed by Hyper-V. But perhaps Hyper-V is ‘good enough’ here, too…) There are lots of ways this could play out – VMware has already dropped the vRam pricing; Microsoft being cheaper in license terms may not make it cheaper in total cost of ownership in the enterprise; VMware is starting to push VMware Go, which could turn into a significant disruptor itself.
So can the $250 billion Microsoft really prove to be more nimble than the $37 billion VMware? History would suggest Microsoft will deliver a solid product (eventually). Hypervisors themselves are becoming commodities. So the high dollar value will shift upward to management. VMware may chase the upward value (like the integrated steel mills did, that were largely disrupted out of existence); they may go after the commodity space (reducing their profit margins, but possibly protecting their revenue). Or they may push VMware Go, Cloud Foundry, and other cloud offerings, disrupting things entirely in another direction.
Of course, there are many other possibilities that could play the role of disruptor in the enterprise hypervisor space: Citrix (Xenserver) and KVM spring to mind, but these (currently) tend to play better in the large data center cloud space, rather than the enterprise.
Still, VMware is very much in a position of strength and is well suited to lead the next round of innovation which I see as the release of a product which allows for the movement of VM’s seamlessly from my own infrastructure to a cloud provider’s and back, while maintaining control, security and performance (and monitoring) that IT is accustomed to. Let’s see if I am right. Fun times ahead!
– This article was contributed by Steve Francis, founder and Chief Product Officer at LogicMonitor