LogicMonitor provides a New User Message template that you can use to welcome new users to your LogicMonitor portal. When you add a new user, the user receives an email welcoming them to your portal. You can customize this template as needed.
The New User Message settings enable you to modify the email template and provide key details to the new user to get started with their onboarding process. You can use a text editor with various formatting options to customize the messaging. In addition, the text editor enables you to modify the messaging in HTML format.
When a new user is onboarded, LogicMonitor automatically sends the welcome email with the content that you add in the template.
Placeholder Tokens
The text editor supports placeholder tokens that are mapped with user details when the email is sent (for example, ##user## is the username of the user). You can use tokens throughout the text editor as needed. The following table lists the tokens you can leverage in the text editor:
| Token | Description |
##ROLE## | Role assigned to the user |
##EMAIL## | Email address of the user |
##DATE## | Current date |
##PHONE## | Phone number of the user |
##NOTE## | Description of the user account |
##USER## | Username of the user |
##SMSMETHOD## | The message format for SMS or SMS for email messages (long – full alert descriptions – or short) limited to 160 characters |
Note: Tokens are defined by LogicMonitor. You cannot create new tokens.
Requirements for Modifying the New User Message Template
To modify the New User Message Template, you need a LogicMonitor user with the “Administrator” role and the “Manage” permission for Settings.
To leverage placeholder tokens in the text editor template, the token must be prefixed and suffixed with a double hash (##).
Modifying the New User Message Template
- Navigate to Settings > Message Templates > New User Message.

- Select
 Manage.
The message template text editor is displayed.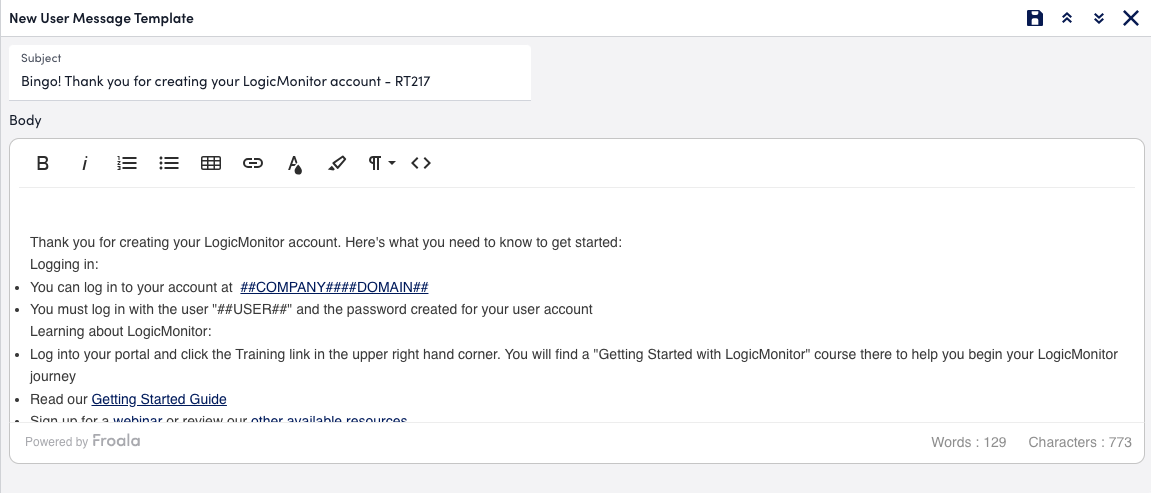
- Modify the content as needed, using the toolbar to format the content.
Alternatively, you can modify the content in HTML format by selecting the Code View in the editor.
If you add a table, you can resize the cells in the table by dragging the rows and columns to the size you need.
If you add an image, additional settings are available for the image, such as alignment and alternative text. Select the image after you add it to access the additional settings. - Select
 Save.
Save.
Changes are applied to the new user message. All welcome emails sent to new users receive the message in the template until you make additional updates and save again.
LogicMonitor provides a New User Message template that you can use to welcome new users to your LogicMonitor portal. When you add a new user, the user receives an email welcoming them to your portal. You can customize this template as needed.
The New User Message settings enable you to modify the email template and provide key details to the new user to get started with their onboarding process. You can use a text editor with various formatting options to customize the messaging. In addition, the text editor enables you to modify the messaging in HTML format.
When a new user is onboarded, LogicMonitor automatically sends the welcome email with the content that you add in the template.
Placeholder Tokens
The text editor supports placeholder tokens that are mapped with user details when the email is sent (for example, ##user## is the username of the user). You can use tokens throughout the text editor as needed. The following table lists the tokens you can leverage in the text editor:
| Token | Description |
##ROLE## | Role assigned to the user |
##EMAIL## | Email address of the user |
##DATE## | Current date |
##PHONE## | Phone number of the user |
##NOTE## | Description of the user account |
##USER## | Username of the user |
##SMSMETHOD## | The message format for SMS or SMS for email messages (long – full alert descriptions – or short) limited to 160 characters |
Note: Tokens are defined by LogicMonitor. You cannot create new tokens.
Requirements for Modifying the New User Message Template
To modify the New User Message Template, you need a LogicMonitor user with the “Administrator” role and the “Manage” permission for Settings.
To leverage placeholder tokens in the text editor template, the token must be prefixed and suffixed with a double hash (##).
Modifying the New User Message Template
- Navigate to Settings > Message Templates > New User Message.
- Select Manage.
The message template text editor is displayed. - Modify the content as needed, using the toolbar to format the content.
Alternatively, you can modify the content in HTML format by selecting the Code View in the editor.
If you add a table, you can resize the cells in the table by dragging the rows and columns to the size you need.
If you add an image, additional settings are available for the image, such as alignment and alternative text. Select the image after you add it to access the additional settings. - Select Save.
Changes are applied to the new user message. All welcome emails sent to new users receive the message in the template until you make additional updates and save again.
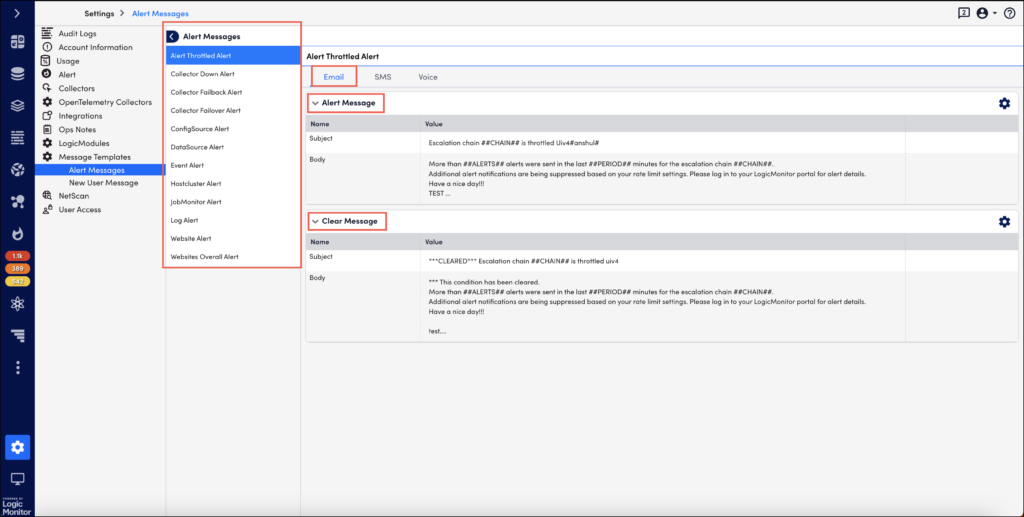
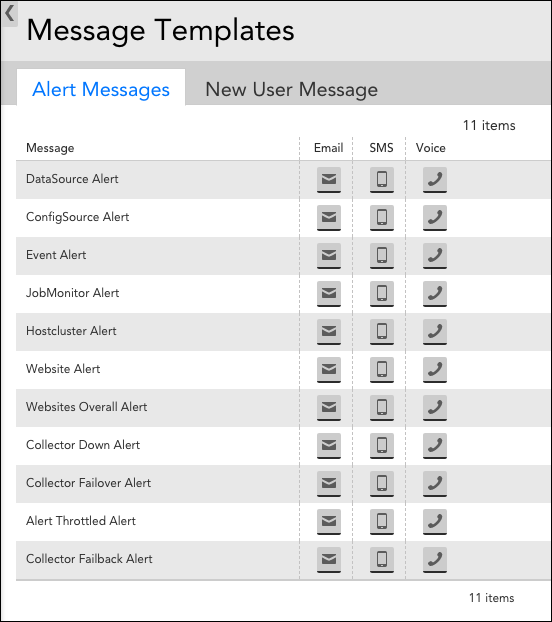
LogicMonitor is entrusted with sending crisp and informative alert messages to customers. As a user with Administrator role, you are responsible for managing the content of alert messages defined in the alert messages templates. LogicMonitor supports 12 types of alert messages. The alerts can be send via email, SMS, and voice. The alert message template setting allows you to edit the template for email, SMS, and voice and provide alert details to the user. As and when an alert is triggered, LogicMonitor auto send the email or SMS or makes a call with the content that you have drafted in the template.
The content of the alert message is defined in the Alert Message and Clear Message template. You can override the global template for a particular datapoint, eventsource, or batchjob by defining an alert template for that item. Global templates are only used when an alert template is notdefined for an item.
Note: Any timestamps provided in alert notification messages correspond to the time zone configured globally for the portal (Settings > Account Information > Portal Settings). This is in contrast to viewing alerts from within the LogicMonitor UI, where alerts are timestamped according to the user’s configured time zone (assuming that the time zone is set for the user and that it is the current active display time zone, as discussed in Users).
Accessing Global Templates
For each alert type you can define email, SMS, and voice message template for active alerts and for cleared alerts.
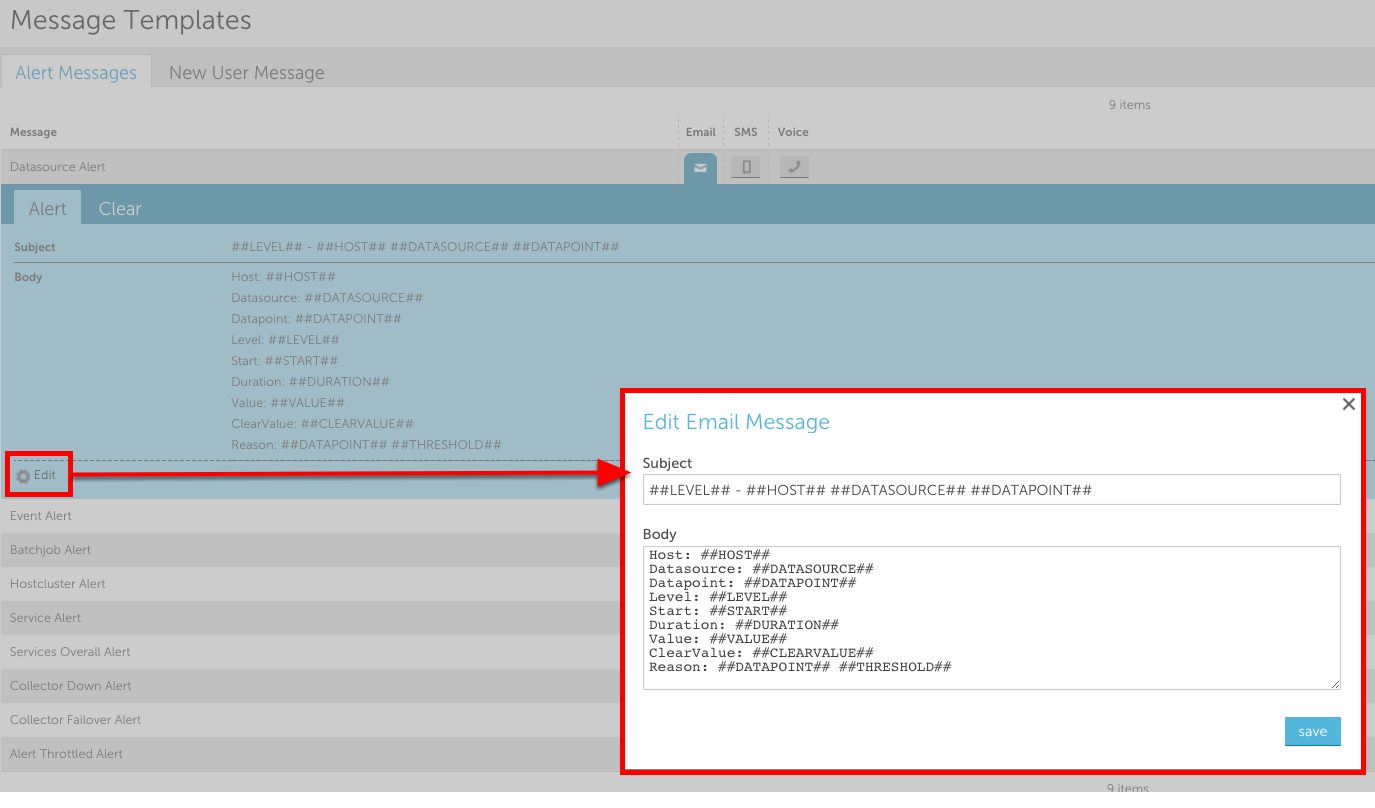
To access the alert message template, navigate to Settings > Message Templates > Alert Messages.
Placeholder Tokens
Before you edit the message template, you should be familiar with the placeholder tokens:
- The system supports a set of placeholder tokens which are mapped with user details while sending the alert. For example, the token ##user## indicates the user’s username.
- The token must always be prefixed and suffixed with double hash ##
- You cannot create new tokens. They are defined by LogicMonitor.
- You can change the order of tokens, add, or drop tokens placed in the message template.
Points to Consider
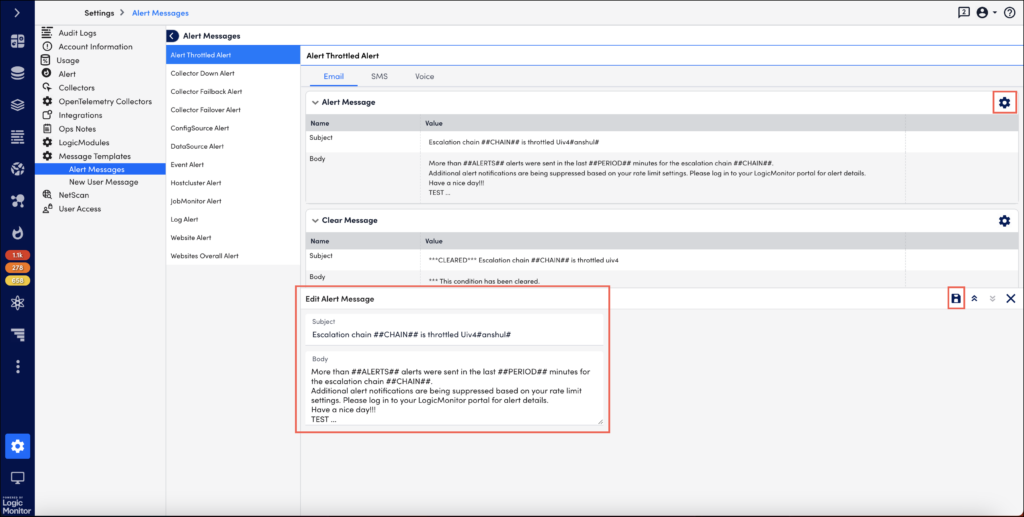
- If you close the message template editor without saving the changes, you will loose the changes.
- Use the Up and Down
 arrows to expand and minimise the editor.
 - The changes saved to the template will be applied to all the alert messages sent to the users until you make additional updates and save again.
Editing the Template
Select the Manage ![]() icon to edit an alert message template. The steps to edit are same for all alert types (unless overridden at the datapoint, EventSource or JobMonitor level, as discussed in the Overriding the Global Templates section of this support article).
icon to edit an alert message template. The steps to edit are same for all alert types (unless overridden at the datapoint, EventSource or JobMonitor level, as discussed in the Overriding the Global Templates section of this support article).
You can edit the subject and content of the message. Note that voice message template does not support ‘subject’ for the message.
All standard DataSource, EventSource, JobMonitor, and website tokens can be used in alert message templates.
To edit the Clear Message template, select the Manage ![]() icon.
icon.
Overriding Global Alert Message Templates
Global alert message templates can be overriden on a case-by-case basis for datapoint, EventSource, and JobMonitor alerts. All of these alert events support custom alert message configurations. This can be useful, for example, if you want a unique alert message template for just a handful of datapoints. For more information on overriding global alert message templates for these types of alert events, see Datapoint Overview, Creating EventSources, and Creating JobMonitor Definitions respectively.
When an administrator creates a new user account in LogicMonitor, the user receives a welcome email. From Settings | Message Templates | New User Message you can edit the contents of this welcome email.

The body of the message supports HTML content. You can use the following tokens (which are replaced at sending time with the users information) to customize the content:
##ROLE## – the user’s assigned role
##EMAIL## – the user’s email address
##SMSMETHOD## – the message format for SMS or SMS via email messages (long – full alert descriptions – or short – limited to 160 characters)
##DATE## – the current date
##PHONE## – the user’s phone number
##NOTE## – the account description
##USER## – the user’ username
Overview
The content of alert notification messages is defined by alert message templates. By default, alert notifications will be formatted based on the global alert message templates in the Settings | Message Templates | Alert Templates section of your account. These global templates can be overriden for a particular datapoint, eventsource, or batchjob by defining an alert template for that item. Global templates are only used when an alert template is not defined for an item.
Note: Any timestamps provided in alert notification messages correspond to the time zone configured globally for the portal (Settings | Account Information | Portal Settings). This is in contrast to viewing alerts from within the LogicMonitor UI, where alerts are timestamped according to the user’s configured time zone (assuming one has been set for the user and that it is the current active display time zone, as discussed in Users).
Global Templates
In general, there are six templates that exist for each type of alert, two for each contact method- one for active alert messages and one for cleared alert messages. The contact method specified for a recipient in the escalation chain an alert is routed to determines which template is used for an alert type.
Selecting the icon for the contact method for a particular type of alert will display two templates, one for the alert notification and one for the alert clear notification:

Editing a global template
Select the manage gear icon to edit a global template. Keep in mind that this applies globally to all notifications of that type/contact method (unless overridden at the datapoint, EventSource or JobMonitor level, as discussed in the Overriding the Global Templates section of this support article).
All standard DataSource, EventSource, JobMonitor, and website tokens can be used in alert message templates.
Overriding Global Alert Message Templates
Global alert message templates can be overriden on a case-by-case basis for datapoint, EventSource, and JobMonitor alerts. All of these alert events support custom alert message configurations. This can be useful, for example, if you’d like a unique alert message template for just a handful of datapoints. For more information on overriding global alert message templates for these types of alert events, see Datapoint Overview, Creating EventSources, and Creating JobMonitor Definitions respectively.
