| Concepts or Terms | Description |
| Cluster | A set of machines, called nodes, that run containerized applications managed by Kubernetes. |
| Container | A lightweight and portable executable image that contains software and all of its dependencies. In LogicMonitor, containers are discovered for each monitored pod. |
| Node | A node is a worker machine in Kubernetes. |
| Pod | The smallest and simplest Kubernetes object. A Pod represents a set of running containers on your cluster. A pod is a chargeable monitored Kubernetes resource. |
| Service | A Kubernetes Service is an object that describes how to access one or more pods running an application. |
| LM Container Helm Chart | A unified LM Container Helm chart allows you to install all the services necessary to monitor your Kubernetes cluster, including Argus, Collectorset-Controller, and the kube-state-metrics (KSM) service. |
| LM Service Insight | LM Service Insight services can group one or more monitored resources within LogicMonitor. An LM Service Insight Service may be used to monitor and set alerts on a Kubernetes Service, which points to one or more pods running an application. However, LM Service Insight can also be used to monitor and alert on non-Kubernetes use cases. |
| Argus | It runs as a Pod in the cluster and uses LogicMonitor’s API to add Nodes, Pods, Services, and other resources into monitoring. It uses Kubernetes API to collect data for all monitored resources. |
| Collectorset-Controller | It is a StatefulSet to manage the lifecycle of LogicMonitor’s collector pods. |
| kube-state-metrics (KSM) | A simple service that listens to the Kubernetes API server and generates metrics about the state of the objects. |
| LM Collector | The LogicMonitor Collector is an application that runs on a Linux or Windows server within your infrastructure and uses standard monitoring protocols to intelligently monitor devices within your infrastructure. |
| Watchdog | Watchdog is a part of LogicMonitor Collector that detects Kubernetes anomalies and surfaces root causes. |
The API server is the front end of the Kubernetes Control Plane. It exposes the HTTP API interface, allowing you, other internal components of Kubernetes, and external components to establish communication. For more information, see Kubernetes API from Kubernetes documentation.
The following are the benefits of using Kubernetes API Server:
- Central Communicator— All the interactions or requests from internal Kubernetes components with the control plane go through this component.
- Central Manager— Used to manage, create, and configure Kubernetes clusters.
Use Case for Monitoring Kubernetes API Server
Consider a cluster comprising of two nodes; Node 1 and Node 2, constituting the cluster’s Control Plane. The Kubernetes API Server plays a crucial role, consistently interacting with several services within the Control Plane. Its primary function is to schedule and monitor the status of workloads and execute the appropriate measures to maintain continuous operation and prevent downtime. If a network or system issue leads to Node 1’s failure, the system autonomously migrate the workloads to Node 2, whilst the affected Node 1 is promptly removed from the cluster. Considering the Kubernetes API Server’s vital role in the cluster, ensuring the operational efficiency of the cluster heavily relies on the robust monitoring of the component.
Requirements for Monitoring Kubernetes API Server
- Ensure you have LM Container enabled.
- You have enabled the Kubernetes_API_server datasource.
Note: This is a multi-instance datasource, with each instance indicating an API server. This datasource is available for download from LM Exchange.
Setting up Kubernetes API Server Monitoring
Installation
You don’t need any separate installation on your server to use the Kubernetes API Server. For more information on LM Container installation, see Installing the LM Container Helm Chart or Installing LM Container Chart using CLI.
Configuration
The Kubernetes API Server is pre-configured for monitoring. No additional configurations are required.
Viewing Kubernetes API Server Details
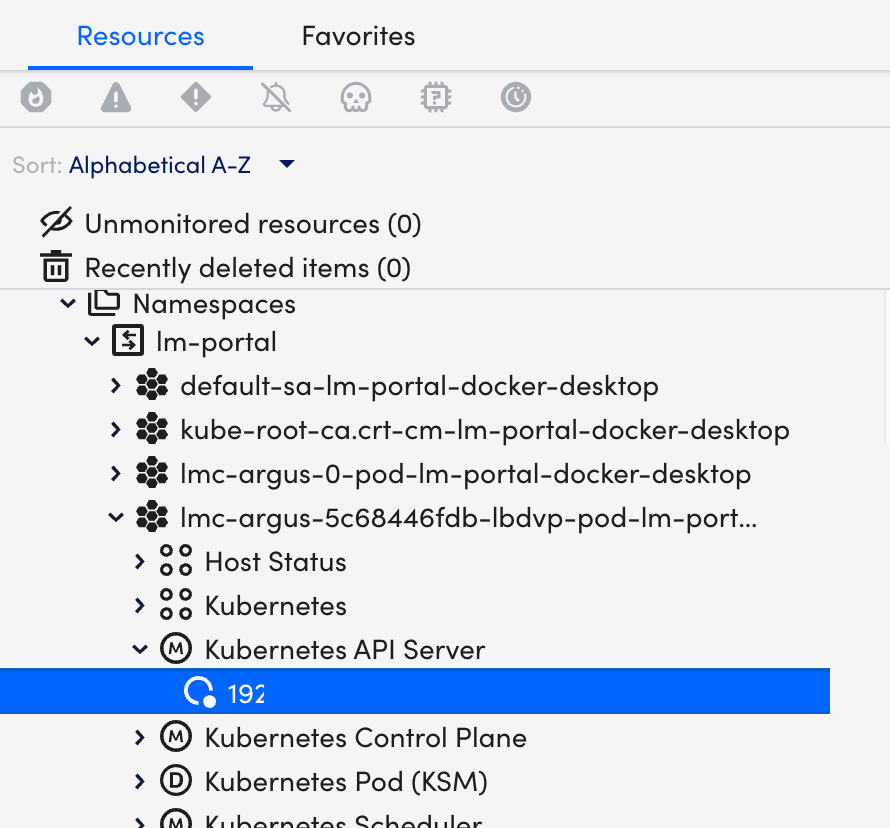
Once you have installed and configured the Kubernetes API Server on your server, you can view all the relevant data on the Resources page.
- In LogicMonitor, navigate to Resources > select the required DataSource resource.
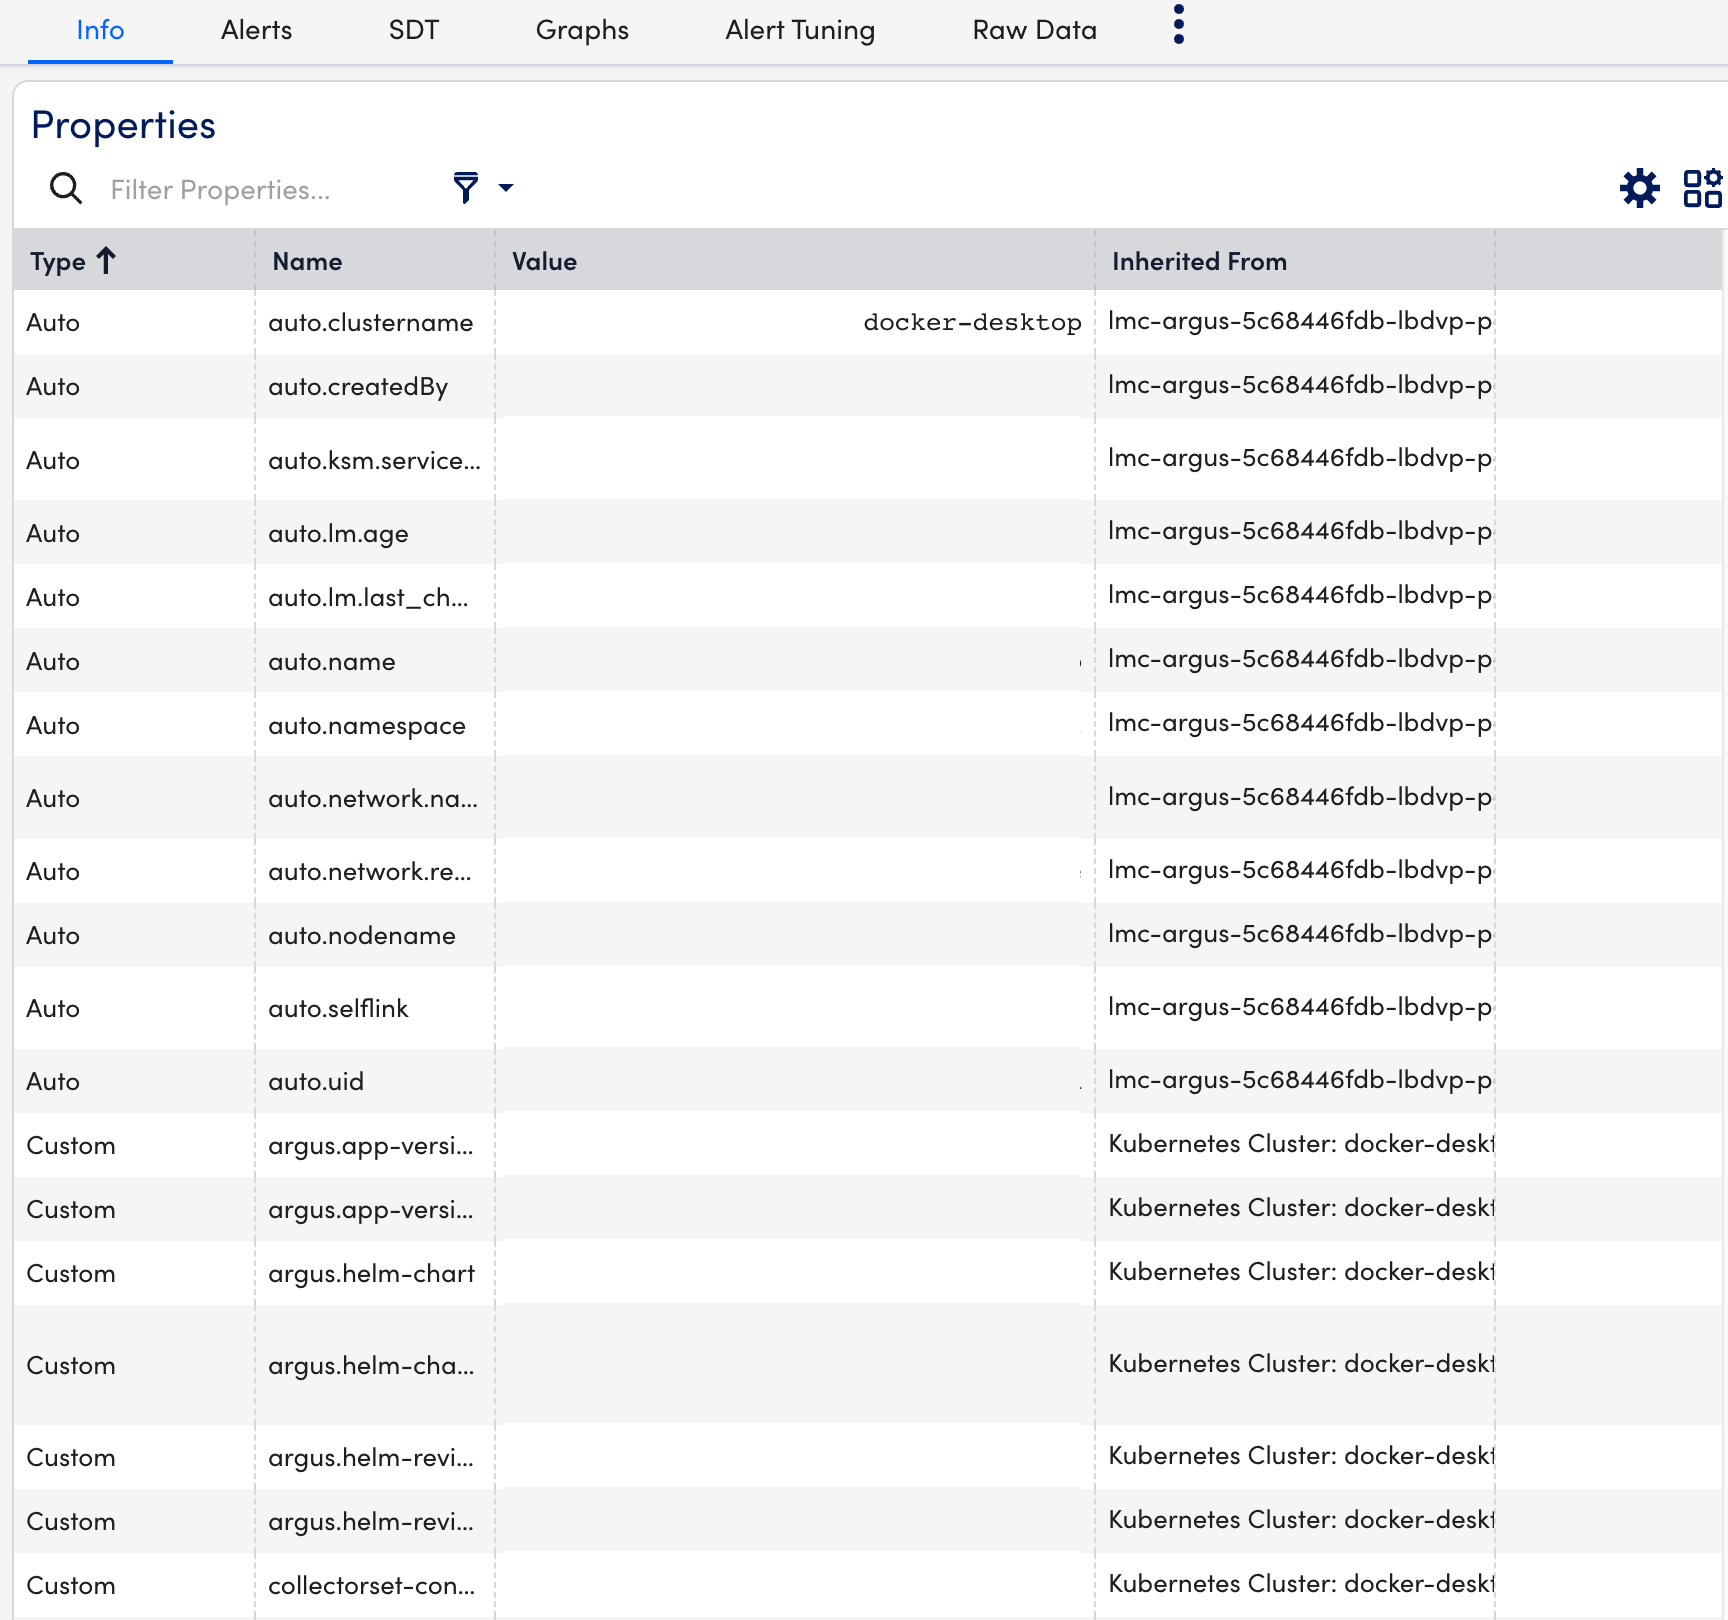
- Select Info tab to view the different properties of the Kubernetes API Server.
- Select Alerts tab to view the alerts generated while checking the status of the Kubernetes API Server resource.
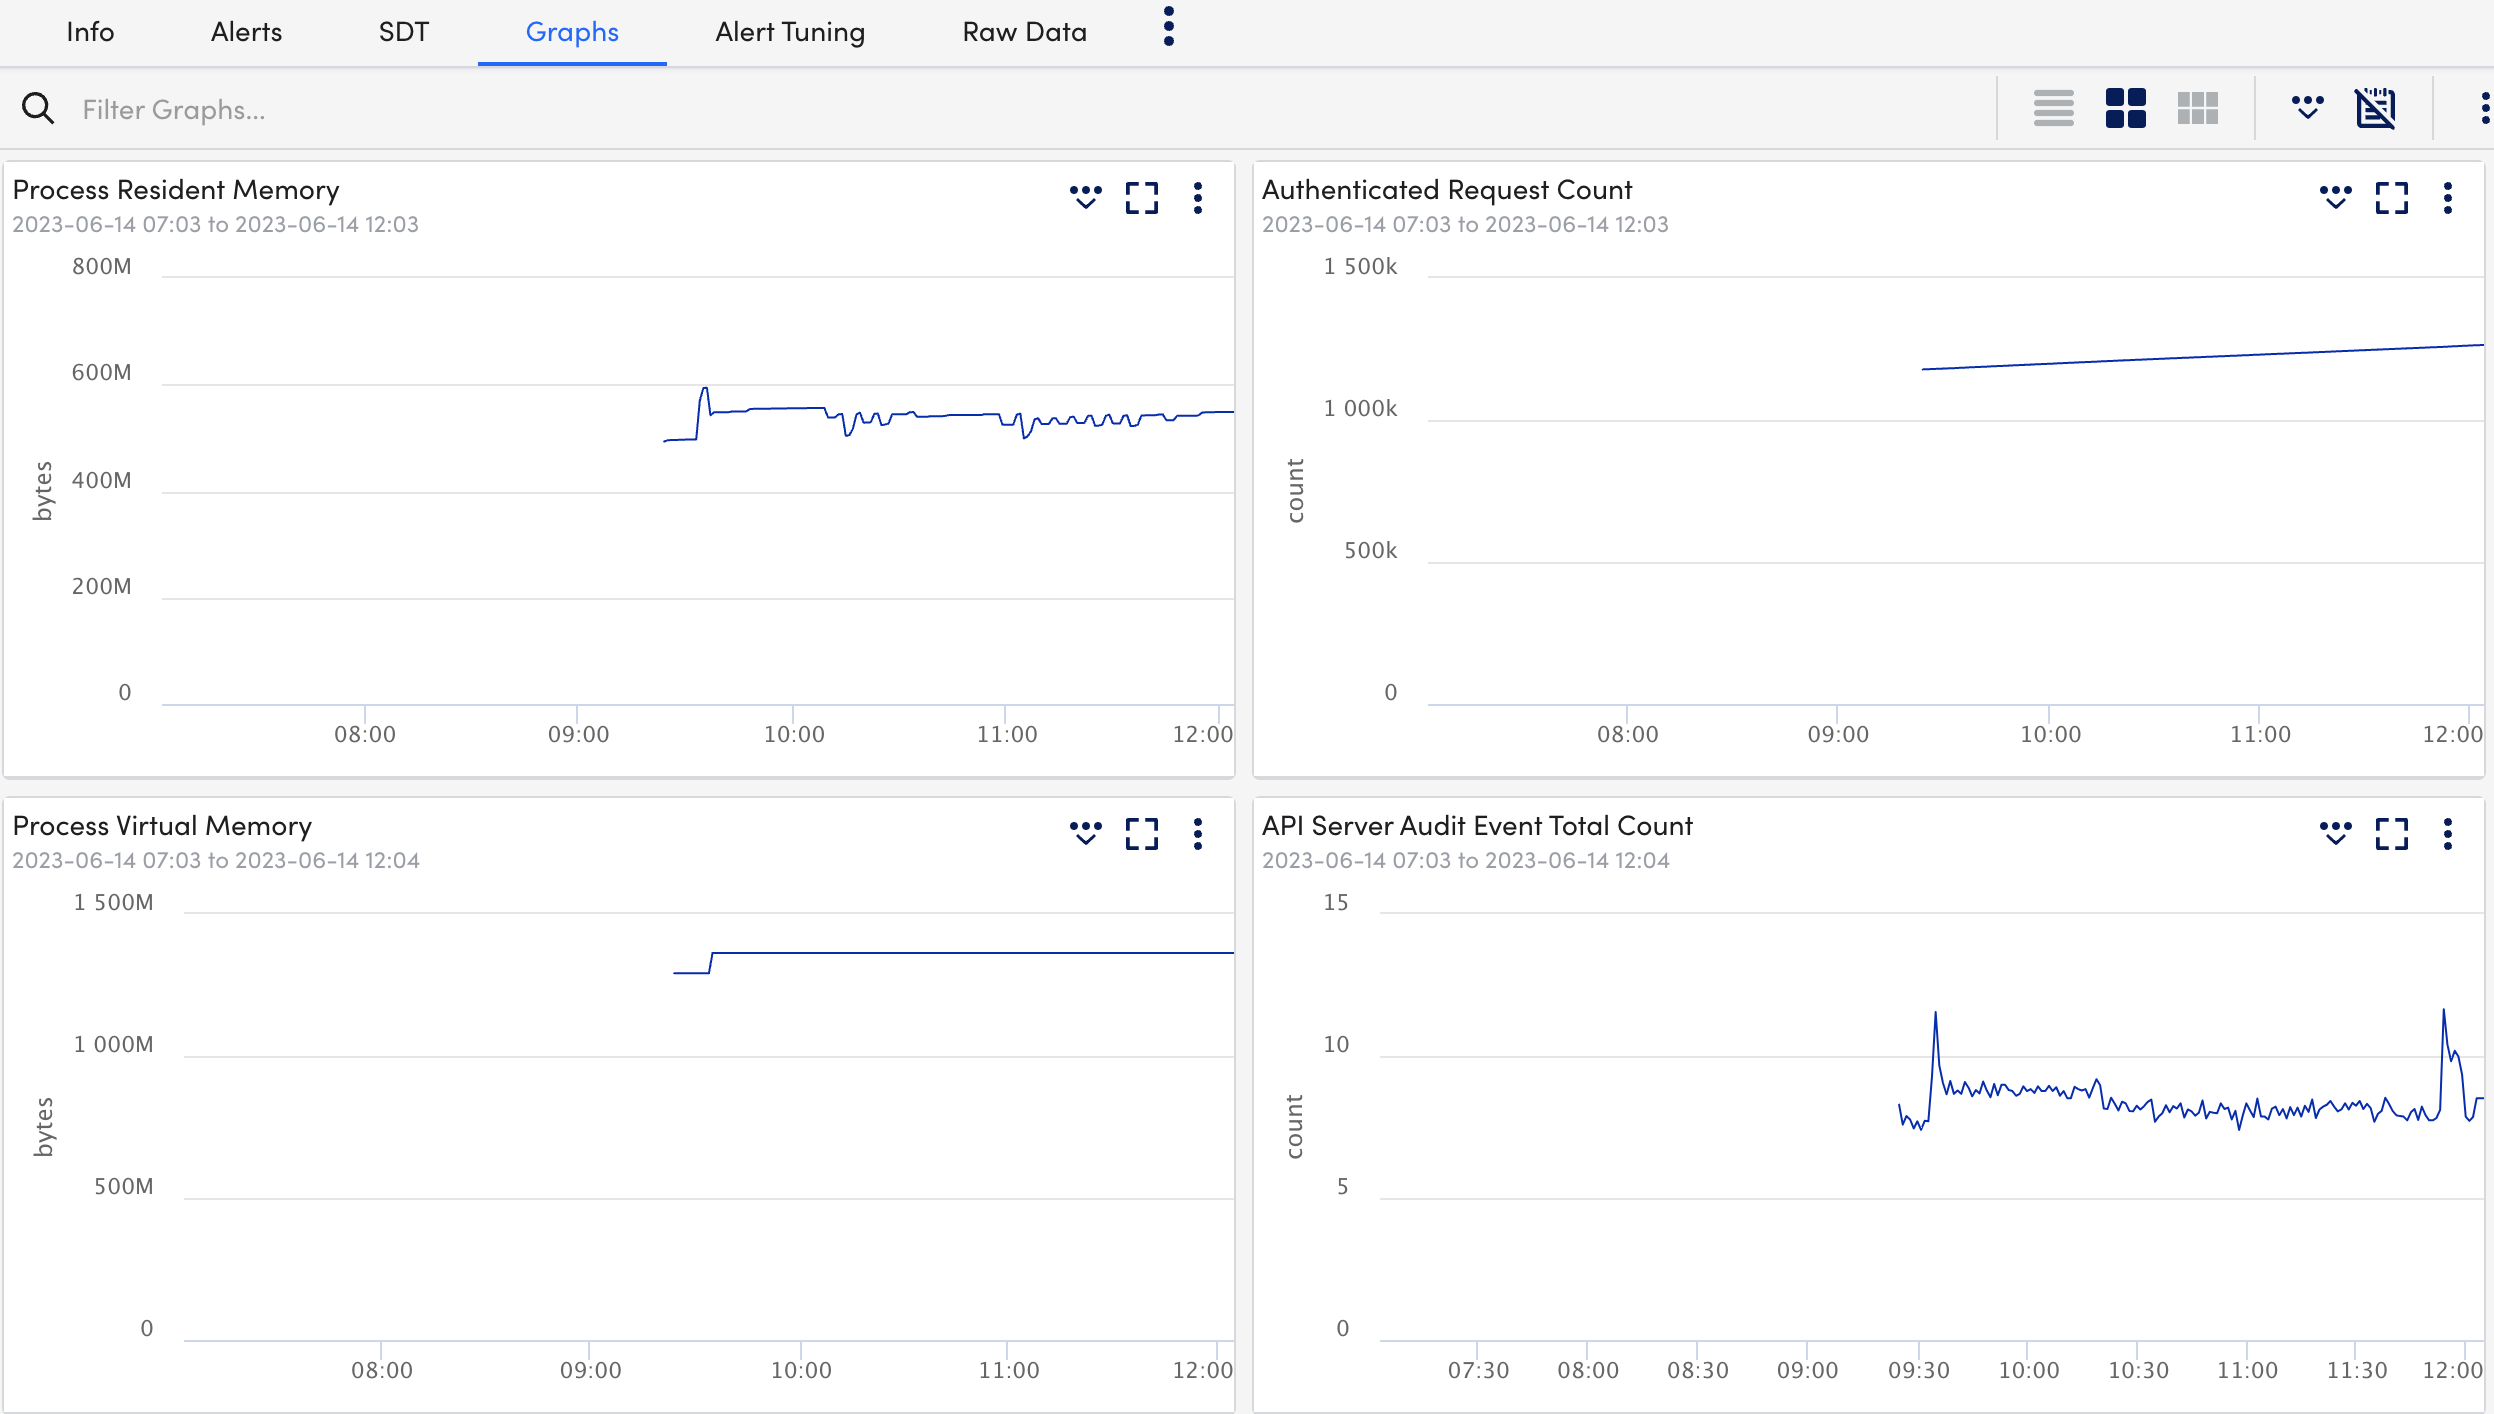
- Select Graphs tab to view the status or the details of the Kubernetes API Server in the graphical format.
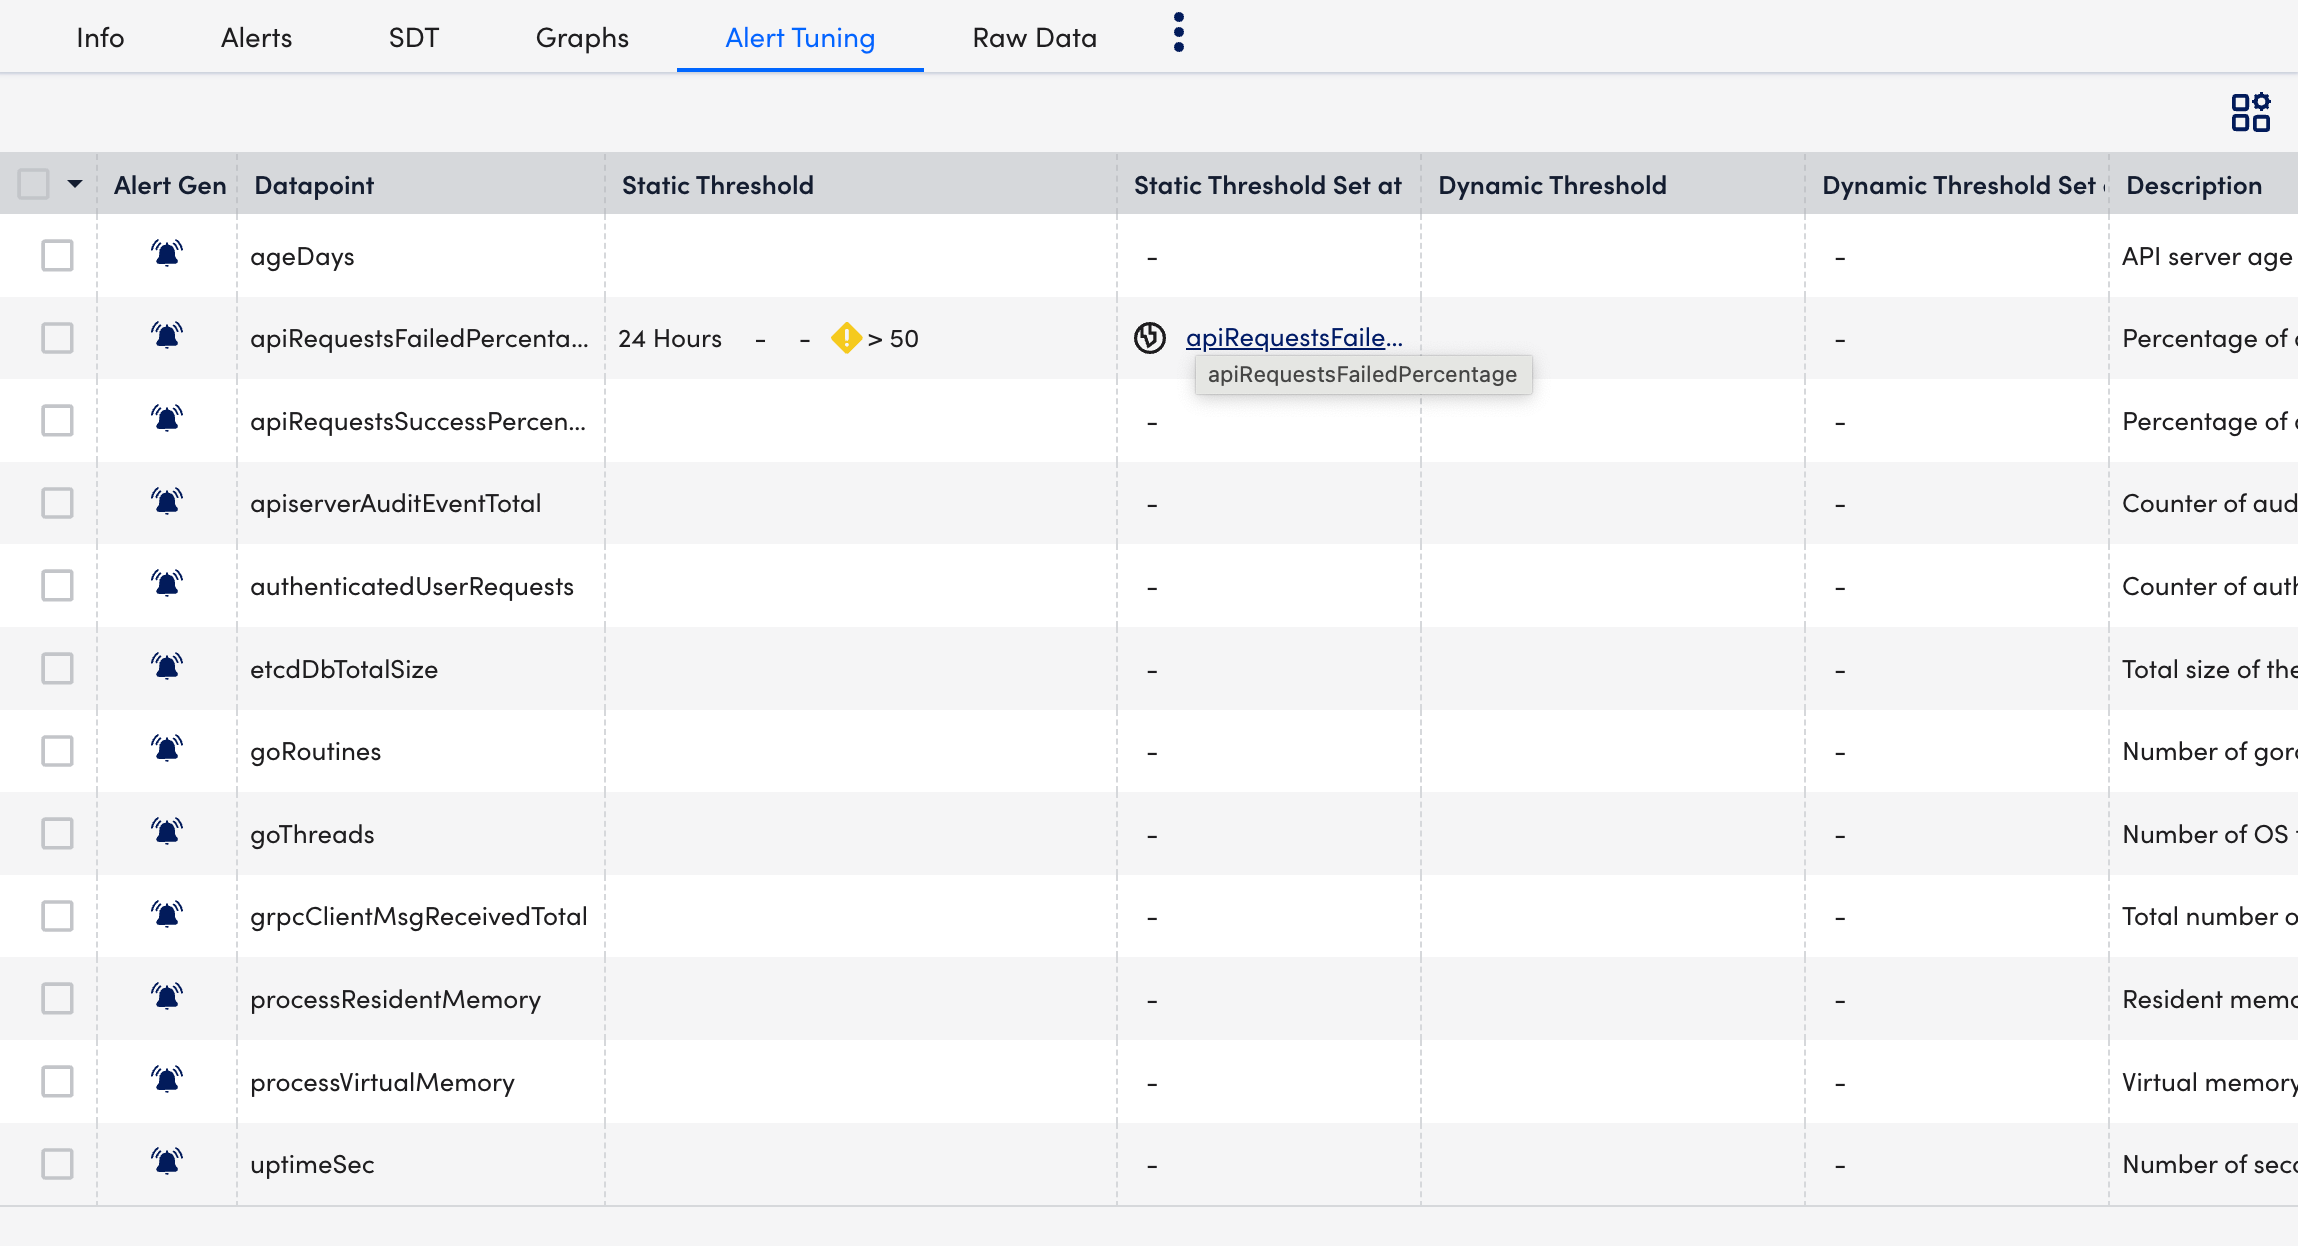
- Select Alert Tuning tab to view the datapoints on which the alerts are generated.
- Select Raw Data tab to view all the data returned for the defined instances.
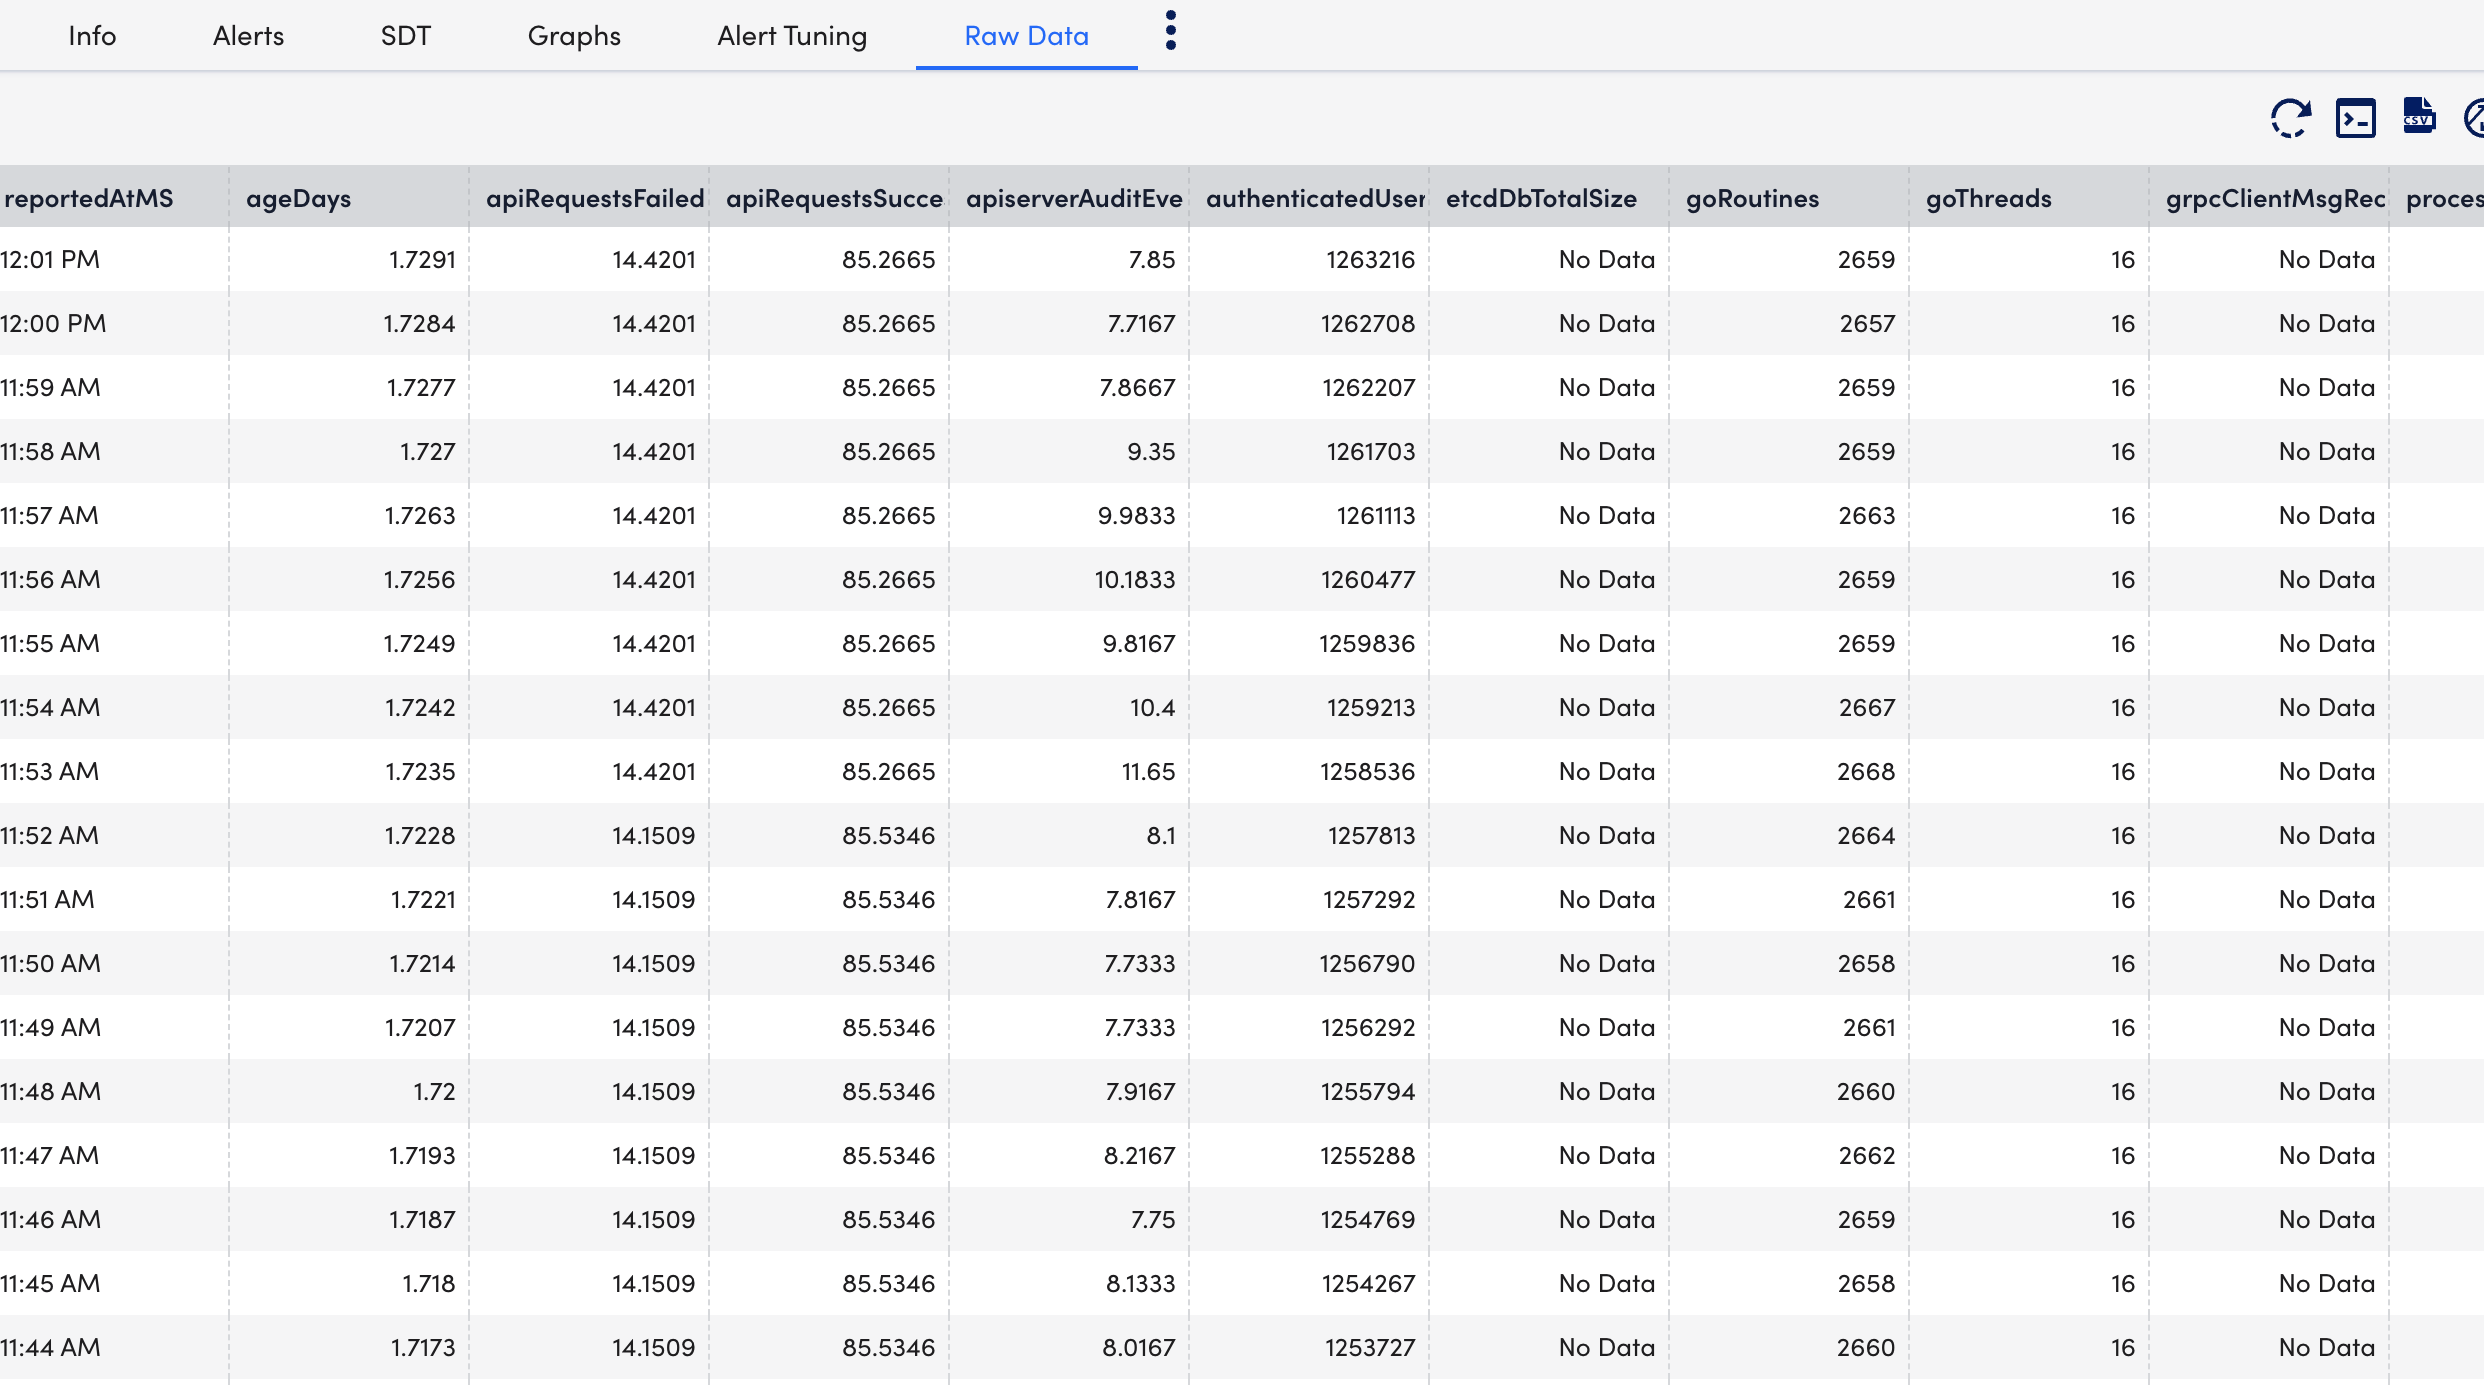
Creating Kubernetes API Server Dashboards
You can create out-of-the-box dashboards for monitoring the status of the Kubernetes API Server.
Requirement
Download the Kubernetes_API_Server.JSON file.
Procedure
- Navigate to Dashboards > Add.
- From the Add drop-down list, select From File.
- Import the downloaded
Kubernetes_API_Server.JSONfile to add the Kubernetes API Server dashboard and select Submit. - On the Add Dashboard from JSON File dialog box, enter values in the Name and the Dashboard Group fields.
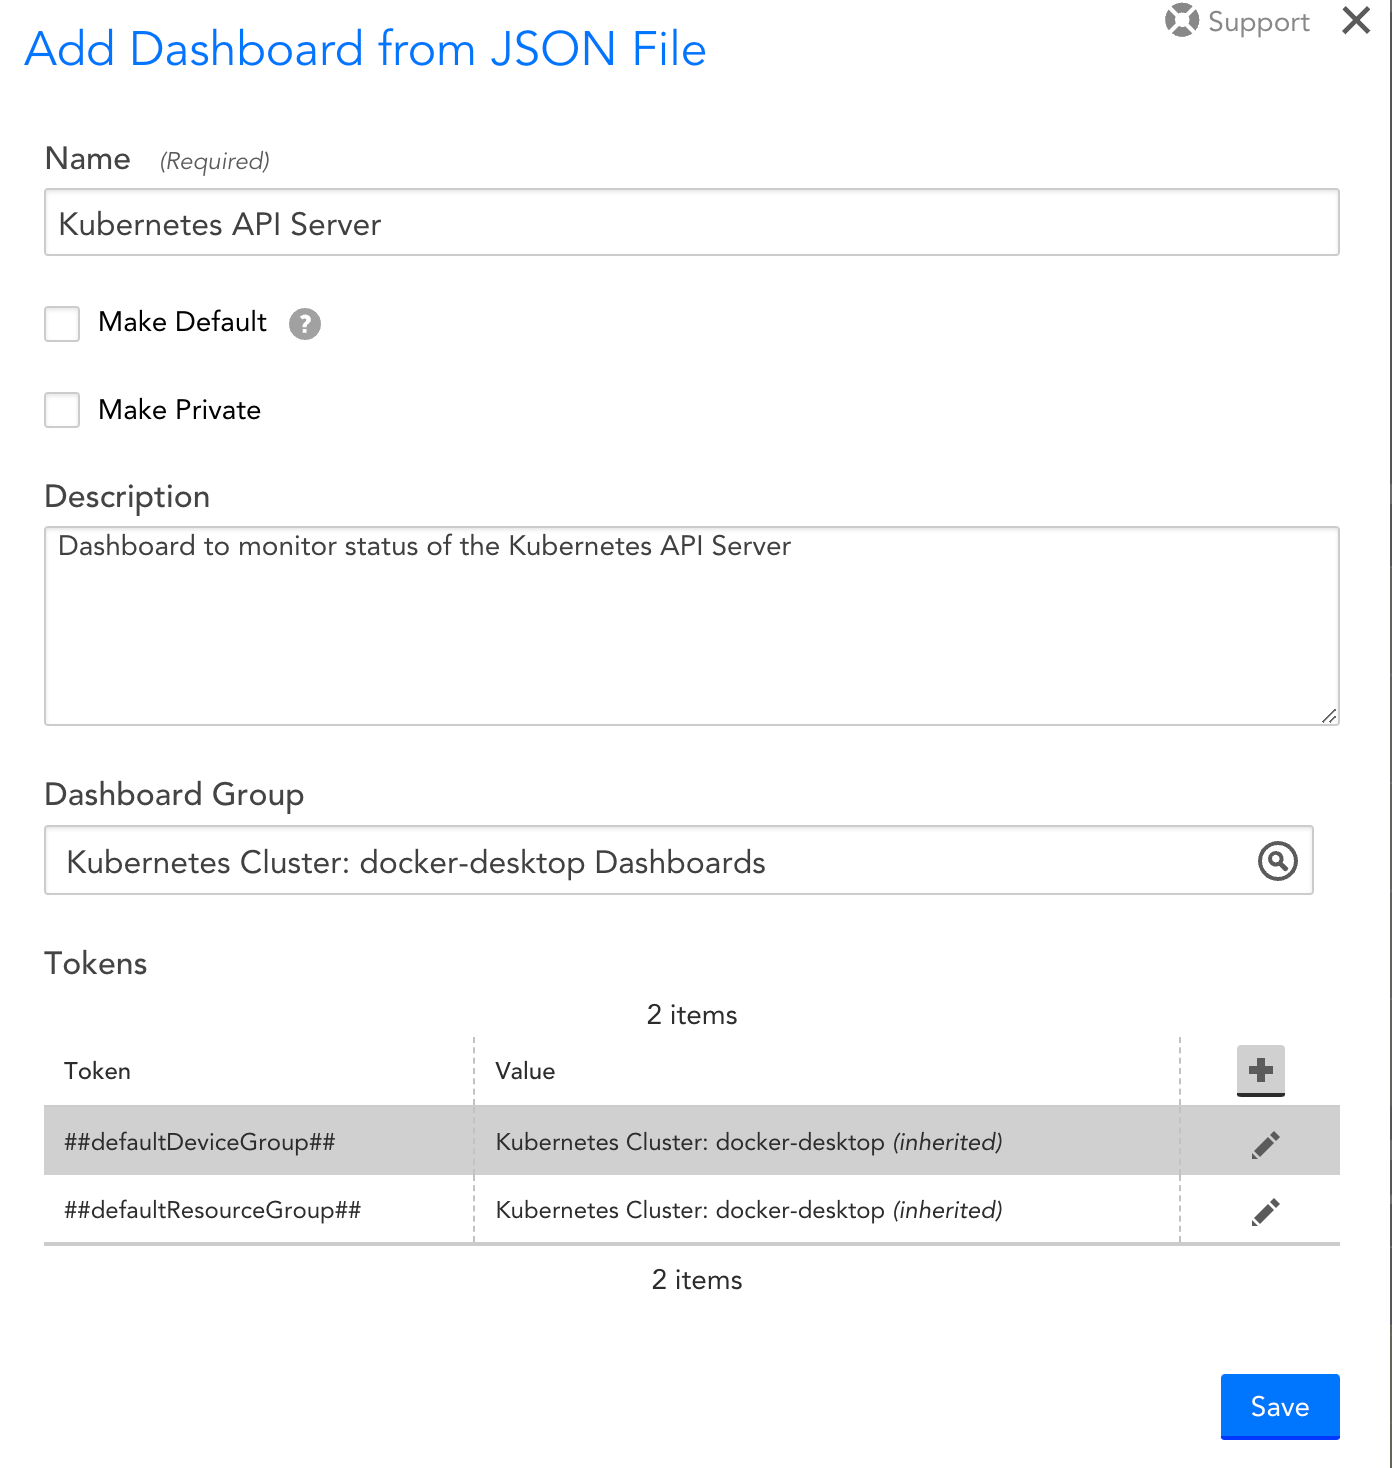
- Select Save.
On the Dashboards page, you can now see the new Kubernetes API Server dashboard created.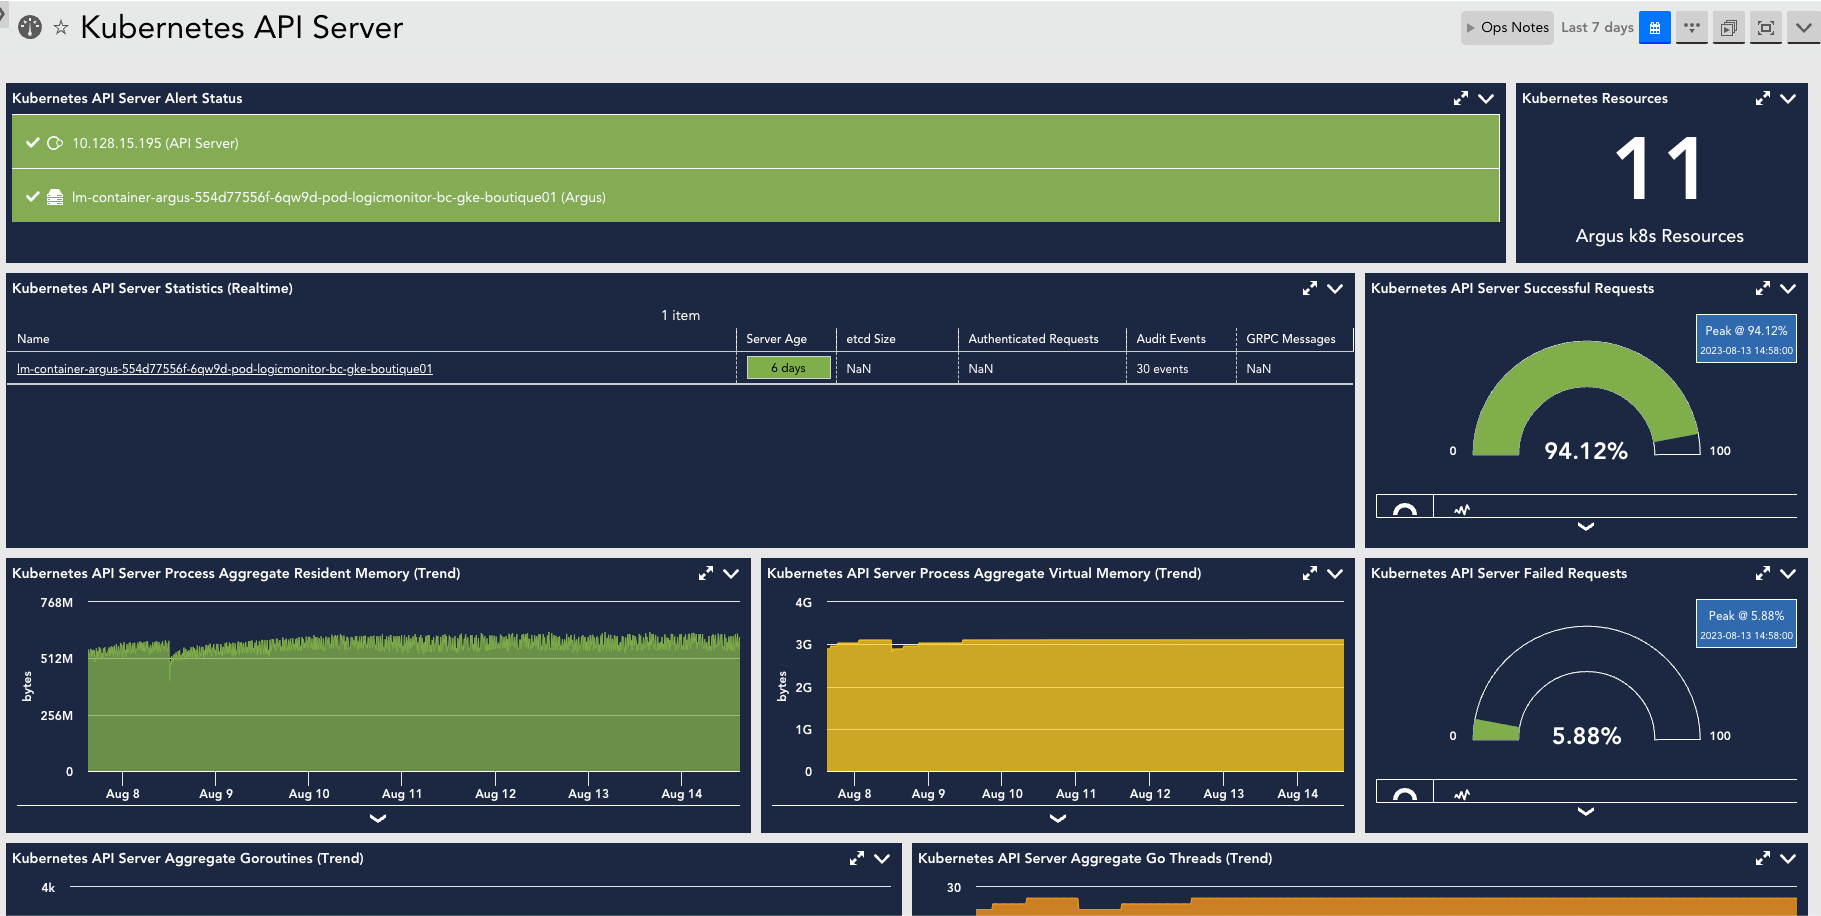
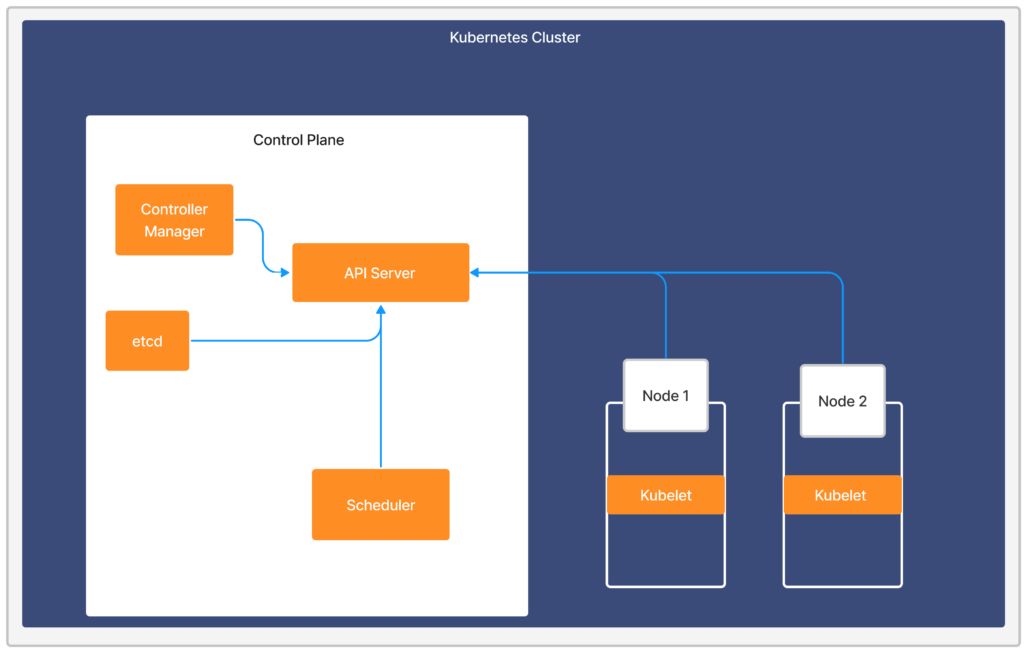
A Kubernetes cluster consists of worker machines that are divided into worker nodes and control plane nodes. Worker nodes host your pods and the applications within them, whereas the control plane node manages the worker nodes and the Pods in the cluster. The Control Plane is an orchestration layer that exposes the API and interfaces to define, deploy, and manage the lifecycle of containers. For more information, see Kubernetes Components from Kubernetes documentation.
The Kubernetes Control Plane components consist of the following:
The following image displays the different Kubernetes Control Plane components and their connection to the Kubernetes Cluster.
The Kubernetes Scheduler is a core component of Kubernetes, which assigns pods to nodes through a scheduling process based on available resources and constraints. Monitoring the Kubernetes Scheduler service is crucial in determining its ability to efficiently use resources and handle requests at acceptable performance levels.
Important: We do not support Kubernetes Scheduler monitoring for managed services like OpenShift, Amazon Elastic Kubernetes Service (EKS), Google Kubernetes Engine (GKE) and Azure Kubernetes Service (AKS) because they don’t expose the Kubernetes Control Plane components.
The following are the benefits of using Kubernetes Scheduler:
- Performance tuning— The scheduler ranks each node based on constraints and resources and associates each pod to the best matching nodes.
- Flexible framework— The scheduler is a pluggable framework architecture that allows you to add new plugins to the framework.
Use Case for Monitoring Kubernetes Scheduler
Let’s say you have two nodes; Node 1 and Node 2, running on the same pod through a Kubernetes API server. The Kubernetes Scheduler communicates with the Kubernetes API server and decides that Node 1 is the best pair for the pod based on the affinity rules, or central processing unit, or memory parameters.
Requirements for Monitoring Kubernetes Scheduler
- Ensure you have LM Container enabled.
- Enable the Kubernetes_Schedulers datasource.
Note: This is a multi-instance datasource, with each instance indicating a scheduler. This datasource is available for download from LM Exchange. - Ensure you change the bind-address to the specific Kubernetes pod. The default value is 0.0.0.0. For more information, see the bind-address string in kube-scheduler from Kubernetes documentation.
Setting up Kubernetes Scheduler
Installation
You don’t need separate installation on your server to use the Kubernetes Scheduler. For more information on LM Container installation, see Installing the LM Container Helm Chart or Installing LM Container Chart using CLI.
Configuration
The Kubernetes Scheduler is pre-configured. If you don’t see any data for the Kubernetes Scheduler, do the following:
- In your Kubernetes pod, navigate to /etc/kubernetes/manifests.
- Open and edit the kube-scheduler.yaml file.
- Change the –bind-address at .spec.containers.command from 127.0.0.1 to .status.podIP present on kuber-scheduler pod.
- Save the kube-scheduler.yaml file.
Note: If –bind-address is missing, the scheduler continues to run with its default value 0.0.0.0.
For monitoring self-implemented scheduler, do as follows:
- In LogicMonitor, navigate to Settings > DataSources > select Kubernetes Scheduler DataSource.
- In the Kubernetes Scheduler DataSource page, expand Active Discovery.
- In the Parameters section, select Embedded Groovy Script option.
- In the Groovy Script field, enter the required component name for the scheduler_label array.
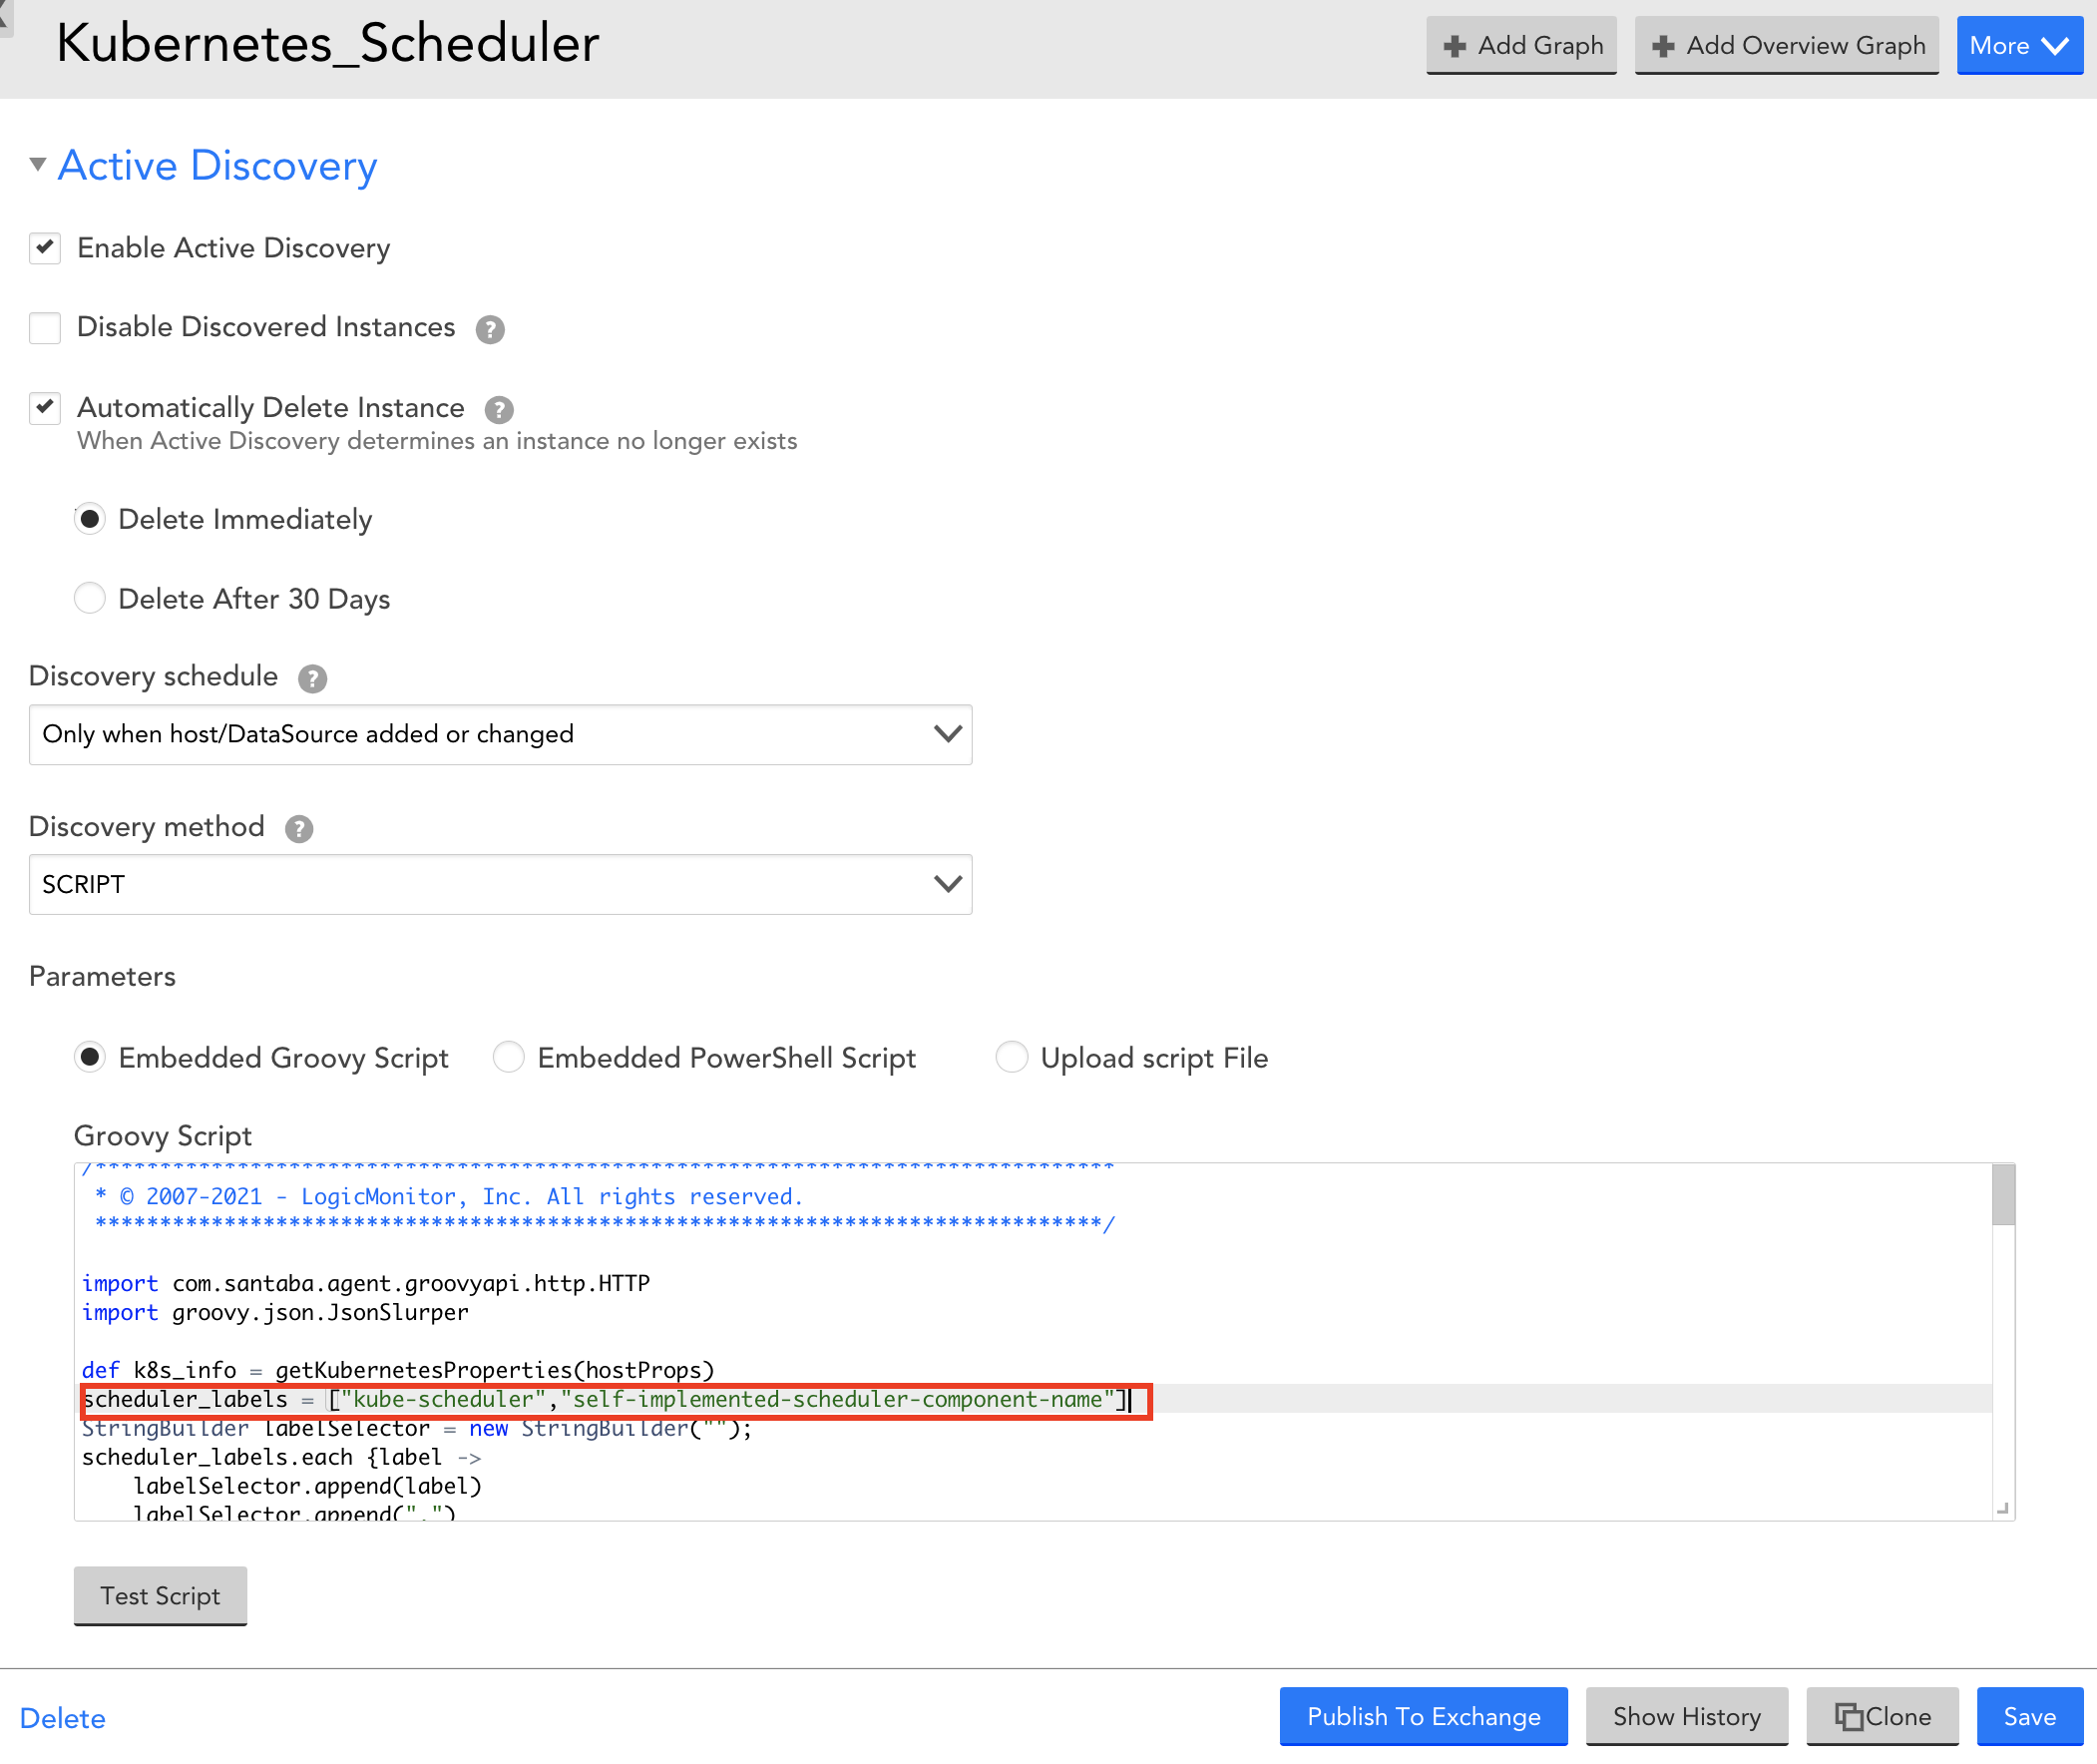
- Expand Collector Attributes and in the Groovy Script field, enter the required component name for the scheduler_label array.
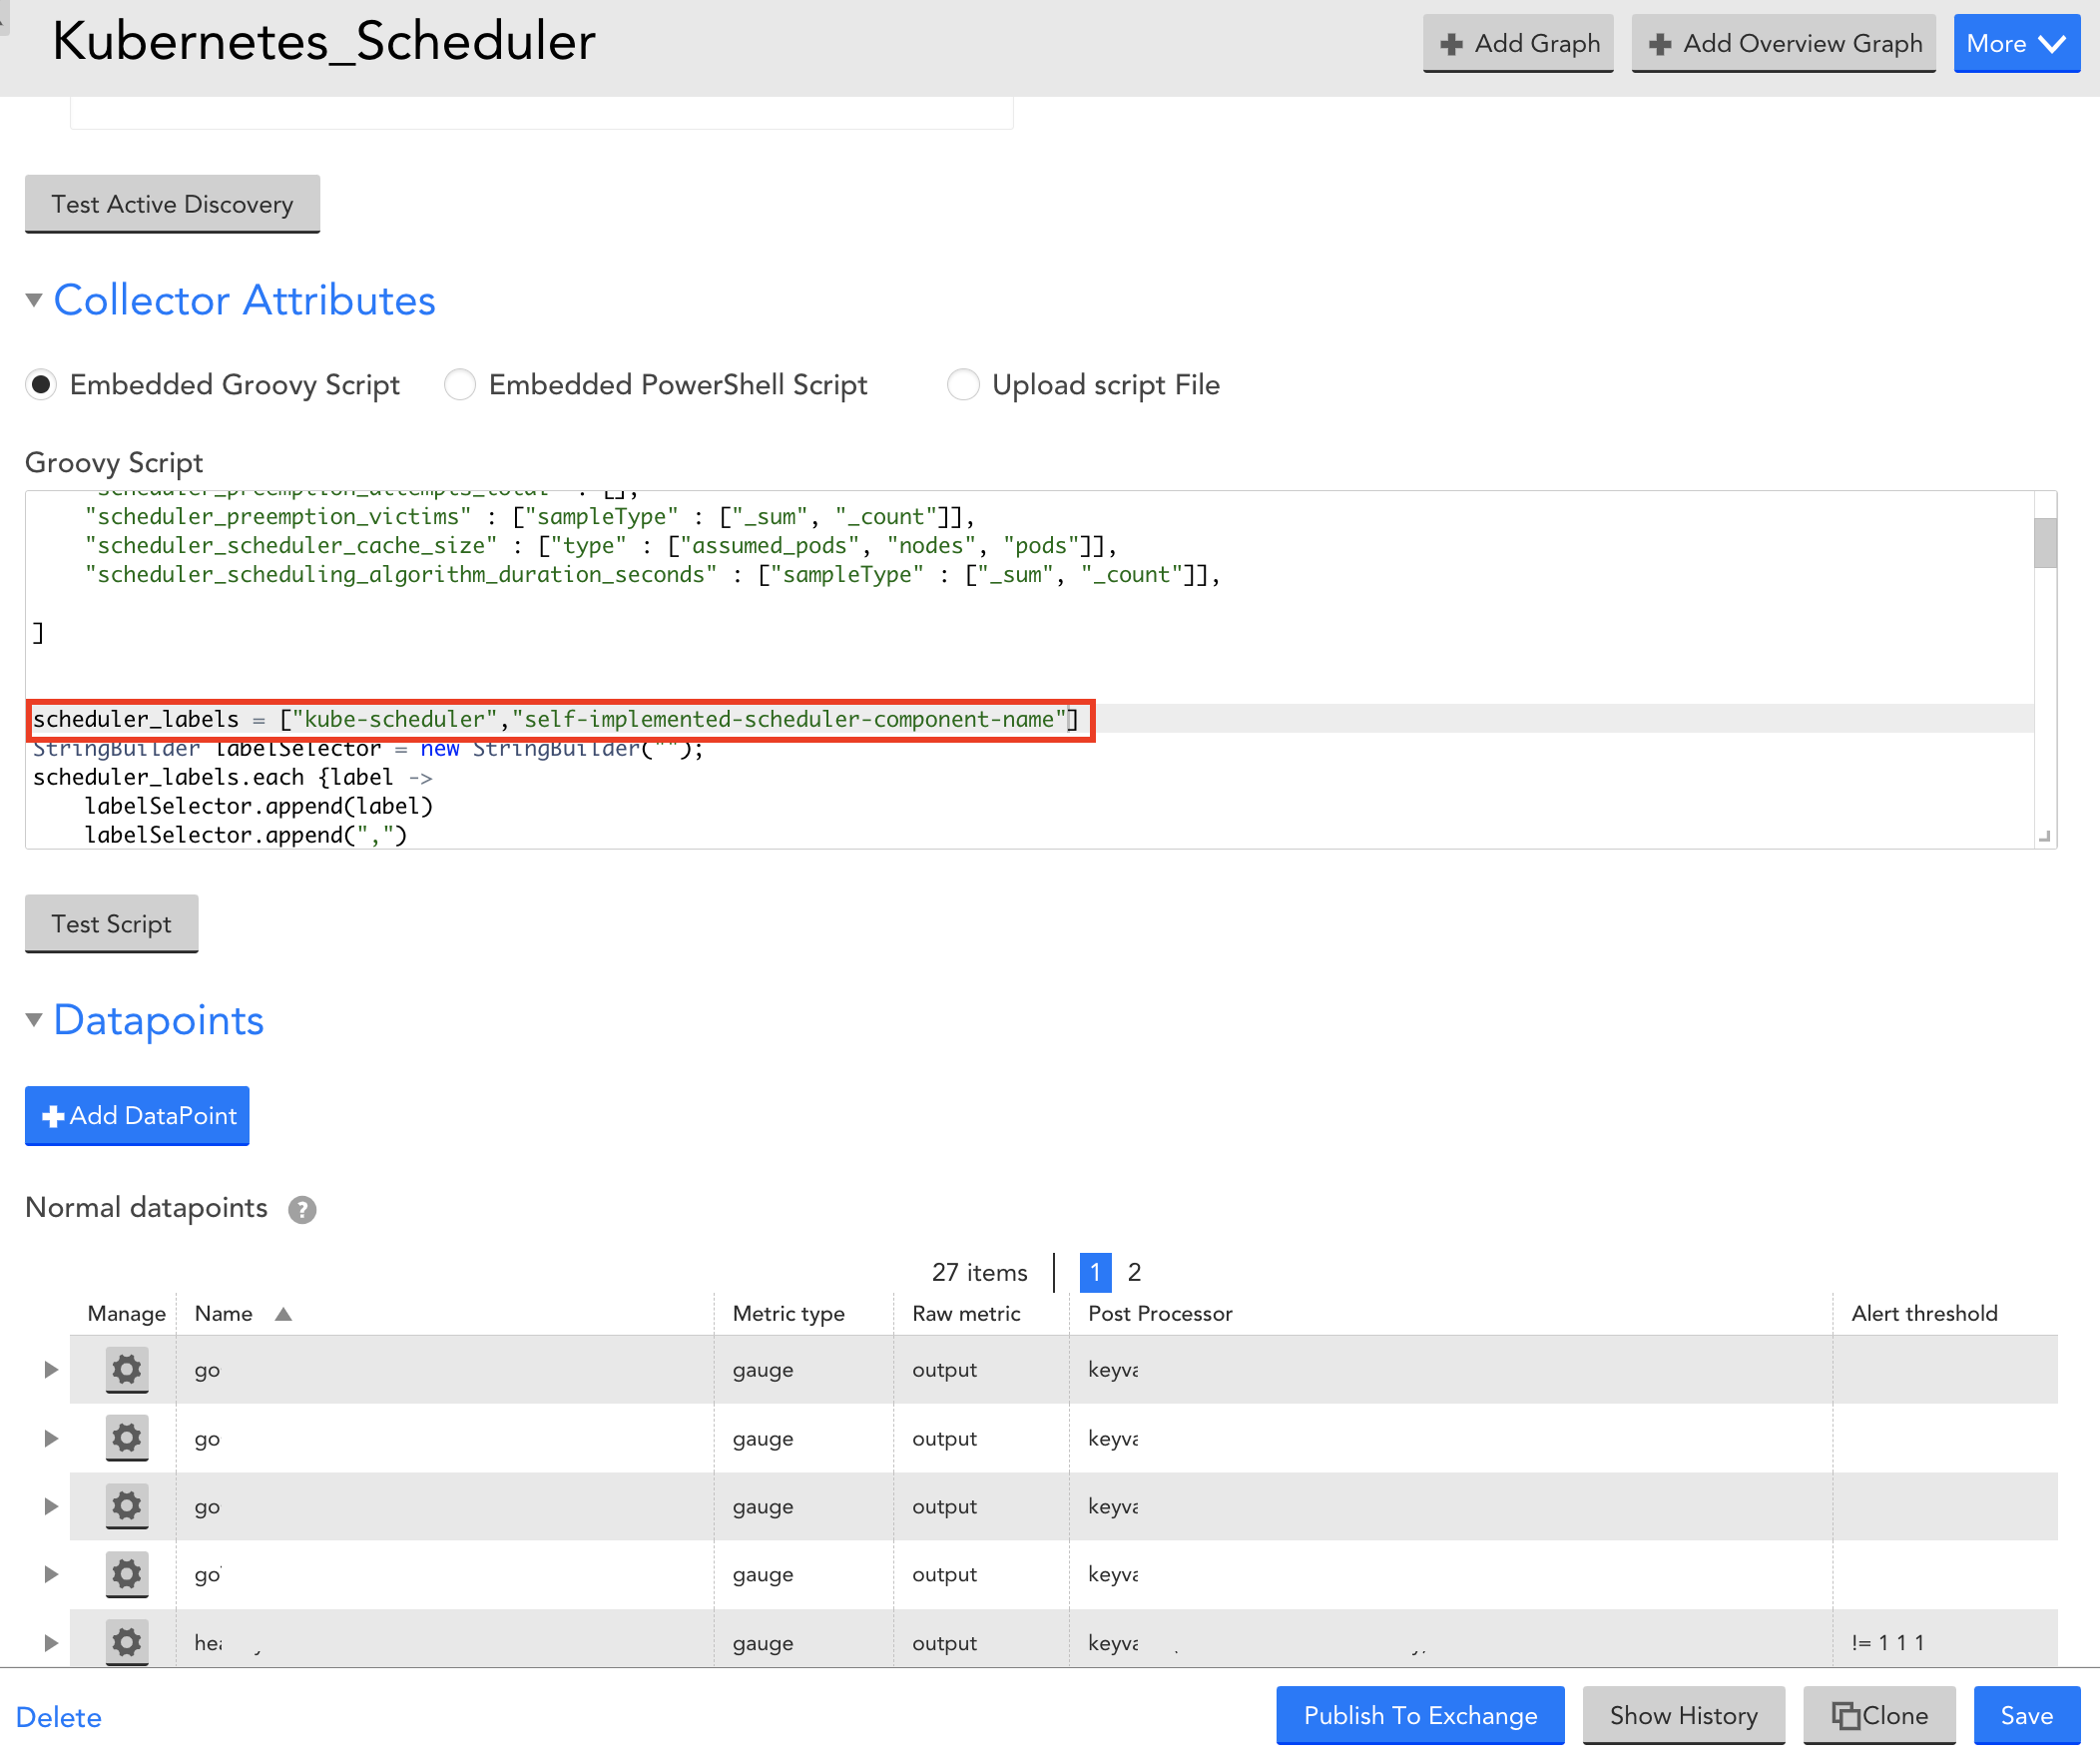
- Select Save to save the Kubernetes Scheduler DataSource.
Viewing Kubernetes Scheduler Details
Once you have installed and configured the Kubernetes Scheduler on your server, you can view all the relevant data on the Resources page.
- In LogicMonitor, navigate to Resources > select the required DataSource resource.
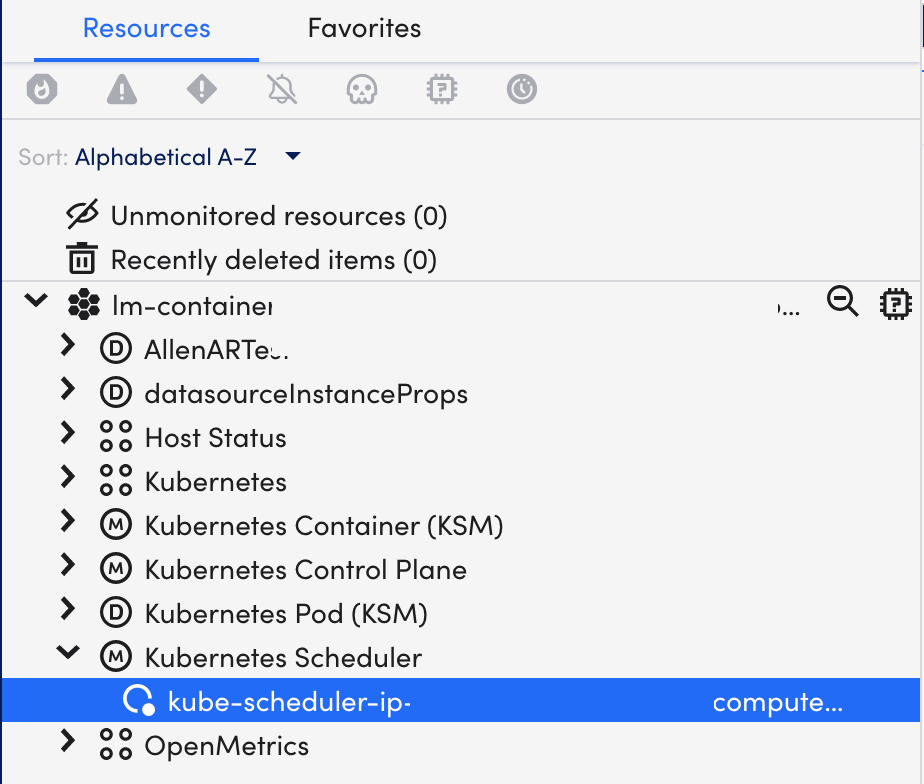
- Select Info tab to view the different properties of the Kubernetes Scheduler.
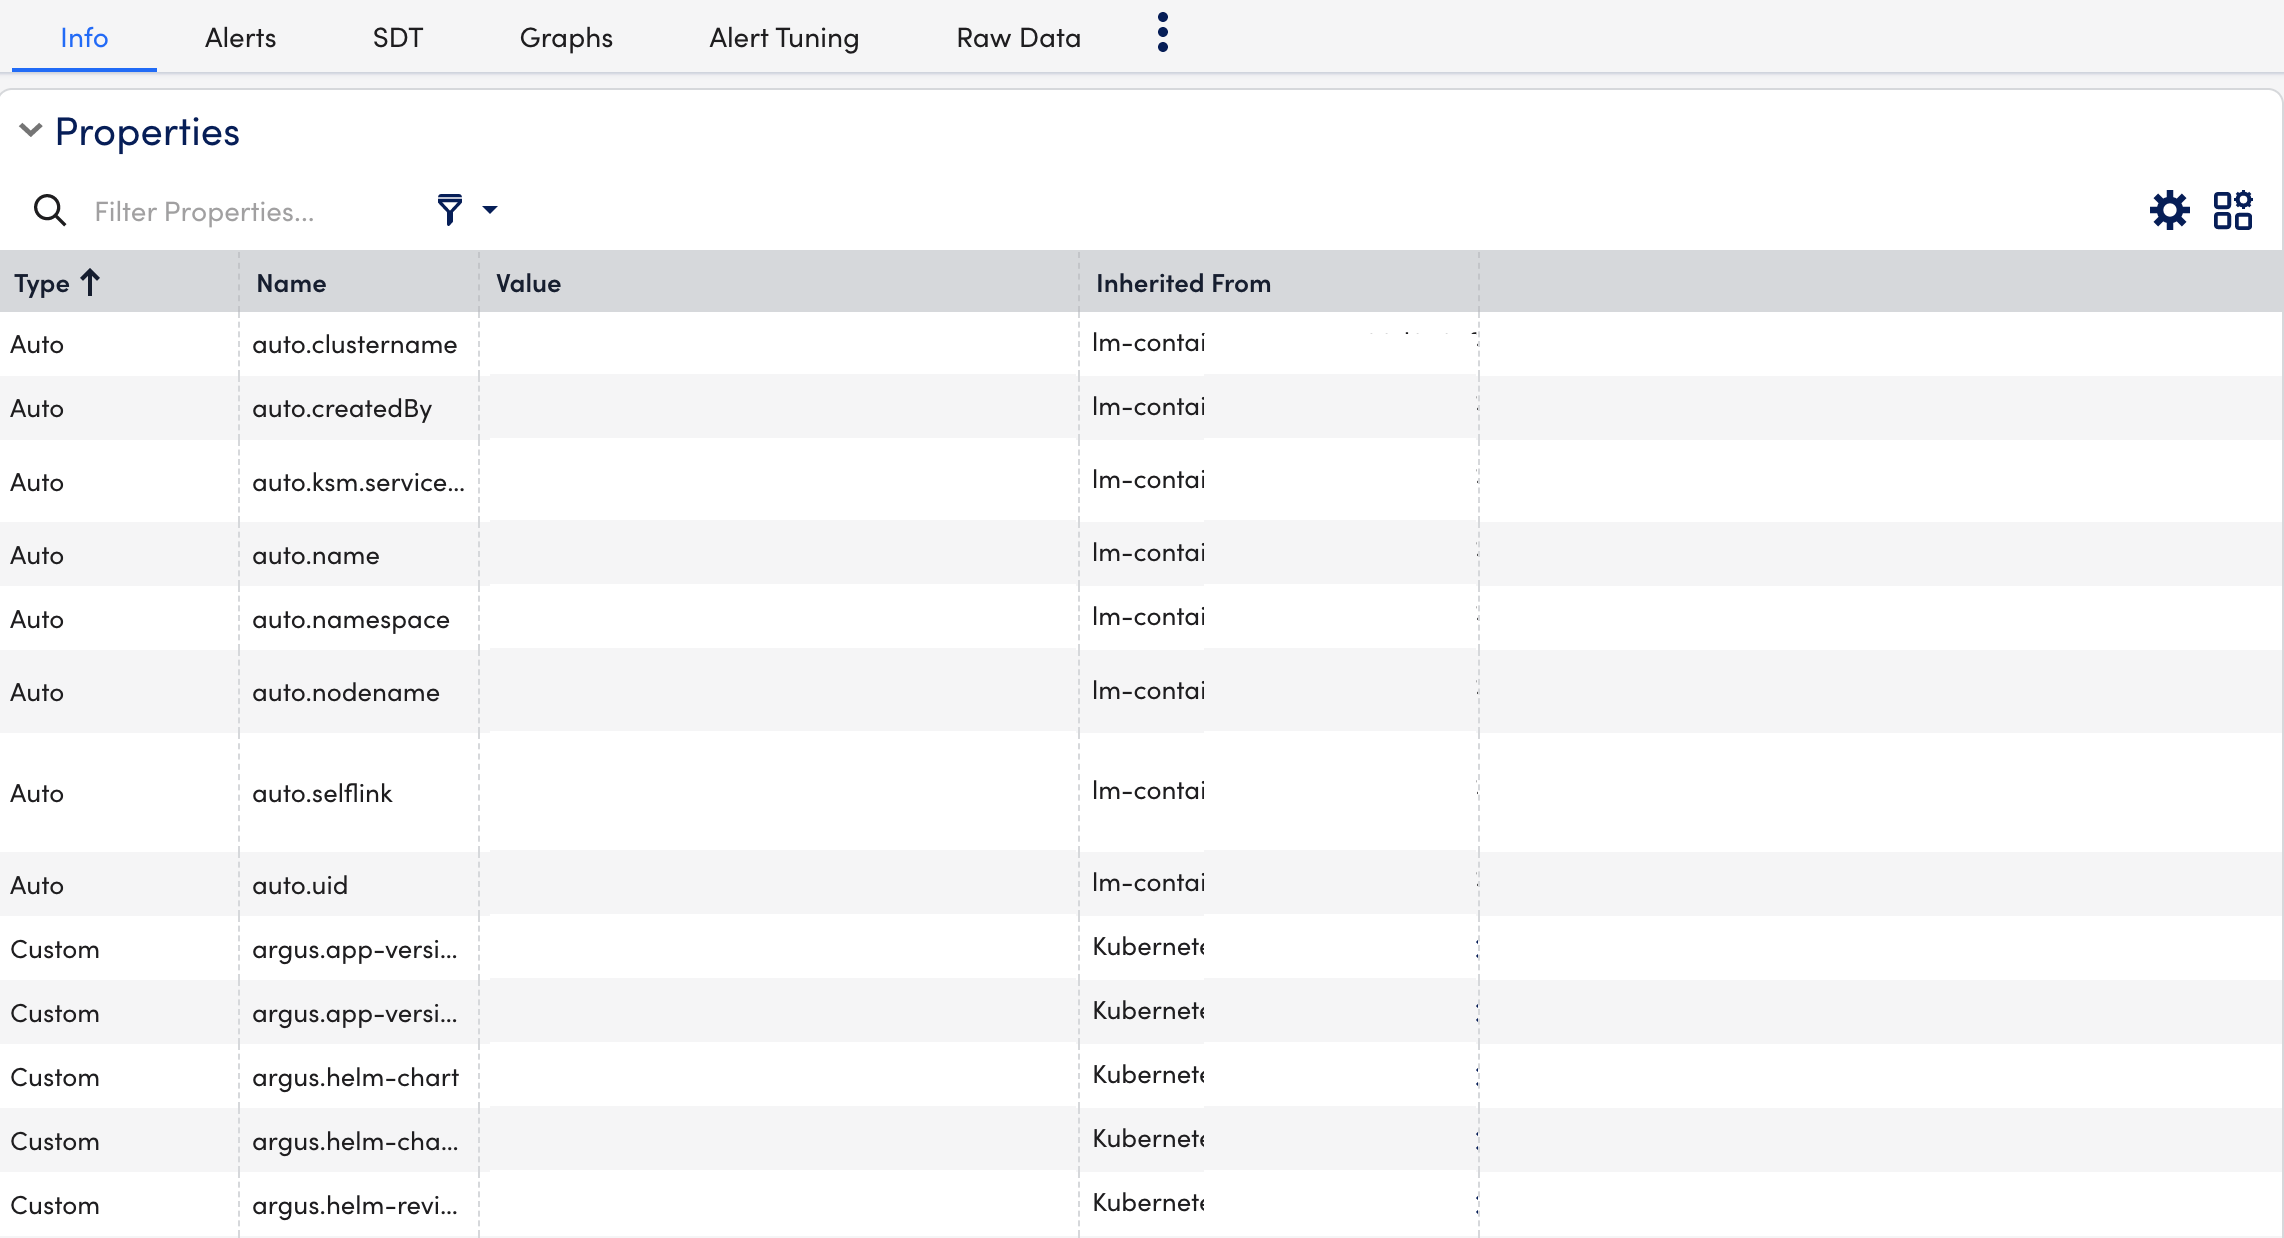
- Select Alerts tab to view the alerts generated while checking the status of the Kubernetes Scheduler resource.

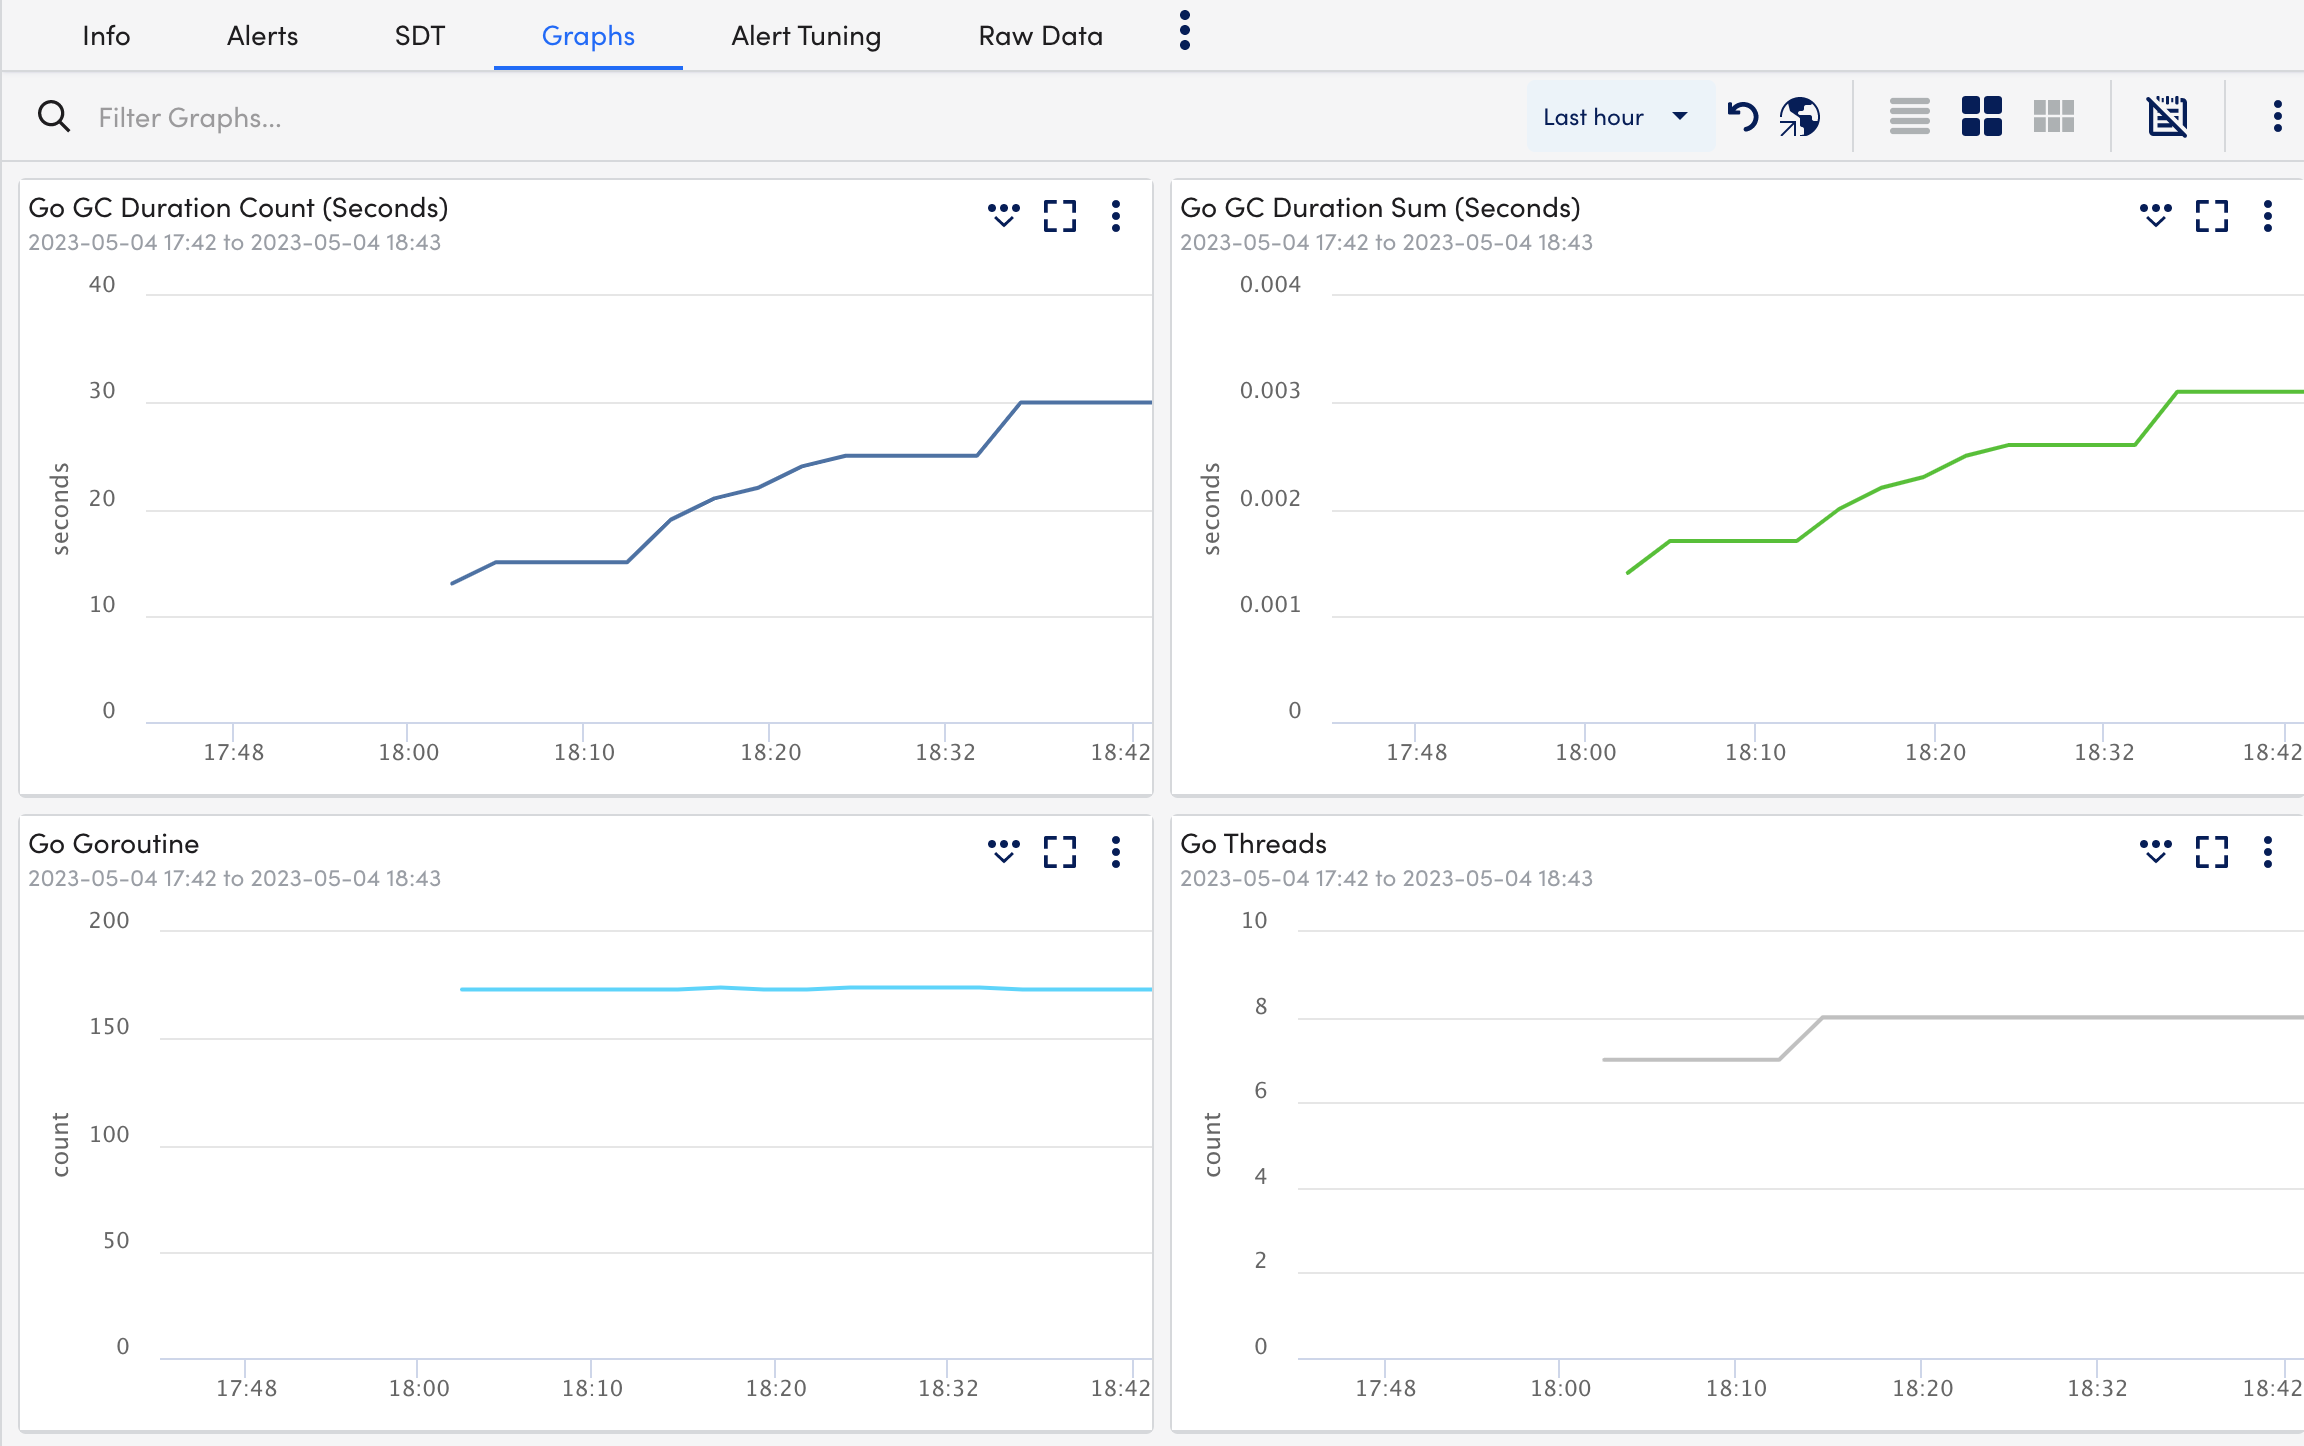
- Select Graphs tab to view the status or the details of the Kubernetes Scheduler in the graphical format.
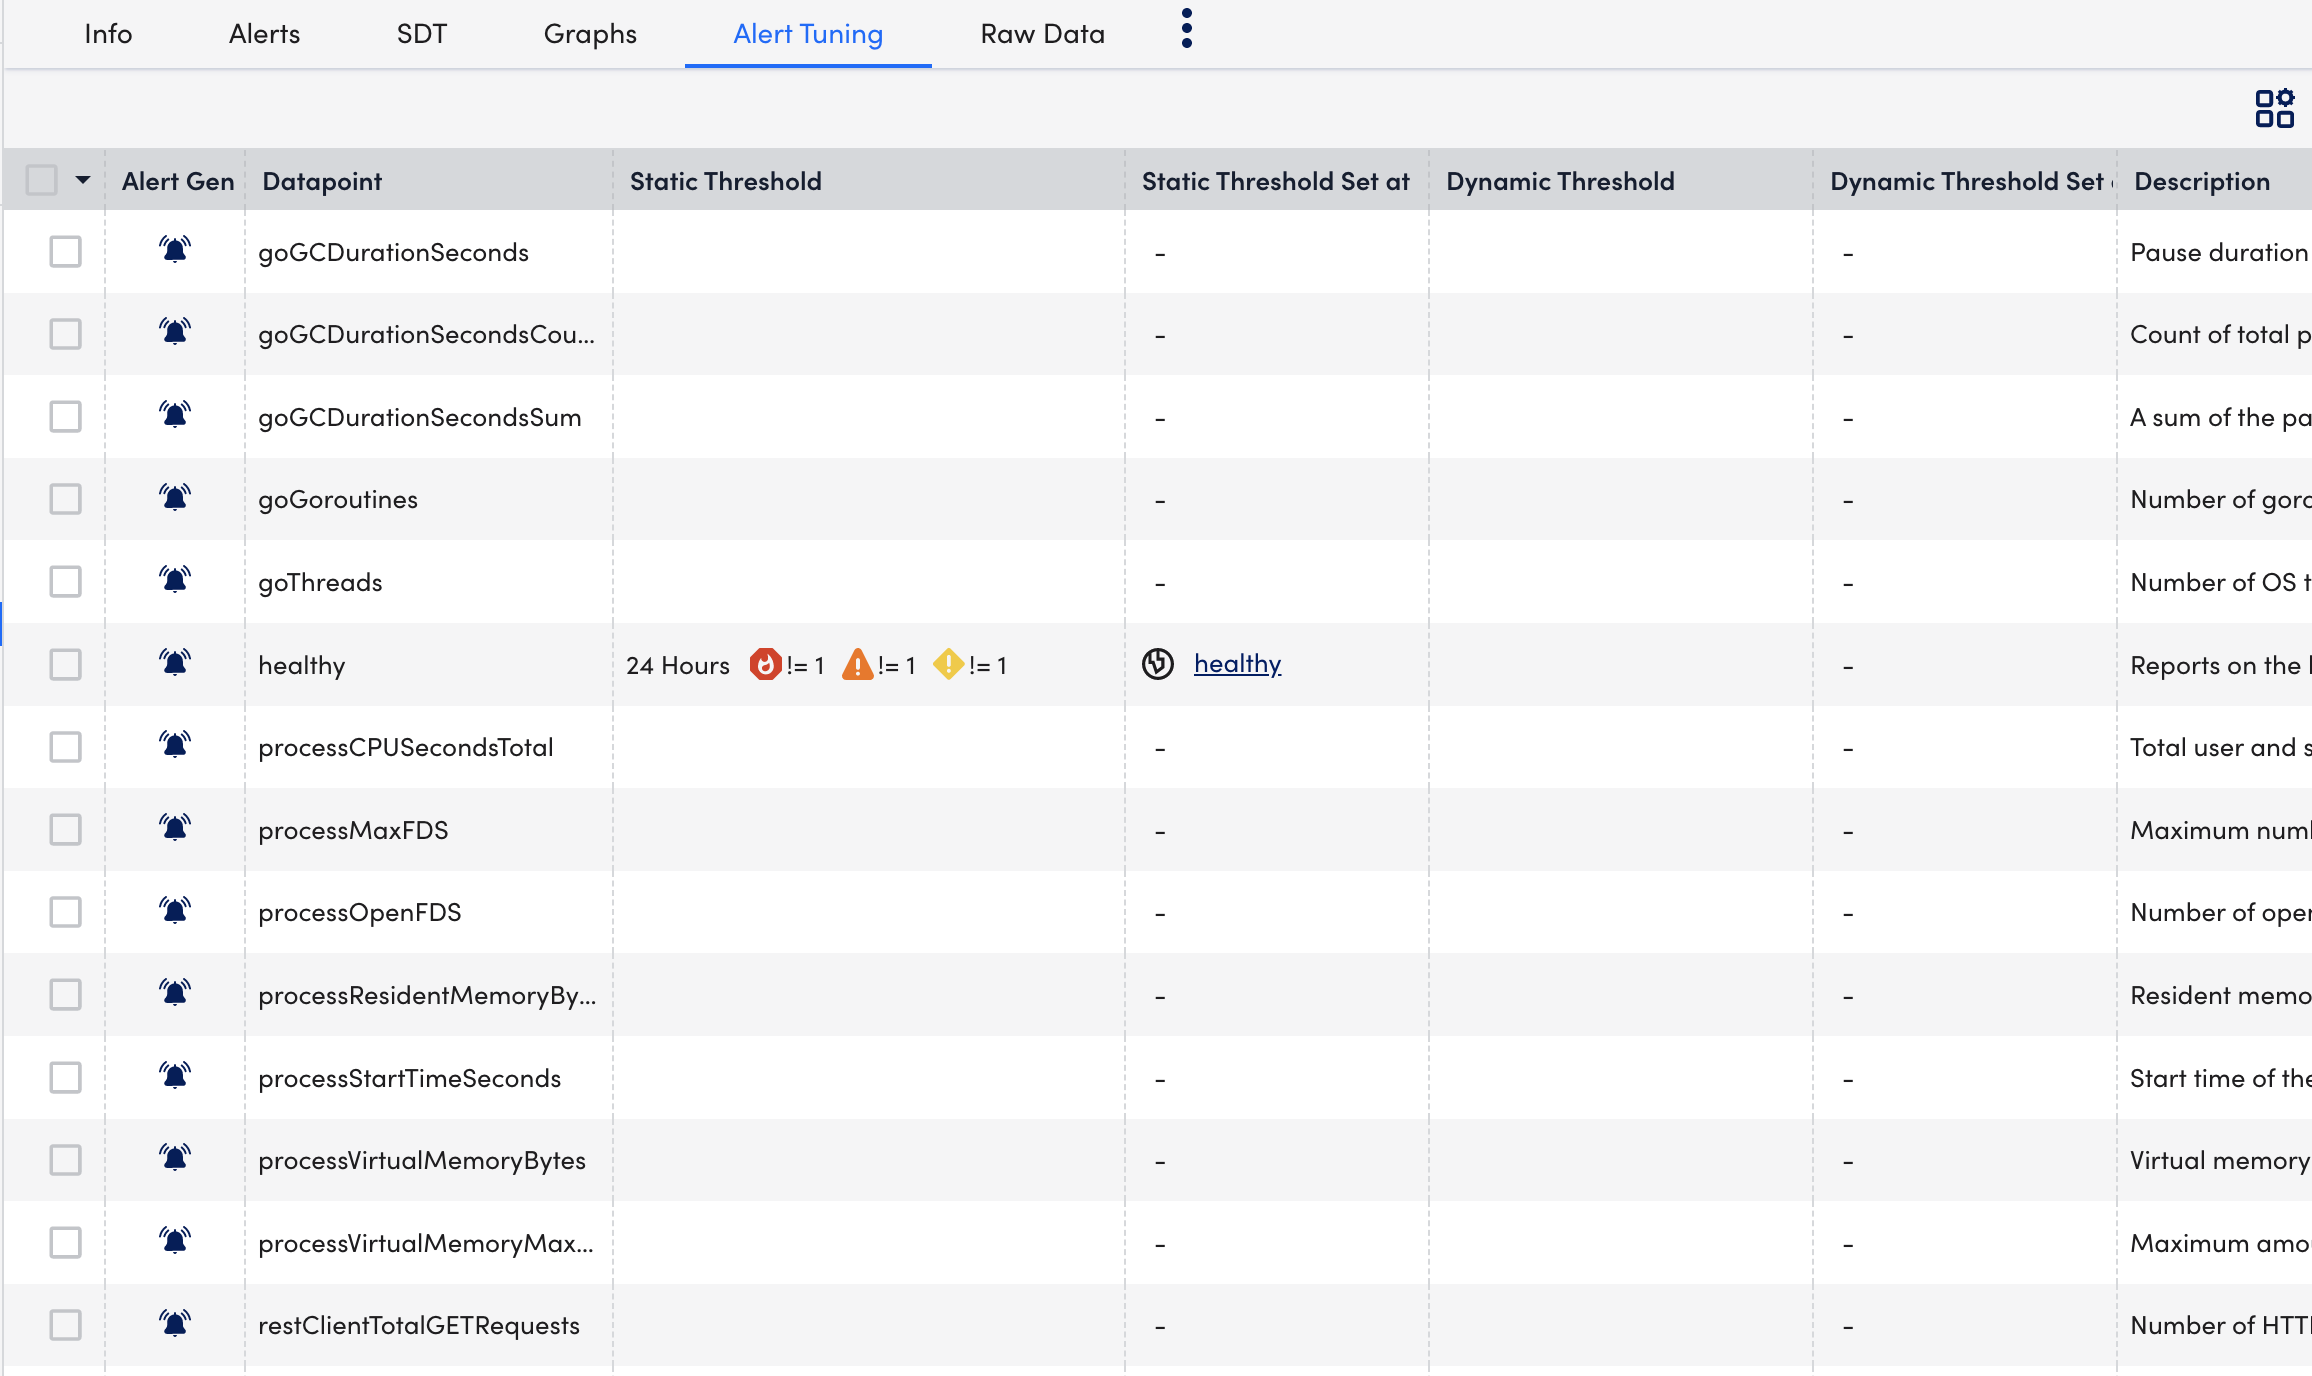
- Select Alert Tuning tab to view the datapoints on which the alerts are generated.
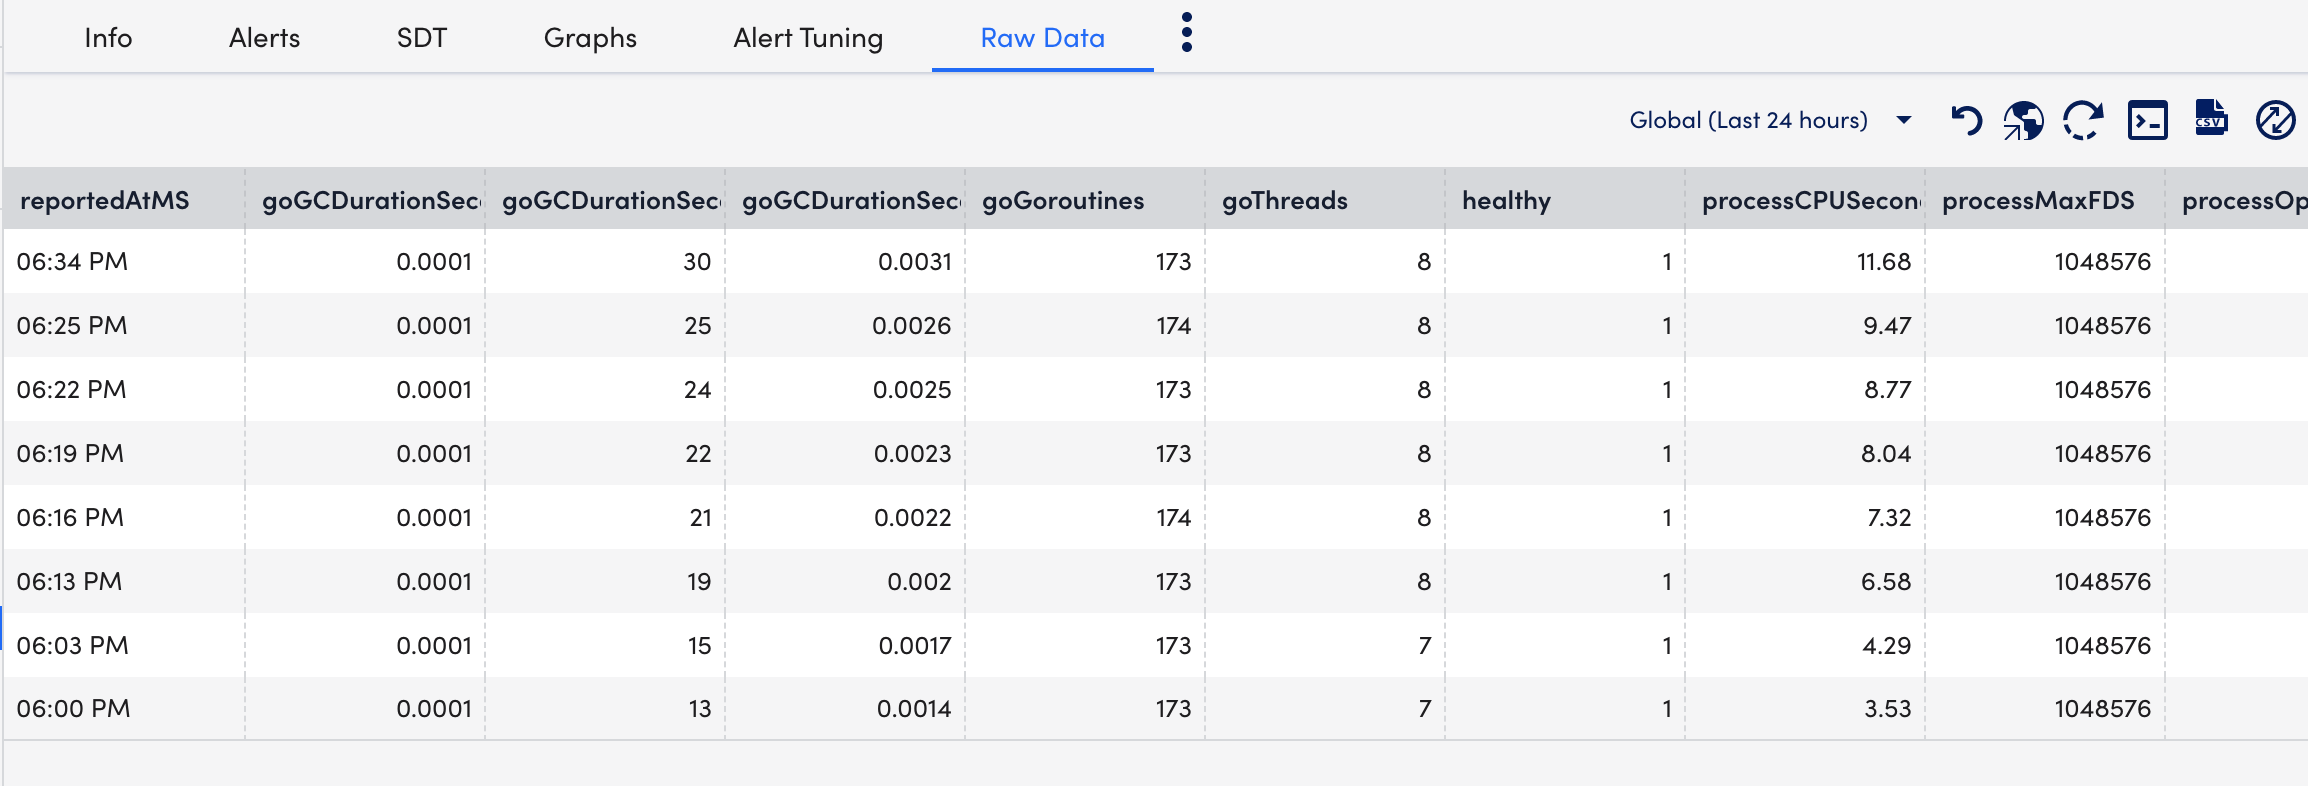
- Select Raw Data tab to view all the data returned for the defined for the instances.
Multiple Operation Updates get Generated for Annotations and Labels
Cause
If an annotation or label updates on a Kubernetes resource frequently (every 1 minute), then multiple operation updates occur despite no considerable changes.
Resolution
Add annotations.ignore and labels.ignore fields with variables (displayed in the following table) under argus.monitoring section to ignore unnecessary updates of annotations or labels using Helm. For more information on syntax, see the Govaluate expressions manual.
| Value | Variable Name | Value Datatype | Comments |
| type | Resource Type | String | The operators “==”, “!=”, “in” work on the type variable. Note: The “in” operator on the type variable doesn’t work when the array has only one element. |
| name | Resource Name | String | Not applicable |
| namespace or ns | Resource Namespace | String | Displays empty for resources that are not namespace scoped. |
| key | Annotations or Label Name | String | Name of the annotations or label based on which section it is used in. |
| value | Annotations or Label Name | String | Name of the annotations or label based on which section it is used in. |
The following is an example of the annotation.ignore and label.ignore fields added in the configuration file:
argus:
  monitoring:
    annotations:
      ignore:
        - 'key == "t1" && type == "pod"'
        - 'key in ("virtual-kubelet.io/last-applied-node-status", "control-plane.alpha.kubernetes.io/leader")'
        - 'key =~ "control-plane."'
        - '"control-plane.alpha.kubernetes.io/leader" =~ "lead"'
        - 'value =~ "renewTime"'
        - 'key =~ "control-plane." && type == "endpoint"'
- 'key == "control-plane.alpha.kubernetes.io/leader" && type == "endpoint" && ns == "kube-system"'argus:
monitoring:
labels:
ignore:
- 'value =~ "renewTime" && type == "endpoint" && ns == "logicmonitor"'
- 'key == "l1" && type == "endpoint" && ns == "logicmonitor"'Important: This applies to LM Container services using Argus v4 or later and Collectorset-Controller v1 or later.
This topic describes how to uninstall LM Container using Argus and Collectorset-Controller.
You may need to uninstall LM Container for the following reasons:
- Start a fresh LM Container installation.
- Upgrade to a newer LM Container Helm Chart. For more information, see Migrating Existing Kubernetes Clusters Using LM Container Helm Chart.
Considerations
- Ensure you are operating in the appropriate context on the machine where you are running Helm and kubectl.
- Take a backup of previous helm chart configurations. For more information, see Migrating Existing Kubernetes Clusters Using LM Container Helm Chart.
- Ensure you have administrator role privileges. For more information, see Roles.
Procedure
- Open the command line interface window.
- In the terminal, run the following Helm command to uninstall the Collectorset-Controller:
helm uninstall collectorset-controller -n <respective namespace> - Run the following Helm command to uninstall Argus:
helm uninstall argus -n <respective namespace> - Delete the Custom Resource Definition (CRD) object by using the following command:
kubectl delete crd collectorsets.logicmonitor.com
Note: The CRD object doesn’t get deleted with the uninstall Helm command. You have to manually delete the CRD.
- Delete the client cache configmaps using the following command:
kubectl delete configmaps -l argus=cache
Important: This applies to LM Container services using LM Container Helm Chart 1.0.0 or later.
This topic describes how to uninstall LM Container using the unified Helm Chart.
You may need to uninstall LM Container to start a fresh LM Container installation.
Considerations
- Ensure you are operating in the appropriate context on the machine where you are running Helm and kubectl.
- Take a backup of previous Helm chart configurations. For more information, see Migrating Existing Kubernetes Clusters Using LM Container Helm Chart.
- Ensure you have administrator role privileges. For more information, see Roles.
Procedure
- Open the command line interface window.
- In the terminal, run the following Helm command to uninstall the existing Argus and Collectorset-Controller from a Kubernetes cluster:
helm uninstall lm-container -n <respective namespace> - Delete the Custom Resource Definition (CRD) object by using the following command:
kubectl delete crd collectorsets.logicmonitor.com
Note:
- The CRD object doesn’t get deleted with the uninstall Helm command. You have to manually delete the CRD.
- ConfigMaps created by argus get deleted automatically through Helm uninstall. Use the following command if it doesn’t get automatically uninstalled from the cluster:
$ export ARGUS_SELECTOR="app.kubernetes.io/name=argus,app.kubernetes.io/instance={{ .Release.Name }}" kubectl delete configmaps -l $ARGUS_SELECTOR,argus.logicmonitor.com/cache==true
By default, Argus deletes resources immediately. If you want to retain resources, you can configure the retention period to delete resources after the set time passes.
You must configure the following parameters in the Argus configuration file:
- Set the DeleteDevices parameter to false.
Note: Argus moves deleted resources to_deleted dynamicdevice group, and the alerts set on the deleted resources are disabled.
To modify the parameter values for an existing installation, see Upgrading the Argus using Helm deployment. - Specify the retention period in ISO-8601 duration format for the deleted devices using the property
kubernetes.resourcedeleteafter= P1DT0H0M0S.
For more information, see ISO-8601 duration format. - By default, the value for the retention period property is set to 1 day, which means the device will be permanently deleted from the LogicMonitor portal after 1 day. You can modify the default property value.
Note: The maximum retention period allowed for all resources is 10 days. If you want to retain resources for more than the set maximum period, you must contact the customer support team to modify the maximum retention period for your account.
- Argus adds the retention period property to the cluster resource group to set the global retention period for all the resources in the cluster. You can modify this property in the child groups within the cluster group to have different retention periods for different resource types. In addition, you can modify property for a particular resource.
Note: Argus configures different retention periods for Argus and Collectorset-Controller Pods for troubleshooting. The retention period for these Pods cannot be modified and is set to 10 days.
Setting the Retention Period Property
To set the retention period for the resources, you must set the following parameters in the argus-configuration.yaml:
device_group_props:
  cluster:
    # To delete resources from the portal after a specified time
    - name: "kubernetes.resourcedeleteafterduration"
      value: "P1DT0H0M0S" // adjust this value according to your need to set the global retention period for resources of the cluster
override: falseBy default, Argus deletes resources immediately. If you want to retain resources, you can configure the retention period to delete resources after the set time passes.
You must configure the following parameters in the Argus configuration file:
- Set the DeleteDevices parameter to false.
Note: Argus moves deleted resources to_deleted dynamicdevice group, and the alerts set on the deleted resources are disabled.
To modify the parameter values for an existing installation, see Upgrading the Argus using Helm deployment. - Specify the retention period in ISO-8601 duration format for the deleted devices using the property
kubernetes.resourcedeleteafter= P1DT0H0M0S.
For more information, see ISO-8601 duration format. - By default, the value for the retention period property is set to 1 day, which means the device will be permanently deleted from the LogicMonitor portal after 1 day. You can modify the default property value.
Note: The maximum retention period allowed for all resources is 10 days. If you want to retain resources for more than the set maximum period, you must contact the customer support team to modify the maximum retention period for your account.
- Argus adds the retention period property to the cluster resource group to set the global retention period for all the resources in the cluster. You can modify this property in the child groups within the cluster group to have different retention periods for different resource types. In addition, you can modify property for a particular resource.
Note: Argus configures different retention periods for Argus and Collectorset-Controller Pods for troubleshooting. The retention period for these Pods cannot be modified and is set to 10 days.
Setting the Retention Period Property
To set the retention period for the resources, you must set the following parameters in the argus-configuration.yaml:
device_group_props:
  cluster:
    # To delete resources from the portal after a specified time
    - name: "kubernetes.resourcedeleteafterduration"
      value: "P1DT0H0M0S" // adjust this value according to your need to set the global retention period for resources of the cluster
override: falseDisclaimer: Argus and Collectorset-Controller Helm Charts are being phased out. For more information to switching to the new LM Container Helm Chart for a simpler install and upgrade experiencere, see Migrating Existing Kubernetes Clusters Using LM Container Helm Chart.
kube-state-metrics (KSM) monitors and generates metrics about the state of the Kubernetes objects. KSM monitors the health of various Kubernetes objects such as Deployments, Nodes, and Pods. For more information, see kube-state-metrics (KSM) documentation.
You can now use the kube-state-metrics-based modules available in LM Exchange in conjunction with the new Argus and Collector Helm charts to gain better visibility of your Kubernetes cluster. The charts automatically install and configure KSM on your cluster and monitor the following resources:
- Daemonsets
- Replicasets
- Statefulsets
- PersistentVolumes
Note: By default, KSM is installed while installing Argus. Also, the newly added resources are monitored using KSM. For more information, see Installing KSM.
Enabling KSM Monitoring
To configure KSM, you must set the kube-state-metrics.enabled property to true in the Argus configuration file. In case the kube-state-metrics.enabled property is set to false, only active discovery for resources will work and the newly added resources will not be monitored.
For a detailed list of customizable properties, see kube-state-metrics Helm Chart.
Sample:
You must configure the following KSM properties in the values.yaml file:
# Kube state metrics configuration
# For further customizing KSM configuration, see kube-state-metrics Helm Chart.
kube-state-metrics:
 # Set enabled to false in case you want to use a custom configured KSM
 enabled: true
 # No. of KSM Replicas to be configured
 replicas: 1
 collectors:
 - daemonsets
 - replicasets
 - statefulsets
- persistentvolumesNote: By default, the collectors are enabled to monitor the new resources using KSM. You can also customize the KSM Helm Chart. For more information, see kube-state-metrics Helm Chart.
Installing KSM
If the kube-state-metrics.enabled property is enabled, KSM is automatically installed. In addition, you can configure KSM while installing Argus or while upgrading Argus.
Note: If you don’t want to install KSM while installing Argus, you can manually install KSM using CLI. For more information, see Installing KSM using CLI.
Installing Argus with KSM Monitoring
To configure KSM while installing Argus for the first time, complete the following steps.
Requirements
- Import PropertySources and DataSources to monitor the resources.
- Ensure that Openmetrics is enabled to monitor or support the new resources.
1. Navigate to Exchange > Public Repository and import the following PropertySource and DataSources from LM :
PropertySourceaddCategory_KubernetesKSM:
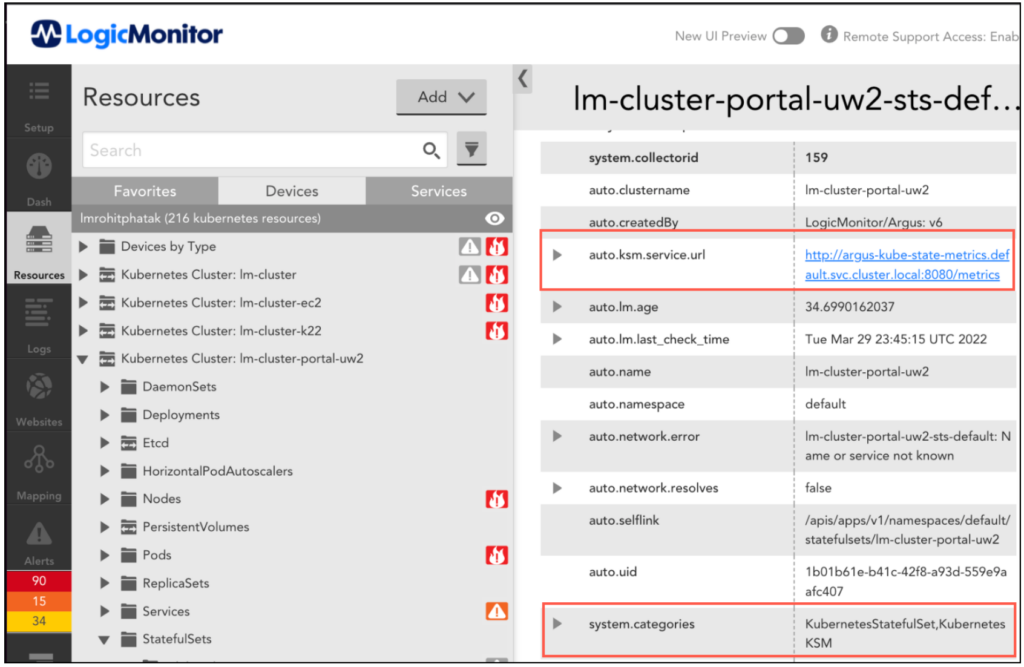
PropertySources checks if the kube-state-metrics service is configured on a cluster (through Argus or CLI) and sets the following properties on each Kubernetes resource:
KubernetesKSM– category to check if the resources can be monitored through kube-state-metrics.auto.ksm.service.url– kube-state-metrics service URL to get the metrics data. OpenMetrics DataSources uses the metrics data for monitoring Kubernetes resources.
DataSource
DataSources collects metrics from KSM in OpenMetrics format. These DataSources utilize metrics for representing data in graphs and for generating alerts. The following DataSources provide metrics for Daemonsets, Replicasets, Statefulsets, and Persistent Volumes PV respectively:
Kubernetes_KSM_DaemonsetsKubernetes_KSM_StatefulsetsKubernetes_KSM_ReplicasetsKubernetes_KSM_PersistentVolumes
In addition, these DataSources use the OpenMetrics server URL that is configured using addCategory_KubernetesKSM PropertySource.
2. Install Argus. For more information, see Argus Installation.
Upgrading Argus to Enable KSM Monitoring
To upgrade the existing cluster to the latest version of Argus to monitor new resources with KSM, complete the following steps.
Requirements
You must ensure that Openmetrics is enabled to monitor or support the new resources.
Note: To enable Openmetrics, contact your Customer Success Manager (CSM).
1. Navigate to Exchange > Public Repository and import the following PropertySource and DataSources from LM :
PropertySourceaddCategory_KubernetesKSM
DataSource
Kubernetes_KSM_DaemonsetsKubernetes_KSM_StatefulsetsKubernetes_KSM_ReplicasetsKubernetes_KSM_PersistentVolumes
2. Add the following KSM configuration properties into Argus values.yaml:
For example:
kube-state-metrics:
 # Set enabled to false in case you want to use a custom configured KSM
 enabled: true
 # No. of KSM Replicas to be configured
 replicas: 1
 collectors:
 - daemonsets
 - replicasets
 - statefulsets
- persistentvolumesFor more information, see kube-state-metrics Helm Chart.
3. Run the following command to upgrade Helm:helm repo update
4. Run the following command to upgrade Argus:helm upgrade --reuse-values -f argus-config.yaml argus logicmonitor/argus
5. Restart Argus Pod.
Note: You can also use CLI to install kube-state-metrics. For more information, see Installing KSM using CLI.
Installing KSM using CLI
Note: KSM is automatically installed when enabled in Argus charts. However, if you want to install KSM manually, run the following command to install kube-state-metrics using command-line arguments:
kube-state-metrics --telemetry-port=8081 --kubeconfig=<KUBE-CONFIG> --apiserver=<APISERVER> …Or configured in the args section of your deployment configuration in a Kubernetes or Openshift context:
spec:
  template:
    spec:
      containers:
        - args:
          - '--telemetry-port=8081'
          - '--kubeconfig=<KUBE-CONFIG>'
          - '--apiserver=<APISERVER>'
