Disclaimer: This content is no longer being maintained and will be removed at a future time. For more information on the recommended way to ingest logs, see Script Logs LogSource Configuration .
Overview
You can use the Script EventSource collection method to detect and alert on any event. This may be useful if you have custom logging that can’t be monitored with the other EventSource collection methods (log files, windows event logs, SysLogs, and SNMP traps).
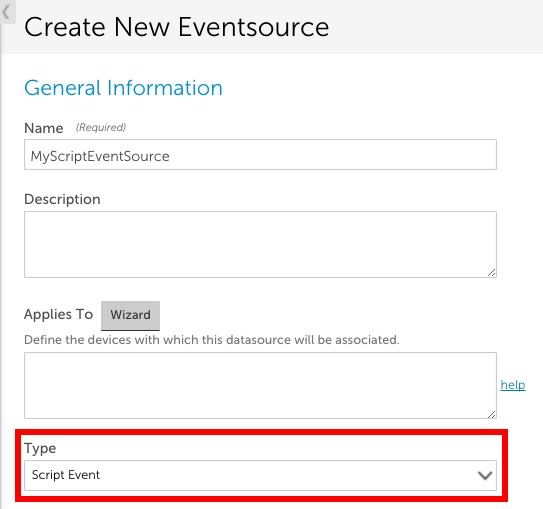
To create an EventSource using this collection method, set the EventSource Type field to ‘Script Event’ and either upload an external script or enter an embedded Groovy script.
Note: A maximum of 50 events can be discovered per script execution and a maximum of 100 events can be discovered per collector per minute.
Script Output Format
Regardless of whether it is an embedded or external script, the output needs to be a JSON object with an array of one or more events, like this:
The following fields can be used to describe an event in the script output:
NOTES:
- If your data structure is not JSON, you can use groovy JSON tools (e.g. JSONBuilder) to convert it. If you do use these tools, make sure to include this import statement in your script: import groovy.json.*
- Severity levels (warn | error | critical) are not case sensitive.
- You can add multiple custom attributes per event. These will simply need to be separated by a comma and newline. In the script output example below, we included customAttributes buffer.size and thread.number:
{
  "events": [
    {
      "severity": "warn",
      "happenedOn": "Thu Jun 01 09:50:41 2017",
      "buffer.size": "500m",
      "thread.number": 20,
      "message": "this is the first message",
      "Source": "no ival"
    },
    {
      "severity": "warn",
      "effectiveInterval": 0,
      "happenedOn": "Thu Jun 01 09:50:41 2017",
      "buffer.size": "500m",
      "thread.number": 20,
      "message": "this is the second message"
    }
  ]
}
happenedOn
LogicMonitor supports the following logfile date/times formats:
Example
If the script output is:
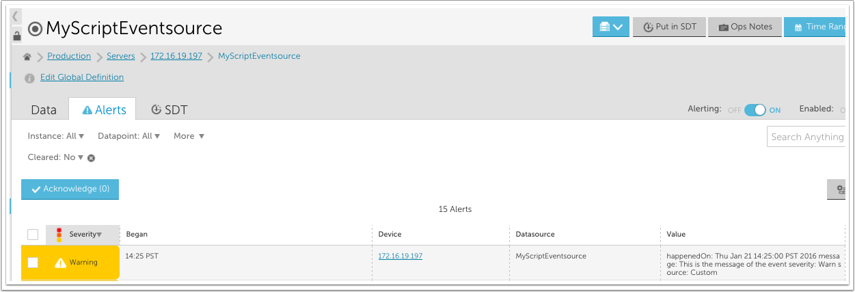
The following alert will be triggered for the associated device:
Disclaimer: This content is no longer being maintained and will be removed at a future time. For more information on the recommended way to ingest logs, see Syslog LogSource Configuration.
Using the Syslog EventSource, LogicMonitor can monitor syslog messages pushed to the Collector for alerting purposes only. The Syslog EventSource is not intended as a syslog viewing or searching tool. For Syslog viewing and searching, you can use LM Logs. See Collecting and Forwarding Syslog Logs.
Setting Up Syslog Monitoring
To set up your system for syslog monitoring, complete the following steps:
- Configure the syslog Collector
- Configure the syslog message source
- Create the syslog EventSource
Step 1: Configure the Syslog Collector
By default, the Collector listens on port UDP/514 to receive the incoming syslog messages. If you would like the Collector to listen on a different port, you can edit the eventcollector.syslog.udp.port property found in the Collector’s agent.conf file. (For instructions on editing a Collector’s configurations, see Editing the Collector Config Files.)
Step 2: Configure the Syslog Message Source
There are two typical configuration scenarios:
- Configuring the syslog daemon. Configure the syslog daemon running on the monitored device to forward syslog messages to the Collector.
- Configuring the central syslog server. If you have a central syslog server, configure it to forward syslog messages to the Collector. Under normal circumstances, the Collector will parse the syslog message for a hostname and assign the event to the monitored resource; if that resource property cannot be found within the message, it will associate the event with the centralized log server instead (assuming it has been added into LogicMonitor.)
The following example configures a UNIX syslog daemon to forward all syslog messages with the severity err to the device 172.16.0.12 on which the Collector is running.
*.err @172.16.0.12
Please refer to your syslog server/daemon manual for information on how to configure message forwarding.
Step 3: Create the Syslog EventSource
You can create a new EventSource by selecting Settings | LogicModules | EventSources | Add | EventSource. As shown next, be sure to set the Type field to “SysLog.” This will ensure you see the appropriate filter options.
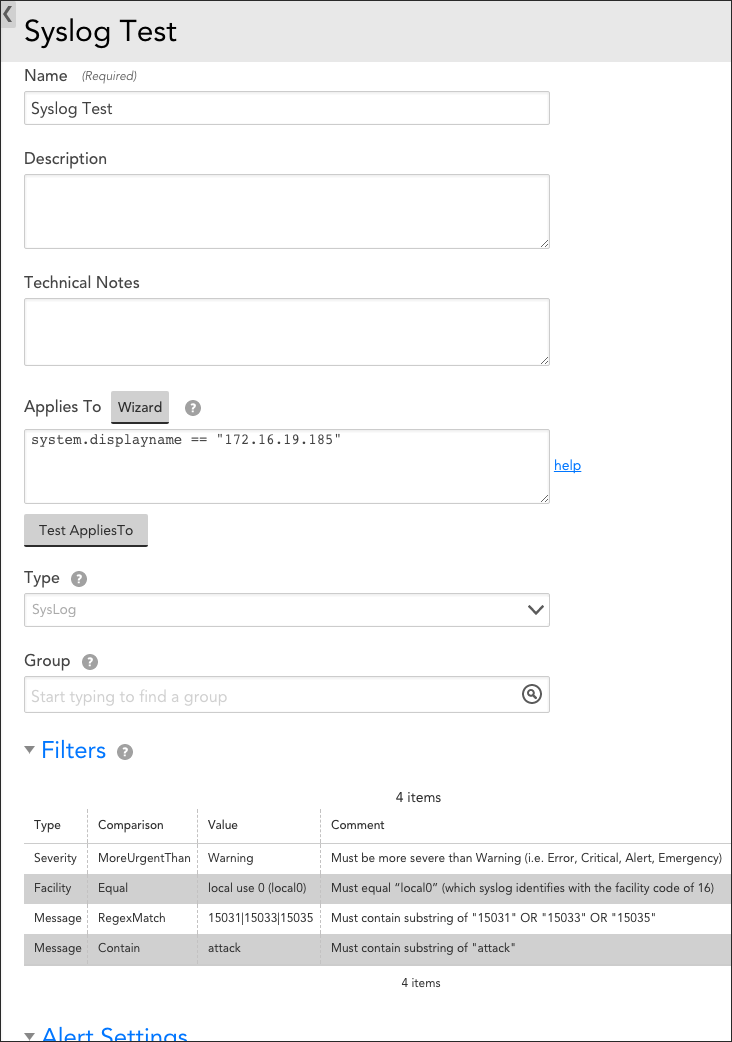
The figure above creates a syslog EventSource titled “Syslog Test” that applies to device 172.16.19.185. Only syslog messages that satisfy ALL four of the configured filters will be stored in the LogicMonitor database and trigger alerts:
- Severity | MoreUrgentThan | Warning. The first filter listed is a Severity filter type. It requires the severity of the message to be more severe than Warning (i.e. Error, Critical, Alert, or Emergency). Note that syslog assigns numerical values to severity levels, with lower values indicating higher urgencies.
- Facility | Equal | local use 0 (local0). The second filter listed is a Facility filter type. It requires the facility of accepted messages to equal “local0” (which syslog identifies with the facility code of 16).
- Message | RegexMatch | 15031|15033|15035. The third filter listed is a Message filter type. It requires the syslog message to contain the substring of either “15031,” “15033,” or “15035.” The RegexMatch comparison operator can be effectively used to build an OR statement that returns TRUE if one or more of the substring values is present.
- Message | Contain | attack. The fourth filter listed is also a Message filter type. It requires the syslog message to contain the substring “attack.” Note that the Contain comparison operator is case-insensitive.
Note: If alerting is disabled for a syslog EventSource (or is disabled at a higher level such as a device or group) no syslog events will be displayed.
Mapping Between Syslog and LogicMonitor Alert Severities
High Availability Syslog Alerting
Syslog monitoring alerts can use LogicMonitor’s backup Collectors for high availability alerting of syslog events. In order to do this, configure your devices to send syslog messages to both the primary and backup Collectors. LogicMonitor Collectors only alert on syslog messages from devices they are currently monitoring. Therefore, the backup Collector will ignore all syslog messages while it is not monitoring the syslog device, but will commence alerting on them in the event of a Collector failover.
Disclaimer: This content is no longer being maintained and will be removed at a future time. For more information on the recommended way to ingest logs, see SNMP Traps LogSource Configuration.
Overview
SNMP traps involve the monitored device sending a message to a monitoring station (the LogicMonitor Collector in our case) to notify of an event that needs attention. Through the creation of an EventSource, LogicMonitor can alert on SNMP traps received by the Collector.
Preferred Alternatives to SNMP Trap Monitoring
LogicMonitor generally recommends SNMP polling (where LogicMonitor queries the device for its status) as opposed to monitoring SNMP traps, for the following reasons:
- An SNMP trap is a single packet sent without any deliverability guarantees, to tell you something is going wrong. Unfortunately, it is sent when something is going wrong—exactly the time a single packet is least likely to be delivered.
- Setting up SNMP traps requires configuring your device to send the traps to the correct destination—on every device.
- There is no way to ensure traps are configured correctly to be sent by the device (not blocked by the network or a firewall), and received by the Collector, except sending a trap. So months later, when you need to receive a trap, and things have changed, you may not receive it.
- Traps give no context: did a temperature trap get sent because temperature just recently spiked, or has it been climbing for months?
However, if there is a particular trap that you would like to capture and alert on, perform the various configurations outlined in this support article.
Configuring Your Device to Send SNMP Traps to the Collector Machine
LogicMonitor can alert on SNMP traps received by the Collector. Please follow these general steps to configure your device to send its SNMP traps to the Collector machine:
- Check your device’s SNMP configuration and ensure that this device’s Collector machine is configured as the SNMP “trap destination” for the device to dispatch its SNMP trap messages out to.
If you run a backup Collector, configure both Collectors as trap destinations. Only the Collector that is currently active for the device will report the trap.
- Ensure that UDP port 162 is open between this device and the Collector machine and that no other applications are listening on this port on your Collector machine.
If you run a backup Collector, please make sure that UDP port 162 is open between your device and secondary Collector machine as well.
If necessary, the default listening SNMP trap port that the Collector uses can be changed. Please contact support for assistance.
Configuring an SNMP Trap EventSource
To add a new SNMP Trap Eventsource, navigate to Settings | LogicModules | EventSource | New | EventSource. There are three categories of settings that must be established in order to configure a new SNMP Trap EventSource:
- General Information
- Collector Attributes
- Alert Settings
The settings in these three categories collectively determine the type of EventSource, which devices the EventSource will be applied to, and the conditions that must exist in order for the EventSource to trigger an alert.
General Information
In the General Information area of an EventSource’s configurations, complete the basic settings for your new EventSource. These settings are global across all types of EventSources; see Creating EventSources for more information on these basic settings.
Filters
In the Filters area of an EventSource’s configurations, you can specify a set of filters that will allow you to inclusively filter and select for particular SNMP traps to alert on. All filters defined here are assessed, and any traps that fail any of the filters are excluded from capture and alerting.
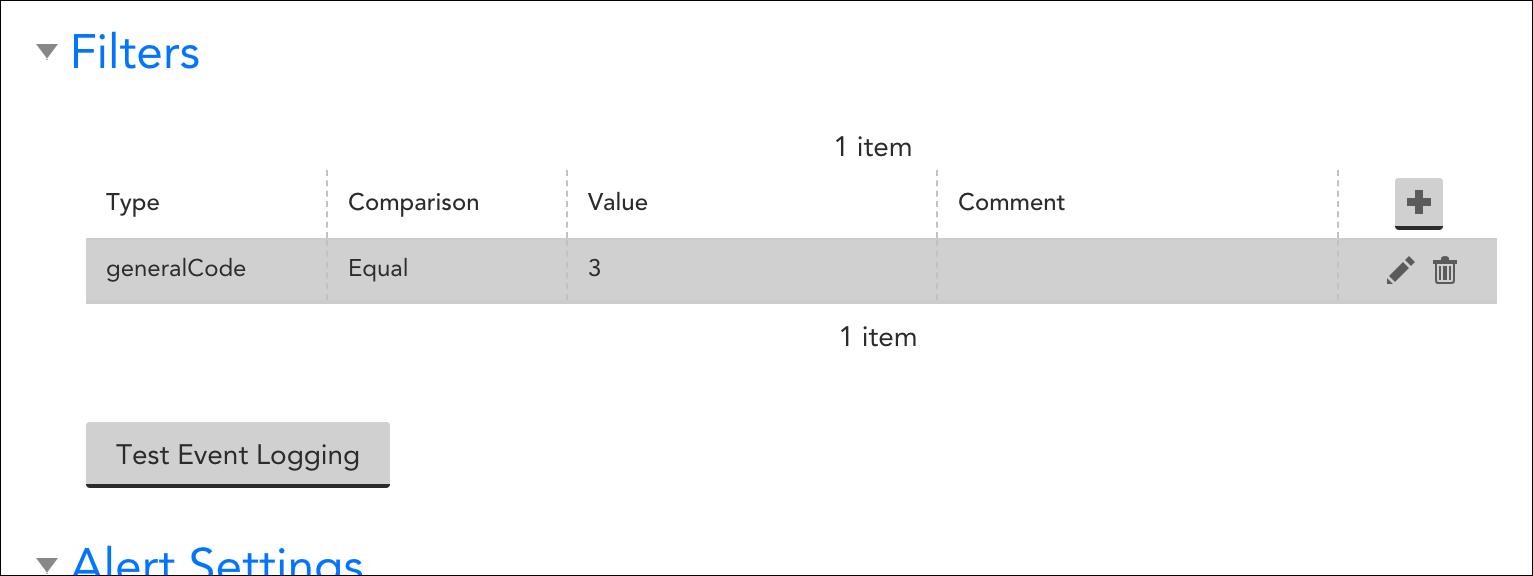
The following objects included in most standard SNMPv1 trap messages can be referenced as the Type for your trap filters:
- generalCode
- specificCode
- enterpriseOid
- sysUpTime
- trapVariableBindingCount
- Message*
For SNMPv2 and v3, LogicMonitor supports the following trap filters:
- sysUpTime
- TrapOID
- trapVariableBindingCount
- Message*
* “Message,” when selected as the filter from the Type field, allows users to filter message strings using the RegexMatch and RegexNotMatch operators.
Alert Settings
In the Alert Settings area of an SNMP Trap’s EventSource configurations, use the Severity field’s dropdown to indicate the severity level that will be assigned to the alerts that are triggered by this EventSource.
The other alert settings found in this area are global settings that must be configured across all types of EventSources; see Creating EventSources for more information on configuring these.
Configuring a Collector for SNMPv3 Traps
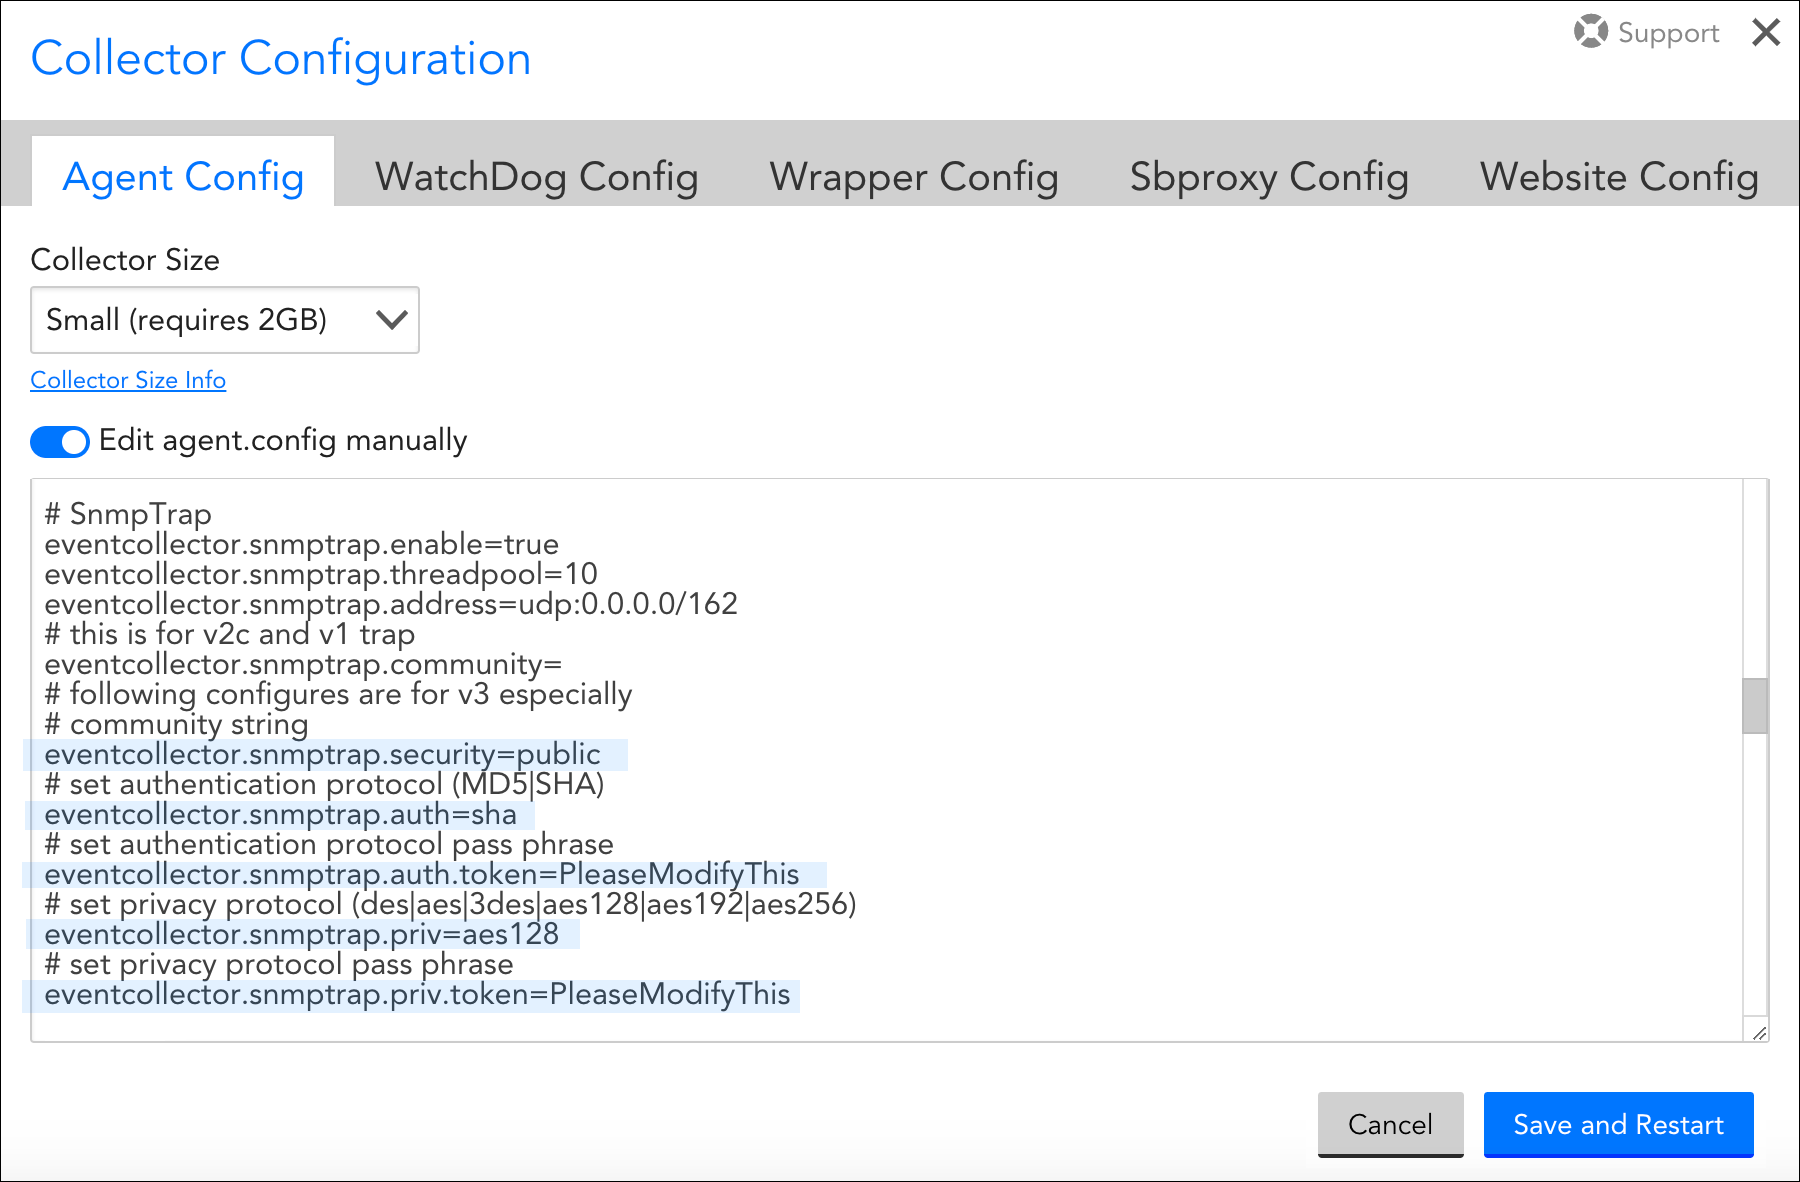
In order for a Collector to decrypt SNMPv3 traps, you must manually enter additional credentials into into the Collector’s agent.conf file, which, as discussed in Editing the Collector Config Files, is accessible from the LogicMonitor interface. This must be done for every Collector that will receive v3 traps, including backup Collectors.
The following parameters must be edited in the agent.conf file to match those of the device sending v3 traps:
eventcollector.snmptrap.security
eventcollector.snmptrap.auth
eventcollector.snmptrap.auth.token
eventcollector.snmptrap.priv
eventcollector.snmptrap.priv.token
For more information on these SNMPv3 credentials, see Defining Authentication Credentials.
SNMP Traps and SNMP Polling Credentials
Usually, a single set of credentials (for example, snmp.community, snmp.security, and so on) is applied on a device’s host property to receive SNMP traps (v1, v2c, and v3) and to collect data for SNMP DataSources that is SNMP polling. However, some devices may need different SNMP configuration where separate credentials are used for SNMP traps and SNMP polling. In such cases, you can use the following:
- SNMP Polling – The set of credentials/host properties for data collection are as follows:
snmp.community,snmp.security,snmp.auth,snmp.authToken,snmp.priv, andsnmp.privToken. - SNMP Traps – The set of credentials/host properties to receive SNMP trap requests are as follows:
snmptrap.community,snmptrap.security,snmptrap.auth,snmptrap.authToken,snmptrap.priv, andsnmptrap.privToken.snmp.*) in the host properties to decrypt traps. This also ensures backward compatibility.
To decrypt the SNMP traps request, the credentials are used in the following order:
- Collector first checks for the set of credential
snmptrap.* in the host properties. - If the
snmptrap.* credentials are not defined, it looks for the set ofsnmp.*in the host properties. - If sets for both
snmptrap.* andsnmp.* properties are not defined, it looks for the seteventcollector.snmptrap.* present in theagent.confsetting.
Disclaimer: This content is no longer being maintained and will be removed at a future time. For more information on the recommended way to ingest logs, see Windows Event Logs Ingestion Overview.
Overview
LogicMonitor can detect and alert on events recorded in most Windows Event logs. An EventSource must be defined to match the characteristics of an event in order to trigger an alert. When a collector detects an event that matches an EventSource, the event will trigger an alert and escalate according to the alert rules defined.
Note: LogicMonitor does not currently support the monitoring of any logs located under the “Application and Services Logs” folder in the Windows Event Viewer snap-in console, as these logs aren’t natively exposed to WMI. If you would like to monitor your Application and Services Logs in LogicMonitor, you can use Microsoft Subscriptions to ‘copy’ logs from your Application and Services folder to another log folder (e.g. “Application” logs). For instructions on how to correctly set up both Microsoft Subscriptions and your EventSource to accomplish this, see the Filter Required When Using Subscriptions to Copy Events to Another Destination section of this support article.
Creating a Windows Event Log EventSource
You can define a new Windows Event Log EventSource from Settings | LogicModules | Eventsource | New | Eventsource.
Note: The size configured for the Windows Event Log can impact device’s memory usage when executing a WMI query. In some cases, it can cause an increase in memory consumption. You can observe similar behaviour after enabling Windows Event Log EventSource on a device.
To begin, set the Type field to “Windows Event Logging”.
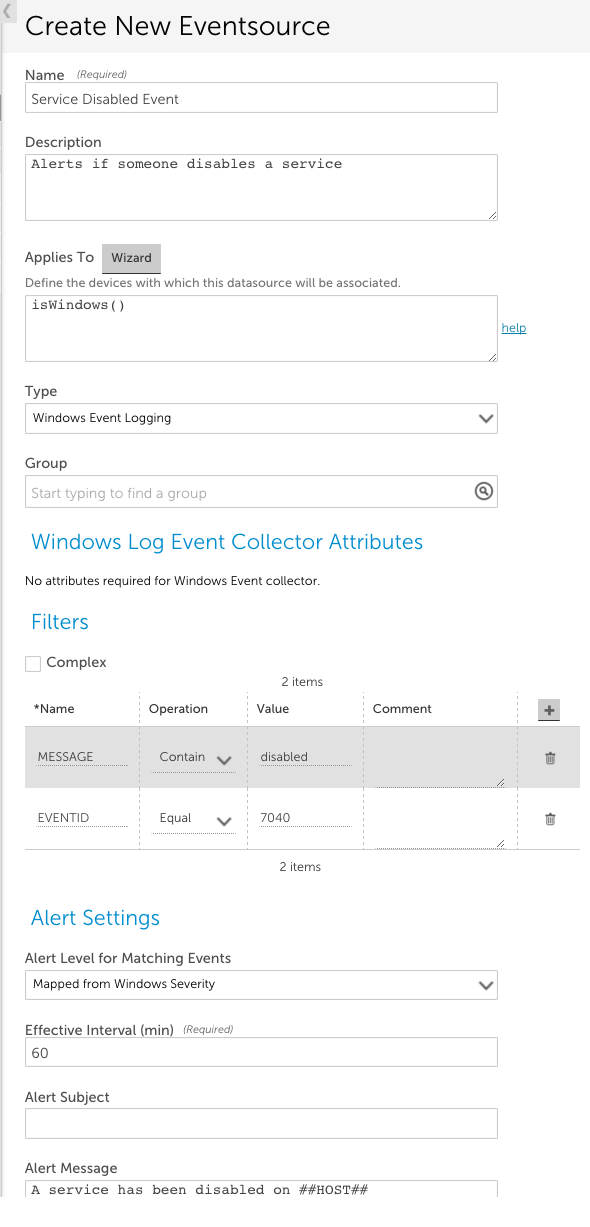
Other fields that must be configured include:
- Applies To. This field accepts LogicMonitor’s AppliesTo scripting as input to determine which resources will be associated with this EventSource. In the example above, “isWindows()” indicates the EventSource will be associated with any Windows devices. For detailed information on using this field (including its wizard and test functionality), along with an overview of the AppliesTo scripting syntax, see AppliesTo Scripting Overview.
- Group. (Optional) This field allows you to group several EventSources in a folder.
- Filters. This area of the configuration dialog sets characteristics that events must have in order to trigger an alert. You can filter based on the alert event ID, level, log name, message, and source name. An event must satisfy every line in the Filters section. In the example above, the Event ID must equal 7040 AND the string ‘disabled’ must be in the event message.
- Alert Settings. This area of the configuration dialog defines the characteristics of the alert that is triggered when an event is detected that matches the filter criteria for this EventSource. The settings available for configuration here are largely identical across all EventSource types and discussed in Creating EventSources. However, there are two alert settings unique to Windows Event Logs:
- Alert Level for Matching Events. By default, LogicMonitor maps Windows severity levels to LogicMonitor severity levels (e.g. error to error, critical to critical). You can use this field to override this default mapping so that LogicMonitor alerts triggered for particular Windows Event Log EventSources are assigned a static alert severity.
Note: LogicMonitor’s pre-built Windows Event Log EventSources have filters that restrict alerting to error and critical level events.
- Suppress duplicate Events. Sometimes the system may create events with the same EventId for a given host. If you have two EventSources with the same Event ID filter applied to filter out events, and if you do not select the Suppress duplicate Events option, then you will get two alerts and they will not be suppressed. You will get one alert in each EventSource. To prevent this from happening, you can select Suppress duplicate Events. By default, this option is selected. This suppresses duplicate Windows Event Log events that have the same event ID for the duration of the interval set in the Clear After field. As a result, LogicMonitor captures a single event per host and generates an alert.
If this option is not selected, duplicate events are not suppressed. As a result, though a single event is captured per EventSource, multiple duplicate events are captured and multiple alerts are generated. Events captured by a single EventSource are suppressed within the specified interval.
Note: If all the duplicate events are mapped to a single EventSource, a single alert is generated.
To capture duplicate events, you have to create different EventSources with specific filters.
The ability to override duplicate EventID suppression requires Collector version 29.104 or later.
Example 1
Scenario: One EventSource is applied to a device. The filter is: EVENTID – 725
LogicMonitor gets two events with EventId 725 but with different messages.
In this scenario, both the events are mapped to this EventSource.
If the Suppress duplicate Events option is selected, a single alert is generated and the other event is suppressed.
If the Suppress duplicate Events option is not selected, a single event is captured and the other event is suppressed. The reason being, there can be only one alert per EventSource.
Example 2
Scenario: Two EventSources are applied to a device.
For EventSource 1, the filter is – EVENTID – 725 and MESSAGE – Message 1
For EventSource 2, the filter is – EVENTID – 725 and MESSAGE – Message 2
LogicMonitor gets two events for the EVENTID 725. Each event has its own message in the filter.
In this scenario, one event is mapped with EventSource 1 and the other event with EventSource 2.
If the Suppress duplicate Events option is selected, a single alert is generated and the other event is suppressed.
If the Suppress duplicate Events option is not selected in both EventSources, two alerts (one alert for each EventSource) are generated.
- Alert Level for Matching Events. By default, LogicMonitor maps Windows severity levels to LogicMonitor severity levels (e.g. error to error, critical to critical). You can use this field to override this default mapping so that LogicMonitor alerts triggered for particular Windows Event Log EventSources are assigned a static alert severity.
Event Filtering
To match multiple event IDs, you can use the In comparison operation, and list the event IDs separated by the pipe “|” character – spaces are ignored.
Notes:
- Each line in the Filters section is combined using a logical AND with the other lines, so adding more lines makes the filter more restrictive.
- Windows Event Log uses the same event level for both error and critical events reported through WMI. Ensure that you take this into account when choosing the alert level for routing. Selecting anything over warning will catch both error and critical events. Critical events route the same as error events and are also designated as error-level alerts in the LogicMonitor console.
- Regexmatch should not be used – use the In operator instead.
- RegexNotMatch does not support regular expressions – it only supports a bar separated list of eventIDs to exclude.
- By default, LogicMonitor excludes all events of level Informational. Thus if you specified a filter of Logname equals System, with no other filters, you would see all events except those of informational level. In order to raise alerts on Informational level events, you must specify the event explicitly by ID using the EQUAL or IN operator.
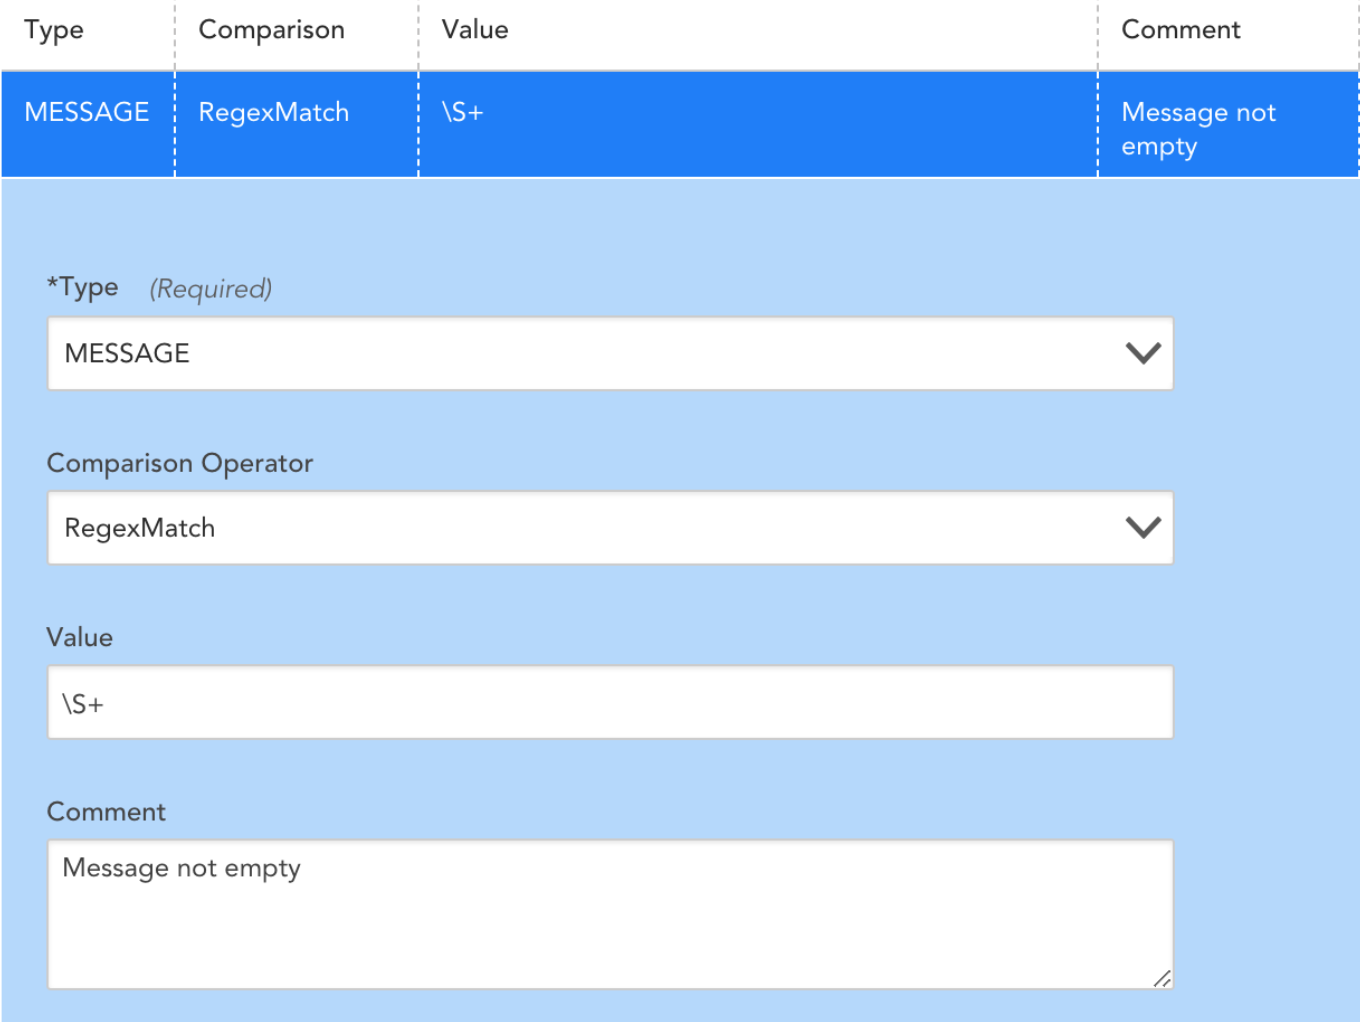
- In some cases, a resource’s Windows Event Log will generate an event without populating the INSERTIONSTRINGS attribute of the message. This may result in LogicMonitor capturing an event with a matching EventID and generating an alert, passing along the null value read from the host side. You can add a filter into the EventSource to discard messages that the resource generates incorrectly:
You can use the ##FILTEREDEVENTS## token to filter event Ids based on the value of the FILTEREDEVENTS property set at the device, device group, or global level. Consider the following EventSource filters:

The first three lines in the Filters section above will find all events in the System Event log with a severity greater than warning, excluding events with EventIDs 1111 or 10009 . The fourth line (boxed in red) will then exclude events where the EventID matches the IDs contained in the ##FILTEREDEVENTS## property.
- You can set the FILTEREDEVENTS property to exclude events. This property can be set on the global, group, or device level for granular control.
- Initially, when the FILTEREDEVENTS property has not yet been set on any device or device group, it is an empty string, and so does not match (or exclude) any events.
Example
For example, you want to exclude event ID 123 from triggering an alert on all windows devices. To do this, set the property FILTEREDEVENTS to 123 on the top level of the device tree. This setting will be inherited by all lower nodes.
For one group of servers, you want to exclude event IDs 123 as well as 456 and 789 triggering alerts. In this case, you can set the filteredevents property to the expression 123|456|789 on the group level. This will override the inherited property that has been set on the root level group just for that group and lower nodes.
For a specific server within this group, you might be interested in alerting on all events including 123, but not 456 or 789. You can set the FILTEREDEVENTS property again on this specific server to 456|789 to override the inherited property from all levels above.
If you want to filter on a composition of both the filtered events set on the upper group + the lower group, define an additional ##FILTEREDEVENTS1##, ##FILTEREDEVENTS2##, etc. token variable in the EventSource definition, and then define these separately at different levels of your device group tree structure. Make one token for each device group level in your device group tree structure that you would like to cumulatively match.
The standard filters described above are all combined with an AND clause – i.e. an event must meet the criteria specified in each and every filter in order to be alerted on. This is sufficient for most cases – but not for cases where more specificity is required (e.g. ignore eventID 123 if it is from IIS, but alert on it otherwise), or where several conditions are sufficient to trigger the alert (e.g. alert if Level is error or higher, or if the alert is eventID 123)
Complex Event Filtering
If Complex filtering is checked, a Groovy script can be used to filter events. The script should return a boolean value as the filter’s result. Otherwise, the value of last expression will be the return value.
The event will only be detected and trigger alerts if the return value is true. If the return value is false or null, the event will not be detected. All other values will throw an exception and cause filtering to fail.
Complex Windows Event Filters do not have validity checking. Thus, simple filtering should be used where possible.
For instance, if you were filtering based on a wide range of Event IDs, ie. between 4000 and 5000, you would use the following Groovy script:
(EVENTID>’4000′) && (EVENTID < ‘5000’)
Filter Required When Using Subscriptions to Copy Events to Another Destination
LogicMonitor does not currently support the monitoring of any logs located under the “Application and Services Logs” folder in the Windows Event Viewer snap-in console, as these logs aren’t natively exposed to WMI. If you would like to monitor your Application and Services Logs in LogicMonitor, you can use Microsoft Subscriptions to ‘copy’ logs from your Application and Services folder to another log folder (e.g. “Application” logs), as demonstrated in this video.
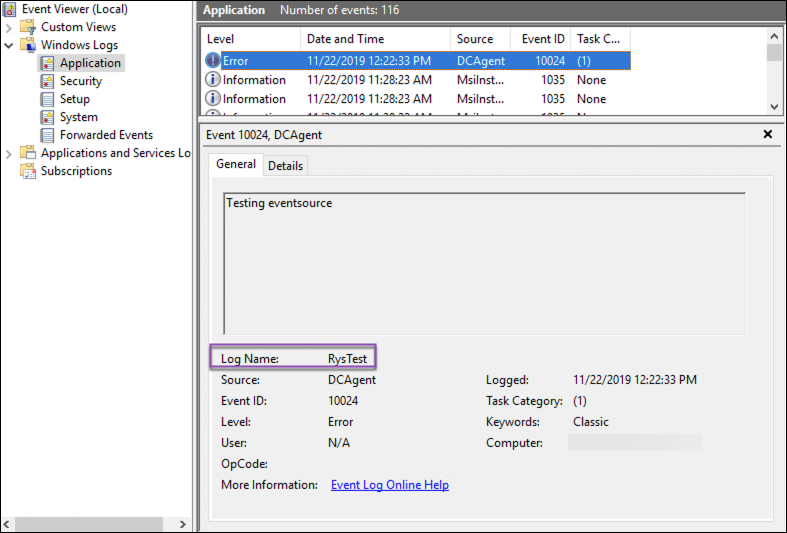
Once the logs are copied to a destination that is available to LogicMonitor, you will need to add a filter type of “LOGNAME” that equals <OriginalLogName>. As shown next, you can find your event’s original log name in the event details that display in the Event Viewer.
Predefined Variables
The following predefined variables can be used to access data about the event being processed:
| Name | Type |
| LOGNAME | String |
| MESSAGE | String |
| SOURCENAME | String |
| LEVEL | Integer (Value: Meaning) 1: Error 2: Warning 3: Information 4: Security Audit Success 5: Security Audit Failure |
| EVENTID | Integer |
For a more complete definition of each variable, see https://msdn.microsoft.com/en-us/library/aa394226(v=vs.85).aspx. Note the names of properties are translated to uppercase.
There are many operators in Groovy, but it is worth calling out the regular expression operator:
Examples
Disclaimer: This content is no longer being maintained and will be removed at a future time. For more information on the recommended way to ingest logs, see Log Files LogSource Configuration .
Overview
LogicMonitor lets you monitor log files generated by your OS or applications such as MySQL, Tomcat, and so on. For example, you can monitor the MySQL slow query log so an alert will be triggered every time a slow query is logged in the log file.
Note: A LogicMonitor Collector must have direct file access to all log files you would like to monitor.
The Collector must be able to read the files to be monitored – in most cases, this means the Collector must be installed on the server with the log files (access via a network mount – NFS, or CIFS, etc – of course works fine.) Log file monitoring complements our syslog monitoring facility. (In many cases, you can configure your log files to be sent via Syslog to the LogicMonitor Collector, which then negates the need to install a Collector locally on the server.) By editing the Log File EventSource you can control which log files to monitor, what pattern to look for, and what kind of alert messages to trigger. The Collector checks every line appended to the monitored log files. If the new line matches a configured pattern, an alert event will be triggered, and the Collector reports it to the LogicMonitor server, so users can get notifications via Emails/SMS, generate reports, etc.
Note: The check runs every second to detect modifications to the monitored files.
How to Configure
This section uses a concrete example to show you how to monitor log files. For example, we have a Linux device dev1.iad.logicmonitor.com that runs a Tomcat web server. We want to monitor Tomcat’s log file catalina.out so an alert will be sent every time Tomcat is shutdown for whatever reason (e.g. the JVM crashes or someone kills Tomcat). Here is the procedure for doing so:
- Install a Collector locally on this server. See Installing Collectors.
- Go to Settings | LogicModules | EventSources | Add | EventSource to open the Create New EventSource form.
- Complete the General Information section, making sure to select the EventSource type of “Log Files” from the Type field’s drop-down menu.
- Define the log files you want to monitor in the Log File Collector Attributes section. At least one log file should be specified, but you may add more than one, as shown next.
In the above example, two log files are to be monitored: the first one is a dynamic pathname, using a glob (i.e. wildcard) expression. The second one is a fixed pathname that uniquely identifies a file in the filesystem of the device where the Collector is running. For each specified log file, each line added to the log file will be matched against the given Trigger alert if line matches and Not trigger alert if the line matches criteria. You can modify or define the criteria in the dialog when you click the Manage (cogwheel) icon or +Add button. In this dialog, you define the path of the log file, and the event criteria.
Matching Criteria
There are two sections for specifying the criteria that control whether an alert will be triggered. In both cases, the criteria can be given as a regular expression or plain text: Matching criteria specify the conditions to trigger an alert. Multiple criteria are evaluated independently in the order they appear until a match is found. This means if the log file line matches multiple criteria, an event will be generated for the alerting level defined by the first criteria it matches. Using the example shown in the previous screenshot:
- If a line containing just “Invalid HTTP response headers” appears in the monitored logfile, a WARN event will be generated with the whole line as the event message.
- If a line containing just “Starting Coyote HTTP” appears in the monitored logfile, an Error event will be generated.
- If a line containing both “Invalid HTTP response headers” and “Starting Coyote HTTP” appears in the monitored logfile, then, since “Invalid HTTP response headers” is defined before “Starting Coyote HTTP”, a WARN event will be generated, and no Error level event will be generated.
Not Matching criteria are evaluated before Matching criteria, so if a line in the logfile contains any pattern defined in the Not Matching criteria, no events will be generated. Not Matching Criteria are evaluated independently; if the logfile line matches any of the non matching criteria, no event will be generated.
Note: It is possible to use part of the line as the message of generated events by using a regular expression to define acapture group. The captured content will then be used as the message of the generated events.
Be aware that if you do not have a Collector installed on a device, but this device is included in the Applies To for a log file monitoring EventSource that is also applied to another device which has recently generated an alert, then this alert will be falsely duplicated on the device that does not have a Collector installed.
Monitoring Glob Filepaths
In the above Linux filepath example, the Glob checkbox is checked, meaning the logfile pathname shall be interpreted as a glob expression. This allows you to monitor a variable filepath. A special consideration to take into account when monitoring globbed Windows filepaths is that backslashes must be escaped with another backslash, as depicted in the below example:
Logfile Path
The full path to your Logfile. Note that this path is case sensitive.
Glob
Selecting this option will allow you to use glob expressions in your Log File path. When Glob is enabled, we will monitor a batch of filed that match the Glob path. The monitoring will look for new lines/changes appended to the last modified file.
You will want to ensure that your file separators are escaped with doubles slashes, ie. C:\\Program Files (x86)\\LogicMonitor\\Agent\\logs\\w*.log
In this example, the glob path will match all log files starting with “w,” such as watchdog.log and wrapper.log. Note that you can only monitor one of these log files at a time. As such, monitoring will rotate between watchdog.log and wrapper.log for each polling cycle. If you would like to monitor both these logs at the same time, you would need to create two distinct Log File paths (ie. with wa*.log and wr*.log) or create two separate Log File EventSources.
Note: If you are using glob expressions with UNC paths, the UNC path must start with four backslashes (“\\\\”).
Collecting Events – Summary
As noted above, the device with the log file to be monitored must have a Collector installed. When the Collector starts up, it will:
- Monitor the file names of a dynamic logfiles (i.e. the logfile given as glob expression) to find the latest logfile to be monitored. The latest logfile is determined by the last access time of the logfile.
- Tail the monitored log files to read new lines.
- Match each new line that is read against defining criteria.
- Filter & report events back to server to generate an alert.
Example: Monitoring Log Files for Application Response Times
This demonstrates how to monitor an application log file for the response time of the application. We will install a small daemon onto the system, which uses Perl’s File::Tail module to watch the specified log file, and Berkeley DB to track the number of processed requests and the total elapsed time.
Note: While the scripts and procedures covered on this page will work in many situations, they are presented as an example only, and may require customization. They are easily modified to cover different versions of Linux; different file locations, counting more than the last 100 samples for the max, etc. If you need assistance with these matters, please contact LogicMonitor support.
These are the steps:
- Ensure the Perl module File::Tail is installed on the host with the log file to be monitored. (Not covered in this document.)
- Download AppResponseStats-updater.pl into /usr/local/logicmonitor/utils/ and chmod it to mode 755. This file runs as a daemon, and tails the specified log file, watching for lines of the form “Completed in 0.34 seconds” (the format typically used by Ruby-on-Rails applications). For each such line, it increments a counter, and also increases the Total Time record in a Berkeley DB.
- install AppResponseStats-reporter.pl into /usr/local/logicmonitor/utils/ and chmod it to mode 755. This file is called by snmpd to report the data logged by the daemon.
- Download the startup script AppResponseStats.init into /etc/init.d/. Chmod it to mode 775, and set the script to start on system boot
- modify the snmpd configuration to run the reporting script when polled, and restart snmpd
- wait for (or trigger) ActiveDiscovery so that the datasources to monitor the reported data are active
Quick Start Script
This script can be used on a host to complete most of the setup. You must still check the steps below the script:
Change location of monitored log file, if necessary
Modify the file AppResponseStats-updater.pl to point it towards the application log by editing the line that reads:
If you wish to match lines other than “Completed in “, modify the regular expression in this section of code:
Start the Daemon
Set the daemon to autostart on system boot:
On Debian:
On SuSe or Redhat:
Activate the DataSources
The DataSources AppResponseStats- and AppResponseStatsProcess should be part of your default datasources. If not, you can import them from core.logicmonitor.com. The datasources will automatically discover if your hosts are set up to report application log times – but that may take several hours. You can speed this up by Run Active Discovery on the hosts that you have set these processes up on. You should then see two new set of datasource graphs – one monitoring the status of the daemon, and one monitoring the response time, 95 percentile response time, and DB component time and number of requests of your applications. (95 percentile is a more useful measurement than the maximum response time – the maximum response time is too affected by outliers.)
The default threshold for triggering a response time warning is 4 seconds – which, like all other thresholds, can be tuned globally, or on a group or device basis.
Support Types of Encoding for Log Files
By default, LogicMonitor supports files encoded with Windows-1252 for Windows and UTF-8 for Linux. Please note that the default encoding can vary based on your operating system.


