Overview
LogicMonitor returns status codes for Web Checks, SSL environments encountered during Web Checks, and Ping Checks. These are helpful when troubleshooting monitoring errors. The following tables list and describe the possible status codes LogicMonitor may return for each of these.
Web Check Status Codes
| Status for Individual Checkpoint Locations | Description |
| 1 | Okay |
| 6 | DNS failure |
| 7 | Timeout – either:
|
| 8 | TCP connection refused – the client got explicit information that it could not connect as it was configured to do. |
| 9 | SSL issue |
| 10 | Authorization required |
| 11 | HTTP status unexpected – the returned HTTP status does not match the expected HTTP status codes specified in the Web Check configuration |
| 12 | The keyword specified in the Web Check configuration does not match the response |
| 20 | The request timed out while loading the full page contents |
| 21 | There was no response to the HTTP request |
| 23 | The page load time is longer than the maximum time (configured in the Web Check’s Alert Triggering settings). |
| Overall Status | Description |
| 1 | Okay |
| 2 | Error |
SSL Status Codes for Web Checks
| SSL Status for Individual Checkpoint Locations | Description |
| 1 | Okay |
| 15 | All other SSL error conditions |
| 16 | The certificate chain is untrusted |
| 17 | Requested host name mismatches the CN (common name) in server certificate |
| 18 | Certificate is expired |
| Overall Status | Description |
| 1 | Okay |
| 2 | Error |
Ping Check Status Codes
| Status for Individual Checkpoint Locations | Description |
| 1 | Okay |
| 6 | DNS failure |
| 8 | TCP connection refused – the client got explicit information that it could not connect as it was configured to do. |
| 24 | Either:
|
| Overall Status | Description |
| 1 | Okay |
| 2 | Error |
Overview
In addition to the settings field configuration for Internal Web Checks, you can also execute your check using a Groovy script to collect and process HTTP data. Scripted Web Checks tend to be more flexible and are particularly useful for sites that use form-based authentication with dynamic tokens.
Web Checks that are executed via Groovy script will have at least one step, which will contain a Step Request script and a Step Response processor. What makes scripted checks unique is the ability to share contexts (i.e. a dynamic token for authentication) between steps. In this way, Step One can send a GET request to collect a site’s authenticating token and share the token in Step Two, which will authenticate into the site.
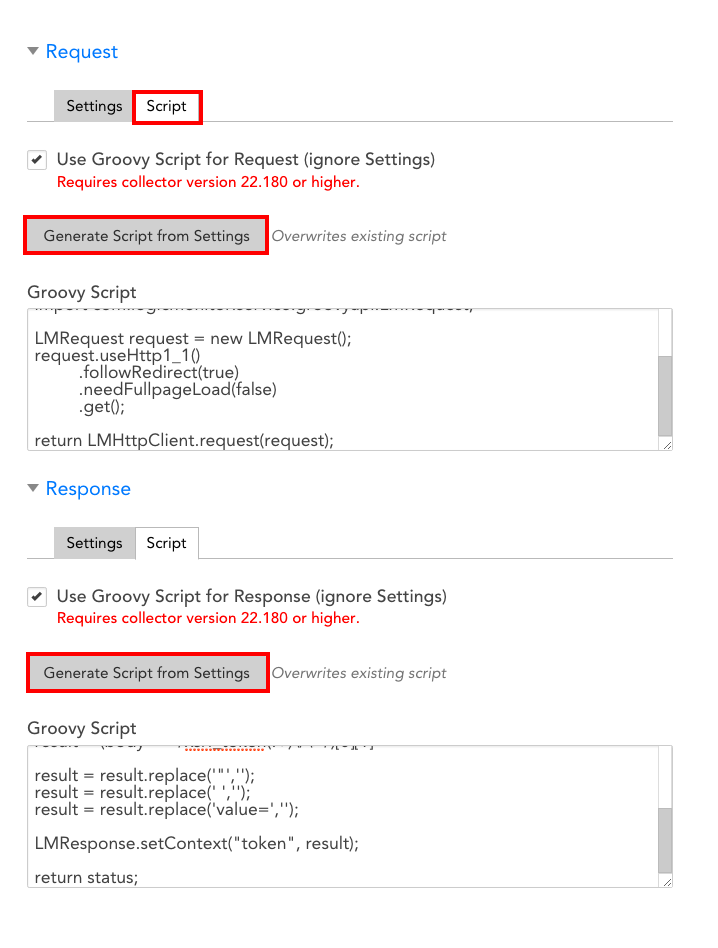
When creating or editing an Internal Web Check, you’ll notice that an additional tab titled Script is available under both the Request and Response sections. You can choose to manually add your request and response Groovy scripts directly into the text boxes found under both of these Script tabs or, as shown next, you can choose to first complete the fields under the Settings tab (e.g. HTTP Version, Method, Follow redirect, Authentication Required, Headers, HTTP Response Format, etc.) and then click the Generate Script from Settings button to have LogicMonitor auto-generate request and response scripts based on those settigs. The latter option produces a basic template for your Groovy scripts. (For more information on completing the fields found under the Settings tab for both the HTTP request and response, see Adding a Web Check).
Writing a Request Script
The request script will use the Groovy API to get an HTTP response.
API Commands for a Request Groovy Script
The following table lists the API commands you may use in your request Groovy script.
| API | Return type | Description | Default value (if applicable) |
| setAuthType(AuthType authType) | LMRequest | Set the Authentication Type | |
| setUsername(String username) | LMRequest | Set the Authentication username | |
| setPassword(String password) | LMRequest | Set the Authentication password | |
| setDomain(String domain) | LMRequest | Set the Authentication Domain (only for NTLM Authentication) | |
| followRedirect(boolean) | LMRequest | Specifies whether or not redirects should be followed | True |
| addHeader(String name, String value) | LMRequest | Add the HTTP headers | |
| userHttp1_0() | LMRequest | Specifies if HTTP/1.0 protocol version is used | False |
| userHttp1_1() | LMRequest | Specifies if HTTP/1.1 protocol version is used | True |
| needFullpageLoad() | LMRequest | Specifies if the full page needs to be loaded | False |
| setContext(String name, Object value) | LMHttpClient | Set the context for the next scripts | |
| getContext(String name) | Object | Get the context of the previous scripts | |
| request(LMRequest) | LMHttpClient | Set the HTTP request parameters | |
| get() | StatusCode | GET the Request and Return status. | |
| get(URL) | StatusCode | GET the Request and Return status. | |
| head() | StatusCode | Check if the URL exists | |
| post(URL, PostDataType, String PostData) | StatusCode | Post the HTTP data | |
| setProxy(String hostname, int port, String schema) | LMRequest | Set the HTTP proxy. Schema can only be HTTP or HTTPS | |
| setProxy(String hostname, int port, String schema, String proxyUsername, String proxyPassword) | LMRequest | Set the HTTP proxy along with credentials. |
Example Request Script Commands
- The following Groovy syntax would be used in the first step of an Internal Web Check for a site using basic authentication.
import com.logicmonitor.service.groovyapi.AuthType; import com.logicmonitor.service.groovyapi.LMRequest; LMRequest request = new LMRequest(); request.setAuthType(AuthType.BASIC) .setUsername("username") .setPassword("password") .followRedirect(false) .useHttp1_0() .needFullpageLoad(true); String jsonData = "{\"name\": \"value\"}" return LMHttpClient.request(request) .post(JSON, jsonData); - Example setContext() response:
StatusCode status = LMResponse.statusMatch(200); LMResponse.setContext("body", Response.getBody()); return status; - Example getContext() response:
return LMResponse.plainTextmatch(Response.getContext("exampletext")) - Example post(PostDataType, String PostData) response:
import static com.logicmonitor.service.groovyapi.StatusCode.*; import static com.logicmonitor.service.groovyapi.PostDataType.*; String jsonData = "{\"name\": \"value\"}"; return LMHttpClient.post(JSON, jsonData); - Example request(LMRequest) response:
import com.logicmonitor.service.groovyapi.AuthType;
import com.logicmonitor.service.groovyapi.LMRequest;
LMRequest request = new LMRequest();
request.setAuthType(AuthType.BASIC)
        .setUsername("username")
        .setPassword("password")
        .followRedirect(false)
        .useHttp1_0()
        .needLoadFullPage(false);
String jsonData = "{\"name\": \"value\"}"
return LMHttpClient.request(request)
                    .post(JSON, jsonData);
Writing a Response Script
The response script will parse the HTTP response from your request script and apply any post processing methods (e.g. check status, check the HTTP response body, etc.).
The following table lists the API calls you may use in your request Groovy script.
| API Command | Return type | Description |
| getStatus() | Integer | Return the HTTP status code |
| getReasonPhase() | String | Return the HTTP Reason Phase |
| getProtocolVersion() | String | Return the HTTP Protocol Version |
| getHeaders() | Map (String, List [String]) | Return all the headers |
| getHeader(String name) | List | Return the header value with name. If the header does not exist, a “null” response will be returned. Note that the name is case sensitive |
| getBody() | String | Return the HTTP Response Body |
| statusMatch(int expected) | StatusCode | Check if the status is as expected. If so, this will return STATUS_OK. Otherwise it will return STATUS_STATUS_MISMATCH |
| regexMatch(String pattern) | StatusCode | Check if the regex pattern matches the HTTP Response Body. If it fails, return STATUS_CONTENTS_MISMATCH |
| globMatch(String pattern) | StatusCode | Check if the regex pattern matches the HTTP Response Body. If it fails, return STATUS_CONTENTS_MISMATCH |
| plainTextMatch(String pattern) | StatusCode | Check if the HTTP Response Body contains the plain text. If it fails, return STATUS_CONTENTS_MISMATCH |
| jsonMatch(String path, String expectValue) | StatusCode | Check if the path’s JSON result matches the expect value. If it fails, return STATUS_CONTENTS_MISMATCH |
| PathMatch(String path, String expectValue) | StatusCode | Check if the string’s path matches the expect value. If it fails, return STATUS_CONTENTS_MISMATCH |
| keyValueMatch(String key, String expectValue) | StatusCode | Check if the returned key/Values match the expect value. If it fails, return STATUS_CONTENTS_MISMATCH |
| setContext(String name, Object value) | void | Sets the context for the next stages of your script |
| getContext(String) | Object | Return the context set in a previous script stage |
Example Response Script
In the event that you wanted to verify a response status of “302” for a site, use the following request:
import com.logicmonitor.service.groovyapi.LMRequest;
LMRequest request = new LMRequest();
return LMHttpClient.request(request.followRedirect(false)
                        .get());
You would write your response script as follows:
return LMResponse.statusMatch(302);Status Codes
| Code | Value | Description |
| STATUS_OK | 1 | Data collection functioned as expected |
| STATUS_MISMATCH | 11 | The HTTP response status does not match |
| STATUS_CONTENTS_MISMATCH | 12 | The HTTP Request did not return expected HTTP Response body |
Full Example Script
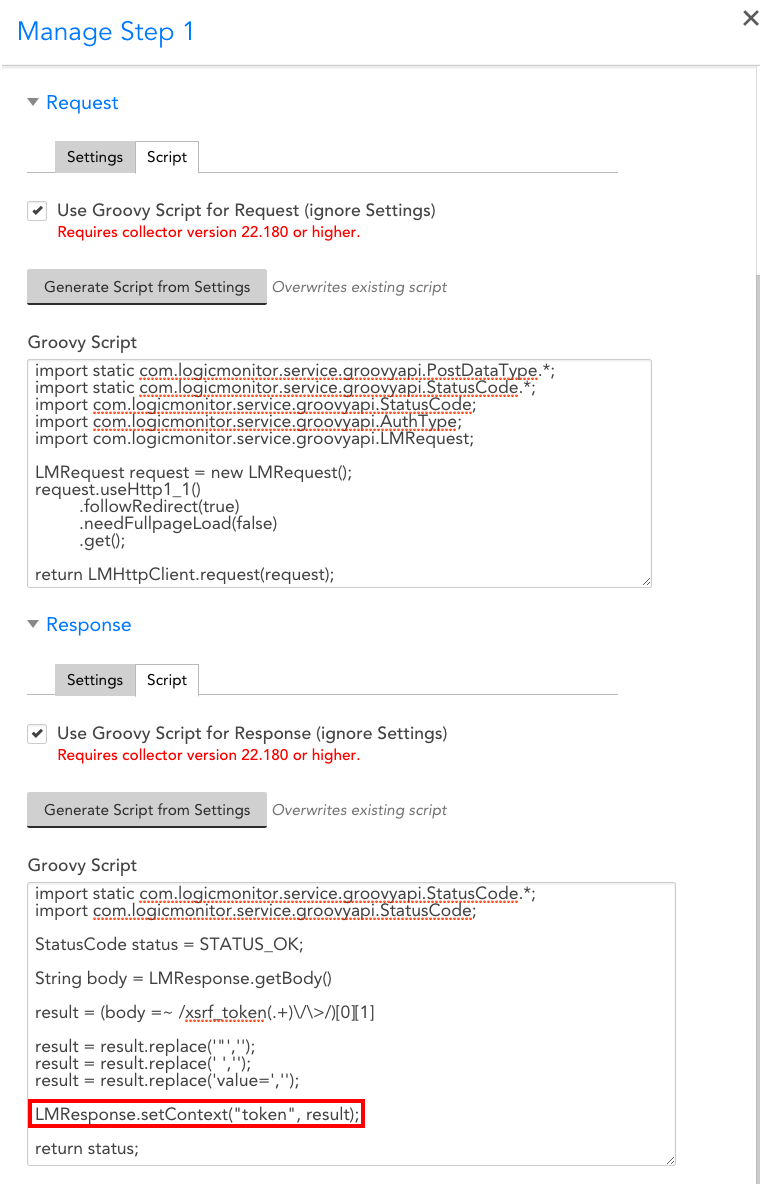
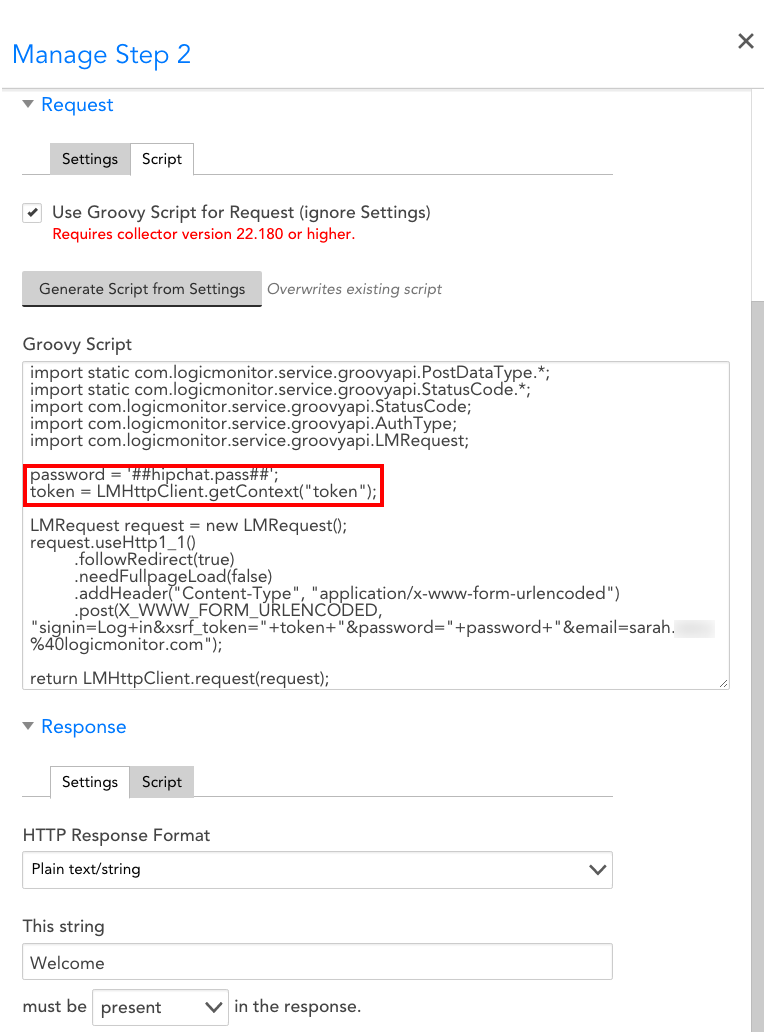
Below is a full two-step script used for verifying the availability of a messaging service. This particular script uses a dynamic token shared between steps one and two of the Internal Web Check via the setContext and getContext commands in order to authenticate into the site. The post-processing method looks for the presence of “Welcome” in the HTTP response as a means of verifying the site’s availability.
The following instructions will walk you through setting up a Web Check for sites that use form-based authentication.
The exact structure of a Web Check will vary based upon the authentication requirements of each individual application. Some may only ask you to POST username and password values while others may require the presence of dynamic tokens. In order to identify the specific authentication measures of your application, follow these steps:
- Using your browser, navigate to the sign-in page of the desired application.
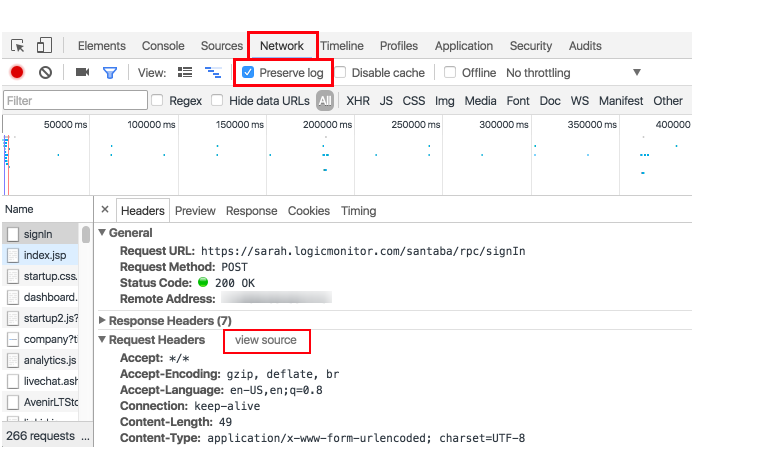
- Open Developer Tools (in your browser’s navigation tool bar View > Developer > Developer Tools). Within these developer tools, make sure that you are in the “Network” tab and that you select “Preserve log.” You want to see the full historical logs associated with authenticating into the site. If you do not check this box, the logs will be cleared each time a new page is loaded.
- Sign in to the application.
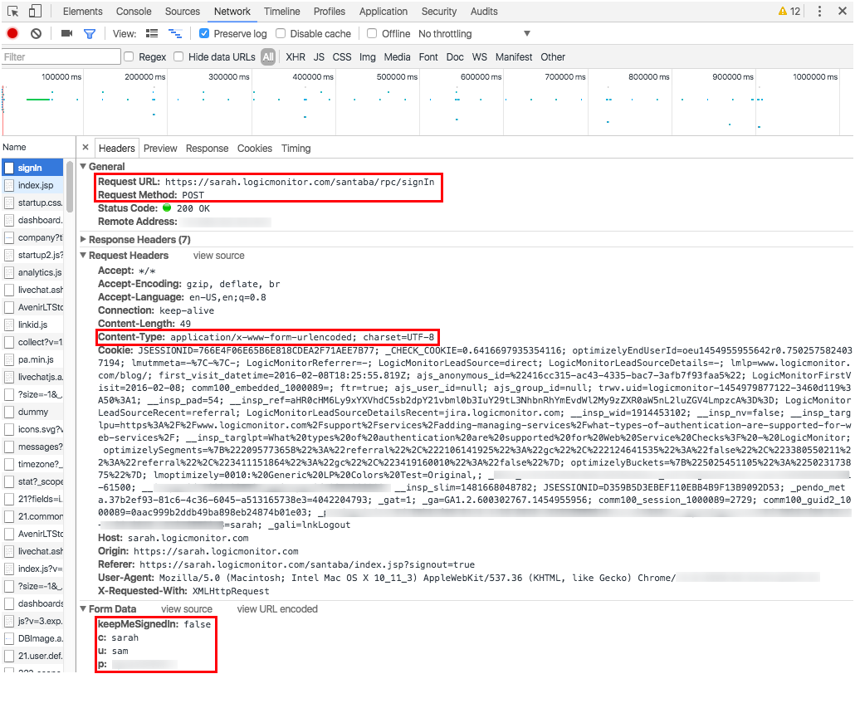
- Look at the sign-in request in the developer tools. The information you will need to include in your Web Check can be found under the General (Request and Step URL), Request Headers (Content-Type), and Form Data (ie. Password, Username, Dynamic token, and/or any other variable listed in this section) fields. As a best practice, you should view the source code of your Form Data and Request Headers to verify whether values such as passwords are URL encoded or not. The format of these values entered in your Web Check should match the format in the source code.
- Add Web Check
Example- LogicMonitor
The following example shows what information needs to be extracted from the developer tools upon sign-in to your LogicMonitor account, which uses form-based authentication requiring both a Username and Password.
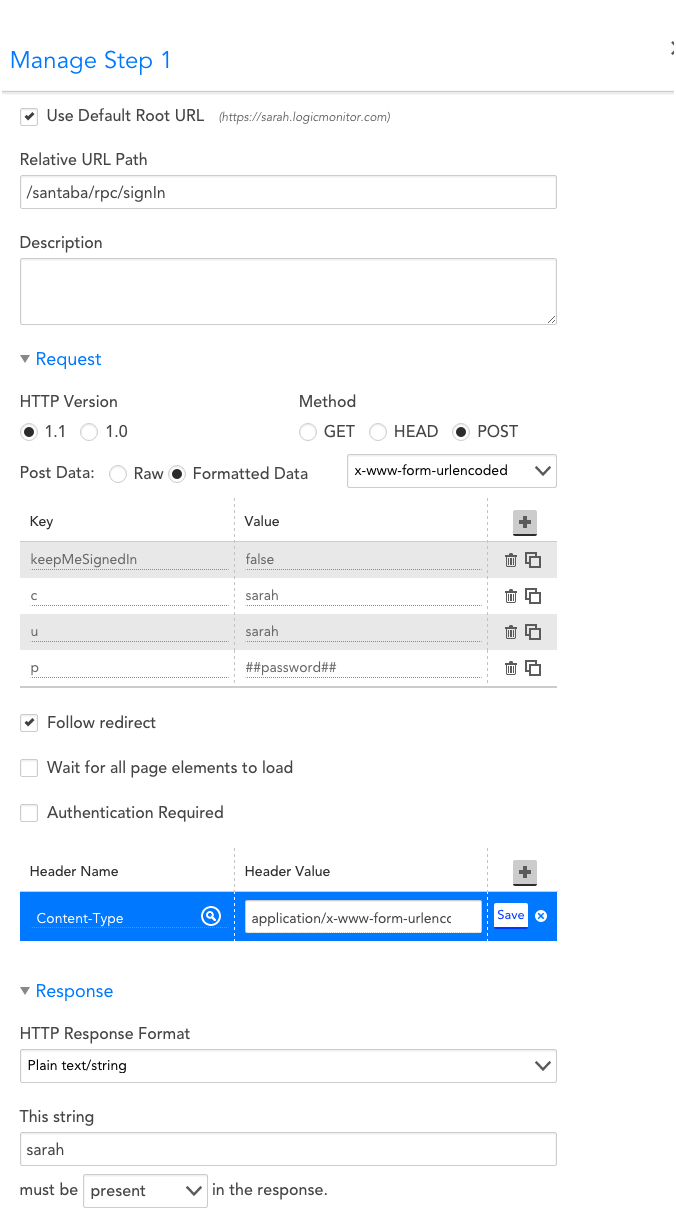
Based on the Developers Tools, we can fill-out the information below:
- Default URL: sarah.logicmonitor.com
- Relative URL Path: /santaba/rpc/signIn
- Method: POST
- Post Data: x-www-form-urlencoded
- Key-Value pairs (all this information is located under Form Data): keepMeSignedIn=false, c=sarah, u=sarah, p=##password## *
*as a best practice, passwords should be saved as a property on your devices/websites. As such, you can simply use a token to pull this value from your websites properties.
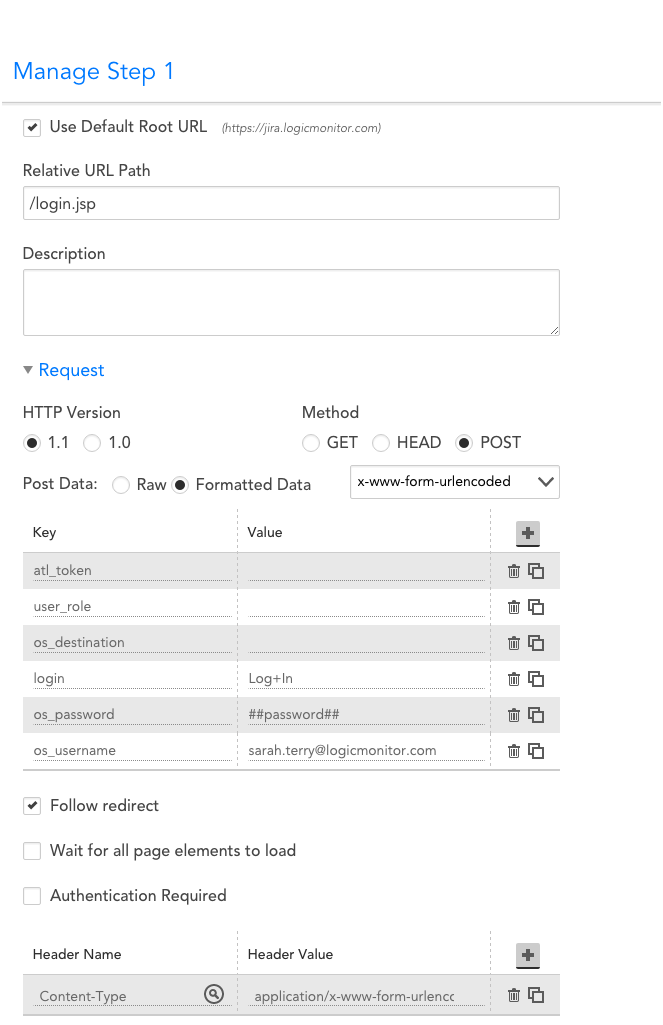
Example- Jira
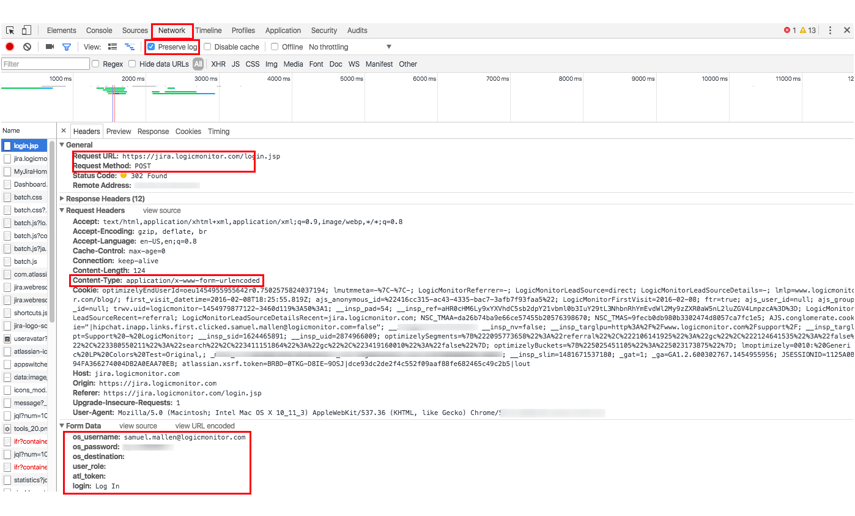
Jira is an internal ticketing system that uses form-based authentication requiring a Username and Password.
Based on the Developers Tools, we can fill-out the information below:
- Default URL: jira.logicmonitor.com
- Relative URL Path: /login.jsp
- Method: POST
- Post Data: x-www-form-urlencoded
- Key-Value pairs (all this information is located under Form Data)*:
- atl_token=
- user_role=
- os_destination=
- login=Log+In
- os_password=##password##
- [email protected]
*note that several of the keys do not display any value in the Web Check or developer tools. Some sites, such as Jira, will require you to precisely match the form data in your Web Checks, regardless of whether or not there are any assigned values.
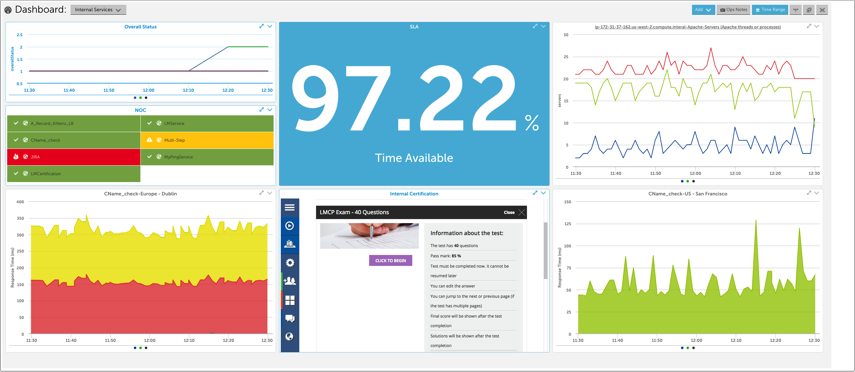
One way to keep an eye on the websites you are monitoring is to create one or more dashboards that display the information you’re interested in.
You can add dashboard widgets to show:
- the availability of your site(s) – consider using an SLA widget to show the uptime of one or more related sites
- the individual status of your site – consider using a Website Status widget to display the success or failure of the Web checks for one or more related sites
- how your site appears to external users – consider using an HTML widget to show your site as it appears to external users
- the performance of your web server – use a Custom Graph widget to display performance metrics for the application and server that are serving your website
the alert status of your site(s) – consider using an NOC widget to indicate whether your services are in alert
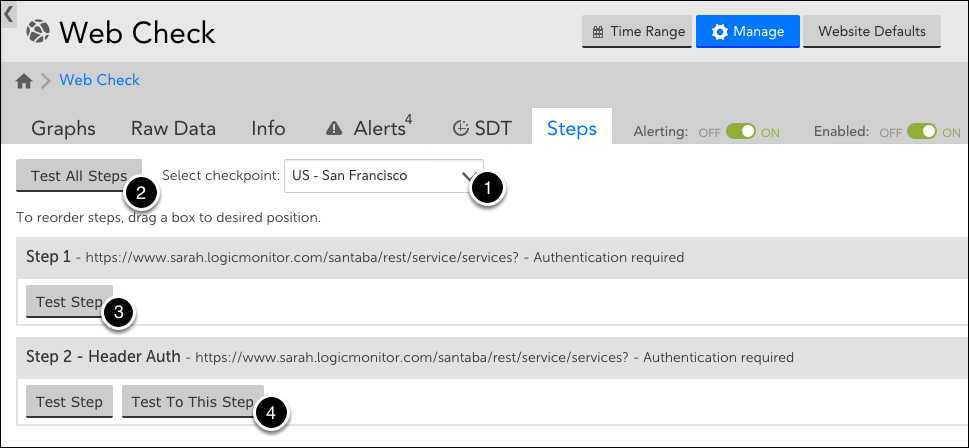
Once you’ve created a Web Check, you can test its step(s) from the Steps tab. As shown (and discussed) next, there are several testing options available to you.
Select Checkpoint
From the Select checkpoint field’s dropdown menu (labeled “1” in the image above), select the checkpoint from which the step(s) should be tested. Depending upon whether the website is being tested by a standard Web Check or an Internal Web Check, you will be choosing from either a list of one or more external testing locations or internal Collectors.
Test All Steps
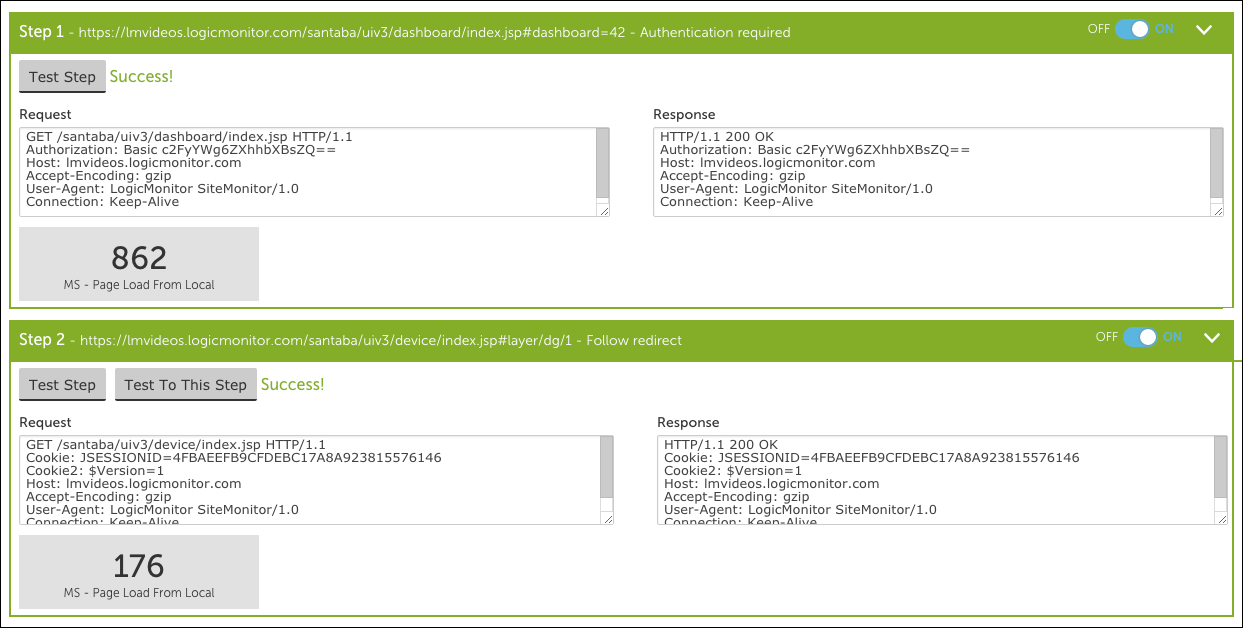
Clicking the Test All Steps button (labeled “2” in the image above), will test all steps currently configured for the Web Check. As shown next, the result of the test, along with HTTP request and response details, will be displayed for each step.
Test Step
Clicking the Test Step button located under a step (labeled “3” in the image above) will test just that one step. The result of the test, along with HTTP request and response details, will be displayed.
Test To This Step
Clicking the Test To This Step button (labeled “4” in the image above) located under a step will test all steps that precede it, up through the step itself. The result of the test, along with HTTP request and response details, will be displayed for each step.
Editing a Website
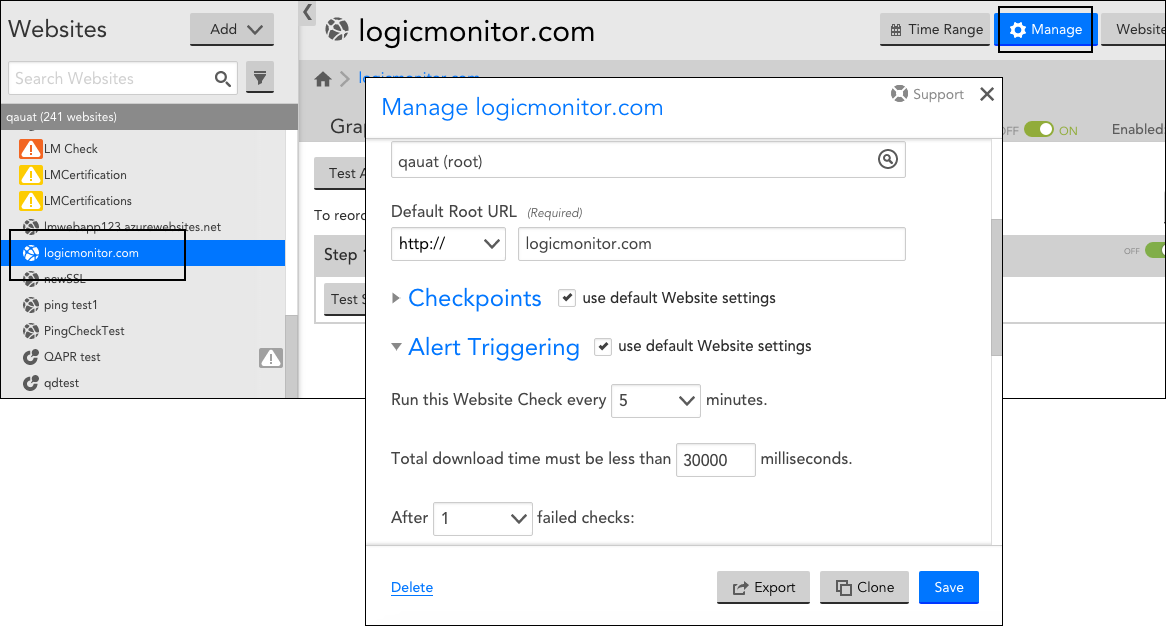
As with other LogicModules, existing websites can be edited. In this support article, the general steps for initiating website configuration edits are discussed. If you are looking for detailed information on the configurations available for editing, see Adding a Web Check or Adding a Ping Check, depending upon the type of website check you are editing.
To edit a website:
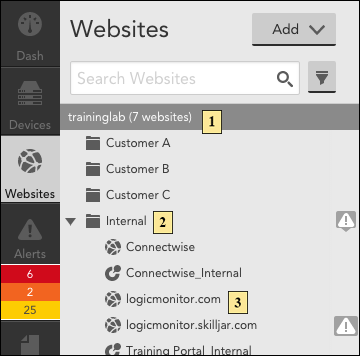
- Navigate to the website from the Websites tree.
- Click the Manage button in the top right corner of the Websites page.
- From the Manage dialog that appears, make any necessary edits and click Save.
Note: If you are editing a Web Check with multiple steps and would like to edit the settings for a particular step, you must do so from the Steps tab, as discussed in the following section.
Editing or Adding a Step
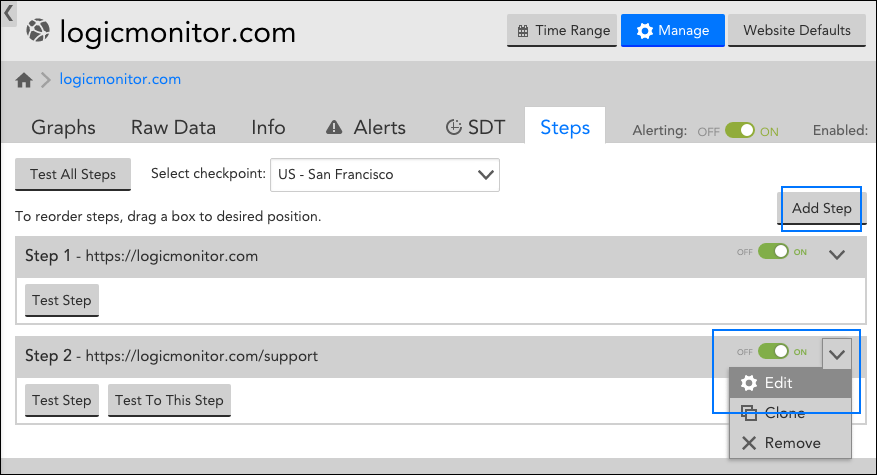
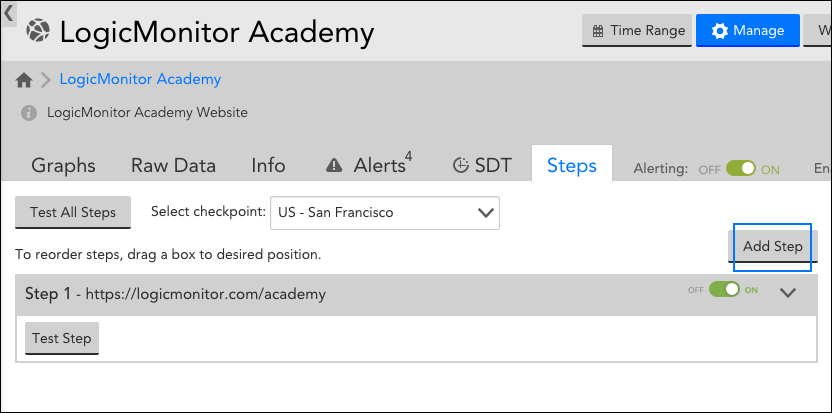
To edit the URL or request and response settings for a particular step in your Web Check, you’ll need to open the Steps tab; these settings are not available from the general Manage dialog. From the Steps tab, steps can be edited or added, as highlighted in the following screenshot.
Deleting a Website
To delete a website:
- Navigate to the website from the Websites tree.
- Click the Manage button in the top right corner of the Websites page.
- In the Manage dialog that appears, click Delete in the bottom left corner to delete the website.
Importing/Exporting a Website
You can Import/Export a Website as a JSON file for sharing or versioning purposes.
To export a Website:
- Navigate to the Website from the Websites tree.
- Click the Manage button in the top right corner of the Websites page.
- Select “Export” in the bottom right corner of the dialog.
For Web Checks, upon selecting “Export”, you will see a confirmation dialog that displays all fields that will be exported, excluding scripted fields in scripted Web Checks. We highly encourage users to tokenize sensitive information as a security best practice (see below).
Note: The Password field in Web Check steps will be emptied if it is not tokenized upon export.
In order to tokenize sensitive fields, simply set the field’s value as a property in the Manage dialog (e.g. password=ABCD). Then, in the field you wish to tokenize, set the property’s name as a token (e.g. ##password##). Upon export, all property values will emptied to ensure your sensitive information is not exported.
Note: As with DataSources, any property name that includes “password” or “.pass” will be masked.
To Import a Website:
- Navigate to the Websites Tab.
- Click “Add”
- Select “Add from File” in the dropdown menu. Proceed to select the JSON Website file.
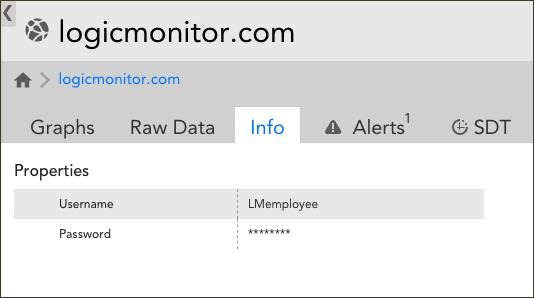
Properties can be added to your LogicMonitor websites to facilitate organization, customize alert message templates, set authentication credentials, and more. You can set website properties at the individual website level, website group level, and at the root group (account) level. As shown next, website properties, once established, can be viewed from the Info tab.
Requirements for Adding a Website Property
- Under GCC properties, ensure that the
service.property.sendToSiteMonitor.enableproperty is set totrue. - When entering a tokenized username and password, you must add double hash “##” before and after the username and password. For example, ##
testusername## and ##testpassword##
Understanding Property Hierarchies
Before you set properties for your websites, you should decide where to set them. Ultimately, this decision depends on how many websites a property applies to. For example:
- A property that applies to all or most websites should be set at the root account level
- A property that applies to multiple websites should be set at a group level
- A property that applies to just one website should be set at the individual website level
Properties cascade down the Website tree until they are overridden. For example, if the same property is set at the website group level and individual website level, the individual website takes precedence. As a best practice, we recommend that you set global credentials and override them as needed for groups of websites or individual websites.
Adding a Property
Website properties can be added when first creating the website, or can be added later. The following set of steps illustrate how to add a property to an existing website, a website group, or the Websites tree root.
- Navigate to the Websites page.
- Navigate to the level at which you want to assign the property: root, website group, or website.
- Click the Manage button in the top right corner of the Websites page.
- Scroll down to the Properties section of the Manage dialog.
- Click the + button to add a property name and value.
Note: Existing property values can be edited from this section as well by simply placing your cursor into the Value field.
- Click the Save button to save the new property. Click the Save button again to exit out of the Manage dialog.
Built-in Website Properties
LogicMonitor offers several built-in properties for website monitoring that allow you to manipulate the settings of the external Web Checks we perform from our checkpoints. Specifically, these settings were created to provide some flexibility in cases where sites may load slower than our default timeouts.
The following built-in properties all default to 30 seconds and all support an acceptable value range between >0 and <=60.
- website.http.client.so.timeoutInSec (socket timeout in seconds)
- website.http.client.connect.timeoutInSec (TCP connection timeout in seconds)
- website.http.client.read.timeoutInSec (read timeout in seconds)
Custom Example: Using Properties for Authentication
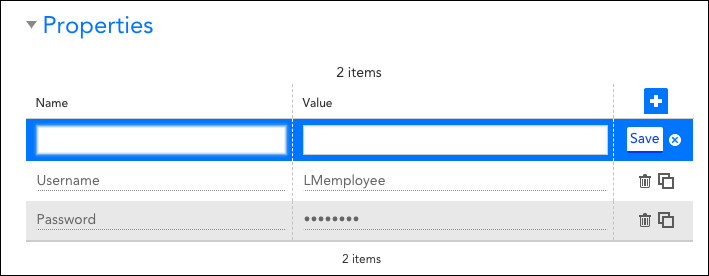
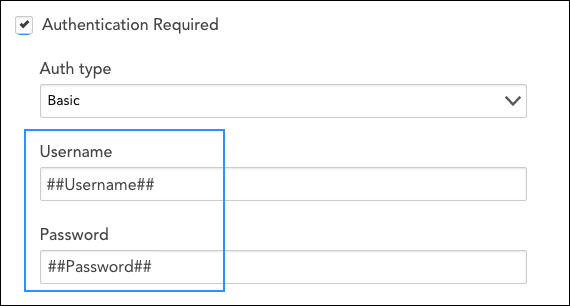
A common use for website properties is for authentication. Username and password properties can be established and then passed in as tokens when authenticating requests, as shown next.
Note: In a real application, LogicMonitor will mask the password as hard-coded passwords are also supported, but as shown above for effect, the password can be passed in as a property as well.
Setting credentials as properties (vs. hard coding credentials into the authorization fields of a Web Check) is useful when there are multiple websites requiring the same authentication credentials. These websites can be grouped together and username and password properties can be set at the group level. With this setup, the process of updating authentication credentials is trivial, requiring only a single update. Additionally, websites that are subsequently added to the group will automatically inherit the correct username and password properties.
LogicMonitor supports the following special characters in a tokenized password for Web Checks:
~ ` ! @ # $ % ^ & * ( ) - _ = + { [ } ] \ | : ; " ' , < . > / ?Overview
Web Checks periodically make HTTP GET, HEAD or POST requests to one or more URLs. LogicMonitor supports two types of Web Checks:
- Standard Web Check—Standard Web Checks (displayed as “Web Checks” in the LogicMonitor interface) are performed by one or more geographically dispersed checkpoint locations. These locations are hosted by LogicMonitor and are external to your network. The purpose of a Standard Web Check is to verify that your website is functioning appropriately for users outside of your network (as compared to regular server monitoring which is performed internally) and to adequately reflect these users’ experiences.
- Internal Web Check—Internal Web Checks are performed by one or more Collectors internal to your network. The purpose of an Internal Web Check is to verify that websites and cloud services (whether internal or external to your network) are functioning appropriately for users within your private network.
The processes for creating Standard Web Checks and Internal Web Checks are largely identical. This support article covers the creation of both types of checks.
Note: For information on the type of data that is monitored for your configured Web Checks and how that data is organized on the Websites page, see What Is Website Monitoring?.
Configuring Basic Information
To create a new Web Check, select Websites > Add > Web Check or Websites > Add > Internal Web Check, depending upon whether you want the tests to be performed from locations external or internal to your network.
Note: Web Checks can also be added using LogicMonitor’s API. For more information, see Using LogicMonitor’s REST API.
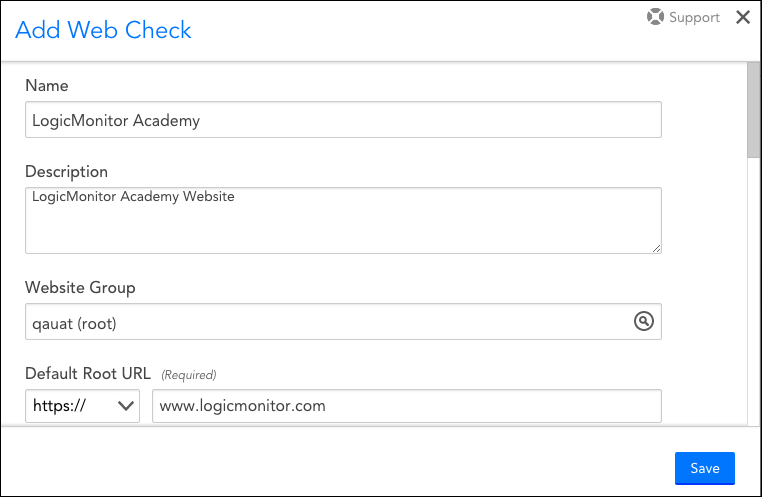
Name
In the Name field, enter a descriptive name for the Web Check.
Description
In the Description field, describe the scope and purpose of the Web Check.
Website Group
From the Website Group dropdown menu, select the group the Web Check should belong to from the list of existing groups. By default, the root (top-level) website group is selected.
Default Root URL
From the Default Root URL dropdown menu, select “http://” or “https://” depending on your web server settings. Enter the website domain to which your Web Check request will be sent.
Configuring URL Request and Response Settings
For every Web Check, you must configure at least one URL path, along with the corresponding request and response settings for that URL path. Additional URL paths can be added, but only after the configurations for the first URL path have been saved.
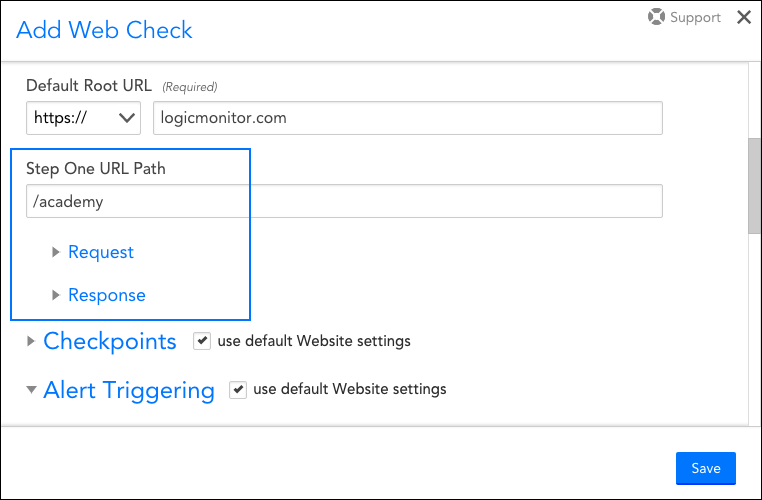
Step One URL Path
In the Step One URL Path field, enter the first path that should be tested for your website. Enter the path relative to the website domain (e.g., “/folder/page.htm”).
Request
From the Request area of the dialog, notice the following difference between Standard Web Checks and Internal Web Checks:
- Standard Web Checks only support requests that are built based on pre-defined request settings. These settings are described in detail in the following sections.
- Internal Web Checks support the ability to use Groovy scripts to issue requests and parse response data. Scripts tend to be more flexible and are useful for websites that use form-based authentication with a dynamic token.
Note: Script settings are not discussed in this support article. For more information on using a Groovy script to execute an Internal Web Check, see Executing Internal Web Checks via Groovy Scripts.
For Web Checks that are not using a Groovy script, there are several HTTP request settings that must be completed for the URL.
Note: If you are testing a path that uses form-based authentication, there are browser tools you can use to identify what information you need to include in your request. For more information on using these tools, see Web Checks with Form-Based Authentication.
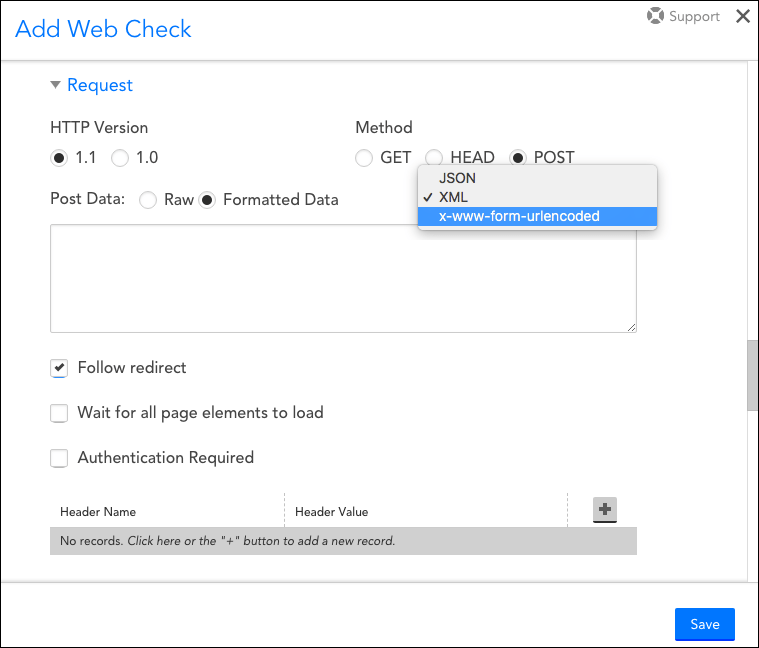
HTTP Version
For the HTTP Version field, select the version of HTTP that should be used to make the request. The version you select is based on your website’s settings.
Note: You can determine this setting in the response headers using the Linux/Unix cURL command (e.g. curl –head help.logicmonitor.com).
Method
For the Method field, select the HTTP method that should be used to make the request: GET, HEAD, or POST.
If you select the POST option, additional configurations display that allow you to specify the data to be included in request payload. In addition, the Formatted Data option allows you to specify how the data should be formatted.
Note: As discussed in Web Checks with Form-Based Authentication, there are browser tools you can use to identify what information you will need to include in your request and what format it should be in.
Follow redirect
If the Follow redirect option is selected, the HTTP request will follow any redirects configured for the URL.
Wait for all page elements to load
If the Wait for all page elements to load option is selected, the HTTP request will wait for all page elements (e.g., headings, paragraphs, images) to load before checking the response.
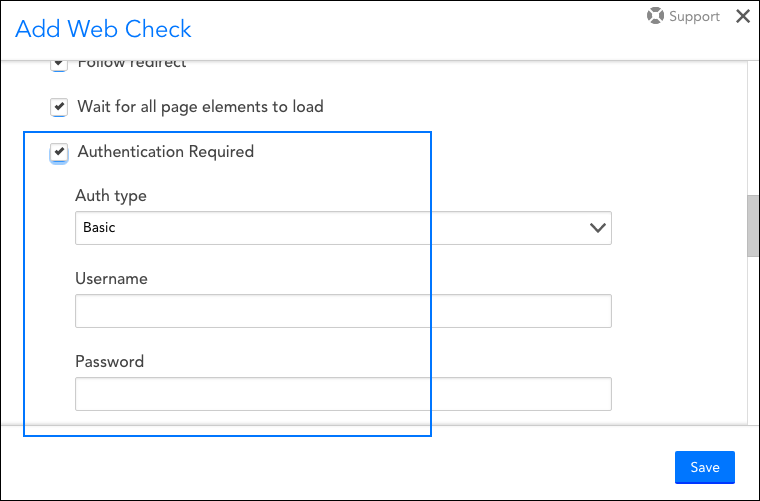
Authentication Required
For requests that are going to a page that requires either HTTP Basic authentication or NT LAN Manager (NTLM) authentication, select the Authentication Required checkbox to have LogicMonitor construct the authentication headers for you. Additional configurations display that allow you to specify the type of authentication and the authentication credentials that will be used in the HTTP request.
Note: If the website uses form-based authentication, you can add steps to the Web Check that POST the username and password values. For more information, see Web Checks with Form-Based Authentication.
Auth type
From the Auth type dropdown, select the type of authentication used by the page:
- Basic— HTTP Basic authentication passes the username and password as fields in an HTTP header.
- NTLM—NT LAN Manager (NTLM) is a suite of Microsoft security protocols that provides authentication, integrity, and confidentiality to users. This authentication type is usually recognizable by a grey dialog that prompts you for username and password.
Authentication Credentials
In the Username and Password, enter your authentication credentials. If using NTLM authorization, you are prompted to enter a domain as well.
Header Name and Value
In the header table, click the + button to add any header key-value pairs that should be included in the HTTP request.
Response
The Response area also features a Groovy scripting option for Internal Web Checks only.
For Web Checks that are not using a Groovy script, there are several HTTP response settings that must be completed for the URL.
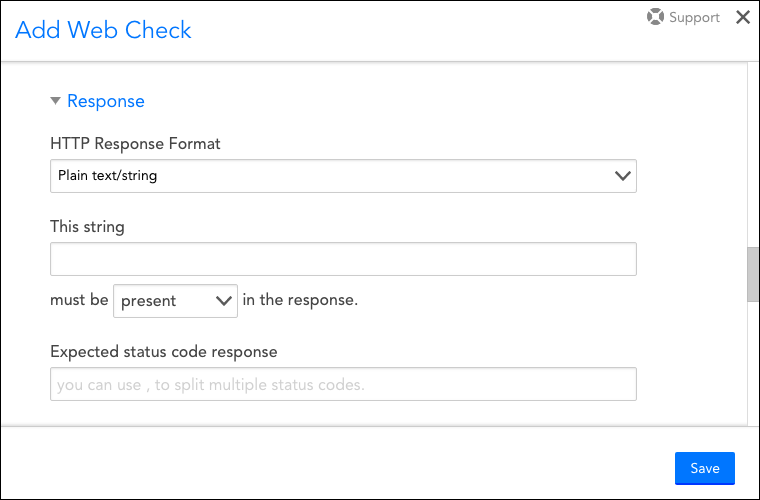
HTTP Response Format
From the HTTP Response Format dropdown, select a format for the response to the HTTP request. Once selected, some of the fields on the page are dynamically updated to allow you to specify format-specific criteria that should be included in (or absent from) the response. If relying on the presence of a string, note that the entry is case-sensitive.
In the Expected status code response field, enter the expected HTTP status code(s) that will be included in the response. Enter only integers. Multiple status codes should be separated by commas. If no status is specified, a 200/OK response is expected.
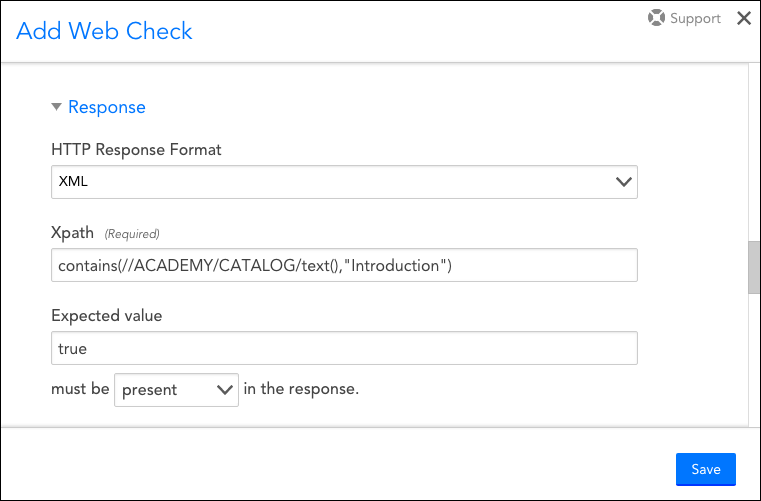
Note: If you choose “XML” as the response format, it’s important to note that Xpath processing does not support regular expressions. In order to find string matches in the page’s returned XML, you will need to use the contains query, as shown in the following screenshot. This query returns TRUE if the string is present. A useful tool for testing Xpath queries can be found at freeformatter.com.
Adding More Steps to a Web Check
When you add a new Web Check, at least one URL path (called the Step One URL Path), must be specified, along with its corresponding request and response settings. However, multiple steps can be added to the same Web Check in order to support more complicated checks that require a series of URL requests and responses in order to verify that a website is in full working order.
Additional steps are added from the Steps tab after the Web Check is saved.
Click the Add Step button and enter a path (either relative to the root URL previously established for the Web Check or independent from) and a description for this additional step into the Add a Step dialog. Then, proceed to configure request and response settings as outlined in this support article.
Each step you add is saved individually and available for management and testing from the Steps tab. For more information, see Testing Web Check Steps.
Configuring Checkpoints
In the Checkpoints area, specify the locations from which Web Checks should be sent. The types of locations that are available here vary depending upon whether you are adding a Standard Web Check or an Internal Web Check.
Note: If your Web Check consists of multiple steps, the checkpoints configured here apply to all of these steps.
Note: If you have default checkpoints established and want to use or build on those, leave the use default Website settings checkbox selected. For more information, see Website Default Settings.
External Checkpoints
If you are adding a Standard Web Check, there are five geographically dispersed checkpoints, hosted by LogicMonitor, from which the check can be sent.
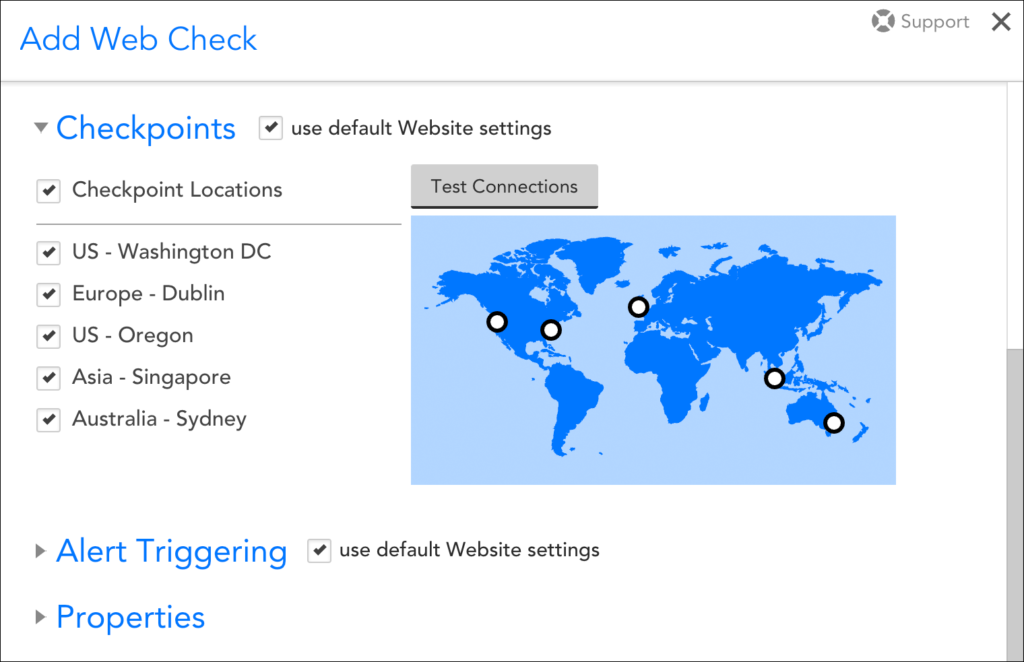
Click the Test button to verify that the selected locations can successfully reach your website.
Internal Checkpoints
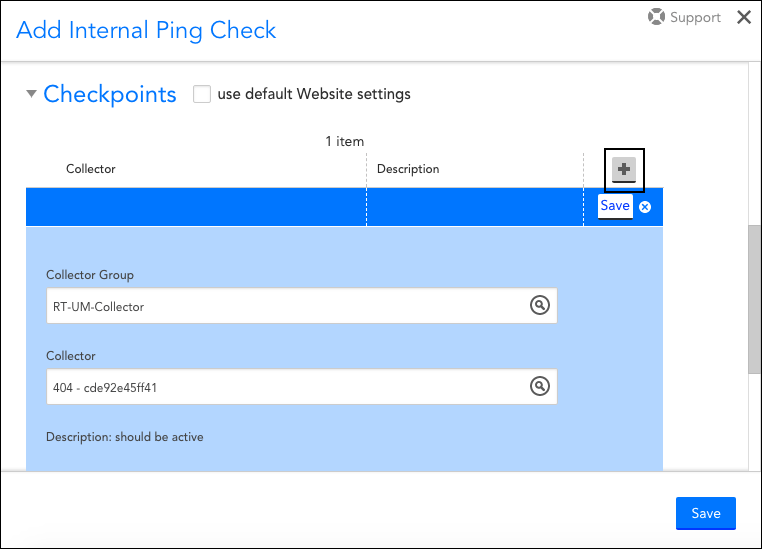
If you are adding an Internal Web Check, you will need to specify the Collectors that will be sending the checks. Click the + button to add Collectors to the table.
Note: Your user account must have Collector view permissions in order for you to be able to view and select Collectors from this area of the dialog. For more information, see Roles.
Configuring Alert Triggering
In the Alert Triggering section, you must specify the conditions that must be met in order for a website alert to be triggered, as well as the severity of the resulting alerts.
Note: If your Web Check consists of multiple steps, the alert triggers configured here apply to all of these steps.
Note: If you have default alert triggering settings established and want to use or build on those, leave the use default Website settings option selected. For more information, see Website Default Settings.
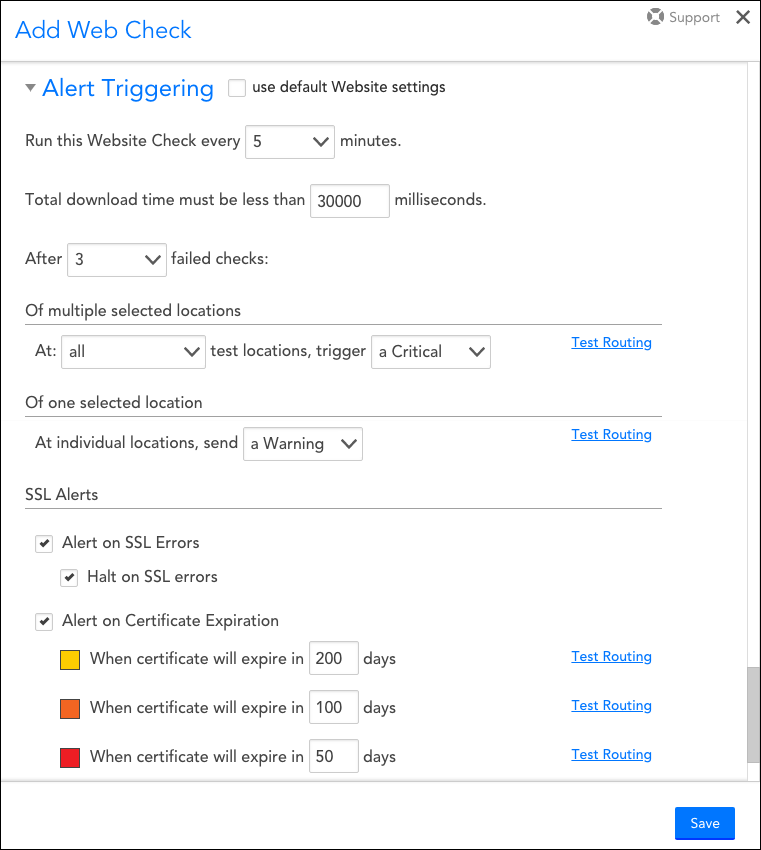
Run this Website Check every (X) minutes
From the Run this Website Check every X minutes dropdown menu, select how often the designated checkpoints should check the website. You can choose from frequencies that range from once a minute to once every 10 minutes.
Total download time must be less than (X) milliseconds
In the Total download time must be less than X milliseconds field, specify how many milliseconds in which the website must load.
After (X) failed checks…
From the After X failed checks dropdown menu, select the number of consecutive checks that must fail in order for an alert to be triggered.
…Of multiple selected locations
This field gives you the ability to designate a different alert severity should checks from multiple checkpoints fail, as compared to the failure of just one checkpoint. For example, you could specify that if all checkpoints report failure for three consecutive checks, an alert with the severity level of critical will be triggered.
…Of one selected location
This field gives you the ability to designate a different alert severity should checks from only one checkpoint fail, as compared to the failure of multiple checkpoints. For example, you could specify that a failure at a single checkpoint location for three consecutive checks will trigger an alert with the severity level of warning. In addition, using individual checkpoint alerts allows for greater request/response detail in the alert messages, since it is not simply a summarization of all checkpoints.
SSL Alerts
In the SSL Alerts area of the Alert Triggering section, you can configure LogicMonitor to alert you when SSL certificate issues are encountered during a Web Check.
Alert on SSL Errors
When selected, the Alert on SSL Errors option triggers alerts if a certificate experiences any of the following issues:
- Unsupported algorithms
- Untrusted or incomplete certificate chain
- CName and HostName mismatch
- Expired certificate
Halt on SSL errors
If any of the above issues are encountered and the Halt on SSL errors option is also selected, the Web Check will stop and send the alert without continuing.
Alert on Certification Expiration
You can also choose to get proactive notification of certificate expiration. Select the Alert on Certificate Expiration option and enter the number of days in advance of expiration in which you would like to receive a corresponding alert for each severity level.
Test Routing
Once you have configured the conditions that must be met in order for a website alert to be triggered, you can use the Test Routing hyperlinks to see what alert rule will match each condition, along with the escalation chain associated with that alert rule.
From the test display, the Test Now button can be used to send a synthetic test notification to the first stage in the specified escalation chain.
Note: Synthetic alert messages use LogicMonitor’s default global alert message templates. Any customizations, such as addition of alert tokens, are ignored during testing. You must use a live alert to test customizations. For more information, see Alert Messages.
For more information on alert rules and their associated escalation chains, see Alert Rules.
Configuring Properties
Properties can be added to your Web Checks to facilitate organization, customize alert message templates, set authentication credentials, and more. For more information, see Website Properties.
Overview
Ping Checks periodically ping a host name or IP address in order to verify that a device or website is up and listening. LogicMonitor supports two types of Ping Checks:
- Standard Ping Check. Standard Ping Checks, known simply as “Ping Checks” in the LogicMonitor interface, are performed by one or more geographically dispersed checkpoint locations. These locations are hosted by LogicMonitor and are external to your network. The purpose of a standard Ping Check is to verify that the outside world can reach the host name or IP address.
- Internal Ping Check. Internal Ping Checks are performed by one or more Collectors internal to your network. The purpose of an Internal Ping Check is to verify that the host name or IP address (whether internal or external to your network) is available to your network users.
The processes for creating standard Ping Checks and Internal Ping Checks are largely identical. This support article covers the addition of both types of checks, but will identify where configurations diverge, notably when identifying checkpoint locations.
Note: For information on the type of data that is monitored for your configured Ping Checks and how that data is organized on the Websites page, see What Is Website Monitoring?.
Configuring Basic Information
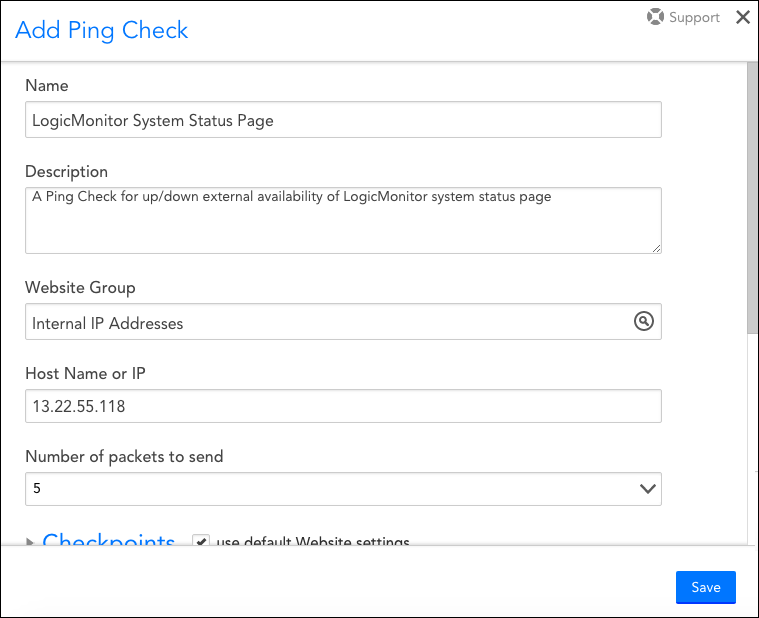
To begin the creation of a new Ping Check, select Websites | Add | Ping Check or Websites | Add | Internal Ping Check, depending upon whether you want the pings to be sent from locations external or internal to your network. In the Add dialog that opens, there are several pieces of basic information that must be provided, as shown (and discussed) next.
Note: Ping Checks can also be added using LogicMonitor’s API; see Using LogicMonitor’s REST API for more information.
Name
In the Name field, enter a descriptive name for your new Ping Check.
Description
In the Description field, briefly describe the scope and purpose of your new Ping Check.
Website Group
From the Website Group field’s dropdown menu, select the group that the Ping Check should belong to from the list of existing groups. By default, the root (top-level) website group is selected.
Host Name or IP
In the Host Name or IP field, enter the host name or IP address to which the ping test will be sent.
Number of packets to send
From the Number of packets to send field’s dropdown menu, select the number of packets to send for the Ping Check. LogicMonitor defaults to five packets, but you can choose to send up to 50. Packets are sent one by one, with a delay of 250 milliseconds between each packet.
Configuring Checkpoints
In the Checkpoints section of the Add dialog, specify the locations from which ping requests should be sent. As discussed in the following two subsections, the types of locations that are available here vary depending upon whether you are adding a standard Ping Check or an Internal Ping Check.
Note: If you have default checkpoints established and want to use or build on those, leave the use default Website settings option checked. For more information on configuring default Website settings, see Website Default Settings.
External Checkpoints
If you are adding a standard Ping Check, there are five geographically dispersed checkpoints, hosted by LogicMonitor, from which the ping request can be sent.
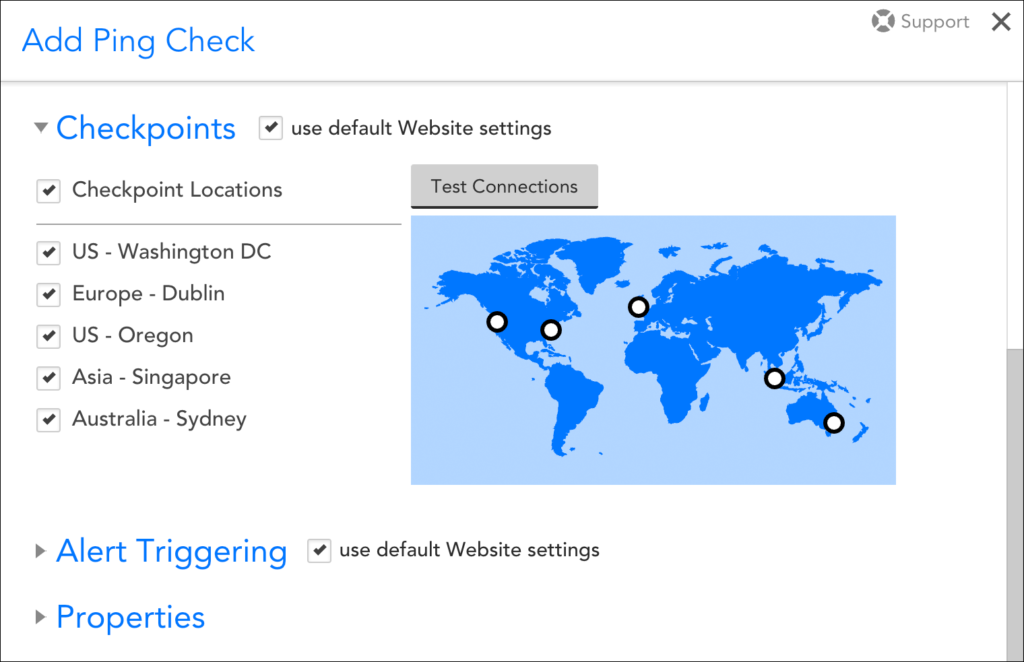
When you have finished selecting the external locations from which your ping requests will originate, click the Test button to verify that the selected locations can successfully ping the host name or IP address.
Internal Checkpoints
If you are adding an Internal Ping Check, you will need to specify the Collectors that will be sending the ping request. Click the + button to add Collectors to the table, as shown next.
Note: As discussed in Roles, your user account must, at a minimum, have Collector view permissions in order for you to be able to view and select Collectors from this area of the dialog.
Configuring Alert Triggering
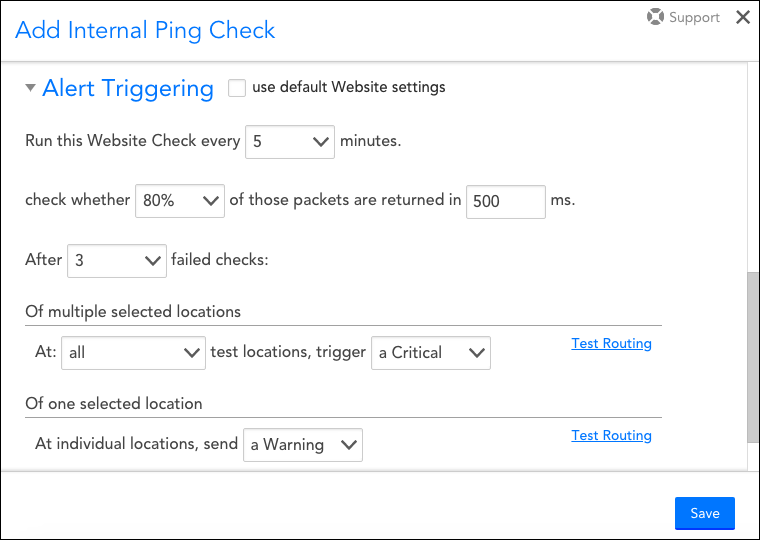
In the Alert Triggering section of the Add dialog, you will specify the conditions that must be met in order for a website alert to be triggered, as well as the severity of the resulting alert(s). There are several fields that require configuration in this section, as shown (and discussed) next.
Note: If you have default alert triggering settings established and want to use or build on those, leave the use default Website settings option checked. For more information on configuring default Website settings, see Website Default Settings.
Run this Website Check every (X) minutes
From this field’s dropdown menu, select how often the designated checkpoints will ping the host name/IP address. You can choose from frequencies that range from once a minute to once every 10 minutes.
Check whether (X)% of those packets are returned in (X) ms
From the two fields in this configuration, designate the percentage of packets that must be returned and the designated time period (given in milliseconds) in order for the check to be deemed successful. Packets are sent one by one, with a delay of 250 milliseconds between each packet. For example, if you leave the default of five packets in the Number of packets to send field, it will take 1000 milliseconds (one second) to deliver all five packets.
Note: These two fields technically operate independently of each other. If either criterion is not met (for example, any returned packet takes longer than the minimum allowed return time OR the number of packets returned is less than the minimum percentage threshold), the check is considered a failed check.
After (X) failed checks…
From this field’s dropdown menu, select the number of consecutive checks that must fail in order for an alert to be triggered.
…Of multiple selected locations
This field piggybacks on the previous field. It gives you the ability to designate a different alert severity should ping requests from multiple checkpoints fail, as compared to the failure of just one checkpoint. For example, as shown in the previous screenshot, you could specify that if all checkpoints report failure for three consecutive checks, an alert with the severity level of critical will be triggered.
…Of one selected location
This field also piggybacks on the After (X) failed checks: field. It gives you the ability to designate a different alert severity should ping requests from only one checkpoint fail, as compared to the failure of multiple checkpoints. For example, as shown in the previous screenshot, you could specify that a failure at a single checkpoint location for three consecutive checks will trigger an alert with the severity level of warning.
Test Routing
Once you’ve configured the conditions that must be met in order for a website alert to be triggered, you can use the Test Routing hyperlinks to see what alert rule will match each condition, along with the escalation chain associated with that alert rule.
From the test display, the Test Now button can be used to send a synthetic test notification to the first stage in the specified escalation chain.
Note: Synthetic alert messages use LogicMonitor’s default global alert message templates. Any customizations such as addition of alert tokens will be ignored during testing. You must use a live alert to test customizations. For more information on alert message templates, see Alert Messages.
For more information on alert rules and their associated escalation chains, see Alert Rules.
Configuring Properties
Properties can be added to your Ping Checks to facilitate organization, customize alert message templates, and more. For more information on adding and using properties, see Website Properties.


