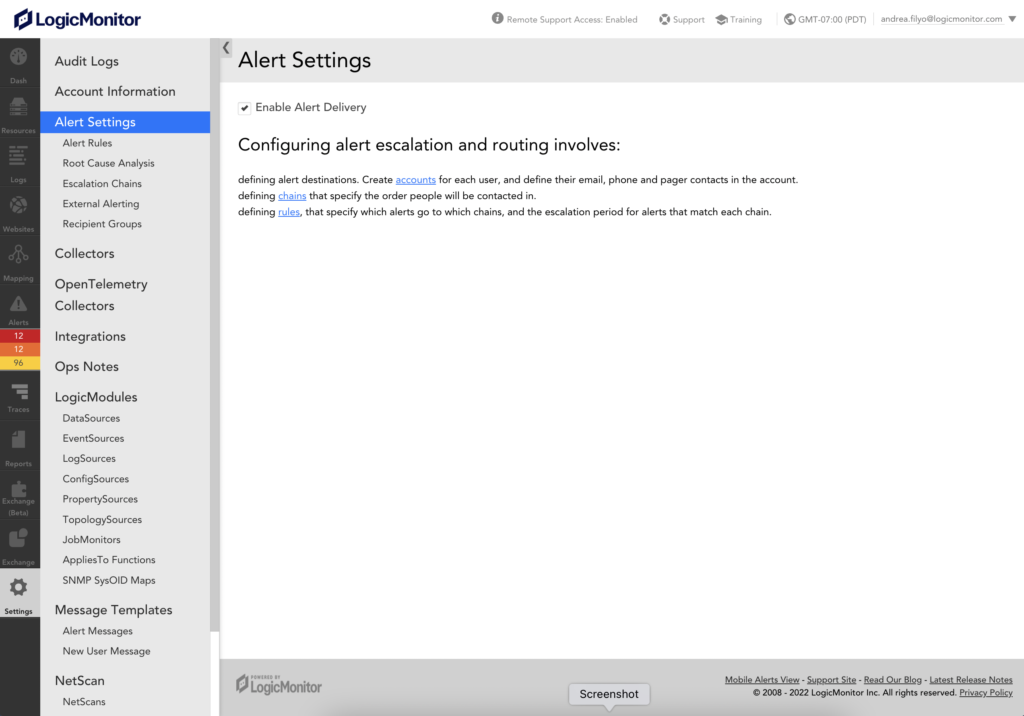
You configure global alert delivery from the Alert Settings section of the Settings page.
Enabling and Disabling Alert Delivery
Do the following:
- Click More Options in the left navigation menu, and select Settings.
- Click Alert Settings.
- Deselect the Enable Alert Delivery checkbox.
This will disable all alert delivery for your entire account. By default, alert notifications are delivered per your Alert Rules and Escalation Chains. Disabling alert delivery will result in no alerts being routed, alerts will only be displayed in your account.
Similar to a mailing list, a recipient group is a single entity that holds multiple alert delivery recipients. Consisting of multiple user accounts or other recipient groups, recipient accounts act as time-saving shortcuts when the same group of recipients needs to be notified of a variety of different types of alerts.
After you configure a Recipient Group, it becomes available to add to an escalation chain. For more information, see Escalation Chains.
Requirements for Creating a Recipient Group
The level of permissions determine which users or previously-created recipient groups are available for selection when adding recipients. You must have view permissions for each recipient or recipient group you want to add to the stage.
Creating a Recipient Group
- In LogicMonitor, navigate to Settings > Recipient Groups, and select Add.
- Enter a name and description for the recipient group.
This information displays in the list of Recipient Groups.
Note: The value you enter in the Name field is the value that is displayed in the escalation chain when adding recipients to a stage. For more information, see Escalation Chains.
- Add recipients to your recipient group by doing the following:
- In the Recipients settings, select the Add + button.
- Enter a value for a recipient in the Add User field.
LogicMonitor performs a lookup as you type to try and match users. - If you added an individual user as a recipient, select a value for a contact method from the Contact Method field.
You can add an LM Integration as a contact method.
Recommendation: Create a dedicated user account to associate with the integration to add an LM integration as a recipient. For more information about creating users, see Users.
- Select Save.
- (Optional) In the Arbitrary Emails field, enter one or more email addresses that are not associated with existing user accounts.
- To save, do one of the following:
- Select Save to save the recipient group and return to the list of recipient groups.
- Select Save & Add Another to save the recipient group and immediately add an additional recipient group.
Overview
Alert notifications are typically sent directly from servers within LogicMonitor’s data centers. However, with external alerting, a Collector is configured to pull triggered alerts from LogicMonitor and deliver them via SNMP traps, Syslog messages, or custom scripts.
External alerts are processed independent of standard alert delivery. In other words, they are delivered separately (and in addition to) any alert notifications configured via standard alert rules and their escalation chains.
Note: You can only configure one external alert definition per Collector.
Creating External Alerts
To create an external alert, navigate to Settings | Alert Settings | External Alerting | Add. As discussed next, the Add External Alerting dialog displays, containing several settings that must be configured in order to create an external alert.
Groups
From the Groups field, limit the resources to which the external alert will apply by designating one or more device groups. You can use an explicit group name or glob expression in this field.
Collector
From the Collector field, designate the Collector that will process alerts for the specified groups. You can only configure one external alert definition per Collector. If need be, Collectors can be added specifically for external alerting to overcome firewall rules or other obstacles unique to the external alerting environment (e.g. accessing a ticket management system).
Delivery Mechanism
From the Delivery Mechanism field’s dropdown menu, select the method (i.e. “SNMP trap”, “Syslog”, or “Script”) that the Collector will use to deliver external alerts for the resources contained by the specified groups. Depending on the method selected, varying configurations display.
SNMP Trap Delivery
If “SNMP trap” is selected as the delivery mechanism, the Collector will send an SNMP trap to an SNMP trap server for each alert triggered by resources in the group(s) specified. SNMP traps must be less than 1024 bytes, so the message may be truncated.
SNMP Trap Server
In the SNMP Trap Server field, enter the server to which SNMP traps will be sent. SNMP traps sent from Collectors will carry the LogicMonitor enterprise OID of 1.3.6.1.4.1.39832.
SNMP Community
In the SNMP Community field, enter the community string required for Collector authentication when sending SNMP traps to the specified server.
SNMP Version
From the SNMP Version field’s dropdown menu, select the version of SNMP the Collector will use when sending SNMP traps.
Syslog Delivery
If “Syslog” is selected as the delivery mechanism, the Collector will send a Syslog message to the specified Syslog server for each alert triggered by resources in the group(s) specified.
In the Syslog Server field, override the placeholder loopback IP address with the IP address of your Syslog server.
Script Delivery
If “Script” is selected as the delivery mechanism, the Collector will execute a script for each alert triggered by resources in the group(s) specified.
Script
External alerting scripts should be saved to the Collector’s directory (i.e. <lm_install_directory>\agent\local\bin). Assuming this is the case, simply enter the name of the script into the Script field. If an alternate folder is used, be sure to specify the script using its full path and ensure the Collector has the appropriate permissions.
Script Command Line
In the Script Command Line field, enter any arguments or parameters to be passed to the script. Any of the supported LogicModule tokens can be used as script parameters, but it is recommended that tokens common to all LogicModule alert types be used. If this is not possible, scripts should be constructed to function in the presence or absence of specific arguments, which can vary based on alert type. For more information on the available tokens, see Tokens Available in LogicModule Alert Messages.
Managing External Alerts
Once created, external alerts can be managed from the External Alerting page. Available by navigating to Settings | Alert Settings | External Alerting, this page allows you to view details for, sort, edit, and delete existing external alerts.
When a triggered alert is matched to an alert rule, it is assigned an escalation interval (defined in the alert rule), and then dispatched to an escalation chain. You can configure settings for an escalation chain directly in your LogicMonitor portal.
Note: It is possible that an alert could match an alert rule, but still not be routed. This scenario occurs if alert notification suppression is enabled using one of LogicMonitor’s AIOps features features to reduce alert noise. For more information, see Enabling Dynamic Thresholds for Datapoints and Enabling Root Cause Analysis.
When you configure an escalation chain you add recipients and contact methods specifying how recipients receive alert notifications. This allows LogicMonitor to route alert notifications to the recipients in the chain. For more information, see Alert Delivery Methods.
You can add the following types of recipients to an escalation chain:
- User accounts—You can deliver notifications to either the email address, SMS email address, or phone number stored in the user account. For more information, see Users.
- Recipient Groups—Recipient groups act as shortcuts when the same set of recipients needs to be notified of multiple types of alerts. Recipient groups can consist of user accounts, arbitrary email addresses, and other recipient groups. For more information, see Recipient Groups.
- LM Integrations—You can deliver alert notifications to any LM Integration defined in your LogicMonitor account. This allows you to direct alert notification delivery to third-party tools. For more information, see LogicMonitor Integrations Overview.
Recommendation: Create a dedicated user account to associate with the integration to add an LM integration as a recipient. For example, you can create a “Read Only” user account as the LM integration recipient to ensure that alerts are consistently routed to the dedicated user. Creating this type of user account also prevents the escalation chain from breaking if users change.
- Arbitrary Emails—You can add an email address that is not associated with an existing user account or recipient group. For example, you can use an arbitrary email address to represent a distribution list. Ensure that the distribution list is configured to allow external addresses.
Escalation Chain Stages
Escalation chains include stages that can contain recipients. An escalation chain must include at least one stage. Later stages of an escalation chain are notified if the alert is still in effect and prior stage recipients have not acknowledged or suppressed the alert within the escalation interval. For more information, see Alert Rules.
The following diagram illustrates an escalation chain with multiple stages:

When an alert matches an alert rule, the notification is sent to Recipients A and B in stage 1 based on the contact methods defined for the recipients. If the alert is not acknowledged or cleared by the recipients in Stage 1, LogicMonitor routes alert notifications to the recipients in Stage 2. If the alert remains active for the escalation interval time period (defined in the alert rule) after the second stage, notifications are repeatedly sent to the second stage recipients at the period specified by the escalation interval until the alert clears or is acknowledged.
Recommendation: Create an escalation chain for each functional group in your organization that receives alert notifications (For example, on-call engineers, a network team, or a database team).
You can configure an escalation chain with an empty stage. This is useful for delaying alert notifications for a particular DataSource or EventSource without impacting timely delivery of all alert notifications. An empty stage delays notification for the duration of the escalation interval (defined in the alert rule), at which point the next stage is triggered.
The following diagram illustrates an escalation chain with an empty stage:

The first stage of the escalation chain has no recipients assigned to it. Recipients A, B, and C do not receive a notification until the time defined in the escalation interval passes and the alert is not acknowledged or cleared during the escalation interval (defined in the alert rule). If the alert remains active for the entirety of the second stage, the alert escalates and notifications are resent to the recipients in Stage 2.
Note: If a throttle message is sent to an escalation chain with an empty first stage, recipients of later stages do not receive the throttle message.
Time-Based Escalation Chains
You can create a time-based escalation chain that lets you route alert notifications to different recipients depending on the day and time that the alert is triggered. LogicMonitor treats the stages added to a time-based escalation chain as a subchain of recipients. When an alert is routed to a time-based escalation chain, the subchains are processed in order until a subchain has an effective time that matches the current day and time. If there is no matching subchain, the alert is not routed, but displays on the Alerts page.
The following diagram illustrates a time-based escalation chain:
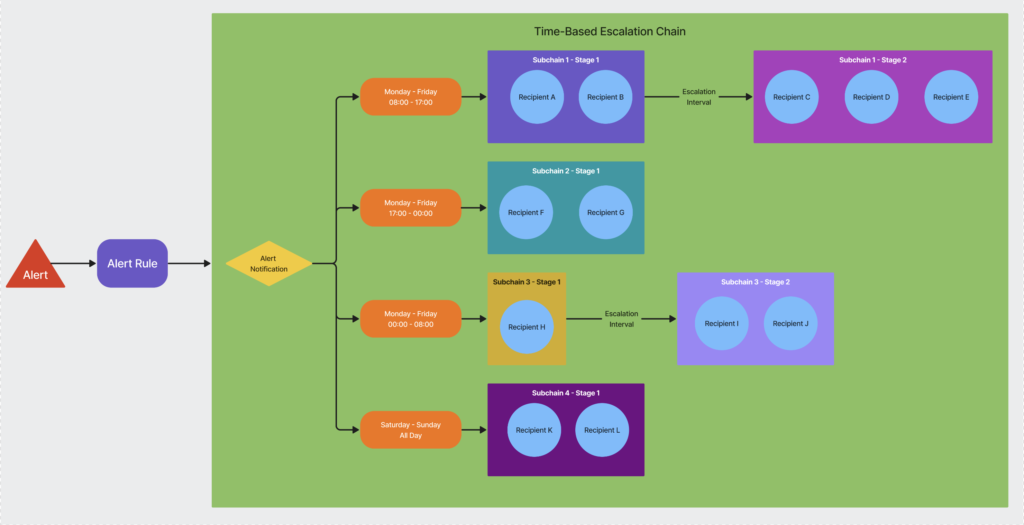
The recipients of an active alert are determined by the subchain that is active at the time the alert is triggered. When the alert is cleared, the recipients of the clear notification are determined by the subchain that is active at the time of the alert’s resolution. If the alert is cleared during a different period, the recipients of the active subchain at that time will receive a clear notification.
Note: Different subchains may not receive a clear notification when they contain different recipients.
Example: If an alert triggers during business hours (Subchain 1, active from 9:00 AM to 5:00 PM), the alert notification will be sent to recipients from Subchain 1. If the alert is cleared after hours (during Subchain 2, active from 5:00 PM to 9:00 AM), the clear notification will go to recipients from Subchain 2.
Recommendation: If your environment leverages LM Integrations, and you want to implement a time-based escalation chain, use a single integration across the subchains. For example, if you have a time-based escalation chain with two subchains (one for business hours and one for after hours), you must use the same integration as the recipient in both subchains.
Adding an Escalation Chain
- Navigate to Settings > Escalation Chains.
- Select Add.
- Enter a name and description for the escalation chain.
- To set the maximum number of alerts that can be sent to a stage within this escalation chain during a specified time period, select Enable Rate Limit and configure the following options:
- In the Rate Limit period (min), enter an amount of time (in minutes) during which alert notifications can be delivered.
- In the Rate Limit alerts, enter a number for the maximum number of alert notifications that can be delivered during the specified Rate Limit Period.
Alert notifications that are resent count towards this number.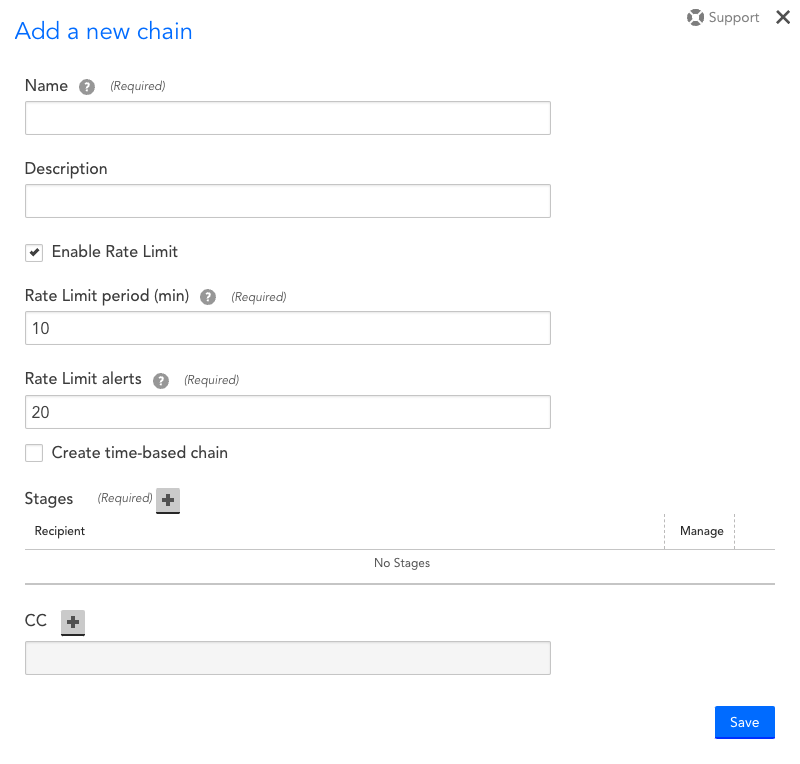
Note: If the number of alerts delivered to the chain’s initial stage exceeds the rate limit, then a throttle message is sent to the individuals assigned to that stage indicating that the number of alerts has exceeded the throttling level. Throttle messages are not escalated and are sent to the first stage. Recipients of later stages in an escalation chain with an empty first stage do not receive the throttle message.
Alert clear and acknowledgment notifications are still sent to all recipients, regardless of the escalation stage.
- Add a stage to your escalation chain. For more information, see Adding a Stage to an Escalation Chain.
- Select Save.
Adding a Stage to an Escalation Chain
When you configure a stage in an escalation chain you add recipients and their contact methods. You can also add an empty stage.
Your level of permissions determine which users or recipient groups are available for selection when adding recipients. You must have view permissions for each recipient or recipient group you want to add to the stage. In addition, you can add an LM Integration as a recipient.
Recommendation: Create a dedicated user account to associate with the integration to add an LM integration as a recipient. For example, you can create a “Read Only” user account as the LM integration recipient to ensure that alerts are consistently routed to the dedicated user. Creating this type of user account also prevents the escalation chain from breaking if users change.
You can add as many stages to an escalation chain as your environment needs.
- From the escalation chain settings, select add (+) for the Stages settings.
- Select add (+) to add recipients.
- Enter a recipient in the Add User field and choose a contact method from the Contact Method drop-down menu.
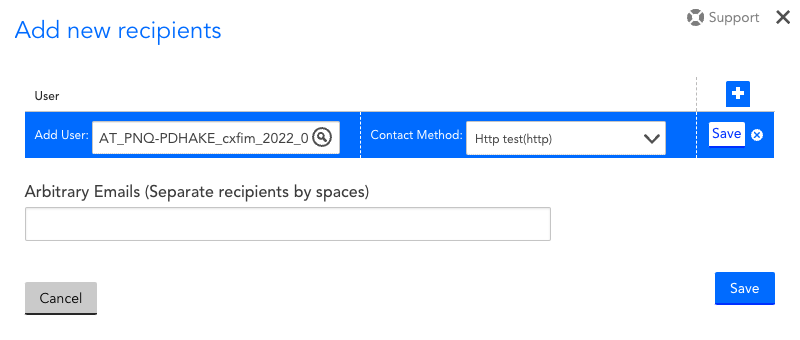
Note: To add an LM Integration as a recipient, you must enter a user account and the name of the integration.
- Select Save for the recipient entry.
- Repeat step 3 to add additional recipients as necessary.
- (Optional) In the Arbitrary Emails field, enter one or more email addresses that are not associated with existing user accounts or recipient groups.
- Select Save.
- To copy in recipients to receive a notification for every stage of the escalation chain, select + for the CC settings, and repeat steps 2-7.
Adding a Time-Based Escalation Chain
- Navigate to Settings > Escalation Chains.
- Select Add.
- Enter a name and description for the escalation chain.
- To set the maximum number of alerts that can be sent to a stage within this escalation chain during a specified time period, select Enable Rate Limit and configure the following options:
- In the Rate Limit period (min), enter an amount of time (in minutes) during which alert notifications can be delivered.
- In the Rate Limit alerts, enter a number for the maximum number of alert notifications that can be delivered during the specified Rate Limit Period.
Alert notifications that are resent count towards this number.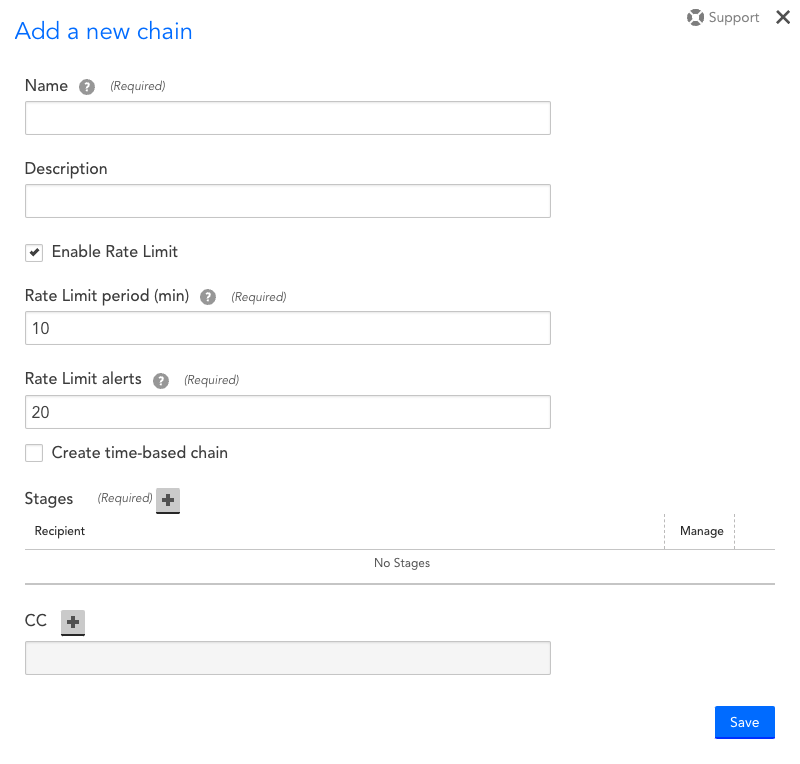
Note: If the number of alerts delivered to the chain’s initial stage exceeds the rate limit, then a throttle message is sent to the individuals assigned to that stage indicating that the number of alerts has exceeded the throttling level. Throttle messages are not escalated and are sent to the first stage. Recipients of later stages in an escalation chain with an empty first stage do not receive the throttle message.
Alert clear and acknowledgment notifications are still sent to all recipients, regardless of the escalation stage.
- Select Create time-based chain and configure the following settings for the subchain:
- Select add (+) for the Subchains settings.
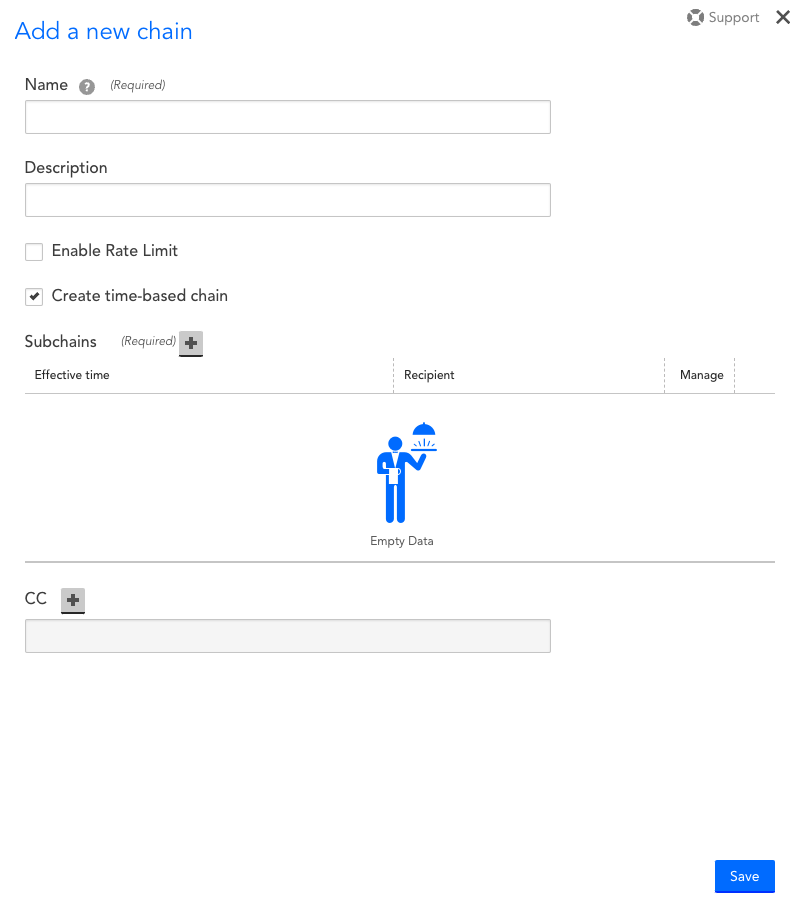
- From the Days settings, select which days to route the alert notification.
- From the Time settings, configure the time range to route the alert notification.
Alternatively, you can select All day to allow an alert to be routed at any time during the specified days. - Select TIME ZONE, and choose the time zone.
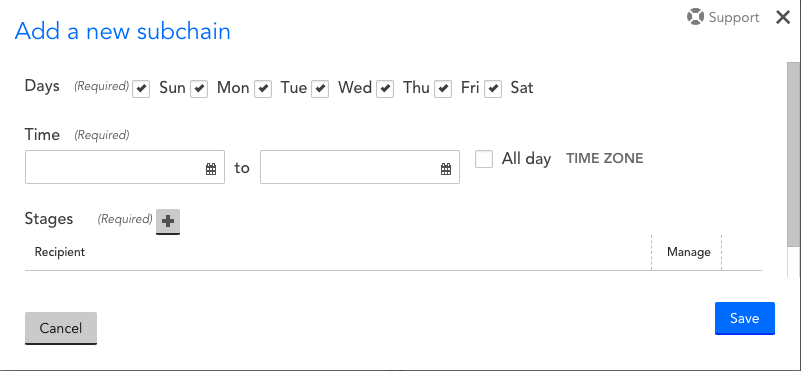
- Add a stage to the subchain. For more information, see Adding a Stage to an Escalation Chain.
- Select add (+) for the Subchains settings.
- Select Save.
Alert rules determine which alerts are routed as alert notifications, as well as how they are routed. An incoming alert is filtered through all rules, in priority order (starting with the lowest number), until it matches a rule’s filters based on alert level, resource attributes (name or group or property), and LogicModule/datapoint attributes. When a match occurs, rule processing stops and the alert is routed to the specified escalation chain, proceeding through the stages of the escalation chain until it is acknowledged or cleared.
An alert that does not match an alert rule is not routed, but still displays in your LogicMonitor portal.
Note: It is possible that an alert could match an alert rule, but still not be routed. This scenario occurs if alert notification suppression is enabled using one of LogicMonitor’s AIOps features that serve to intelligently reduce alert noise. For more information, see Enabling Dynamic Thresholds for Datapoints and Enabling Root Cause Analysis.
You can use the settings in your LogicMonitor portal to add, edit, or delete an alert rule. These settings determine which alerts the alert rule apply to, as well as how the alert is routed and managed after the alert rule is applied.
Adding an Alert Rule
- Navigate to Settings > Alert Rules.
- Select Add.
- Enter a unique name in the Name field.
- In the Alert Priority field, enter a numeric value to determine the priority order the alert rule is evaluated against other rules.
A value of “1” represents the highest priority. Values can consist of up to ten digits. The default value is “100”.
When a triggered alert matches an alert rule, no further alert rules are evaluated.
Recommendations:
- From the Level field drop-down menu, choose a level that corresponds to the severity levels you assigned when creating alert conditions.
Alerts with severity levels that correspond to the level specified match this alert rule.
Recommendation: If your environment leverages a third-party integration that relies on alerts, configure the alert to match all potential alert level severities.
- (Optional) Enter values for the following settings that a triggered alert must match to have the alert rule apply to it:
- Group—Specify one or more device or website groups that a resource must belong to.
- Resource/Website—Specify one or more resources or websites that the alert must be triggered by.
You can use glob expressions and wildcard matching for both settings. For more information, see Glob expressions.
Notes:
- Use the Resource Property Filters settings to specify one or more property values that a resource or website must have for an alert to match the alert rule by doing the following:
- Select the plus icon (+).
- Enter a property name in the Name field.
You can enter a maximum of five properties. Multiple properties are joined by an “AND” operator.
Property values support glob expressions and wildcard matching. For more information, see Glob expressions.
LogicMonitor attempts to auto-complete matching results for device properties only. Website property names must be manually entered.
Important: Property names are case sensitive and must be entered fully.
- In the LogicModule field, specify which LogicModules the alert must be triggered by to match the alert rule.
Alternatively, you can enter a wildcard (*) to indicate all LogicModules.
You can use glob expressions and wildcard matching. For more information, see Glob expressions.
The search option for looking up a LogicModule returns the value of the Displayed as field in the LogicModule record. For more information, see Introduction to LogicModules.
- In the Instance field, specify which instances the alert must be triggered by to match the alert rule.
Alternatively, you can enter a wildcard (*) to indicate all instances.
You can use glob expressions and wildcard matching. For more information, see Glob expressions.
Notes:
- In the Datapoint field, specify which datapoints the alert must be triggered by to match the alert rule.
Alternatively, you can enter a wildcard (*) to indicate all datapoints.
You can use glob expressions and wildcard matching. For more information, see Glob expressions.
Any datapoint filters established here are ignored by EventSource and JobMonitor alerts, as these types of alerts are not triggered by datapoint conditions.
- Enable Send notification when alerts clear to allow any recipient of the initial alert notification to also receive a notification when an alert clears. This option also ensures alert notifications are delivered if SDT (scheduled downtime) is subsequently activated to temporarily suppress other routed alert notifications for the issue.
Note: Receiving a notification when an alert clears regardless of SDT status only applies to alerts triggered by DataSources. Notifications for EventSources are not delivered if the triggering instance or resource is put in SDT.
Important: If your environment leverages a third-party integration that relies on alerts, enable this option to ensure that LogicMonitor can route alerts to your third-party tool. This applies regardless of whether the alert has an SDT status. This setting also ensures that LogicMonitor can close incidents in your third-party integration when an alert clears.
- Enable Send status notifications for Acknowledge or SDT to allow any recipient of the initial alert notification to receive a notification when an alert is acknowledged or put in SDT.
- In the Escalation Interval (min) field, enter a value for the amount of time in minutes that should elapse before an alert is escalated to the next stage in your escalation chain. Escalation stops when the alert is acknowledged or cleared.
If there is only one stage in the escalation chain, the alert notification is repeatedly sent to that stage until it is acknowledged or cleared. Similarly, if the notification reaches the end of a multi-stage escalation chain, the alert is repeatedly sent to the final stage until it is acknowledged or cleared.
Important: If your environment leverages a third-party integration that relies on alerts, enter “0”. This routes the alert notification to the first stage of the escalation chain once, and does not resend unless you manually escalate the alert. Repeatedly sending an alert notification to an integration can result in duplicate behavior in your third-party tool.
- From the Escalation Chain drop-down menu, select the escalation chain you want to route alerts to. For more information, see Escalation Chains.
- Select Save.
Best Practices for Configuring Alert Rules
Configuring your alert rules is highly dependent on your environment. For example, if your environment leverages LM Integrations, you should consider the alert lifecycle when configuring an alert rule. Use the following best practices for configuring your alert rules:
- Only route alerts that require immediate attention—Alert routing works well for alerts that require immediate attention, such as critical level alerts. Some alerts don’t require immediate attention, such as warning alerts, and as such are better viewed in reports. Instead of having “catch all” rules that are sending every single alert to a certain group of people, you can set up your alert rules such that only specific alerts are going to be routed. Make sure, however, that you’re not ignoring any alerts; you should still review alerts that are not being routed in a report.
LogicMonitor also offers AIOps features that suppress alert notifications on a very targeted basis with the aim of intelligently reducing alert noise. For more information, see Enabling Dynamic Thresholds for Datapoints and Enabling Root Cause Analysis.
If you do want to route all alerts, consider creating a rule with an escalation interval of “0” for warning alerts. This filters out all warning alerts and send them only once to the first stage of the specified escalation chain. Then you can set up other rules that route only error and critical alerts to people within your organization. - Give specific rules higher priorities—Organize your rules so specific rules have higher priorities (lower numbers), and general rules have lower priorities (higher numbers). Any alerts that do not meet the criteria of your specific rules are caught by the general rules.
- Index your priorities—For a large deployment, you can index your priorities to correspond to groups within your organization. For example, you could set dev related rules to have priorities in the 100s, production related rules to have priorities in the 200s, and QA related rules to have priorities in the 300s. Ensuring that every rule is set to only match alerts from a specific device group, each department can work within their range of priorities to customize routing for their group, without affecting alerts for any other department.
- Leave large gaps between priority levels—If your priority levels are too close together sequentially, you may need to edit the priorities for your existing rules to make room for new rules.
- Test alert rules—Test alert delivery to ensure that alerts are routing as intended. For more information, see Testing Alert Delivery.
- (For LM Integrations) Use a single alert rule for the entire alert lifecycle—If an alert rule references delivery to an alert integration as part of its escalation chain, that rule should be configured to match all potential alert level severities. This prevents duplicate behavior or orphaned incidents in your third-party tool.
When LogicMonitor delivers alert information to a third-party tool, LogicMonitor looks for an external reference (for example, a ticket ID number) for that alert. This reference is returned to LogicMonitor by the third-party tool. LogicMonitor captures this reference, and associates it with the alert using a key that consists of the alert rule ID and integration ID. This key is then used to tie all future activity for that alert back to the original target integration object.
If an external reference is not found for an alert, the integration creates a new object. If an external reference is found, the integration updates the existing object.
Example Alert Rule Setup
The following screenshot depicts a sample set of alert rules:

The highest priority rule is “Production Warning Alerts”. It filters out all alerts with a severity level of “Warn” in the child groups under production. This rule posts alert notifications to a messaging tool (using LM Integrations) every 30 minutes, until the alert is acknowledged or cleared.
The second highest priority rule is “Production Database Alerts.” It only matches alerts on DataSources that have the term “SQL” somewhere in the name for devices in the child groups under the servers group. Since the “Warn” alerts are filtered out by the first rule, this rule only picks up database alerts with severity levels of “Error” or “Critical.” The stage one recipients of the “DB Admins” escalation chain is notified first, and if they do not acknowledge the alert and it does not clear within 15 minutes, it is sent to the stage two recipients. After 15 minutes, if nobody has acknowledged the alert and it has not cleared, the alert escalates to stage three. Stage three does not have recipients, so no one is notified. Since alert notifications are repeatedly sent to stage three until the alert is acknowledged or cleared, having an empty last stage is essentially ensuring that nobody is notified after the alert escalates past stage two.
Note: When sending alert notifications to a ticketing system in one of your stages, ensure that you have either a zero resend interval or a subsequent stage with a different delivery method. This prevents multiple tickets for the same condition.
The next highest priority rule is “Production Server Alerts”. It matches any alerts with a severity level of “Error” or “Critical” for any resource in any child group under the servers group. Since this rule has a lower priority (that is, a higher number) than the “Production Database Alerts” rule, any error or critical alerts that do not originate from a SQL DataSource match this rule instead. This alert rule catches the overflow—anything that is not going to the database team is picked up by the server team.
The fourth rule routes all alerts with a severity level of “Error” or “Critical” for resources in the child groups of the network group. All alerts with a severity level of “Warn” are filtered out so this rule is catches error and critical alerts that are not routed to the database or server teams.
All alerts display within your LogicMonitor interface. You can additionally choose to have alerts routed (using alert rules and escalation chains) via a variety of delivery methods, including text, email, voice call, or integration with a third-party app such as a ticketing system.
If you think you aren’t receiving routed alert notifications that you must be receiving—or if you think you are receiving too many alert notifications, follow the troubleshooting tips listed in the following sections.
Troubleshooting Missing Alert Notifications
The generation of alerts and subsequent routing of alert notifications has many moving parts in LogicMonitor. In addition, there are features that seek to intelligently suppress alert notifications under targeted circumstances in order to reduce alert noise. Review the possible causes for missing alert notifications in the following sections to see if any apply to your situation.
Are the alerts being generated?
First, it is important to distinguish whether your problem is with alert generation or alert delivery. All alerts, whether routed or not, display on the Alerts page/tab in your LogicMonitor account.
If you cannot find the alerts for which you think you must be receiving notifications for within the interface (make sure to manually include cleared alerts in your filter criteria), then the alert probably isn’t being triggered in the first place. In this case, you’ll need to adjust the triggering criteria such as datapoint thresholds, website alerting configurations, and so on such that alerts are triggered as you expect. For more information, see Static Thresholds for Datapoints and website alerting configurations.
Does the alert match an alert rule?
If you do see the alerts within your LogicMonitor account, but you aren’t receiving alert notifications, then you need to determine whether you have an alert rule configured to route notifications for that type of alert. Remember that in order for alert notifications to be routed, the particular website, EventSource, resource datapoint must match an alert rule, and this alert rule must reference an escalation chain that contains the recipients that you want to deliver notifications to. For more information, see Alert Rules and Escalation Chains.
In most cases, alert notifications do not reach their intended destinations because they are being matched to an unexpected alert rule. To troubleshoot this possibility, you can:
- Test alert routing. For more information, see Testing Alert Delivery.
- Display the Alert Rule column on the Alerts page to see what alert rule is matching the alert. For more information on customizing columns on the Alerts page, see Managing Alerts from the Alerts Page.
Was the alert triggered during scheduled downtime (SDT)?
Keep in mind that alerts that occur during periods of SDT display in the LogicMonitor interface, but are never routed for external delivery. A resource (or website, EventSource, and so on) that is in SDT is denoted with a unique clock icon throughout the LogicMonitor interface to help you quickly identify SDT status. For more information, see SDT Tab.
Are alert notifications being suppressed by one of LogicMonitor’s AIOps features?
It is possible that an alert could match an alert rule, but still not be routed beyond LogicMonitor’s interface. This scenario occurs if alert notification suppression is enabled via one of LogicMonitor’s AIOps features that serve to intelligently reduce alert noise. For more information, see Dynamic Thresholds for Datapoints and Dependent Alert Mapping.
Is the escalation chain rate limited?
If rate limiting is enabled for the escalation chain, the number of alert notifications that can be sent to the escalation chain in a specified time period is limited. For more information on rate limiting, see Escalation Chains.
Is the contact information for your user incorrect?
Escalation chain recipients are typically specified using user accounts. If the information for a user in an escalation chain is incorrect, alert notifications won’t be delivered correctly. Double check the contact settings (Settings > Users & Roles > Users) for the user account in question.
Is your receiving email or SMS gateway refusing messages or queuing messages for delivery?
Alert notification messages could be refused or queued because of spam control, gateway misconfiguration, DNS issues, and so on.
Was the alert notification marked as spam by your email client?
Check your spam folder.
Is the missing alert notification for a Collector, website, EventSource, or external alert?
- Collector—If notifications for Collector down alerts are not being received, make sure there is a valid escalation chain specified for your Collector. For more information, see Monitoring Your Collectors.
- Websites—LogicMonitor uses checkpoints to determine if websites are accessible. Configured Web Checks and Ping Checks allow you to differentiate alert notification settings depending upon the failure of multiple or individual checkpoints. Make sure these settings are as you expect. For more information on alert settings for website, see Ping Check or Web Check.
- EventSources—LogicMonitor automatically suppresses some duplicate EventSource alert notifications. Review the duplicate suppression details to ensure behavior is as you expect. For more information, see Creating EventSources.
- External alerting—Ensure that the referenced Collector is online.
Troubleshooting Too Many Alert Notifications
Receiving too many LogicMonitor alert notification emails can ultimately lead to alert fatigue and the ignoring of important alerts. Some tips for avoiding this undesirable situation include:
- Tuning your static datapoint thresholds to suit your environment. For more information, see Static Thresholds for Datapoints.
- Enabling AIOps features that serve to intelligently suppress alert notifications for targeted situations. For more information, see Dynamic Thresholds for Datapoints and Dependent Alert Mapping.
- Avoiding routing all alerts. Some alerts, such as alerts with a severity of warning (as compared to error or critical), are better viewed regularly in LogicMonitor reports, or being posted to a ticketing system using custom alert delivery methods. For more information, see Custom HTTP Delivery.
Overview
Larger environments can have a complex network of alert rules, and it can be difficult to predict with certainty how alert rule priority and wildcard matching will play out. For this reason, it is generally a good idea to test alert delivery in LogicMonitor to ensure that alerts are being routed as intended. Alert routing testing can be performed for instances, EventSources, ConfigSources, and cluster alerts.
Alert routing testing performs a static test of the trigger in order to find its matching alert rule and deliver to the recipient(s) of that rule’s specified escalation chain. It does not take into account any dynamic conditions that could be at play when the alert is triggered under day-to-day circumstances. For example, in actuality, if the resource triggering the alert is in SDT or if the alert is evaluated using AIOps features such as dynamic thresholds or root cause analysis, the resulting notification routing could be suppressed.
Testing Alert Delivery for Alerts Triggered by Resources
To test alert delivery for alerts associated with your devices and resources, navigate to the Resources page and find the appropriate DataSource/DataSource instance, EventSource, ConfigSource or cluster alert in the Resources tree. Open the Alert Tuning, Alert Routing, or Cluster Alerts tab (depending on what is triggering the alert you are testing) and click the alert routing icon. As shown next, an Alert Routing dialog opens, displaying routing details (i.e. matching alert rule and its specified escalation chain) for each alert severity level.
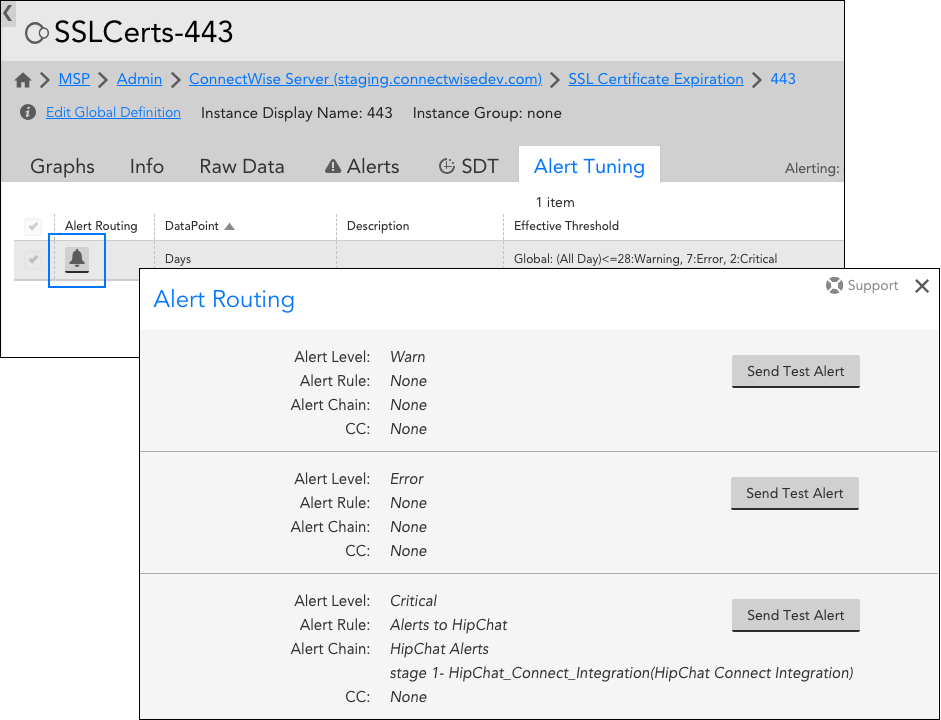
For each severity level that matches an alert rule, you can click the Send Test Alert button to generate a synthetic alert and ensure that the intended recipient(s) do in fact receive the alert notification.
Note:
- Synthetic test alerts are not escalated; they are only sent to the first stage of recipients in the corresponding escalation chain.
- Synthetic alert messages use LogicMonitor’s default global alert message templates. Any customizations such as addition of alert tokens will be ignored during testing. You must use a live alert to test customizations. For more information on alert message templates, see Alert Messages.
Testing Alert Delivery for Alerts Triggered by Websites
Alert delivery tests for websites (Web Checks and Ping Checks), are performed from the Websites page; specifically, from the Manage dialog of the Web or Ping Check you would like to test. For more information, see Adding a Web Check and Adding a Ping Check respectively.
Troubleshooting Alert Delivery
If an alert notification doesn’t arrive at your intended delivery destination and you’re at a loss as to why, see Troubleshooting Alert Delivery for common issues.
Note: Alert notifications that are routed to an LM Integration can only be tested if the integration is configured to update alerts in addition to creating them in the third-party application. Integrations configured to create tickets (or equivalents) based on LogicMonitor alerts, but not update those tickets when the alert is acknowledged, escalated or cleared, may not send test alerts correctly. For more information, see Alert Rules and Escalation Chains.
Overview
LogicMonitor supports several methods of delivering alert notifications:
The method used is determined by the escalation chain assigned to the alert’s matching alert rule. Alert rules determine which alerts are additionally routed as alert notifications, as well as how they are routed. If no alert rule is in place for the current alert condition, it will display on the Alerts page in the LogicMonitor interface. For more information on alert rules, see Alert Rules.
LogicMonitor generates the phone number for your account that is used for voice calls and SMS messages. If you want to know the phone number generated for your account, please contact LogicMonitor support.
Note: The phone number used for SMS messaging may change over time.
Text Message (SMS) Alert Delivery
LogicMonitor supports two methods of delivering alerts via text messages: via an email-to-sms gateway (SMS Email) and native SMS.

Note: New Zealand customers may incur a carrier fee of $0.20 for replies via SMS alerts.
SMS Email
An email to sms gateway is simply an email address that can be used to deliver sms or mms messages. The advantages of this method are that it is generally free of carrier charges, and because most email to sms gateways and phones preserve the subject line or body in replies, it is easier to respond to alerts simply by replying to the message. The disadvantage is that it depends on the availability of your phone provider making this email gateway available – something commonly done in the United States, but not in all other countries.
SMS email alert notifications are formatted based on the default email alert message templates in your account, unless a custom message template is defined for the datapoint, EventSource, website, etc. in alert. The format for SMS email alert notifications can be set to full (which will display the entire alert message) or short (limits the message to 160 characters).
To route alert notifications via SMS email, first ensure that an SMS email address is defined for a user in your account, then add a recipient in an escalation chain and set the contact method to the user’s SMS email address.
For instructions on how to respond to SMS email alert notifications, see Responding to Alert Notifications via Email or SMS Email.
Native SMS
Native SMS messages can be sent directly to a user’s phone when the user’s phone number is defined in their account. The advantage of native SMS is that it can be more reliable and will work even where the provider does not provide an email-to-sms gateway address. The disadvantages of this method are that it is harder to respond to alerts, as native SMS messages do not carry any context (the subject line of the original message is not sent back with the reply) so requires the user to enter the alert ID when responding to alerts.
SMS alert notifications are formatted based on the default SMS alert message templates in your account, unless a custom message template is defined for the datapoint, EventSource, website, etc. in alert.
To route alert notifications via native SMS, first ensure that a phone number is defined for a user in your account, then add a recipient in an escalation chain and set the contact method to the user’s SMS phone number
For instructions on how to respond to native SMS alert notifications, see Responding to native SMS alert notifications.
Email Alert Delivery
LogicMonitor allows you to route alert notifications to an email address using one of two different methods:
- Standard email alert delivery
- Custom email alert delivery
Standard Email Alert Delivery
Standard email alert delivery sends alert notifications according to the alert message defined in the definition of the datapoint in alert, or according to the default alert message template if no custom message is defined for the datapoint. This has the advantage that the email can be formatted specifically for the alert, and can include explanatory information or advice on how to react to the alert. For example, consider the following email alert:
The host prod5 is experiencing an unusual number of failed TCP connections, probably incoming connections. There are now 4.16 per second failed connections, putting the host in a warn level.
This could be caused by incorrect application backlog parameters, or by incorrect OS TCP listen queue settings.
Email alert notifications are formatted based on the email alert message templates in your account, unless a custom message template is defined for the datapoint, EventSource, website, etc. in alert.
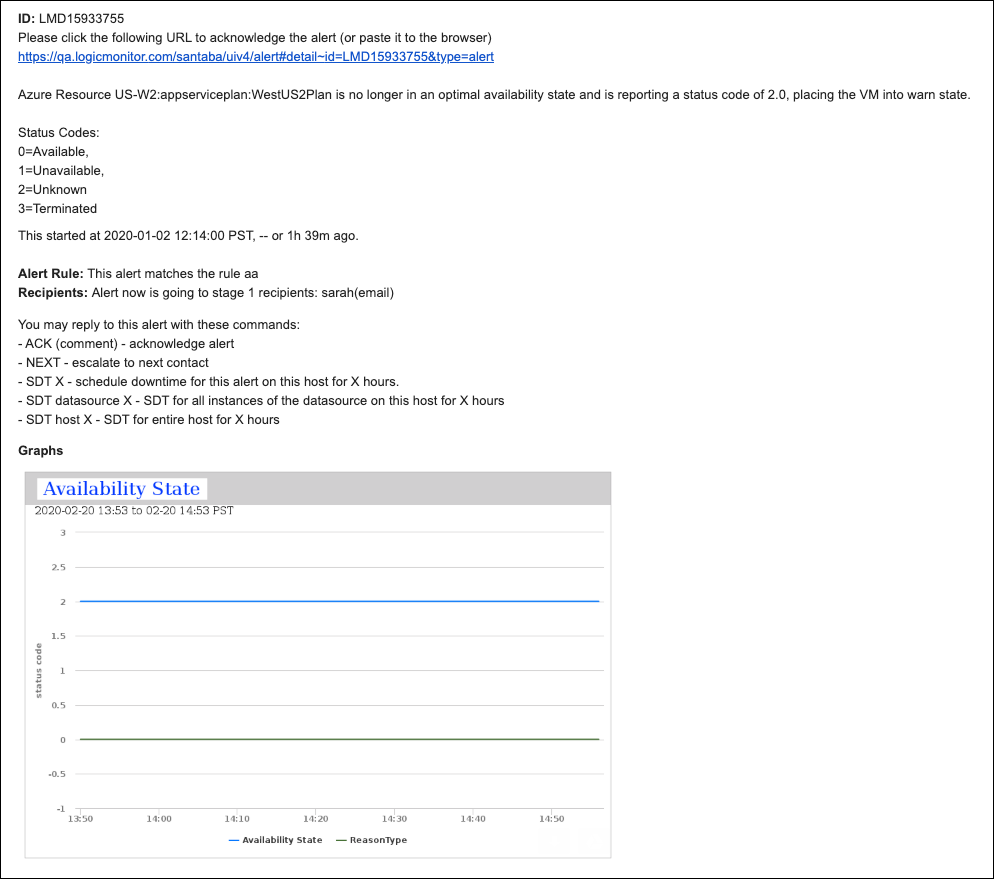
If an alert is triggered by a datapoint, the resulting email alert notifications include DataSource graphs for faster time to resolution. All graphs relevant to the instance and datapoint in alert are included and feature 60 minutes of data immediately preceding the alert. For more information on DataSource graphs, see DataSource Graphs.
To route alert notifications via email, either:
- add a user as a recipient in an escalation chain and set the contact method to email; OR
- add an arbitrary email address to the CC field in the recipient field for an escalation chain
For instructions on how to respond to email alert notifications, see this help page.
Custom Email Alert Delivery
Custom email alert delivery allows you to format alert notification emails in a more consistent format, without explanatory text. This can be advantageous if you’re sending alert notifications to a ticketing system, for example. Custom email alert delivery enables you to define the precise format of the email subject and body using tokens, so that it can be easily parsed by the recipient system. For example consider the following custom email alert:
Custom email alert notifications are formatted based on the subject and email body in the definition of the custom email alert delivery method.
To route alert notifications via custom email delivery:
- define a custom email alert delivery method; and
- add a user as a recipient in an escalation chain and set the contact method to the custom email alert delivery method you defined.
For instructions on how to respond to email alert notifications, see this help page.
Voice Call Alert Delivery
You can choose to have LogicMonitor alert notifications delivered to users in your account via voice calls. These notifications will be formatted based on the default email alert message templates in your account, unless a custom message template is defined for the datapoint, EventSource, website, etc. in alert.
To route alert notifications via voice calls, add a user as a recipient in an escalation chain and set the contact method to voice for that user. Note that voice alerts do support international calls – simply format the international phone numbers using E.164 number formatting. E.164 numbers can have a maximum of fifteen digits and are usually written as follows: [+][country code][subscriber number including area code].
- For example, to convert a US phone number (415 599 2671) to E.164 format, one would need to add the ‘+’ prefix and the country code (which is 1) in front of the number (+1 415 599 2671). In the UK and many other countries internationally, local dialing requires the addition of a 0 in front of the subscriber number. However, to use E.164 formatting, this 0 must be removed. A number such as 020 7183 8750 in the UK would be formatted as +44 20 7183 8750.
You can acknowledge, SDT, or escalate alerts delivered via voice notifications by responding on your phone’s keypad (the notification message will provide instructions for doing so).
Alerts for LM Integrations
You can integrate with third-party tools to extend the monitoring capabilities and alerting technologies that LogicMonitor provides, enabling you to have a seamless experience with the tools in your environment. You can integrate LogicMonitor with a messaging program to enable you to acknowledge LogicMonitor alerts from within your messaging tool, or integrate LogicMonitor with an ITSM (IT Service Management) solution to automatically manage incidents in your ITSM tool. For more information, see LogicMonitor Integrations Overview.

