Users are required to authenticate themselves with a bearer token before making LogicMonitor REST API v3 requests. It is a combination of multiple alpha numeric characters and is auto generated by LogicMonitor. You can use bearer token to authenticate yourself to use LogicMonitor Python and GO v3 SDK files and LogicMonitor REST API v3.
You do not have to buy special license to get a bearer token. As a LogicMonitor customer, when you buy a license for a device such as cloud device, physical device, or device of any other type, you are eligible to get a bearer token. Also, you do not need a specific role to get the token. It is unique for each user.
Unlike LMv1 token that needs a combination of current date and time to authenticate, bearer token is not dependent on date and time for authentication. It does not expire or generate a random code that you have to use for authentication. Once you get the bearer token, you have to add it to the API requests just once. Later on, LogicMonitor REST API code will reuse the token without you having to enter it every time. As a developer using LogicMonitor REST API, you need not develop authentication header or write commands to authenticate yourself. Thus, bearer token not only saves time, it also saves development efforts.
High Security Standards of Bearer Token
Bearer token has been designed and developed to ensure customer data security. Refer to the following points to understand the security strength of bearer token:
- Bearer token is fully visible in LogicMonitor only at the time of its generation. That’s the only chance to copy it at a secure location. Next time onwards, the token is partially masked.
- The token is unique for each user and therefore, non-transferable. Thus, nobody can misuse it because it is partially masked and other than the rightful owner, authentication will fail.
- Bearer token is system generated and hence, it cannot be edited.
Prerequisite
You must have the Allow Creation of API Tokens permission to access the API Tokens tab and to generate a bearer token.
Generating Bearer Token
Follow these steps to generate a bearer token:
- Navigate to Settings > Users & Roles > API Tokens tab > Bearer tab. A list of bearer tokens is displayed.
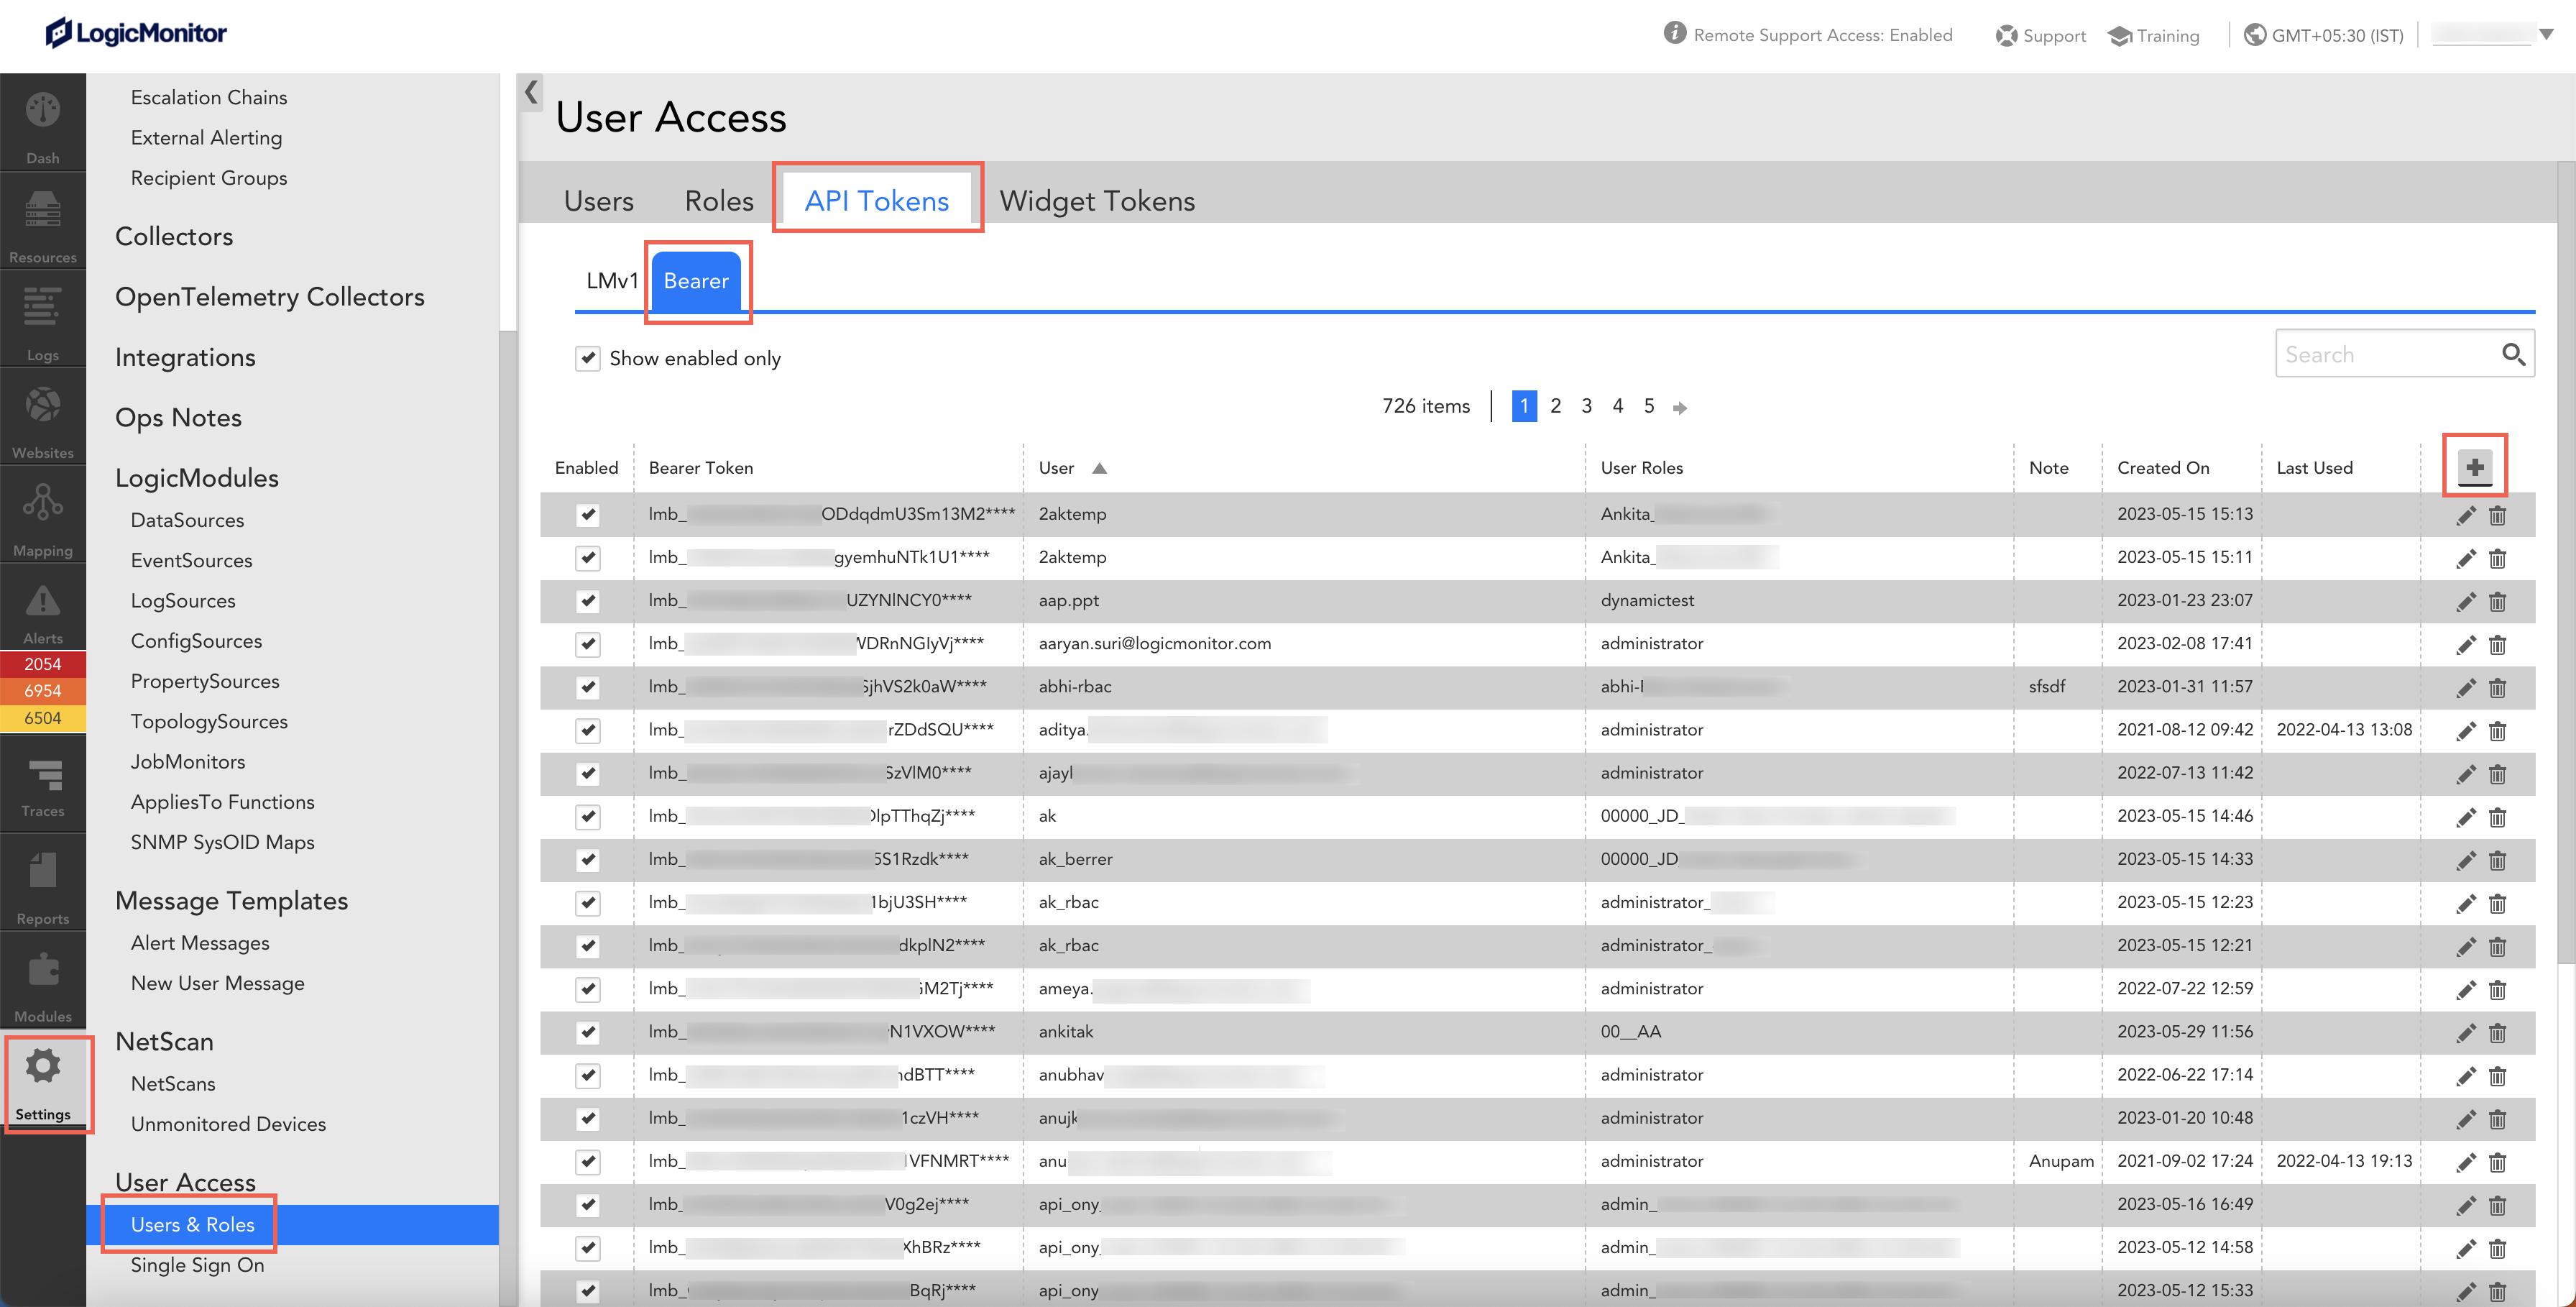
- Select add
 . A form to capture details is displayed. Note that by default, Bearer is selected in the Token Type drop down.
 - Search and select your username in the User field. LogicMonitor immediately generates a token in the Token field.
- Select Copy
 to copy the token at a secure location.
Note:
Once generated, you have the only chance to copy it. The token is designed in such a way that later on, you can only view the token but cannot copy or edit it. This helps to ensure security of the token. - Enter details or any information related to the token in the Note field.
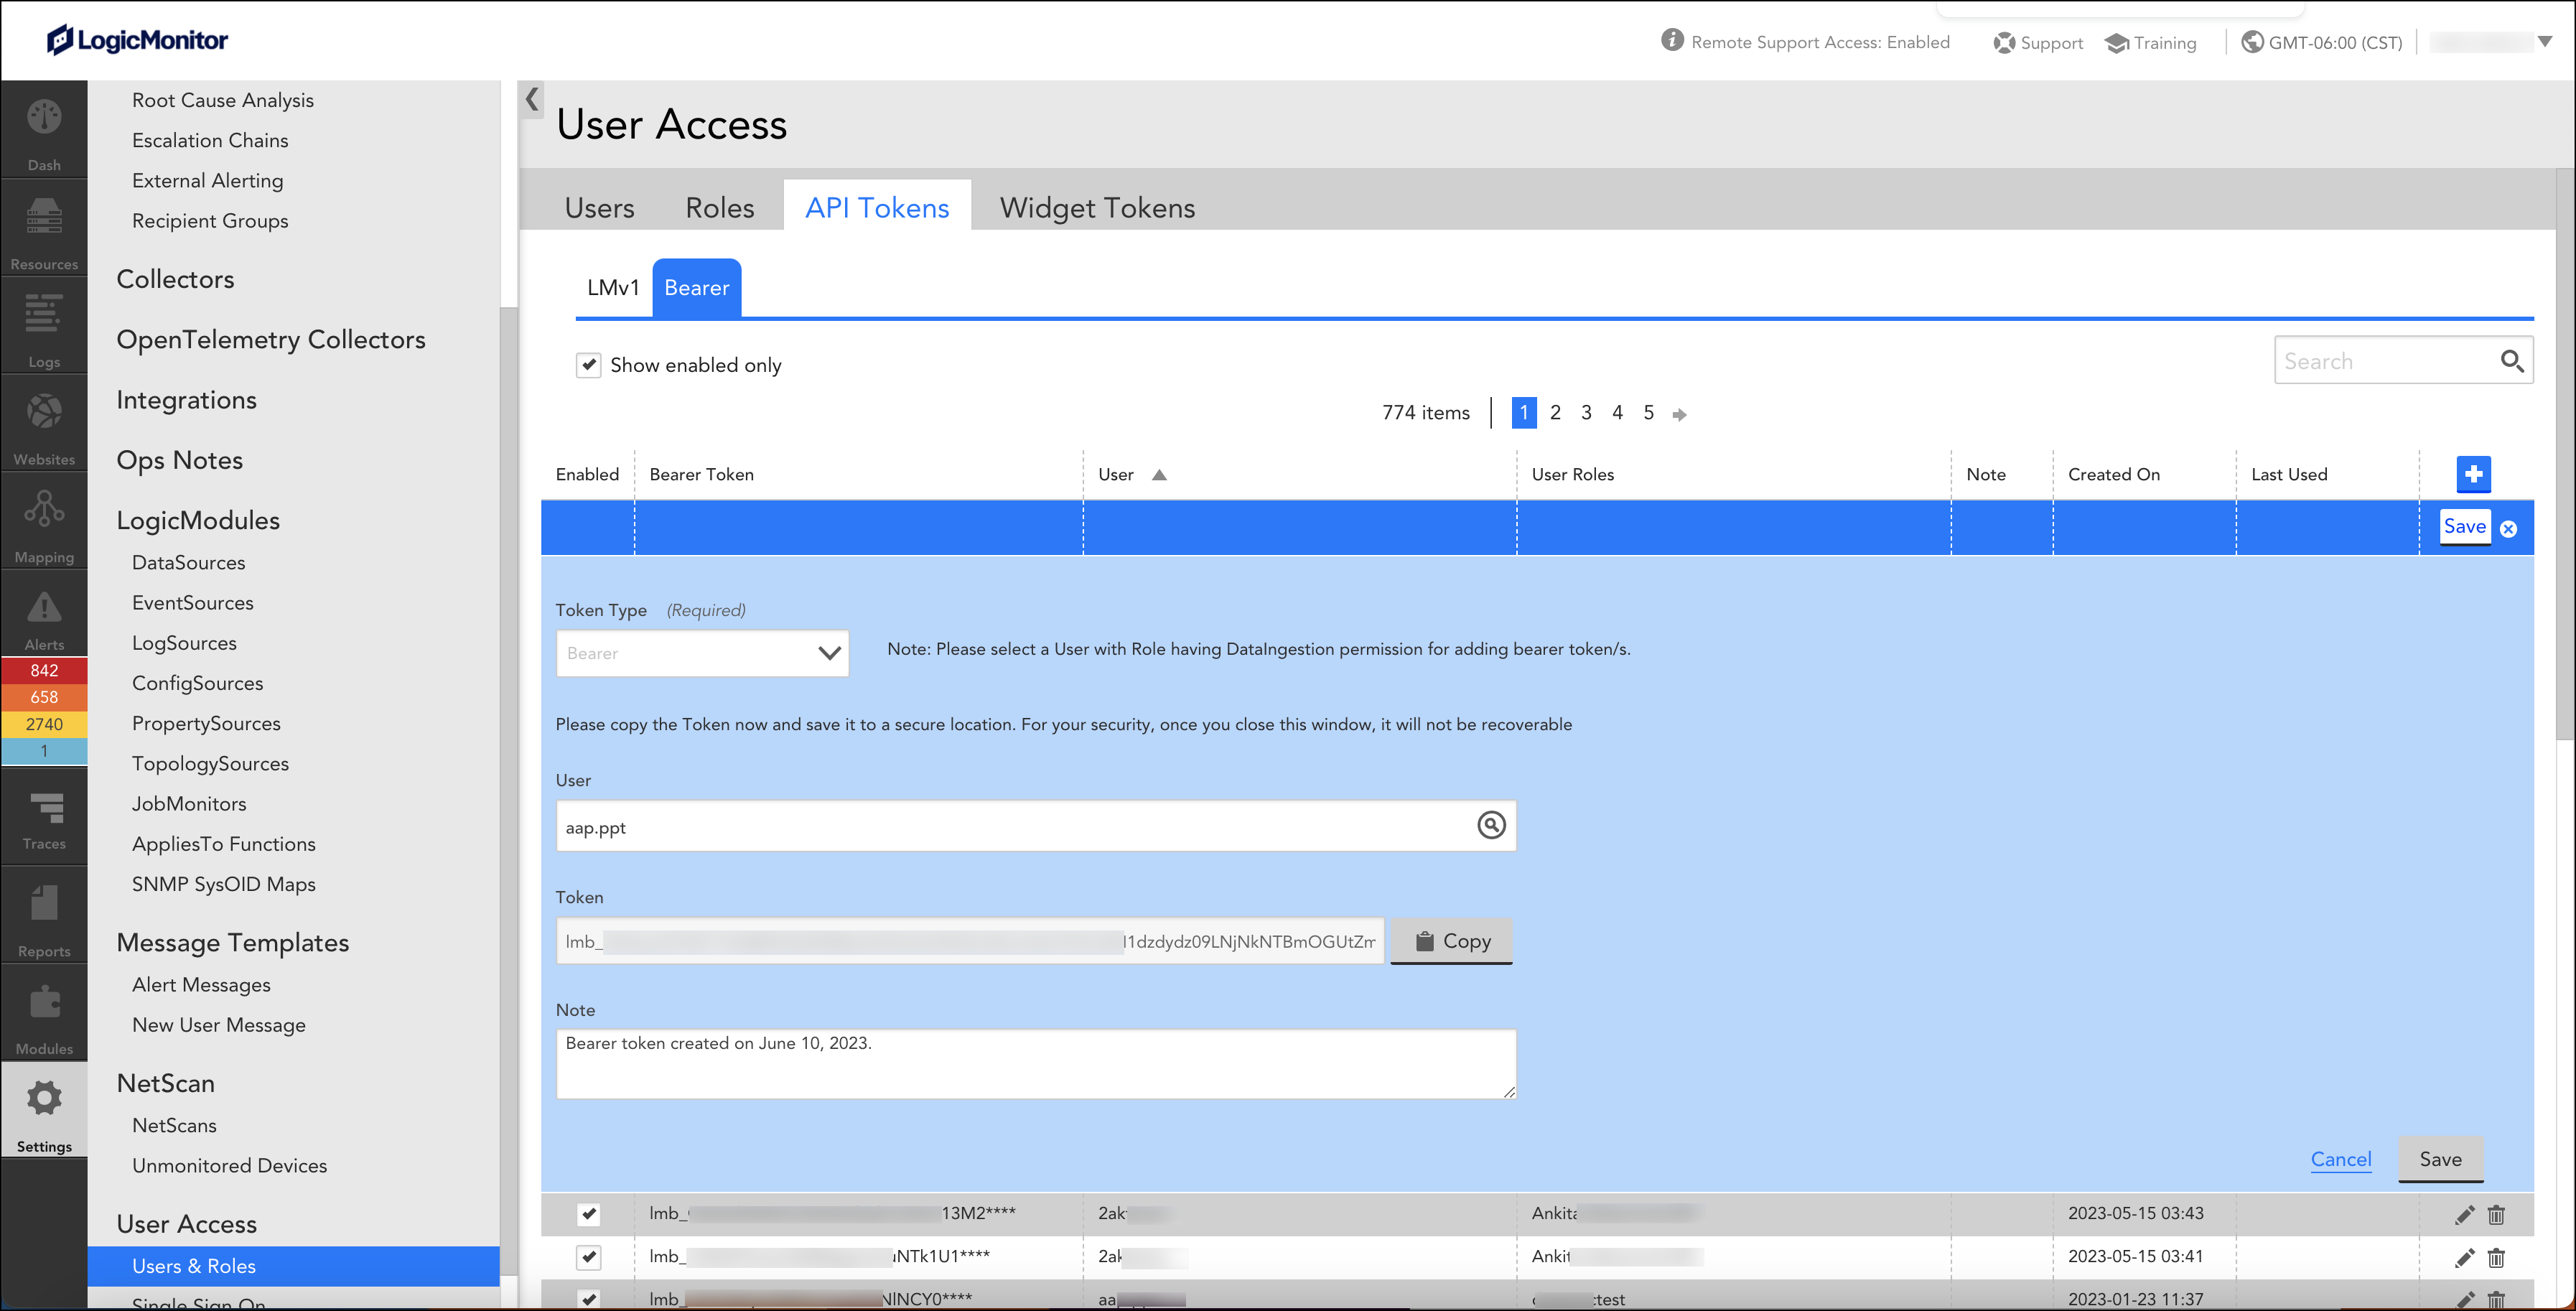
- Select Save to enable the bearer token. You can now start using the bearer token to authenticate yourself when making LogicMonitor REST API v3 requests.
To maintain secrecy of the bearer token, once you save the token, the system automatically masks some part of it with asterisks (*). Thus, even if other users view your token, they cannot use it.

Managing Bearer Token
You can manage your bearer token in few quick steps. In this section, you will learn to edit, delete, enable, and disable your token.
Editing Bearer Token Details
Although you cannot edit the bearer token, you can edit the note related to it. Follow these steps to edit the note:
- Navigate to Settings > Users & Roles > API Tokens tab > Bearer tab. A list of bearer tokens is displayed.
- Search for your bearer token.
- Select edit
 corresponding to your bearer token. A form with bearer token details is displayed.
 - Update the note and select Save.
Deleting Bearer Token
You must consider the following points before deleting your token:
- Once a bearer token is deleted, it cannot be retrieved.
- All the existing API requests where you have provided the bearer token will fail after the token is deleted.
However, if you delete your existing bearer token, you can generate a new token and resume to authenticate LogicMonitor REST API requests.
Follow these steps to delete your bearer token:
- Navigate to Settings > Users & Roles > API Tokens tab > Bearer tab. A list of bearer tokens is displayed.
- Search for your bearer token.
- Select delete
 corresponding to your bearer token. A message confirming deletion is displayed.
 - Select Ok.
Enabling and Disabling Bearer Token
On the Bearer token table, the Enabled check box for each bearer token indicates if the token is enabled or not. However, as per need, you can disable and then re-enable your bearer token.
- Enabling bearer token – You can authenticate API requests only if the bearer token is enabled. Once a bearer token is generated, by default, it is enabled.
- Disabling bearer token – Clear the Enabled check box for your bearer token. All the existing API requests where you have provided the bearer token will fail after the token is disabled.
- Re-enabling bearer token – Select the Enabled check box for your bearer token to re-enable.
- Viewing only enabled bearer tokens – Select the Show enabled only check box to view enabled bearer tokens. If you clear the check box, you can view both enabled and disabled bearer tokens.
Using Bearer Token on the User Interface
You can use bearer token to authenticate yourself while making API requests. You must carefully paste the bearer token in the Token field without adding blank space or extra characters.
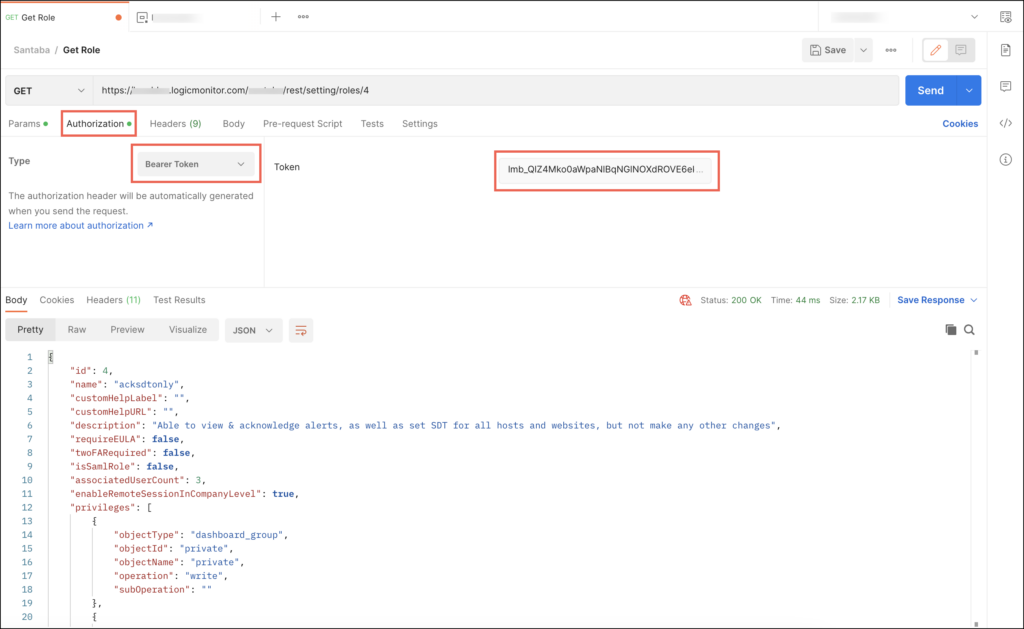
Authenticating LogicMonitor v3 SDK Files
You must authenticate yourself before using the GO and Python v3 SDK files. You can use either an LMv1Auth or a Bearer token to authenticate.
Authenticating GO SDK using Bearer Token
The supported method in config is SetBearerToken(). By default, nil is set as the bearer token. You have to enter your bearer token to authenticate.
Example
bearerToken := “BEARER_TOKEN_VALUE”
config.SetBearerToken(&bearerToken)

Authenticating Python SDK using Bearer Token
To authenticate yourself using Bearer token, enter the following details:
configuration.auth_type = ‘Bearer’
configuration.bearer_token = ‘BEARER_TOKEN_VALUE’

Users in LogicMonitor allow individual access to your LogicMonitor account and portal. Depending on the permissions you assign to the user, you can restrict or grant access to certain areas of your account and portal.
When you create a user, you use a wizard in your LogicMonitor portal to add the user to your portal, assign a role to the user (roles restrict or grant access), and configure additional settings, such as adding the user to a group or forcing the user to change their password at initial login.
In addition to assigning role to a user, you can also grant view permissions to specific pages in your LogicMonitor portal to determine visibility for the user within the portal. It is a user-level access and view permission. If a page is not enabled for the user, the user does not have access to that page in the portal regardless of the permission levels provided to the user by the assigned role. For example, if a user does not have view permission to Logs, Traces, and Reports, then in the portal, the Logs, Traces, and Reports pages are not visible to that user. If the same user has an Admin role with “read” and “write” permission to Logs, Traces, and Reports, then the user can access public APIs through tools such as Postman and send API requests for Logs, Traces, and Reports. Before making any API requests, LogicMonitor checks for the permissions granted to the user’s role.
Requirements for Adding a User
To add a user, you need a user assigned “User Access” in the Settings Role permissions. For more information, see LogicMonitor Roles.
Adding a Role
- In LogicMonitor, navigate to Settings > Users and Roles.
- Select the Users tab.
The Users table is displayed with user groups and users. - Select Add User Options, and then select Add User.
The Add User wizard is displayed to walk you through adding a role to your portal. - At the Basic step of the wizard, do the following:
- In the Username field, enter a name for the user.
You can enter a name or an email address that is used to log in to the account.
Note: An email notification is sent to the email associated with the user if this setting is modified.
- (Optional) In the First Name and Last Name fields, enter names to help identify the user.
Note: An email notification is sent to the email associated with the user if this setting is modified.
- In the Email field, enter the primary email address for the user.
This contact method is used for email alert and report delivery.
The email verification link is sent to the users in the following scenarios:
- When a new user is created
- When the existing user updates the email ID
The user must select the link provided in the email to complete the verification process and activate the account.
Note: An email notification is sent to the email associated with the user if this setting is modified.
- In the Password field, enter the password the user needs to use during initial login. Re-enter the password in the Retype Password field.
The passwords must be a minimum of 12 characters and a maximum of 256 characters, the password must contain:
- At least one uppercase letter
- At least one lowercase letter
- At least one digit
- At least one of the following special characters: ~, !, $, %, ^, (, ), _, –, +, =, }, {, ], [, @, #, &, \, |, ;, :, < , >, . ,?, /
Note: In addition to the password conditions, your password is verified automatically for any previous data breaches using the Have I Been Pwned integration with LogicMonitor. This integration allows LogicMonitor to check if you are using a compromised login password when creating an account, updating an account, and resetting the password to your account. If you wish to verify your password manually, see Have I Been Pwned.
Note: An email notification is sent to the email associated with the user if this setting is modified.
- To prompt the user for a password change at initial login, toggle the Force Password Change switch.
- To require the user to use two-factor authentication at next login, toggle the Enable two factor authentication? switch.
For more information about LogicMonitor’s implementation of this additional security layer, see Two-Factor Authentication.
Note: Two-factor authentication is not enforced when logging in through the mobile client.
Note: An email notification is sent to the email associated with the user if this setting is modified.
- (Optional) In the Enter phone number field, enter a valid phone number.
This is the phone number that is used for voice alerts and native SMS alerts.
Note: An email notification is sent to the email associated with the user if this setting is modified.
- (Optional) In the SMS Email Address field, enter an email address that is available as a contact method for email SMS alerts, and then select the format for the email SMS alert notifications from Email Format.
The “Full-text” option sends the entire alert message, and “Short (160 chars)” option sends an abbreviated version.
Note: An email notification is sent to the email associated with the user if this setting is modified.
- From TimeZone, select the time zone for the user.
By default, the time zone specified for the LogicMonitor account is applied to all users. Selecting a different time zone from the account allows the user to view and configure time-based data and settings relative to their local region. Users have the ability to toggle between their configured time zone and the account time zone after they are added to the portal.
All events a user configures (for example, SDT, Collector upgrades, report delivers, SLA periods) are configured in their specified time zone. This can be overriden using the time zone settings in the applicable event. - Select a timeout value at user-level from the User Inactive Session Timeout dropdown menu to log users out of the LogicMonitor portal after a specified time.
The default value is “Timeout not applied”. Inactivity for the specified length of time results in a user account being logged out.
Important: When a timeout value is set at the user level, it overrides the timeout value configured at the portal level. - In the User Groups. settings, assign the user to one or more previously-configured user groups.
If you do not assign the user to a group, the user is assigned to the default “Ungrouped” group in the users table. For more information, see Adding a User Group. - In Status, select whether to make the user active or suspended.
Users are active by default. Suspended users will be unable to log in to the system. - (Optional) In the Note field, enter any information for reference.
This information does not display anywhere else in the portal.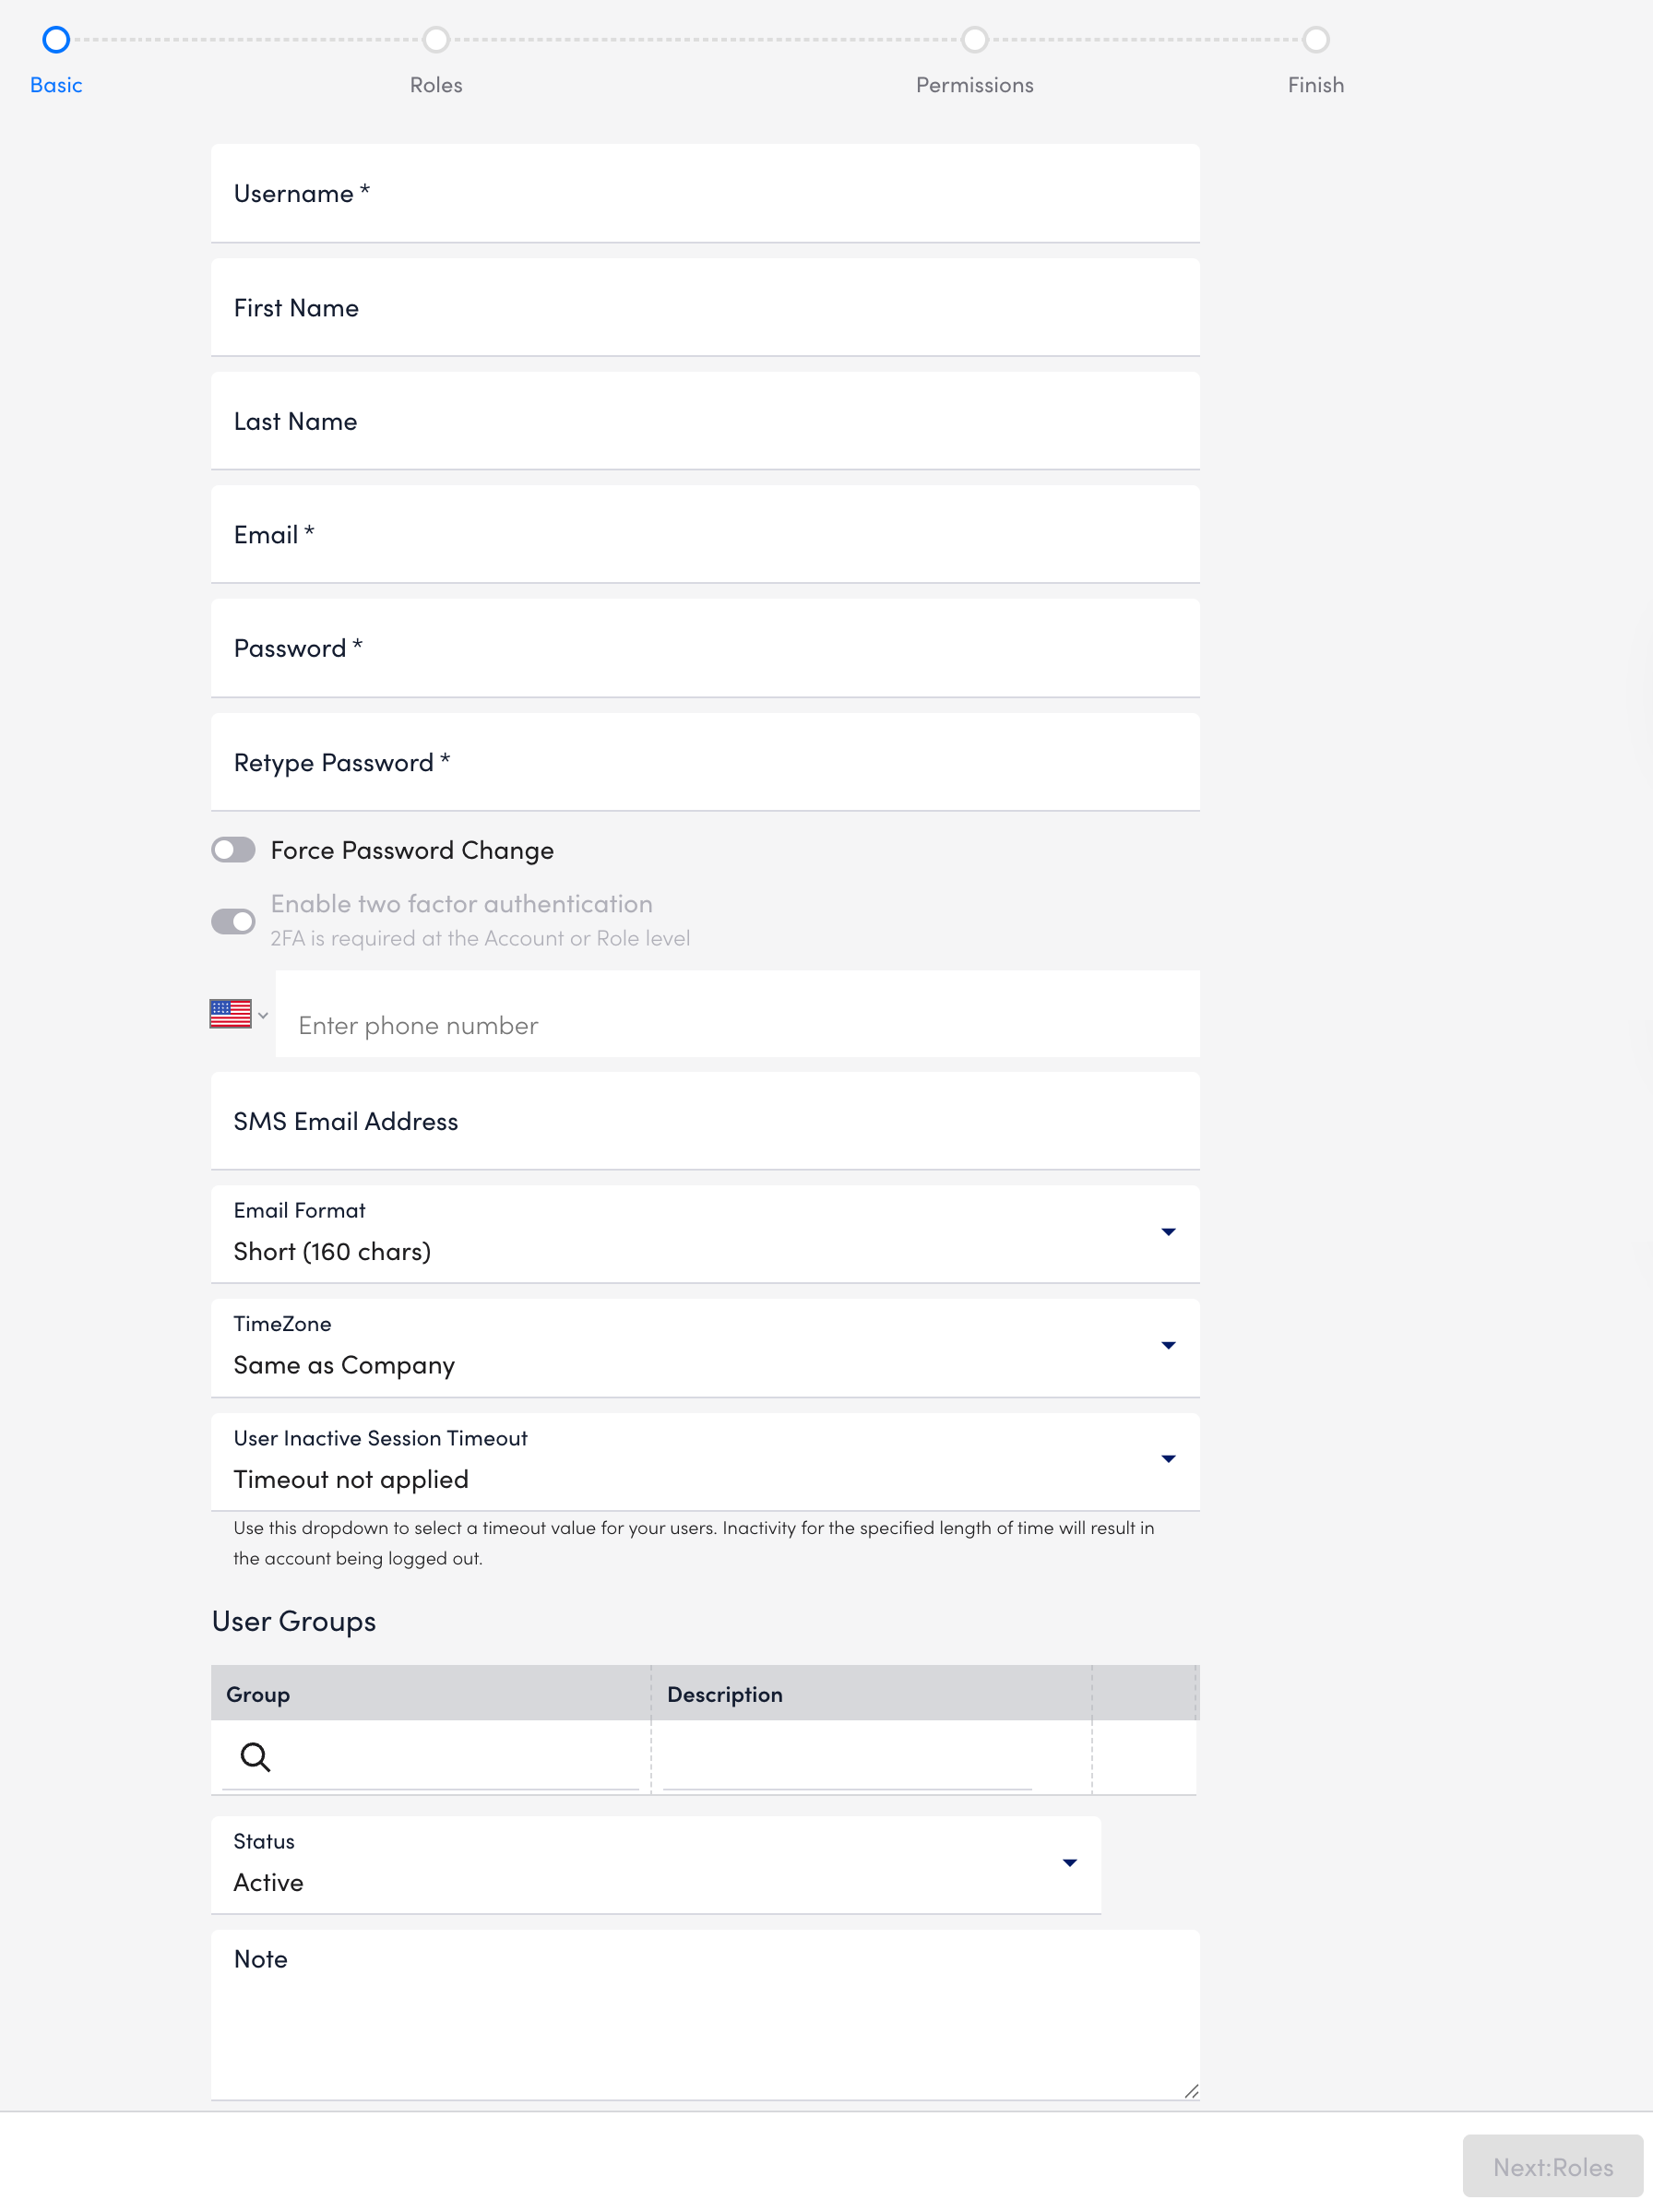
- Select Next: Roles.
- At the Roles step of the wizard, select the roles you want to assign to the user.
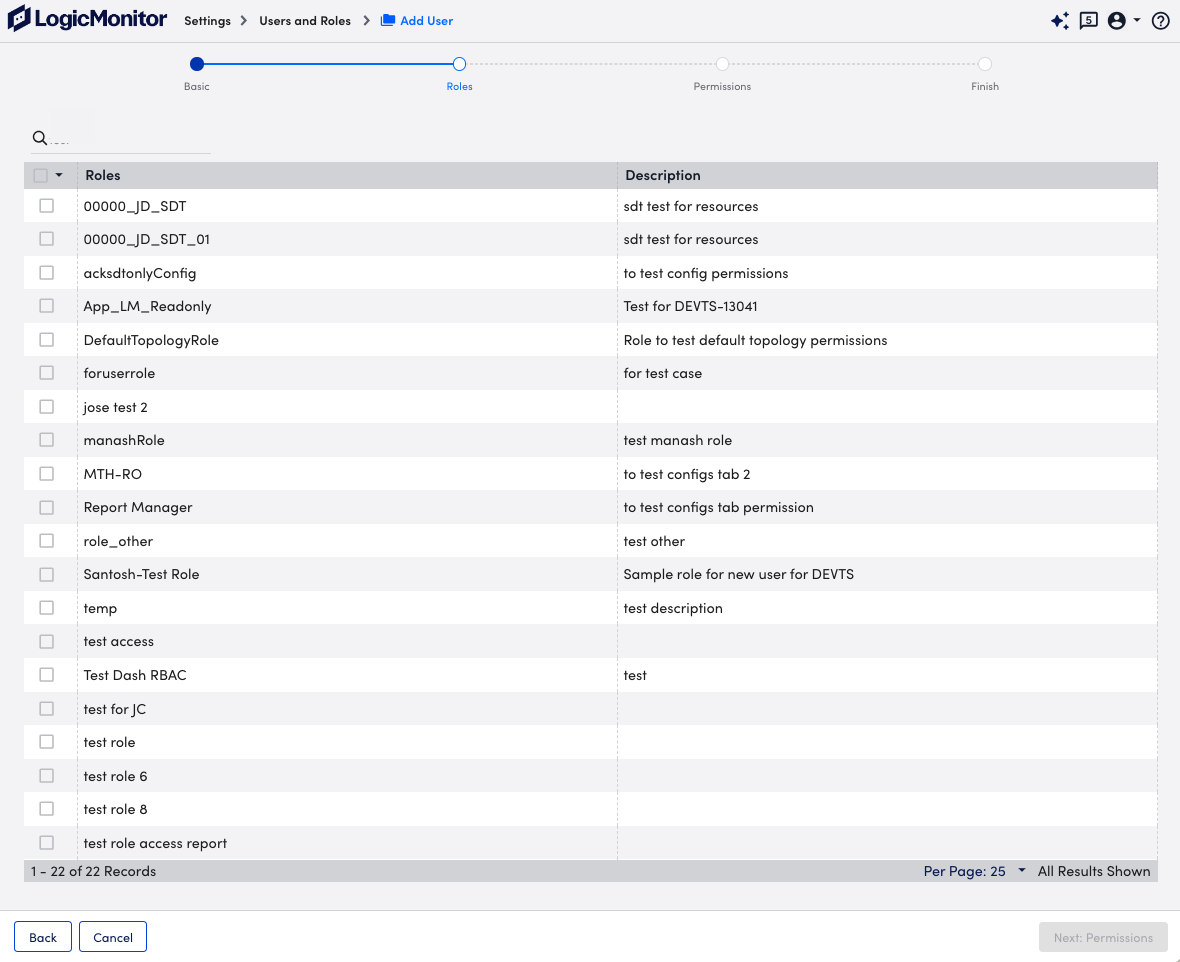
You can assign as many roles as needed to a user.
If a user is assigned multiple roles, the effective permissions for that user are the sum of the privileges of each role. For example, if one assigned role provides view only permissions to all resources, but another assigned role provides manage permissions to all resources, the user will have view and manage permissions for all resources. If yet another assigned role provides view permissions for all dashboards, but no permissions for resources, the user will maintain manage permissions for all resources and additionally gain view permissions for all dashboards. - Select Next: Permissions.
- At the Permissions step of the wizard, select the View Permissions you want the user to have.
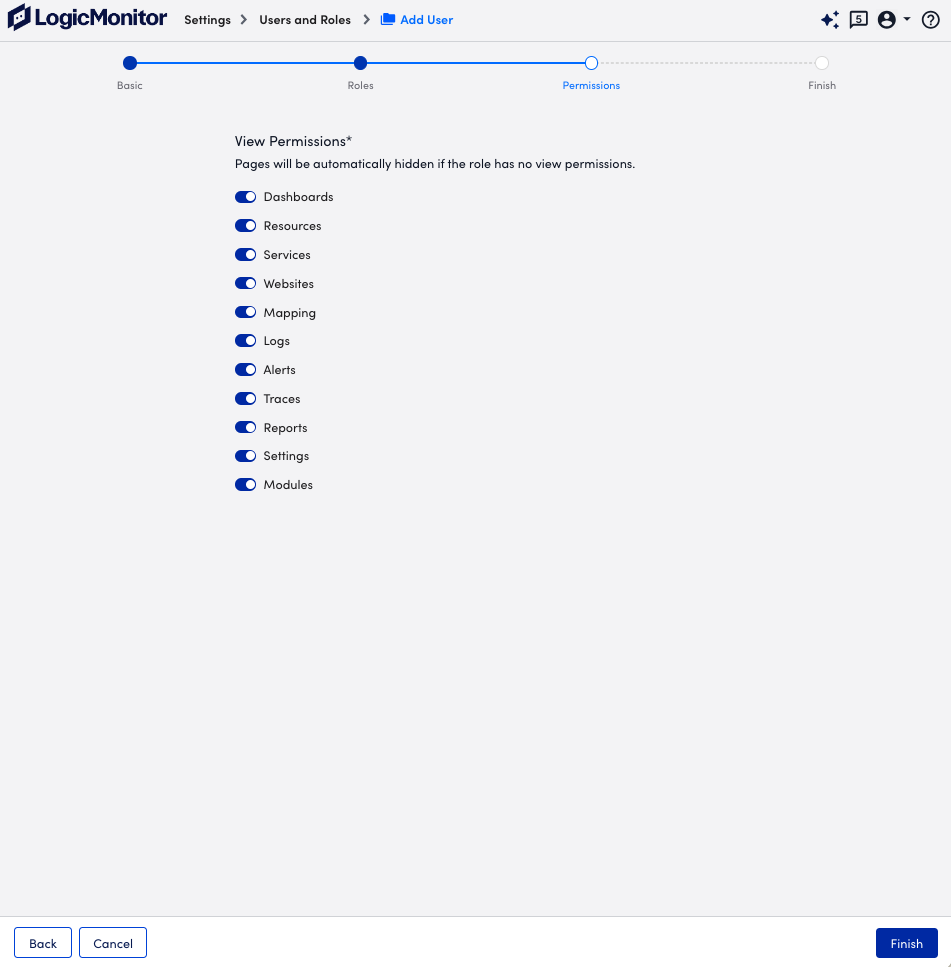
If a toggle for a page is not selected, the user does not have access to that page in the portal regardless of the permission levels provided to the user by the assigned role. - Select Finish.
Two-factor authentication (2FA) strengthens the security of your LogicMonitor account by requiring users to verify their identity through both a username and password, plus a third-party application or authentication token delivered through SMS, voice, or email.
2FA is mandatory and set up by default for all LogicMonitor user accounts to maintain consistent account security across the platform.
Note: The two-factor authentication push approval function is disabled as LogicMonitor no longer use the deprecated Authy API. However, you can continue to use Authy App along with other TOTP apps using the listed methods.
LogicMonitor Two-Factor Authentication Types
When logging in with two-factor authentication enabled, you are prompted to select from the following verification methods:
- LogicMonitor Passkey —For more information, see LogicMonitor Passkey
Recommendation: Use LogicMonitor Passkey as your default Two-Factor Authentication method.
- Multi-Factor Authenticator App Verification—For more information, see Multi-Factor Authenticator App Verification
- SMS Text Message Verification Code—For more information, see SMS Text Message Verification Code
- Phone Call Verification Code—For more information, see Phone Call Verification Code
- Email Verification Code—For more information, see Email Verification Code
Important: CAPTCHA verification is triggered after a total of five invalid authentication attempts across all 2FA modes combined. For example, this includes two invalid SMS attempts and three invalid email attempts, or five invalid email attempts altogether.
API Tokens can be used to authenticate requests to LogicMonitor’s REST API. API Tokens (LMv1 and Bearer tokens) enable you to control which users in your account use the REST API, and monitor how often they are using it. For more information on API tokens (LMv1, Bearer) and best practices to use API tokens, see Application Authentication Overview.
Creating API Tokens
You can create two types of API tokens that are LMv1 tokens and Bearer tokens. These tokens are created on a per-user basis.
Important: Any user except an out-of-the-box administrator user role can create API tokens. Ensure to check the Allow Creation of API Token checkbox under Settings> User Profile.
Creating LMv1 Tokens
LMv1 token is a key-based authentication which allows you to authenticate API calls to the LogicMonitor platform. It consists of a key pair (access-id and access-key). Follow the steps to create LMv1 tokens:
- On the User Access page, select the API Tokens tab.
LMv1 tab is selected by default.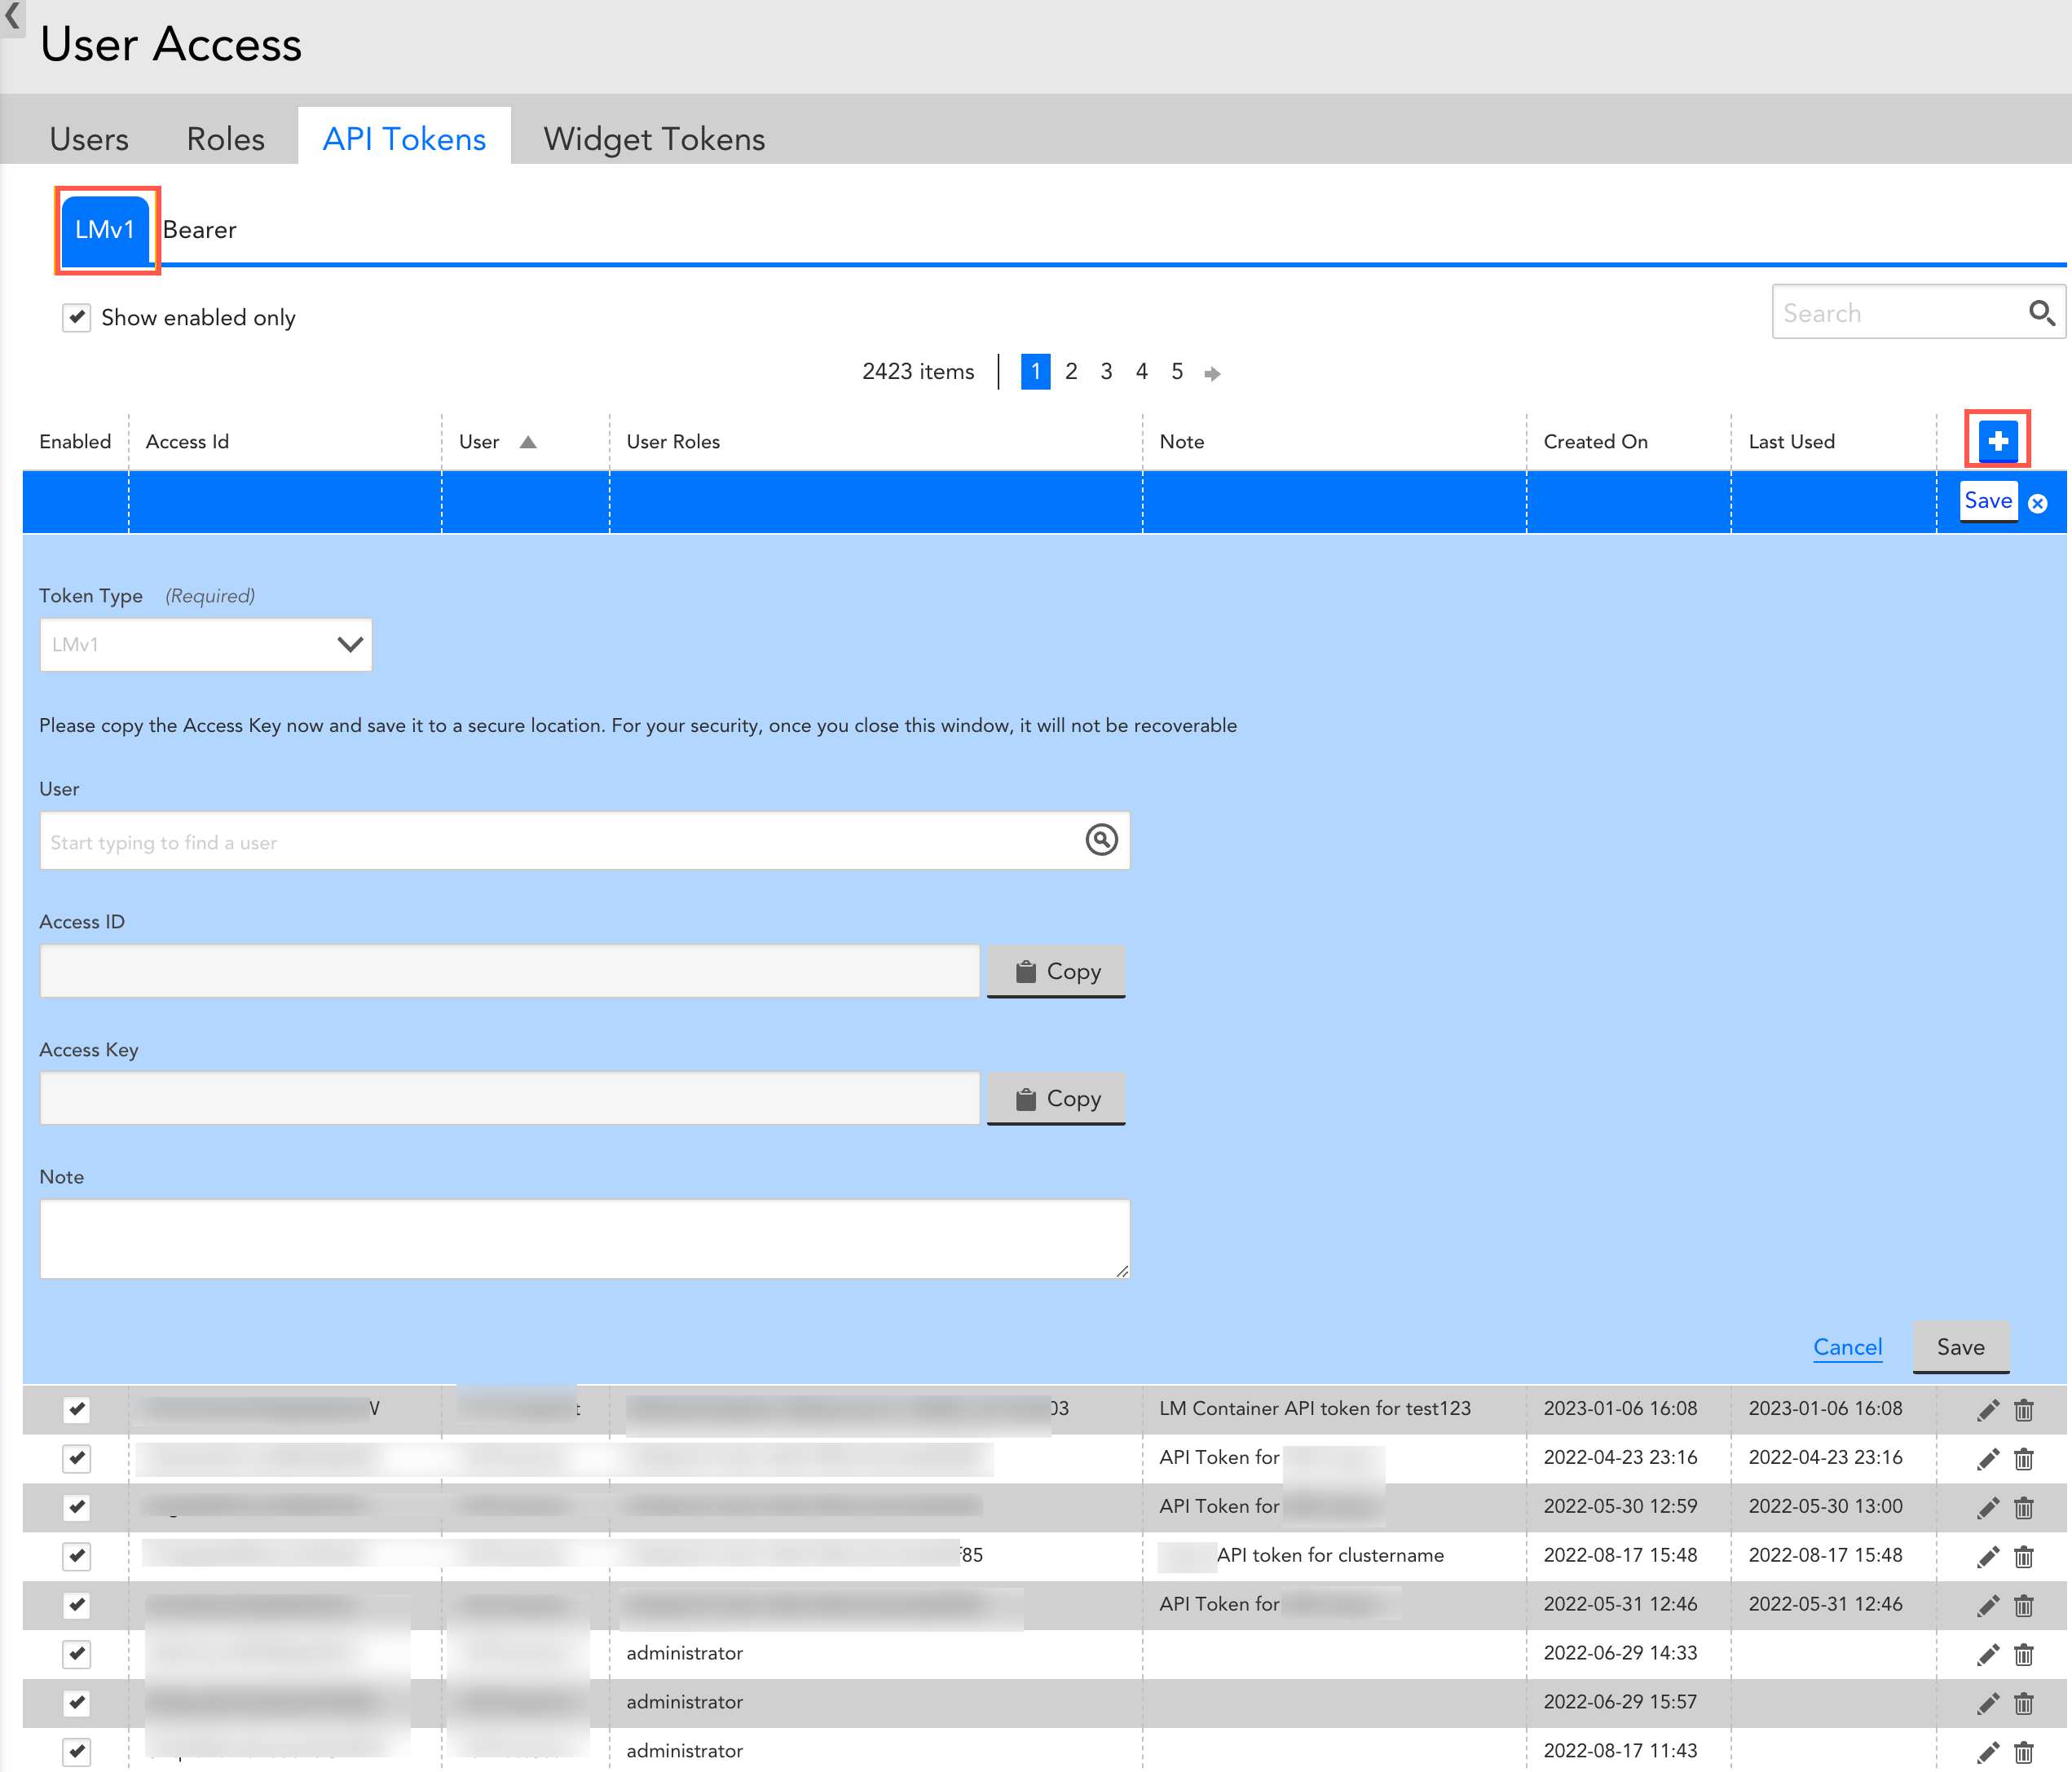
- Select
 to create a LMv1 token.
Note: The LMv1 option is selected by default in the Token Type field. - In the User field, select an email address for log in process.
Once you select an email address, the Access ID and Access Key are automatically populated. - (Optional) Select the Copy button against the Access ID and Access Key.
Recommendation: Copy the Access key and save it to a secure location. - (Optional) In the Note field, enter a relevant note.
- Select Save.
The new LMv1 token is created and displayed in the table.
Creating Bearer Tokens
Important: Bearer tokens are available only to users who have enabled Traces (LM APM license).
Bearer tokens are designed to provide an authentication mechanism by which they can authenticate the API calls to the LM Platform. You can create Bearer token by following the below steps:
- In the User Access page, select the API Tokens tab.
- Select the Bearer tab.
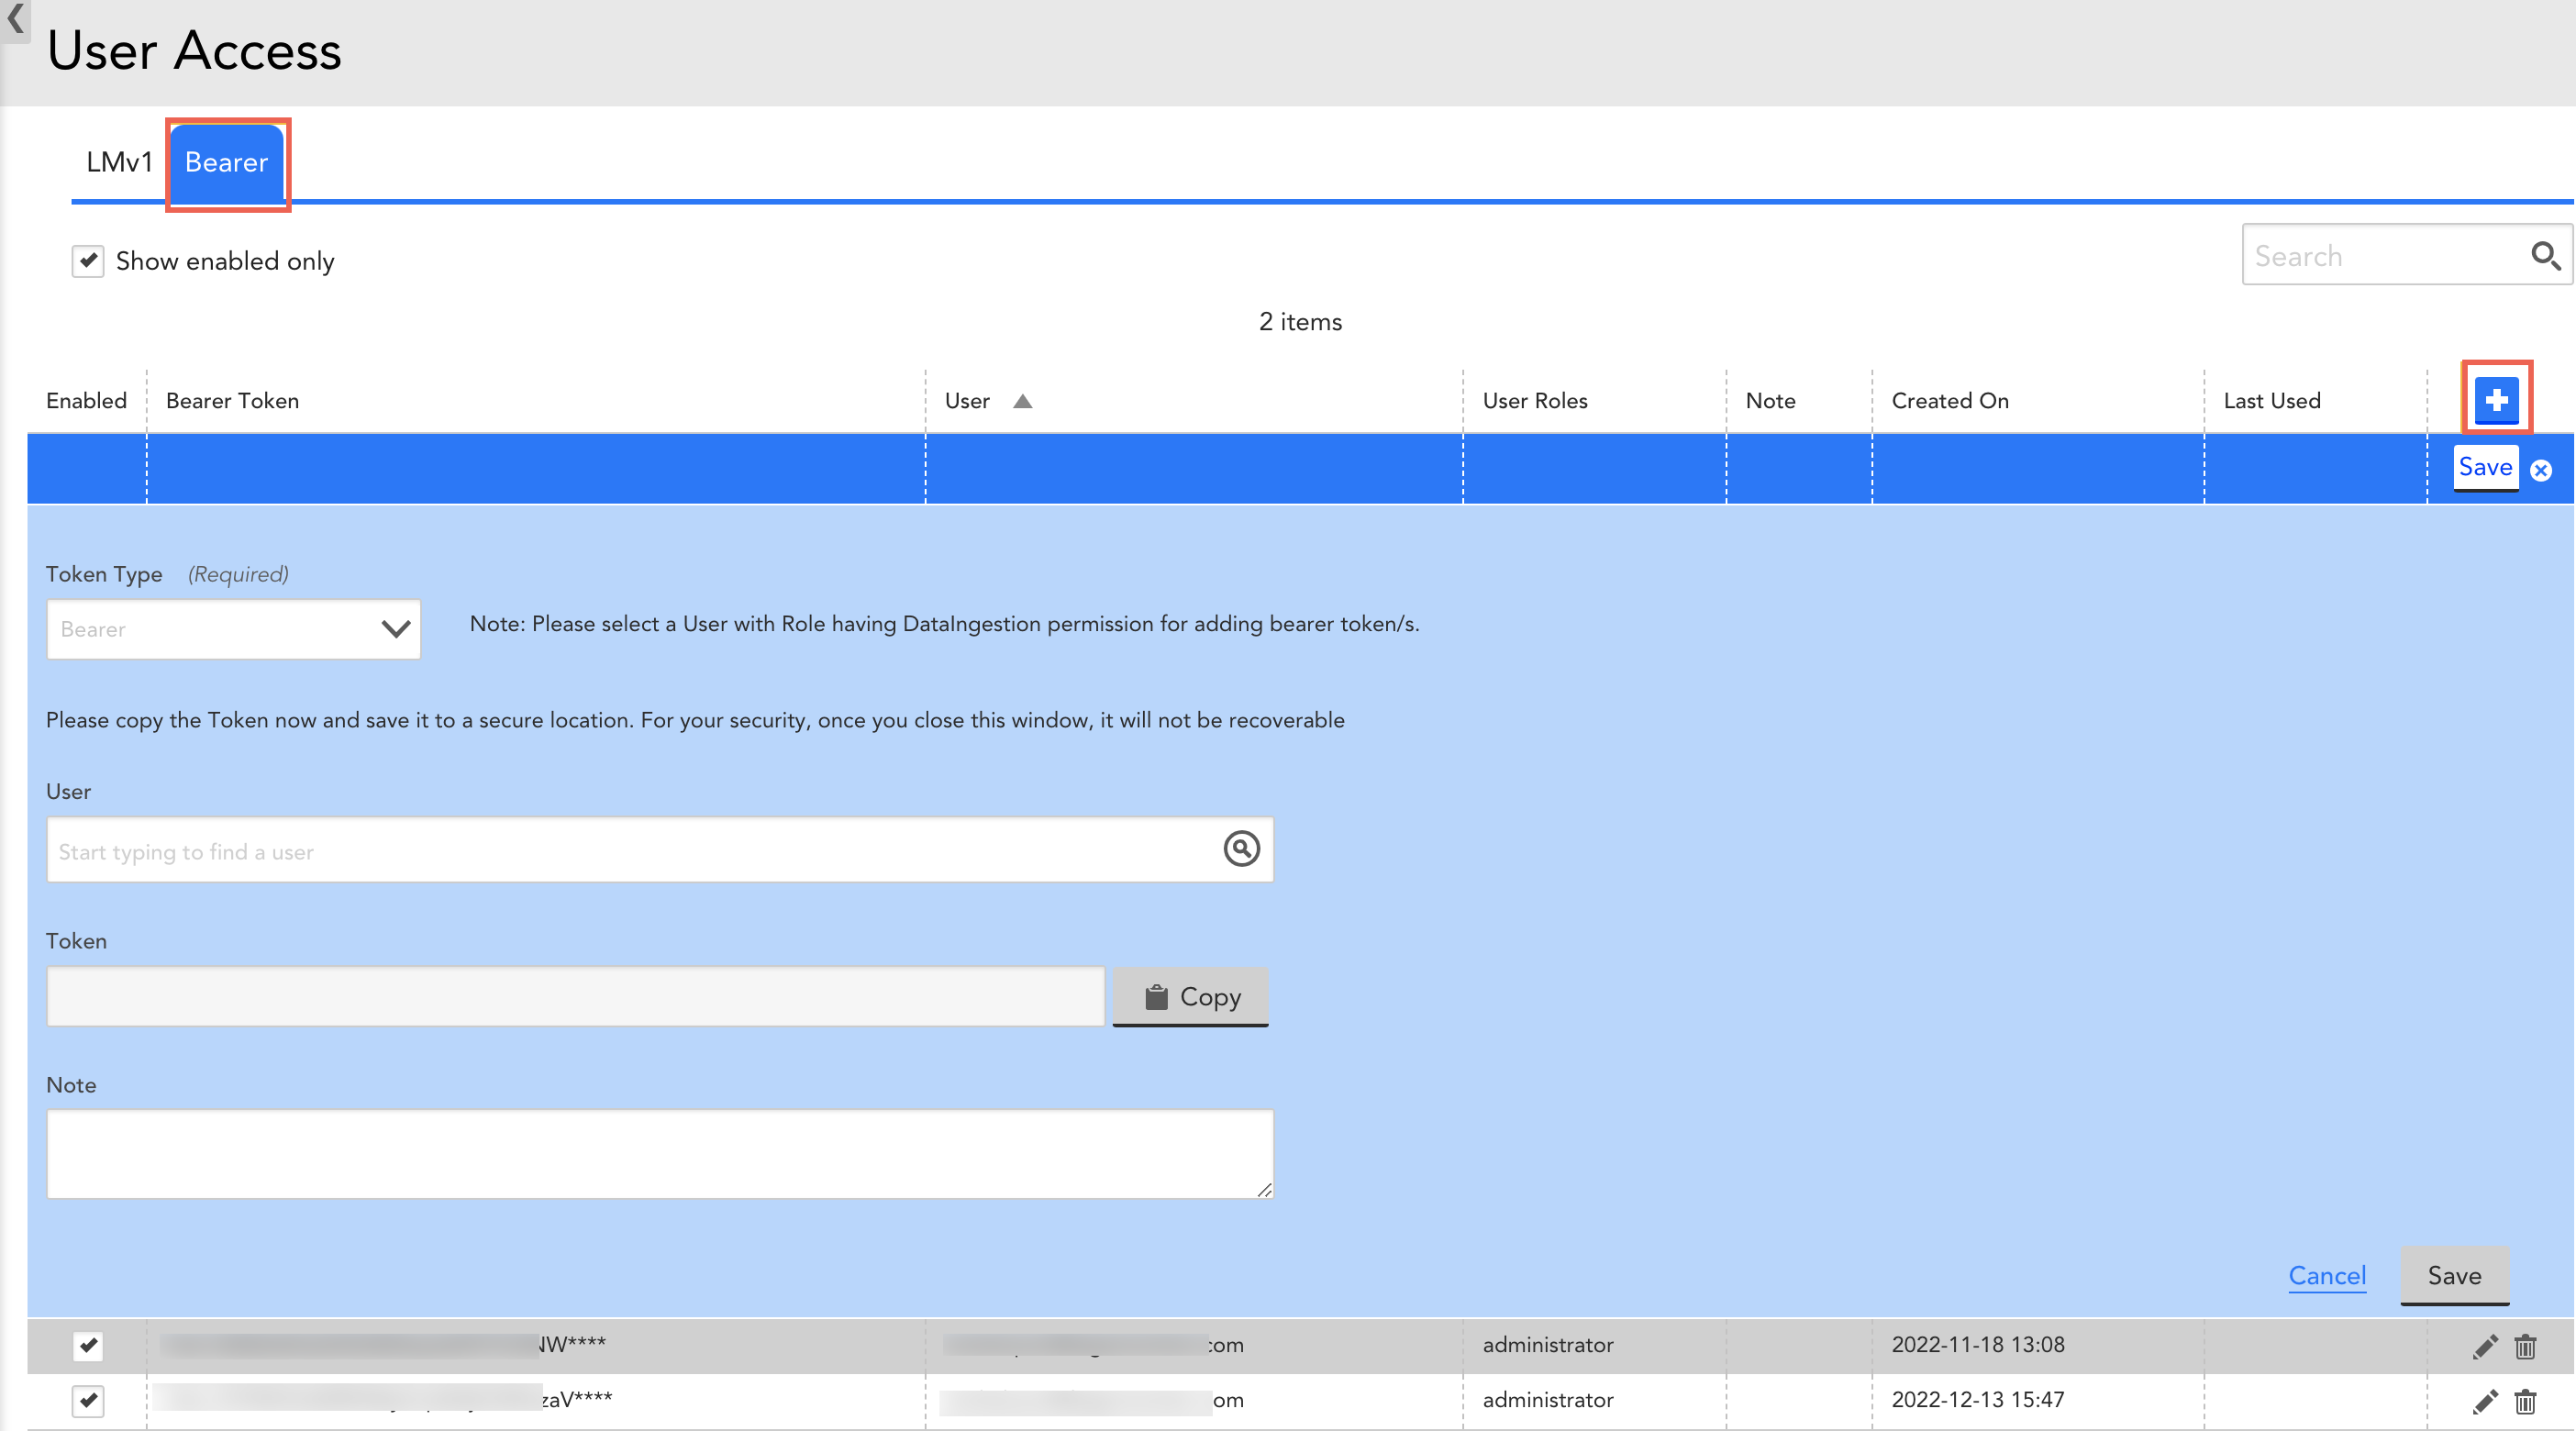
- Select
 to create a Bearer token.
Note: The Bearer option is selected by default in the Token Type field. - In the User field, select an email address for log in process.
Once you select an email address, the Access ID and Access Key are automatically populated. - (Optional) Select the Copy button against the Access ID and Access Key.
Recommendation: Copy the Access key and save it to a secure location. - (Optional) In the Note field, enter a relevant note.
- Select Save.
The new Bearer token is created and displayed in the table.
Viewing API Tokens
The API Tokens Tab in Settings | User Access displays all API Tokens across all account users. For each token, you can see the associated user, roles, note, created on date, last used date and the enabled/disabled status. Sort by any column header, limit what is displayed to enabled tokens or search to quickly find what you’re looking for.
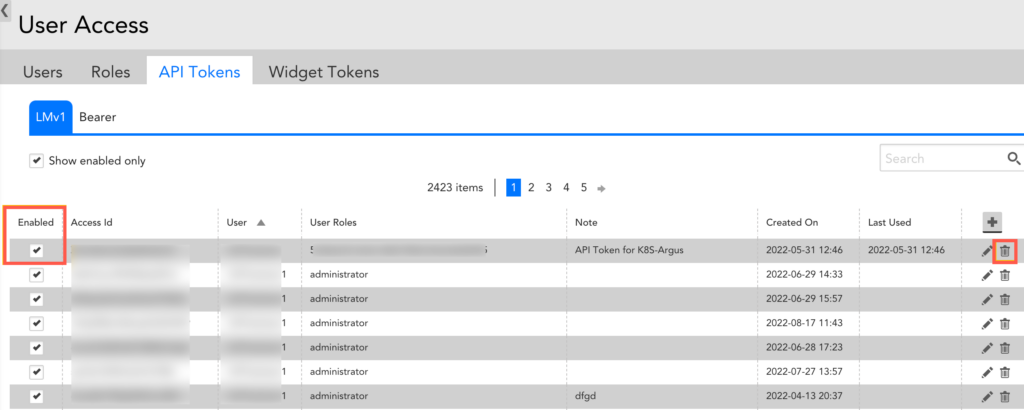
Searching and Sorting Tokens
Use the search field to search for the Access Id, user, role or note associated with one or more tokens. Select the ‘Show enabled only’ checkbox underneath the search field to only display enabled tokens. Select a column header to sort the displayed tokens by that column.
Disabling and Deleting Tokens
Uncheck the Enabled checkbox for a token to disable it. Disabled tokens can be re-enabled simply by selecting the “Enabled” checkbox.
You can delete tokens by selecting the “Delete” icon on the far righthand side of the API Tokens table.
LogicMonitor’s Single Sign On (SSO) solution enables administrators to authenticate and manage LogicMonitor users directly from their Identity Provider (IdP). This simplifies the login process and password management while providing the ability to take advantage of all of your IdP’s security features and efficiencies.
LogicMonitor’s SSO can work with any SAML 2.0 compatible IdP. In short, this enables LogicMonitor and your IdP to verify one another via a handshake, and to share user authentication information via SAML assertions. The exchange looks something like this (with LogicMonitor as the Service Provider):
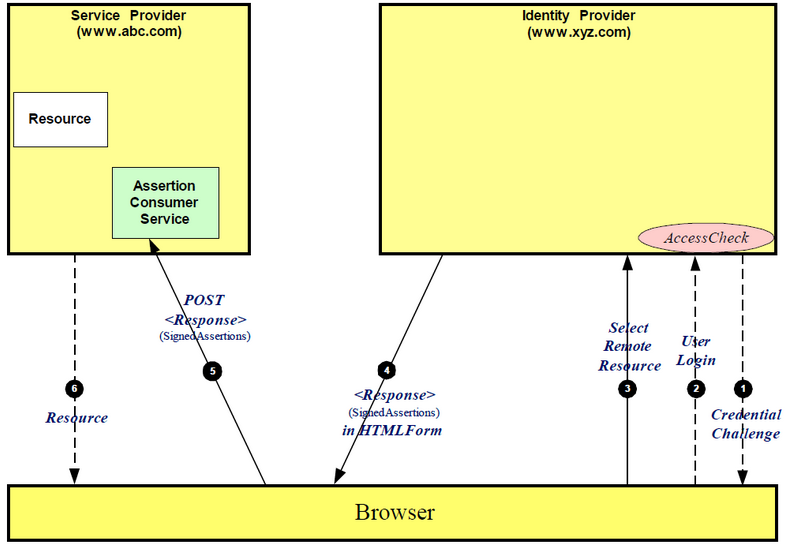
The exchange can also be initiated from LogicMonitor. In terms of the user experience, in IdP initiated the user will login to your IdP and launch LogicMonitor directly from there. In the Service Provider flow, users can go directly to company.logicmonitor.com and we will either verify they are logged in with the IdP or redirect them to do so.
Enabling SSO
Enabling SSO in your LogicMonitor account will not impact existing users, but will allow you to test the integration.
- Select the Enable Single Sign On setting from Settings > User Access > Single Sign On.
- Download the Service Provider Metadata. You will need to upload this to your IdP.
- Configure your IdP. All required information should be present in the Service Provider Metadata. See the “IdP Configuration” section for more details.
- Download your IdP metadata. You will need to upload this to your LogicMonitor portal.
After the IdP metadata has been uploaded to your LogicMonitor account, you can test the integration.
IdP Configuration
The following fields are common to IdP configuration:
- EntityID: https://companyname.logicmonitor.com
- LoginURL, Recipient, or Assertion Consumer Service: https://companyname.logicmonitor.com/santaba/saml/SSO/
- PostBack URL: https://companyname.logicmonitor.com/santaba/rpc/ssoSignIn?func=idpSso&c=testcompany
- Force Authentication: Yes
- Name ID Format: Email Address
- Group Name: https://www.logicmonitor.com/saml/roles
- Response: Signed
- Assertion: Signed
- Request: Compressed
- MaxAuthenticationAge: Some IdPs allow users to stay authenticated for a specified amount of time by setting a value (in seconds) for this field
From the user’s IdP, you can auto-populate the following attribute names:
- Email Address: The URI for a claim that specifies the email address of an entity, http://schemas.xmlsoap.org/ws/2005/05/identity/claims/emailaddress
- Given Name: The URI for a claim that specifies the given name of an entity, http://schemas.xmlsoap.org/ws/2005/05/identity/claims/givenname
- Surname: The URI for a claim that specifies the surname of an entity, http://schemas.xmlsoap.org/ws/2005/05/identity/claims/surname
- Phone: Phone
- For Roles, the following formats are accepted:
- “http://schemas.microsoft.com/ws/2008/06/identity/claims/role”
- “http://logicmonitor.com/saml/roles”
- “memberof”
- “groups”
- “group”
- “roles”
- “role”
Configuring Microsoft Azure AD Idp
If you are using the Microsoft Azure Active Directory (AD) IdP, you must rename the outgoing group claim attribute name from “http://schemas.microsoft.com/ws/2008/06/identity/claims/groups” to “groups” to ensure the attribute is recognized by LogicMonitor and roles are assigned appropriately. This is done from the LogicMonitor application on Azure AD and is only available for on-premise environments with Azure AD Connect synchronization enabled.
After successful customization of the group claim attribute, the User Attributes & Claims display should look similar to the following:
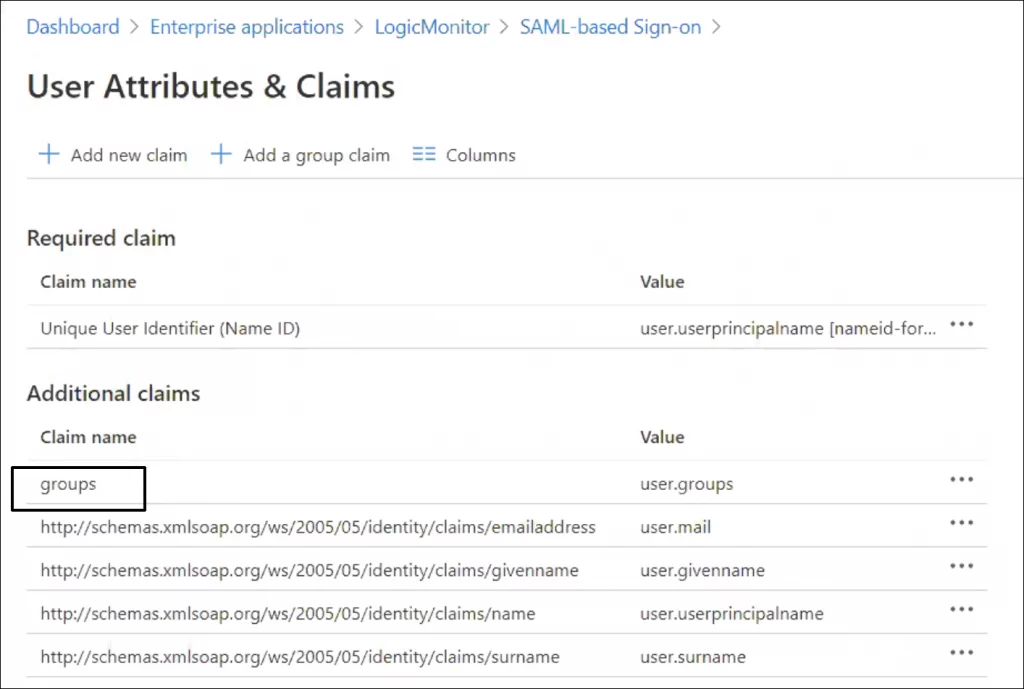
Recommendation: The number of groups emitted in a token is limited to 150 for SAML assertions, including nested groups. In large organizations this number might be exceeded which can lead to issues when users log in to LogicMonitor. For more information, see this Microsoft Azure documentation.
Do the following to avoid issues with the SAML assertion limit imposed by Azure IdP: Use the option “Groups assigned to the application” and assign the groups that the application will be checking under the section “Users and Groups” for the application.
Configuring ADFS
The general procedure of the SSO configuration is the same for all Identity Providers (IdPs). The following describes how to configure ADFS.
- Confirm ADFS 2.0 is installed, the default ADFS version is 1.0. ADFS 2.0 can be downloaded here: https://www.microsoft.com/en-us/download/details.aspx?id=10909.
- For more information on installing and deploying ADFS, see https://technet.microsoft.com/en-us/library/dn486820.aspx.
- Download the SP metadata from your LogicMonitor account (Settings > Single Sign On > Service Provider Metadata > Download).
- In the Microsoft Management Console, select Add Relying Party Trust. Select Import data about the relying party from a file and select the SP metadata file. Click Next.
- Leave Open the Edit Claim Rules dialog option checked and finish the wizard.
- Select Add Rule, choose Send LDAP Attributes as Claims and click Next.
- Set any name as “Claim rule name” and choose Active Directory as Attribute store.
- Map the LDAP attributes with the LDAP Attribute and Outgoing Claim Type pairs. For attributes and type values, see mapping table in the following.
- Important-Open the provider by double-clicking it, select tab Advanced and change “Secure hash algorithm” to SHA-1 or higher.
- Upload your IdP metadata (downloaded from https://[NameOfYourADFSServer]/FederationMetadata/2007-06/FederationMetadata.xml) to your LogicMonitor account. Metadata files must be under 64KB. ADFS will occasionally include unnecessary information, if your file is over 64KB please remove any SPSRoleDescriptor and Role Descriptor information. The Entity information and IDPSSODescriptor section are required.
Mapping of LDAP Attributes and Outgoing Claim Type
Note: This configuration will have ADFS look for LogicMonitor usernames that match SamAccount-Name, so LM usernames need to be consistent with SAMAccount-Names. If you’d prefer to match email addresses instead, you can omit the SAMAccount-Name mapping and include a second E-Mail-Addresses rule with Name ID as the outgoing claim.
| LDAP Atribute | Outgoing Claim Type |
| SAM-Account-Name | Name ID |
| Token-Groups – Unqualified Names | Role |
| E-Mail-Addresses | E-Mail Address |
Note: There is a known issue with Chrome and ADFS authentication. To use Chrome for authentication, disable “Extended Protection” for the ADFS web portal. Do the following to turn off Extended Protections on your ADFS server:
1. Launch IIS Manager.
2. Select Sites > Default Web Site > ADFS > ls.
3. Double-click the Authentication icon, right-click Windows Authentication, and select Advanced Settings.
4. On the Advanced Settings dialog, choose Off for Extended Protection.
Enabling SLO
LogicMonitor’s SSO integration includes support for the SAML Single Logout (SLO) protocol. When SLO is enabled, a logout initiated from the LogicMonitor portal will not only trigger the IdP to sign out the user from LogicMonitor, but from all SSO application to which that user is currently signed on.
SLO functionality can be enabled from the same dialog in which SSO is configured by checking the Enable Single Logout option. This checkbox is only available for selection once accurate IdP metadata has been uploaded.
Note: SLO has been implemented in accordance with the SAML v2 specification. Although functionality has been validated with several standards-based IdPs, we cannot guarantee compatibility with all IdPs as some don’t support the SAML specification in its entirety.
Creating and Updating Users via SSO
LogicMonitor and SAML Roles
By default, a role is marked as a LogicMonitor role.
When a user logs in to LM with a role in SAML assertion and that role matches with the role in LM, then the role will be updated to a SAML role, if it is not updated earlier.
- In other words, a LogicMonitor role is considered as a SAML role when it matches exactly with a role present in IDP.
- Once a role is marked as SAML role, it cannot be reverted to LogicMonitor role.
For an existing user (SAML user), in addition to the roles coming from SAML assertion, the admin can assign roles that are specific to LogicMonitor.
Note:
When a user attempts to log in using SSO with a username that conflicts with an existing local user, the system does not create a new SAML user. Instead, the user is logged in based on the role and privileges of the existing local user, and the SAML assertion roles are not assigned.
In this case, to create a new SAML user, you can:
- Delete the local user to allow a new SAML user to be created with the same username.
- Modify the local username to create a new SAML user while preserving the current local user.
Creating Users via SSO
A new user can initiate a user session in LogicMonitor in the following way:
- The user account does not exist and a role attribute (memberof, role, group, or groups) is included in the SAML assertion. The user is created with the corresponding role(s) as long as they are an exact match in LogicMonitor roles.
- For a new user where the user account does not exist and no role attribute is included in the SAML assertion, the user is created and the default role (configured in the SSO Settings) is assigned.
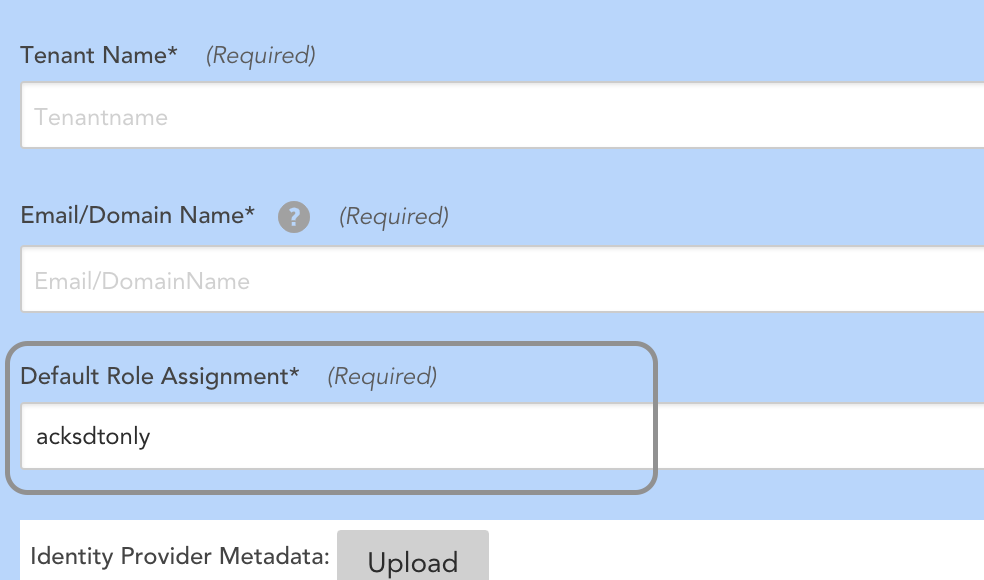
Note: New user accounts will be placed in the default “Ungrouped” user group.
Updating Users via SSO
An existing user (SAML user) can initiate a user session in LogicMonitor in the following way:
- The user account already exists in LogicMonitor. In this case, your identity provider (IdP) user matches a LogicMonitor SAML username. (If you set NameID format to email, then your LogicMonitor username will be an email address.)The user’s existing LogicMonitor roles are respected for the session. If an LM administrator manually changes the user’s LogicMonitor role, then both the new LogicMonitor role and the one from the SAML assertion will be present.
- For an existing user (SAML user) who does not have LogicMonitor roles, has existing SAML roles, and does not have role attributes included in SAML assertion, the default role (configured in the SSO Settings) is assigned to the user. See the image in Creating Users via SSO section.
- SAML roles in LogicMonitor are updated according to the IDP roles. As a result,
- The existing SAML user’s LogicMonitor roles will be retained.
- The previously existing SAML roles present in LogicMonitor but not coming in the current SAML assertion will be discarded.
- The existing SAML users will have the existing LogicMonitor roles and SAML roles coming from SAML assertion.
| Existing LogicMonitor roles | Existing SAML roles | Roles coming from current SAML assertion | Final role assigned | |
| Existing User (SAML user) | Role is retained. Example, Administrator role. | Discarded if not present in the current SAML assertion. Example, Role B | Role is assigned if it exactly matches with the SAML role present in LogicMonitor. Example, Role A and Role C | Administrator, Role A, and Role C |
| Existing User (SAML user) | None assigned | Assigned. Example, Role B | None | Default role (configured in the SSO Settings) |
| New User | NA | NA | Role is assigned if it exactly matches with the SAML role present in LogicMonitor. Example, Role C (matches), Role D (doesn’t match) | Role C |
| New User | NA | NA | Empty SAML assertion or none of the roles exactly match with the SAML role. | Default role (configured in the SSO Settings) |
Enforcing SSO
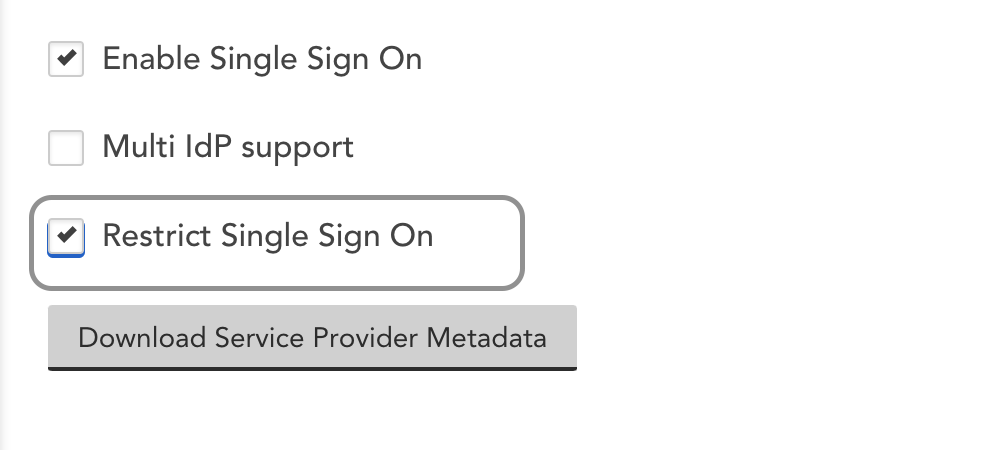
To force users to authenticate with your Identity Provider, select Restrict Single Sign On. If users visit https://companyname.logicmonitor.com, we will check to see if they have an active IdP session. If not, they will be redirected to login. There is an alternative way for administrators to access the account in the case there is an issue with your IdP. Contact support for details.
Note: Restricting Single Sign On disables the ability to enforce 2FA. In addition, when using LogicMonitor’s REST API, users are able to authenticate API requests via username/password or API tokens.
IdP Partners
You can integrate your LogicMonitor environment with a variety of SaaS Identity Providers, including Microsoft, OneLogin, PingIdentity, Centrify, Bitium and Okta.
Supported Role Formats
A role string from SAML assertion is parsed into roles. LogicMonitor supports three types of role formats:
- Simple format – The role string contains a simple role name. Multiple roles that are assigned to a user via SAML assertion are separated by a semicolon. For example,
admininstrator-Network;Manager - ADFS qualified group format – In the qualified role string, for example
domain\group1, the rolegroup1is parsed. - OneLogin
memberofformat – The role string is parsed into 4 roles:Administrators,everyone1,group1, andreadonlyCN=Administrators,CN=Builtin,DC=lmcddomain,DC=com;CN=everyone1,OU=Groups,OU=gawain-test,DC=lmcddomain,DC=com;CN=group1,OU=Groups,OU=gawain-test,DC=lmcddomain,DC=com;CN=readonly,OU=Groups,OU=gawain-test,DC=lmcddomain,DC=com;
Roles are sets of permissions and configurations that determine how a user interacts with the LogicMonitor platform, as well as what functionality users can access. By default, LogicMonitor installs with four standard roles:
- Administrator. The administrator role assigns manage permissions to all areas of the platform, allowing administrators to perform any possible function, including security-sensitive actions.
- Manager. The manager role assigns almost the same level of permissions as the administrator role, with the exception of security-sensitive actions.
- Ackonly. The ackonly role assigns view, acknowledge, and SDT permissions for alerts for all hosts and websites. It also includes permissions for managing device dashboards and creating private dashboards.
- Readonly. The readonly role assigns view permissions to all areas of the platform; it provides no ability to make changes to the platform, with one exception: users with this role can create private dashboards.
In addition to these four predefined roles, administrators (or any user granted manage permissions for User Access settings) can create an unlimited number of additional roles with very granular sets of permissions. This flexibility is extremely useful for limiting users to the specific areas of the platform relevant to their duties.
You can assign View or Manage permissions for a user’s access to different areas of the platform: Dashboards, Resources, Websites, Logs, Saved Maps, Reports, Settings, and Help & Support. Within each platform area, there may be other more granular permissions available.
Creating Roles
To create a new role, navigate to Settings > Users & Roles > Roles > Add > Role. The Add Role dialog displays, featuring all permissions and configurations available for inclusion in a role. Each is discussed next.
Name and Description
In the Name and Description fields, enter a name and description for the role.
Note: Role names cannot include the operators and comparison functions used by LogicMonitor’s datapoint expression syntax, which is discussed in Complex Datapoints.
Role Group
From the Role Group field, enter the name of the existing role group to which this new role belongs. If your organization doesn’t organize roles by group, or if the group hasn’t yet been created, leave the default “Ungrouped” group in place. For more information on role groups, see the Role Groups section of this support article.
Require to sign LogicMonitor’s EULA
Checking the Require to sign LogicMonitor’s EULA option will require any user assigned this role to sign LogicMonitor’s End User Licensing Agreement (EULA).
This setting is configured per role, but stored per user. Once a user has accepted the terms, they will not be shown the EULA again, unless the LogicMonitor terms change.
Dashboard Permissions
Under the Dashboards area of the Add Role dialog, establish the level of dashboard permissions that users assigned this role will have. As discussed (and shown) next, there are several types of permissions available for dashboards.
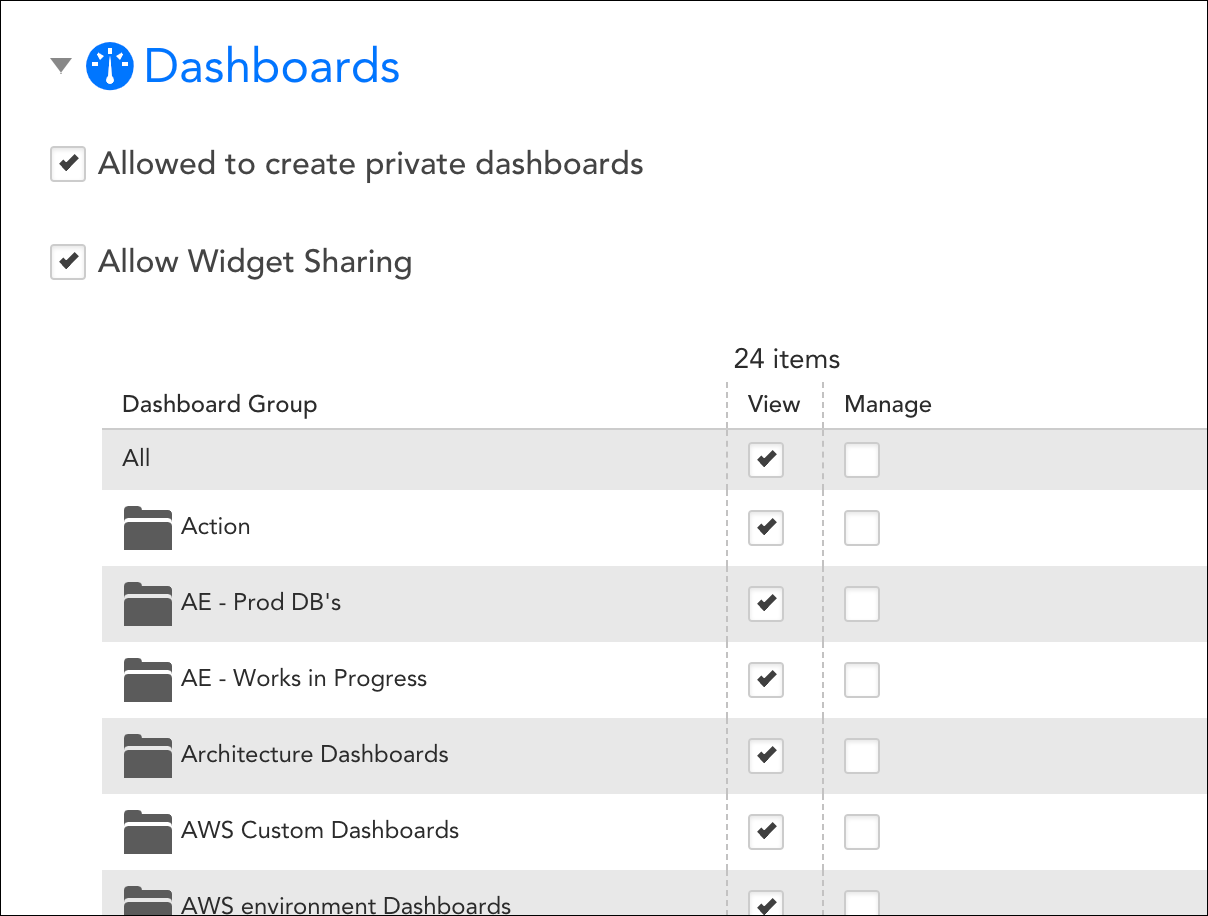
Allowed to Create Private Dashboards
Checking the Allowed to create private dashboards option allows users to create/edit their own private dashboards. As discussed in Creating Dashboards, private dashboards are only available to the user who created them (and administrators).
Allow Widget Sharing
When checked, the Allow Widget Sharing option allows the role’s users to share widgets via a URL that can be embedded externally to the LogicMonitor platform. Users must also have manage permissions for the dashboard group that parents a widget in order to share it.
Additionally, this option must be selected to allow the user to manage embedded URL widgets from the Widget Tokens tab. To learn more about generating and managing embedded widget URLs, see Sharing Widgets via Embedded URLs.
View/Manage Permissions for Dashboards
From the table of dashboards, you can assign view or manage permissions for all dashboards found within a dashboard group or subgroup. Subgroups will inherit permissions specified for a parent group.
- View. View permissions provide the ability to view all dashboards within a selected group. If you don’t provide, at a minimum, either (1) view permissions for at least one dashboard group or (2) permissions to create private dashboards, the Dash page will be hidden for this role.
- Manage. Manage permissions provide the ability to view, edit, and delete dashboards within a selected group, as well as add, edit, or delete widgets for those dashboards. Manage permissions also provide the ability to create new subgroups for those groups permissions are assigned.
If you check the All option at the top of the “View” or “Manage” column, you’re setting that level of permissions not only for all current existing dashboard groups, but for all future dashboard groups as well.
Note: In order to view dashboard widgets that display data for a particular resource, website, or topology map, a user will additionally require view permissions for that component. To give a user permission to view component data via dashboards, but not view the component(s) themselves, uncheck the pages from the options found under the View Permission heading in the user account record. It’s important to note that unchecking pages (e.g. resources, websites, mapping, etc.) from this area of the user record will hide these pages altogether from the user.
Note: View or manage permissions can only be given to public dashboards. Private dashboards are not available for access through role assignment, but the sharing of a private dashboard can be initiated from the dashboard itself, as discussed in Sharing and Exporting/Importing Dashboards.
Resource Permissions
Under the Resources area of the Add Role dialog, establish the level of resource permissions that users assigned this role will have. As discussed (and shown) next, there are several types of permissions available for resources.
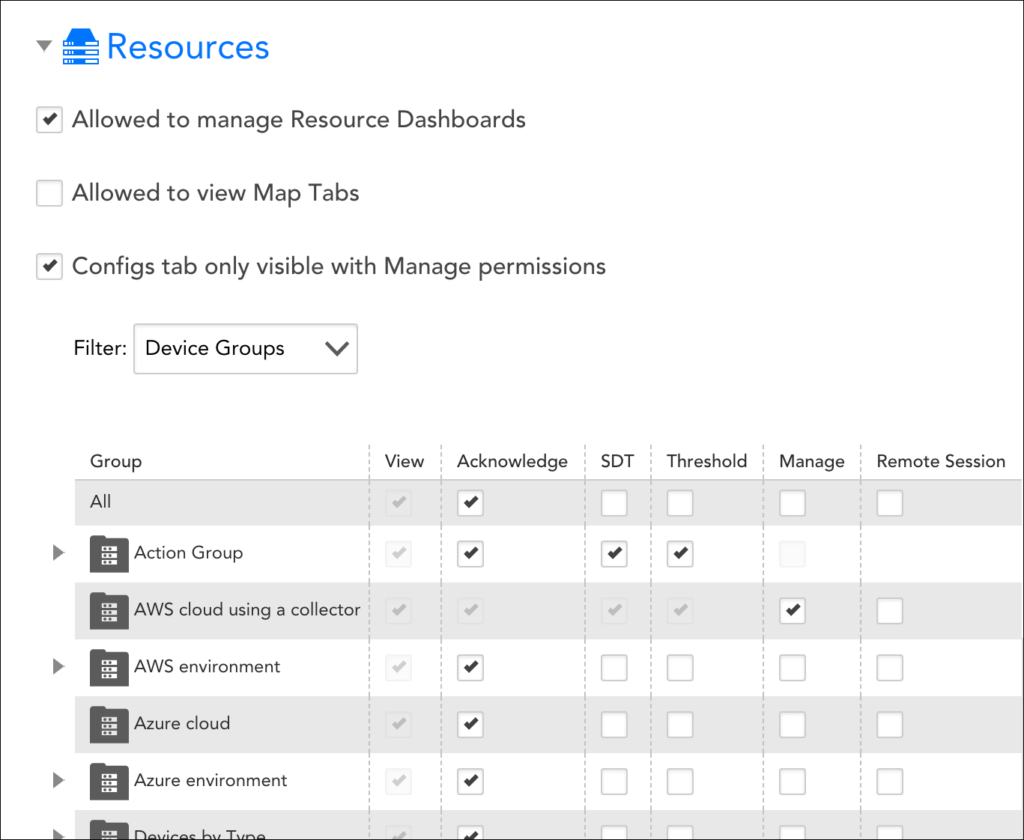
Allowed to Manage Resource Dashboards
When checked, the Allowed to manage Resource Dashboards option allows users assigned this role to manage the resource dashboards (i.e. Graphs tab) for each resource in which the user is assigned permissions.
Allowed to View Map Tabs
When checked, the Allowed to view Map Tabs option allows users assigned this role to access a resource’s Maps tab, assuming they have view (or greater) permissions to that resource. As discussed in Maps Tab, Maps tabs are related to topology mapping, a feature that is only available to LogicMonitor Pro and Enterprise accounts.
Configs Tab Only Visible with Manage Permissions
When checked, the Configs tab only visible with Manage permissions option allows users assigned this role to view the Configs tab that displays for ConfigSources, assuming they are applied to resources for which the user has manage permissions.
Note: If a user has more than one role assigned and the option Configs tab only visible with Manage permissions is selected in any of the roles, then the user will be able to see the Config tab for the Configsources of resources only with Manage permission.
View, Acknowledge, SDT, Threshold, Manage, and Remote Session Permissions for Resources
From the table of resources, you can assign view, acknowledge, SDT, and threshold permissions to all devices or services found within a resource group. In addition, manage and remote session permissions are available for device groups and subgroups. If not explicitly assigned, subgroups will inherit permissions specified for a parent group. Resource permissions can only be assigned at the group level; you cannot assign view or manage permissions to individual resources within a group.
Note: You cannot directly assign manage permissions to dynamic groups (or services which are a type of dynamic group) as the resources that make up these groups are ever changing. Only administrators and those with admin-level manage permissions to resources (i.e. the All option is selected at the top of the table of resources) have the ability to manage dynamic groups. For more information on dynamic groups, see Device Groups Overview.
- View. View permissions provide the ability to view all resources within a selected group. View permissions are also required in order to view resource data from dashboard widgets, reports, and the Alerts page. If you don’t provide view permissions for at least one resource group, the Resources page will be hidden for this role.
- Acknowledge. Acknowledge permissions provide the ability to acknowledge alerts for the resources in the selected group.
- SDT. SDT permissions provide the ability to schedule downtime for the resources in the selected group.
- Threshold. Threshold permissions allow a user to set or update datapoint thresholds at the resource group, resource, or instance level.
- Manage. Manage permissions incorporate view, acknowledge, SDT, and threshold permissions. In addition, this permission level provides the ability to:
- Edit and delete resources within the selected group.
- Add new resources to the selected group.
Note: When adding new devices, you must assign the device to a Collector or Collector group; therefore, you must also have view permissions to the relevant Collectors, as discussed in the Settings Permissions section of this support article, in order to add new devices.
- Create new subgroups for the group.
- Remote session. Remote session permissions apply to device groups only, allowing users to remotely access and operate the devices within a selected group from within the LogicMonitor platform. As discussed in Remote Session, this functionality, when assigned, is initiated from the Resources page.
If you check the All option at the top of the “View,” “Acknowledge,” “SDT,” “Threshold,” “Manage,” or “Remote Session” column, you’re setting that level of permissions not only for all current existing resource groups, but for all future resource groups as well.
Service Group Permissions
Service Group permissions are managed within the subset of Resources. LM Services can be created within existing Service Groups if provided during instrumentation, or will be automatically created at ingestion (for Service Namespaces).
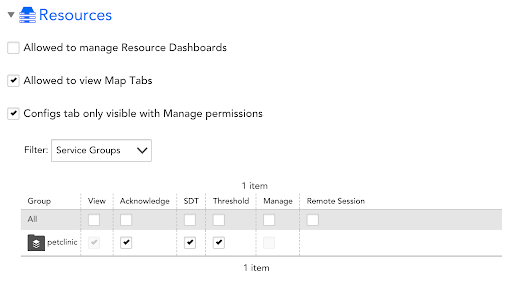
The existing functionality within Resources is also supported for Service groups.
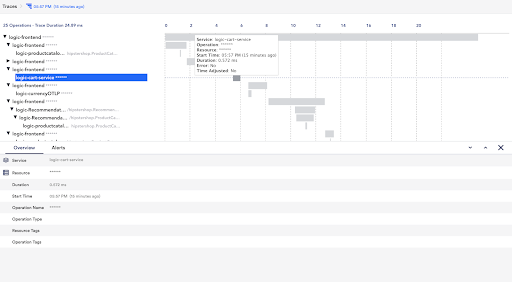
Traces Permissions
Traces permissions enables access to view the Traces page and its associated features.
To view data on the Traces page, you must have both Traces View permission enabled as well as View permissions on the Service groups.

If the Traces View permission is disabled, you can not view any of the data presented on the Traces page (even if you have access to the Service groups corresponding with the traces).
If you have Traces View permissions enabled, but only view access to a subset of Service groups, you will not see the traces in your LogicMonitor portal. Any data corresponding to services that you do not have access will not be visible.
Website Permissions
Under the Websites area of the Add Role dialog, establish the level of website permissions that users assigned this role will have. As discussed (and shown) next, you can assign view, acknowledge, SDT, or manage permissions to all websites found within a website group or subgroup.
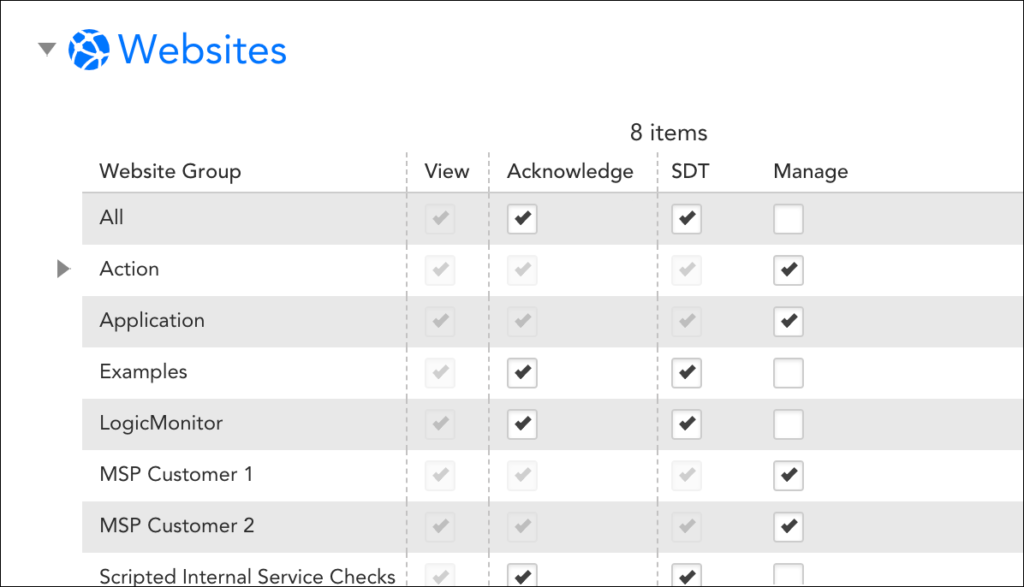
Website permissions can only be assigned at the group level; you cannot assign view or manage permissions to individual websites within a group. If not explicitly assigned, subgroups will inherit permissions specified for a parent group.
- View. View permissions provide the ability to view all websites within a selected group. View permissions are also required in order to view website data from dashboard widgets, reports, and the Alerts page. If you don’t provide view permissions for at least one website group, the Websites page will be hidden for this role.
- Acknowledge. Acknowledge permissions provide the ability to acknowledge alerts and schedule down time for the websites in the selected group.
- SDT. SDT permissions provide the ability to schedule downtime for the websites in the selected group.
- Manage. Manage permissions incorporate view, acknowledge, and SDT permissions. In addition, this permission level provides the ability to edit and delete websites within the selected group, as well as add new websites. Manage permissions also provide the ability to create new subgroups for those groups permissions are assigned.
If you check the All option at the top of the “View,” “Acknowledge,” “SDT,” or “Manage” column, you’re setting that level of permissions not only for all current existing website groups, but for all future website groups as well.
Note: If you would like a user to be able to edit the default checkpoint and alert triggering settings in place for websites, the All option must be checked for the “Manage” column. For more information on website default settings, see Website Default Settings.
Saved Map Permissions
Under the Saved Maps area of the Add Role dialog, establish the level of permissions that users assigned this role will have for the Mapping page. As discussed in Mapping Page, saved maps are related to topology mapping, a feature that is only available to LogicMonitor Pro and Enterprise accounts.
You can assign view or manage permissions to all topology maps found within a map group. Map permissions can only be assigned at the group level; you cannot assign view or manage permissions to individual maps within a group.
- View. View permissions provide the ability to view all topology maps within a selected group. View permissions are also required in order to view topology map widgets based on a saved topology map. If you don’t provide view permissions for at least one topology map group, the Mapping page will be hidden for this role.
- Manage. Manage permissions provide the ability to edit and delete topology maps within the selected group, as well as add new maps.
If you check the All option at the top of the “View” or “Manage” column, you’re setting that level of permissions not only for all current existing topology map groups, but for all future topology map groups as well.
Note: If a user does not have the permissions necessary to see a resource that would otherwise be rendered via a topology map (i.e. the resource is a member of a resource group that the user does not have permissions for), it will be hidden from the map output and not display as a vertex on the map.
Report Permissions
Under the Reports area of the Add Role dialog, establish the level of report permissions that users assigned this role will have.
You can assign view or manage permissions to all reports found within a report group. Report permissions can only be assigned at the group level; you cannot assign view or manage permissions to individual reports within a group.
- View. View permissions provide the ability to view and generate all reports within a selected group. If you don’t provide view permissions for at least one report group, the Reports page will be hidden for this role.
- Manage. Manage permissions provide the ability to edit, schedule, and delete reports within the selected group, as well as add new reports.
If you check the All option at the top of the “View” or “Manage” column, you’re setting that level of permissions not only for all current existing report groups, but for all future report groups as well.
Note: In order to view reports that display data for a particular resource or website, a user will additionally require view permissions for that component.
Logs Permissions
The Logs permissions enables access to LM Logs and its associated features.
Logs
- View grants access to the Logs page and its shared functionality on other pages. To view log events, you also need permissions to view the Resources that generate the logs.
Pipelines
- View grants access to Log processing pipelines.
- Manage enables you to view, add, and edit log pipelines and alert conditions.
Log Ingestion API
- Manage lets an API-only user submit logs through the Log Ingestion API. See Sending Logs to the LM Logs Ingestion API.
Settings Permissions
Under the Settings area of the Add Role dialog, establish the level of permissions that users assigned this role will have for the various configurations and features available from the Settings page.
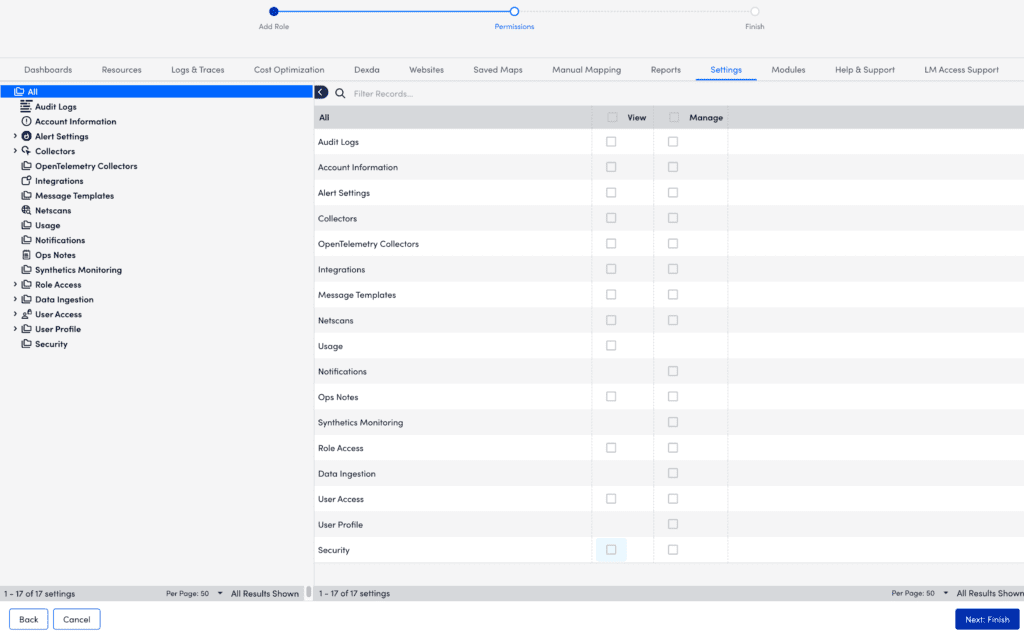
Note: If you don’t provide view permissions for at least one setting, the Settings page will be hidden for users with this role.
Access Logs
Access Logs permissions allow users assigned this role to view, filter, download, and report on the data stored in the platform’s Audit Logs.
Account Information
Account Information permissions allow users assigned this role to view or manage the account information and account-wide settings established for your portal.
Alert Settings
Alert Settings permissions are broken into five categories. You can individually assign view or manage permissions for configurations relating to alert dependency (i.e. root cause analysis), alert rules, escalation chains, external alerting, and recipient groups. In order to configure alert rules for a resource or website, a user must have view permissions for that resource or website.
Collectors
Collectors settings allow you to assign view or manage permissions to all Collectors found within a Collector group.
- View. View permissions provide the ability to view all Collectors within a selected group, as well as add devices or websites to those Collectors.
Note: To give a user permission to assign devices/websites to a group of Collectors, but not to view the Collectors themselves, assign view rights to the Collector group and, from the User account, uncheck the Settings option available under the View Permission heading. It’s important to note that this will hide the Settings page altogether and disrupt the user’s ability to view or manage other setting areas.
- Manage. Manage permissions provide the ability to view, edit, and delete all Collectors within a Collector group, as well as perform all actions associated with Collectors available from the Settings page.
If you check the View or Manage option for the overall Collectors category, you’re setting that level of permissions not only for all current existing Collector groups, but for all future Collector groups as well.
Exchange
This allows users assigned this role to view or manage modules (for example, DataSources or EventSources) within the Exchange. In addition, this role enables users to “Commit” and “Publish” to the Exchange in addition to the standard “View” and “Manage” permissions. This role provides control over what users can commit private or publish version of modules in the LogicMonitor portal.
My Module Toolbox (LogicModules)
This allows users assigned this role to view or manage modules installed from Exchange within My Module Toolbox.
Integrations
Integrations permissions allow users assigned this role to view or manage integrations (pre-built or custom) with external ticketing and team collaboration systems.
Message Templates
Message Templates permissions allow users assigned this role to view or manage the global templates in place for alert messages and new user messages.
NetScans
NetScans permissions allow users assigned this role to view or manage NetScans, which are configured processes that direct LogicMonitor Collectors to periodically look for and automatically discover devices in your network.
Ops Notes
Ops Notes permissions allow users assigned this role to view or manage Ops Notes, which are time-stamped annotations that display in your resource or website graphs.
The level of permissions granted here determine access to Ops Notes both from the Settings page and the Resources/Websites page. You must have at least view permissions for a resource/website group in order to enter ops notes for it or one of its members.
Role Access
Expand the Role Access setting to assign view permissions to all roles found within a particular role group. The ability to create and manage roles is intended for administrators only; therefore, manage permissions can only be assigned as a whole to all role groups (i.e. manage permissions cannot be assigned to roles on a per-group basis).
Note: View permissions are required here in order to create new users.
User Access
Expand the User Access setting to assign view or manage permissions to all users found within a user group. View permissions for users are required in order to add users to recipient groups, add users/user groups as alert recipients as part of escalation chains, or deliver reports to users.
Manage permissions provide the ability to create new users and manage single sign-on settings and are generally intended for administrator accounts.
User Profile
If you do not give manage permissions to User Access settings, you will be provided the option to additionally assign manage permissions to two User Profile settings, which allow users to manage the following settings on their own profile::
- Edit basic user account information (for example name, password, time zone, contact information) by clicking on their usernames in the upper right corner of the LogicMonitor UI
- Create API tokens
Security
Security permissions allow users assigned this role to view or manage the LogicMonitor account’s security settings for your portal. This permission allows you to manage security settings for your portal.
Recommendation: LogicMonitor does not recommend assigning ‘Manage’ access to your user. The ‘Manage’ access is reserved only for users with ‘Admin’ privileges. For more information, see LogicMonitor Security Best Practices.
Note: The Security permission applies to out-of-the-box user roles.
Help/Support Permissions
Under the Help & Support area of the Add Role dialog, establish the level of access to support and help documentation that users assigned this role will have.
Support Type
There are several types of support you can make available to users assigned this role.
- Documentation. If view permissions are given for Documentation, a “Support” link displays in the upper right of the top navigation bar for users assigned this role. When clicked, the “Support” link opens an inline search window titled “Support Guide” that provides access to LogicMonitor’s support articles and development guides. Depending upon other support access provided to the user, the Support Guide window may also feature a “Contact Support” link at its bottom with one or more of the following available actions:
- Chat with an Engineer. This allows users to launch a live chat from within the platform.
- Support Request. This allows users to submit a support ticket.
- Feedback. This allows users to submit platform feedback.
- Training. If view permissions are given for Training, a “Training” link displays in the upper right corner of the top navigation bar for all users assigned this role. The “Training” link allows users to enroll in the LogicMonitor Certified Professional (LMCP) Exam, as discussed in LogicMonitor Certified Professional Exam Information.
For more information on the support resources available to users, see Accessing Support Resources.
Custom Help Link
In addition to LogicMonitor’s built-in Support and Training links, you can also display custom help links for internal sites. You also have the option to add a custom help link and label if you’d like to give users direct access to an internal help site.
If Documentation is enabled by the role, then the label for this link will be displayed under the “Contact Support” link found at the bottom of the Support Guide window. If Documentation is not enabled by the role (i.e. users cannot view inline documentation), then clicking the “Support” link will take the user directly to the URL specified for the custom link.
Assigning Roles to Users
Roles, once created, are assigned to users from the user record, as discussed in Users.
If a user is assigned multiple roles, the effective permissions for that user will be the sum of the privileges of each role. For example, if one assigned role provides view only permissions to all resources, but another assigned role provides manage permissions to all resources, the user will have view and manage permissions for all resources. If yet another assigned role provides view permissions for all dashboards, but no permissions for resources, the user will maintain manage permissions for all resources and additionally gain view permissions for all dashboards.
Note: To see all users assigned to a particular role, generate the Role Report.
Note: From user account settings, there is the ability to remove one or more pages (e.g. Dash page, Resources page, Alerts page, etc.) from the user’s view. If a page is removed from view from the user’s account, this takes precedence over permission levels provided by assigned roles.
Managing Roles
Existing roles can be viewed at Settings | Users & Roles | Roles. All roles are nested in group(s) and listed in table form.
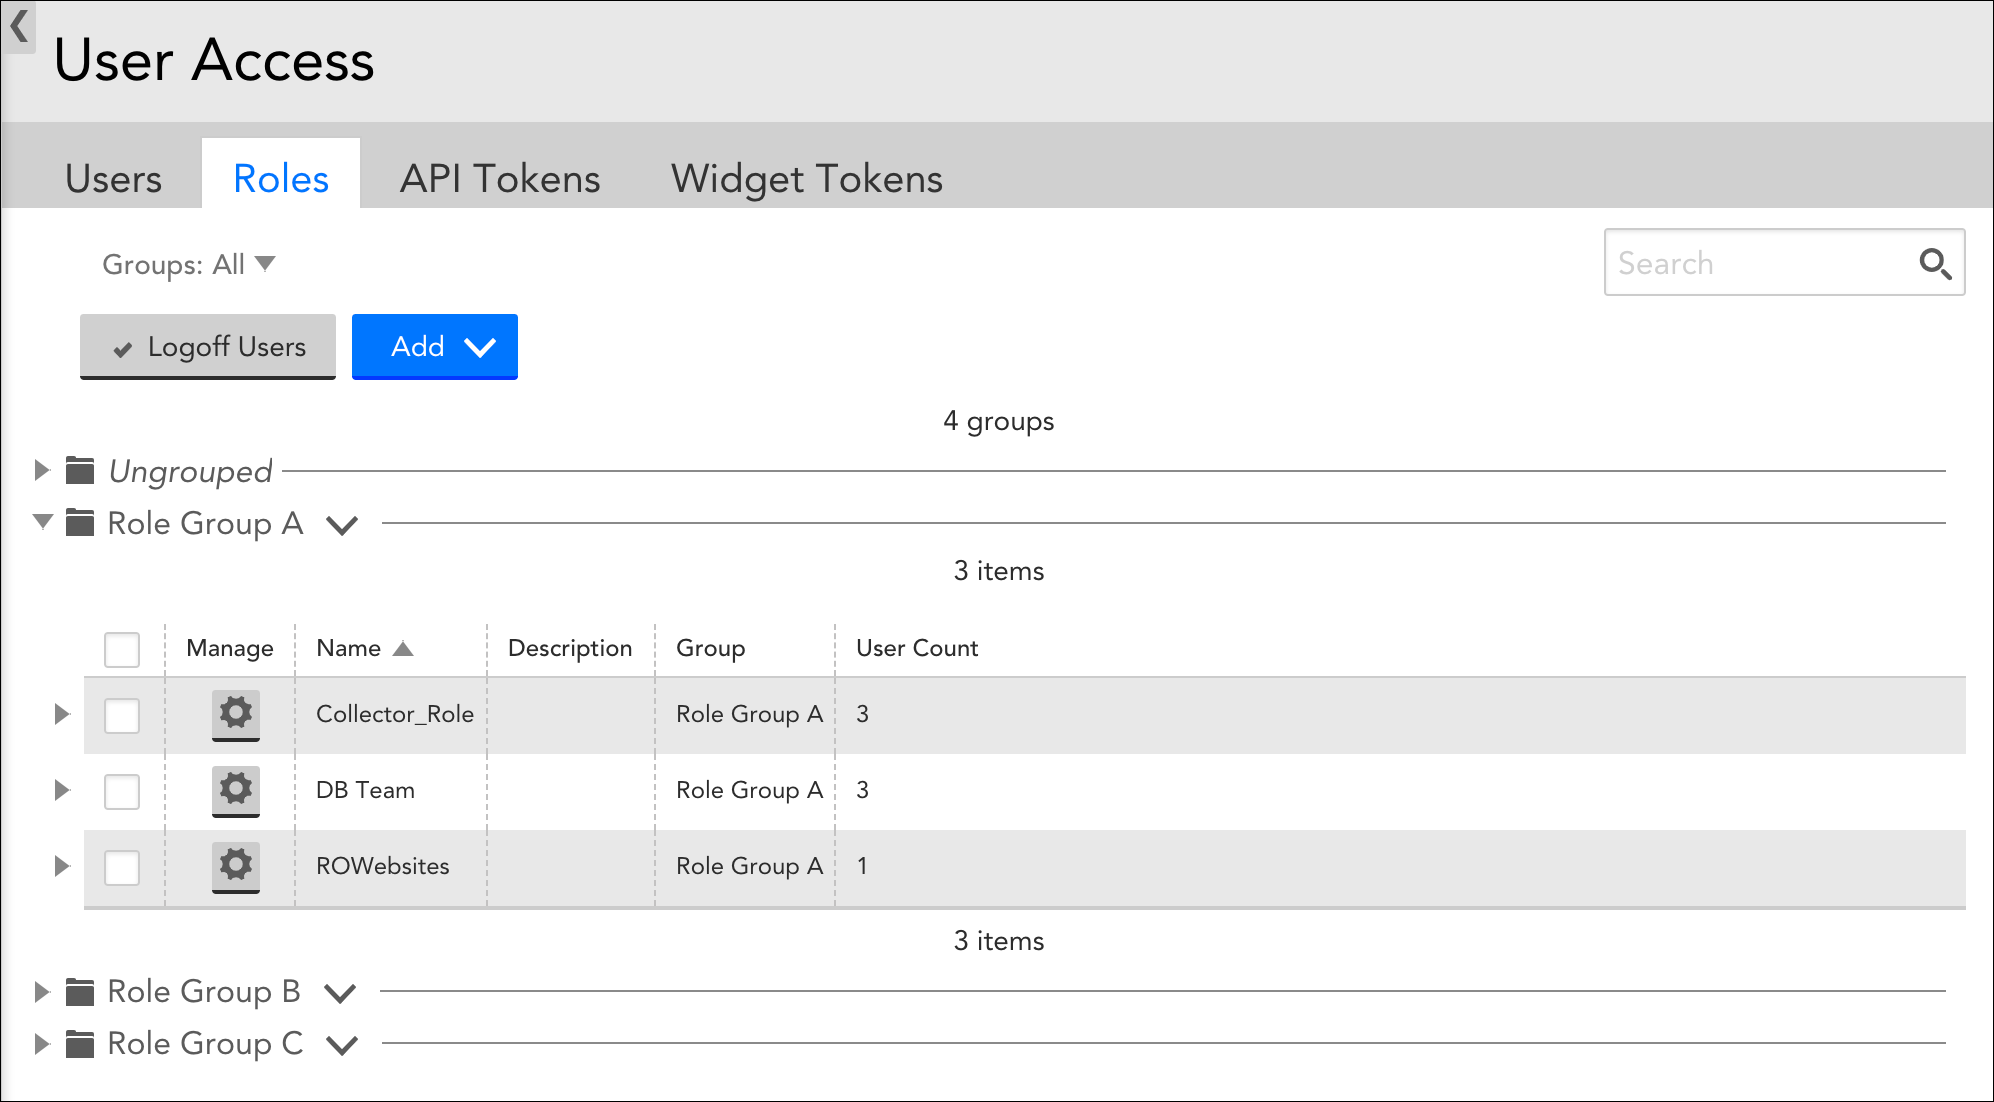
From this table, you can:
- Filter roles. Restrict table display to one or more role groups using the “Groups” filter.
- Search roles. Search for roles using role name, group name, or role description.
- Log off users. Place a checkmark in the leftmost column of one or more roles and click the Logoff Users button to log off all users to which a role is assigned.
- Expand role details. Click the arrow to the left of a role to expand listing to include all permissions assigned to the role.
- View user count. The far right column displays the number of users the role is assigned to. You can get additional details on users assigned to a particular role by generating the Role Report.
- Edit, clone, or delete a role. Click the gear icon to open the Manage Role dialog. From this dialog, you can update the permissions assigned to a role, clone a role, or delete a role. If you update role permissions assigned to a user that is currently active in the platform, they will experience those updates as soon as they move to a new area of the product (i.e. a refresh takes place). You cannot delete a role that is currently assigned to one or more users.
- Manage role groups. Click the drop-down arrow to the right of a role group name to edit or delete the group.
Role Groups
As with other areas of LogicMonitor, roles can be organized into logical groupings.
Creating Role Groups
To create a role group, navigate to Settings | Users & Roles | Roles | Add | Role Group. Once created, roles can be added to the group from the Add Role or Manage Role dialogs.
Managing Role Groups
Role groups can be edited or deleted from the Roles tab by clicking the drop-down arrow located to the right of a role group name.
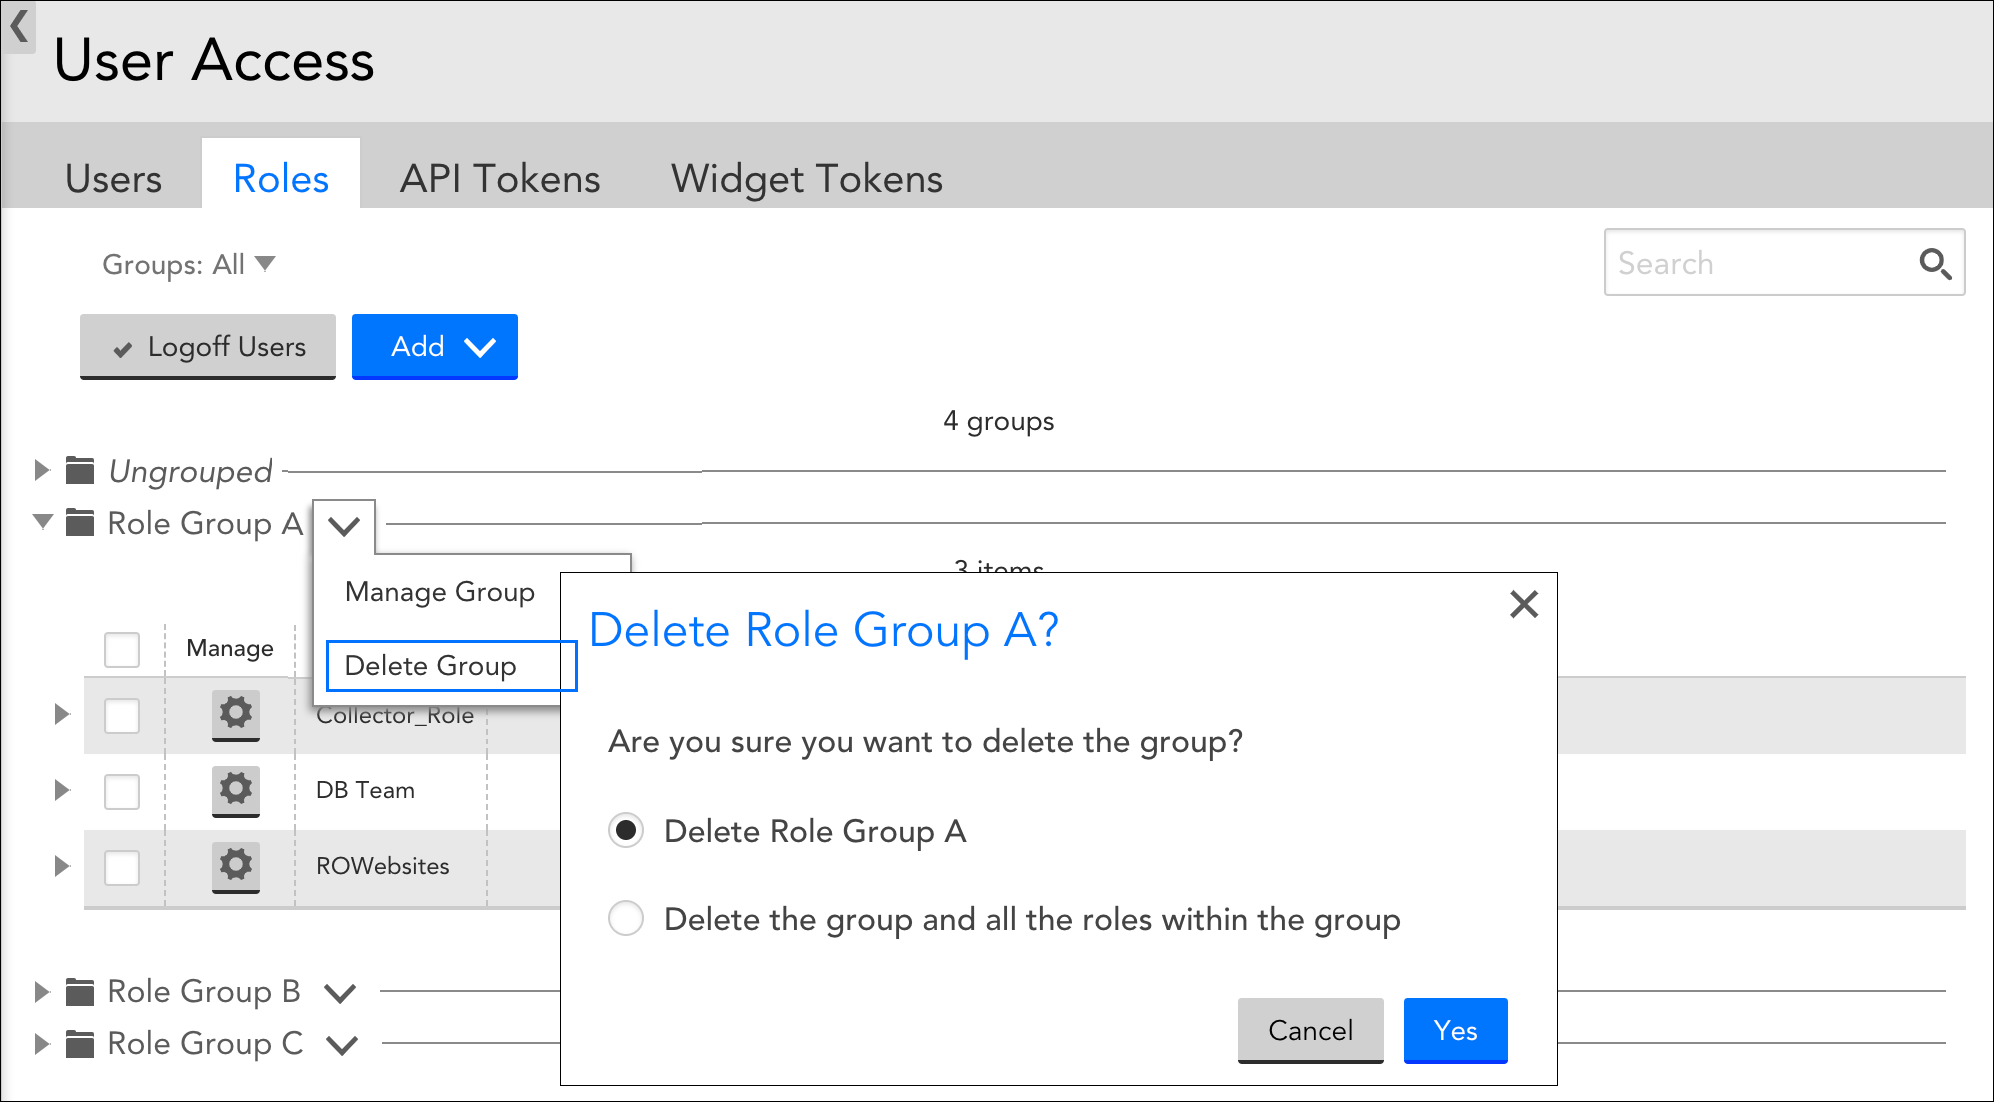
When deleting a role group, you have the option to delete the group only, or the group and all its member roles:
- Delete group only. This option deletes the group and moves any member roles to the default “Ungrouped” group.
- Delete group and all the roles within the group. This option deletes the role group and all of its member roles. If users are currently assigned to any of the member roles, they must first be unassigned before the role can be deleted.
Creating Users
To add new users to your LogicMonitor account, navigate to Settings > User Access > Users & Roles > Add > User. As discussed next, there are several settings that must be established in order to create user accounts. These settings determine credentials, some basic interface behavior, and a user’s level of permissions.
Note: Role Access view permissions and User Access manage permissions are required in order to provision user accounts.
API Only Access
If toggled on, this option will allow creation of a user only capable of API access. For such a user, only the Username, API Tokens, Roles, Status and Notes fields are relevant. API only users don’t have passwords or other user interface-specific fields, making them a more secure option if you are creating a dedicated user for an API-based integration.
Username
A name or email address to be used to log in to the account.
First Name and Last Name
Name fields to help identify the user.
Primary email address for the user. This contact method will be used for email alert and report delivery.
Password
The password to be used upon initial login.
Passwords must be a minimum of twelve characters, containing:
- At least one uppercase letter
- At least one lowercase letter
- At least one digit
- At least one of the following special characters: ~, !, $, %, ^, (, ), _, –, +, =, }, {, ], [, @, #, &, \, |, ;, :, < , >, . ,?, /
Note: Along with the above password conditions, your password is verified automatically for any previous data breaches using the Have I Been Pwned integration with LogicMonitor. This integration allows LogicMonitor to check if you are using a compromised login password when creating an account, updating an account, and resetting the password to your account. If you wish to verify your password manually, see Have I Been Pwned.
Force Password Change
By default, the Force Password Change? option is checked when creating a new user. It will cause the system to immediately prompt the new user for a password change upon their initial login.
Password changes can also be required of existing users at any time. If the user is logged in at the time this is option is checked, they will receive a notification stating they will need to change their password the next time they log in. Once the user has completed the password change, the Force Password Change? option resets to unchecked.
Enable Two-Factor Authentication
If this option is selected, the user will be required to use two-factor authentication upon next login. For more information on LogicMonitor’s implementation of this additional security layer, see Two-Factor Authentication.
Note: Currently, two-factor authentication is not enforced when logging in through our mobile client.
Phone
The phone option is not required. If entered, it is available as a contact method for voice alerts and native SMS alerts.
To add the country code, you can either select the country flag from the drop-down list or you can enter the code manually.
Note: You must enter a valid phone number with a valid format. Refrain from entering alphabets, special characters, and spaces.
For example: +918085808505, +14155552671
SMS Email Address
Not required. If entered, this email address will be available as a contact method for email SMS alerts.
SMS Email Format
The format for email SMS alert notifications that the SMS email address will receive. Select “Full-text” to receive the entire alert message or “Short (160 chars)” to receive an abbreviated version.
Time Zone
The Time Zone field for all new users defaults to the time zone specified for the LogicMonitor account (as configured in the global portal settings). However, if a user is located in a different time zone, it can be selected from this field’s dropdown menu to allow the user to view and configure time-based data and settings relative to their local region.
When a user account is configured to a time zone other than the global LogicMonitor account, their UI will display time-based data (e.g. alerts, report output, one-time events, raw data, etc.) according to their chosen time zone. Users can easily toggle between their user-specific and account level time zones from the UI header, as shown next.

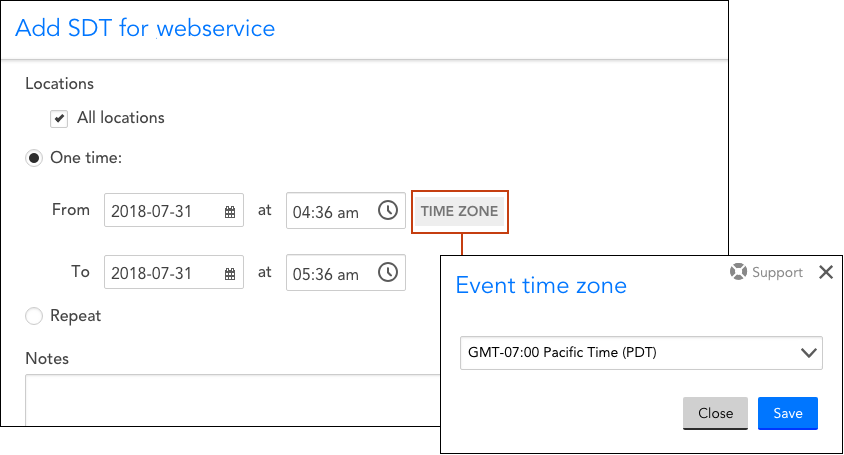
All events a user configures (e.g. SDT, Collector upgrades, report deliveries, SLA periods, etc.) will be configured, by default, in the user’s specific time zone. However, this can be overridden on a case-by-case basis using the Event time zone dropdown menu, shown next, that accompanies all time-related settings throughout the interface.
User Groups
In the User Groups area of user configurations, you can assign the user to one or more previously-configured user groups. If your organization doesn’t organize users by group, or if the group hasn’t yet been created, leave the table empty to assign the user to the default “Ungrouped” group. For more information on user groups, see the User Groups section of this support article.
API Tokens
The API tokens associated with the user. The API Tokens entered here can be used to authenticate REST API requests, and will assume the role(s) of the user. Make sure to save the Access Key to a secure location when you add an API Token, as that value will not be displayed again.
Roles
The roles assigned to this user. If a user is assigned multiple roles, the user’s privileges are a sum of the privileges of each of the assigned roles. For example, if one assigned role provides view only permissions to all resources, but another assigned role provides manage permissions to all resources, the user will have view and manage permissions for all resources. If yet another assigned role provides view permissions for all dashboards, but no permissions for resources, the user will maintain manage permissions for all resources and additionally gain view permissions for all dashboards. For more information on user roles, see Roles.
View Permission
The View Permission area of a user configuration determines the visibility of the pages on the LogicMonitor Portal. It is a user-level access and view permission. If a toggle for a page is not selected, the user does not have access to that page on the LogicMonitor Portal regardless of the permission levels provided to the user by the assigned role. For example, if a user does not have view permission to Logs, Traces, and Reports, then on the LogicMonitor Portal, the Logs, Traces, and Reports pages are not visible to that user.
However, if the same user has an Admin role with read and write permission to Logs, Traces, and Reports, then the user can access public APIs through tools such as Postman and send API requests for Logs, Traces, and Reports. Before making any API request, LogicMonitor checks for the permissions granted to the user’s role.
Generally, select all the pages and let the user’s assigned role determine the visibility and access. However, there may be circumstances in which the user needs to be restricted from a particular page.
Status
Users are active by default. Suspended users will be unable to log in to the system.
Note
The user note is for reference. It does not display anywhere else in the interface.
Managing Users
Existing users can be viewed at Settings | Users & Roles | Users. All users are nested in group(s) and listed in table form.
From this table, you can:
- Filter users–Use the filters to filter users by user group, assigned role, and/or status.
- Search users–Search for users using first name, last name, user name, role name, or group name.
- Sort users–Clicking the header name for most columns allows you to toggle between ascending and descending table sort order for that column.
- Expand user details–Click the arrow to the left of a user to expand listing to display additional details.
- Manage table columns–Click the Settings button to add/remove columns in the user table, as well as reorder columns.
- Edit or delete a user–Click the gear icon to open the Manage User dialog. From this dialog, you can update a user’s configurations or delete a user.
- Log off Users–Place a checkmark in the leftmost column of one or more users and select Actions > Logoff Users to log them out of the platform.
- Move users to other groups–Place a checkmark in the leftmost column of one or more users and select Actions > Move Users to Group to add users to another group. Because LogicMonitor supports the ability to include one user account in multiple user groups, the default behavior is to copy the user to the specified group, while leaving in its existing group as well. For more information on user groups, see the User Groups section of this support article.
- Manage user groups–Click the drop-down arrow to the right of a user group name to edit or delete the group.
Note: Another user management tool is the User report. It can be used to generate detailed data for LogicMonitor user accounts—on a global or granular level. For more information, see User Report.
User Groups
As with other areas of LogicMonitor, users can be organized into logical groupings. In addition to providing basic organization, user groups provide granular role-based access control (RBAC) for the viewing and management of users across the platform. For example, by assigning permissions to a user that only allow that user access to certain user groups, you can restrict which users are displayed to that user when they perform tasks such as establishing report delivery recipients, alert delivery recipients (i.e. escalation chains), or recipient groups.
Creating User Groups and Adding Users
To create a user group, navigate to Settings | Users & Roles | Users | Add | User Group.
Users can be added to user groups when creating the user (i.e. from the Add User dialog), editing the user (i.e. from the Manage User dialog), or, as discussed in the Managing Users section of this support article, from the table of users that displays on the Users tab.
Note: While a single user can exist in multiple user groups, it cannot simultaneously exist in the default “Ungrouped” user group and another user group. Once a user is assigned to a user group other than the default “Ungrouped” group, it is removed from that default placeholder group.
Managing Users Groups
User groups can be edited or deleted from the Users tab by clicking the drop-down arrow located to the right of a user group name.
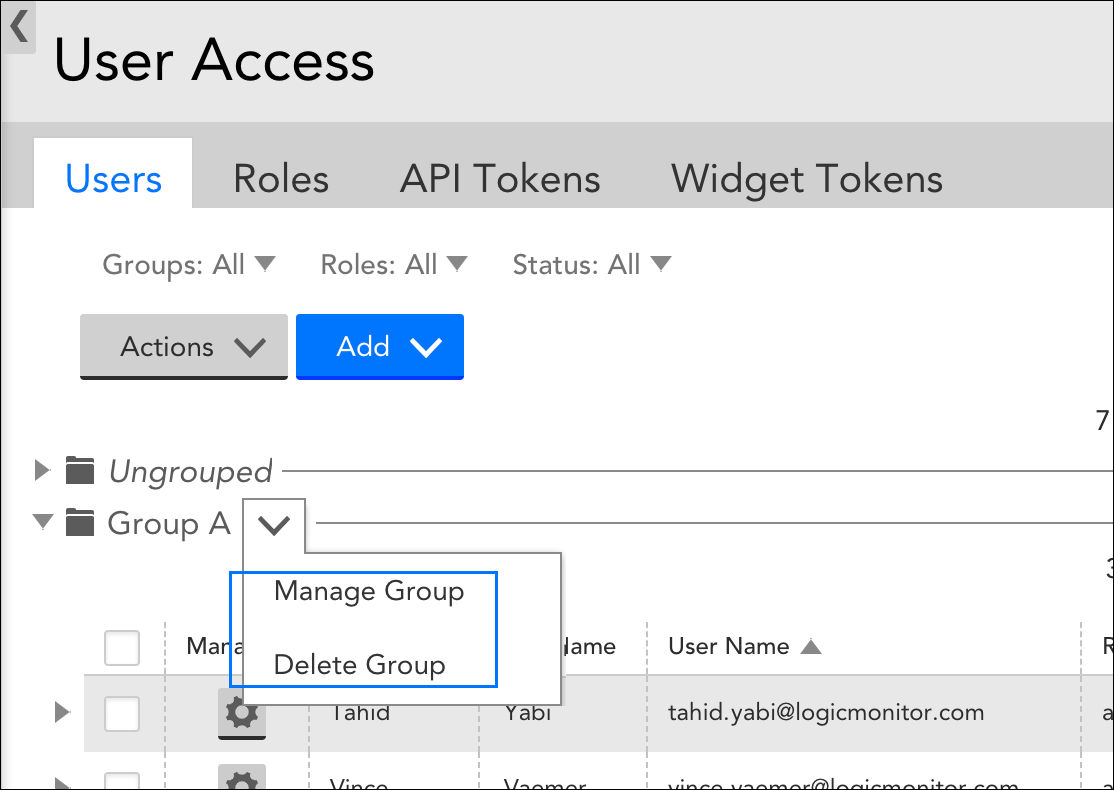
When deleting a user group, you have the option to delete the group only, or the group and all its member users:
- Delete group only–This option deletes the group only. Members that are members of other groups will remain in those groups; members that are not members of other groups will be moved to the default “Ungrouped” user group.
- Delete group and all the users within the group–This option deletes the user group and all of its member users.
Understanding the “lmsupport” User and Remote Support Access
Upon setup of your LogicMonitor portal, a user account named “lmsupport” is auto created with the readonly role assigned. The purpose of this account is to provide LogicMonitor with remote support access to your portal for troubleshooting purposes.
Depending upon the options chosen at the time of setup, the lmsupport user account is initially created as either active or suspended. This designation directly determines whether or not LogicMonitor support can access your portal and, for security purposes, the status (enabled or disabled) of LogicMonitor’s remote support access always displays in the user interface.
The “Active” or “Suspended” status of the lmsupport user account, as well as its level of privileges, can be updated in the same manner as any other user account.
Note: If you toggle the lmsupport user account between active and suspended states, you’ll need to refresh the interface or navigate to a different area in order for the “Remote Support Access” status display to update.


