LogicMonitor provides a New User Message template that you can use to welcome new users to your LogicMonitor portal. When you add a new user, the user receives an email welcoming them to your portal. You can customize this template as needed.
The New User Message settings enable you to modify the email template and provide key details to the new user to get started with their onboarding process. You can use a text editor with various formatting options to customize the messaging. In addition, the text editor enables you to modify the messaging in HTML format.
When a new user is onboarded, LogicMonitor automatically sends the welcome email with the content that you add in the template.
Placeholder Tokens
The text editor supports placeholder tokens that are mapped with user details when the email is sent (for example, ##user## is the username of the user). You can use tokens throughout the text editor as needed. The following table lists the tokens you can leverage in the text editor:
| Token | Description |
##ROLE## | Role assigned to the user |
##EMAIL## | Email address of the user |
##DATE## | Current date |
##PHONE## | Phone number of the user |
##NOTE## | Description of the user account |
##USER## | Username of the user |
##SMSMETHOD## | The message format for SMS or SMS for email messages (long – full alert descriptions – or short) limited to 160 characters |
Note: Tokens are defined by LogicMonitor. You cannot create new tokens.
Requirements for Modifying the New User Message Template
To modify the New User Message Template, you need a LogicMonitor user with the “Administrator” role and the “Manage” permission for Settings.
To leverage placeholder tokens in the text editor template, the token must be prefixed and suffixed with a double hash (##).
Modifying the New User Message Template
- Navigate to Settings > Message Templates > New User Message.

- Select
 Manage.
The message template text editor is displayed.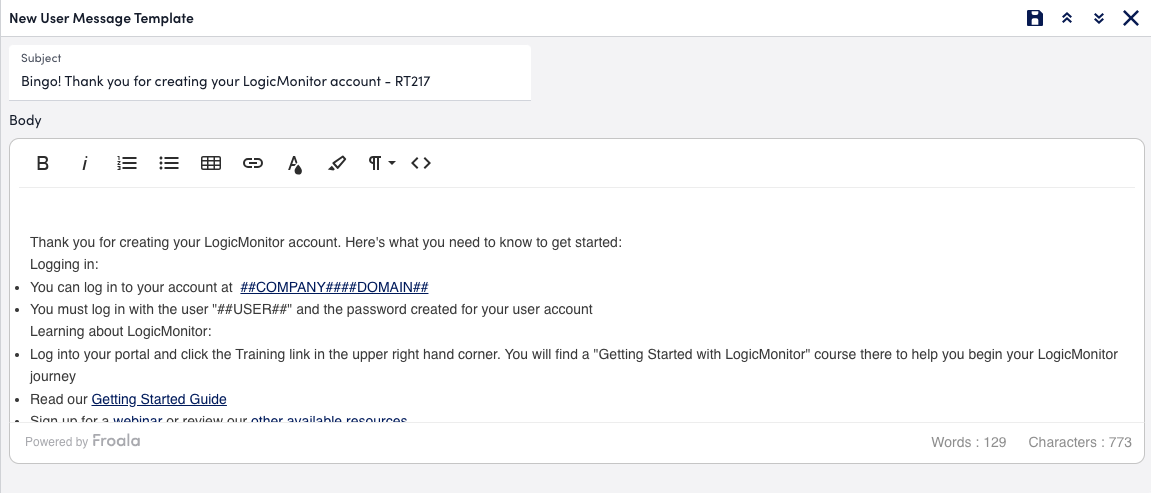
- Modify the content as needed, using the toolbar to format the content.
Alternatively, you can modify the content in HTML format by selecting the Code View in the editor.
If you add a table, you can resize the cells in the table by dragging the rows and columns to the size you need.
If you add an image, additional settings are available for the image, such as alignment and alternative text. Select the image after you add it to access the additional settings. - Select
 Save.
Save.
Changes are applied to the new user message. All welcome emails sent to new users receive the message in the template until you make additional updates and save again.
LogicMonitor provides a New User Message template that you can use to welcome new users to your LogicMonitor portal. When you add a new user, the user receives an email welcoming them to your portal. You can customize this template as needed.
The New User Message settings enable you to modify the email template and provide key details to the new user to get started with their onboarding process. You can use a text editor with various formatting options to customize the messaging. In addition, the text editor enables you to modify the messaging in HTML format.
When a new user is onboarded, LogicMonitor automatically sends the welcome email with the content that you add in the template.
Placeholder Tokens
The text editor supports placeholder tokens that are mapped with user details when the email is sent (for example, ##user## is the username of the user). You can use tokens throughout the text editor as needed. The following table lists the tokens you can leverage in the text editor:
| Token | Description |
##ROLE## | Role assigned to the user |
##EMAIL## | Email address of the user |
##DATE## | Current date |
##PHONE## | Phone number of the user |
##NOTE## | Description of the user account |
##USER## | Username of the user |
##SMSMETHOD## | The message format for SMS or SMS for email messages (long – full alert descriptions – or short) limited to 160 characters |
Note: Tokens are defined by LogicMonitor. You cannot create new tokens.
Requirements for Modifying the New User Message Template
To modify the New User Message Template, you need a LogicMonitor user with the “Administrator” role and the “Manage” permission for Settings.
To leverage placeholder tokens in the text editor template, the token must be prefixed and suffixed with a double hash (##).
Modifying the New User Message Template
- Navigate to Settings > Message Templates > New User Message.

- Select
 Manage.
The message template text editor is displayed.
- Modify the content as needed, using the toolbar to format the content.
Alternatively, you can modify the content in HTML format by selecting the Code View in the editor.
If you add a table, you can resize the cells in the table by dragging the rows and columns to the size you need.
If you add an image, additional settings are available for the image, such as alignment and alternative text. Select the image after you add it to access the additional settings. - Select
 Save.
Save.
Changes are applied to the new user message. All welcome emails sent to new users receive the message in the template until you make additional updates and save again.
LogicMonitor is entrusted with sending crisp and informative alert messages to customers. As a user with Administrator role, you are responsible for managing the content of alert messages defined in the alert messages templates. LogicMonitor supports 12 types of alert messages. The alerts can be send via email, SMS, and voice. The alert message template setting allows you to edit the template for email, SMS, and voice and provide alert details to the user. As and when an alert is triggered, LogicMonitor auto send the email or SMS or makes a call with the content that you have drafted in the template.
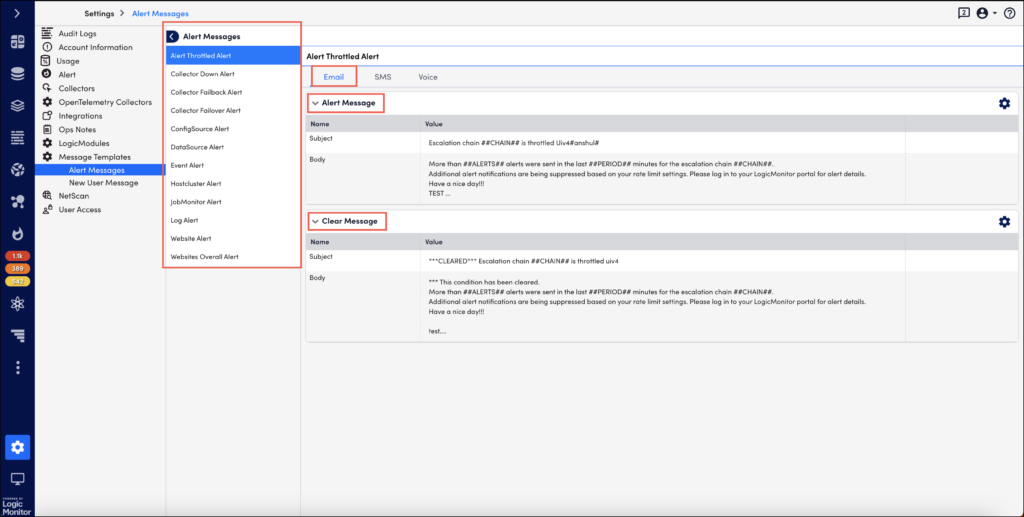
The content of the alert message is defined in the Alert Message and Clear Message template. You can override the global template for a particular datapoint, eventsource, or batchjob by defining an alert template for that item. Global templates are only used when an alert template is notdefined for an item.
Note: Any timestamps provided in alert notification messages correspond to the time zone configured globally for the portal (Settings > Account Information > Portal Settings). This is in contrast to viewing alerts from within the LogicMonitor UI, where alerts are timestamped according to the user’s configured time zone (assuming that the time zone is set for the user and that it is the current active display time zone, as discussed in Users).
Accessing Global Templates
For each alert type you can define email, SMS, and voice message template for active alerts and for cleared alerts.
To access the alert message template, navigate to Settings > Message Templates > Alert Messages.
Placeholder Tokens
Before you edit the message template, you should be familiar with the placeholder tokens:
- The system supports a set of placeholder tokens which are mapped with user details while sending the alert. For example, the token ##user## indicates the user’s username.
- The token must always be prefixed and suffixed with double hash ##
- You cannot create new tokens. They are defined by LogicMonitor.
- You can change the order of tokens, add, or drop tokens placed in the message template.
Points to Consider
- If you close the message template editor without saving the changes, you will loose the changes.
- Use the Up and Down
 arrows to expand and minimise the editor.
 - The changes saved to the template will be applied to all the alert messages sent to the users until you make additional updates and save again.
Editing the Template
Select the Manage ![]() icon to edit an alert message template. The steps to edit are same for all alert types (unless overridden at the datapoint, EventSource or JobMonitor level, as discussed in the Overriding the Global Templates section of this support article).
icon to edit an alert message template. The steps to edit are same for all alert types (unless overridden at the datapoint, EventSource or JobMonitor level, as discussed in the Overriding the Global Templates section of this support article).
You can edit the subject and content of the message. Note that voice message template does not support ‘subject’ for the message.
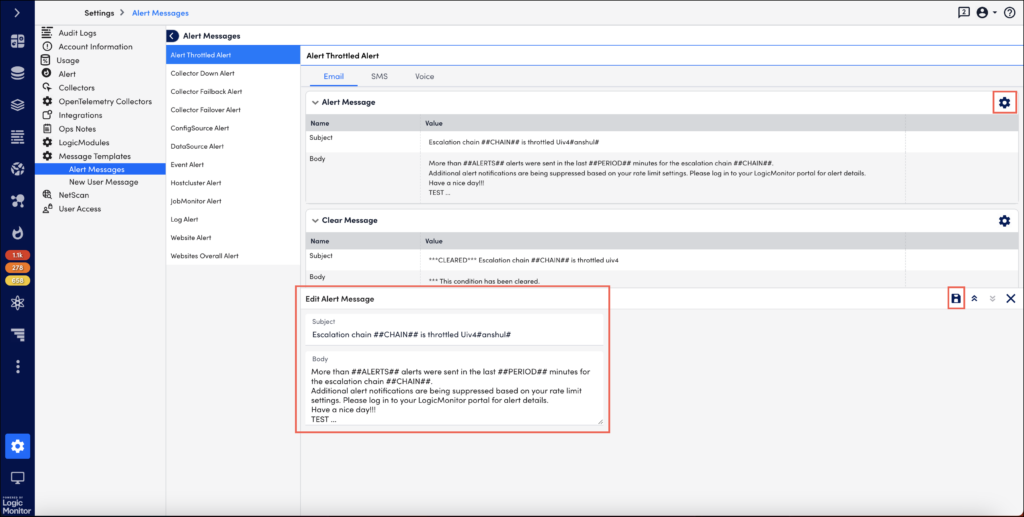
All standard DataSource, EventSource, JobMonitor, and website tokens can be used in alert message templates.
To edit the Clear Message template, select the Manage ![]() icon.
icon.
Overriding Global Alert Message Templates
Global alert message templates can be overriden on a case-by-case basis for datapoint, EventSource, and JobMonitor alerts. All of these alert events support custom alert message configurations. This can be useful, for example, if you want a unique alert message template for just a handful of datapoints. For more information on overriding global alert message templates for these types of alert events, see Datapoint Overview, Creating EventSources, and Creating JobMonitor Definitions respectively.
Users in LogicMonitor allow individual access to your LogicMonitor account and portal. Depending on the permissions you assign to the user, you can restrict or grant access to certain areas of your account and portal.
When you create a user, you use a wizard in your LogicMonitor portal to add the user to your portal, assign a role to the user (roles restrict or grant access), and configure additional settings, such as adding the user to a group or forcing the user to change their password at initial login.
In addition to assigning role to a user, you can also grant view permissions to specific pages in your LogicMonitor portal to determine visibility for the user within the portal. It is a user-level access and view permission. If a page is not enabled for the user, the user does not have access to that page in the portal regardless of the permission levels provided to the user by the assigned role. For example, if a user does not have view permission to Logs, Traces, and Reports, then in the portal, the Logs, Traces, and Reports pages are not visible to that user. If the same user has an Admin role with “read” and “write” permission to Logs, Traces, and Reports, then the user can access public APIs through tools such as Postman and send API requests for Logs, Traces, and Reports. Before making any API requests, LogicMonitor checks for the permissions granted to the user’s role.
Requirements for Adding a User
To add a user, you need a user assigned “User Access” in the Settings Role permissions. For more information, see LogicMonitor Roles.
Adding a Role
- In LogicMonitor, navigate to Settings > Users and Roles.
- Select the Users tab.
The Users table is displayed with user groups and users. - Select Add User Options, and then select Add User.
The Add User wizard is displayed to walk you through adding a role to your portal. - At the Basic step of the wizard, do the following:
- In the Username field, enter a name for the user.
You can enter a name or an email address that is used to log in to the account.
Note: An email notification is sent to the email associated with the user if this setting is modified.
- (Optional) In the First Name and Last Name fields, enter names to help identify the user.
Note: An email notification is sent to the email associated with the user if this setting is modified.
- In the Email field, enter the primary email address for the user.
This contact method is used for email alert and report delivery.
The email verification link is sent to the users in the following scenarios:
- When a new user is created
- When the existing user updates the email ID
The user must select the link provided in the email to complete the verification process and activate the account.
Note: An email notification is sent to the email associated with the user if this setting is modified.
- In the Password field, enter the password the user needs to use during initial login. Re-enter the password in the Retype Password field.
The passwords must be a minimum of 12 characters and a maximum of 256 characters, the password must contain:
- At least one uppercase letter
- At least one lowercase letter
- At least one digit
- At least one of the following special characters: ~, !, $, %, ^, (, ), _, –, +, =, }, {, ], [, @, #, &, \, |, ;, :, < , >, . ,?, /
Note: In addition to the password conditions, your password is verified automatically for any previous data breaches using the Have I Been Pwned integration with LogicMonitor. This integration allows LogicMonitor to check if you are using a compromised login password when creating an account, updating an account, and resetting the password to your account. If you wish to verify your password manually, see Have I Been Pwned.
Note: An email notification is sent to the email associated with the user if this setting is modified.
- To prompt the user for a password change at initial login, toggle the Force Password Change switch.
- To require the user to use two-factor authentication at next login, toggle the Enable two factor authentication? switch.
For more information about LogicMonitor’s implementation of this additional security layer, see Two-Factor Authentication.
Note: Two-factor authentication is not enforced when logging in through the mobile client.
Note: An email notification is sent to the email associated with the user if this setting is modified.
- (Optional) In the Enter phone number field, enter a valid phone number.
This is the phone number that is used for voice alerts and native SMS alerts.
Note: An email notification is sent to the email associated with the user if this setting is modified.
- (Optional) In the SMS Email Address field, enter an email address that is available as a contact method for email SMS alerts, and then select the format for the email SMS alert notifications from Email Format.
The “Full-text” option sends the entire alert message, and “Short (160 chars)” option sends an abbreviated version.
Note: An email notification is sent to the email associated with the user if this setting is modified.
- From TimeZone, select the time zone for the user.
By default, the time zone specified for the LogicMonitor account is applied to all users. Selecting a different time zone from the account allows the user to view and configure time-based data and settings relative to their local region. Users have the ability to toggle between their configured time zone and the account time zone after they are added to the portal.
All events a user configures (for example, SDT, Collector upgrades, report delivers, SLA periods) are configured in their specified time zone. This can be overriden using the time zone settings in the applicable event. - Select a timeout value at user-level from the User Inactive Session Timeout dropdown menu to log users out of the LogicMonitor portal after a specified time.
The default value is “Timeout not applied”. Inactivity for the specified length of time results in a user account being logged out.
Important: When a timeout value is set at the user level, it overrides the timeout value configured at the portal level. - In the User Groups. settings, assign the user to one or more previously-configured user groups.
If you do not assign the user to a group, the user is assigned to the default “Ungrouped” group in the users table. For more information, see Adding a User Group. - In Status, select whether to make the user active or suspended.
Users are active by default. Suspended users will be unable to log in to the system. - (Optional) In the Note field, enter any information for reference.
This information does not display anywhere else in the portal.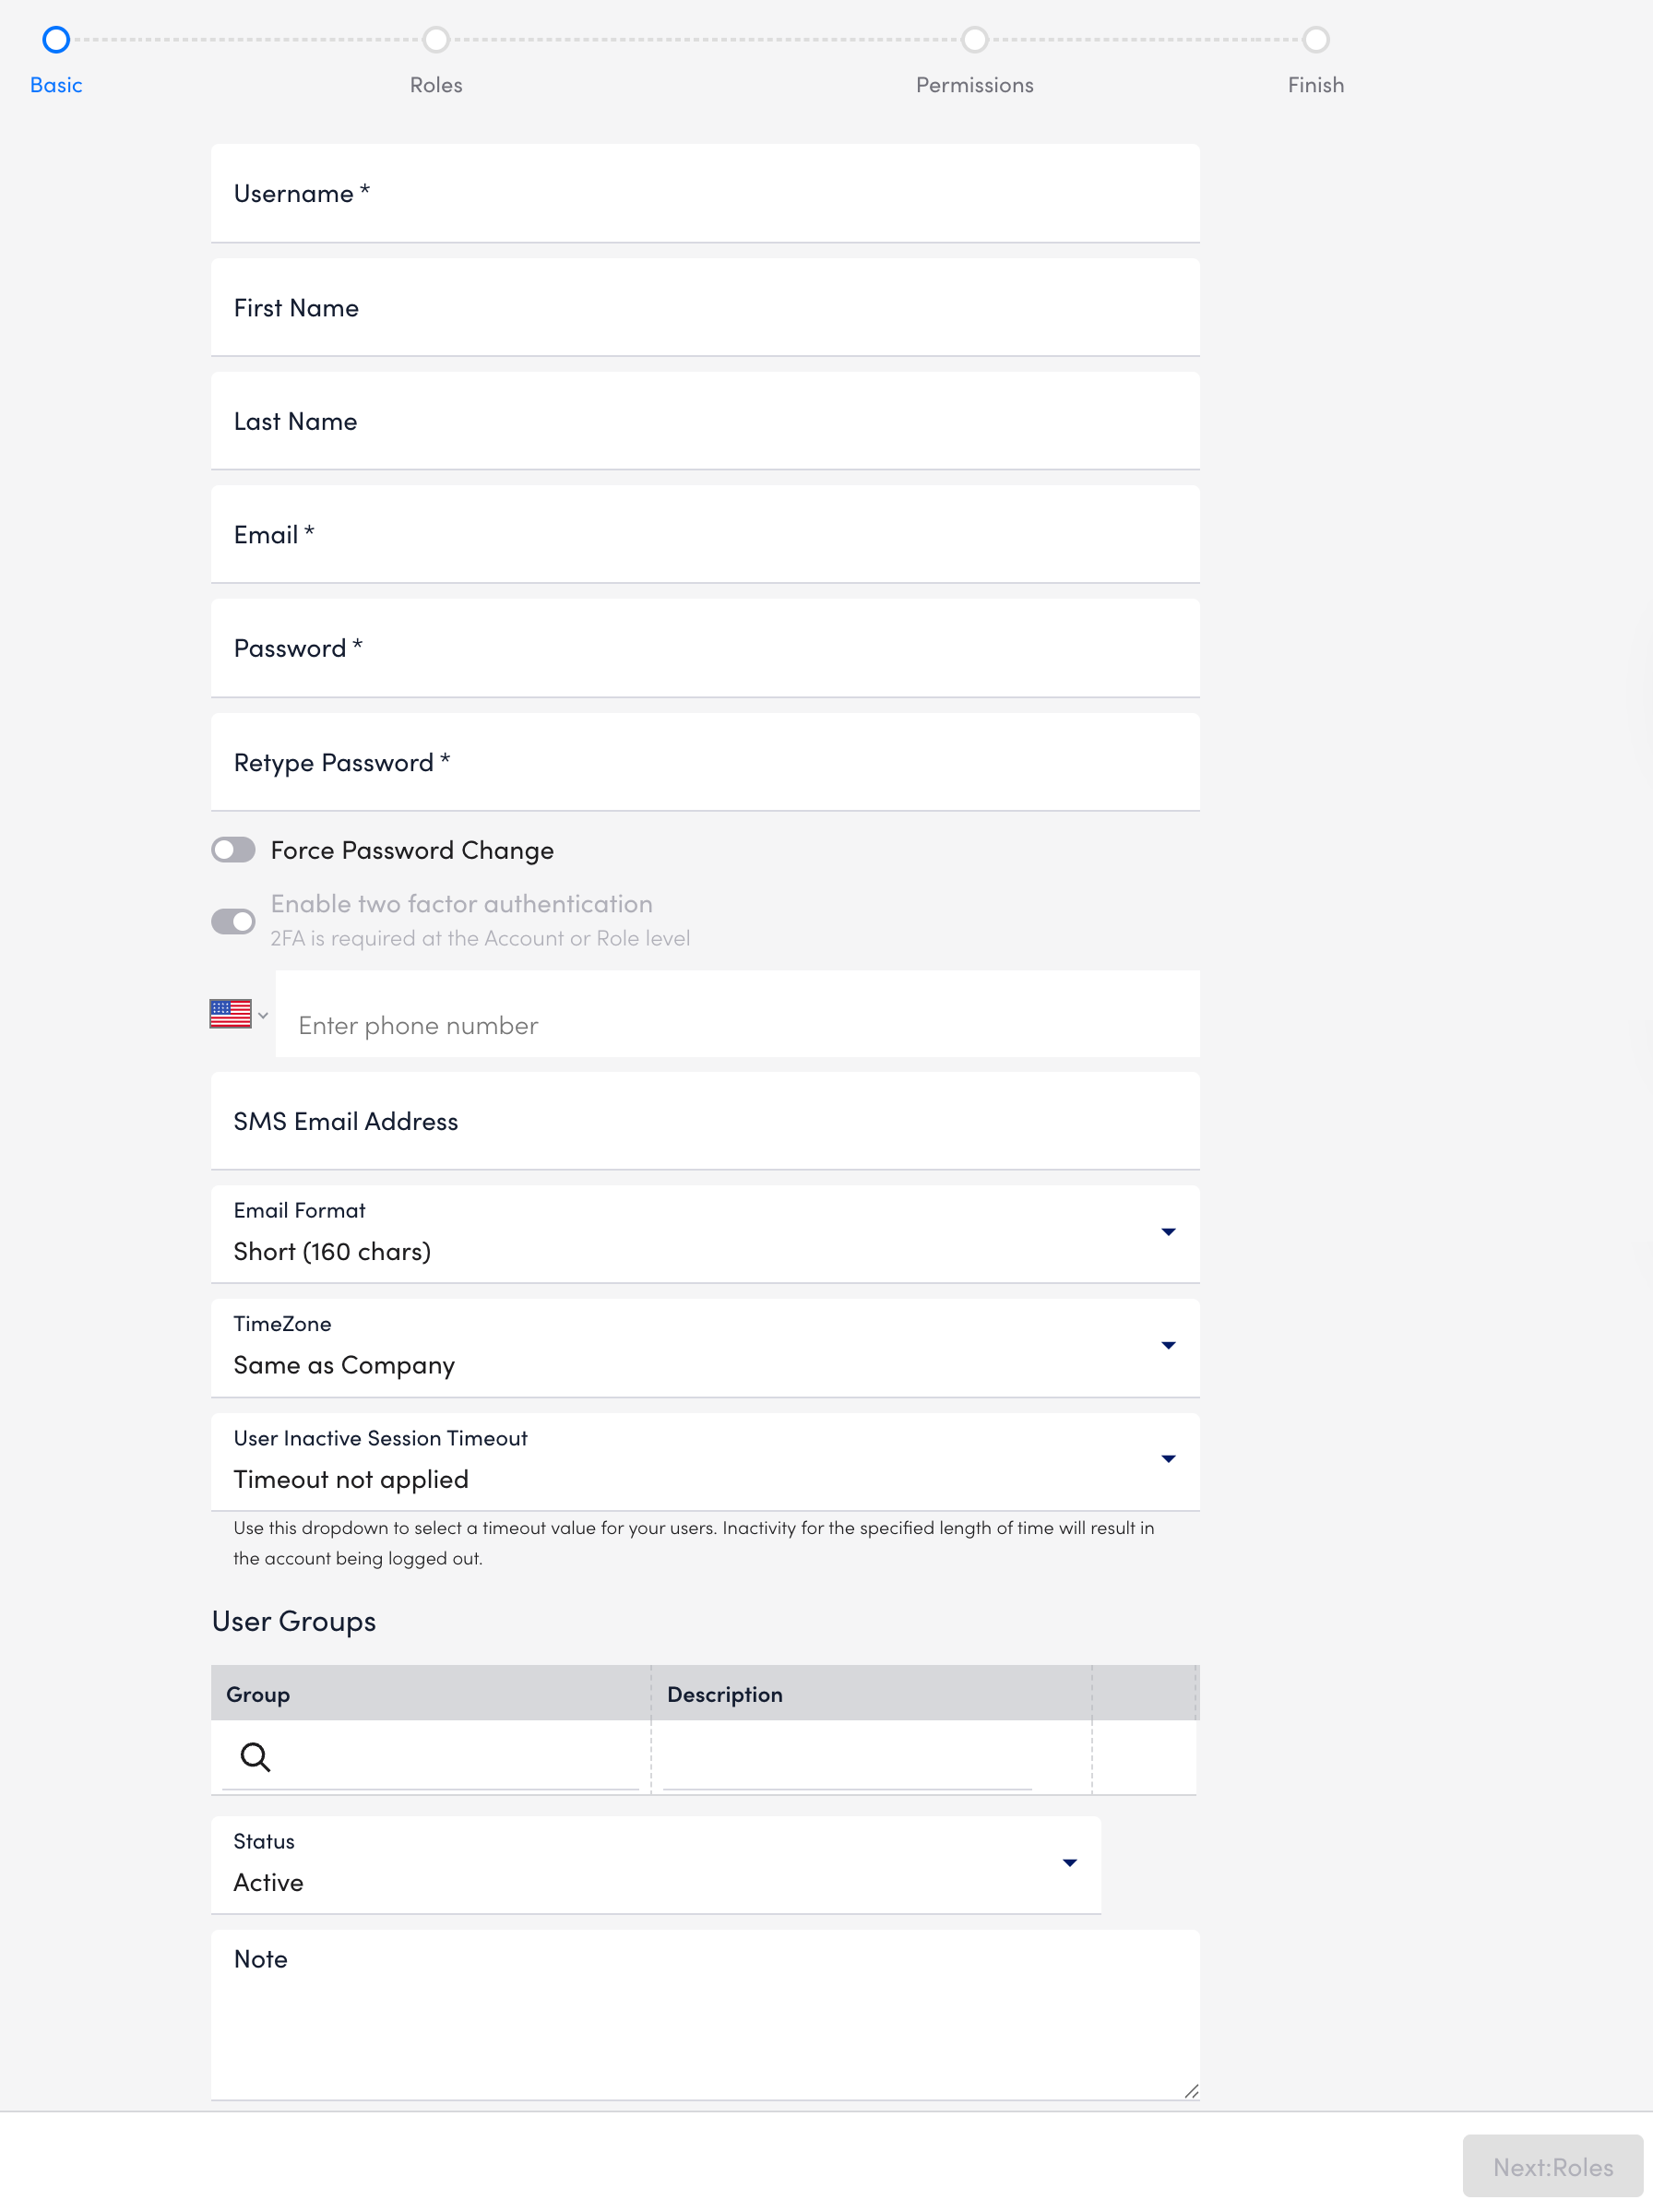
- Select Next: Roles.
- At the Roles step of the wizard, select the roles you want to assign to the user.
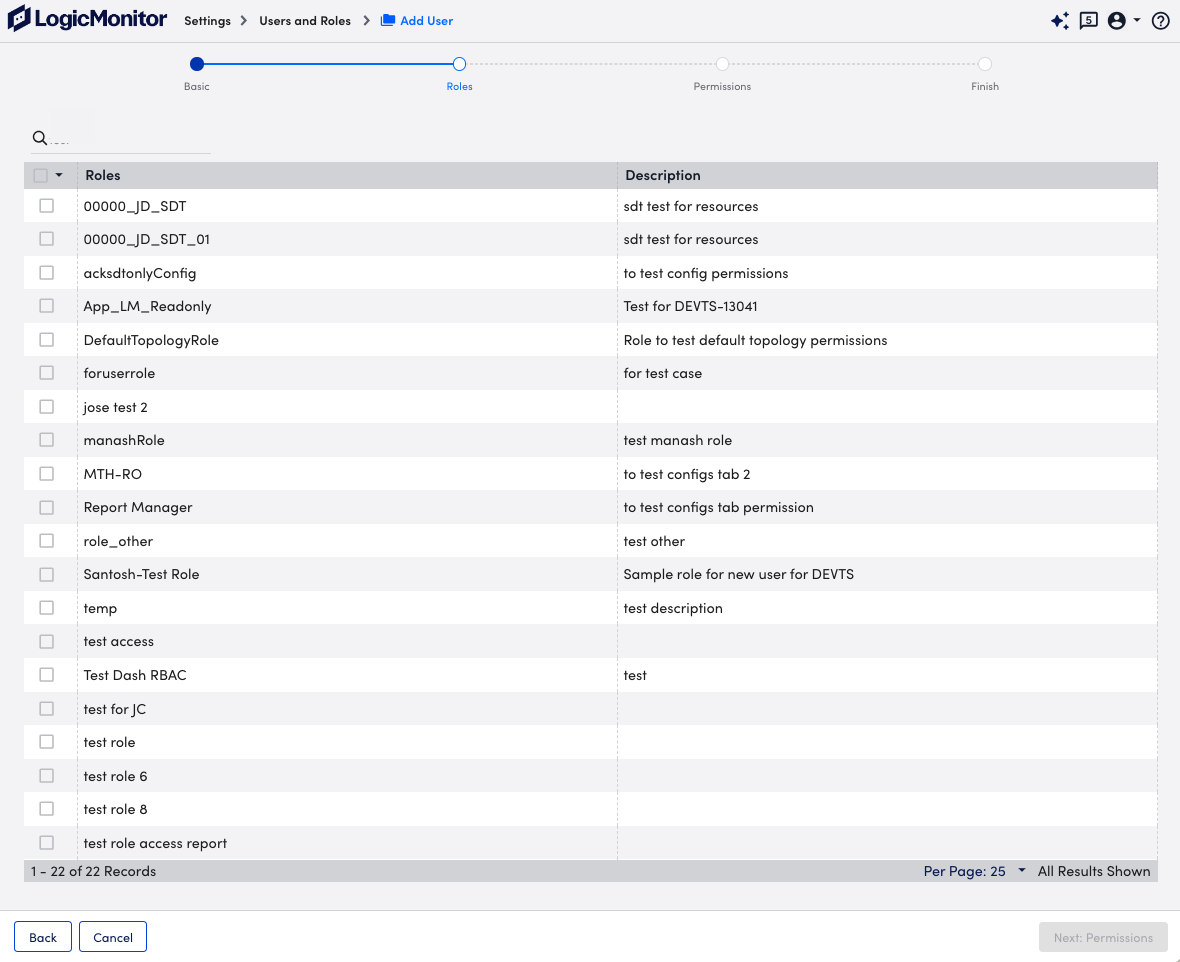
You can assign as many roles as needed to a user.
If a user is assigned multiple roles, the effective permissions for that user are the sum of the privileges of each role. For example, if one assigned role provides view only permissions to all resources, but another assigned role provides manage permissions to all resources, the user will have view and manage permissions for all resources. If yet another assigned role provides view permissions for all dashboards, but no permissions for resources, the user will maintain manage permissions for all resources and additionally gain view permissions for all dashboards. - Select Next: Permissions.
- At the Permissions step of the wizard, select the View Permissions you want the user to have.
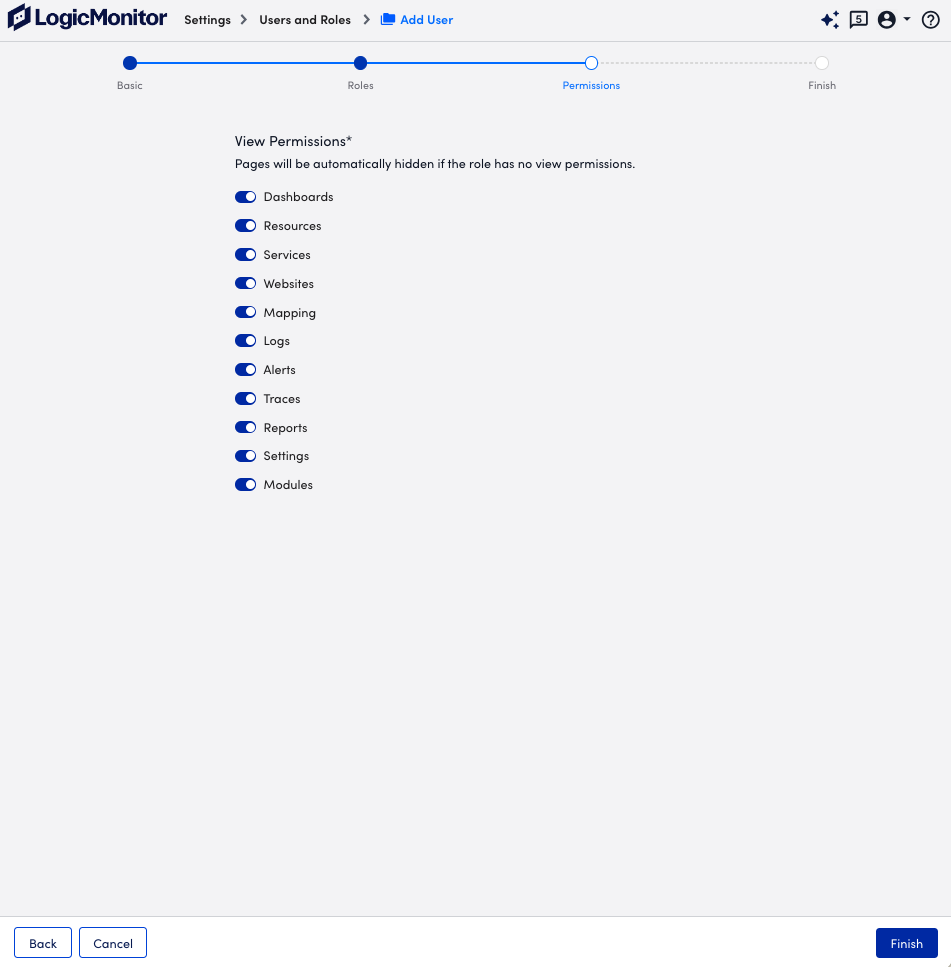
If a toggle for a page is not selected, the user does not have access to that page in the portal regardless of the permission levels provided to the user by the assigned role. - Select Finish.
LogicMonitor’s audit logs provide insight into recent account activity, such as user logins and configuration changes made to resources in the account. Each audit log entry provides a timestamp for the event, the username associated with the event, the IP address associated with the event, and a description of the event. For example, you could use the audit logs to identify when alerting was disabled for a particular device group, or which user updated a particular resource property, and so on.
The duration of time for which audit log entries are preserved is determined by the “alert history storage” level associated with your LogicMonitor package. For a breakdown of “alert history storage” levels by package, visit the LogicMonitor pricing page.
You can access and query your platform’s audit logs using the following:
- Audit Logs page
- Audit Logs report
- LogicMonitor’s REST API
Note: When reviewing audit logs, it is common to see consecutive login events with no log out—if the user does not explicitly log out, but simply lets the session go idle, then starts using LogicMonitor again (possibly from a different computer), a new login event will be recorded.
Audit Logs Page
Accessible from Settings > Audit Logs, the Audit Logs page provides an interface from which you can view and filter audit logs.
Filtering Audit Log Entries
You can filter the audit log entries according to:
- Time Range: The time range dropdown allows you to select your required time range from the time range dropdown. The default value is Last 24 hours. The other available options are Last hour, Last 2 hours, Last 5 hours, Last 8 hours, Last 12 hours, Last 2 days, Last 7 days, Last 30 days, Last calendar month, Last 3 months, Last year, Custom range.
- User name: The user option allows you to filter one or more specific users. Select
 to add your required user or users.
Audit log entries can also be searched using keywords found in the User, IP and Description columns. Single keywords are automatically wildcarded on both ends. For example, a search term of “time” could return “time”, “uptime”, and “timeout.” If multiple search terms are entered, they are automatically joined using the AND operator and are wildcarded at the beginning and end of the full search string (e.g. searching on “trigger alert” is the same as searching on “*trigger AND alert*”). Be sure to add additional wildcards when multiple search terms are in use if necessary. For example, if you want “trigger AND alert” to match on logs containing the keyword “trigger” or “triggers,” you’ll need to manually enter one more wildcard (i.e. “trigger* AND alert”). An OR or an AND NOT operator can be used instead of the default AND operator. When using either of these operators, only a single keyword can be on either side of the operator. For example, searching on “trigger OR alert” will return results as expected, but searching on “trigger alert OR SAML” will not. With the exception of manually entered operators (i.e. AND, OR, and AND NOT), keyword searches are not case sensitive. A keyword search is joined with other current active filters using an AND operator.
Note: The Audit Logs page only provides one year worth of audit log entries for dynamic viewing and filtering.
Downloading and Reporting Audit Log Entries
You can download the current display of log entries. Select  to download the log entries in CSV format.
Additionally, select  to launch the Audit Log report settings dialog. The dialog will be populated with the current filters and search terms. Save the filters as the criteria for a new report and choose to generate its output in CSV, HTML, or PDF format. For more information on the Audit Log report, see Audit Log Report.
Customizing Table Settings
- Navigate to Settings > Audit Logs.
- Select
 .
. - Do the following:
- To order the columns, select
 and drag to the order you want
 - To hide or show columns, select
 .
.
- To order the columns, select
Audit Logs Report
As discussed in Audit Log Report, the Audit Log report offers the same filter and search capabilities as the Audit Log page, but expanded capabilities when it comes to output formats, sorting, and duration of historical data available. And, as with all LogicMonitor reports, the Audit Log report can be scheduled to run on a recurring basis.
Audit Logs Retrieval using REST API
Audit log entries can be queried from the LogicMonitor REST API. These results can be further refined for post-processing and analysis. For more information, see Get Audit Log Entries.
Two-factor authentication (2FA) strengthens the security of your LogicMonitor account by requiring users to verify their identity through both a username and password, plus a third-party application or authentication token delivered through SMS, voice, or email.
2FA is mandatory and set up by default for all LogicMonitor user accounts to maintain consistent account security across the platform.
Note: The two-factor authentication push approval function is disabled as LogicMonitor no longer use the deprecated Authy API. However, you can continue to use Authy App along with other TOTP apps using the listed methods.
LogicMonitor Two-Factor Authentication Types
When logging in with two-factor authentication enabled, you are prompted to select from the following verification methods:
- LogicMonitor Passkey —For more information, see LogicMonitor Passkey
Recommendation: Use LogicMonitor Passkey as your default Two-Factor Authentication method.
- Multi-Factor Authenticator App Verification—For more information, see Multi-Factor Authenticator App Verification
- SMS Text Message Verification Code—For more information, see SMS Text Message Verification Code
- Phone Call Verification Code—For more information, see Phone Call Verification Code
- Email Verification Code—For more information, see Email Verification Code
Important: CAPTCHA verification is triggered after a total of five invalid authentication attempts across all 2FA modes combined. For example, this includes two invalid SMS attempts and three invalid email attempts, or five invalid email attempts altogether.
API Tokens can be used to authenticate requests to LogicMonitor’s REST API. API Tokens (LMv1 and Bearer tokens) enable you to control which users in your account use the REST API, and monitor how often they are using it. For more information on API tokens (LMv1, Bearer) and best practices to use API tokens, see Application Authentication Overview.
Creating API Tokens
You can create two types of API tokens that are LMv1 tokens and Bearer tokens. These tokens are created on a per-user basis.
Important: Any user except an out-of-the-box administrator user role can create API tokens. Ensure to check the Allow Creation of API Token checkbox under Settings> User Profile.
Creating LMv1 Tokens
LMv1 token is a key-based authentication which allows you to authenticate API calls to the LogicMonitor platform. It consists of a key pair (access-id and access-key). Follow the steps to create LMv1 tokens:
- On the User Access page, select the API Tokens tab.
LMv1 tab is selected by default.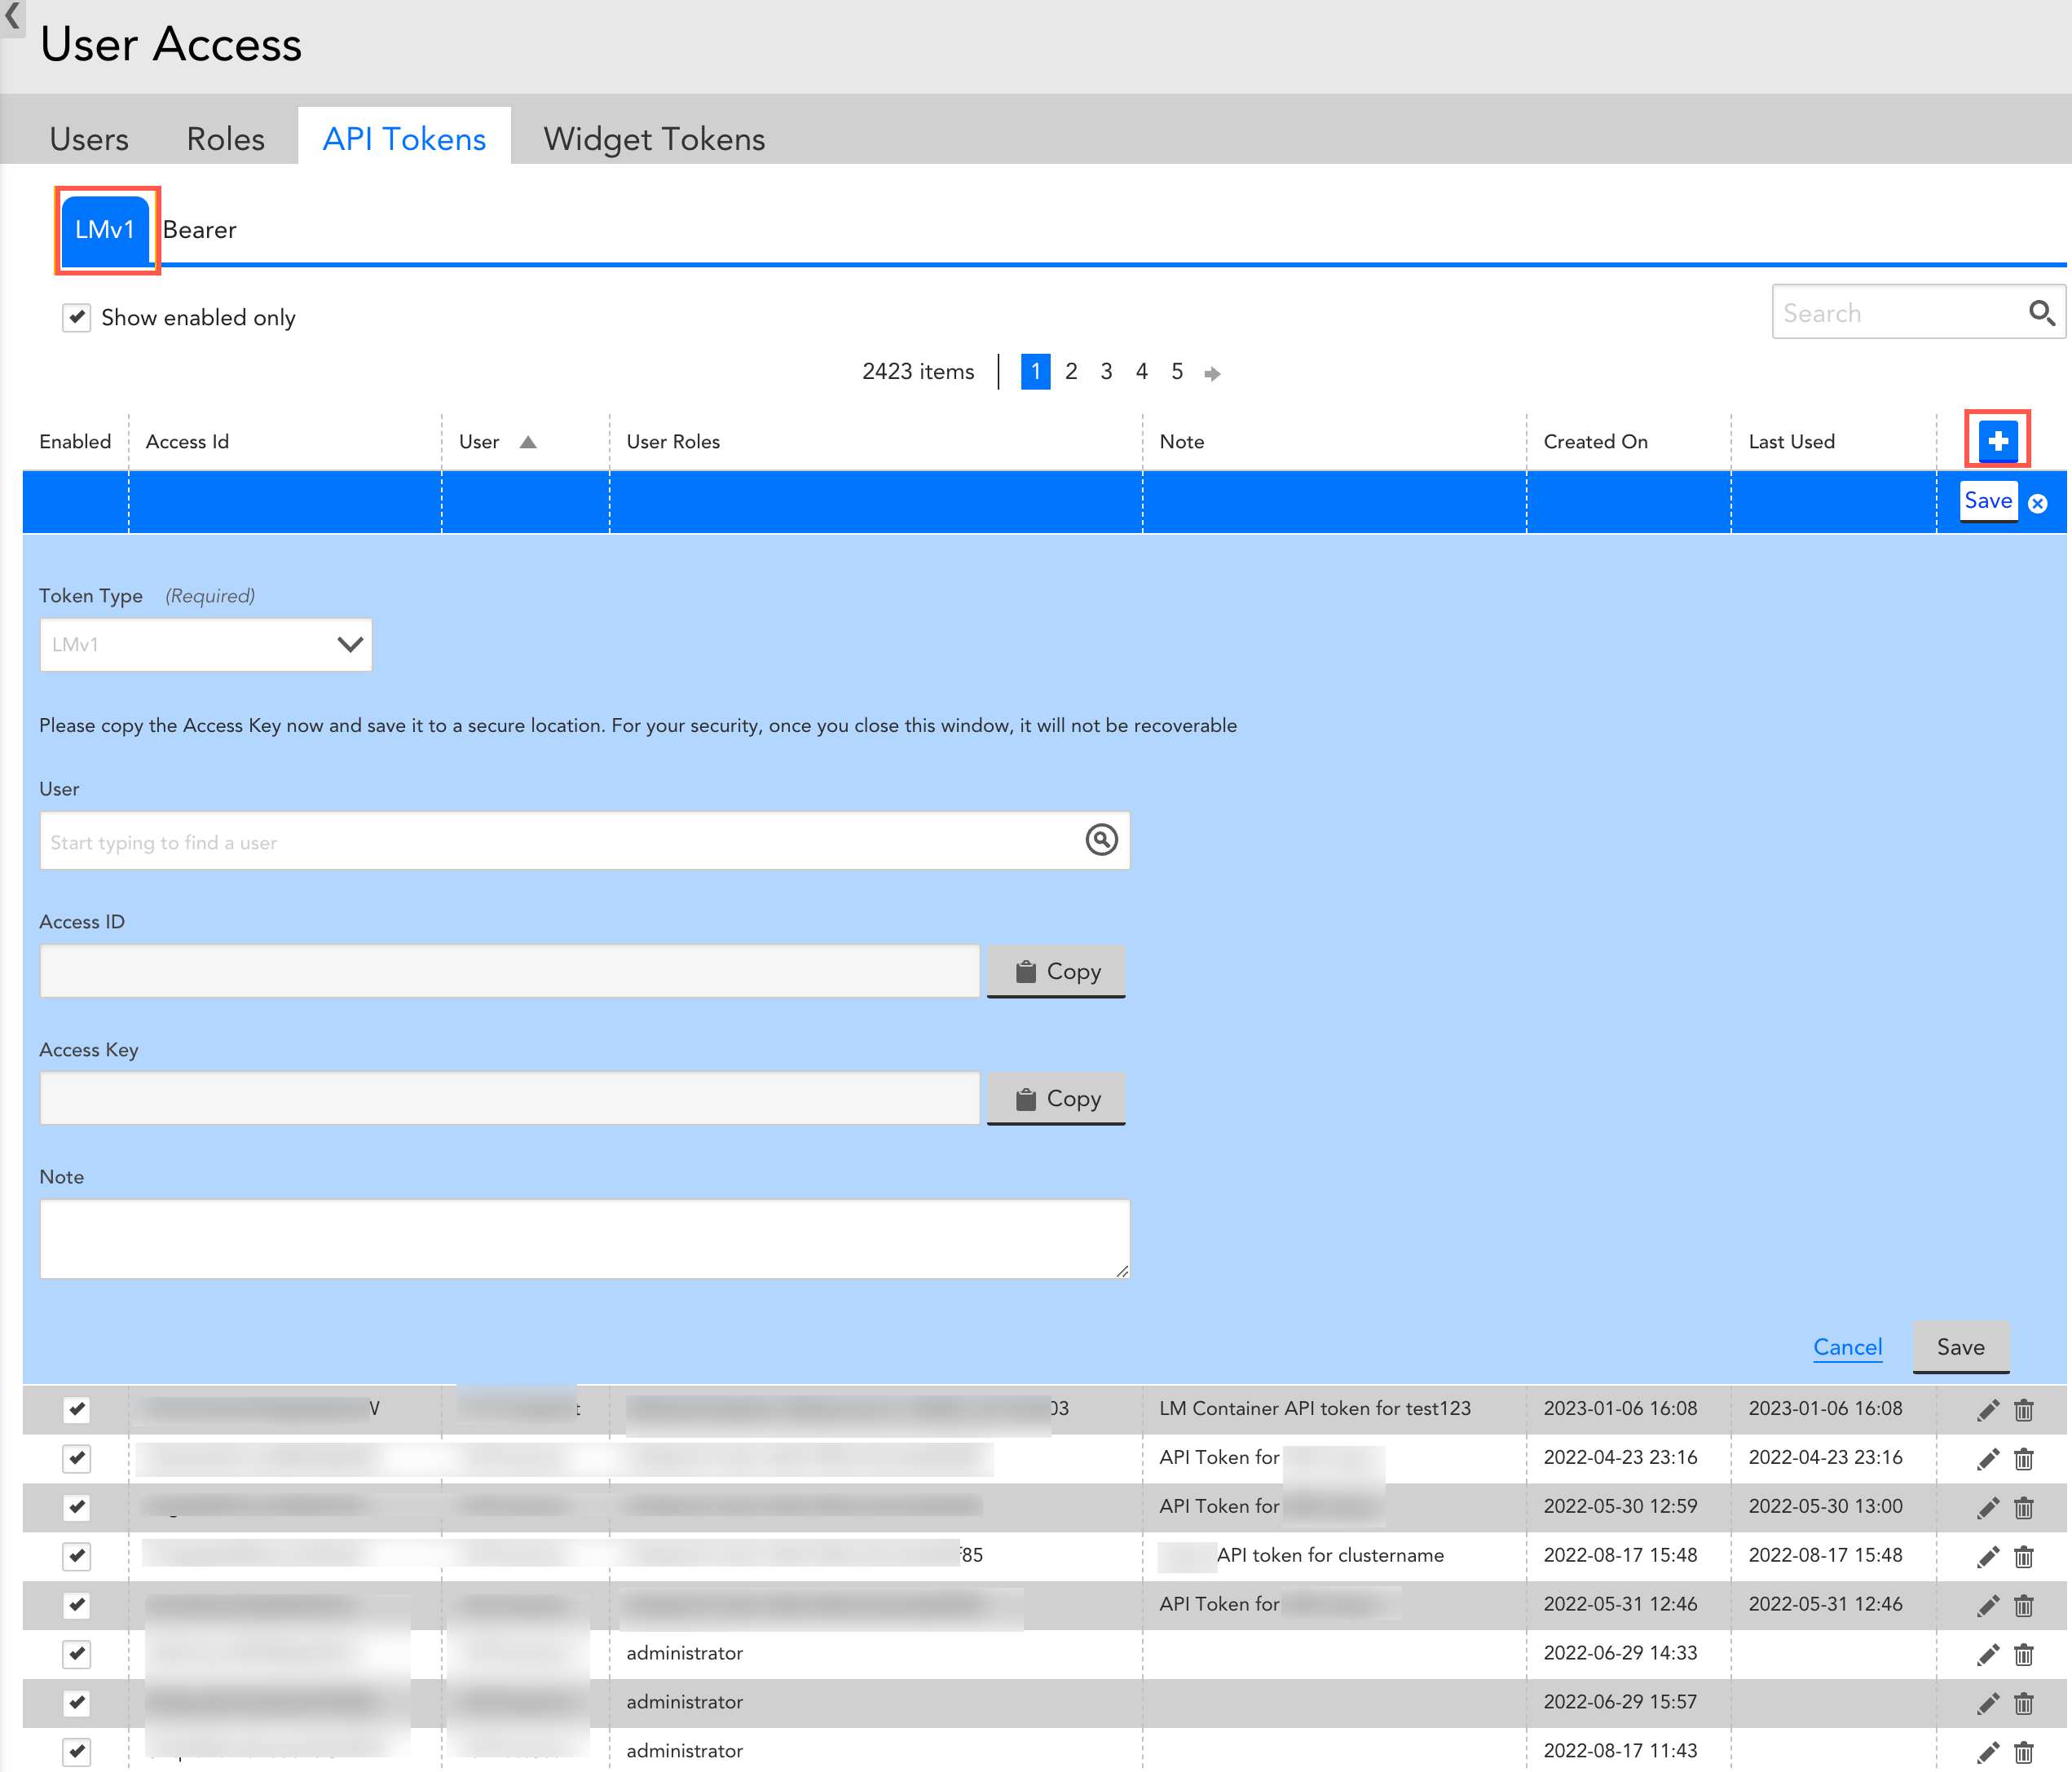
- Select
 to create a LMv1 token.
Note: The LMv1 option is selected by default in the Token Type field. - In the User field, select an email address for log in process.
Once you select an email address, the Access ID and Access Key are automatically populated. - (Optional) Select the Copy button against the Access ID and Access Key.
Recommendation: Copy the Access key and save it to a secure location. - (Optional) In the Note field, enter a relevant note.
- Select Save.
The new LMv1 token is created and displayed in the table.
Creating Bearer Tokens
Important: Bearer tokens are available only to users who have enabled Traces (LM APM license).
Bearer tokens are designed to provide an authentication mechanism by which they can authenticate the API calls to the LM Platform. You can create Bearer token by following the below steps:
- In the User Access page, select the API Tokens tab.
- Select the Bearer tab.
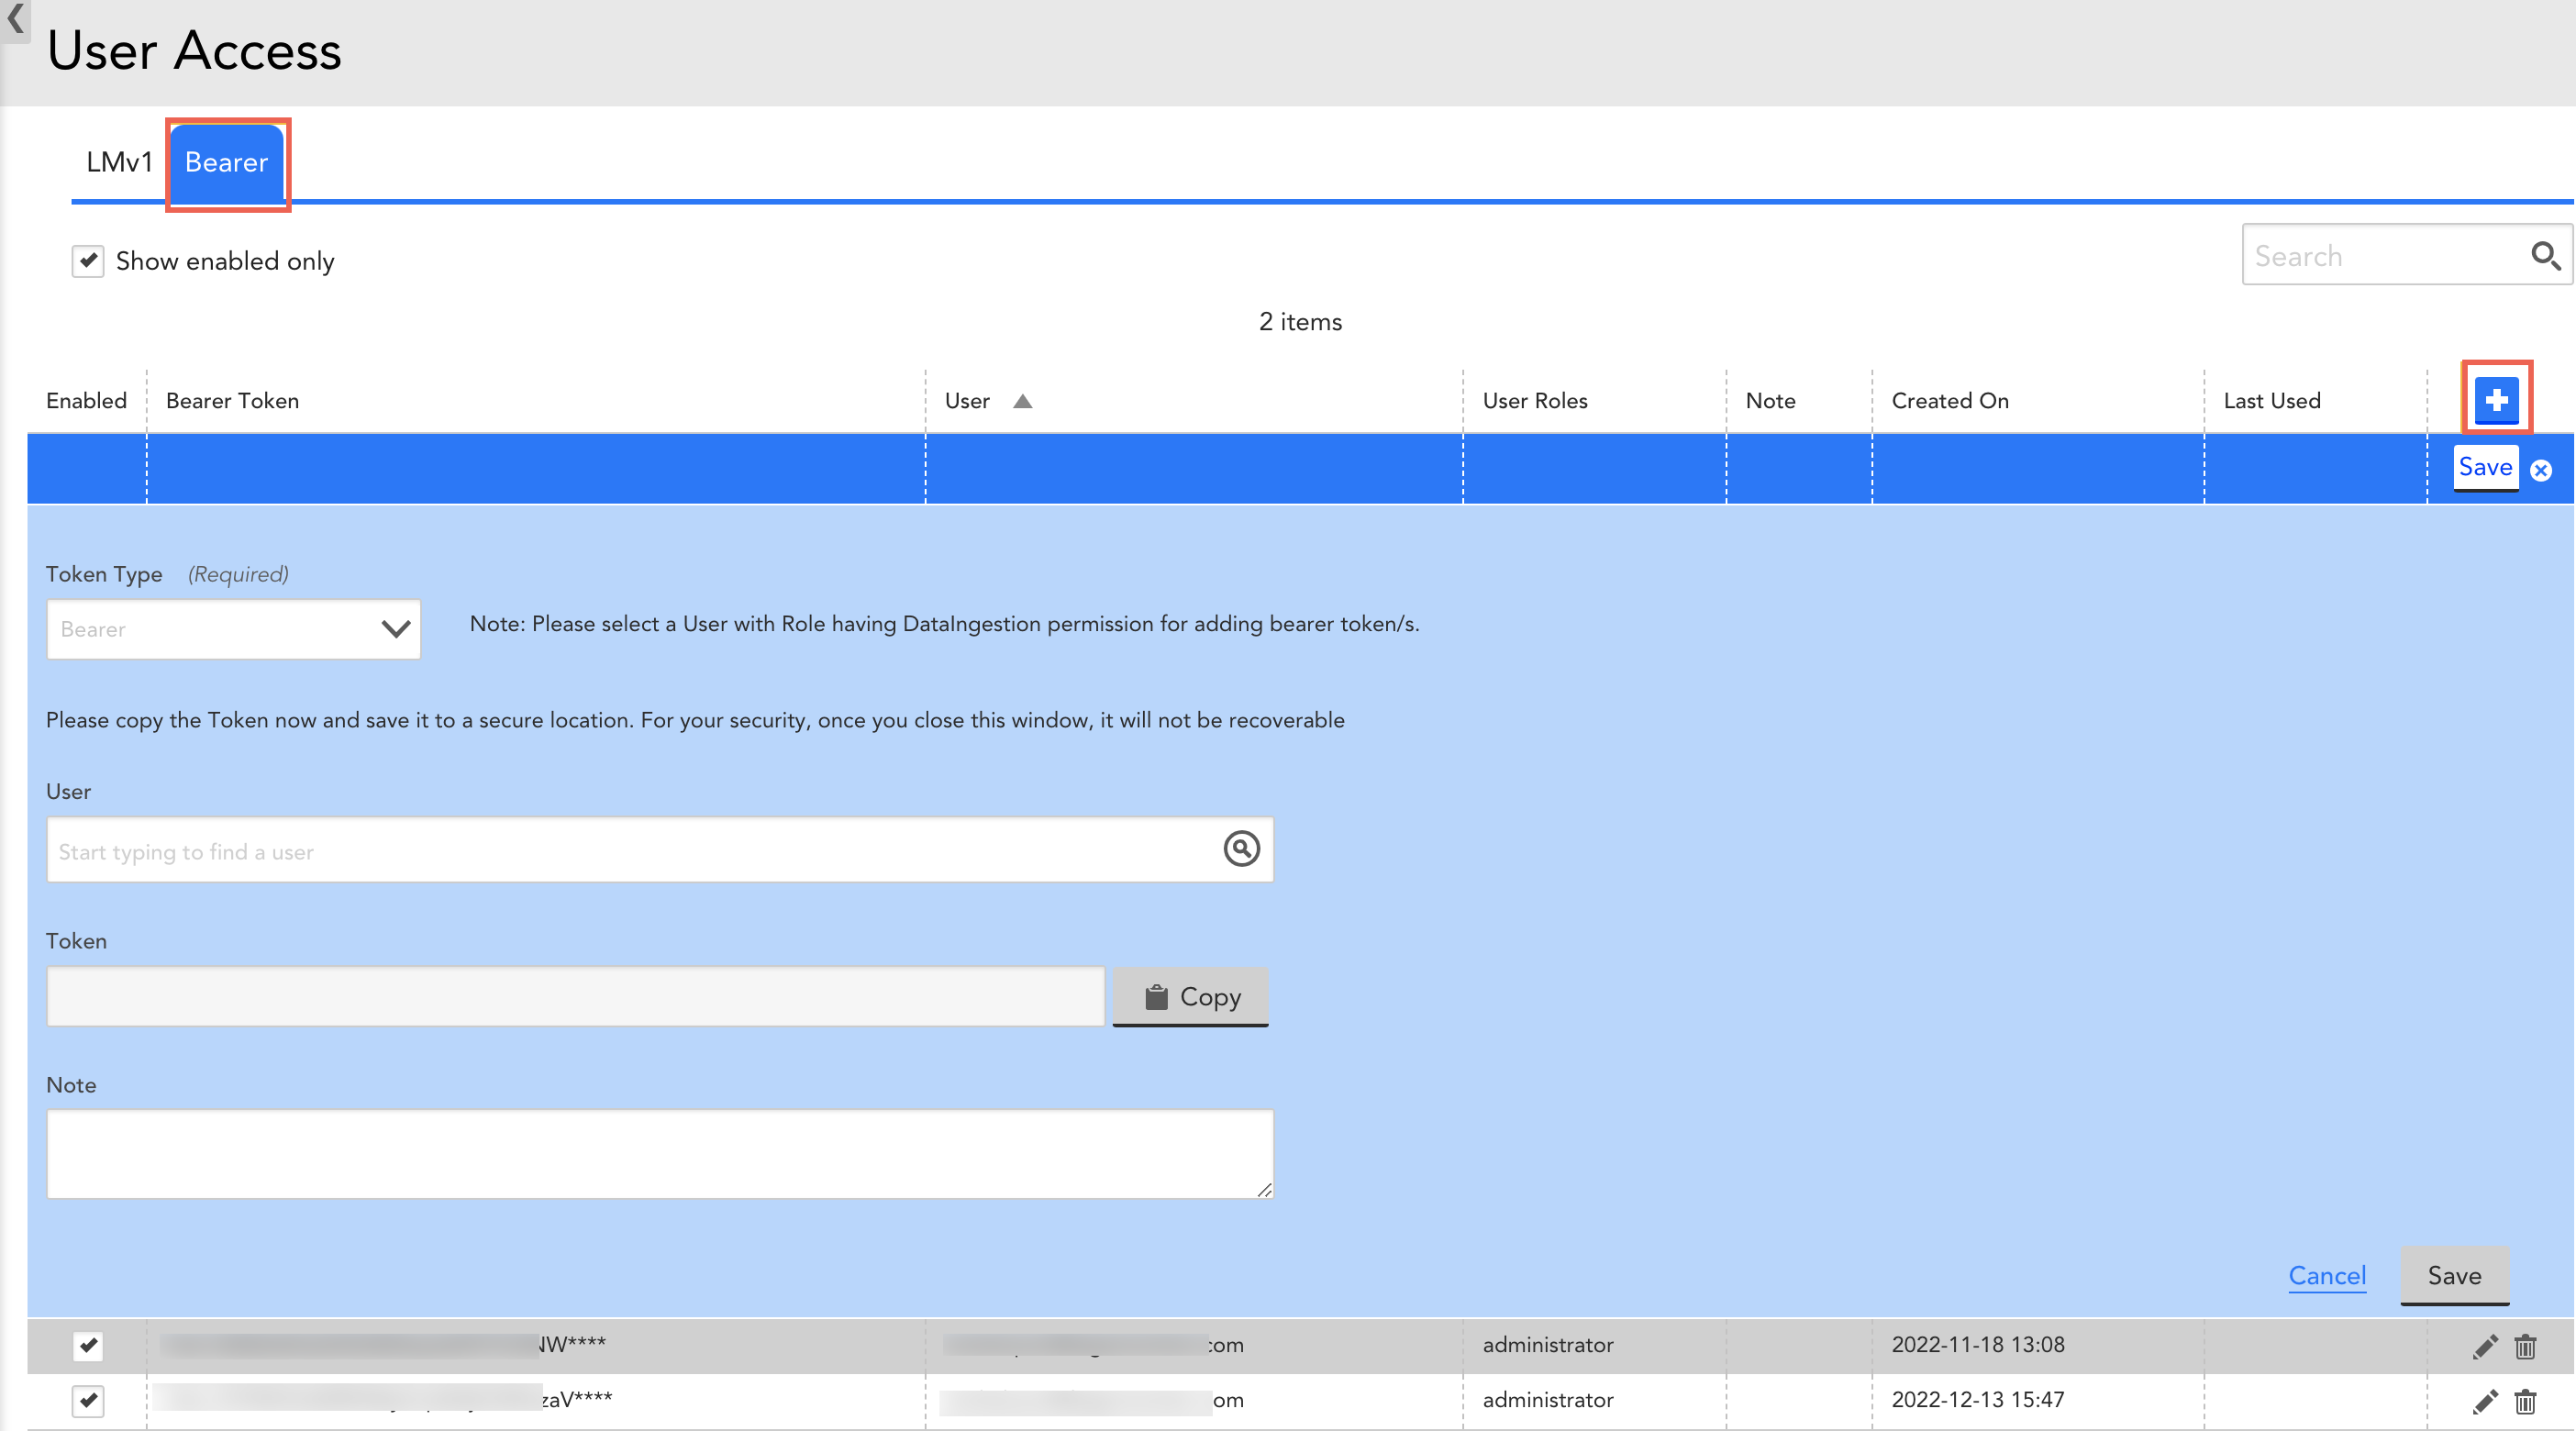
- Select
 to create a Bearer token.
Note: The Bearer option is selected by default in the Token Type field. - In the User field, select an email address for log in process.
Once you select an email address, the Access ID and Access Key are automatically populated. - (Optional) Select the Copy button against the Access ID and Access Key.
Recommendation: Copy the Access key and save it to a secure location. - (Optional) In the Note field, enter a relevant note.
- Select Save.
The new Bearer token is created and displayed in the table.
Viewing API Tokens
The API Tokens Tab in Settings | User Access displays all API Tokens across all account users. For each token, you can see the associated user, roles, note, created on date, last used date and the enabled/disabled status. Sort by any column header, limit what is displayed to enabled tokens or search to quickly find what you’re looking for.
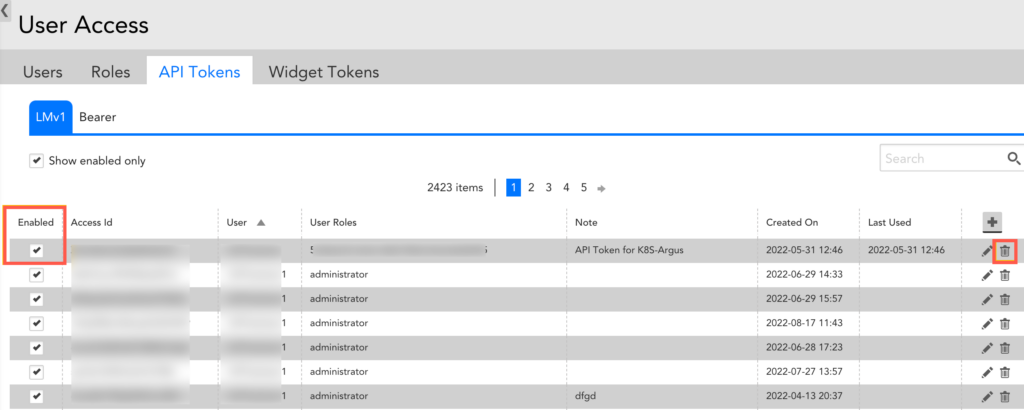
Searching and Sorting Tokens
Use the search field to search for the Access Id, user, role or note associated with one or more tokens. Select the ‘Show enabled only’ checkbox underneath the search field to only display enabled tokens. Select a column header to sort the displayed tokens by that column.
Disabling and Deleting Tokens
Uncheck the Enabled checkbox for a token to disable it. Disabled tokens can be re-enabled simply by selecting the “Enabled” checkbox.
You can delete tokens by selecting the “Delete” icon on the far righthand side of the API Tokens table.
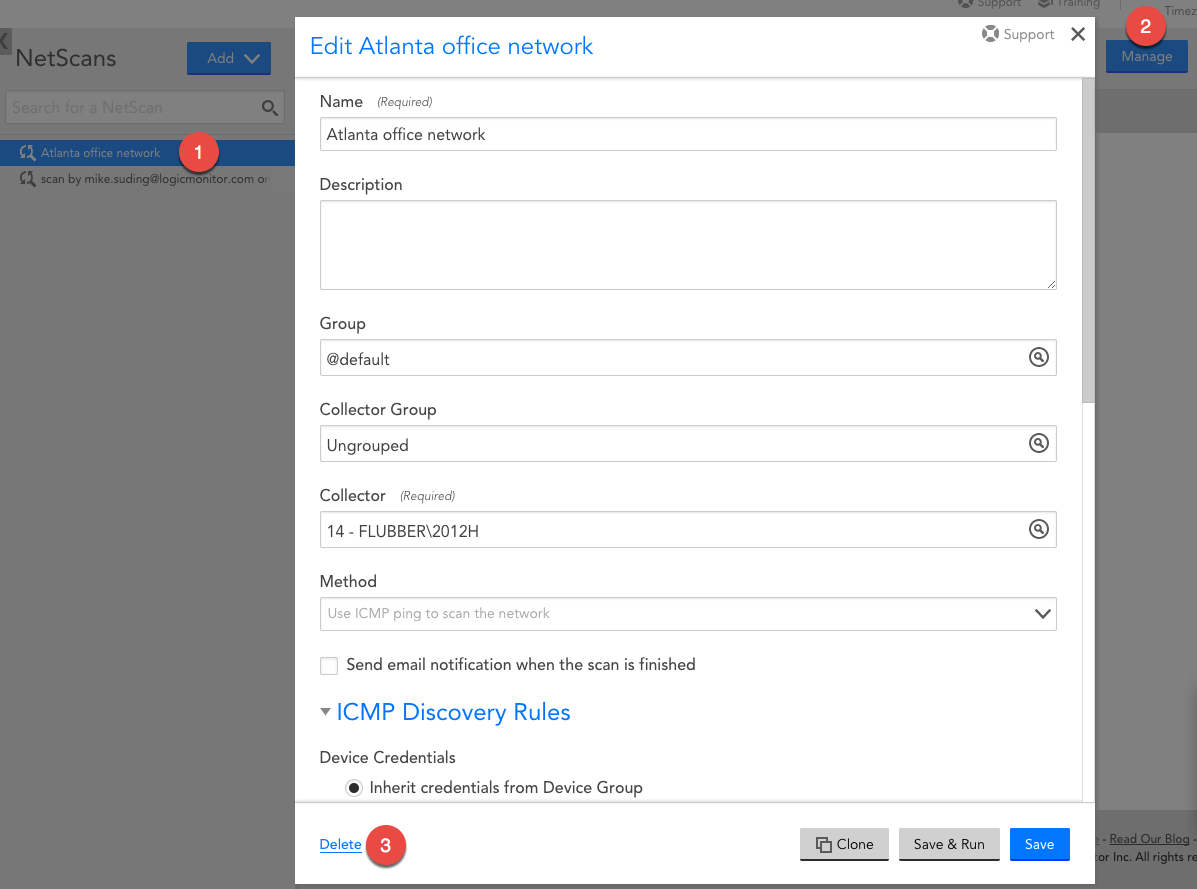
To delete a NetScan, select your NetScan and click the “Manage” button.
In the bottom lefthand corner of the “Manage” window, click “delete.”
Under the History tab of your NetScan, you can view records of each individual iteration of the NSP, including the number of devices added as a result of the scan, the Collector on which it was run, the timestamp, as well as the user who performed the scan.
If your discovered resources were added to the Unmonitored Group, additional information about discovered devices can be found on the Devices page. See Unmonitored NetScan Devices.
You can choose to assign any newly discovered devices to a specific device group. Alternatively, if you do not wish to add these devices to a group, they will be assigned to the “Unmonitored Netscan Devices” group under the Devices tab.
The process of assigning devices discovered via Netscan to a group is different for ICMP, AWS, and Script methods.
ICMP
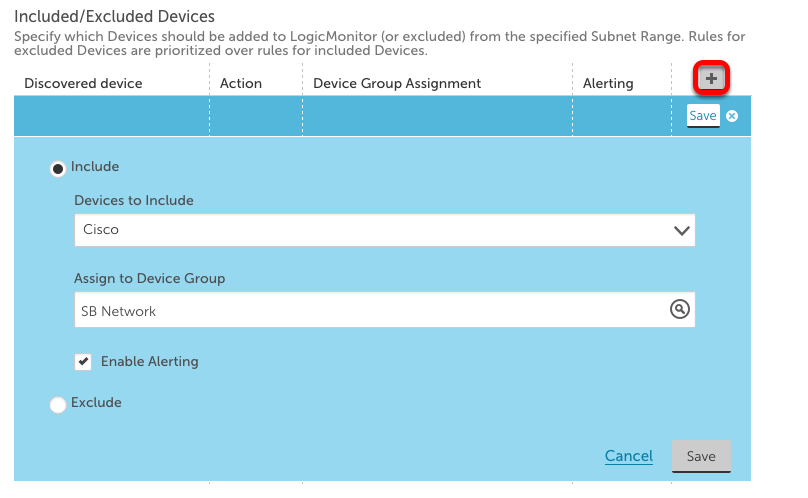
Using ICMP Netscan, you can choose to automatically add newly discovered devices to a device group based on the device type. To do this, scroll down to Device Discovery Rules in the “Manage” window. Click the “+” button (outlined in red below). This will open a dropdown menu in which you can specify that a certain device type (Cisco, Linux, Windows, NetApp, or a Custom Query) be automatically added to a specific device group.
In the screenshot below, you can see that all discovered Cisco devices will be added to the SB Network device group.
AWS
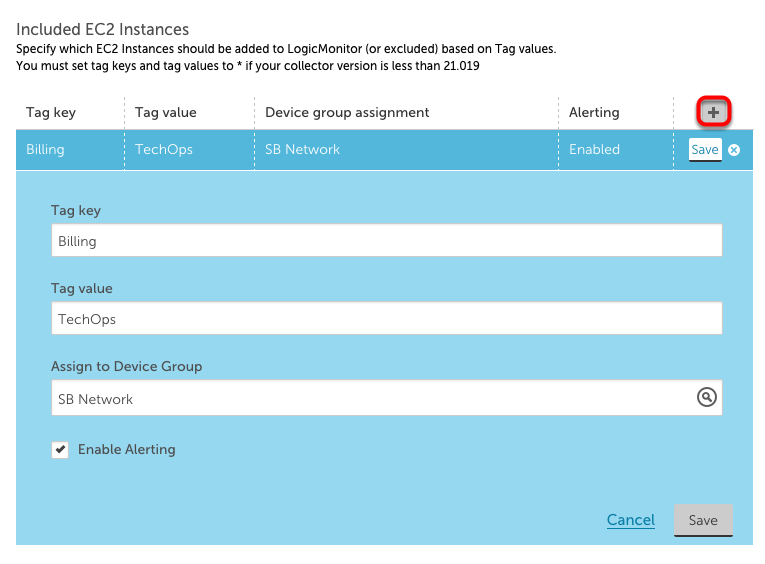
AWS devices can be assigned to a device group based upon their respective AWS Tag Filters. To add Tag Filters, scroll down to Device Discovery Rules in the “Manage” window. Click the “+” button (outlined in red below). This will open a dropdown menu in which you can assign devices that have specific AWS Tag Filters to a specific device group.
For instance, in the image below, devices with the Tag Key of “Billing” and Tag Value of “TechOps” will be assigned to device group SB Network. When done, click “Save.”
Note:
- You can use glob expressions with the tag filter (e.g. tag value = prod*)
- Multiple filters will be logically connected with an OR
- The tag filter is case sensitive
Script
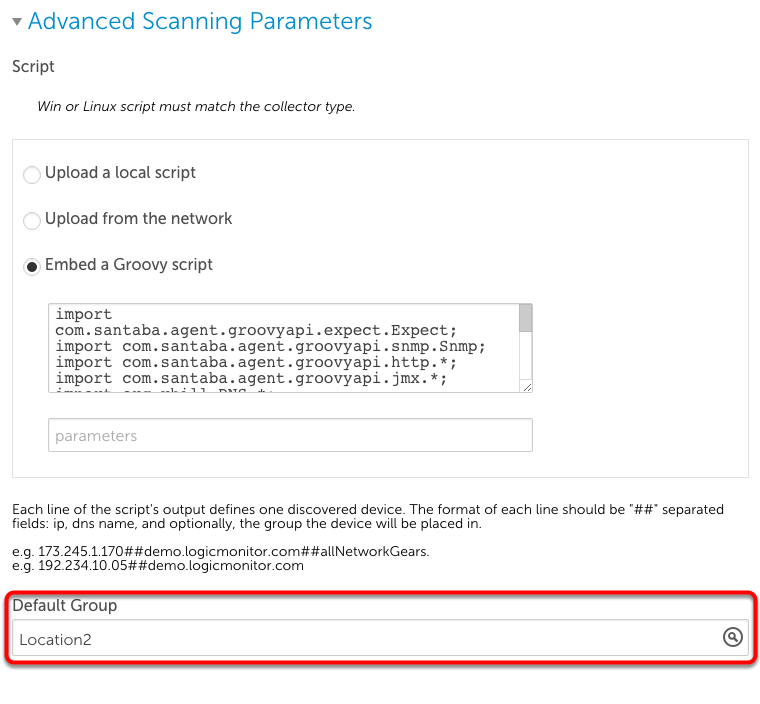
To automatically add newly discovered devices from a Script NetScan to a specific device group, go to the Default Group section within the “Manage” window. Here, you can assign any devices discovered with your specific Script query to a device group of your choosing.
In the screenshot below, any devices discovered using the Groovy script will be added to the Location2 device group.
Minimal Monitoring
LogicMonitor accounts created after the v.79 Release have a pre-set, dynamic device group, “Minimal Monitoring,” which displays devices that were discovered via Netscan, but not properly identified (typically due to incorrect SNMP community strings, WMI credentials, etc).
“Minimal Monitoring” is preconfigured to add devices that match an appliesTo of system.sysinfo=="" && system.sysoid=="" && isDevice() && !(system.virtualization) && !(monitoring=="basic")


