What is Container Monitoring? What are the advantages of Container Monitoring?
LM Container provides organizations insight into the performance of applications running in containers and the health of the underlying container resources and orchestrating components.
To get the most out of deployment, LogicMonitor presents these insights alongside your organization’s existing monitored hybrid infrastructure in a single, unified platform.
Containers create a dynamic environment that is difficult to monitor because container resources are ephemeral. An effective monitoring solution has to be able to detect and monitor containers while they exist, understand when they disappear, and retain data about the performance of the service or application that is running in the container.
LogicMonitor addresses these challenges with Container Monitoring.
What is Kubernetes Monitoring?
LM Container monitors your Kubernetes-orchestrated container environment and the applications running within the hybrid infrastructure on a single pane of glass. LM Container provides automated monitoring and pre-configured alert thresholds for Kubernetes cluster components (containers, nodes, pods, and services), container health, and application performance.
How to monitor Kubernetes with LogicMonitor?
Kubernetes allows DevOps teams to deploy containerized applications faster and makes managing containers at a scale significantly easier. For more information, see Kubernetes documentation.
With LogicMonitor’s new Kubernetes Monitoring Integration, you can comprehensively monitor your Kubernetes clusters and the containerized applications running within them, alongside your
existing hybrid IT infrastructure on a single pane of glass.
LogicMonitor uses API to ensure that your monitoring is always up to date, even as the resources within the cluster change. Data is automatically collected for Kubernetes nodes, pods, containers, services, and master components (e.g. scheduler, api-server, controller-manager). Pre-configured alert thresholds provide meaningful alerts out of the box.
What does Kubernetes monitoring do and what are the advantages of LogicMonitor’s implementation of Kubernetes monitoring?
LogicMonitor’s event-based Kubernetes monitoring:
- Eliminates the need to have an agent on every node (unlike some other container monitoring tools).
- Automatically adds and removes cluster resources from monitoring (including nodes, pods, and services).
- Offers comprehensive performance and health metrics at both the cluster and application levels.
- Stores data for up to two years (unlike Prometheus, an open-source monitoring alternative).
- Provides insight on underutilized resources (including CPU and memory) for maximum optimization.
- Allows you to create intuitive out-of-the-box dashboards. For more information, see Kubernetes Dashboards.
How can I estimate the number of resources monitored by LogicMonitor?
LogicMonitor can detect and monitor several resources in your Kubernetes cluster such as Pods, Nodes, Services, etc.
Our billing model is based on the number of devices that you monitor, and LM Container treats each Kubernetes object instance as a device. To estimate the number of devices that incur charges, follow these steps:
- Check the various Kubernetes-supported objects for monitoring the required objects. For more information, see the Supported Resources section in the About LogicMonitor’s Kubernetes Monitoring article.
- Run the command to count the number of Kubernetes object instances present in your cluster:
kubectl get pods --all-namespaces --no-headers -o custom-columns=Type:kind,NS:metadata.namespace | sort | uniq -c
For example, the following screenshot shows the number of instances of services and pods present in the different namespaces in your cluster:

Optionally, aggregate the number of instances of the various objects, excluding the ones that you do not want to monitor to estimate the number of licenses that you need to monitor your cluster.
How are Kubernetes container resources counted?
Kubernetes resources, like cloud resources, are ephemeral resources, though Kubernetes nodes and services are more persistent or less ephemeral than pods. ‘Ephemeral’ means that a Kubernetes or cloud resource may only exist for a concise period, possibly only a few minutes. Count Kubernetes container resources the same way that LM cloud resources are counted:
- LogicMonitor polls the customer account several times a day at roughly 4-hour intervals. At each poll, a count of Kubernetes resources in the account is captured at that specific time. At the end of the day, a daily average from the polls is calculated.
- Based on the daily average, monthly billing is calculated. So pods that might spin up and down between polls in essence are complimentary. They are not counted, but LogicMonitor still retains the data for the resource that is mentioned in the customer’s SLA for the license.
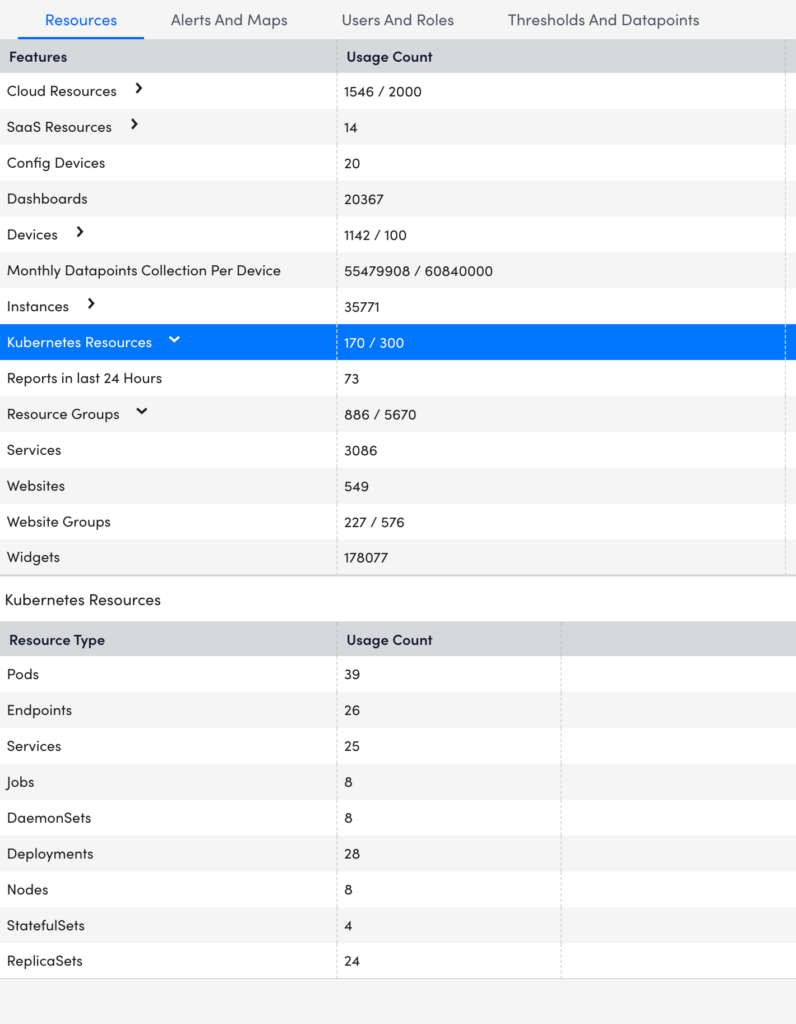
When a poll is taken or whenever a user looks at their portal, the most current Kubernetes resource count is displayed in the Account Information table within LogicMonitor.
Following is the example of the count for the Kubernetes resources:
Where can I find the license information?
For license information, contact your Customer Success Manager (CSM).
What is the pricing for Kubernetes Container Monitoring?
Kubernetes monitoring capability is available as an add-on across all licenses (Starter, Enterprise, SP Enterprise). The add-on feature is called ‘LM Container’. Users are charged per Kubernetes Pod only. This makes it easier for you to count fewer resource types and calculate the number of licenses required to monitor your Kubernetes clusters. LogicMonitor can monitor a variety of Kubernetes objects. For more information on a comprehensive list, see Supported Resources.
Note: Users on legacy SKU will continue to be charged for individual Kubernetes objects, such as Services, Deployments, Pods, and Nodes, until you migrate to the new pricing structure.
- The number of licenses used is determined by the number of Pods monitored per day averaged over the month.
- We recommend contacting your Customer Success Manager with a license purchase request if your infrastructure exceeds your committed licenses. This ensures that your costs grow predictably.
Resource Units for Kubernetes
| Service | Category | Resource Unit | Billable As |
| LM Container | Compute | Kubernetes Pod | PaaS |
By default, Argus deletes resources immediately. If you want to retain resources, you can configure the retention period to delete resources after the set time passes.
You must configure the following parameters in the Argus configuration file:
- Set the DeleteDevices parameter to false.
Note: Argus moves deleted resources to_deleted dynamicdevice group, and the alerts set on the deleted resources are disabled.
To modify the parameter values for an existing installation, see Upgrading the Argus using Helm deployment. - Specify the retention period in ISO-8601 duration format for the deleted devices using the property
kubernetes.resourcedeleteafter= P1DT0H0M0S.
For more information, see ISO-8601 duration format. - By default, the value for the retention period property is set to 1 day, which means the device will be permanently deleted from the LogicMonitor portal after 1 day. You can modify the default property value.
Note: The maximum retention period allowed for all resources is 10 days. If you want to retain resources for more than the set maximum period, you must contact the customer support team to modify the maximum retention period for your account.
- Argus adds the retention period property to the cluster resource group to set the global retention period for all the resources in the cluster. You can modify this property in the child groups within the cluster group to have different retention periods for different resource types. In addition, you can modify property for a particular resource.
Note: Argus configures different retention periods for Argus and Collectorset-Controller Pods for troubleshooting. The retention period for these Pods cannot be modified and is set to 10 days.
Setting the Retention Period Property
To set the retention period for the resources, you must set the following parameters in the argus-configuration.yaml:
device_group_props:
  cluster:
    # To delete resources from the portal after a specified time
    - name: "kubernetes.resourcedeleteafterduration"
      value: "P1DT0H0M0S" // adjust this value according to your need to set the global retention period for resources of the cluster
override: falseBy default, Argus deletes resources immediately. If you want to retain resources, you can configure the retention period to delete resources after the set time passes.
You must configure the following parameters in the Argus configuration file:
- Set the DeleteDevices parameter to false.
Note: Argus moves deleted resources to_deleted dynamicdevice group, and the alerts set on the deleted resources are disabled.
To modify the parameter values for an existing installation, see Upgrading the Argus using Helm deployment. - Specify the retention period in ISO-8601 duration format for the deleted devices using the property
kubernetes.resourcedeleteafter= P1DT0H0M0S.
For more information, see ISO-8601 duration format. - By default, the value for the retention period property is set to 1 day, which means the device will be permanently deleted from the LogicMonitor portal after 1 day. You can modify the default property value.
Note: The maximum retention period allowed for all resources is 10 days. If you want to retain resources for more than the set maximum period, you must contact the customer support team to modify the maximum retention period for your account.
- Argus adds the retention period property to the cluster resource group to set the global retention period for all the resources in the cluster. You can modify this property in the child groups within the cluster group to have different retention periods for different resource types. In addition, you can modify property for a particular resource.
Note: Argus configures different retention periods for Argus and Collectorset-Controller Pods for troubleshooting. The retention period for these Pods cannot be modified and is set to 10 days.
Setting the Retention Period Property
To set the retention period for the resources, you must set the following parameters in the argus-configuration.yaml:
device_group_props:
  cluster:
    # To delete resources from the portal after a specified time
    - name: "kubernetes.resourcedeleteafterduration"
      value: "P1DT0H0M0S" // adjust this value according to your need to set the global retention period for resources of the cluster
override: falseDisclaimer: Argus and Collectorset-Controller Helm Charts are being phased out. For more information to switching to the new LM Container Helm Chart for a simpler install and upgrade experiencere, see Migrating Existing Kubernetes Clusters Using LM Container Helm Chart.
kube-state-metrics (KSM) monitors and generates metrics about the state of the Kubernetes objects. KSM monitors the health of various Kubernetes objects such as Deployments, Nodes, and Pods. For more information, see kube-state-metrics (KSM) documentation.
You can now use the kube-state-metrics-based modules available in LM Exchange in conjunction with the new Argus and Collector Helm charts to gain better visibility of your Kubernetes cluster. The charts automatically install and configure KSM on your cluster and monitor the following resources:
- Daemonsets
- Replicasets
- Statefulsets
- PersistentVolumes
Note: By default, KSM is installed while installing Argus. Also, the newly added resources are monitored using KSM. For more information, see Installing KSM.
Enabling KSM Monitoring
To configure KSM, you must set the kube-state-metrics.enabled property to true in the Argus configuration file. In case the kube-state-metrics.enabled property is set to false, only active discovery for resources will work and the newly added resources will not be monitored.
For a detailed list of customizable properties, see kube-state-metrics Helm Chart.
Sample:
You must configure the following KSM properties in the values.yaml file:
# Kube state metrics configuration
# For further customizing KSM configuration, see kube-state-metrics Helm Chart.
kube-state-metrics:
 # Set enabled to false in case you want to use a custom configured KSM
 enabled: true
 # No. of KSM Replicas to be configured
 replicas: 1
 collectors:
 - daemonsets
 - replicasets
 - statefulsets
- persistentvolumesNote: By default, the collectors are enabled to monitor the new resources using KSM. You can also customize the KSM Helm Chart. For more information, see kube-state-metrics Helm Chart.
Installing KSM
If the kube-state-metrics.enabled property is enabled, KSM is automatically installed. In addition, you can configure KSM while installing Argus or while upgrading Argus.
Note: If you don’t want to install KSM while installing Argus, you can manually install KSM using CLI. For more information, see Installing KSM using CLI.
Installing Argus with KSM Monitoring
To configure KSM while installing Argus for the first time, complete the following steps.
Requirements
- Import PropertySources and DataSources to monitor the resources.
- Ensure that Openmetrics is enabled to monitor or support the new resources.
1. Navigate to Exchange > Public Repository and import the following PropertySource and DataSources from LM :
PropertySourceaddCategory_KubernetesKSM:
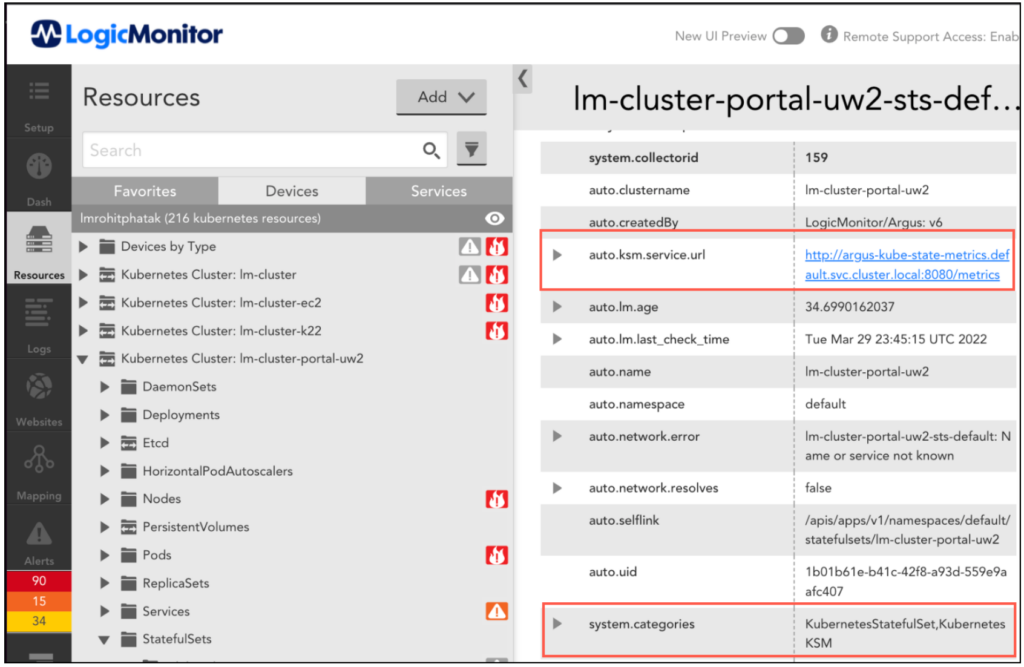
PropertySources checks if the kube-state-metrics service is configured on a cluster (through Argus or CLI) and sets the following properties on each Kubernetes resource:
KubernetesKSM– category to check if the resources can be monitored through kube-state-metrics.auto.ksm.service.url– kube-state-metrics service URL to get the metrics data. OpenMetrics DataSources uses the metrics data for monitoring Kubernetes resources.
DataSource
DataSources collects metrics from KSM in OpenMetrics format. These DataSources utilize metrics for representing data in graphs and for generating alerts. The following DataSources provide metrics for Daemonsets, Replicasets, Statefulsets, and Persistent Volumes PV respectively:
Kubernetes_KSM_DaemonsetsKubernetes_KSM_StatefulsetsKubernetes_KSM_ReplicasetsKubernetes_KSM_PersistentVolumes
In addition, these DataSources use the OpenMetrics server URL that is configured using addCategory_KubernetesKSM PropertySource.
2. Install Argus. For more information, see Argus Installation.
Upgrading Argus to Enable KSM Monitoring
To upgrade the existing cluster to the latest version of Argus to monitor new resources with KSM, complete the following steps.
Requirements
You must ensure that Openmetrics is enabled to monitor or support the new resources.
Note: To enable Openmetrics, contact your Customer Success Manager (CSM).
1. Navigate to Exchange > Public Repository and import the following PropertySource and DataSources from LM :
PropertySourceaddCategory_KubernetesKSM
DataSource
Kubernetes_KSM_DaemonsetsKubernetes_KSM_StatefulsetsKubernetes_KSM_ReplicasetsKubernetes_KSM_PersistentVolumes
2. Add the following KSM configuration properties into Argus values.yaml:
For example:
kube-state-metrics:
 # Set enabled to false in case you want to use a custom configured KSM
 enabled: true
 # No. of KSM Replicas to be configured
 replicas: 1
 collectors:
 - daemonsets
 - replicasets
 - statefulsets
- persistentvolumesFor more information, see kube-state-metrics Helm Chart.
3. Run the following command to upgrade Helm:helm repo update
4. Run the following command to upgrade Argus:helm upgrade --reuse-values -f argus-config.yaml argus logicmonitor/argus
5. Restart Argus Pod.
Note: You can also use CLI to install kube-state-metrics. For more information, see Installing KSM using CLI.
Installing KSM using CLI
Note: KSM is automatically installed when enabled in Argus charts. However, if you want to install KSM manually, run the following command to install kube-state-metrics using command-line arguments:
kube-state-metrics --telemetry-port=8081 --kubeconfig=<KUBE-CONFIG> --apiserver=<APISERVER> …Or configured in the args section of your deployment configuration in a Kubernetes or Openshift context:
spec:
  template:
    spec:
      containers:
        - args:
          - '--telemetry-port=8081'
          - '--kubeconfig=<KUBE-CONFIG>'
- '--apiserver=<APISERVER>'Argus discovers all Kubernetes resources that are monitored by LogicMonitor. In addition, you can use Argus to exclude resources from monitoring.
You can add resource filters in the Argus configuration files under the filter parameters. The rule engine evaluates rules sequentially; when the first rule is met and is evaluated as true, the rule engine breaks the rules evaluation, and the resource is excluded.
Note: LM-Container v8.2.0 and later disables filtering for LM Container resources from monitoring. This feature ensures effective deployment management.
Following is the sample configuration:
| Filters | Description |
'type in ("pod", "deployment") && name =~ "nginx"' | If the name of the pods and deployments contains nginx, those pods and deployments will get excluded. |
'!(type == "pod" && namespace == "kube-system")' | Negates rule to simplify as whitelist rule; only pods of kube-system namespace will get monitored, remaining pods gets excluded. |
'namespace == "default"' | Excludes all resources of the default namespace. |
'!(type != "replicaset" && ns == "logicmonitor")' | Excludes replicasets within LogicMonitor namespace – remaining resources will be included. In addition, this rule is equivalent to 'type == "replicaset" && ns == "logicmonitor" |
Note: If you want to exclude only helm chart secrets, the rule is
argus:

          filters:

              "secret" && jsonGet(object, "type") == "helm.sh/release.v1"'
If you want to exclude all the resources of any type, then instead of adding a rule with a wildcard notation “name =~.*”, you must add the resources in the monitoring disable list:
Example:
argus:
    monitoring:
       disable:
- "replicasets"LogicMonitor uses the open-source Govaluate library for evaluating the filter expressions. For more information on the syntax of the filter expressions, see the Govaluate expressions manual.
Rule Engine Variables
You can write filter rules using the following variables that are made available to the rule engine:
| Variable Name | Value | Value Datatype | Comments |
| type | Resource Type | string | The following operators will work on the type variable: "==", "!=", "in" Note: (known issues): in operator on the type variable doesn’t work when the array has only one element. |
| name | Resource Name | String | |
| namespace | Resource Namespace | String | Empty, if the resource is not namespace scoped. |
| Resource labels with their keys as variable names | Resource Labels values against its keys | String | Note: As per the Govaluate documentation, you need to escape variable names having special characters viz. dot (.), hyphen (-), etc. using square brackets around it. |
| Resource annotations with their keys as variable names | Resource Annotations values against its keys | String | Note: As per the Govaluate documentation, you need to escape variable names having special characters viz. dot (.), hyphen (-), etc. using square brackets around it. |
Note: If the same key is used for annotations and labels, the label value gets higher priority and is used for evaluation.
Rule Writing Guidelines
- Rules must be written in single-quoted strings to avoid parsing errors across YAML conversions.
- There must be no distinction such as include rules and exclude rules. If the rule is evaluated as true that means resources will get excluded.
Note: In some cases, if you want to simplify the rule, you can write the include rule and invert its value to make it an exclude rule.
Example 1:
If you want to monitor only resources of a single namespace frontend, the rule is
'!(ns == "frontend")'
Note: As per the Govaluate documentation, you need to escape variable names having special characters viz. dot (.), hyphen (-), etc. using square brackets around it.
Example 2:
You have added a web service label on resources having their respective value. If you want to monitor only the user web service resources while excluding the remaining resources of all remaining services, then you can write the rule as '!([web-service] == "user")' – here square brackets define everything within it as a variable name while parsing the rule. If you miss surrounding the web-service variable then Govaluate makes it a mathematical expression web -(minus) service – which will not exclude the resources as expected.
Example 3
The following example presents a few possible configurations you can use to selectively monitor resources in your cluster:
filters:
# Remove NGINX pods and deployment from monitoring
- 'type in ("pod", "deployment") && name =~ "nginx"'
# Remove pods in kube-system namespace from monitoring
- '(type == "pod" && namespace == "kube-system")'
# Remove resources in the default namespace from monitoring
- 'namespace == "default"'
# Remove relicasets in the logicmonitor namespace from monitoring
- '(type != "replicaset" && ns == "logicmonitor")'
Available Operators to Write Rules
| Operator | Description | Comments | Examples |
| == | Equality | Exact string match | ns == "default" |
| != | Inequality | Is not equal to the exact string | name != "nginx" |
| =~ | Regex match | Regex having a dot and hyphen may not work in some cases | name =~ "nginx" Resources having prefixes as Nginx in their name, then the resources will get excluded |
| !~ | Inverted regex pattern | Equivalent to !(<regex>) | name !~ “nginx” equivalent to !(name =~ “nginx”)Resources that do not have Nginx in the name will be excluded |
| && | Logical AND | Short circuits if the left side expression is false | ns == "default" && name =~ "nginx". This will exclude resources of the default namespace that has Nginx in the name |
| || | Logical OR | Short circuits if the left side evaluates to true. Although the operator is available, you must write another rule if the left side and right side are not logically connected, as the set of rules are OR’ed. | |
| in | Membership in array | Performs equality == to check membership | ns in ("kube-system", "kube-public")This will exclude the resources of mentioned namespaces |
| () | Parenthesis to group |
Disclaimer: Argus and Collectorset-Controller Helm Charts are being phased out. For more information to switching to the new LM Container Helm Chart for a simpler install and upgrade experience, see Migrating Existing Kubernetes Clusters Using LM Container Helm Chart.
Argus is a tool for monitoring Kubernetes with LogicMonitor. Argus runs as a Pod in your cluster and uses LogicMonitor’s API to add Nodes, Pods, Services, and resources into monitoring. Once in monitoring, data collection starts automatically. Argus uses Kubernetes API to collect data for all monitored resources. Additionally, you can leverage LogicMonitor DataSources to monitor your applications running within the cluster.
Argus offers the following key features for Kubernetes monitoring:
- Automated Resource Discovery: Argus leverages Kubernetes events and LogicMonitor’s API to provide real-time accuracy of the resources of a cluster in LogicMonitor. With Argus, you can discover etcd members, cluster Nodes, Services, Pods, and resources. You can also automate the management of their lifecycle as Resources in LogicMonitor.
- Comprehensive Monitoring: Argus manages the Dockerized LogicMonitor Collectors running in a StatefulSet and collects data via the Kubernetes API for Nodes, Pods, Services, Containers, and resources.
You can install Argus either by using the command-line interface (CLI) or from your LogicMonitor portal.
Requirements
To install Argus, you need the following:
- Helm 3
- Kubernetes v1.14 or later
- Add LogicMonitor chart repository:
$ helm repo add logicmonitor https://logicmonitor.github.io/k8s-helm-charts - Ensure to install the LogicMonitor Collectorset-controller before installing Argus. For more information, see Installing Collectorset-controller.
- Refer to the Configuration templates of Helm charts values.yaml. to select compatible versions of the Collectorset-controller and Argus binaries.
Installing Collectorset-Controller
A Collectorset-Controller automatically installs and manages the LogicMonitor’s Collectors based on the requirements added in the configurations file.
Requirements:
- Helm chart (refer to Configuration templates of Helm charts values.yaml)
- LogicMonitor account
1. Navigate to Resources > Add and select “Kubernetes Cluster”.
2. On the Add Kubernetes Cluster page, enter the required details and click Next.
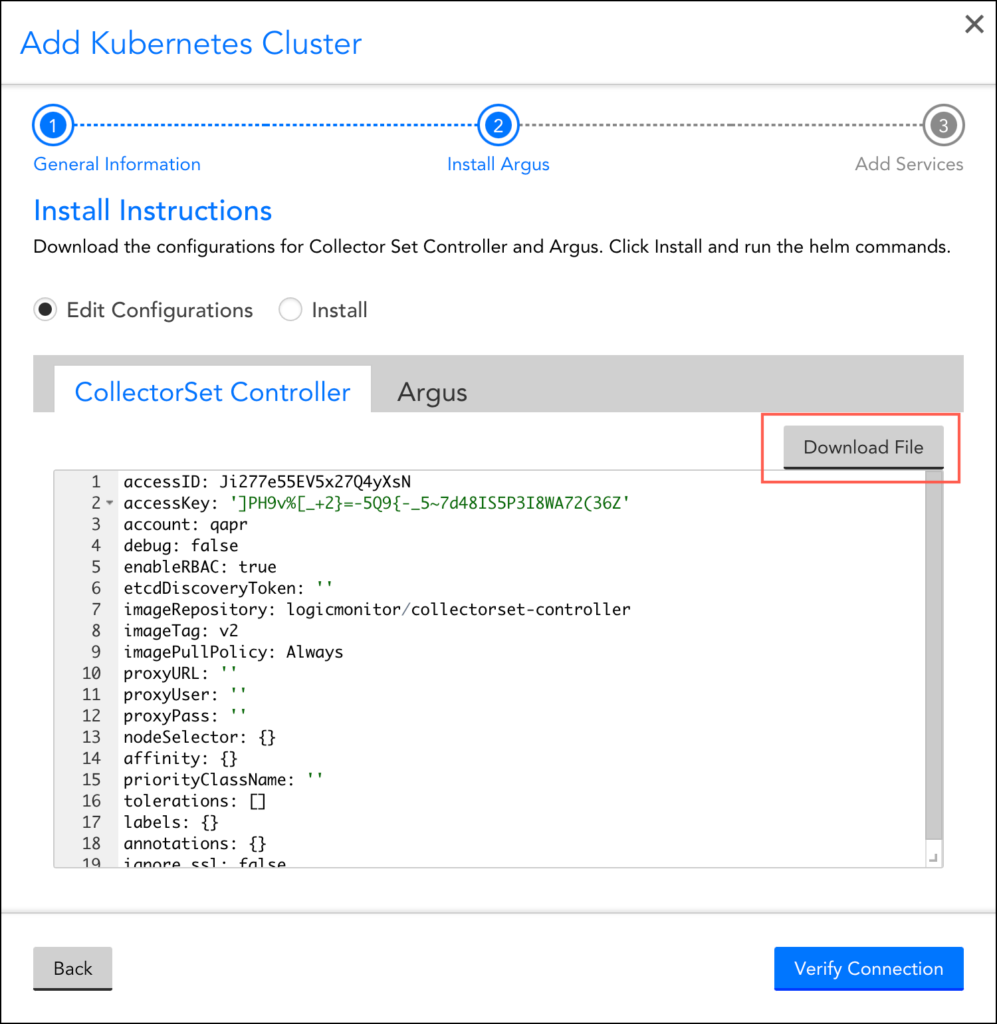
3. In the Install Argus section, select “Edit Configurations” to enter the required configuration details.
Note: You may click Download File, to edit the configuration file from your LogicMonitor portal, or you can create the file using the template.
4. Update the configuration parameters in the configuration file.
5. Export the configuration file path and enter the following helm command:
$ export COLLECTORSET_CONTROLLER_CONF_FILE=<collectorset-controller-configuration-file-path>
$ helm upgrade \
  --install \
  --debug \
  --wait \
  --namespace="$NAMESPACE" \
  -f "$COLLECTORSET_CONTROLLER_CONF_FILE" \
collectorset-controller logicmonitor/collectorset-controllerFor more information on the list of values and their descriptions used in the collectorset-controller configuration yaml file, see Default value from ArtifactHUB.
Installing Argus
The setup wizard provides the configuration and installation commands for the applications needed for monitoring CollectorSet-Controller and Argus.
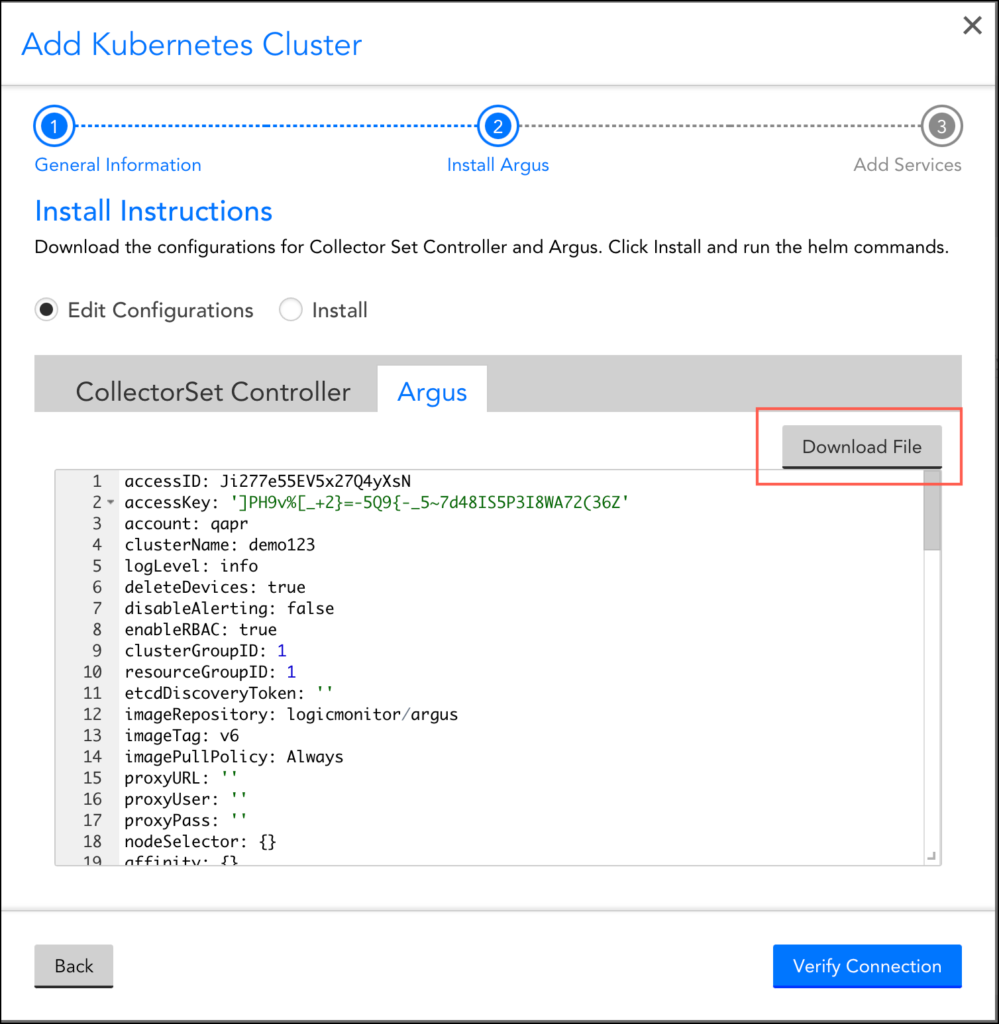
- From the setup wizard, select “Edit Configuration” to customize the YAML configuration files for the CollectorSet-Controller and Argus. For the complete list of configuration options, see Configurations.
Note: You can click Download File to edit the configuration and install them using the Kubernetes CLI.
2. Select “Install” to see the Helm commands to install the CollectorSet-Controller and Argus and LogicMonitor’s Helm Charts. You can copy and paste the commands to install the integration into your cluster.
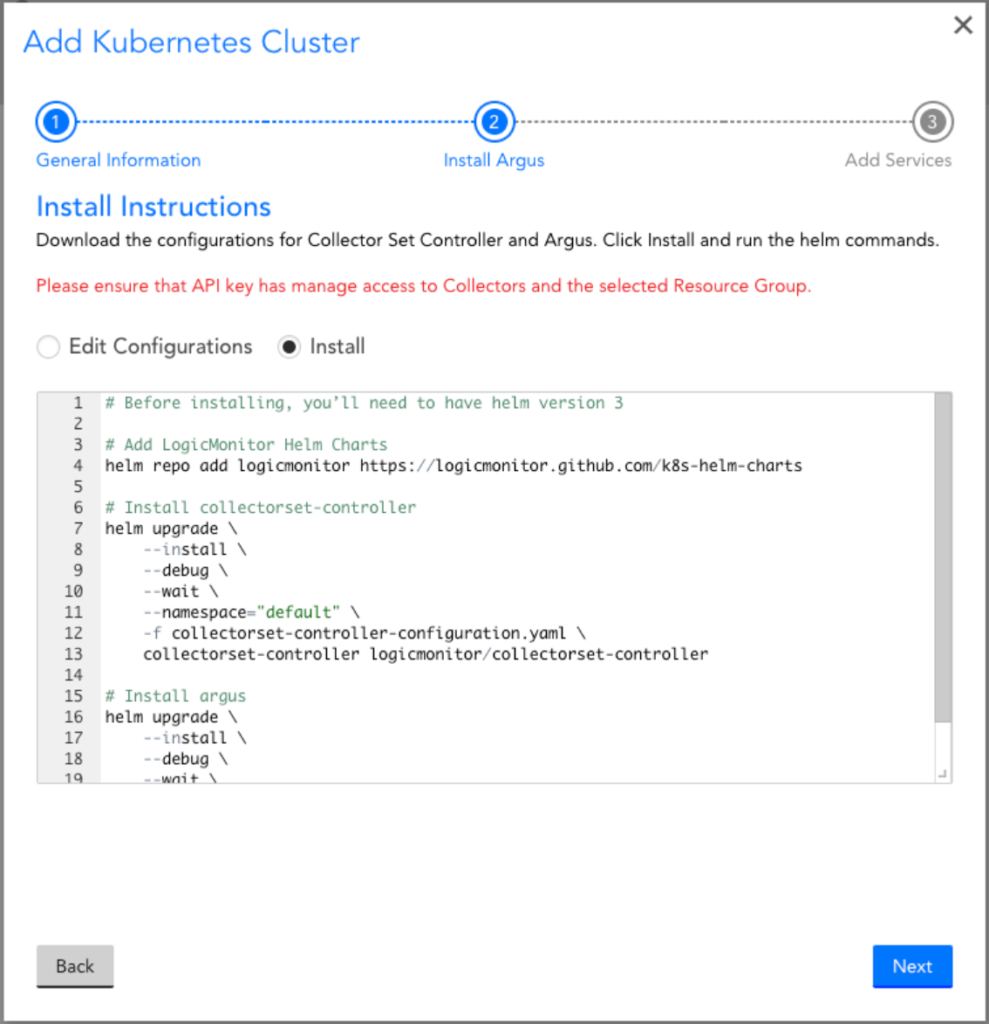
For more information on the list of values and their descriptions used in the argus configuration yaml file, see Default value from ArtifactHUB.
3. Click Verify Connection to ensure that the Collectors and the cluster resources were properly added into monitoring.
Note: The connection verification process may take up to a minute.
Disclaimer: Argus and Collectorset-Controller Helm Charts are being phased out. For more information to switching to the new LM Container Helm Chart for a simpler install and upgrade experiencere, see Migrating Existing Kubernetes Clusters Using LM Container Helm Chart.
Configuring Collectorset-Controller using Helm Charts
The Collectorset-Controller Helm chart supports the following values:
Required Values
| Parameters | Description |
| accessID (default: “”) | The LogicMonitor API key ID |
| accessKey (default: “”) | The LogicMonitor API key |
| account (default: “”) | The LogicMonitor account name |
Optional Values
Parameters Settings
| Parameters | Description |
| imageRepository (default: “logicmonitor/collectorset-controller”) | The image repository of the Collectorset-Controller container |
| imageTag | The image tag of the Collectorset-Controller container |
| proxyURL (default: “”) | Http/s proxy URL |
| proxyUser (default: “”) | Http/s proxy username |
| proxyPass (default: “”) | Http/s proxy password |
Advanced Parameters Settings
| Parameters | Description |
| enableRBAC (default: true) | If your cluster does not have RBAC enabled, this value should be set to false |
| etcdDiscoveryToken (default: “”) | The public etcd discovery token used to add etcd hosts to the cluster device group |
| imagePullPolicy (default: “Always”) | The image pull policy of the Collectorset-Controller container |
| nodeSelector (default: {}) | It provides the simplest way to run Pod on particular Node(s) based on labels on the node |
| affinity (default: {}) | It allows you to constrain which nodes your Pod is eligible to be scheduled on |
| priorityClassName (default: “”) | The priority class name for Pod priority. If this parameter is set then you must have PriorityClass resource created otherwise Pod will be rejected |
| tolerations (default: []) | Tolerations are applied to Pods and allow the Pods to schedule onto nodes with matching taints |
Configuring Argus using Helm Chart
The Argus Helm chart supports the following values:
Required Values
| Parameters | Description |
| accessID (default: “”) | The LogicMonitor API key ID |
| accessKey (default: “”) | The LogicMonitor API key |
| account (default: “”) | The LogicMonitor account name |
| clusterName (default: “”) | A unique name given to the cluster’s device group |
| logLevel (default: “info”) | Set Argus Log Level |
| collector.replicas (default: 1) | The number of collectors to create and use with Argus |
| collector.size (default: “”) | The collector size to install. Can be nano, small, medium, or large |
Optional Values
| Parameters | Description |
| clusterGroupID (default: 1) | A clusterGroupID is a user-defined static or dynamic group under which Kubernetes Cluster’s dynamic group is created. A cluster group is a logical organization of Kubernetes clusters and is uniquely identified through its numeric identifier. Every Kubernetes cluster must be associated with a cluster group by specifying the group’s id in this field. If not specified, the default value corresponding to the root group (1) is added to the cluster group ID. Note: The dynamic groups have references to resources according to AppliesTo function evaluation. |
| resourceGroupID (default: 1) | The resourceGroupID is the ID of the primary resource group where the Argus resources are created. If not specified, the resourceGroupID takes the default value corresponding to the root group (1). Note: The root group contains special logic to display only the groups and not the resources, so we recommend setting the resourceGroupID value to other values if you need to narrow the scope of the API tokens beyond the root group. |
| imageRepository (default: “logicmonitor/argus”) | The image repository of the Argus container |
| imageTag | The image tag of the Argus container |
| proxyURL (default: “”) | The Http/s proxy URL |
| proxyUser (default: “”) | The Http/s proxy username |
| proxyPass (default: “”) | The Http/s proxy password |
| collector.groupID (default: 0) | The ID of the group of the collectors |
| collector.escalationChainID (default: 0) | The ID of the escalation chain of the collectors |
| collector.collectorVersion (default: 0) | The version of the collectors |
| collector.useEA (default: false) | On a collector downloading event, either download the latest EA version or the latest GD version |
| collector.proxyURL (default: “”) | The Http/s proxy URL of the collectors |
| collector.proxyUser (default: “”) | The Http/s proxy username of the collectors |
| collector.proxyPass (default: “”) | The Http/s proxy password of the collectors |
Advanced Parameter Settings
| Parameters | Description |
| enableRBAC (default: true) | Enable RBAC. If your cluster does not have RBAC enabled, this value should be set to false |
| etcdDiscoveryToken (default: “”) | The public etcd discovery token used to add etcd hosts to the cluster resource group |
| imagePullPolicy (default: “Always”) | The image pull policy of the Argus container |
| nodeSelector (default: {}) | It provides the simplest way to run Pod on particular Node(s) based on labels on the node |
| affinity (default: {}) | It allows you to constrain which nodes your Pod is eligible to be scheduled on |
| priorityClassName (default: “”) | The priority class name for Pod priority. If this parameter is set then the user must have PriorityClass resource created otherwise Pod will be rejected |
| tolerations (default: []) | Tolerations are applied to Pods, and allow the Pods to schedule onto nodes with matching taints |
| filters.pod (default: “”) | The filtered expression for Pod resource type. Based on this parameter, Pods would be added or deleted for discovery on LM |
| filters.service (default: “”) | The filtered expression for Service resource type. Based on this parameter, Services would be added or deleted for discovery on LM |
| filters.node (default: “”) | The filtered expression for Node resource type. Based on this parameter, Nodes would be added or deleted for discovery on LM |
| filters.deployment (default: “”) | The filtered expression for Deployment resource type. Based on this parameter, Deployments would be added/deleted for discovery on LM |
| collector.statefulsetspec | Holds the Collector Pod’s Statefulfulset specification as per the Kubernetes statefulset object’s spec format. Refer statefulset basics for more information |
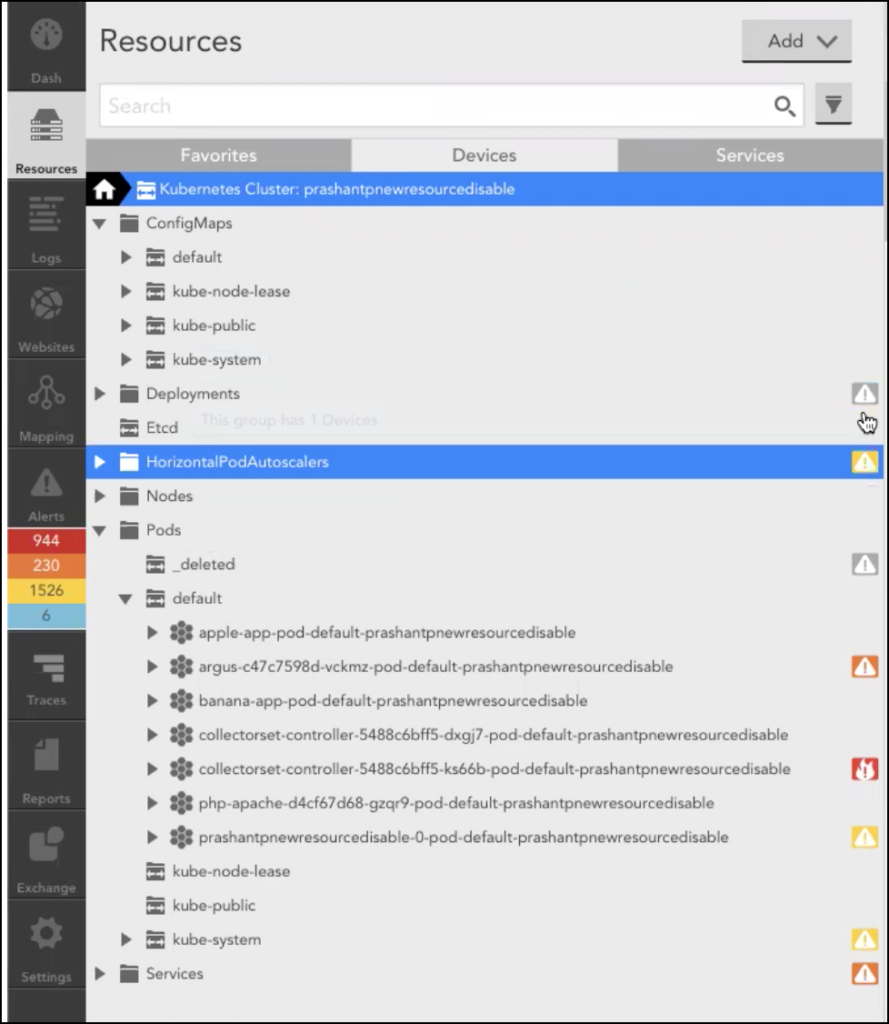
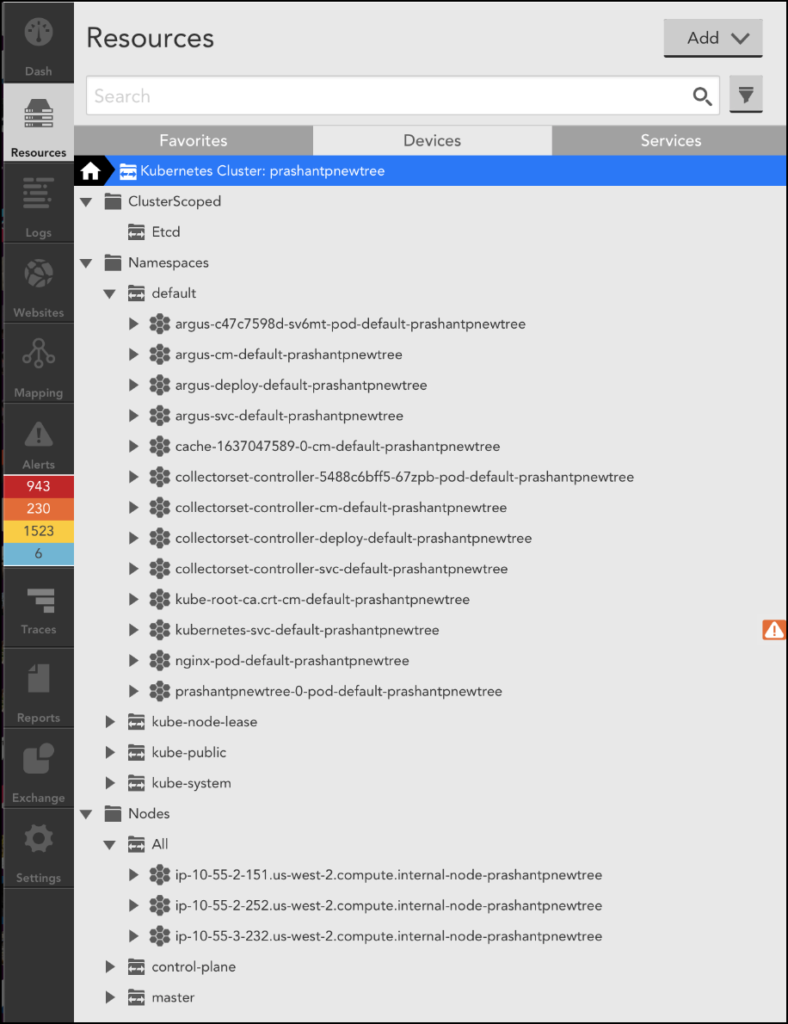
With Argus v5 or the previous resource tree, dynamic groups were created for each type of resource. Now with Argus v7, the resource tree is enabled by default, to optimize the performance. In the new resource tree, all the namespace scoped resources such as Pods, Deployments, and Services are grouped under Namespaces, and cluster scoped resources such as etcd is grouped under the ClusterScoped group.
Note: The resource tree is automatically enabled with fresh installed Argus helm chart version 2.0.0 and Argus version v7. However, if you are upgrading Argus, then you must follow the instructions mentioned in the Updating Resource Tree section.
Updating Resource Tree
To enable the new resource tree structure, set enableNewResourceTree: true in the argus-config.yaml file. Following are the samples of Argus v5 and v6 resource tree structure :Argus v5 resource tree sample:
Argus v6 resource tree sample:
Note: By enabling the new resource tree structure few of the components such as reports, alerts, services, etc might get affected and may not be displayed in the Dashboard.
You must update the Item field as per the new resource tree structure for the resources to be displayed in the Dashboard.

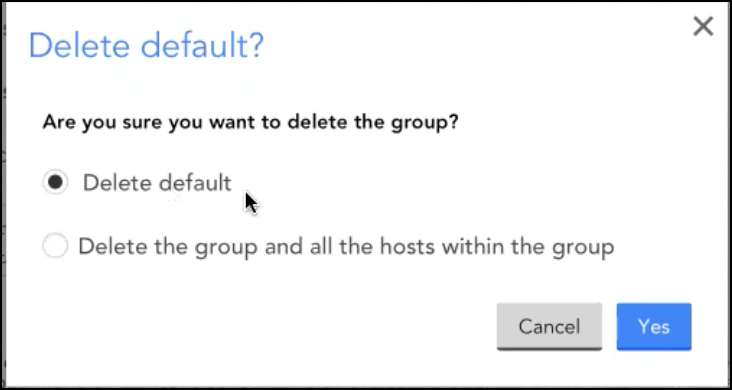
Once you have successfully made the changes to the resources in the new structure, you may delete the old resource tree structure.
Note: Ensure to select the Delete default option while deleting the old resource tree structure.
Disclaimer: Argus and Collectorset-Controller Helm Charts are being phased out. For more information to switching to the new LM Container Helm Chart for a simpler install and upgrade experiencere, see Migrating Existing Kubernetes Clusters Using LM Container Helm Chart.
When you add your Kubernetes cluster into monitoring, dynamic groups are used to group the cluster resources. For more information on adding a Kubernetes cluster into monitoring, see Adding Kubernetes Cluster into Monitoring.
Earlier, for adding dynamic groups, you required ‘manage all resources’ permission. However, now you can use API keys that have access to at least one resource group to add clusters for monitoring. The dynamic groups are linked to the resource groups that have the API keys with view permissions.
Administrator: Steps to Assign Permission to a Non-Admin User
- Create different device groups for non-admin users. For more information, see Adding Device Groups.
- Navigate to Settings> User Access> User and Roles> Roles tab.
- Select the required user group and click the Gear icon.
- On the Manage Role dialog box, provide access to the respective static groups.
Note: You can create multiple users with specific roles from the Manage Role dialog box.
Once the required permissions are provided, the non-admin users can add and monitor the Kubernetes clusters within the static groups respectively.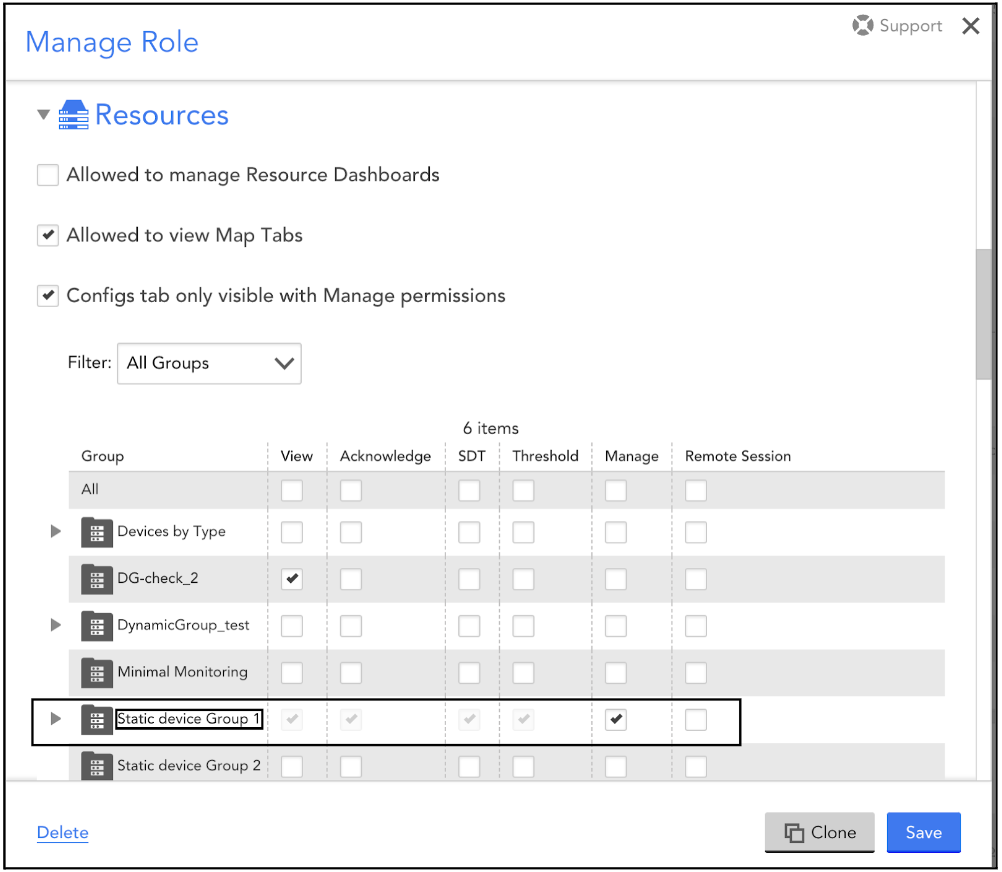
- Create different Collector groups and Dashboard groups for the non-admin users and provide access to the users for their respective groups.
- Select the User Profile setting and grant access to the non-admin users to create the API tokens and manage their profiles.
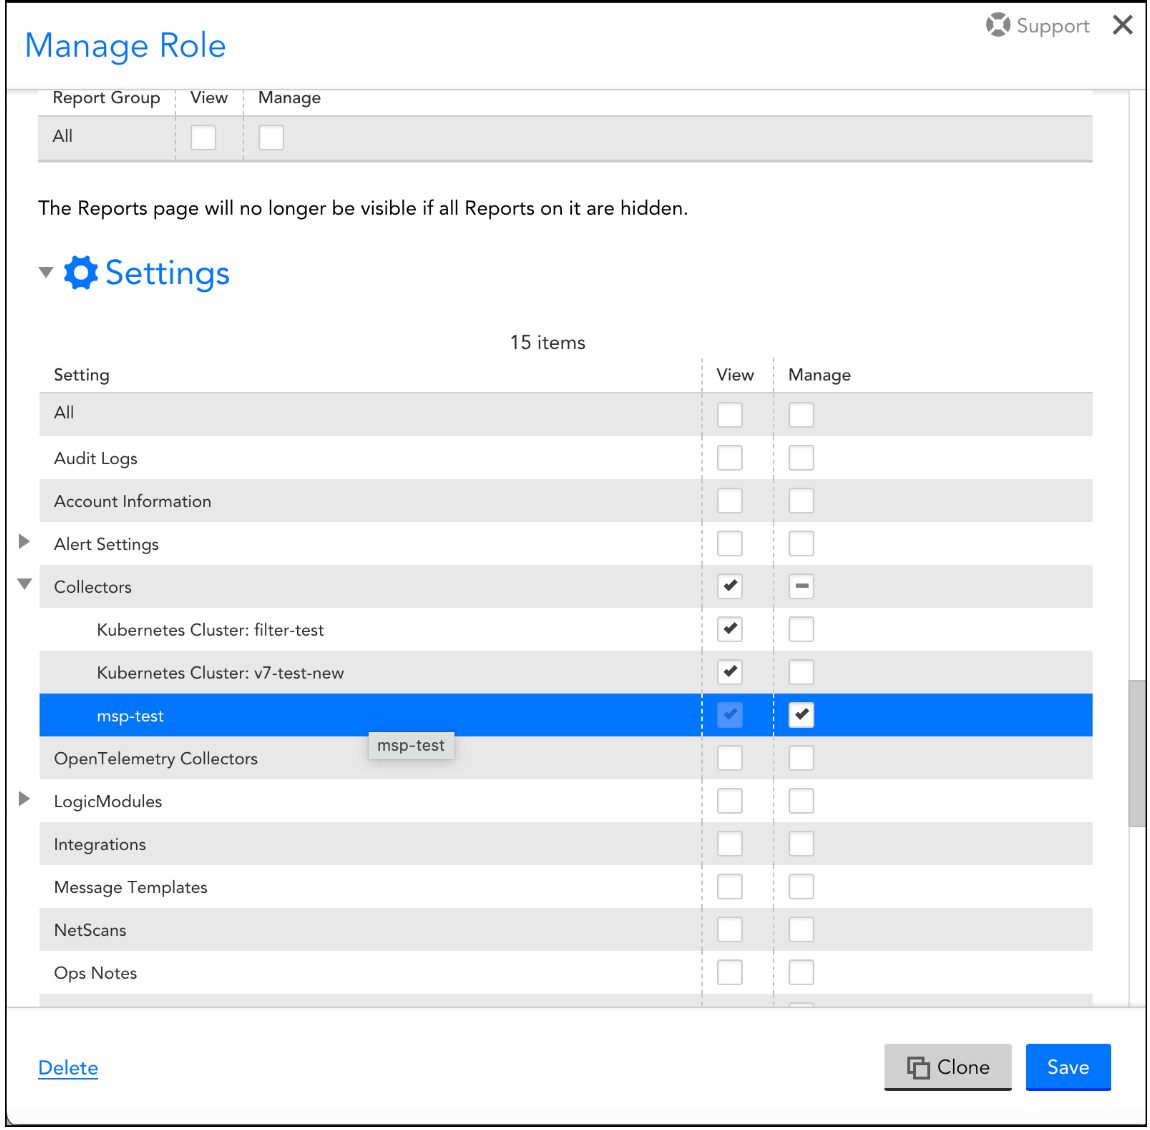
Note: Ensure to select the View checkbox for Collectors.
Non-admin user: Adding a Kubernetes Cluster
Once the administrator has completed all the prerequisites and allocated a resource group, then you can complete the following steps to add the Kubernetes cluster:
Note: You must have access to at least one collector before adding a Kubernetes cluster.
1. Navigate to Resources > Devices > select the allocated resource group for adding the cluster.
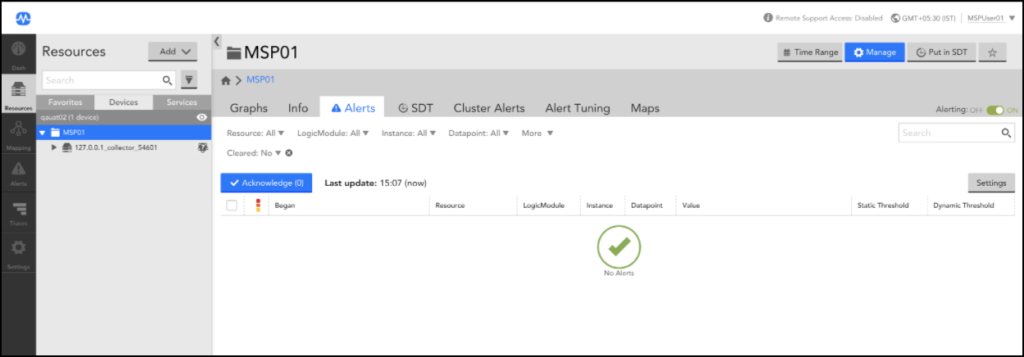
2. From the Add drop-down list, select Kubernetes Cluster.

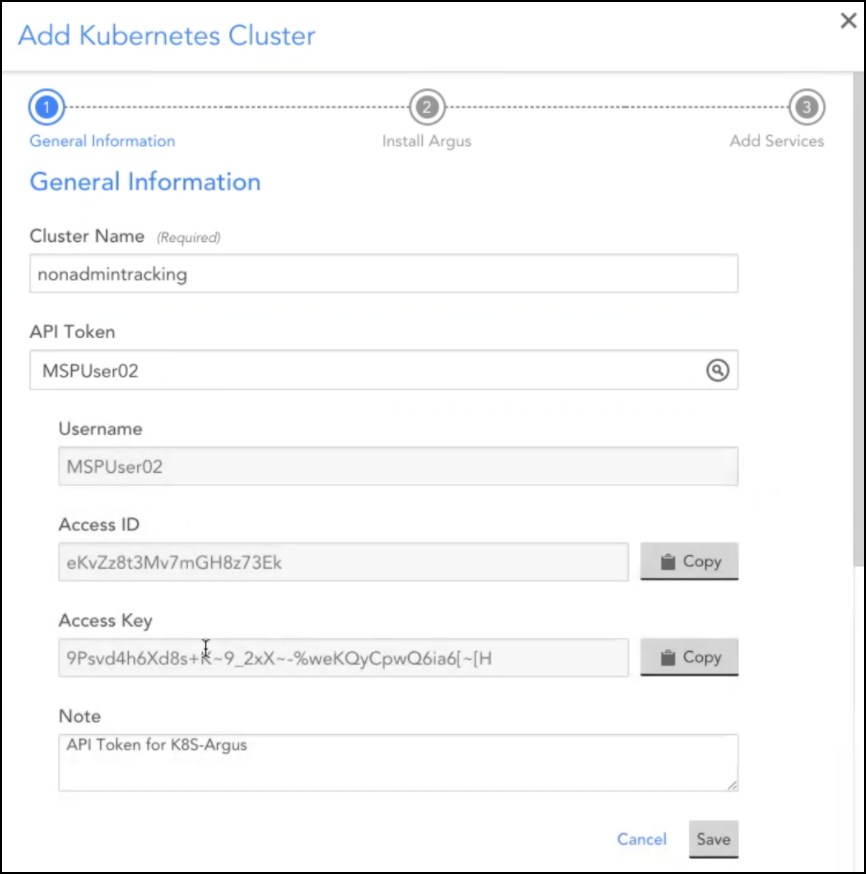
3. On the Add Kubernetes Cluster page, add the following information:
a. In the Cluster Name field, enter the cluster name.
b.In the API token field, select the API token for the allocated resource group and click Save.
The other API Token fields information will get populated automatically.
c. In the Resource Group field, select the allocated resource group name.
Note: If you select the root group in the Resource Group field, an error message “Insufficient permissions” will occur.
d. In the Collector Group and Dashboard Group fields, select the allocated Resource Group.
4. Click Next.
5. In the Install Instruction section, select the Argus tab.
6. Select the resourceGroupID parameter and replace the default value with the system.deviceGroupId property value of the allocated resource group.
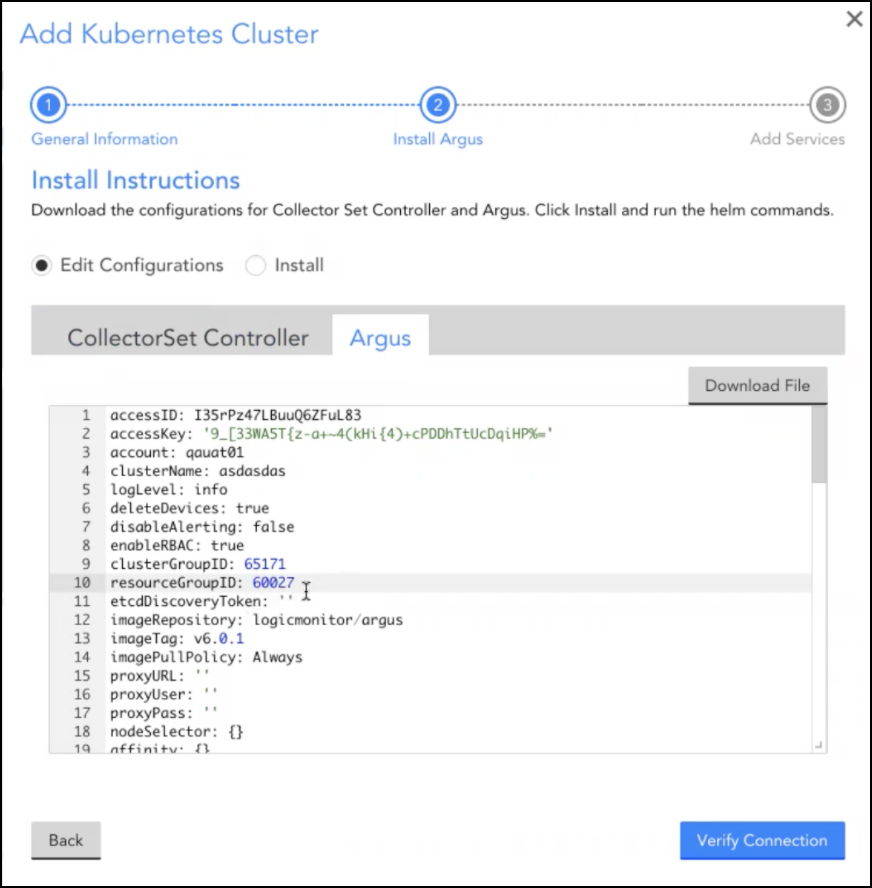
Note: To view the system.deviceGroupId value, navigate to Resources > Devices > select the allocated resource group, and click the Info tab.
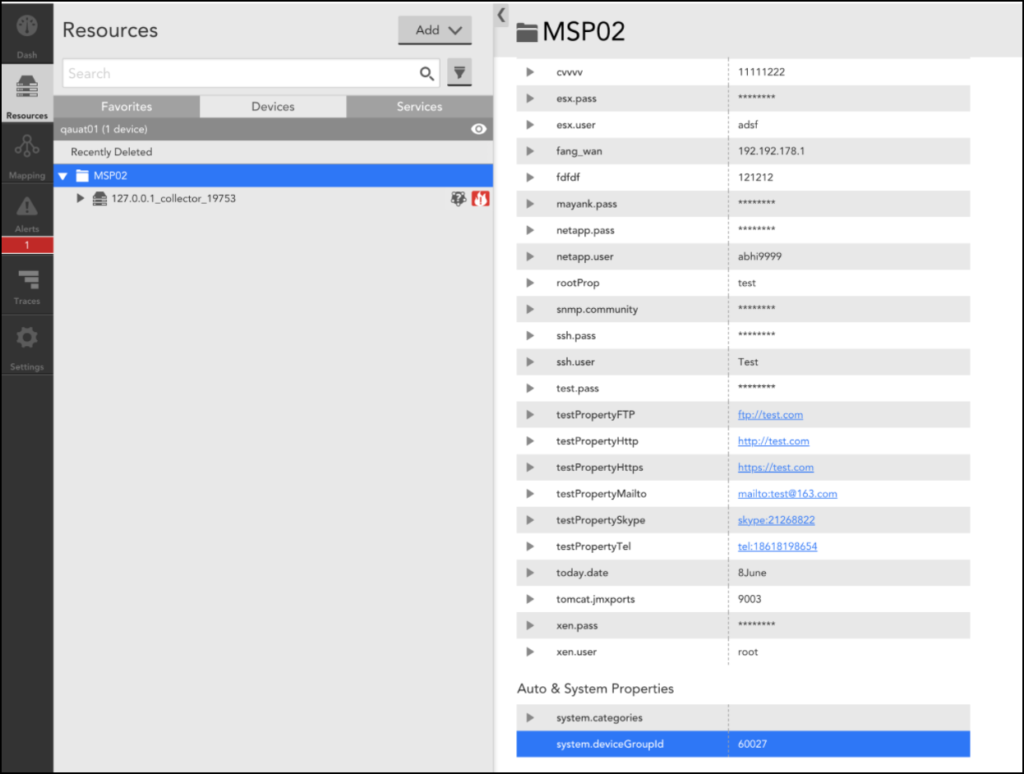
7. Click Verify Connection. Once the connection is successful, your cluster is added.
Note: Currently, you cannot add services to the Kubernetes cluster. You must contact the administrator to add the required services.
Google Anthos enables you to run and manage Kubernetes Clusters running anywhere, whether natively via Google Kubernetes Engine (GKE) or externally in another cloud service and on-premise.
With LM Container, you can ensure central and consistent monitoring for clusters managed through Anthos. Specifically, LM Container provides a central view within LogicMonitor for you to monitor the health and performance of your cluster components (such as nodes, pods, containers, services, deployments, and so on) as well as the performance of the applications running within the clusters.
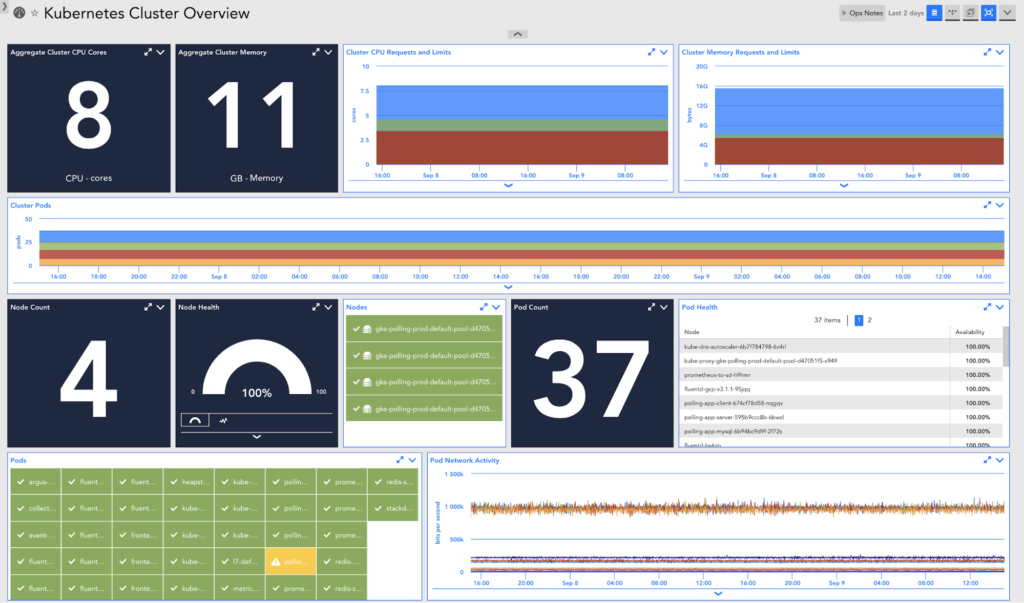
To get started, add each of your clusters into monitoring.
Once added, you should see the Anthos-managed clusters within LogicMonitor. Container applications will be automatically detected and monitored.
Alternatively, you can develop your own LogicModules to monitor custom applications.
To get additional metrics for Google Cloud Platform (GCP) resources, such as GKE notes, you can add your GCP projects into monitoring.


