
Configuring WinRM for Windows Collector
Last updated - 22 September, 2025
WinRM is Microsoft’s implementation of WS-Management Protocol, a standard SOAP-based firewall friendly protocol that allows hardware and operating systems from different vendors to interoperate. Thus, WinRM provides a way to get management data from a local computer or a remote computer using WS-Management protocol.
Prerequisites
You must meet the following prerequisites to configure and use WinRM to query data.
- You must install EA Collector 35.400 or a later version.
- You must create and enable an HTTPS listener on the Windows devices. For more information, see, Creating an HTTPS Listener (port 5986).
Creating Domain User
You can create a new domain user or use an existing domain user. However, ensure that the domain user is not a member of the Administrators group. If you are going to create a new domain user, it is recommended that you first create a domain user and then install the collector using that domain user.
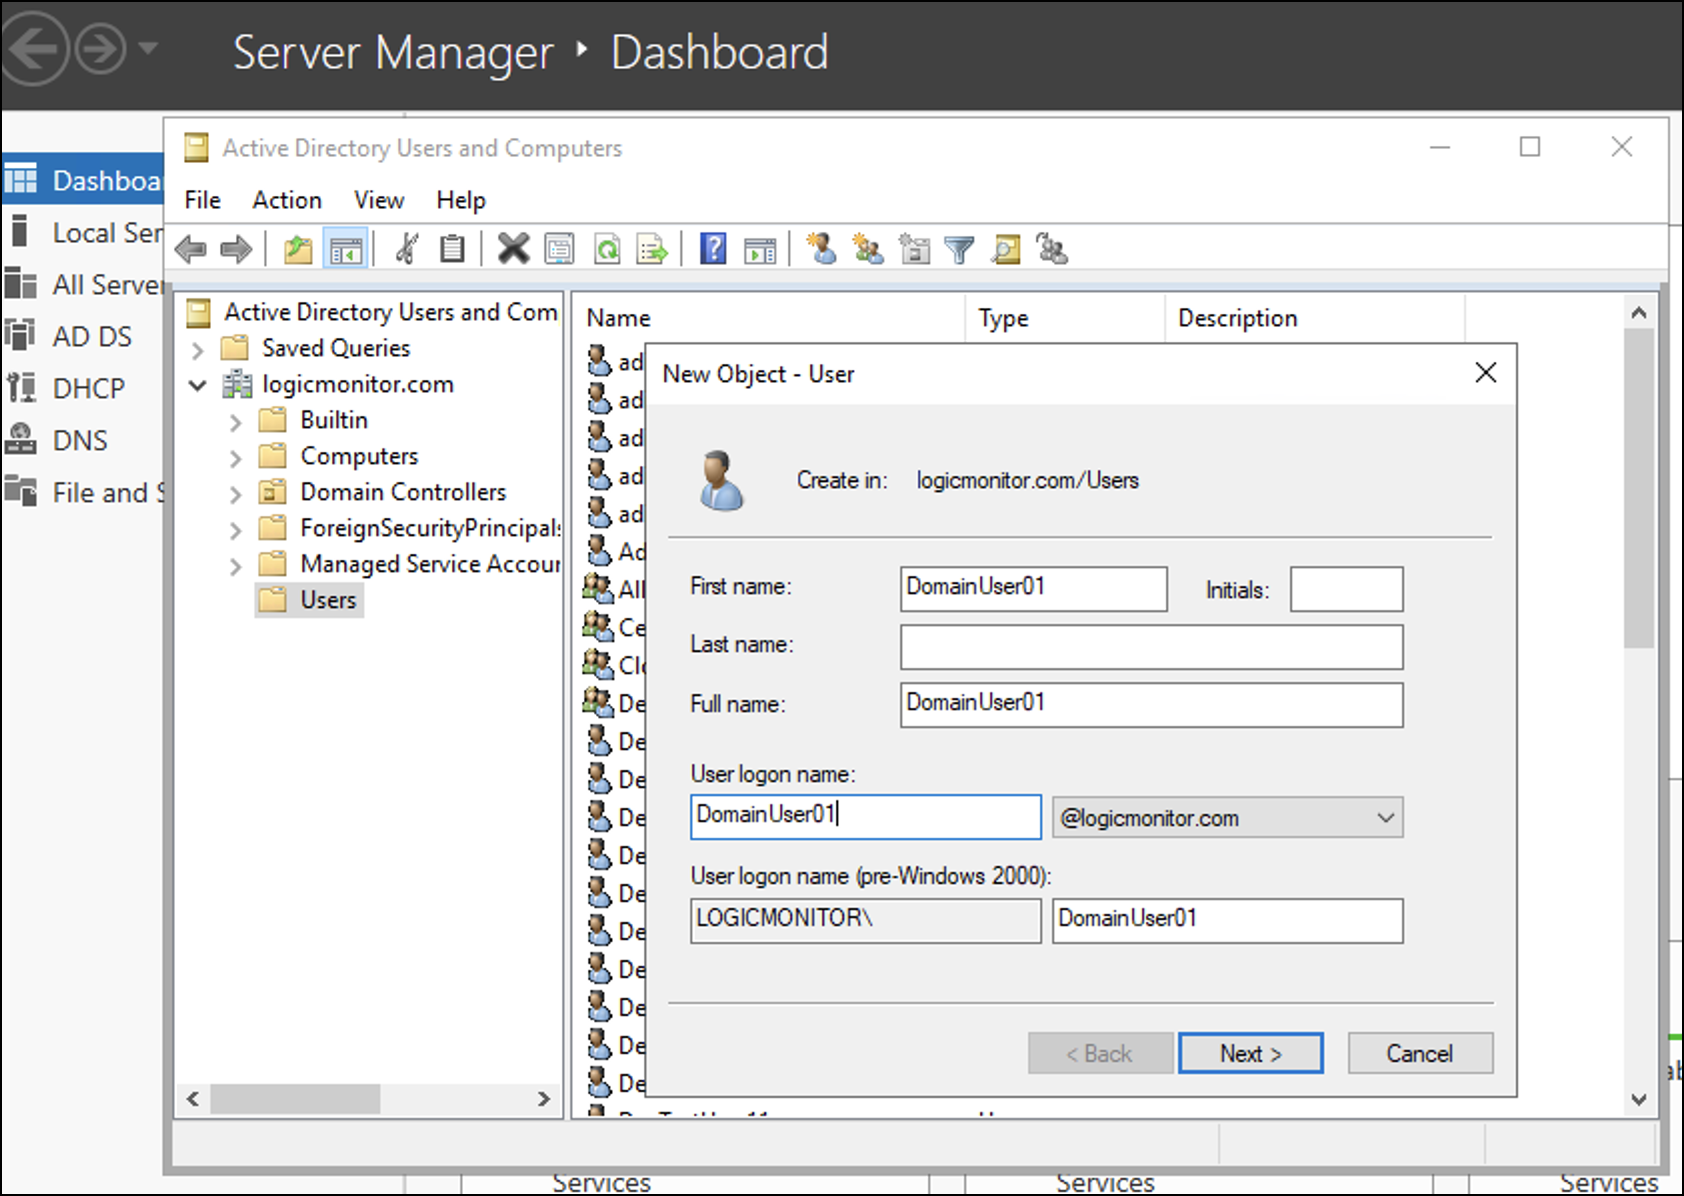
- Navigate to Server Manager > Tools > Active Directory Users and Computers.
- Go to the domain that you want to use for WinRM and right-click Users and select New.
- Enter the new user details and select Next.
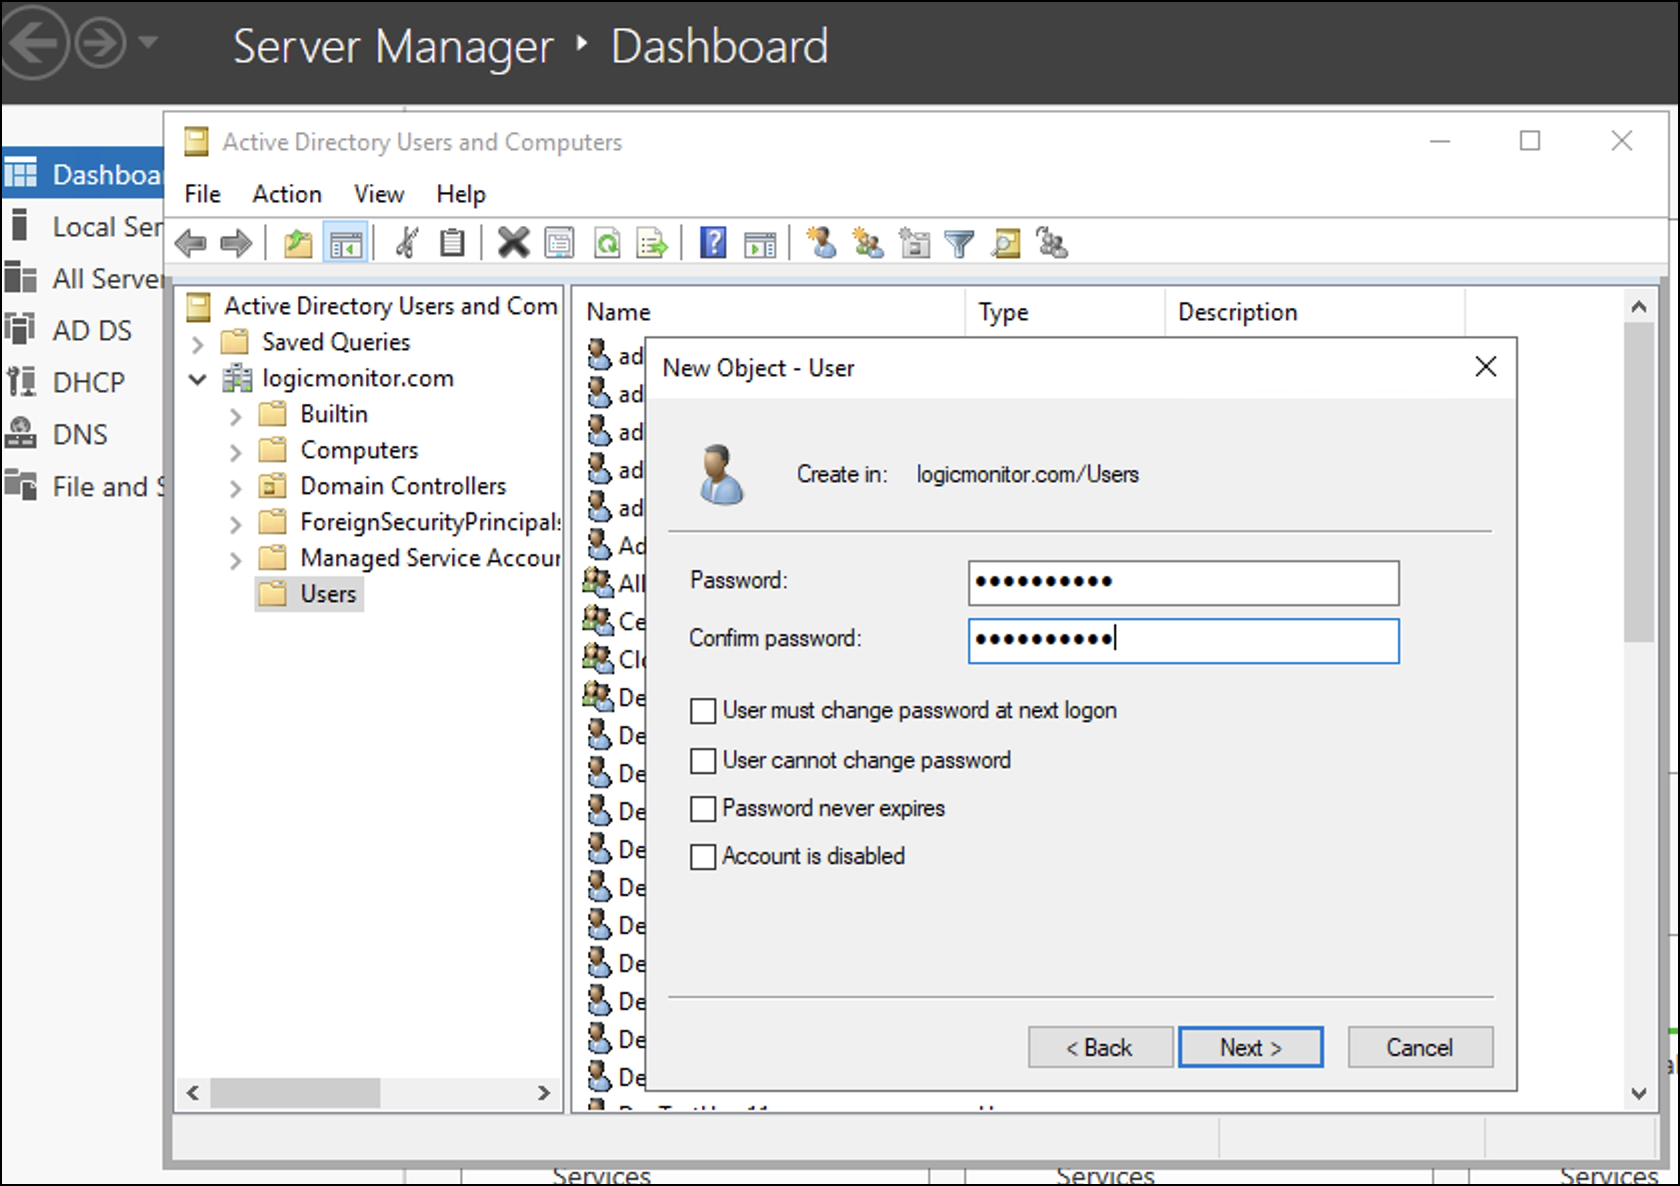
- Enter a password and confirm it, and then select Next.
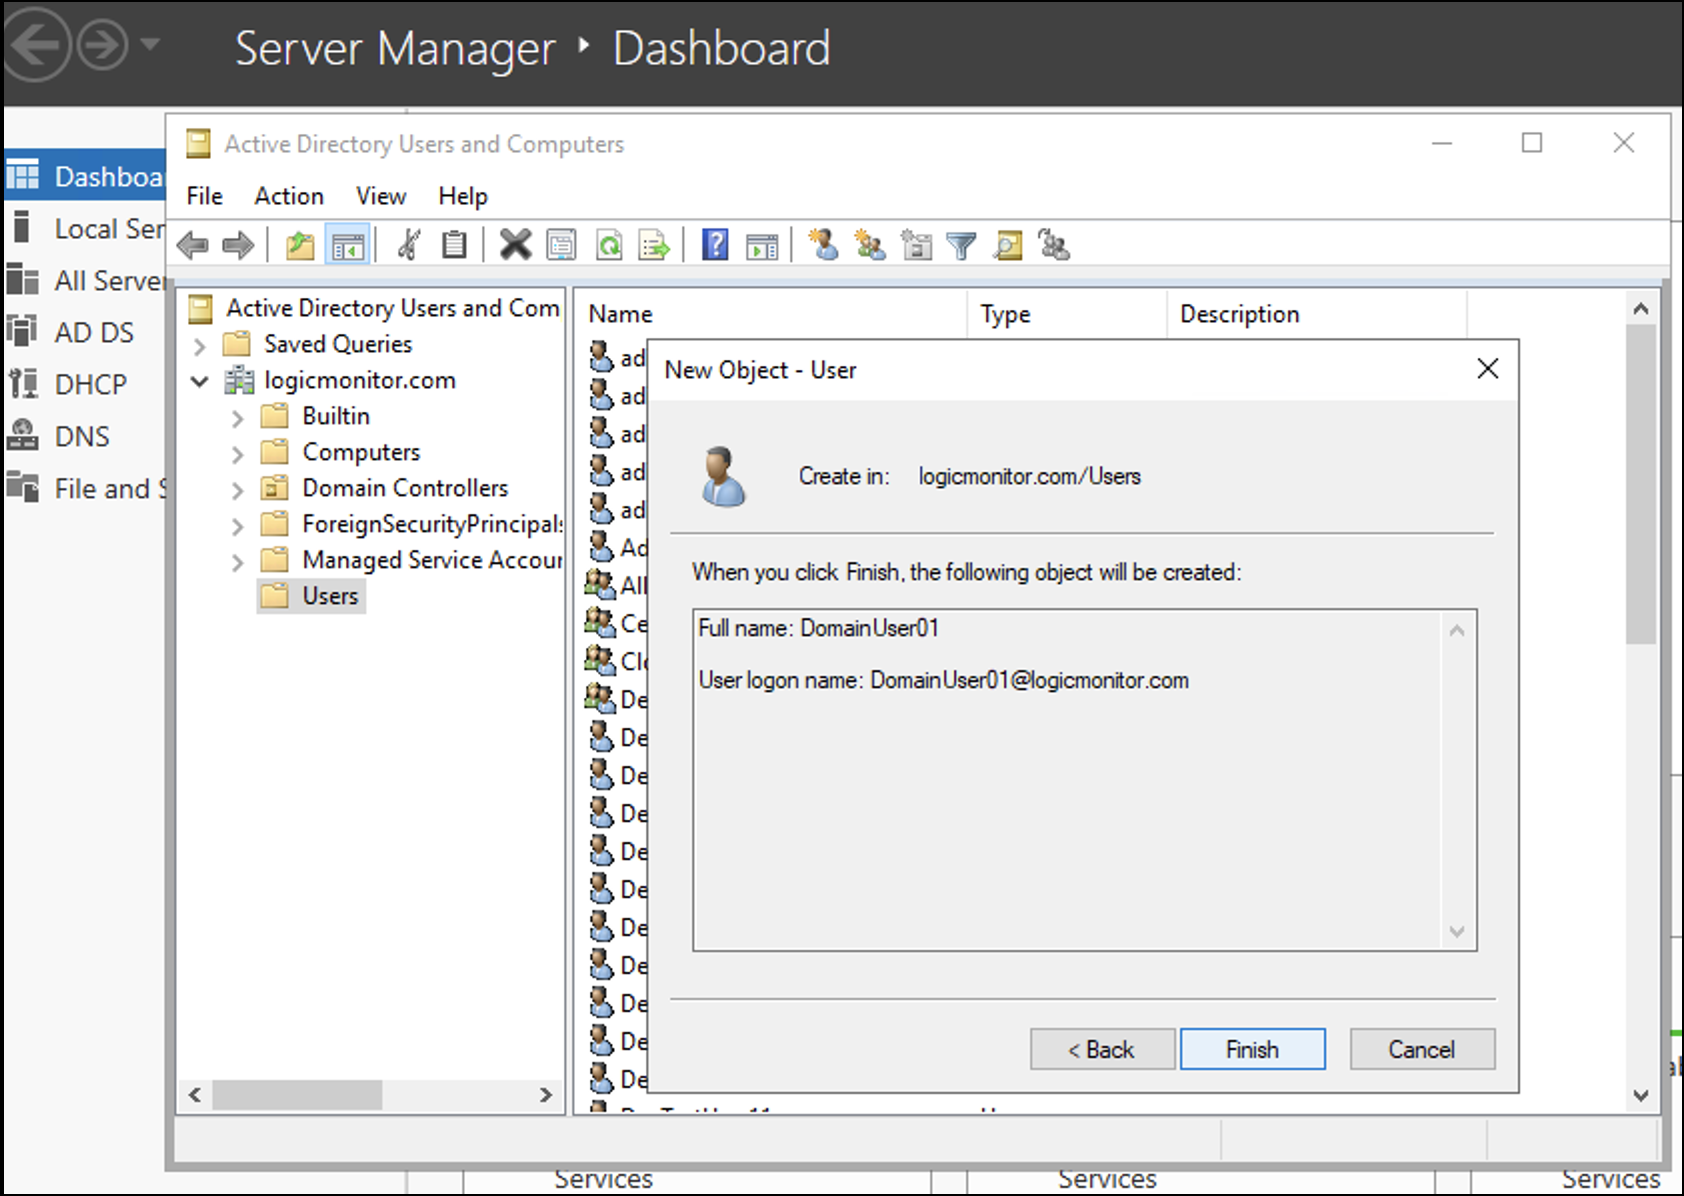
- Check details and select Finish.
Creating an HTTPS Listener (port 5986)
An HTTPS listener must be created and/or enabled on the Windows devices. If you do not have an HTTPS listener created for WinRM, follow the steps given below:
- Run the command
WinRM e winrm/config/listenerin cmd_prompt to check if port 5986 is already enabled on WinRM service. - Use a certificate signed by a trusted Certificate Authority (CA).
- Copy the thumb print of the existing certificate and run the following command on PowerShell.
winrm create winrm/config/Listener?Address=*+Transport=HTTPS '@{Hostname="<YOUR_DNS_NAME>"; CertificateThumbprint="<COPIED_CERTIFICATE_THUMBPRINT>"}‘ - To verify if the listener is created, run the command
WinRM e winrm/config/listenerin cmd_prompt to print details of port 5985 and 5986. - To add a new firewall inbound rule to allow all connections for port 5986 (TCP), follow these steps:
- Search and select the Windows Firewall with Advanced Security option. The Windows Firewall with Advanced Security window is displayed.
- In the left navigation, right-click Inbound Rules and select New Rule. The New Inbound Rule Wizard window is displayed.
- Select the Port radio button and select Next.
- Select the TCP radio button.
- Select the Specific local ports radio button and enter 5986 in the blank field. Select Next.
- Select the Allow the connection radio button and select Next.
- Select the Domain, Private, and Public checkboxes and select Next.
- Enter a rule name in the Name field and select Finish.
Setting Up WinRM Enabled Collector
To setup WinRM enabled collector, follow these steps:
- Install Windows collector
- Configure WinRM properties
- Automate WinRM non-admin configuration
- Create GPO policy
- Add WinRM tasks to the GPO policy
- Restart remote machine
Installing Windows Collector
Follow the instructions given in Installing Collectors to install Windows Collector. Ensure that you install EA Collector 35.400 or a later version.
Configuring WinRM Properties
To use the WinRM data collection feature using HTTP (port 5985), configure the following properties.
| Property | Location in Collector Settings | Default Value | Description |
wmi.winrm.enable | agent.conf | false | Allows you to enable or disable the WinRM feature. To enable the collector to perform WinRM queries, set the value to true. |
wmi.winrm.authType | sbproxy.conf | Negotiate |
|
wmi.winrm.useSSL | true | Allows you to perform WinRM data collection using HTTPS. To do so, ensure that you have configured HTTPS setup. | |
wmi.winrm.certCheck | true |
For more information, see SkipCACheck and SkipCNCheck Microsoft documentation. As per security best practices, it is recommended that you set the value of this property to true.Note: wmi.winrm.useSSL and wmi.winrm.certCheck properties are provided only for testing purpose and will be removed in the future release of collector. |
Restart the collector after you update the configuration files with the properties.
Note: The sections starting from Automating WinRM Non-admin Configuration onwards are meant for only those who want the WMI query user to be a non-admin user.
Automating WinRM Non-admin Configuration
We have automated the WinRM non-admin configuration process by adding Windows_NonAdmin_Config.ps1. You must consider the following points about the scripts:
- The scripts are bundled with the Windows collector installer.
- After installing collector, go to
\LogicMonitor\Agent\binand move the scripts to the netlogon folder. - All the machines in the domain must have access to the netlogon folder in order to access this script when executed through Group Policy (GPO).
In case of access issue, see Microsoft documentation.
Creating GPO Policy
- Navigate to Server Manager > Tools > Group Policy Management.
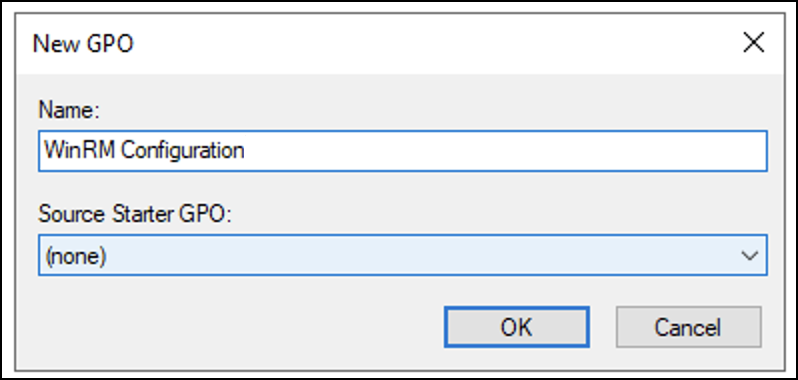
- Right-click the domain you want to use and select Create a GPO in this domain, and Link it here…
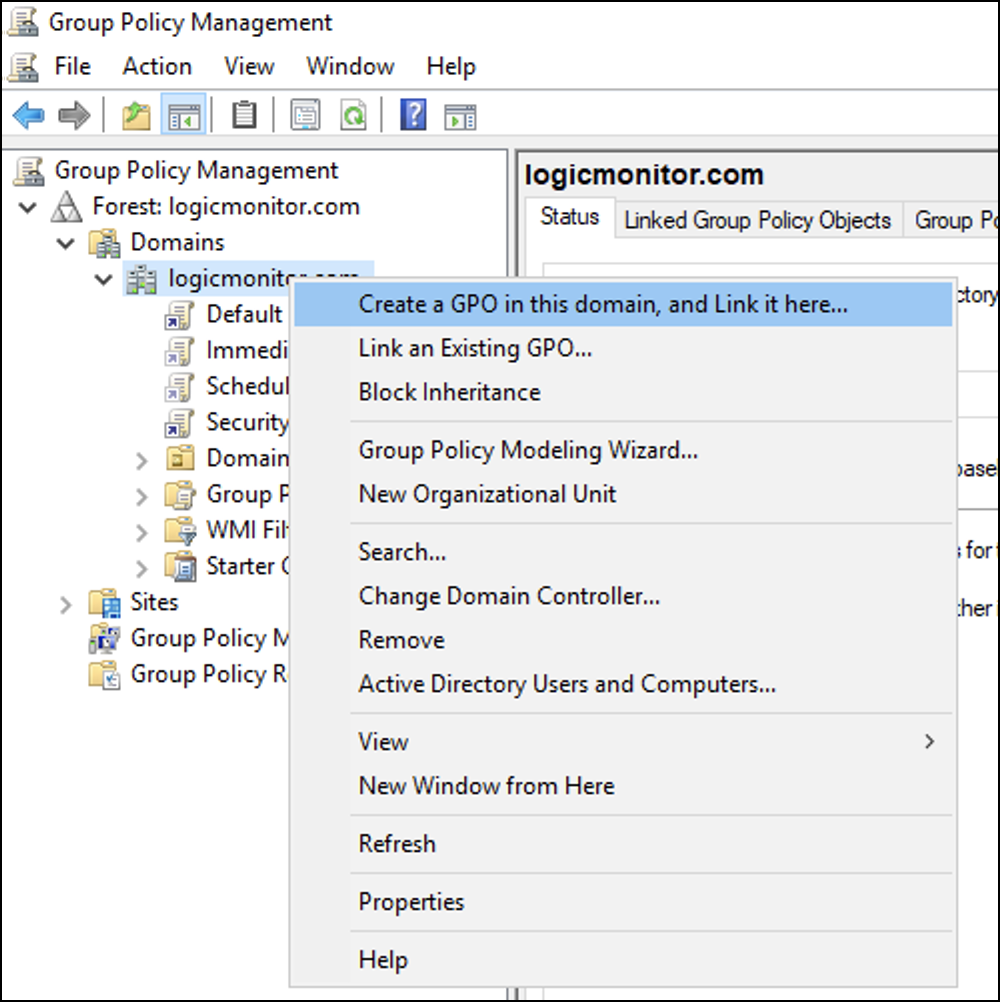
- Enter a name for the new GPO policy (for example, WinRM Configuration) and then select OK. Note that the Source Starter GPO will remain (none).
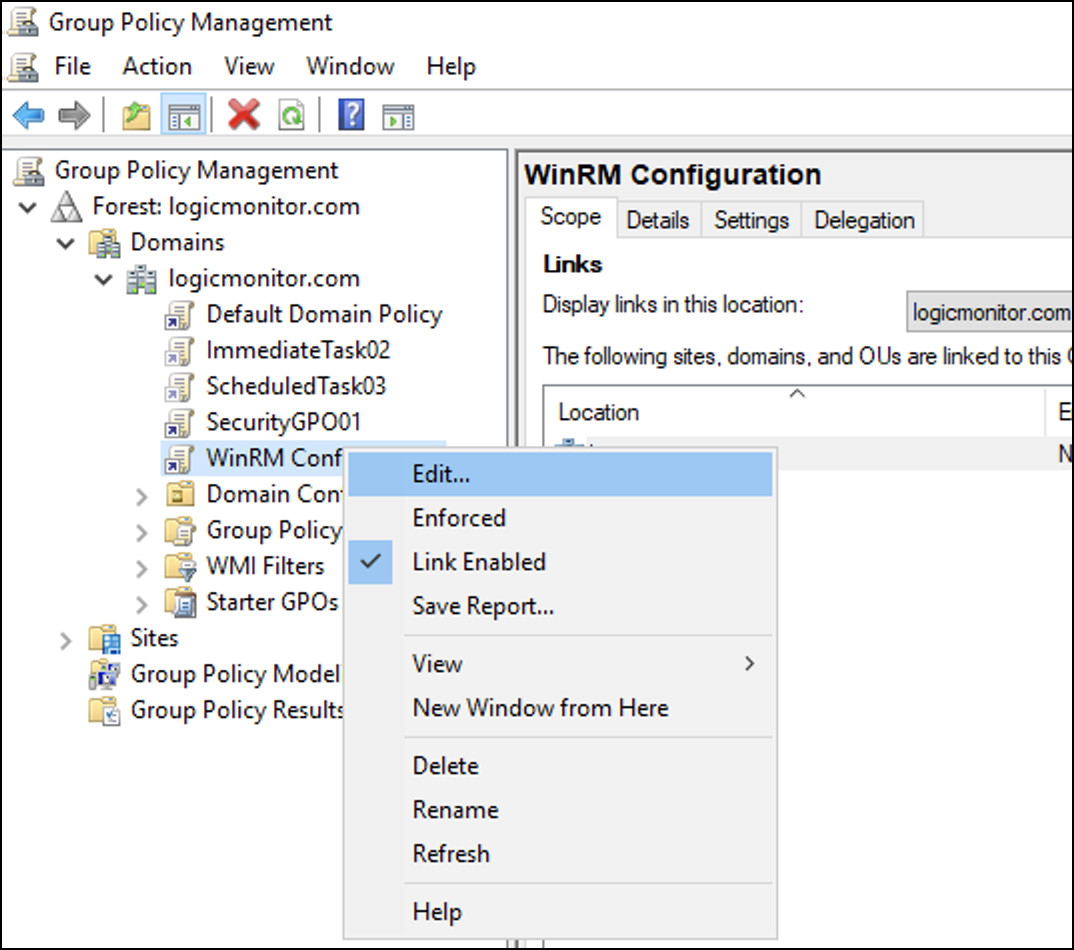
- Right-click the newly created GPO policy and select Edit to add WinRM tasks.
Adding WinRM Tasks to GPO Policy
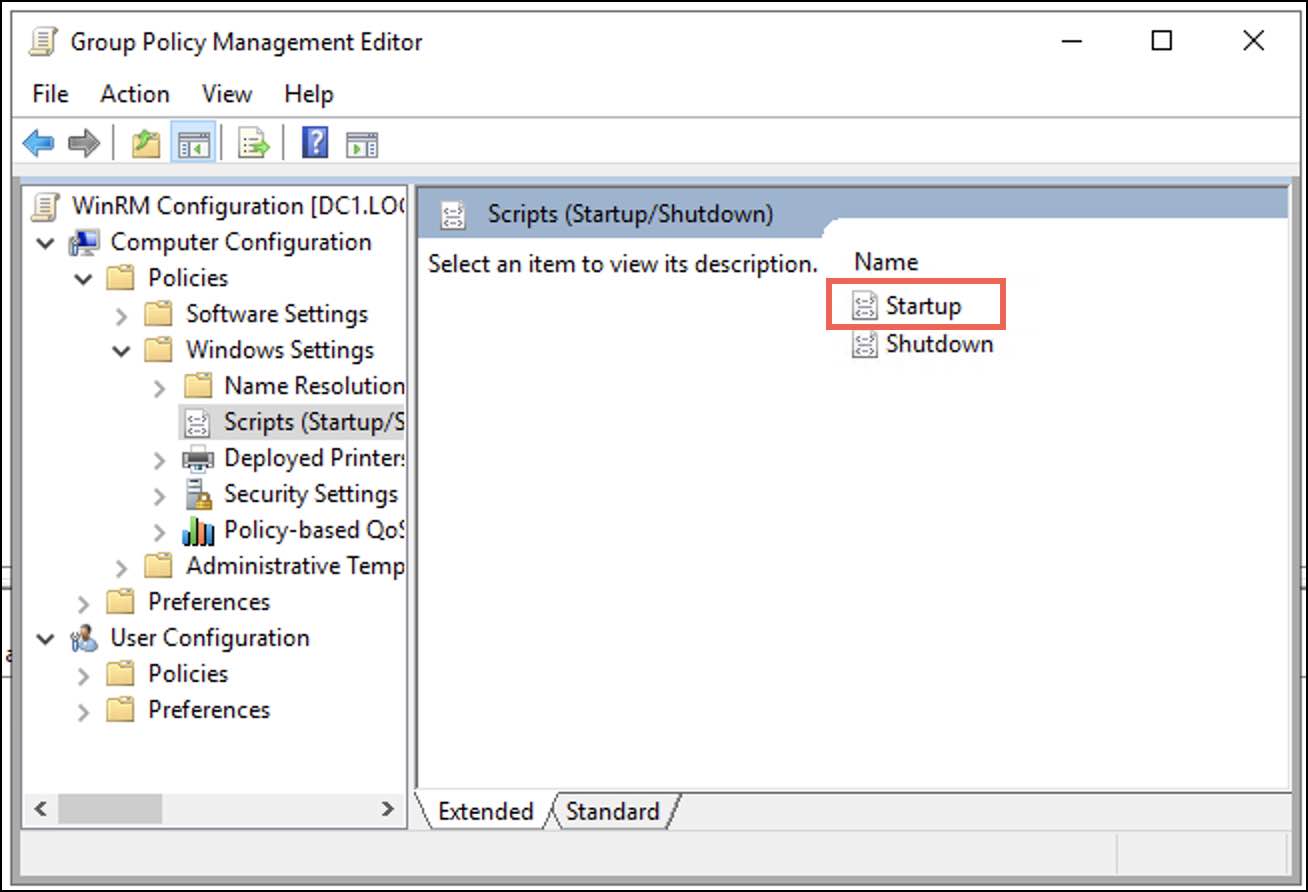
- In the Group Policy Management Editor, navigate to Computer Configuration > Policies > Windows Settings > Scripts (Startup / Shutdown) and select Startup.
A Startup Properties dialogue box is displayed. - Under the Scripts tab select Add.
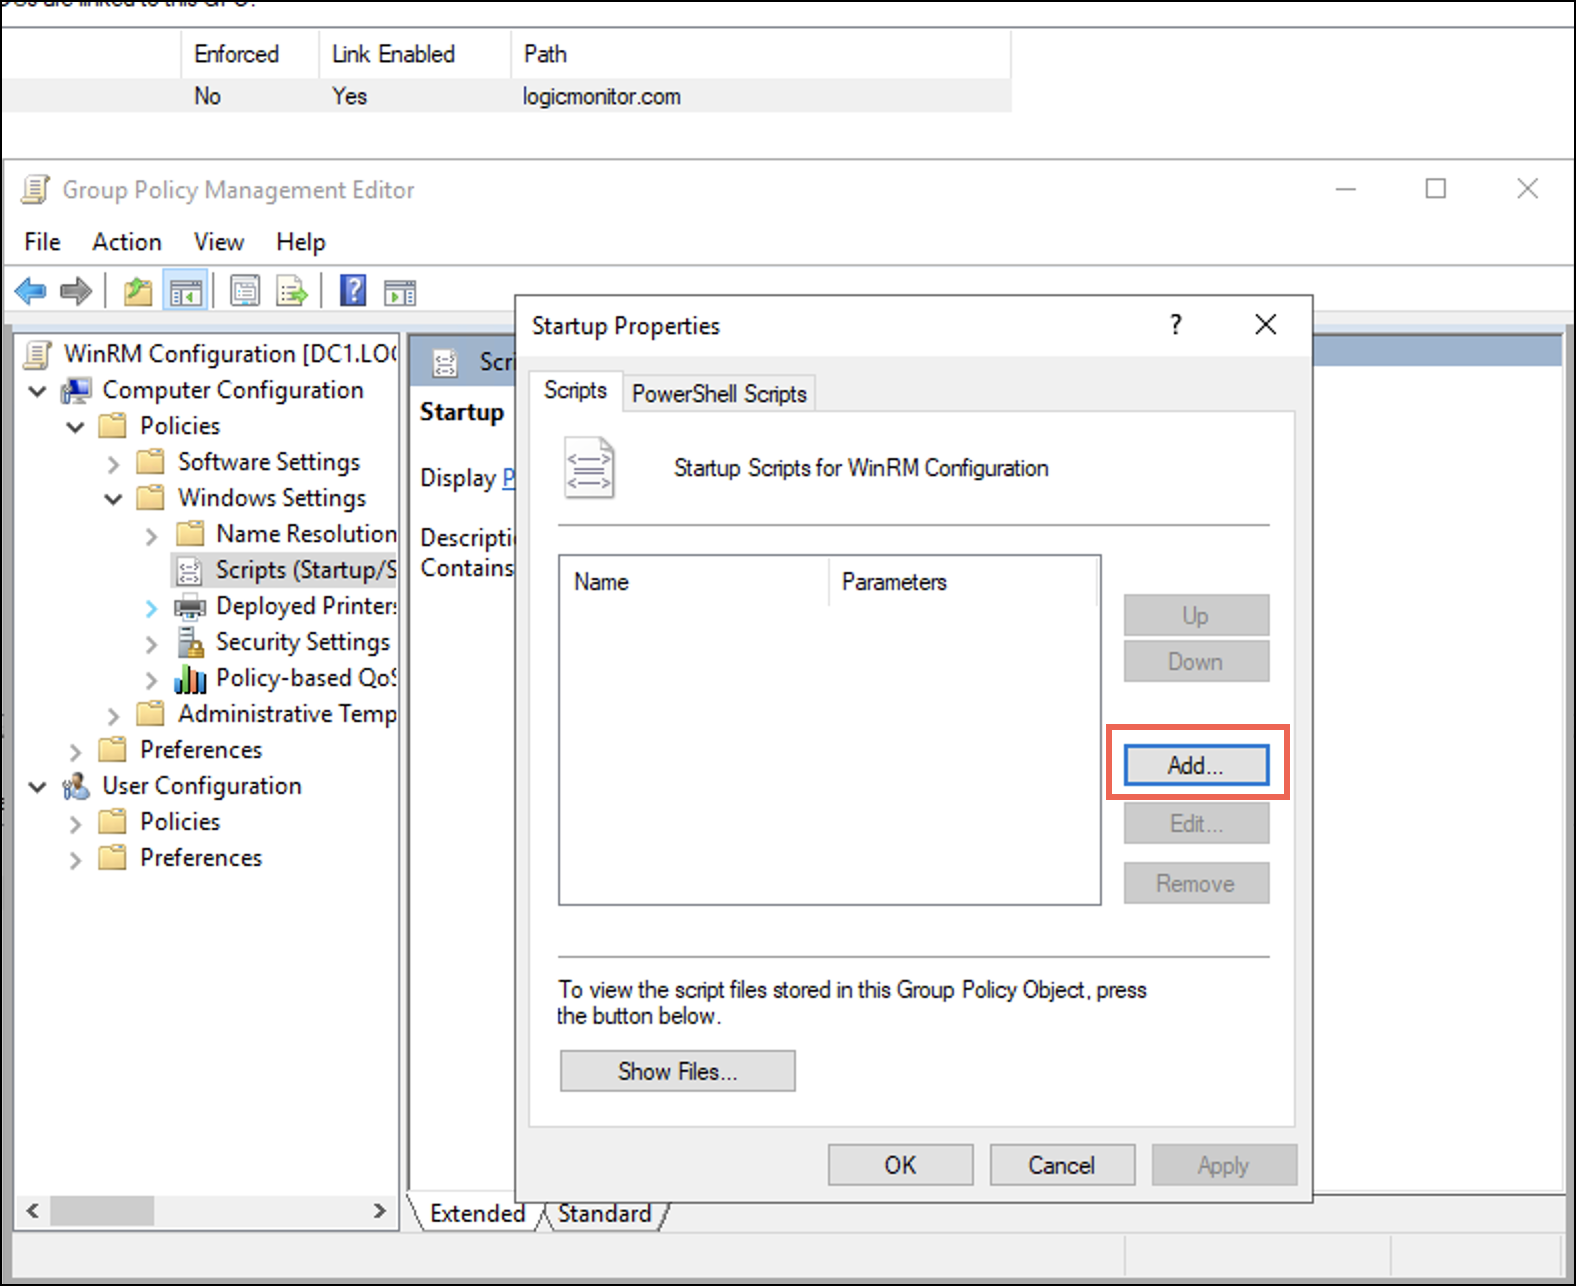
An Add a Script dialogue is displayed. - On the Add a Script dialogue, enter the following details.
- In the Script Name field browse for the PowerShell.exe path. Typically, the path is
C:\Windows\System32\WindowsPowerShell\v1.0\Powershell.exeNote: If the path differs, browse for the specific folder where you have placed thePowershell.exe. - In the Script Parameters field enter the following parameters for the script.
-Noninteractive -ExecutionPolicy Bypass -Noprofile -file \\<IP_Address_of_DC>\netlogon\Windows_NonAdmin_Config.ps1 -add -UserName logicmonitor\DomainUser01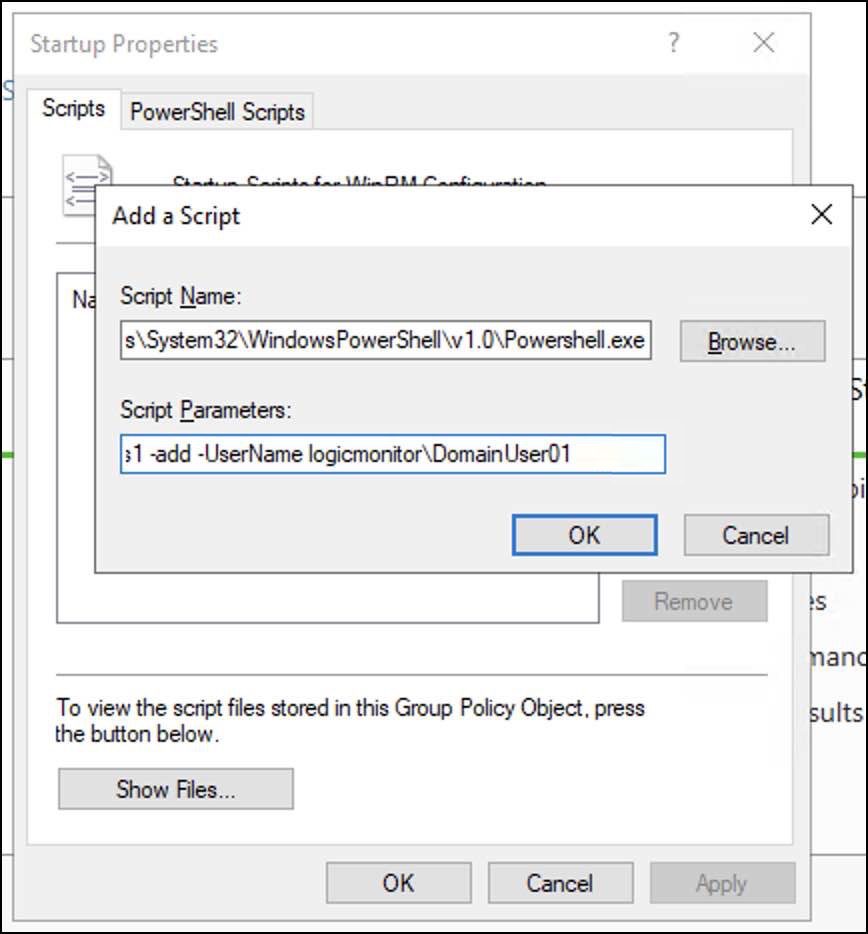
- In the Script Name field browse for the PowerShell.exe path. Typically, the path is
- Select OK and then select Apply.
Restarting Domain Machine
- Open PowerShell terminal and run
gpupdate/force.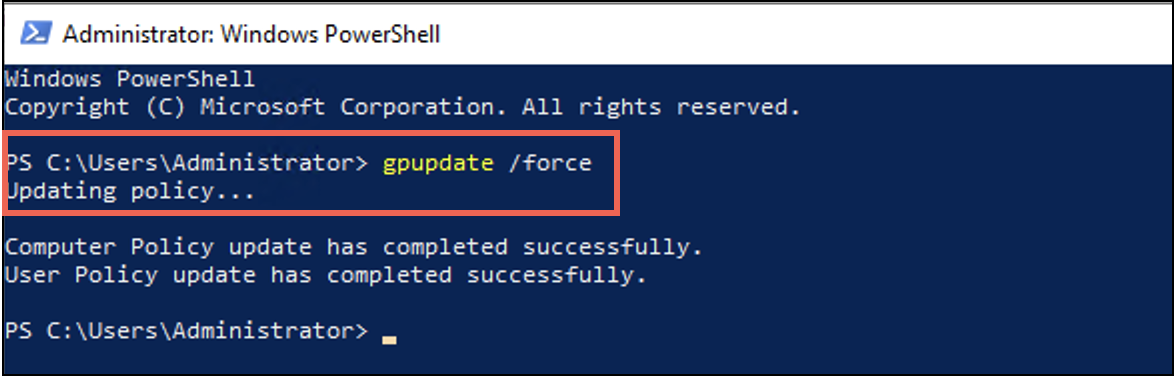
- Once the user policy is successfully updated, restart the domain machines.
To manually perform the above setup, see Windows Server Monitoring and Principle of Least Privilege.
Using the Debug Command to Verify Configuration
When the configuration is complete, you can run the !winrm debug command to verify the WinRM setup. In addition, you can run !winrm for any query to get the output. When the debug command runs successfully, it prints the output of the query. The format of the debug command is as follows:
!winrm host=<Computer Name> [auth=<Auth Type>] [useSSL=true|false] [certCheck=true|false] [username=foo] [password=var] [query=winrmquery]The properties in this debug command are described in the following table:
| Property Name | Description |
host | (Mandatory) The remote domain computer you want to monitor. |
auth | Supported authentication types are Kerberos and Negotiate. The default value is Negotiate. |
useSSL | WinRM data collection over HTTPS. The default value is true. |
certCheck | Indicates if certificate must be used or not. The default value is true. |
username and password | The domain user credentials. If not passed, wmi.user and wmi.pass are used. |
query | The WQL query. The default value is select * from Win32_Service. |
timeout | The timeout value in seconds for the WQL query. By default, the timeout value is 60 seconds. |
The following is an example of a query input:
!winrm host=EC2AMAZ-93376C4.logicmonitor.com auth=Kerberos username=LOGICMONITOR\WinUser01 password=WinPass@123 useSSL=false certCheck=falseRolling Back WinRM Configuration
You can revert the changes done by the Windows_NonAdmin_Config.ps1 script. Refer the following example:
-Noninteractive -ExecutionPolicy Bypass -Noprofile -file \\<IP_Address_of_DC>\netlogon\Windows_NonAdmin_Config.ps1 -remove -UserName logicmonitor\ScriptTestUser01
Follow the steps given in Adding WinRM Tasks to GPO Policy section but run the scripts with remove flag to roll back WinRM configuration.
Note: In the example, add the IP address of a DC with a correct path.
Troubleshooting
WQL filter issue for groovy scripts modules containing wmi.queryfirst() wmi.queryAll()
WQL filter supports the following 2 formats:
- Format 1 – “select * from win32_bios where NAME LIKE ‘%’” – Double quotes surround the WQL and the clause value is enclosed with single quotes.
- Format 2 – ’select * from win32_bios where NAME LIKE “%” ’- Single quotes surround the WQL and the clause value is enclosed with double quotes.
WinRM (when you set wmi.winrm.enable= true) supports only the format 2. If you have enabled WinRM and if for custom datasource you use the format 1, then you will see errors on calling wmi.queryFirst() / wmi.queryAll() in the groovy script. To avoid the errors, we recommend you to use the format 2.
Intermittent issue – Network path not found
Due to issues with network or domain you may get the “Network path not found” message.
Error Message : Exception calling "Invoke" with "2" argument(s): "The network path was not found.".Exception.MessagesWhen you find this error message in the logs, to troubleshoot it, reapply the scripts as a fresh task.
To migrate service account to non-admin user separately, see Migrating Windows Collector from Admin to Non-admin User.
