
JobMonitor Configuration
Last updated - 04 April, 2023
LogicMonitor can monitor batch jobs on Windows and LInux/Unix systems to ensure jobs are started on time, complete when expected, and exit with the expected exit code. You can also configure custom data to be report to LogicMonitor for each job. Each monitored batch job needs to have a definition in LogicMonitor that tells your collector when the batch job is expected to start, how long it should run for, and what the exit code should be. In addition, you need to enclose and run the desired batch jobs in a supplied wrapper, which sends information about the jobs to your LogicMonitor collector.
You can create a JobMonitor module a few different ways:
- Manually creating a JobMonitor
- Importing JobMonitors (by an XML file) that have been manually created by others
- Importing JobMonitors from the Exchange that have been published by other members of LogicMonitor’s user base
Regardless of how a JobMonitor is added, every JobMonitor has the same configurations.
Note: If a JobMonitor is disabled from the Resources tree, all its active alerts are updated with an OK Cleared status reflecting the time at which the JobMonitor was disabled.
Requirements for Configuring a JobMonitor
Complete the following requirements before configuring a JobMonitor module:
- You must configure the batch job to run in a supplied wrapper that enables monitoring. For more information, see Supplied Wrappers.
- The system running the batch job must be able to reach TCP port 7214 on the collector or the configured port (if you’ve changed it).
Note: The JobMonitor status is reported to a collector on TCP port 7214 by default. This port can be configured in the collector’s agent.conf. For more information, see Collector Configuration Files.
- If you’re monitoring a batch job on a Linux server, the Linux wrapper requires perl::LWP. This is present on most systems, and if not is easily installed through your package manager (like yum install perl-libwww-perl) or via CPAN.
Supplied Wrappers
In order for LogicMonitor to monitor batch jobs, they should be run within one of the LogicMonitor supplied wrappers. Wrappers are supplied for both Windows and Linux systems, in the lib directory of the collector, logicmonitor/agent/lib.
- The Windows wrapper is lmbatchjobwrapper.js.
- The Linux wrapper is lmbatchjobwrapper.sh.
Both the Windows and Linux wrappers are used in the same way and support the same parameters:
[wrapper script] <collectoraddr> <hostname> <jobname> <cmdline>| Parameter | Description |
| [wrapper script] | Either “lmbatchjobwrapper.js” for Windows or “lmbatchjobwrapper.sh” for Linux. |
| <collectoraddr> | The IP address or DNS name of the collector to report the results to, including the TCP port (7214 by default, but this can be changed in the collectors agent.conf file). For more information, see Requirements for Configuring a JobMonitor. |
| <hostname> | The name of the system running the batch job. This must match either the name or displayname of the system that the batch job datasource is associated with, as defined in LogicMonitor. |
| <IP> | The IP address of the system running the batch job. This can be used in place of the hostname. |
| <jobname> | The name of the batch job. |
Configuring a JobMonitor
- In the LogicMonitor navigation menu, select Modules.
- From My Module Toolbox, select Add.
- In the Add window, select JobMonitor.
The Add New JobMonitor window displays and contains tabs for Info, AppliesTo, and Alert Settings.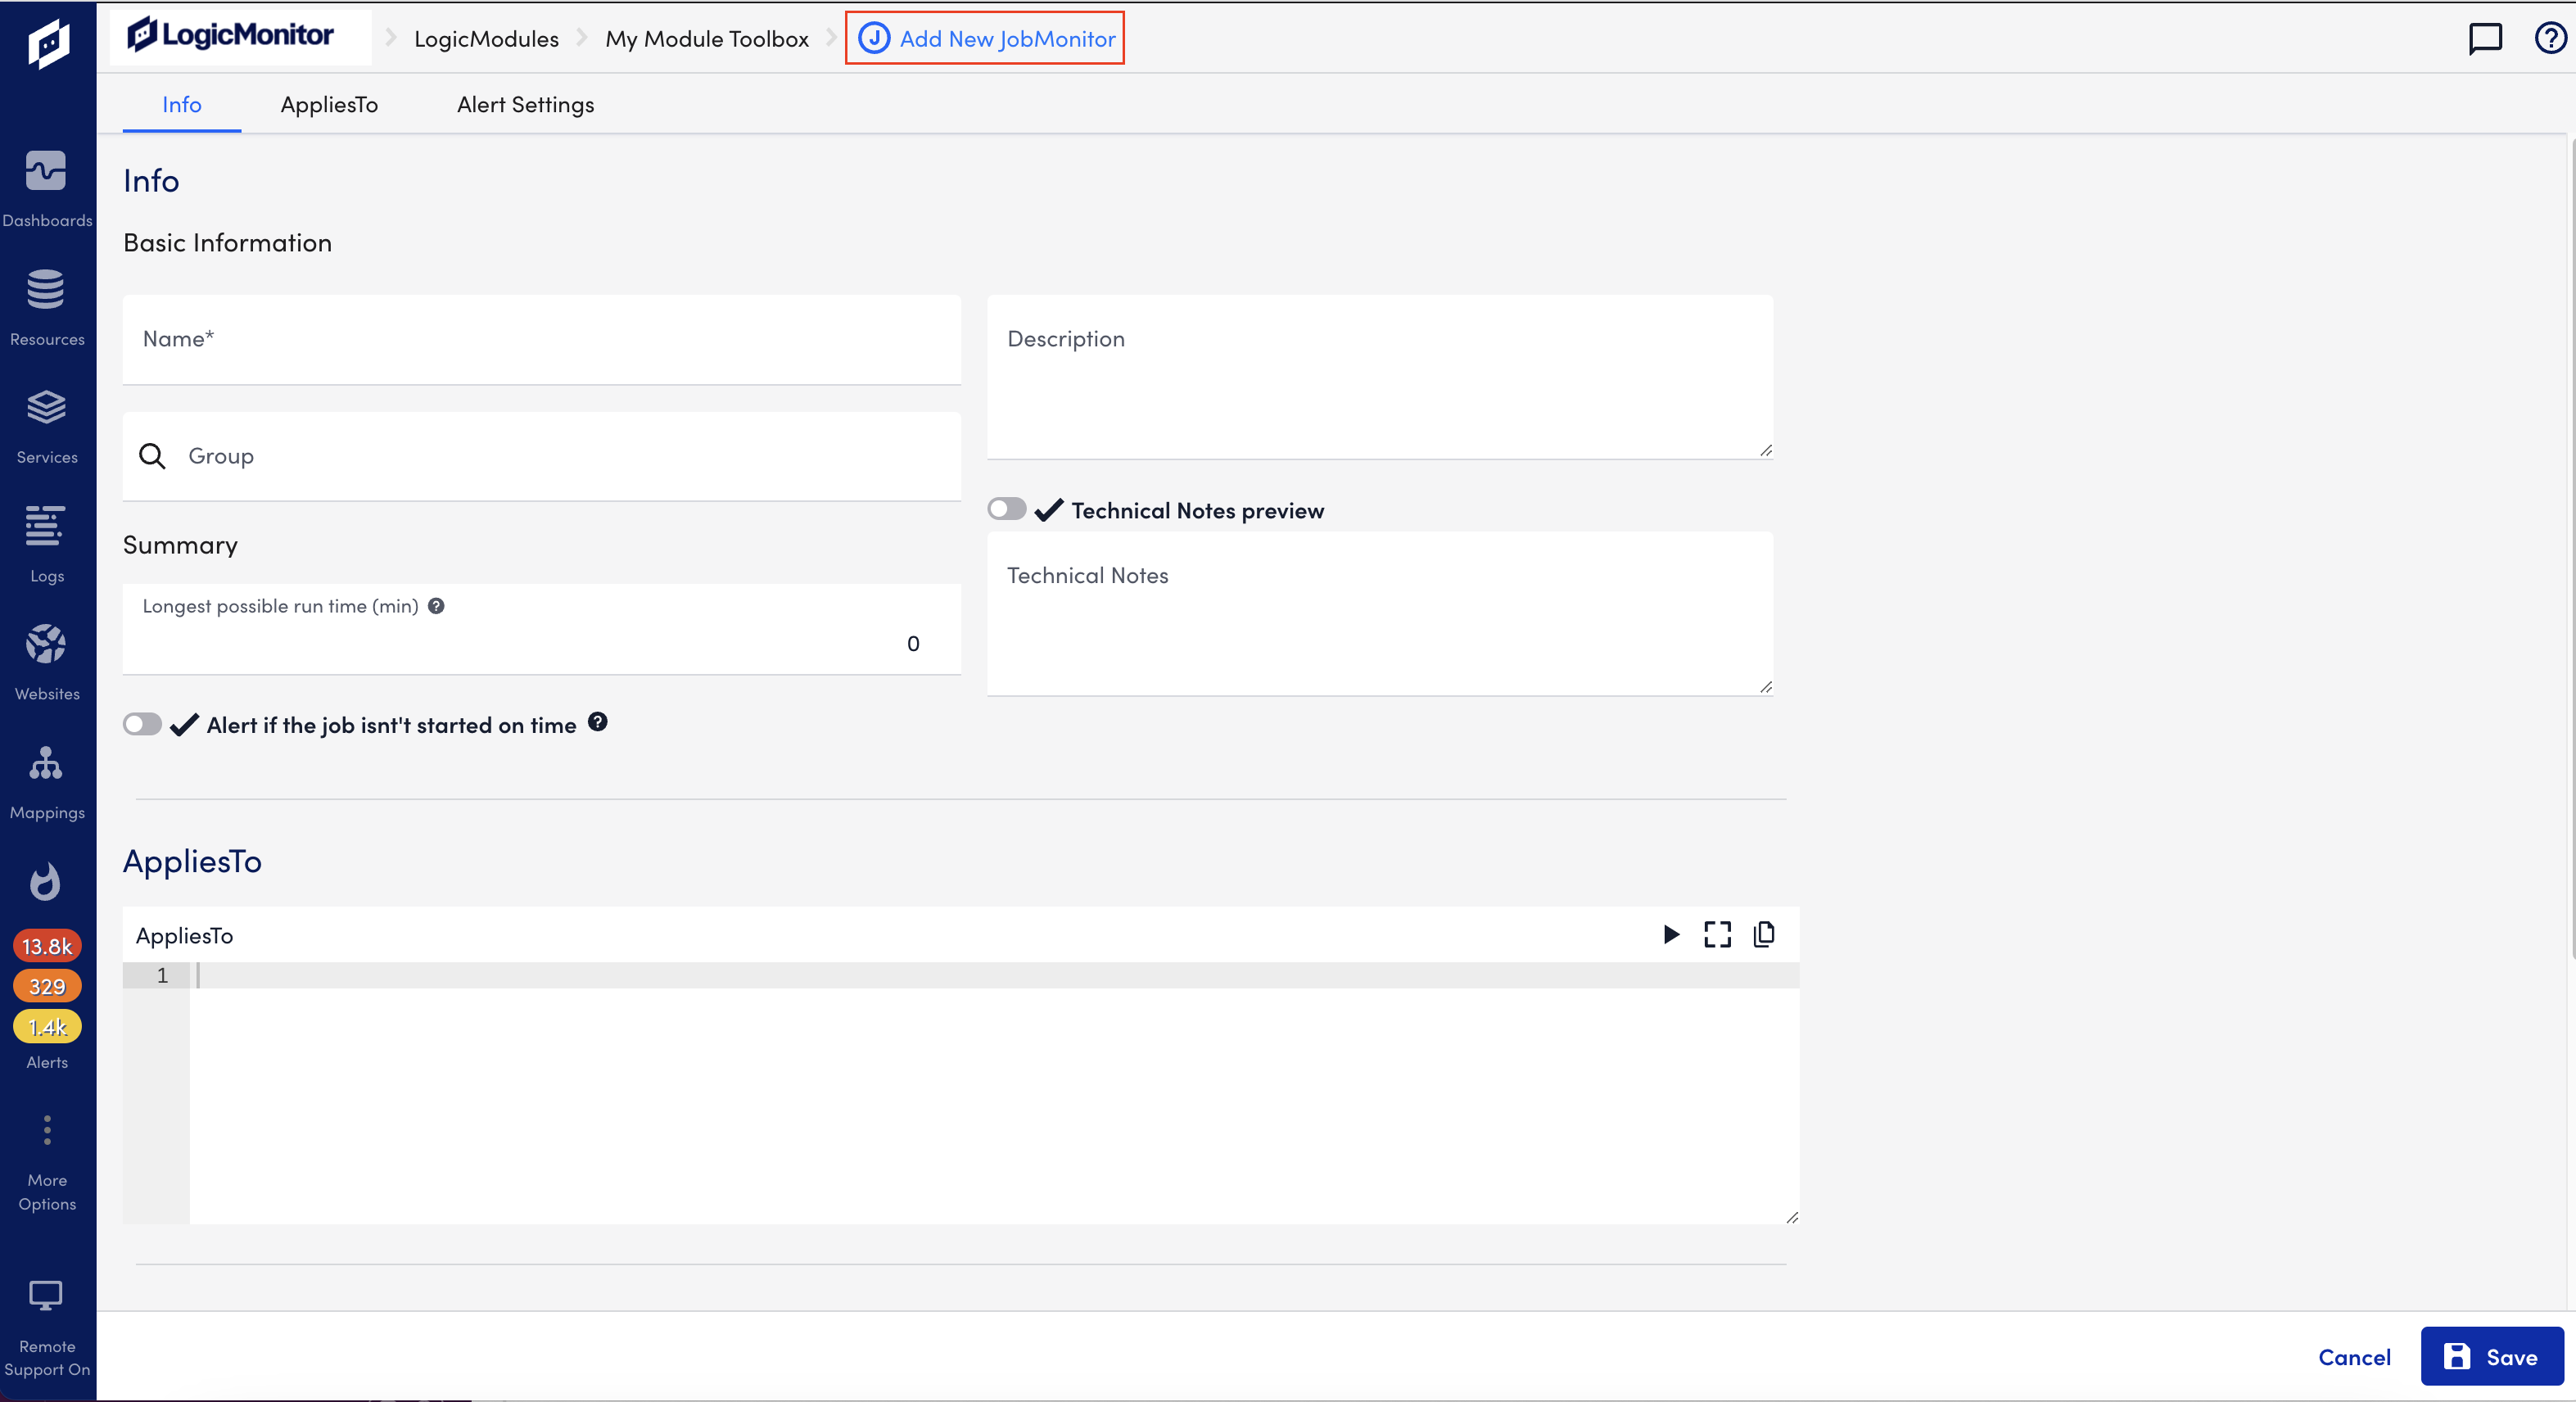
- On the Info tab, enter the following information:
- In the Name field, specify the platform or application and, if necessary, a specific component of the platform.
- (Optional) In the Description field, provide enough detail to ensure the JobMonitor’s purpose can be easily determined.
- (Optional) In the Group field, specify the group to which the JobMonitor will be added in the Resources tree.
If this field is empty, the JobMonitor is added to the default @ungrouped group. If you enter text that doesn’t match an existing JobMonitor group, a new group is created. - (Optional) In the Technical Notes field, enter any technical notes with markdown to be shown in the module.
- (Optional) Toggle on Technical Notes Preview to view how the markdown will look in the module.
- (Optional) In the Longest possible run time in the minutes field, select the maximum number of minutes your JobMonitor can run before it triggers an alert.
Set this field to 0 if you don’t know how long a JobMonitor will take. - (Optional) Toggle on Alert if the job isn’t started on time:
- In the Cron Schedule field, enter a cron expression for when the job is supposed to start.
- In the Time Zone field, select a time zone for the cron schedule.
- In the Max relative time interval error (min) field, select the maximum number of minutes your JobMonitor has as a time difference grace period before it triggers an alert.
- From the Alert Severity dropdown, select the desired severity.
This field indicates the severity of the alert that should be triggered if the job does not start when scheduled, runs longer than expected or exits with an unexpected code.
- (Optional) On the AppliesTo tab, do the following:
- In the AppliesTo field, enter AppliesTo scripting.
The AppliesTo field accepts LogicMonitor’s AppliesTo scripting as input to determine which resources are associated with this JobMonitor. For more information, see AppliesTo Scripting Overview. - Select the Test AppliesTo icon
 to return a count of matching resources and display them in the AppliesTo Results panel.
- In the AppliesTo field, enter AppliesTo scripting.
- On the Alerts Settings tab, enter the following information:
- In the Effective Interval field (min), select an effective interval time (default is 60 minutes). This is the time interval for which the alert triggered for the job should remain active before auto-clearing.
If the Alert if the job isn’t started on time option is selected, the interval defined here must be longer than the interval defined for the Max relative time interval error (min). Otherwise, the alert is no longer active when the maximum relative time interval error (min) time is reached, and no alert is triggered. - (Optional) In the Alert Subject field, enter a unique alert subject to override the default subject that displays in the alert notifications for this JobMonitor.
- (Optional) In the Alert Message field, enter a unique alert message to override the default alert message that displays in alert notifications for this JobMonitor.
- In the Effective Interval field (min), select an effective interval time (default is 60 minutes). This is the time interval for which the alert triggered for the job should remain active before auto-clearing.
Recommendation: Provide an alert message specific to this JobMonitor as opposed to leaving this field blank and relying on the default JobMonitor alert message. You can customize this field using tokens, which are substituted with the appropriate content at the time alert notifications are routed to recipients. For a list of available JobMonitor tokens, see Tokens Available in LogicMonitor Alert Messages.
- Select Save.
- Select Commit Version.
- (Optional) In the Commit a Version window, enter version notes.
- (Optional) Toggle on Make this version Public to make this module available to all users in the LogicMonitor Exchange.
- Select Commit Version.
Troubleshooting Cron Jobmonitor
- Open the terminal and enter the following command:
$ crontab -e - Enter the password.
Note: If you log in as a root user, you are not be required to enter the password.
- Update the Cron Jobomonitor by running the following command:54 11 * * *
/usr/local/logicmonitor/agent/lib/lmbatchjobwrapper.sh <agent ip>:7214 nginx.corp.exactasystems.co "CORP-NGINX GixyTest 6am Daily" /etc/scripts/gixytest.sh > /<path>/anyfile.log 2>&1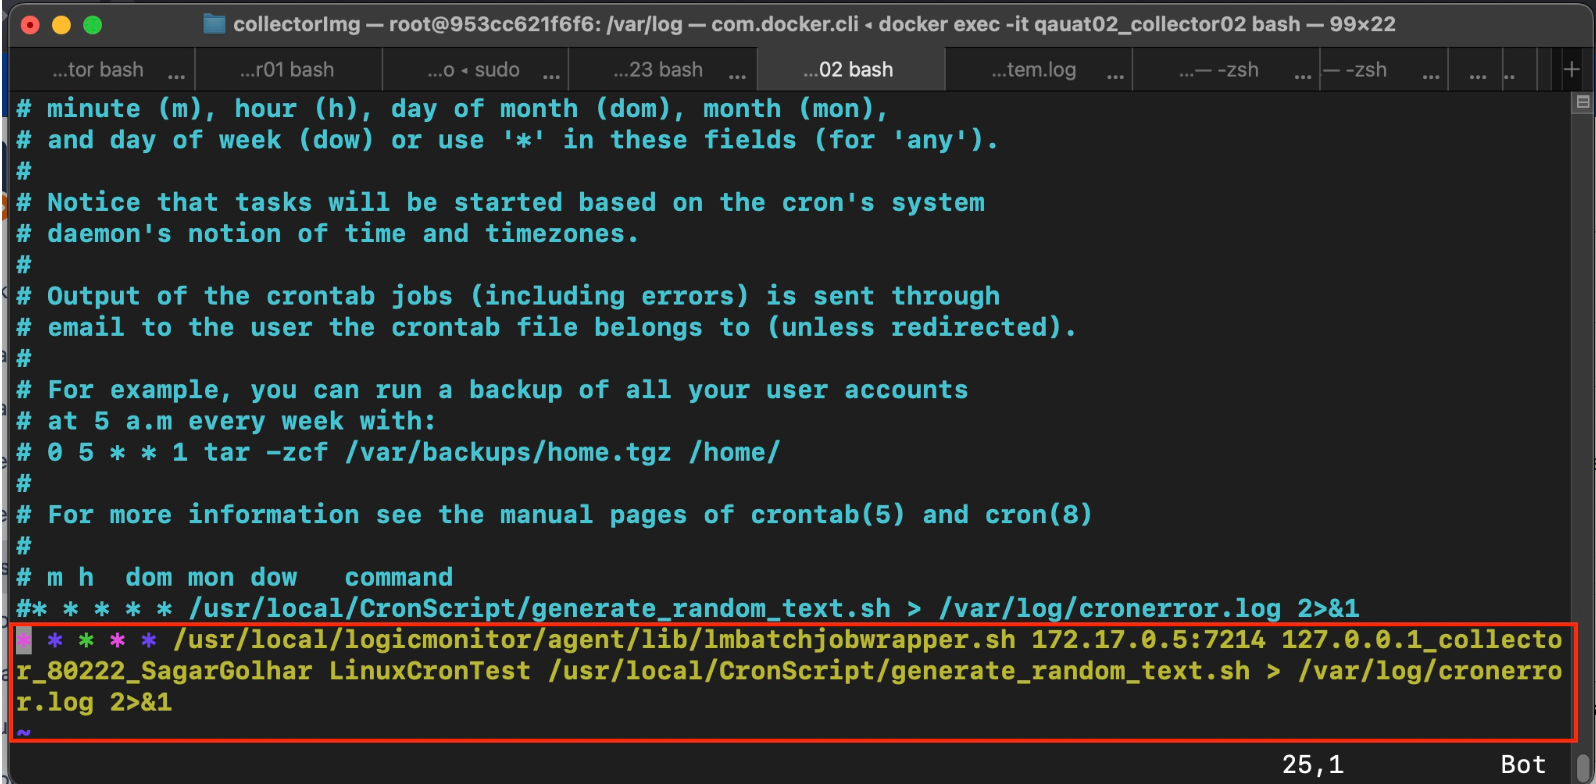
- To apply the changes, restart the Cron Jobmonitor by running the following command:
sudo systemctl restart cron - To see if the Cron jobs are running correctly, run the following command:
tail -f filename.log.
- To enable the Cron Jobmonitor logging, open
/etc/rsyslog.d/50-default.conffile by running the following command and uncommenting the code:# Uncomment the following line to enable cron logging to a separate file cron.* /var/log/cron.log cron.* /var/log/cron.log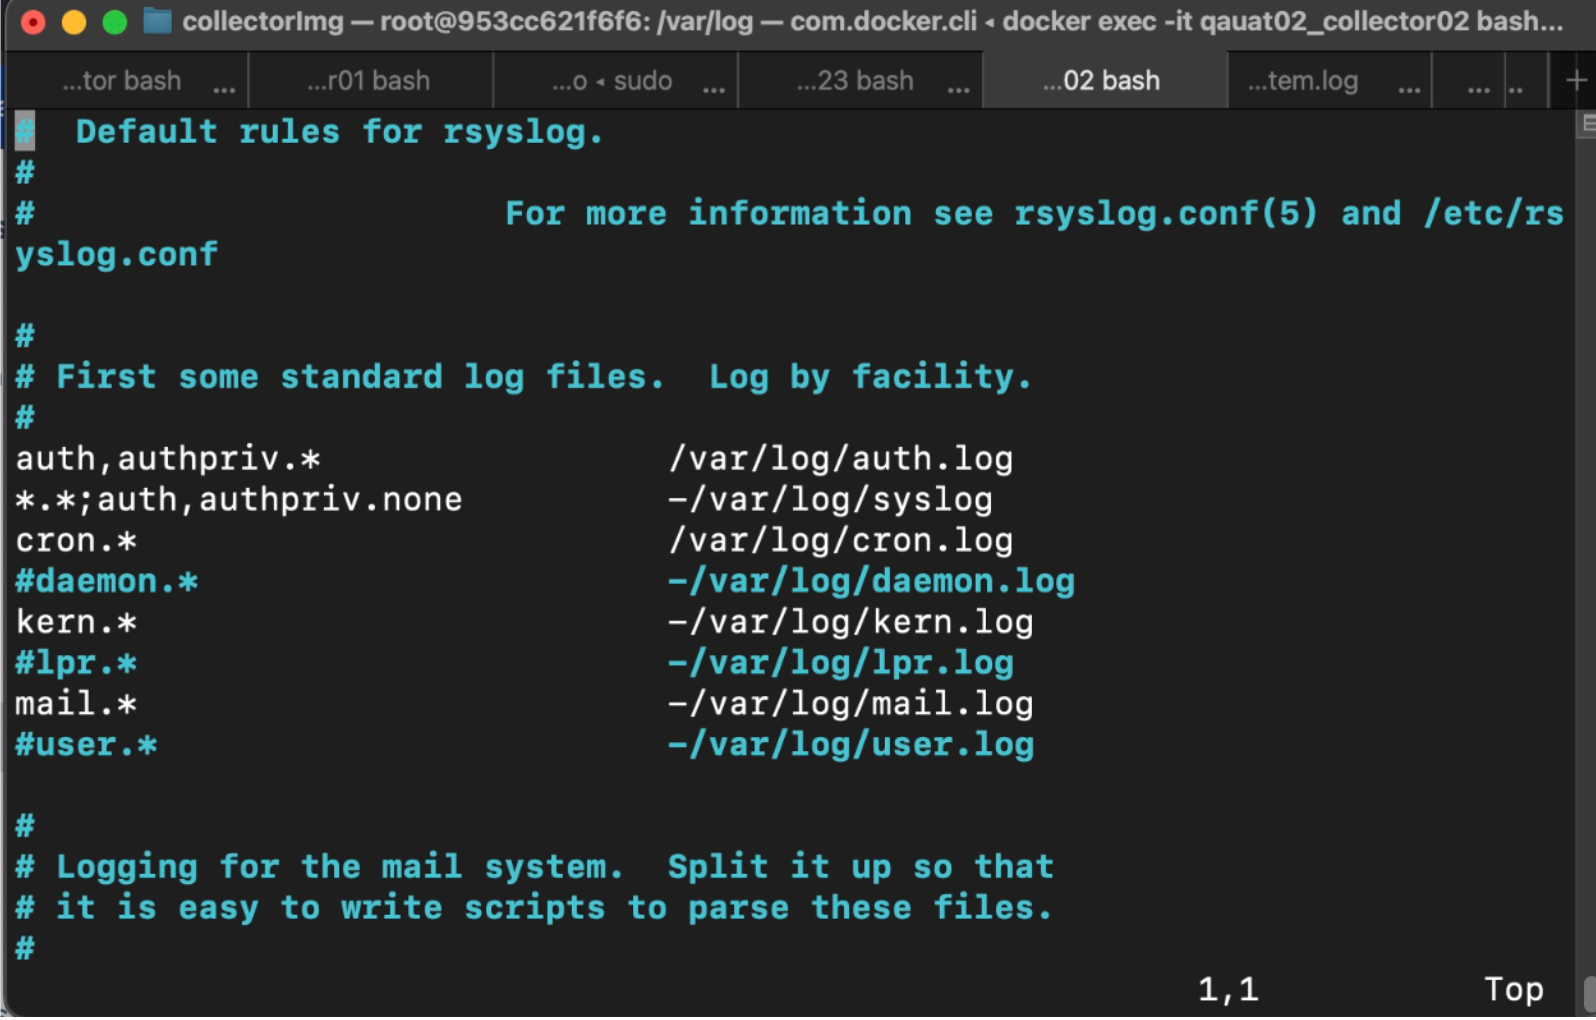
- Restart the Syslog service to ensure the logging configuration is updated and functional by running the following command:
sudo systemctl restart rsyslog - Once the changes are applied, you can see the Cron Jobmonitor details by navigating to Resource Tree > select the resource on which jobmonitor module is applied > data tab.
