
Troubleshooting WMI
Last updated - 03 December, 2025
Overview of WMI Access Permissions
Note: A Windows Collector must be used to monitor Windows hosts.
The LogicMonitor Collector primarily uses Windows Management Instrumentation (WMI) to monitor Windows servers. Most issues with the Windows task collection result from permission restrictions when the Collector machine attempts to query your hosts for data. For more information, see Introduction to WMI Microsoft documentation.
In these situations, the credentials for both of your Collector services, including “LogicMonitor Collector” and “LogicMonitor Watchdog”, should reference either a Domain user that is an Administrative account on the hosts to be monitored , or a local administrator that will be available on each Windows host to be monitored by this Collector. To change the user the services run as, change the credentials in the “Log On” tab for both services, and then start the services again.
If you cannot run the Collector under an administrator user, or if you are monitoring hosts between multiple domains and need to make a host-specific credential adjustment, follow these instructions to add the “wmi.user” and “wmi.pass” custom properties to your host.
- The “wmi.user” custom property should be formatted as DOMAIN\USERNAME.
- To specify a local user rather than a domain user, replace DOMAIN with the ##HOSTNAME## token, ‘.’ or the machine’s name so that the wmi.user value is ##HOSTNAME##\USERNAME, .\USERNAME or MACHINENAME\USERNAME.
Data Collection Failure due to WMI Vulnerabilities
Issue
When Microsoft identified critical vulnerabilities with WMI, it released a Windows DCOM Server security feature bypass (CVE-2021-26414) to address the security vulnerabilities. After applying this update on the server, we observed the occurrences of the event id 10036 in the DCOM RPC between the Client and Server communication.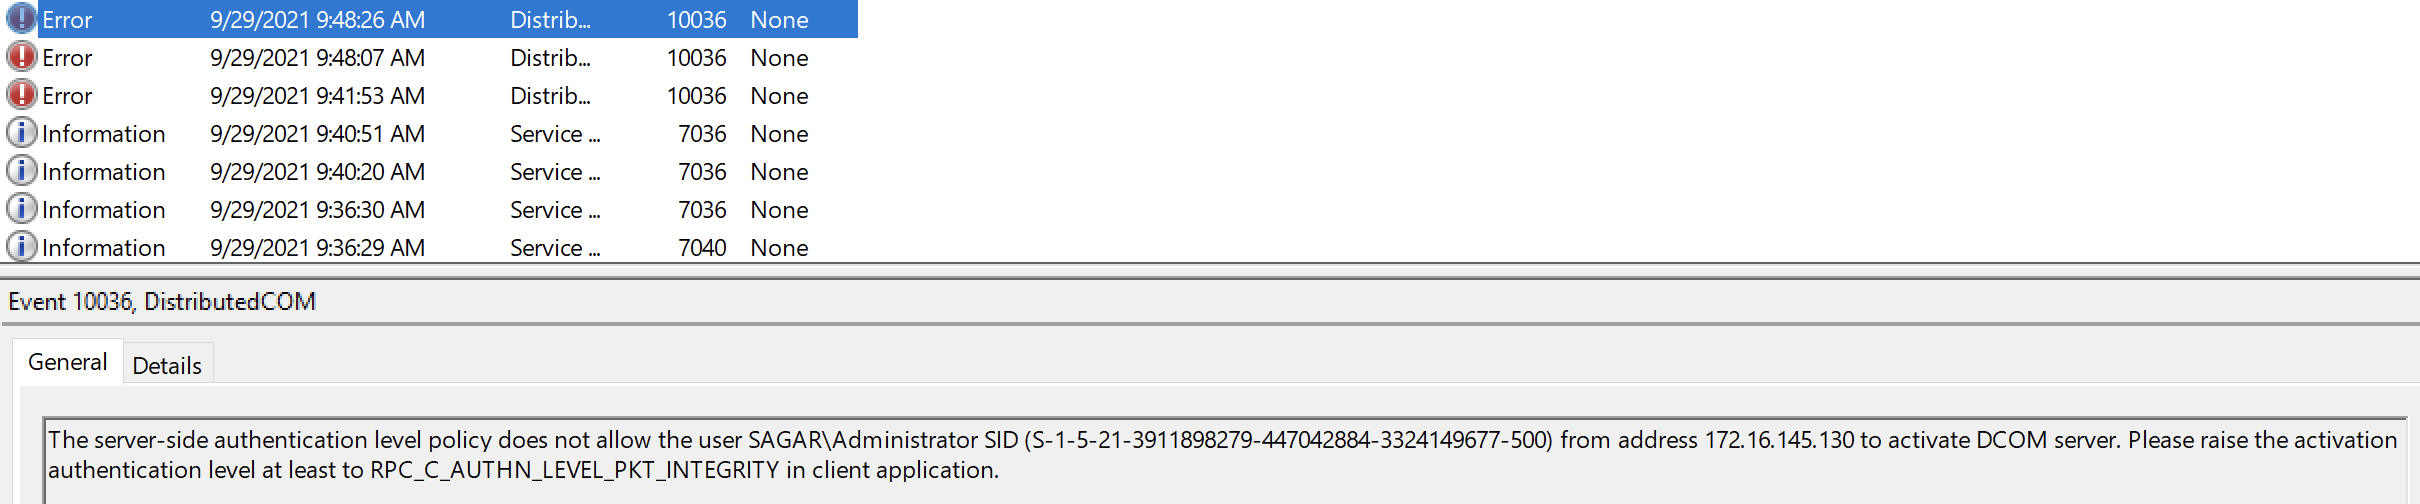
When the patch is installed on the server machine, the ‘RequireIntegrityActivationAuthenticationLevel’ registry value is disabled by default. When you enable it on the server (either without any changes on the client or updating the patch on the client), it has an impact on the DCOM RPC communication resulting in the “Access is Denied” error. For more information, see Manage changes for Windows DCOM Server Security Feature Bypass Microsoft documentation.
Solution
It is therefore recommended that you first patch the Collector device and then the monitored device to the latest updates to resolve the event id 10036 issue. When the patch is installed on the client machine, by default it enables RPC_C_AUTHN_LEVEL_PKT_INTEGRITY on DCOM clients. As a result, both the DCOM RPC communication between the client and the server, and data collection in Collector is successful.
To address the vulnerabilities, on June 14, 2022, Microsoft had programmatically enabled the hardening on DCOM servers by default that could be disabled via the RequireIntegrityActivationAuthenticationLevel registry key if necessary.
Note: According to Microsoft, on March 14, 2023 hardening changes will be enabled by default with no ability to disable them.
If you have bypassed the hardening that was released as part of June 14, 2022 patch, you have to take action now, because the setting will not work post March 14, 2023.
Microsoft is addressing this vulnerability in a phased rollout. For more information on vulnerability, solution, and updates, see Windows DCOM Server Security Feature Bypass CVE-2021-26414 Microsoft documentation.
WMI Services and Dependencies
All of the following services must be running and set to an “Automatic” startup type for WMI monitoring on a Windows host:
- DCOM Server Process Launcher
- Remote Procedure Call (RPC)
- RPC Endpoint Mapper
- Windows Management Instrumentation
The following service(s) can be set to a “Manual” startup type:
- WMI Performance Adapter
Using WBEMTEST for Advanced Troubleshooting
To test a WMI connection manually, run the WBEMTEST utility from the host on which the Collector is running. The following steps describe how to connect to the remote computer and pass WMI queries using the Windows WBEMTEST tool, and you can use it to quickly explore or confirm WMI details.
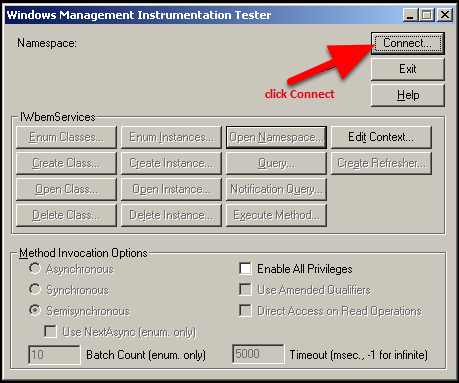
Select Start > Run… > “wbemtest” to enter the WBEMTEST utility. Select Connect.
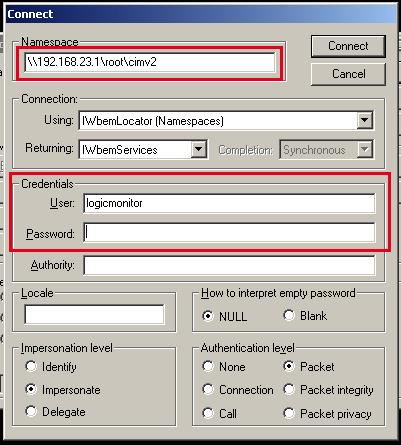
Then enter the local or remote host IP into the remote namespace field, followed by “\root\cimv2”, and credentials into Connection dialog. In the above example, we are attempting to check WMI connectivity of the host 192.168.23.1. Select Connect3.
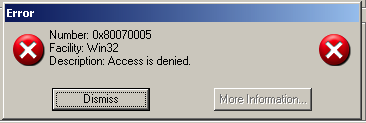
If something is wrong that prevents WBEMTEST from connecting, an error dialog displays the reason for failure.
If you connection is successful, you will be returned back to the main window, this time with additional options available.
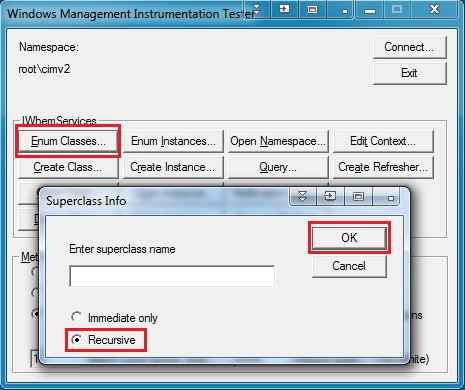
Select Enum Classes…> toggle Recursive > OK.
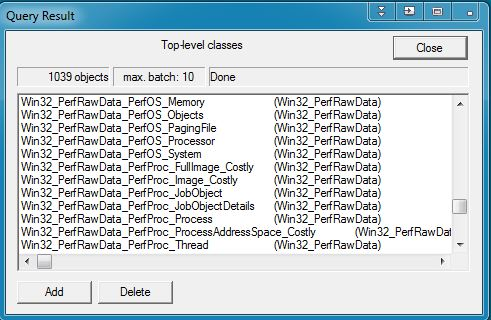
This should return with a list of your available WMI classes. Most normal Windows installations have 800-1200 classes.
If you do not get a list of classes returned, there may be an incompatibility between the WMI implementations of the different hosts. One workaround is to install a Collector on the same OS as the host you want to query (or on that same host.)
Testing WMI Access from the Local Host
To determine whether WMI is working correctly on the host, from the host that you are trying to query:
- Select Start > Run... > wbemtest
- Select Connect… > Leave defaults > Connect
- If this process fails, WMI/RPC may not running on this host, or may need to be repaired.
- It is also possible that your WMI class structure may be corrupted or is inconsistent. In this case, see the instructions to repair your WMI class structure in Troubleshooting WMI.
- If it succeeds, this establishes that WMI is working correctly on the local host.
If local WMI access on the host works, you should isolate why the Collector is not able to collect data.
If permission issues are suspected, try a remote WMI connection, specifying the credentials of a domain administrator account in your network, or local administrator that is available the target machine. If it succeeds, this establishes that WMI is working correctly on the local host and Collector machine, but the LogicMonitor services are running as an account with insufficient privileges.
If WMI is working correctly, but it cannot be accessed from a remote machine, there may be firewall issues, access right issue or DCOM issues. See the section under Access Denied in this article or search support.microsoft.com for more information on how to troubleshoot these issues.
Establishing WMI Access for Non-host-based Firewalls
When using non-host based firewalls or third-party firewalls on Windows, you will need to open specific ports to allow for WMI communication.
By default, port 135/tcp (RPC Endpoint Mapper) is used to establish communications. WMI is then assigned ports through DCOM and communications is handled over a randomly assigned port in the dynamic port range.
In Windows Server 2008 and later versions, and in Windows Vista and later versions, the default dynamic port range changed to the following range:
- Start port: 49152
- End port: 65535
Windows 2000, Windows XP, and Windows Server 2003 use the following dynamic port range:
- Start port: 1025
- End port: 5000
Be advised that LogicMonitor does not provide support for customizations made to operating systems.
The minimum number of ports required may differ from computer to computer. Computers with higher traffic may run into a port exhaustion situation if the RPC dynamic ports are restricted. Take this into consideration when restricting the port range.
For direction in restricting RPC dynamic port allocation, see How to configure RPC dynamic port allocation to work with firewalls Microsoft documentation.
Another option is designating a fixed port for WMI. For more information, see Setting Up a Fixed Port for WMI Microsoft documentation.
WMI Error Codes
Error: 0x800706BA RPC Server Unavailable
Possible Issues: The Windows Firewall is blocking the connection.
Quick fix: Run the command netsh firewall set service RemoteAdmin enable from command console at the monitored host (not the host on which the Collector is running). After passing this command, you can use the Windows Firewall snap-in console (wf.msc) to further tighten access to this port to be only be accessible by a certain host, user, or interface.
For more information, see Connecting to WMI Remotely with VBScript Microsoft documentation.
For Windows Vista and later versions, see Setting up a Remote WMI Connection Microsoft documentation.
Note: Starting with Windows Server 2008 and Windows Vista, the netsh firewall command is deprecated. Instead, use the netsh advfirewall firewall set rule group="Remote Administration" new enable=Yes command.
Error: 0x80070005 – Access is denied by DCOM
Possible Issues: The user does not have remote access to the computer through DCOM.
Quick fix: Give the user Remote Launch and Remote Activation permissions in dcomcnfg.
- Select Start, select Run, type DCOMCNFG, and then select OK.
- In the Component Services dialog box, expand Component Services, expand Computers, and then right-click My Computer and select Properties.
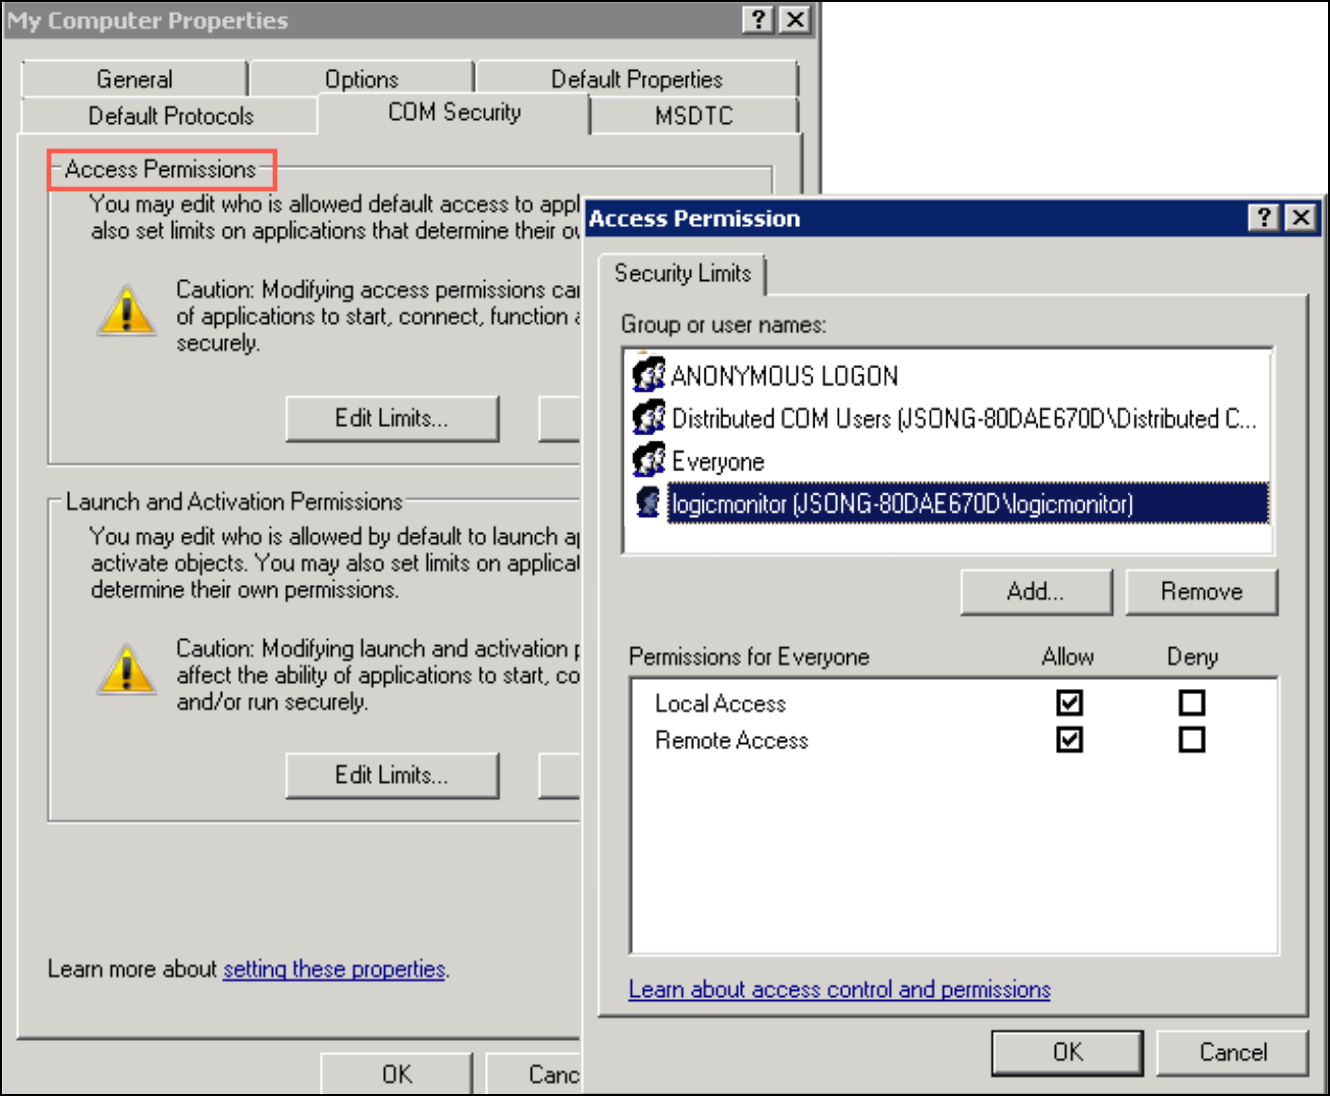
- In the My Computer Properties dialog box, select the COM Security tab.
- Under Access Permissions, select Edit Limits.
- In the Access Permission dialog box, select the user the Collector uses in the Group or user names box (for example, the following figure allows the user ‘logicmonitor’ to access WMI remotely). In the Allow column under Permissions for User, select Remote Access and select OK.
- In the My Computer Properties dialog box, select the COM Security tab.
- Under Launch and Activation Permissions, select Edit Limits.
- In the Access Permission dialog box, select the user the Collector uses in the Group or user names box.
For example, in the following image, the user ‘logicmonitor’ can access WMI remotely. In the Allow column under Permissions for User, select Remote Launch and Remote Activation, and then select OK.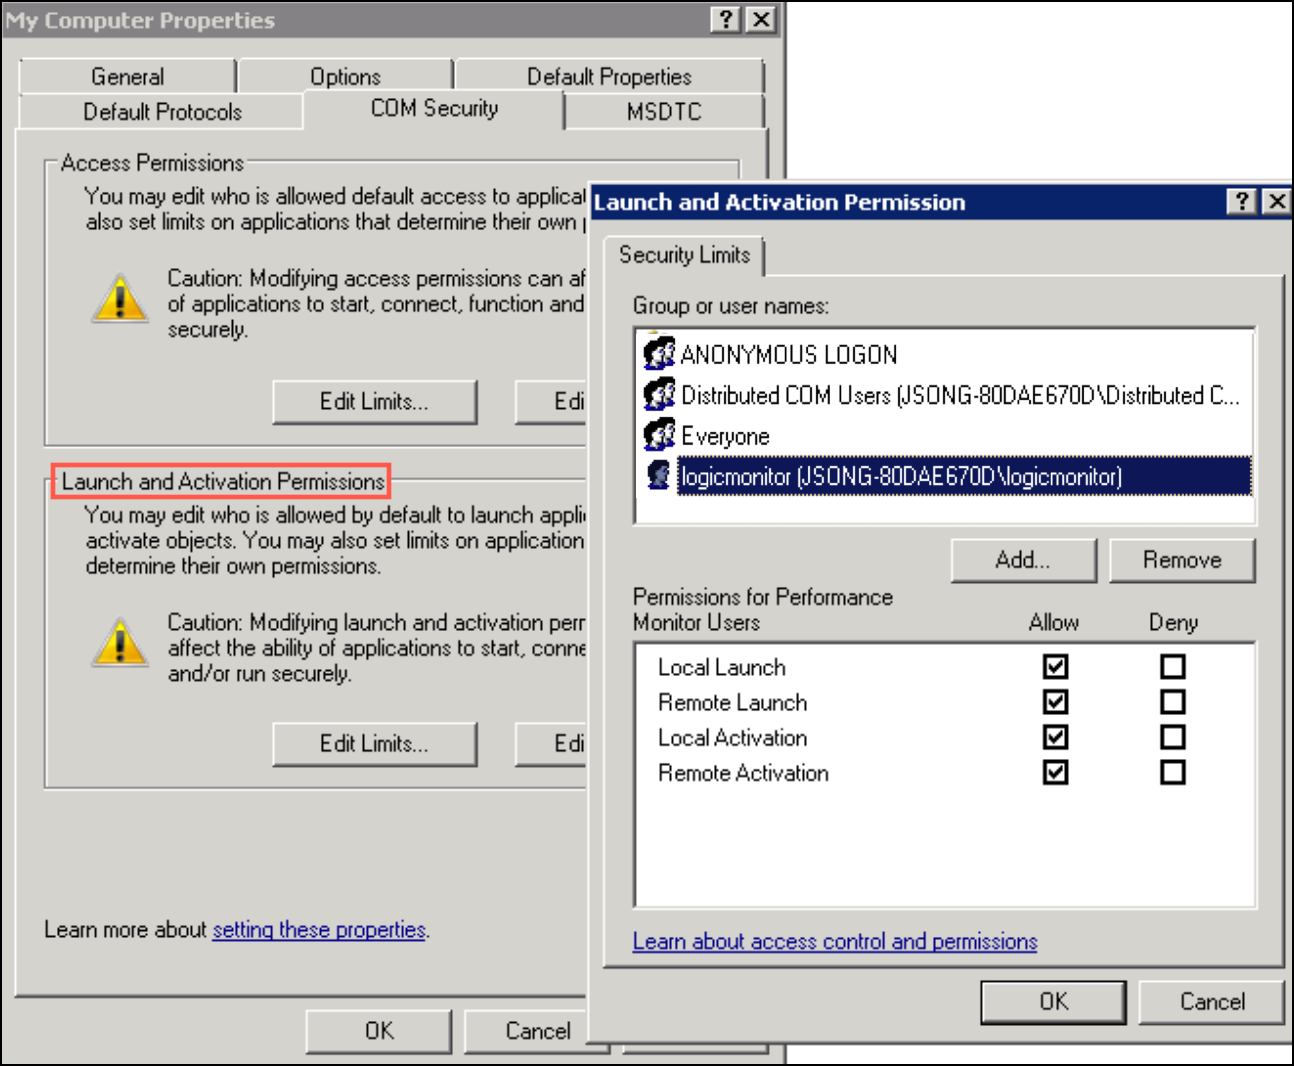
For more information, see Securing a Remote WMI Connection Microsoft documentation.
Error: 0x80041003 – Access is denied by a WMI provider
Possible Issues: If a user tries to connect to a namespace they are not allowed access to, they will receive error 0x80041003. By default, this permission is enabled only for administrators.
Quick fix: An administrator can enable remote access to specific WMI namespaces for a nonadministrator user.
- In the Control Panel, double-click Administrative Tools.
- In the Administrative Tools window, double-click Computer Management.
- In the Computer Management window, expand the Services and Applications tree.
- Right-click the WMI Control icon and select Properties.
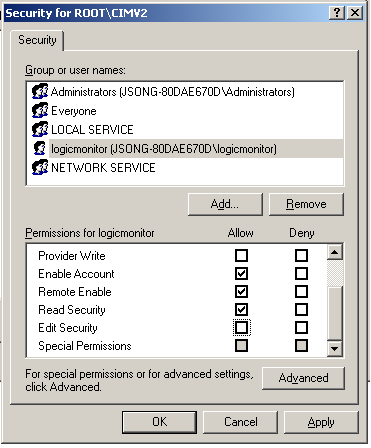
- In the Security tab, select the namespace and then select the Security button.
- Locate the appropriate account and check Remote Enable and Read Security in the Permissions list.
- Select the Advanced button and highlight the user.
- Select Edit…
- Ensure the Apply to: field is set to This namespace and subnamespaces
In the following image, the user ‘logicmonitor’ can access the WMI namespace ‘ROOT/CIMV2’.
For more information, see Securing a Remote WMI Connection Microsoft documentation.
WBEMTEST works, but collector does not
Possible Issues: Collector uses the wrong username/password
Quick fix 1: If the device was already added into LogicMonitor, edit device’s wmi.user and wmi.pass properties.
WMI Counter Repair
At times you may find that no matter what credentials you use and and how many security hurdles you’ve bypassed, you still cannot fully monitor your Windows machine. In these instances, your operating system may have a corrupted or inconsistent WMI class structure.
Other symptoms that you may be experiencing:
- Some WMI-collecting datasources are successfully returning data or have discovered instances, but (most) others are returning No Data.
- You may be experiencing unexplained errors such as “Empty result set”, 0x80041003, 0x80041017 from the Collector debug, WBEMTEST utility, or your custom application.
- You receive a different WMI result set from the Collector debug vs WBETEST, or an error from one and not the other.
Microsoft reports that this may happen when “… certain extensible counters corrupt the registry, or if some Windows Management Instrumentation (WMI)-based programs modify the registry”, but the exact nature of these issues is largely unknown and normally not worth troubleshooting extensively.
You may use the sets of WMI counter repairs below to attempt to rebuild your WMI class structure:
Registering New Counters & Restoring Default Settings
CAUTION: These steps will overwrite all custom Performance counter registry settings that you may have configured and will replace them with default configurations.
Logged in as an Administrator user, please run the following:
- cd c:\windows\system32
- lodctr /R
- cd c:\windows\sysWOW64
- lodctr /R
- winmgmt /clearadap
- Note: Deprecated for Windows versions post-Windows 2008.
- winmgmt /verifyrepository
- winmgmt /salvagerepository
- winmgmt /resyncperf
- sc stop WmiApSrv
- sc start WmiApSrv
Rebuilding the WMI (CIM) Counter Repository
If still having issues, or 0x80041003, “Empty result set” ; “Unexpected WMI query result”, “Expecting size 1, but got size 0” errors.
Logged in as an Administrator user, please run the following:
- wmiadap /c
- wmiadap /f
- wmiadap /r
- winmgmt.exe /verifyrepository
- winmgmt /salvagerepository
- winmgmt.exe /resyncperf
- sc stop WmiApSrv
- sc start WmiApSrv
Comprehensive WMI Class Rebuild
Recommendation: Before attempting to do a class rebuild, it is recommended to connect directly to the target resource with a known local administrator account and use the get-wmiobject PowerShell cmdlet to locally check WMI metrics for any class that was suspected as corrupt. If a local query using a known local administrator returns the class data then the issue does not require a class rebuild and is likely permissions based. At this stage, you can check with Microsoft for further assistance. For more information on WMI troubleshooting, see WMI Troubleshooting Microsoft documentation.
Log in as an Administrator user, and do the following:
- Change the startup type Window Management Instrumentation (WMI) Service to Disabled.
- Stop the IP Helper service and other dependent services.
- Stop the WMI Service.
- Rename the repository folder C:\WINDOWS\system32\wbem\Repository to Repository.old.
- Open a CMD prompt with elevated privileges.
- Type CD windows\system32\wbem.
- Run the following command.
for /f %s in ('dir /b /s *.dll') do regsvr32 /s %s - Set the WMI Service type to Automatic and start the WMI Service.
- Type cd /d c:\ (go to the root of the c drive)
- Run the following command.
for /f %s in ('dir /s /b *.mof *.mfl') do mofcomp %s - (Optional) Reboot after completing each fix block.
Note:
- Many of the above commands do not provide a response after completion, so do not be alarmed if you do not notice any changes occurring after passing a command.
- To perform additional troubleshooting use the Windows WMI Diagnosis Utility (
wmiadiag.vbs). For more information, see WMI Diagnosis Utility Microsoft documentation.
Some Objects Are Not Discovered or No Data
Occasionally, LogicMonitor will not discover an IIS instance (or some other attribute) on a Windows server. This can occur when the performance classes are not correctly registered, or when your WMI class structure is corrupt or inconsistent.
These issues can normally be corrected by running WMI counter repairs. For more information, see WMI counter troubleshooting.
Recognized Issues
No Data Returned
Windows may report No Data for page file statistics if you have a server configured for “Automatically manage paging files for all drives”, or if one of the other “Automatic” options is selected. If you assign a minimum value explicitly, then these counters will become populated.
To explicitly assign a minimum value:
- Navigate to Control Panel > System > Advanced tab > Performance section > Settings > Advanced tab > Virtual memory section and select Change.
- In Windows 2008 and later, there is an option at the top called “Automatically manage paging file size for all drives”; set this to a value.
- Then set back to “Automatically manage paging file size for all drives”.
UAC Locked WMI Classes
There is a recognised condition in which monitored Windows hosts prevent access to all WMI classes except for Win32_OperatingSystem and Win32_Volume. To resolve this, the User Account Control (UAC) must be disabled on monitored Windows hosts.
Note: Disabling UAC only applies to the built-in Administrator account and all other users who are member of the hosts local Administrators group.
There are two methods in which UAC may be disabled.
Method 1: Disabling UAC on UI using the Windows ‘Local Security Policy’. This method enables you to disable a single host.
Follow these steps to disable UAC:
- On your machine, launch Windows and search for Local Security Policy.
- Under Local Policies, select Security Options. A list of policies and their status displays.
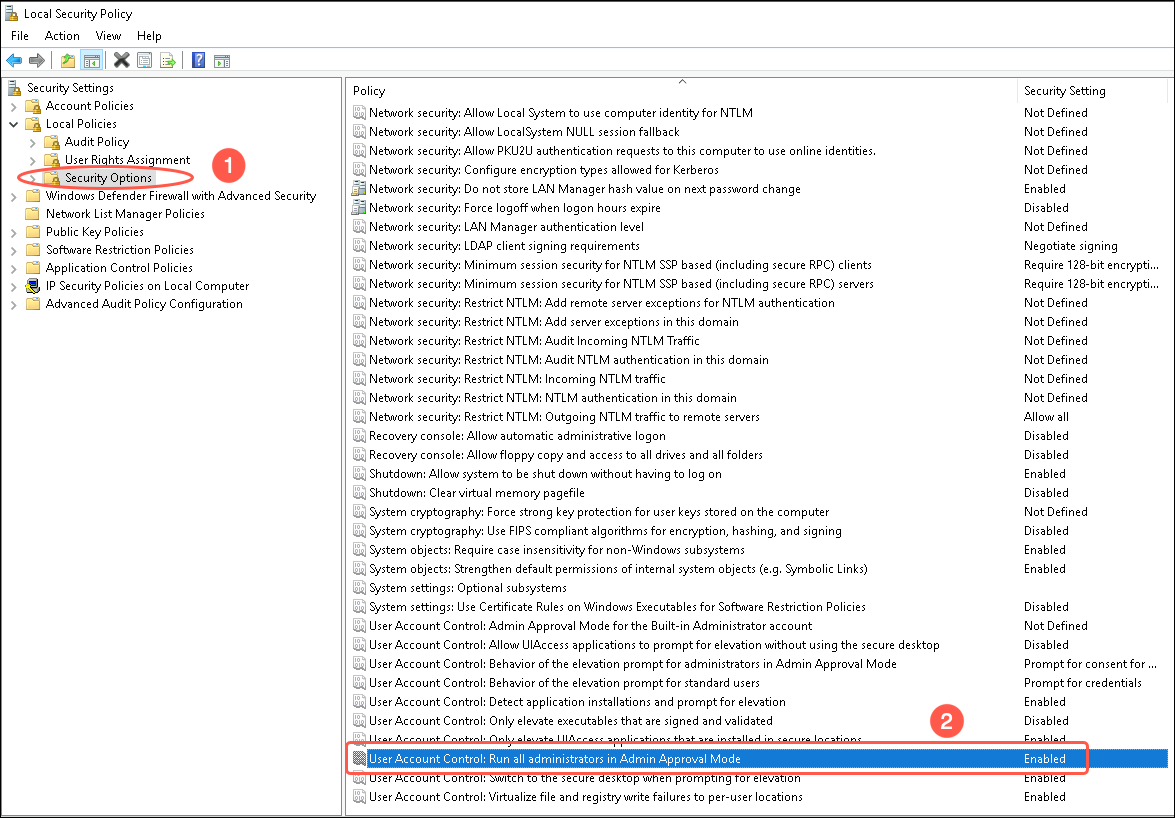
- Select User Account Control: Run all administrators in Admin Approval Mode. A dialog box with options to enable or disable security policy displays.
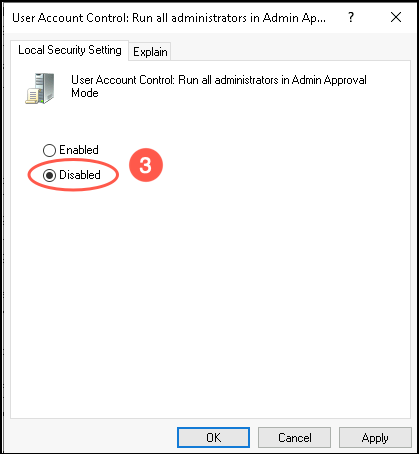
- Select Disabled.
Note: If the Disabled option is greyed out, it could be due to the configuration management which is blocking the adjustment. For example, Group Policy, DSC, and so on. - (Optional) To understand the enable/disable options, select the Explain tab and read the details.
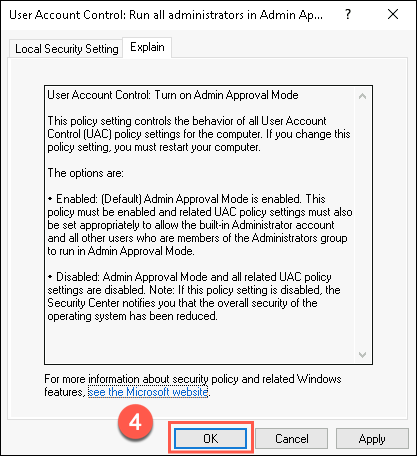
- Select OK to disable UAC.
- Reboot the Windows OS to apply the changes.
Method 2: Disabling UAC using the Windows Registry. This method enables you to disable multiple hosts at a time.
Follow these steps to disable UAC:
- Locate the following registry subkey:
HKEY_LOCAL_MACHINE\SOFTWARE\Microsoft\Windows\CurrentVersion\Policies\System\EnableLUA - Change the value of “EnableLUA” from 1 to 0
- Reboot the device in order for these changes to take effect.
This will disable UAC and permit data collection from all classes.
Alternately, you can also use PowerShell to disable UAC on Windows hosts.
- Right-click PowerShell and select Run as Administrator to launch an elevated PowerShell console.
- Get current value.
Get-ItemProperty -Path 'HKLM:\Software\Microsoft\Windows\CurrentVersion\Policies\System' -Name 'EnableLua'- Set EnableLUA value to 0.
Set-ItemProperty -Path 'HKLM:\Software\Microsoft\Windows\CurrentVersion\Policies\System' -Name 'EnableLUA' -Value '0'
- Reboot the OS to apply the registry changes.
- (Optional) You can rerun the “Get-ItemProperty” cmdlet to verify the changes.
Additional Troubleshooting
In other cases, monitoring will stop for some objects (such as disks) while other monitoring continues correctly.
This may also indicate a WMI issue.
Some options to resolve this may be:
- Ensure the Windows Management Instrumentation service is running.
- Try rebooting the system.
- For Windows 2000, Windows XP, and Windows Server 2003, download and run Windows PowerShell WMI.
- For Windows Vista, Server 2008, and Windows 7, run the “winmgmt /verifyrepository” command to check for an inconsistent repository
Once you have gathered the data, review the Event Logs for WMI errors. If you have captured the output from a utility, review the logs and resolve any errors where possible. Since WMI is such an integral part of Windows Operating System, please engage a Microsoft Support Engineer for assistance.
