
Custom HTTP Delivery
Last updated – 02 June, 2026
Custom HTTP Alert Delivery methods (that is, webhooks) enables you to send alert notification data to an external system using HTTP GET or POST requests. Similar to Custom Email Alert Delivery, this can be advantageous if you are sending alert notifications to a ticketing system. Custom HTTP alert delivery enables you to define the precise format of the alert notification data using tokens (variables), so that it can be easily parsed by the recipient system.
Custom HTTP delivery methods use an HTTP POST to deliver alert notification data in a request payload. However, in some cases, an HTTP GET request is sufficient because the request itself has form data appended to the URL (for example, https://www.example.com/api?param1=abc&m2=def), and no payload needs to be posted.
Defining a custom alert delivery method does not result in notifications being routed using the custom delivery method. The custom delivery method must be included as the contact method for a recipient in an escalation chain, and that escalation chain must be referenced by an alert rule. When configuring these, there are a few guidelines to follow to ensure alert data is posted and updated as expected in the target integration. For more information, see Alert Rules.
Requirements for Configuring Custom HTTP Delivery Integration
To configure custom HTTP delivery integration, you need the following:
- Sufficient permissions in LogicMonitor to configure custom HTTP delivery integrations.
- A license for Automated Diagnostics and Remediation to integrate DiagnosticSource and RemediationSource output with external systems.
Adding Custom HTTP Delivery Integration
- In LogicMonitor, navigate to Settings > Integrations.
- Select Add Integration.
- From the Add Integration page, under Workflow Integration, select Custom HTTP Delivery.
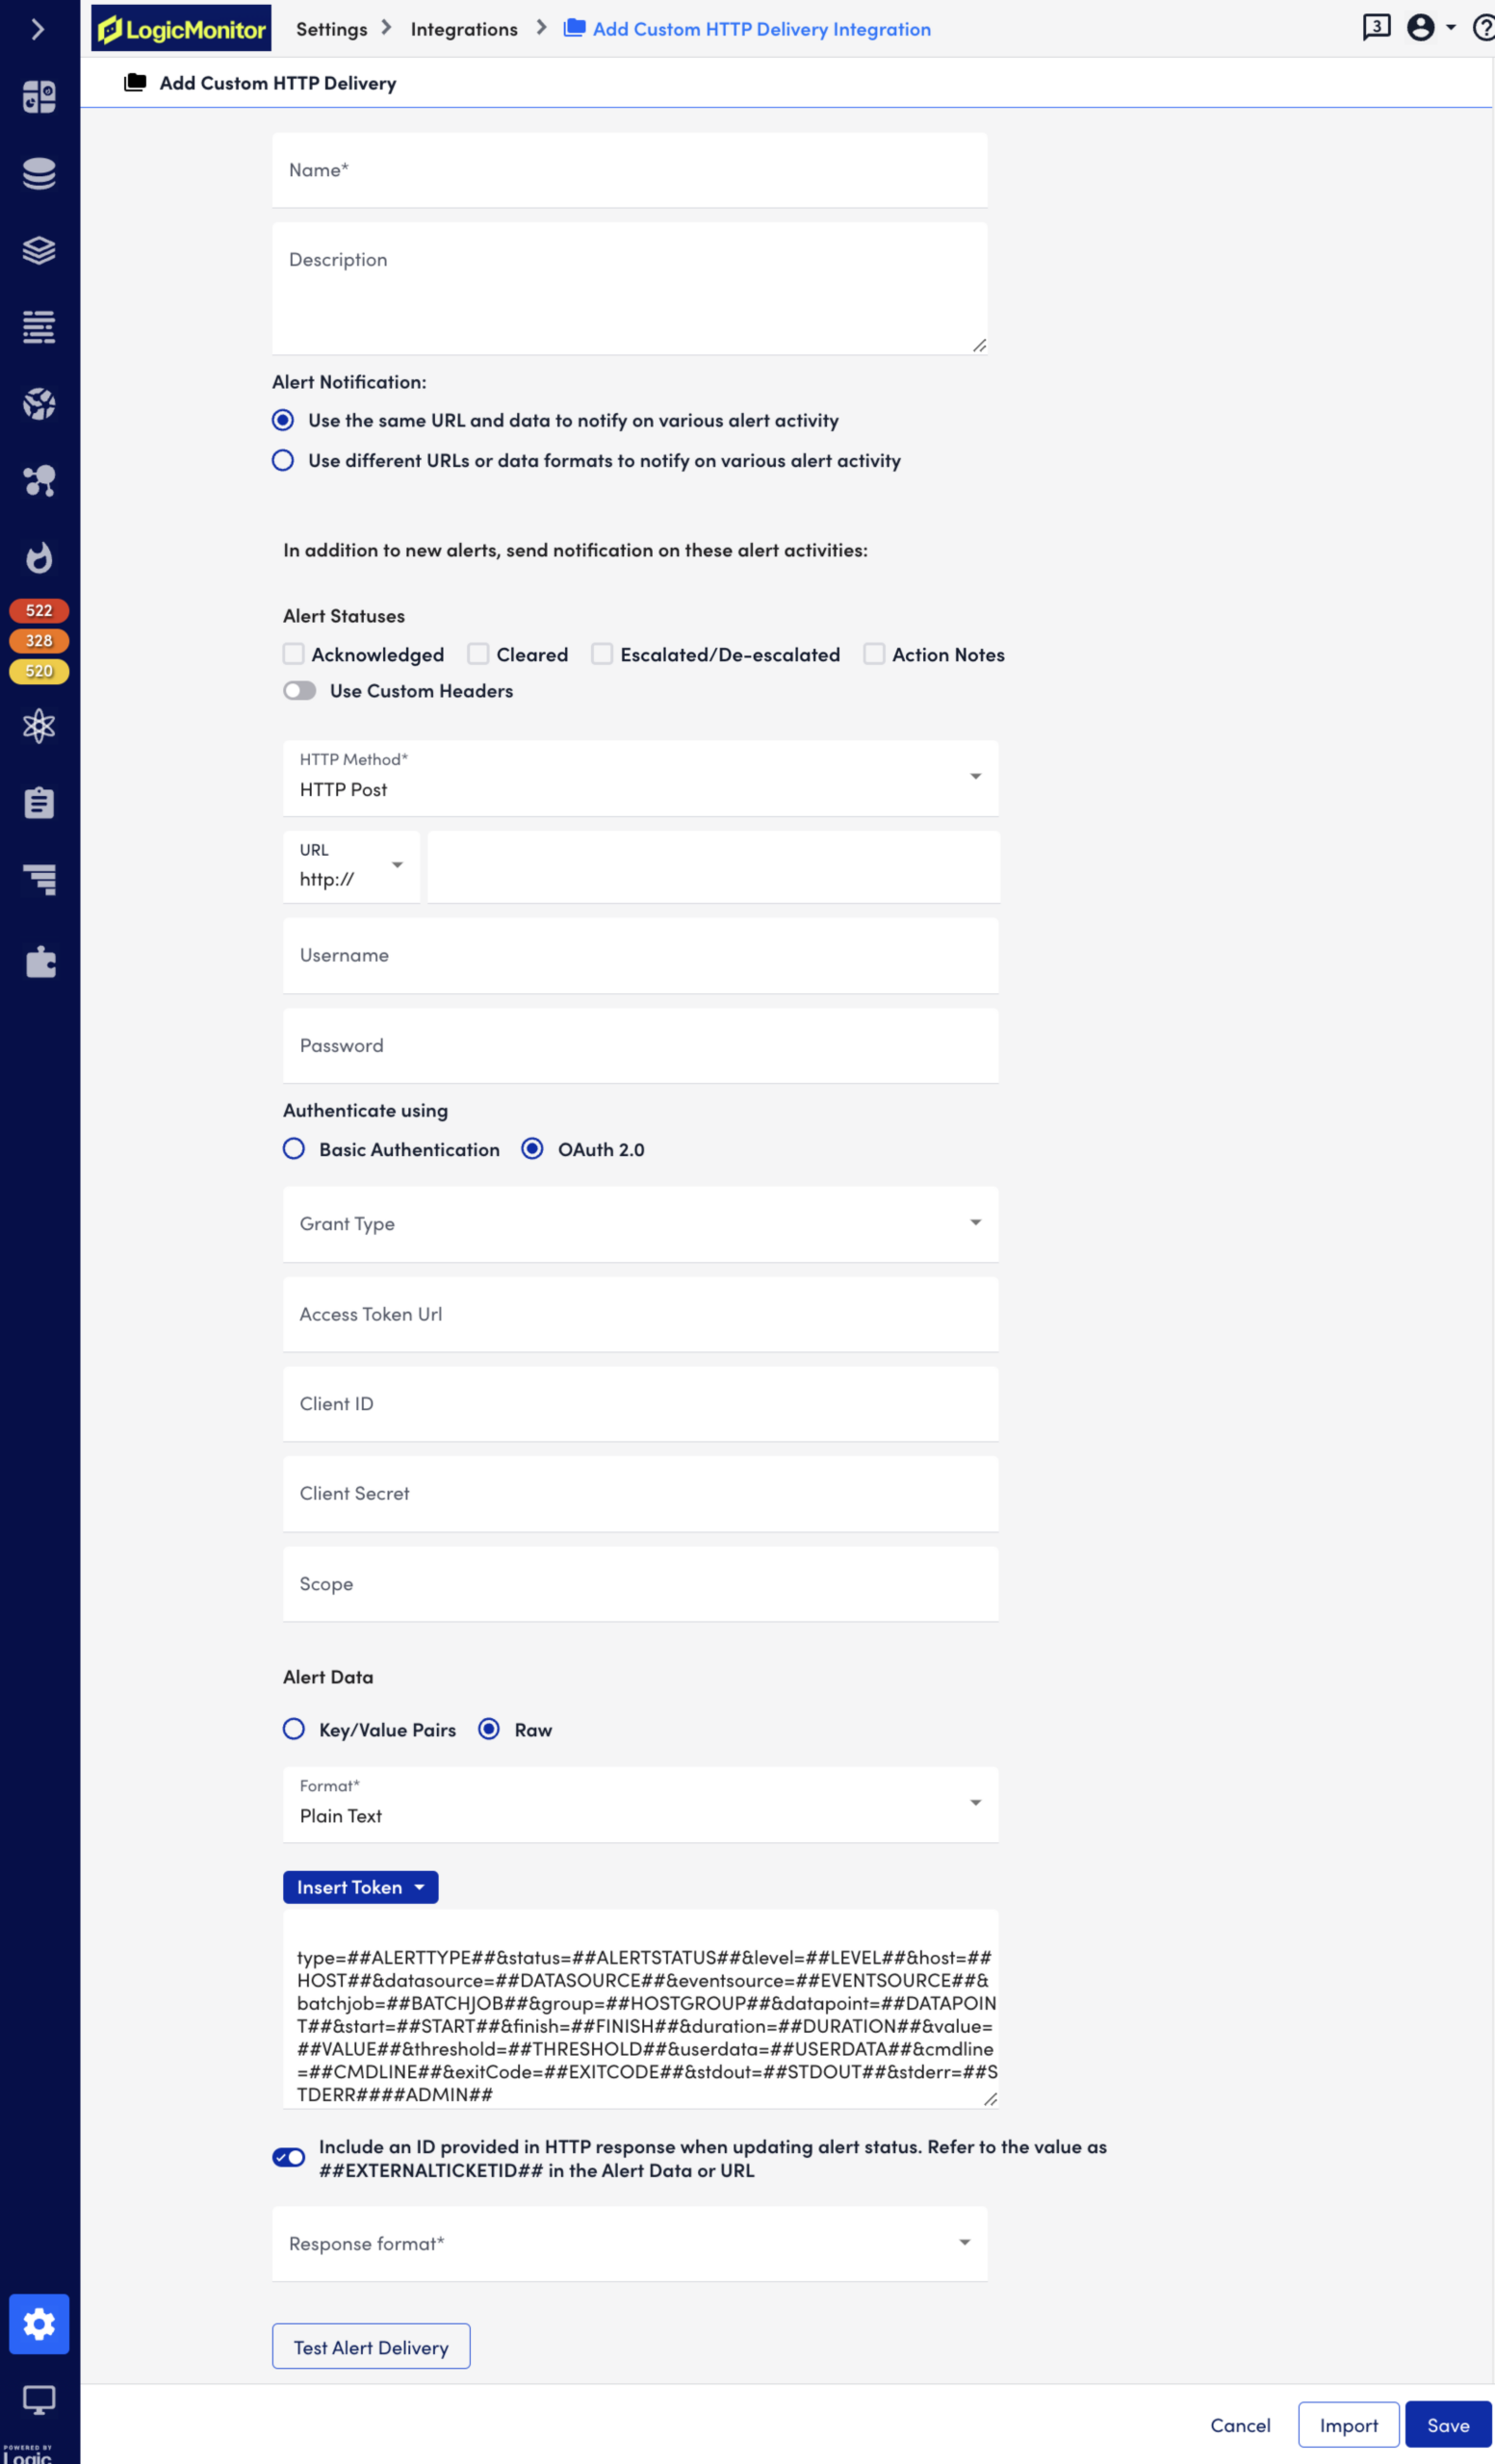
- Enter a Name and Description for the custom HTTP delivery integration.
The Name field is mandatory and the value you enter in the Name field displays in the list of integrations. - Select the Alert Notification option you want:
- Use the same URL and data to notify on various alert activity – Sends HTTP requests for alert activity to the same URL used for the initial HTTP requests for new alerts.
- Use different URL or data format to notify on various alert activity – Sends HTTP requests to different URLs based on the alert activity.
- Select any of the following Alert Statuses for which you want to send a notification. By default, requests are sent for New Alerts.
- Acknowledged—This state processes previously generated alerts that are acknowledged.
- Cleared—This state applies to alerts that satisfy the alert threshold that triggered it.
- Escalated/De-escalated—This state applies when an active alert increases or decreases in alert severity. For example, an alert updating from warning to error, or critical to error use this definition. If the escalated status is selected and a note is added to the alert, an update request is sent whether the alert is active or cleared. If the escalated status is not selected and a note is added to the alert, a request is not sent.
Note: Alert rules and escalation chains are used to deliver alert data to your custom HTTP integrations. When configuring these, there are a few guidelines to follow to ensure notifications are posted and updated as expected in the target integration. These guidelines are discussed in Alert Integrations Overview.
- Action Notes—Enables you to send DiagnosticSource and RemediationSource output reports as alert notification data to an external system using HTTP
POSTAPI request. When a DiagnosticSource or RemediationSource run completes, the Action Notes status is triggered and the output report is sent to the integration. In cases where multiple DiagnosticSources or RemediationSources are triggered for a single alert, each DiagnosticSource and RemediationSource generates a separate action note entry upon completion. The integration adds these entries to the Notes section of the incident ticket.
Recommendation: For seamless delivery of DiagnosticSource or RemediationSource output, select the Use different URLs or data formats to notify on various alert activity notification type.
- If you want to add custome headers, toggle the Use Custom Headers switch, and then do the following:
- Select Add Record and then enter values for Key and Value.
- Select Apply.
Note: Custom headers are used to define your authentication credentials. For the Content-Type header key, you can add a charset value as null or a charset value with a valid MIME type. If you provide an invalid charset or MIME type, a valid MIME type with UTF-8 is added by default.
- In the HTTP Method field, select the method you want. You can select HTTP Post or HTTP Get.
- In the URL field, provide a URL for the HTTP request.
- Enter the Username and Password associated with the specified username.
- To authenticate using Basic Authentication, enter Username and Password. HTTP Basic authentication passes the username and password as fields in an HTTP header.
- To authenticate using OAuth 2.0, select OAuth 2.0, select the Grant Type you want and provide the following information:
- If you select Grant type as client_credentials, provide information for the following fields:
- Access Token URL—Authentication server endpoint that verifies credentials and returns an access token if
clientIdandclientSecretare valid. - Client ID—OAuth application client ID
- Client Secret—OAuth application client secret
- Scope—The scope of the access request
- Access Token URL—Authentication server endpoint that verifies credentials and returns an access token if
- If you select Grant type as password, provide information for the following fields:
- Client ID—OAuth application client ID
- Client Secret—OAuth application client secret
- Username and Password—The username and password associated with the specified username
- Scope—The scope of the access request.
- If you select Grant type as client_credentials, provide information for the following fields:
- From Alert Data, select key and value pairs or raw format to customize the alert message.
- Select Key/Value Pairs, select Add Record, provide key Name and Value, and then select Apply.
- Select Raw, select Insert Tokens, and then add the tokens you want for the alert message. The following tokens are available:
- ##ADMIN##—The user the alert was escalated to.
- ##ADMIN.PHONE##—The phone number of the admin.
- ##ADMIN.EMAIL##—The email ID of the admin.
- ##ADMIN.PAGER##—The pager number of the admin.
- ##ALERTTYPE##—The type of alert (that is, alert, eventAlert, batchJobAlert, hostClusterAlert, websiteAlert, agentDownAlert, agentFailoverAlert, agentFailBackAlert, alertThrottledAlert).
- ##ALERTSTATUS##—The status of the alert.
- ##MESSAGE##—The rendered text of the alert message. This token will also pass all relevant acked information (for example, the user that acknowledged the alert, ack comments, and so on).
- ##ALERTID##—The ID of the alert.
- ##EXTERNALTICKETID##—This captures the external system’s identifier for the ticket that is being created by the integration so that LogicMonitor can refer to it in future actions on that ticket.
For more information, see Tokens Available in LogicModule Alert Messages.
Note:
- To customize an alert message using Key/Value Pairs, only JSON format is available. But to customize an alert message using Raw, you can use Form Data, JSON, Plain Text, URL-Encoded Form Data or XML format.
- By default, as an example, some tokens are included in the Alert Data message section. You can edit this section by adding tokens using the Insert Token button.
- ##DIAGNOSTIC_SOURCE_OUTPUT##—Includes the DiagnosticSource output in JSON or plain text format. Use only for Action Notes.
- ##DIAGNOSTIC_SOURCE_STATUS##—Includes the DiagnosticSource run status—Success or Failure. Use only for Action Notes.
- ##REMEDIATION_SOURCE_OUTPUT##—Includes the RemediationSource output in JSON or plain text format. Use only for Action Notes.
- ##REMEDIATION_SOURCE_STATUS##—Includes the RemediationSource run status—Success or Failure. Use only for Action Notes.
- ##MESSAGE##—Includes the DiagnosticSource or RemediationSource name and run status.
- Toggle the Include an ID provided in HTTP response when updating alert status switch if you want LogicMonitor to find the ID (for example, ticket ID) returned in response to the HTTP request that is associated with a new alert. The response format can be in JSON, Regular expression or XML. LogicMonitor will use this ID in any subsequent requests for alerts that are acknowledged, cleared, and escalated/de-escalated.
- Select Test Alert Delivery to send a test alert and message, to verify that you have configured the integration correctly.
- Select Import if you want to import integration details in JSON format.
- Select Save to save the custom HTTP integration.
- If you want to cancel the integration, select Cancel.
