
Logs Partition
Last updated - 16 June, 2026
Log Partitions in LogicMonitor give you more control over how long different types of log data are stored. You can assign custom retention periods based on the business value or compliance needs of each log type and support scalable and efficient log management across your environment.
For example, you can keep high-volume application logs for just a few days if they are only needed for short-term troubleshooting. At the same time, you can retain critical logs—like Windows audit or compliance logs—for several months. This flexibility enables you to manage log storage more efficiently and predictably.
LogicMonitor provides the following retention options:
- 7 Days
- 1 Month
- 90 Days
- (Default) 1 Year
- Custom retention
In addition to flexible retention, Log partitions enable you to do the following:
- Manually shut-off controls to avoid overages
- Improve search performance by narrowing the query scope
Default Log Partition
The Partitions dropdown in the LM Logs query bar displays “default” as the initial value.
Use the following guidance:
- If you use only the default partition, no action is required. Saved searches, log alert groups, alerts, reports, and dashboard widgets function as expected.
- If you use custom partitions or retention SKUs, replace “default” with your custom partition name (for example, “prod-logs-90d”) in all saved objects.
After you create log partitions, you can edit partitions, start or stop log ingestion (except for the default partition), and delete partitions.
The default partition is automatically created during setup with predefined settings:
- Inherits the longest available retention based on your subscription
- Has log ingestion enabled by default, which cannot be disabled
- Requires no updates unless you use custom partitions
If you use custom partitions, update saved objects to reference the appropriate partition name.
Editable Fields
You can edit the following fields for the default partition:
- Subscription SKU
- Retention
- Description
- Set Limit options:
- Partition Limit
- Stop Ingestion at Partition Limit
- Restart Ingestion at Beginning of Month
Non-Editable Fields
You cannot edit the following fields:
- Partition Name
- Tenant Identifier (system-defined and not visible in the UI)
- Ingesting switch (always enabled)
Note: Deviceless logs can only be ingested into the portal’s default partition.
Tenant ID for Log Partitions
Log partitions provides you multiple logs subscription type within the same portal. Use Logs partitions to segregate logs within your company based on tenant ID. If your environment provides services for multiple accounts, you can use Log Partitions to create logs partition for your tenants and set logs retention period as required by the tenants. As a provider of services to multiple accounts, you can create one logs partition for each tenant, which in most cases equates to “customer_name”.
If you are an enterprise customer, you can retain logs in logs partition for a longer or a shorter duration based on the type of logs. For example, you may decide to retain sensitive logs for a longer duration and test logs for a shorter duration.
With Log Partitions, a default log partition is available out-of-the box. The default logs partition follows the maximum retention value that has been purchased. However, you can change default partition’s retention period.
Requirements for Creating Log Partitions
To create Log Partitions, you need the the following:
- Custom properties on resource groups configured
These properties are used to identify and route logs into the correct partition.
Recommendation:
- Use lowercase consistently (user not User).
- Avoid vague or source-specific names like cstmra; use descriptive names such as customer_acme.
- Use clear and concise field names. Avoid overly verbose or nonstandard abbreviations.
- For more information, see Resource and Instance Properties.
- (If leveraging tenant ID) Tenant identifier configured in the portal.
Important: If system.tenant.identifier is configured on an individual resource rather than the resource group, log partitioning may not work as expected.
- For more information, see Tenant Identifier Property Name.
- A LogicMonitor user with the following permission set:
- Manage permissions for “Partitions” in the Logs & Traces Role
For more information, see Logs & Traces Role Permissions. - Manage permissions for the resource group for creating, viewing, and managing the log partitions of in the Resources Role
For more information, see Resources Role Permissions.
- Manage permissions for “Partitions” in the Logs & Traces Role
Creating a Log Partition
Important: You can create a maximum of 100 Log Partitions per portal.
- In LogicMonitor, navigate to Logs >
 More options > Logs Management.
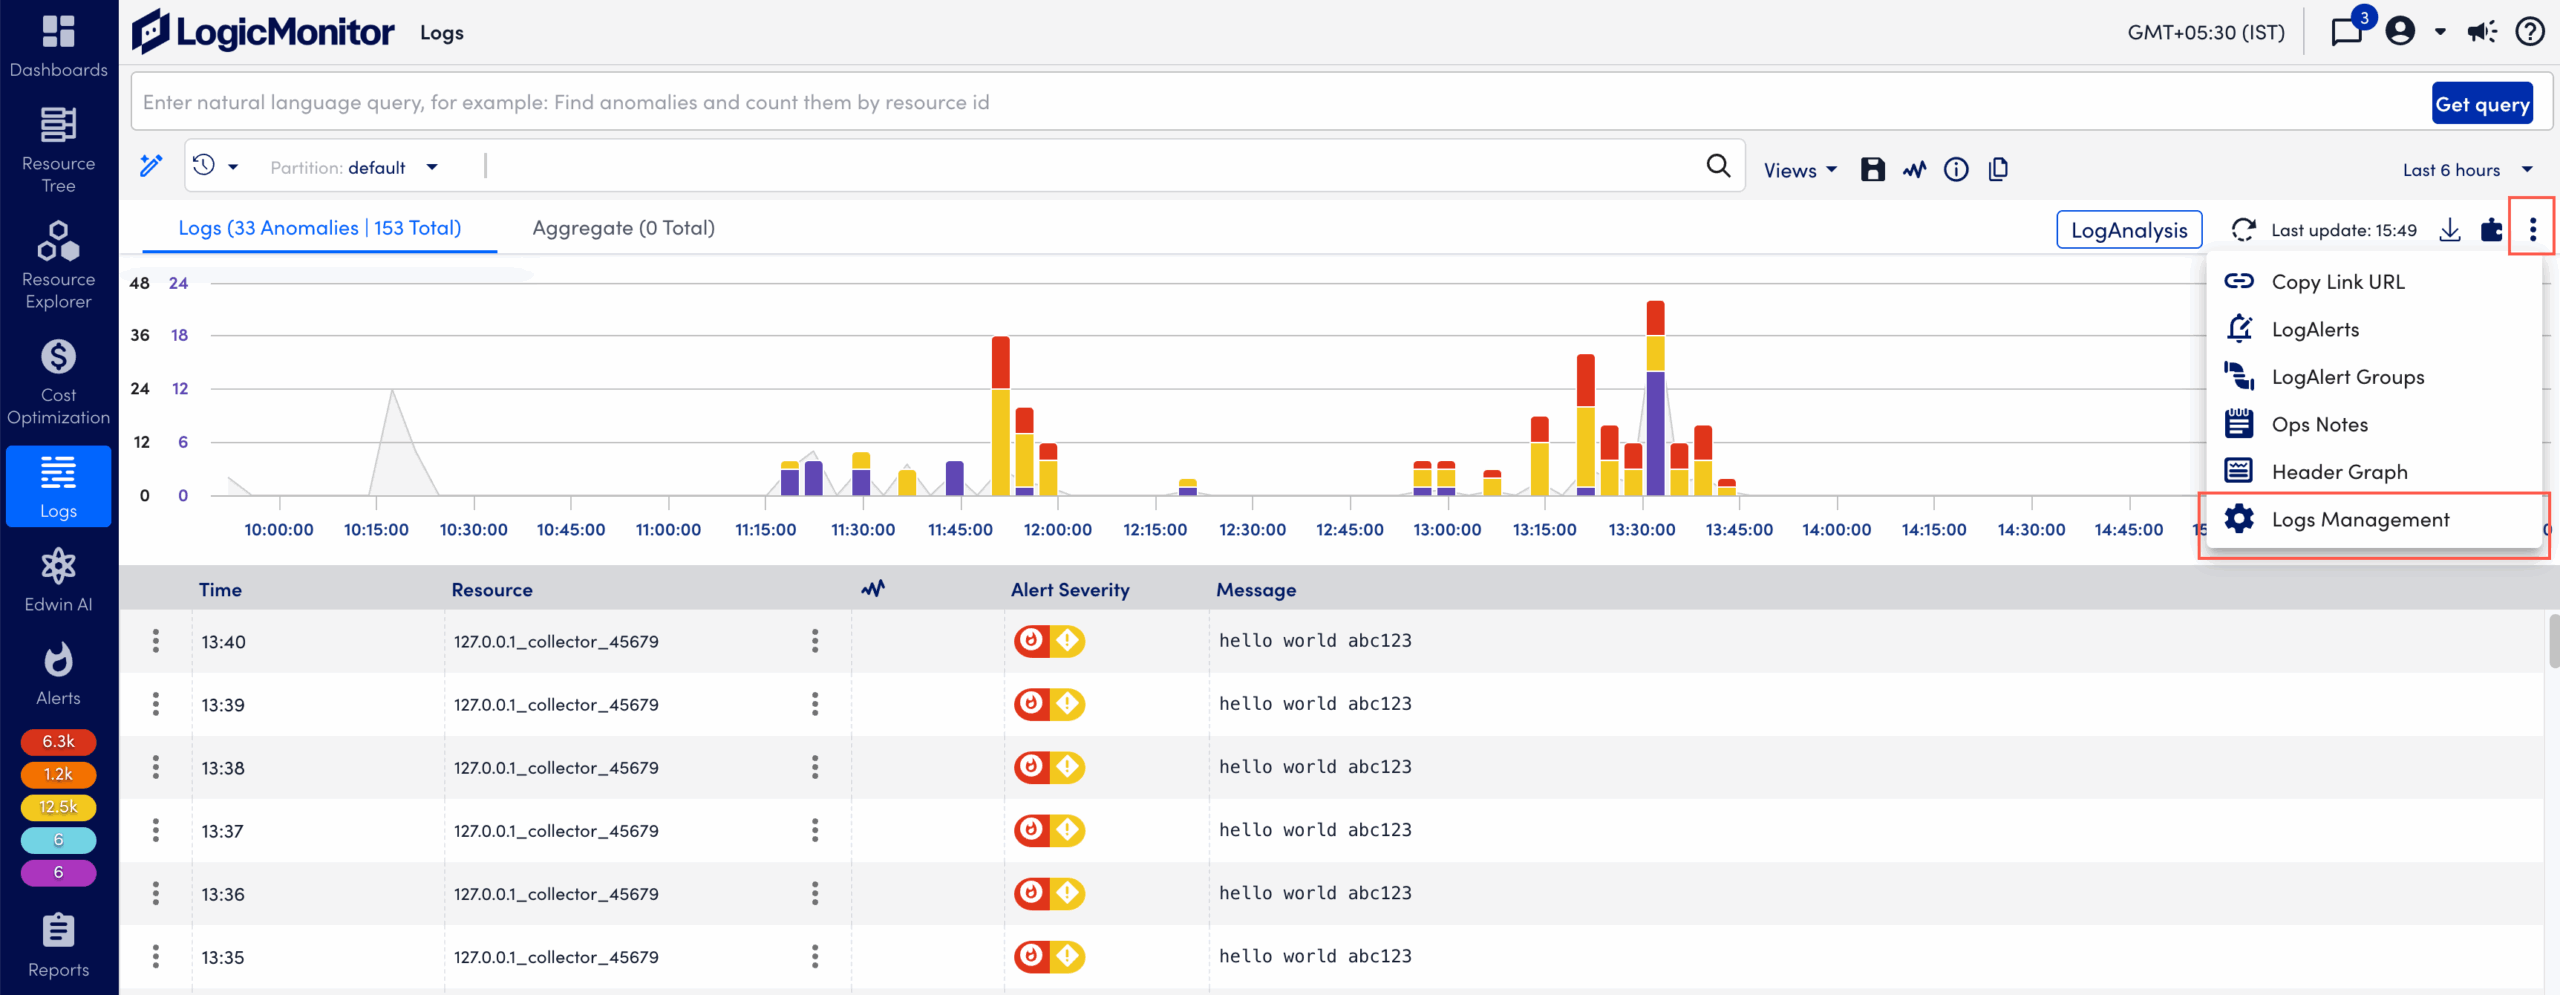
- On the Partitions tab, select
 Add Partition.
The Add Partition panel displays. - On the Add Partition panel, do the following:
- In the Partition name field, enter a name for the partition.
This name displays throughout the portal when selecting a log partition. - In the Tenant identifier field, enter the tenant identifier.
LogicMonitor attempts to match values as you type. - From the Subscription SKU dropdown, select the SKU that matches your organization’s retention and feature needs.
This determines your access to features like custom log partitions and data retention options. - From the Retention dropdown, select a retention period for the logs.Note: Depending on your subscription plan, only specific retention options are available. Retention values cannot exceed your subscription’s maximum retention value.
By default, the Retention value is set to the longest available subscription and retention length based on your subscription.
To change this, contact LogicMonitor Support. For more information on signing into the support portal, see Migration to New Support Platform from the LogicMonitor Community. - (Optional) In the Description field, add a description for the partition.
- In the Partition name field, enter a name for the partition.
- Toggle the Ingesting switch to start the log ingestions.
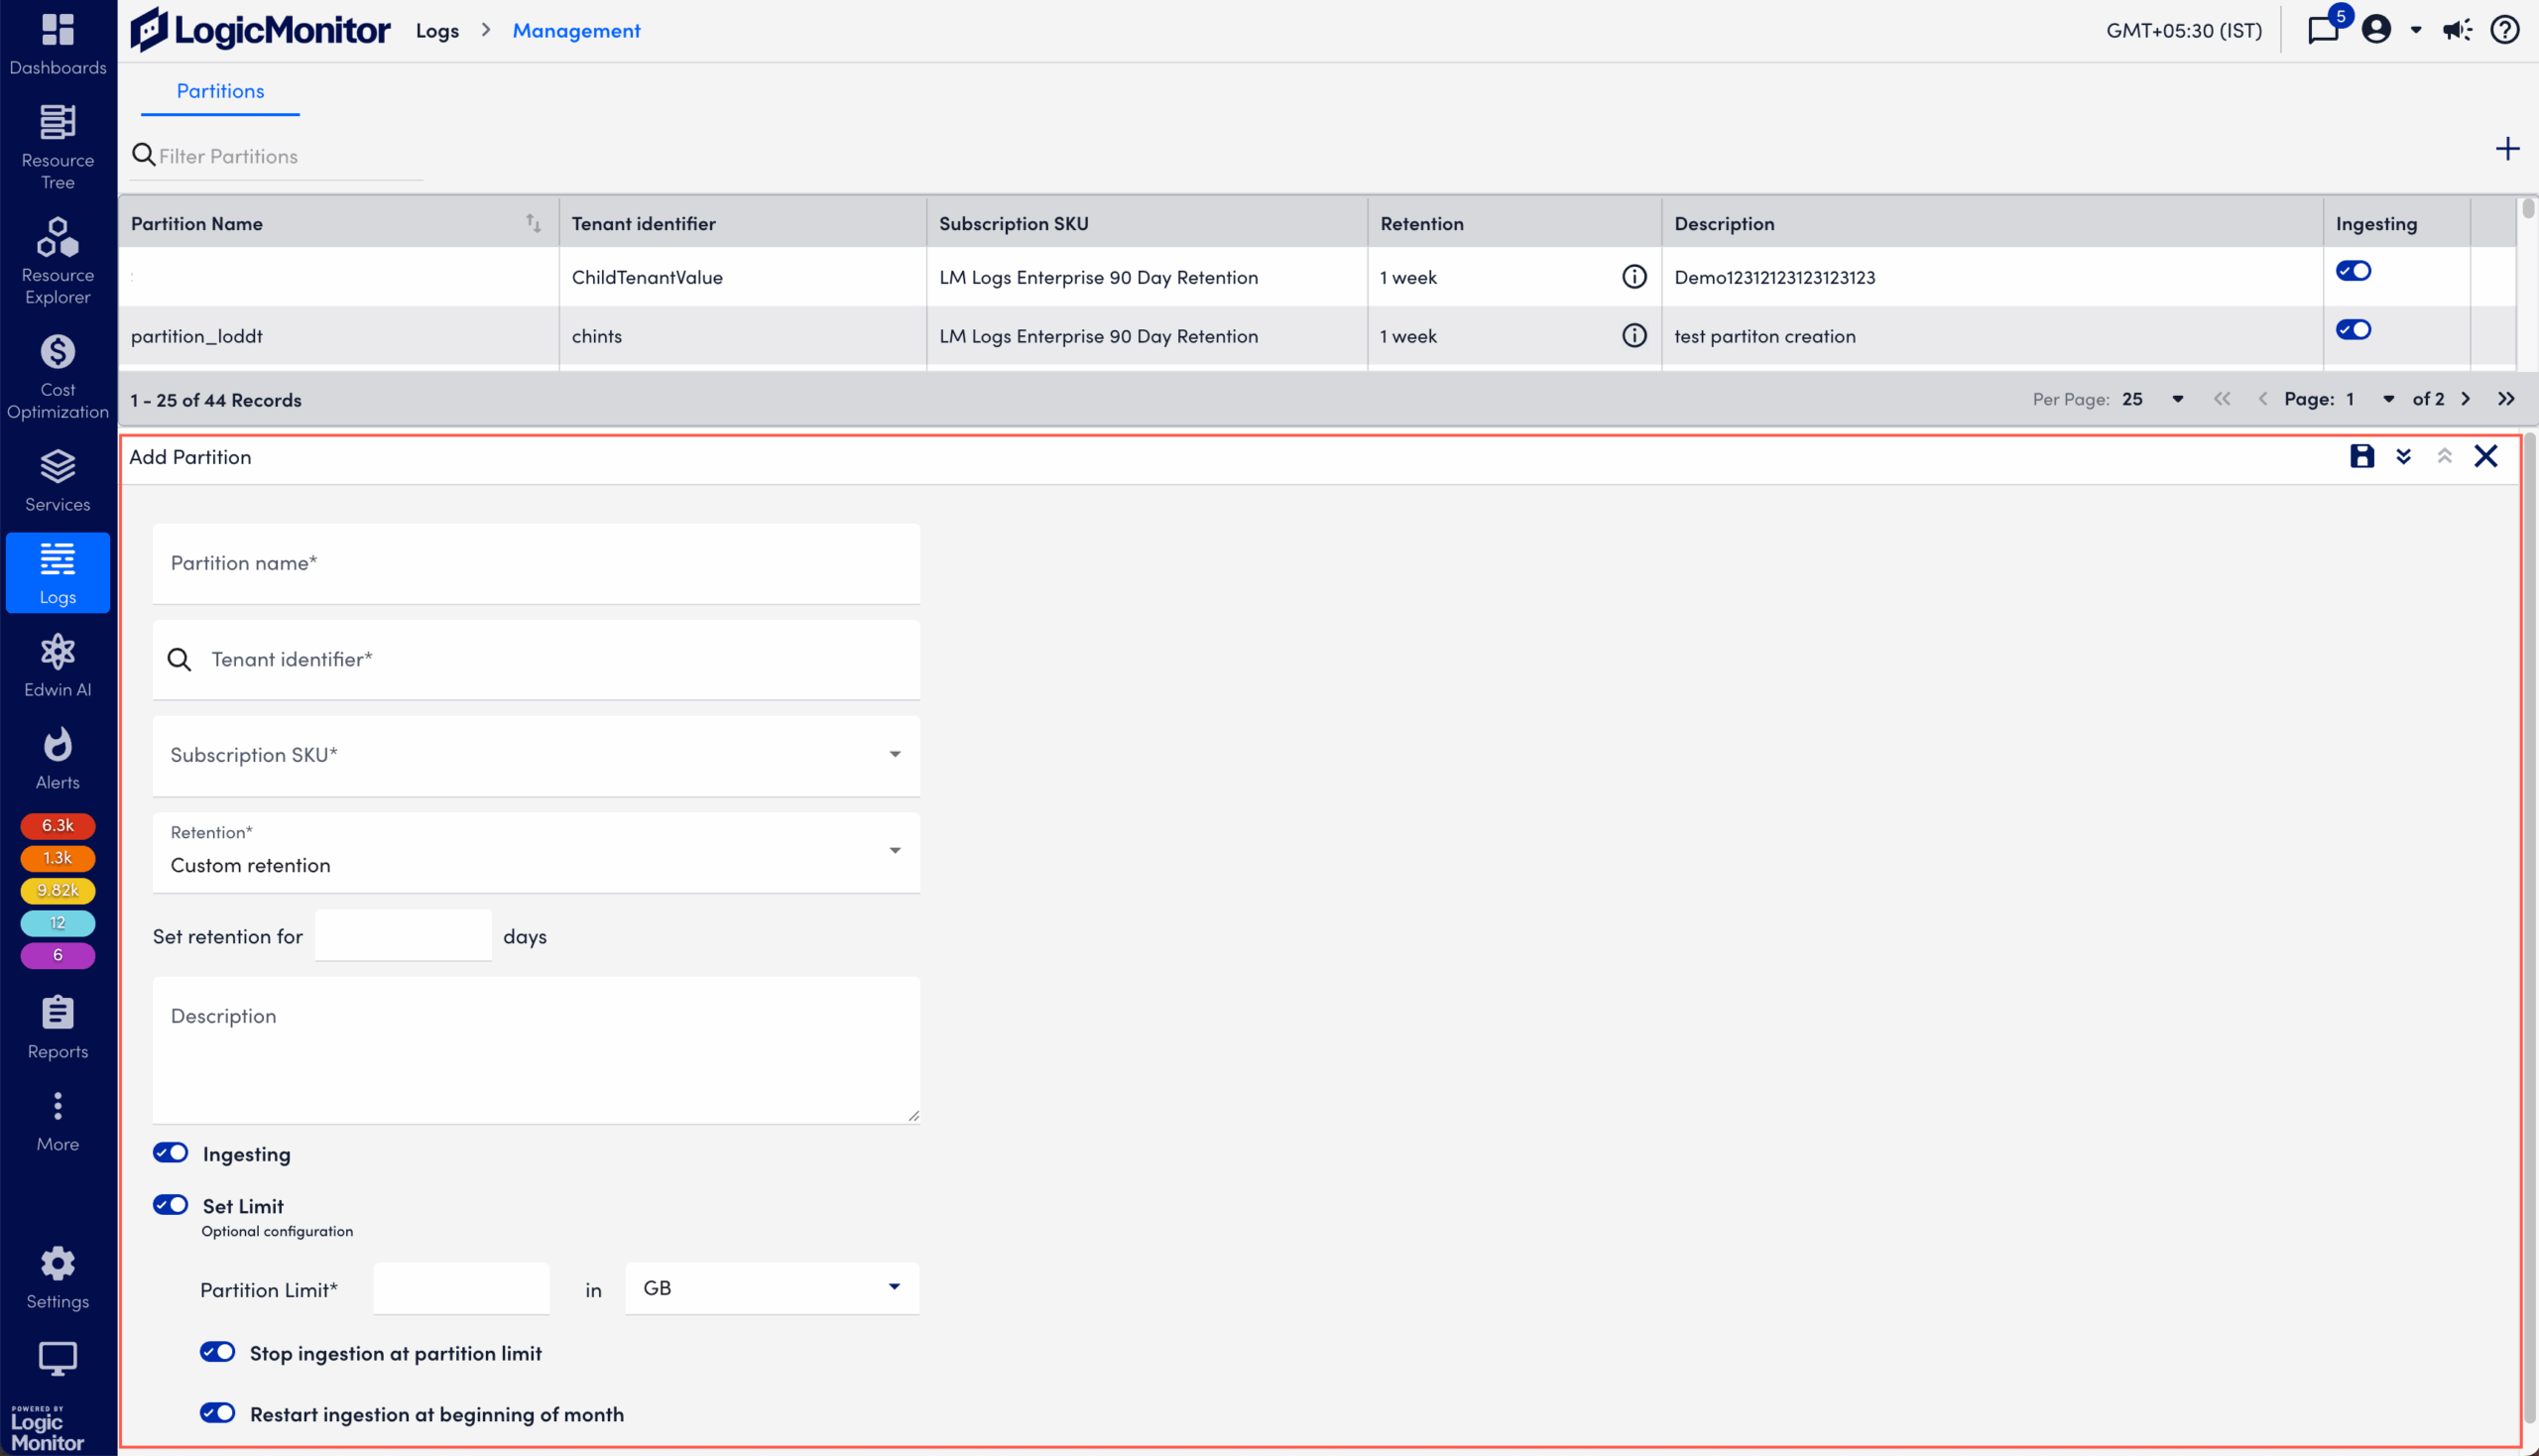
- Toggle the Set Limit switch to enable partition size limits, and then complete the following:
- (Optional) Toggle the Set Limit switch to apply data size limits for the partition in GB or TB, and then select the following toggles:
- Toggle the Stop ingestion at partition limit switch to stop log ingestion when the partition limit is reached.
- Toggle the Restart ingestion at beginning of month switch to automatically restart log ingestion at the beginning of the month. Note:
- The Restart ingestion at beginning of month switch is available only if Stop ingestion at the partition limit is switched on.
- If you update or add usage limits for an existing partition during a billing cycle, the changes take effect in the next billing cycle. FutureContract stores these updates to become part of the active contract when the next billing cycle begins.
However, if you create a new partition and configure usage limits at the time of creation, those limits are enforced immediately after the partition is created.
- Select
 Save.
Save.
Validating Log Ingestion
You can validate that logs are properly ingested into the expected partition by using one of the following methods:
- Select
 Open in New. This opens the Logs page filtered to that partition and automatically runs a search.
 - Alternatively, navigate to the Logs tab, select the partition name you just created, and select Search.
In either case, verify that logs from the resources matching the Tenant Identifier value entered during partition creation are displayed.
Searching Log Partitions
You can search within specific log partitions to quickly locate and analyze log data.
- On the Logs tab, on the search bar, select the Partition dropdown menu.
- Select the partition you want to search.
- After selecting the partition, select
 Run Query to execute the query.
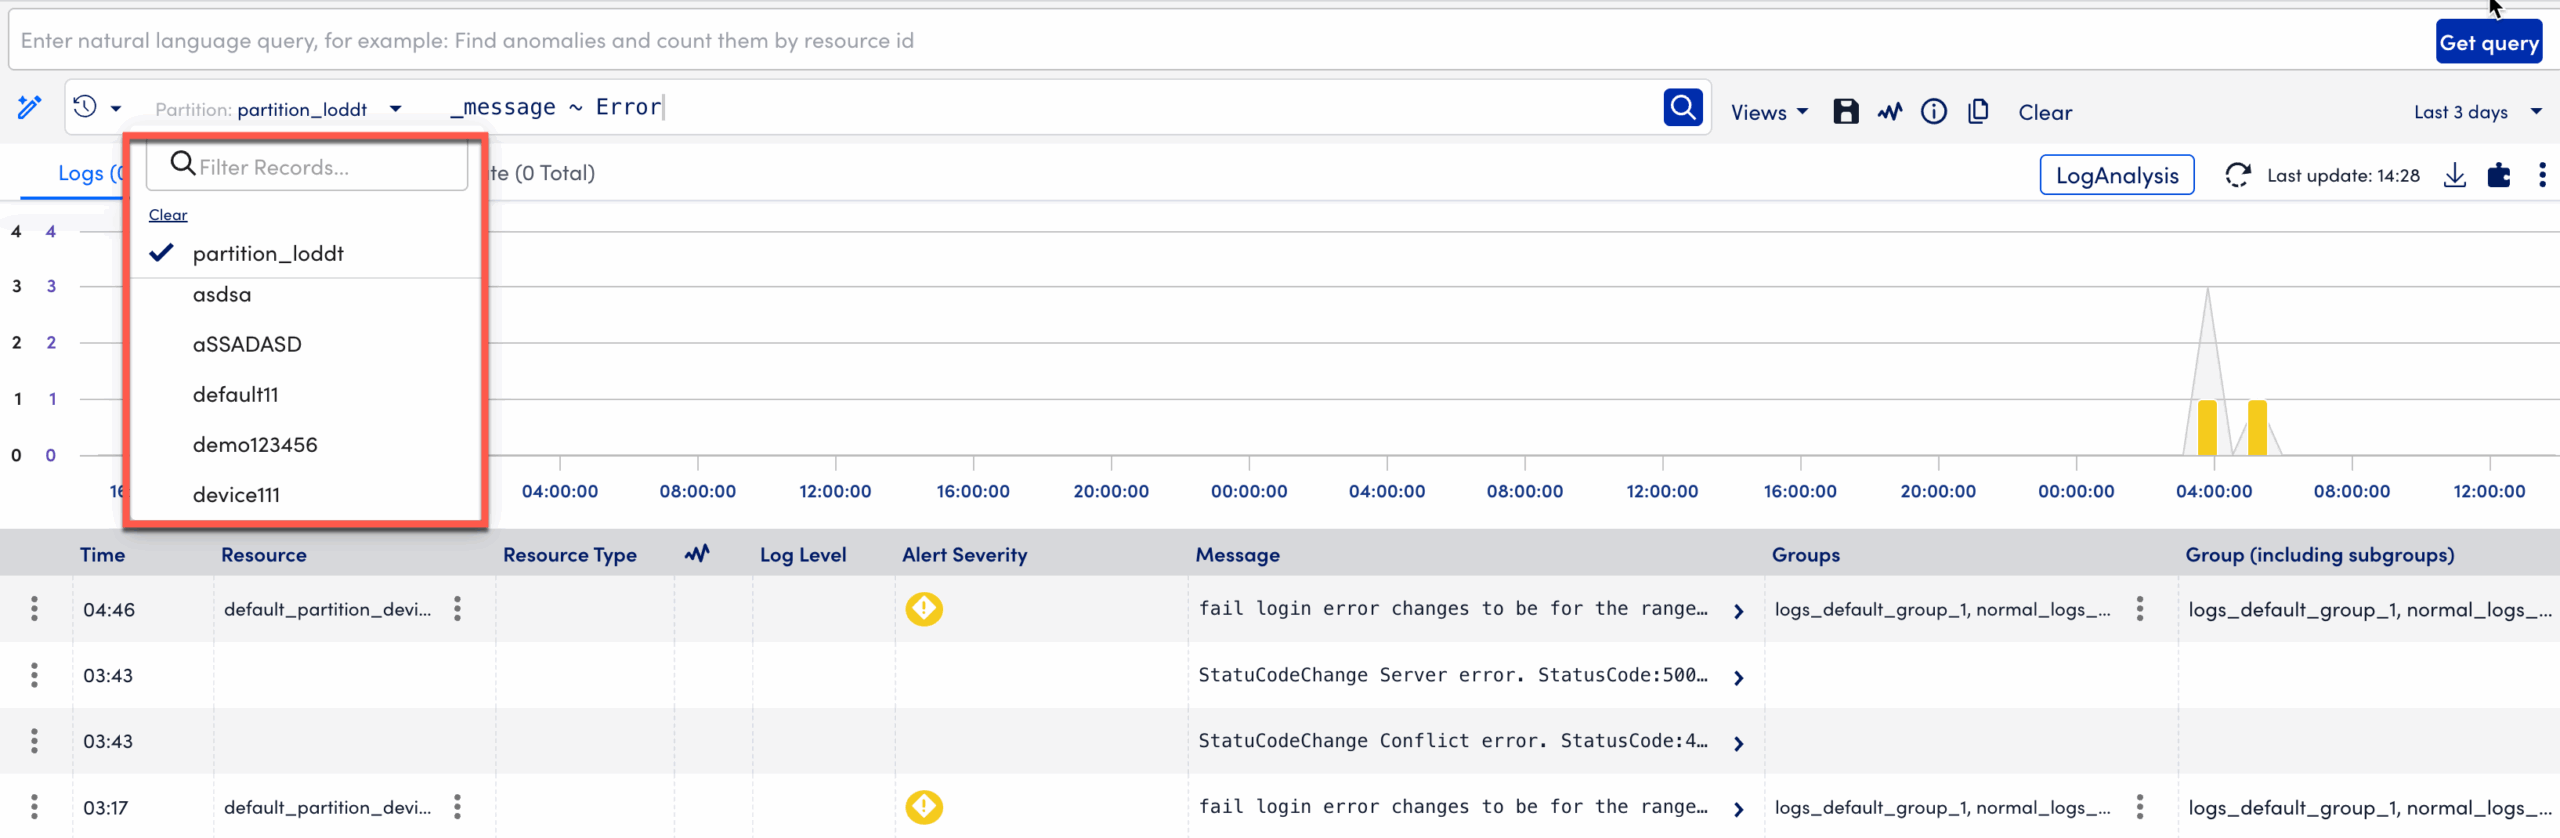
Note: The search only returns results from the selected partition. To view logs across multiple partitions, repeat the search for each relevant partition.
Saving Searches and Views
When you save a search or custom view, LogicMonitor automatically includes the partition name as part of the saved configuration.
- Saved searches and views are stored in the Query Library, retaining the associated partition context.
- This ensures that when you reopen or share a saved query, it automatically executes against the same log partition used when the search was saved.
For example—If you save a view for the prod-logs-90d partition, reopening it later from the Query Library reapplies that same partition automatically.
Editing a Log Partition
You can change the retention period (depending on your purchase plan), log partitions description, and start or stop logs ingestion for an existing log partition.
- In LogicMonitor, navigate to Logs > More options > Logs Management.
- On the Partitions tab, select the Log Partition you want to edit.
The Edit Partition panel displays.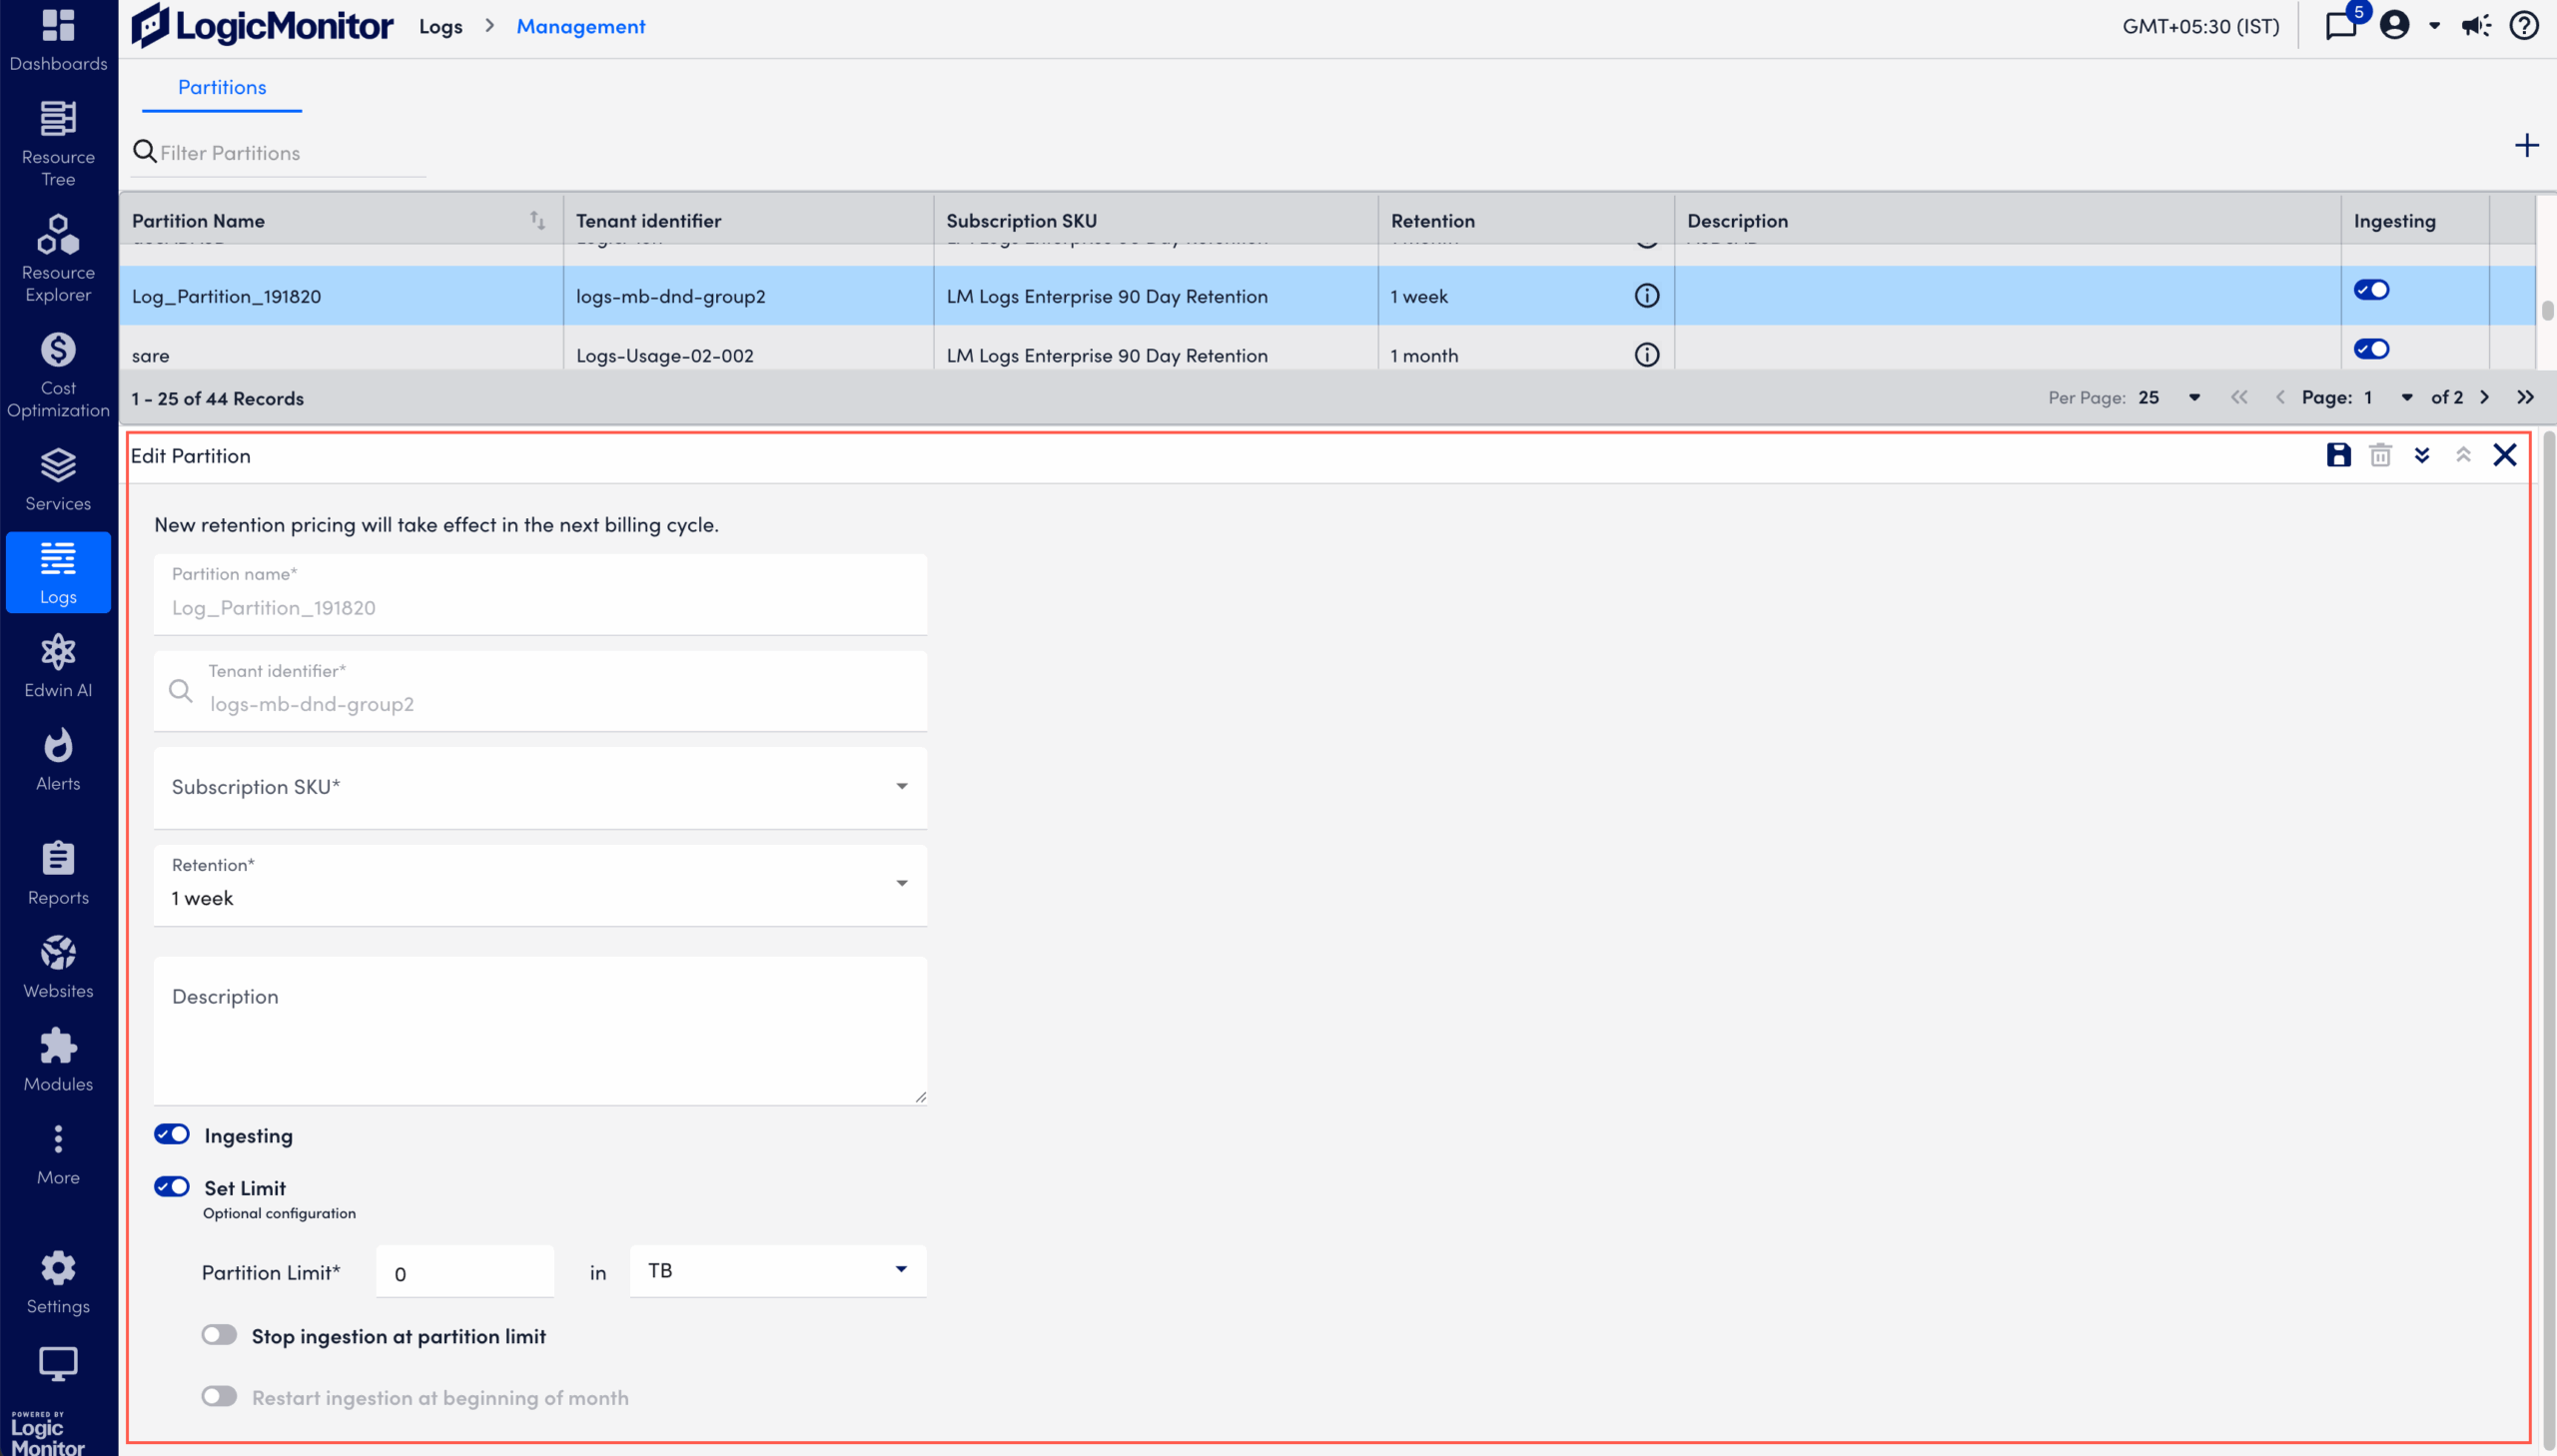
- From the Edit Partition panel, make any necessary changes.
Note: Partition name and tenant identifier of an existing log partition cannot be edited.
- Select Save.
Starting or Stopping Log Ingestion for a Log Partition
Note: Log ingestion for the default partition cannot be stopped.
- In LogicMonitor, navigate to Logs > More options > Logs Management.
- On the Partitions tab, locate the Log Partition you want to start or stop.
- Toggle the Ingesting switch on or off.
- When prompted, confirm whether to stop or start ingesting logs.
When you stop ingesting logs for a partition, logs configured for that specific partition are discarded.
Deleting a Log Partition
Deleting a custom log partition does not stop log ingestion. Logs intended for the deleted partition are automatically routed to the default partition. To stop log ingestion, you must disable log forwarding at the source. This process varies by log type and system. For example, if your environment provides services for multiple accounts, ensure each account stops sending logs before you disable ingestion and delete their partition.
To delete a Log Partition, you must first stop log ingestion for that partition and then wait for the cooldown period.
Note:
- After deleting a log partition, if the logs are still flowing, they are automatically routed to the default partition. The default partition cannot be deleted.
- The cooldown period is a built-in waiting time that ensures all ongoing log ingestion processes have completed and any pending data writes are finalized before the partition is permanently deleted.
This safeguard prevents data corruption and ensures log integrity during the deletion process.
- In LogicMonitor, navigate to Logs > More options > Logs Management.
- On the Partitions tab, select the Log Partition you want to delete.
The Edit Partition Panel displays.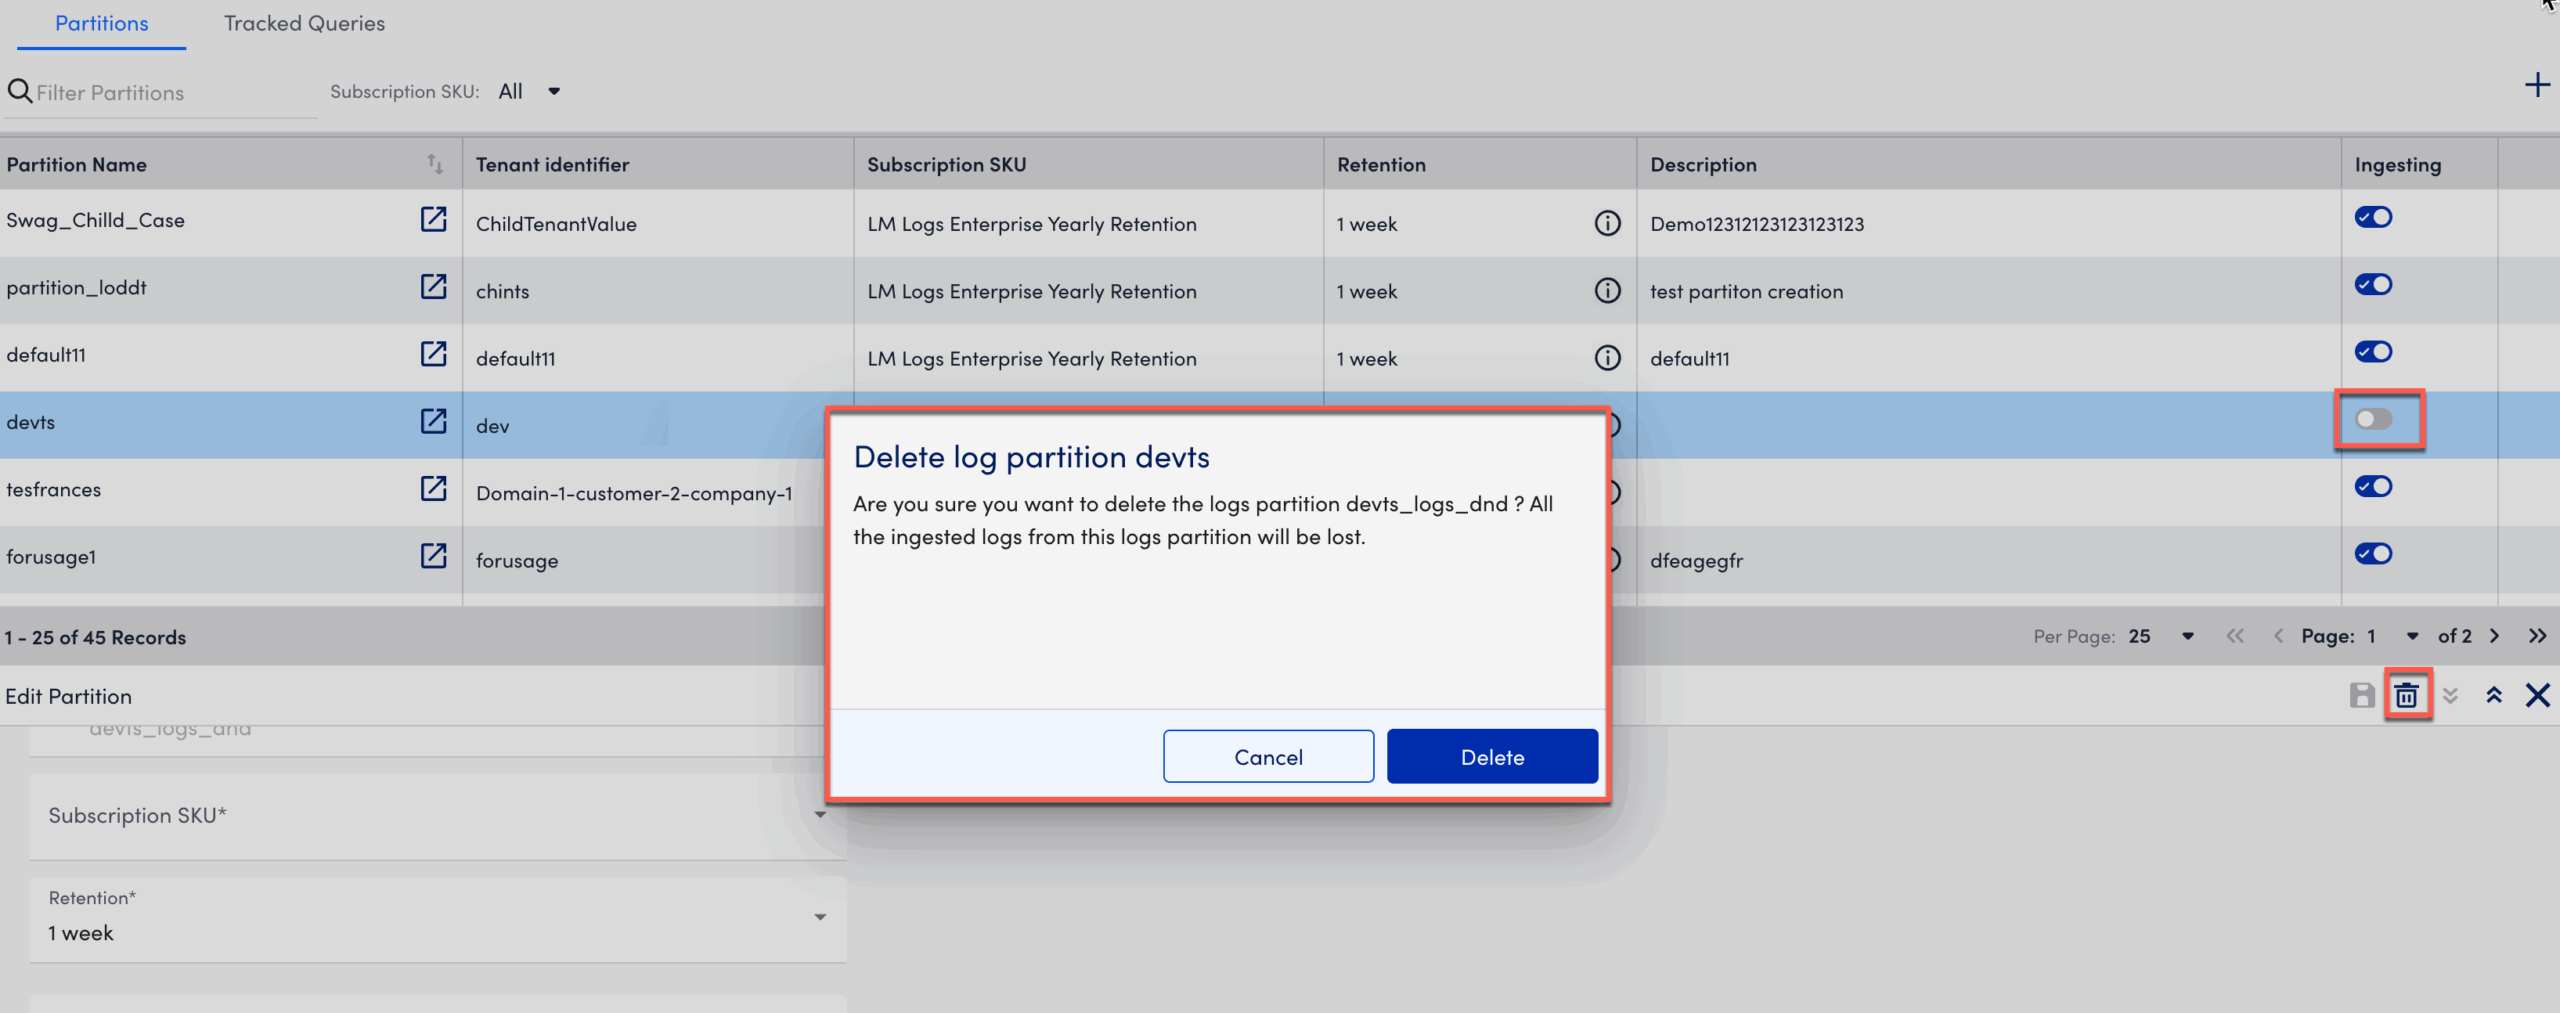
- Select
 Delete.
After you delete a log partition, the existing logs from the log partition are permanently deleted.
