
NOC Widget
Last updated - 14 October, 2025
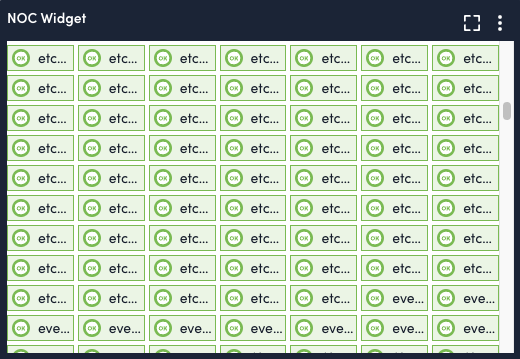
The NOC (Network Operating Center) widget provides at-a-glance insight into the health of a set of groups, resources, applications, or websites. Using the NOC widget, you can:
- Select specific alert statuses for display
- Include device groups, devices, datasources, instances, datapoints, websites, and website groups
- See entities that are functioning in the normal ranges represented with green
- Include custom information in NOC widget items
To configure a NOC widget, you need set up alert statuses, sort by options, NOC item types and their datapoints, and widget display settings.
Configuring a NOC Widget
- Create a NOC widget. For more information, see Widget Creation.
- Configure Basic Information fields. For more information, see Configuring Standard Widget Settings.
- (Optional) In the Alert Statuses to Display settings, toggling on the alert statuses you want to display in the image (all alert statuses are toggled on by default):
- Critical (red)
- Error (orange)
- Warning (yellow)
- Acknowledged (black checkmark)
- Scheduled Down Time (SDT icon)
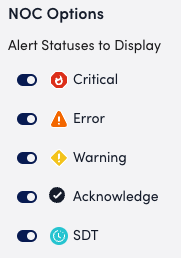
Note: The displayed statuses for items in the NOC widget only reflects the selected alert statuses. Items without an alert matching a selected alerts status display as green.
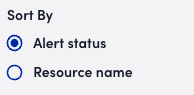
- (Optional) In the Sort By settings, select one of the following options:
- (Default) Alert Status: Displays items starting with any alerts in the top left corner, listing them in order of severity from most critical to least critical. The remaining items with no alerts are listed last.
- Resource Name: displays the items in the widget in alphabetical order.
- In the NOC items settings, select + Add Record, and then select one of the following options:

- Resource:
- Configure datapoints. For more information, see Adding Widget Datapoints.
- (Optional) In the Group By field, select an option to group this datapoint by (defaulted to Resource Group).
- In the NOC Item Name field, enter a name to identify this NOC item by in the widget.
Use the Insert Token function to add the appropriate context to the item. To keep this field in sync with the Group By field, insert the token associated with your Group By selection to display the associated names of the entity you chose to group by. - Select Apply.
- Website:
- In the Website Group Name field, enter a website group name and select it from the results list or enter a * glob expression to select multiple website groups.
- In the Website Name field, enter the name of a website and select it from the results list or enter a * glob expression to add all websites associated with the selected website group(s).
- (Optional) In the Group By field, select an option to group this datapoint by (defaulted to Website Group)
- In the NOC Item Name field, enter a name to identify this NOC item by in the widget.
Use the Insert Token function to add the appropriate context to the item. To keep this field in sync with the Group By field, insert the token associated with your Group By selection to display the associated names of the entity you chose to group by. - Select Apply.
- Resource:
- In the Display Settings, select one of the following options:
- Grid: You can show more items and get a heat map view. Heat maps are better at expressing patterns.
- Table: Gives you more data about each individual item and a decision between if you want to see more detail about each individual item or you want to focus on the set status.
- In the Max Display Columns field, set the number of columns to be displayed in the widget.
- (Optional) Toggle on Show Item Type Icons to save space in the widget (defaulted to on).
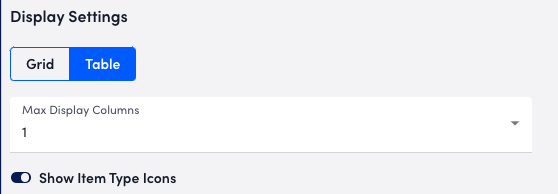
Note: If there are more entities in your widget configuration than can fit in the number of columns you’ve selected, a horizontal scroll bar is provided in the widget display to enable viewing of all items.
- Complete the standard widget configurations, and then Save the widget. For more information, see Configuring Standard Widget Settings.
