
Monitoring Windows Devices Using Linux Collector (OMI)
Last updated - 14 July, 2022
Disclaimer: This feature is currently in Beta. To become a Beta participant, contact Customer Success.
Previously, you could monitor Windows devices only through Windows Collector. LogicMonitor has now developed the ability to monitor Windows devices using Linux Collectors. You can continue to perform WMI tasks on Linux Collectors. Linux Collectors have the ability to perform tasks for both the Operating Systems.
This feature is cost-effective as you need not buy a licensed copy of Windows server for Collector, thereby reducing your LogicMonitor onboarding and adoption cost.
Note: For now, Perfmon type DataSources will not work on Linux Collectors. If you want to use perfmon data in LogicMonitor, you should create a WMI based DataSource with the intended perfmon class mentioned as the WMI class within the DataSource definition.
Requirements
- OpenSSL version 1.0.x or 1.1.x.
- x64 (64-bit) Linux machine supported by OMI.
- CentOS 6, 7, and 8
- Debian 8, 9, and 10
- Oracle Linux 5, 6, 7, and 8
- Red Hat Enterprise Linux Server 5, 6, 7, and 8
- SUSE Linux Enterprise Server 11, 12, 12 ppc, and 15
- Ubuntu 14.04 LTS, 16.04 LTS and 18.04 LTS, and 20.04 LTS
- Collector version 10000.100. It is a special Beta version and should be used only for this Beta. It will not be supported in the production environment. To access this version, see Installing Collectors.
- Root permission to install Open Management Infrastructure (OMI) server during Collector installation.
Note: The root permission is only required during installation. Collector can run as non-root after the installation is complete.
Points to Consider
- As part of the Collector installation process, OMI will be installed on your Linux machine.
- SBProxy is replaced with OMI server installed on Linux Collector.
- The following OSS dependency and the license it is shipped under is given in the table:
| Dependency | License |
| OMI | MIT |
WMI Credentials
Provide username and password as a device-level property.
- Username = wmi.user
- Password = wmi.pass
Enter username in the username@domain format to pass the domain name in the username.
agent.conf Configuration Parameters
You should configure the following parameters:
| Parameter | Type | Default | Description |
| linux.collector.enable.windows.monitoring | Boolean | FALSE | Set it as ‘true’ to enable Linux Collectors to monitor Windows devices. |
| omi.encryption.https.enable | Boolean | TRUE | By default, basic authentication over HTTPS is used. If you set it as ‘false’, it will use NTLM over HTTP. Note that we currently do not support NTLM authentication. |
Basic Authentication
By default, basic authentication (only over HTTPS) Port 5986 will be disabled on WinRM configuration of the remote host. To enable it, perform the following steps on the remote monitored host in cmd_prompt:
- winrm quickconfig
- winrm set winrm/config/service/auth @{Basic=”true”}
You need not install any additional packages for basic authentication. However, an HTTPS listener must be created/enabled on the Windows devices. If you do not have HTTPS listener created for WinRM, follow the steps given below to set Windows devices with basic authentication.
Create an HTTPS Listener using Self-Signed Certificate
To create an HTTPS listener for WinRM, perform the following steps:
- Run the command WinRM e winrm/config/listener in cmd_prompt to check if port 5986 is already enabled on WinRM service.
- Create a new self-signed certificate using PowerShell.
New-SelfSignedCertificate -DnsName “<YOUR_DNS_NAME>” – CertStoreLocation Cert:\LocalMachine\My
Note: The DnsName is your computer’s full name. You can find it under Control Panel > System and Security > System > Full computer name. - Copy the thumb print and run the following command in cmd_prompt.
winrm create winrm/config/Listener?Address=*+Transport=HTTPS @{Hostname=”<YOUR_DNS_NAME>”; CertificateThumbprint=”<COPIED_CERTIFICATE_THUMBPRINT>”} - To verify if the listener is created, run the command WinRM e winrm/config/listener in cmd_prompt to print details of port 5985 and 5986.
- To add a new firewall inbound rule to allow all connections for port 5986 (TCP), follow these steps:
- Search and select the Windows Firewall with Advanced Security option. The Windows Firewall with Advanced Security window is displayed.
- In the left navigation, right-click Inbound Rules and select New Rule. The New Inbound Rule Wizard window is displayed.
- Select the Port radio button and click Next.
- Select the TCP radio button.
- Select the Specific local ports radio button and enter 5986 in the blank field. Click Next.
- Select the Allow the connection radio button and click Next.
- Select the Domain, Private, and Public checkboxes and click Next.
- Enter a rule name in the Name field and click Finish.
Enable Windows Monitoring when Installing Linux Collectors
- Follow the instructions given in Installing Collectors to install Linux Collector. Once the Collector is successfully installed, the system will display a message if you want to enable Windows monitoring. Note that by default, Windows monitoring is NOT enabled on Linux Collector.
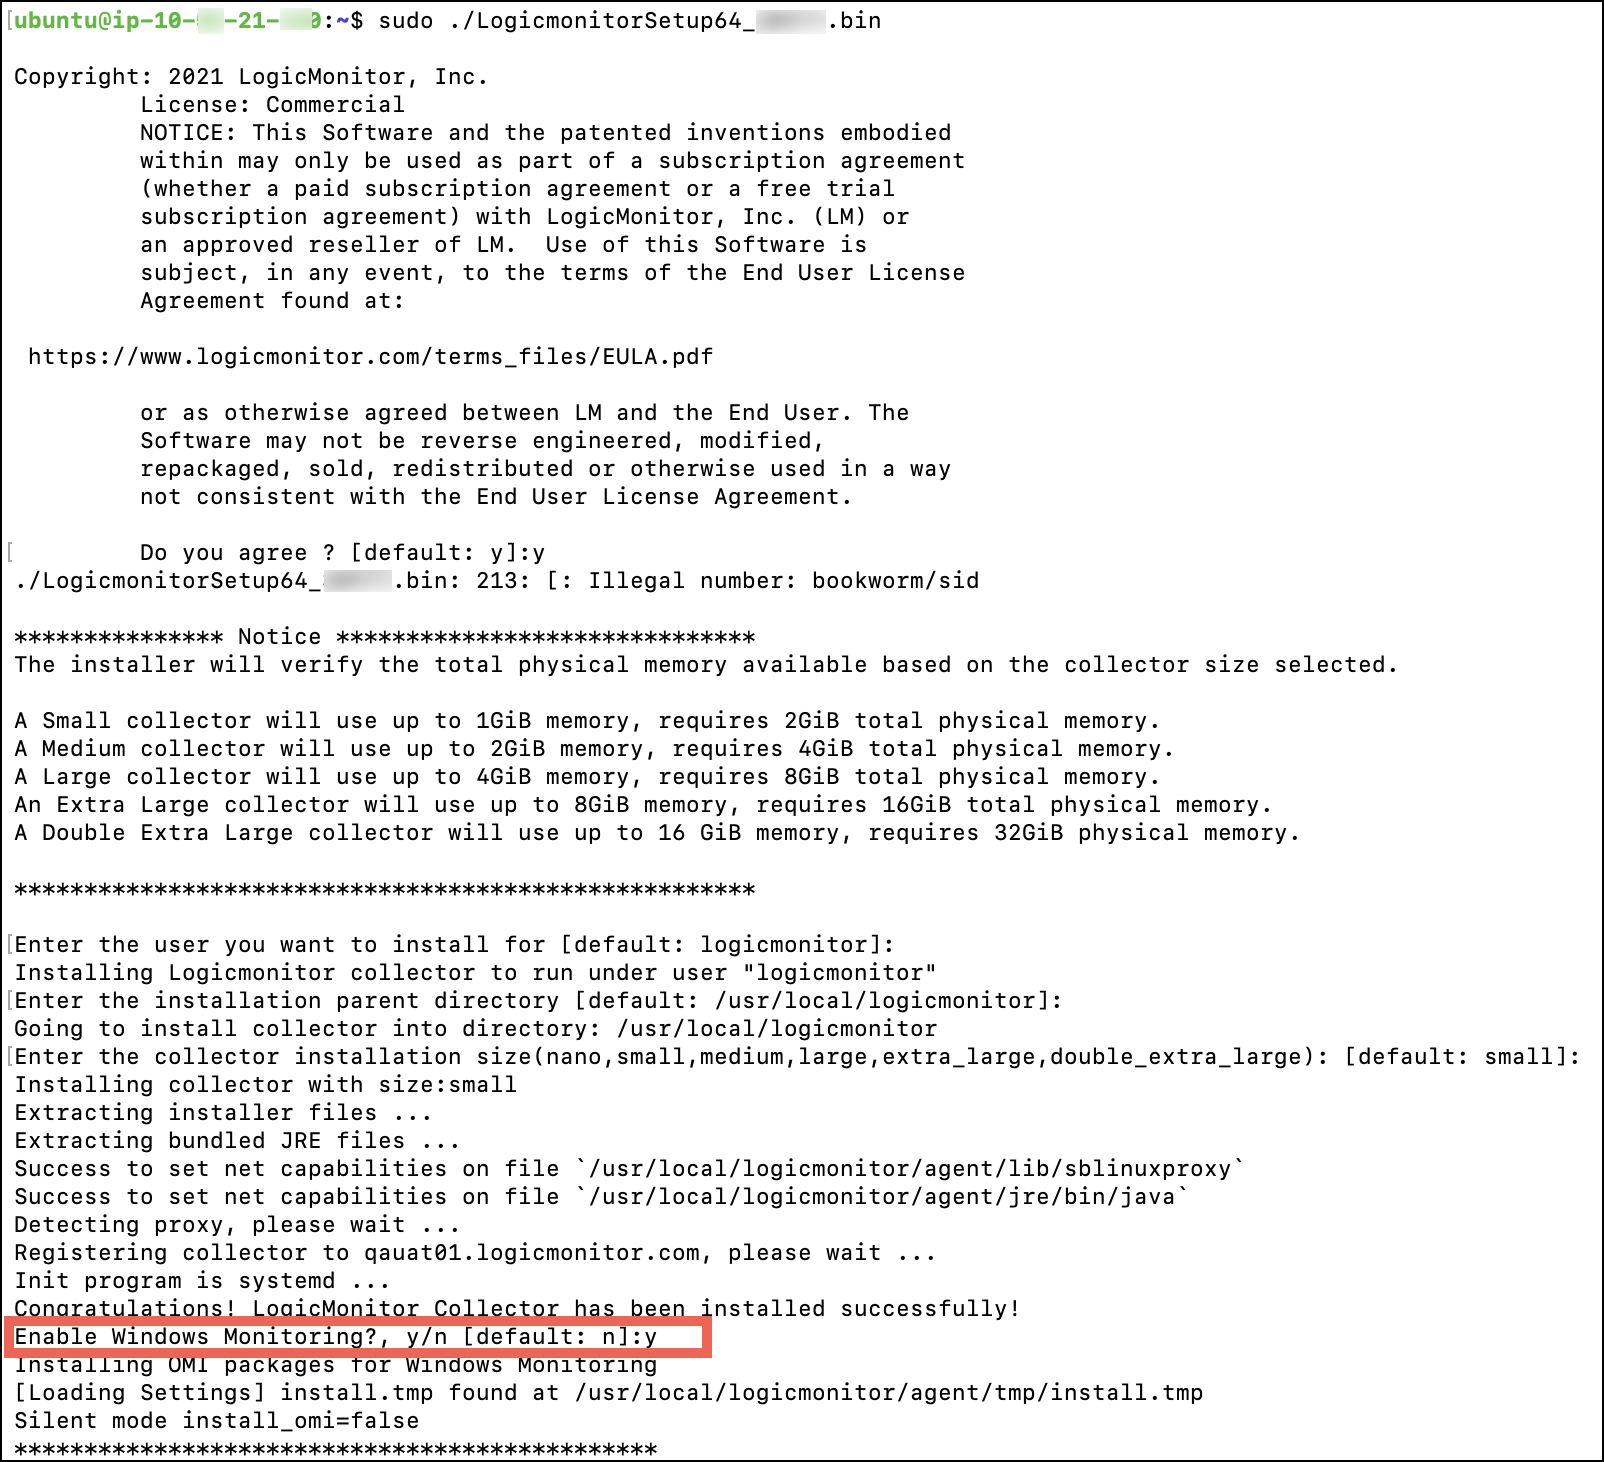
- Press Y to install packages required to monitor Windows devices through Linux Collector.
- To enable Linux Collector to monitor Windows devices, in agent.conf settings, manually set the linux.collector.enable.windows.monitoring as ‘true’.
Note: To verify the installation of OMI packages, run the following query in Linux command line terminal of your Collector machine:
/opt/omi/bin/omicli –auth Basic –hostname hostname -u user -p password –port 5986 wql root/cimv2 “Select * from win32_UserAccount” –encryption https
