
Integrating with CyberArk Vault
Last updated on 27 March, 2023LogicMonitor stores sensitive information including credentials, secrets, etc for hosts, devices, services. The LogicMonitor Collector provides the integration with CyberArk as a Vault solution. For more information, see CyberArk documentation.
CyberArk Application Authentication Methods
The CyberArk Credential Provider provides multiple methods to authenticate applications. For more information, see CyberArk documentation on Application authentication methods and Add applications.
LogicMonitor Collector and CyberArk integration support the following methods for the application authentication:
1. Allowed Machines
2. Path
3. Hash
4. Client Certificates.
Authentication to Privileged Access Security (PAS) Solution:
The CyberArk AIMWebService application is deployed on the IIS Server. Hence, LogicMonitor Collector and CyberArk integration support the following authentication methods of IIS:
Basic Authentication
You can log on to the Vault by using the password that is provided to you. After logging into the Vault, you must change your password for security purposes.
- Log on to the Vault
- Change your Password
CyberArk Collector Agent Configuration Settings
The following table contains the collector agent configuration related to the Vault:
| Name | Type | Default | Details |
| vault.bypass | Boolean | True | If the value is set as true, the vault API will not be called. If the value is set as false, the vault API would be called. |
| vault.credentials.cache.expirationtime | Integer | 60 minutes | Expiration timeout (in minutes) for credentials in vault cache. After this time, the credentials in the vault cache expires and would have to be re-fetched from the Vault. |
| vault.credentials.refresh.delay | Integer | 15 seconds | The amount of time delay (in seconds) after credentials cache expiration time. Refresh the task after the cache expiration time.Note: You may customize the amount of time delay while installing the Collector. For more information, see agent.conf Collector Settings. |
Vault properties
Vault properties, such as Vault Metadata and Vault Keys for the Collector, can be configured at the device or device group level.
CyberArk does not allow special characters, such as / : * ? ” < > , to be used in Safe names and object names.
Vault Metadata
The following table lists the Vault Metadata properties.
| Sr No. | Vault Metadata | Description |
| 1 | vault.meta.url | URL of the vault. This URL must contain the folder and application id only. |
| 2 | vault.meta.safe | Safe (Applicable only in case of CyberArk). A device can have only a single safe. |
| 3 | vault.meta.type | The type of the Vault. Currently, only the “CyberArk” vault integration is supported in the Collector. |
| 4 | vault.meta.header | The headers required for HTTP Get Request. The value for this custom property would be the header separated with “&“ the header key value would be separated with “=” as shown in the below example:vault.meta.header – Content-Type=application/json&Accept-Encoding=gzip, deflate, br |
| 5 | vault.meta.keystore.type | Type of the key store. If the key store type is not specified, the default type for the key store is JKS. |
| 6 | vault.meta.keystore.path | Path of the Keystore file. |
| 7 | vault.meta.keystore.pass | Password for the Keystore. |
Vault Keys
Vault keys need to be specified at the device level with suffix .lmvault. For example, ssh.user information should have the key specified as ssh.user.lmvault.
| Sr No. | Vault Keys | Description |
| 1. | Property suffixed with .lmvault | The custom property for which value must be retrieved from the Vault and must be specified at the device level by adding suffix .lmvault. The value of such property would be the path of the key in the Vault.For example: ssh.user.lmvault = sshssh.userFor ssh.user.lmvault, the property should be retrieved from the Vault. The value of this property “sshssh.user” represents the path in the Vault where the credential is stored. |
| 2 | Property suffixed with .lmvault : Multi-Safe | The multi-Safe approach allows fetching the values for lmvault properties from different safes within the Vault. The LM vault property value should be specified in the format safe:path.For example, the property referring to the safe sshcreds and object path as sshssh.user can be specified as: ssh.user.lmvault = sshcreds:sshssh.userThe Safe specified at the property level would override the value specified at the device level through the “vault.meta.safe” property. |
LogicMonitor Collector and CyberArk Vault integration
1. Multi-Safe support: Specify the multiple safes under a device to retrieve the credentials from Multiple Safe.
2. Multi-Vault support: You can use multiple vaults for the devices under the collector. Each of the devices can point to a single Vault.
3. You can call Vault API over HTTP or HTTPS. However, if you are calling the Vault APIs over HTTPS, you must configure the RootCA cert. For more information, see RootCA cert.
4. You must complete the CyberArk Authentication. For more information, see CyberArk Application Authentication Methods section.
Note: Device-specific cache is implemented at the Collector to avoid frequent requests to the Vault API.
Configuring CyberArk certificates
You must configure the following CyberArk files at the requesting application side:
- RootCA cert
- client.pfx file
- client.cert and client.pem files
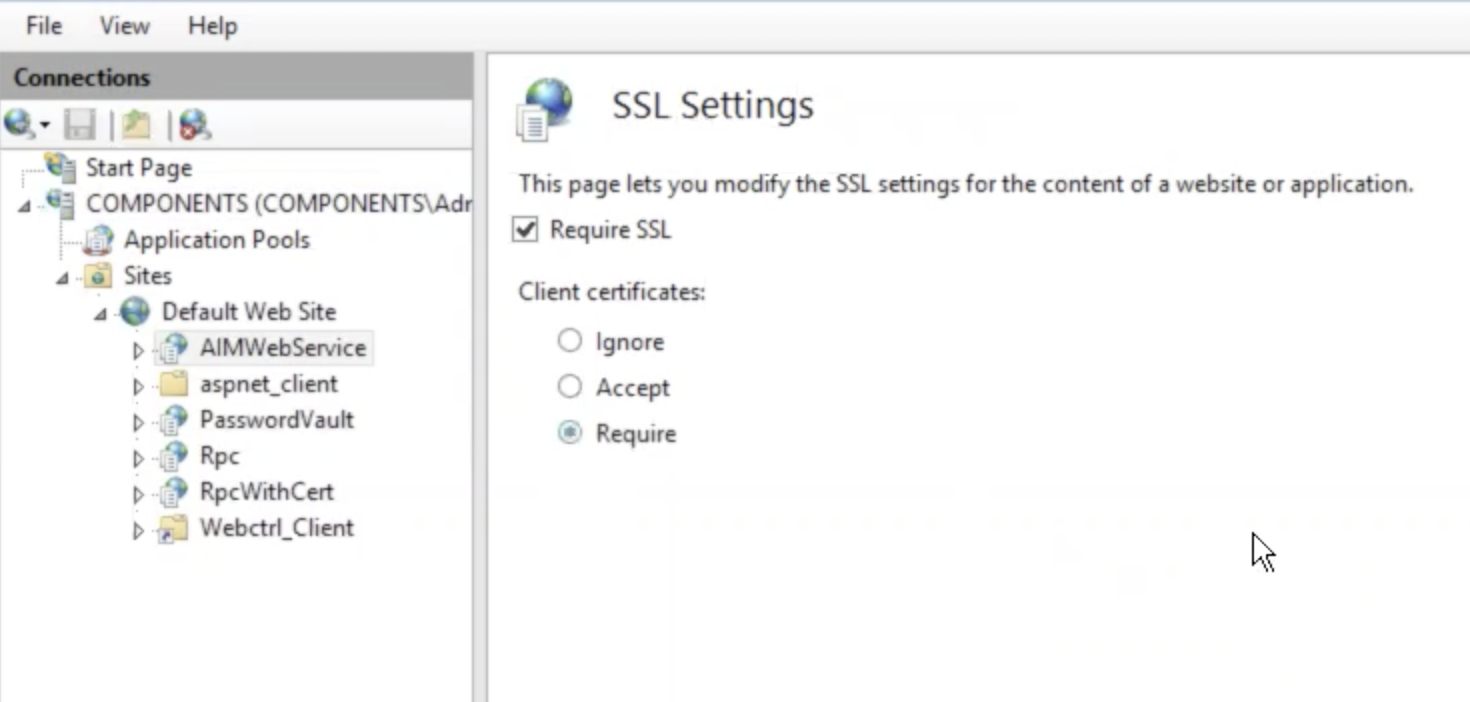
1. RootCA cert:
You must enable the Require SSL checkbox for including the RootCA cert file in the trust store of the requesting application’s server.
To import RootCA cert for the collector, complete the following steps:
- WIndows: RootCA cert must be imported in the collector’s trust store in JRE within the Collector installation folder. By this, the CyberArk endpoint will be considered a trusted source.
- Collector’s installation directory. The default file path is:
- Linux Collectors: /usr/local/logicmonitor/agent/conf /agent.conf
- Windows Collectors: C:Program Files (x86)LogicMonitorAgentconfagent.conf
To import RootCA certificate in the collector’s jre default trust store, use the command:
keytool -importcert -file Path_For_Root_CA_Folder/RootCA.crt -alias CyberArkRootCA -keystore /usr/local/logicmonitor/agent/jre/lib/security/cacert -storepass Store_Password
2. client.pfx file:
CyberArk provides client.pfx file which is a pkcs12 file containing the client certificate and client key. The client certificate and client key must be present in the HTTP request to authenticate the application request to IIS. As the client.pfx is a key store containing the client certificate and client key, this file can be directly used to authenticate the collector’s request with Vault Service deployed on IIS.
To use the client.pfx file, set the below properties at the device/device group level at the Santaba:
vault.meta.keystore.path=Path_For_Client_Keystore_Folder/client.pfx
vault.meta.keystore.pass=CyberArk1
3. client.cert and client.pem files:
Though CyberArk provides the client.pfx key store containing the client certificate and client key, it still provides the client.cert and client.pem files. These files can be used to create the custom key store. Such a custom key store can be used to authenticate the applications/collector’s request to the IIS server on which Vault Credential Service is deployed.
To create the key store using client.cert and client.pem files, use the below command.
openssl pcks12 -export -in Client_Cert_Folder/client.crt -inkey Client_Key_Folder/client.pem -out myclient.pfx -passout pass:Store_Pass
Store_Pass: The password to protect the generated key store.