
Windows Server Monitoring and Principle of Least Privilege
Last updated - 27 February, 2026
The purpose of this configuration is to run remote WMI functionality without administrator privileges. The query user must have adequate privileges for the device. Query user can be a domain user or a local user. The domain user can configure the setup centrally. However, the local user must configure the setup on each device separately.
You can implement the following methods for non-administrator migration and to enable data collection without administrator privileges on Windows Servers. Each method produces the same outcome; select the method that aligns best with your environment.
- Manual Configuration—This method requires completing each step manually without automation or external scripts. While more time-consuming, it is useful in environments where script execution is restricted or domain access is unavailable. For more information, see Manual Non-admin Configuration.
- Automated Configuration Using a Script—Use a prebuilt script to configure each target server. This method is ideal when Group Policy access is unavailable, but running the script is allowed. For more information, see Automating Non-admin Configuration.
- Deploying Using Group Policy—Use Group Policy to distribute and run the script across multiple servers. This method is recommended for scalable, domain-wide deployments. For more information, see Automating Script Execution using GPO.
Manual Non-admin Configuration
To configure manual non-administrator access, complete the following steps:
Adding User to Groups
After the user is created, you must add the user to the following groups:
- Distributed COM Users—Provides permission to access and interact with the Distributed Component Object Model (DCOM) objects on a Windows system. It enables you to run applications that rely on DCOM for inter-process communication and access distributed services across a network.
- Performance Monitoring Users—Provides permission to monitor and collect performance data on a Windows system. It enables you to run performance monitoring tools and gather system metrics.
- Event Log Readers—Provides permission to read event logs on a Windows system. It enables you to monitor and analyse system events. It enables you to view and extract information from event logs, troubleshoot issues, and analyze systems.
- Remote Management Users—Provides permission to remotely manage tasks on a Windows system. It enables you to run commands or scripts remotely and manage configurations. It enables you to use services such as Windows Remote Management (WinRM) and PowerShell remoting.
Note: Adding user to the Remote Management Users group is required only for WinRM. Add the user to this group only if the user intends to toggle between DCOM and WinRM.
Adding User to Groups in a Domain based Setup
- From an elevated PowerShell console or cmd.exe, type the command
dsato launch Active Directory Users and Computers.
Alternatively, open dsa.msc from the Run window (Win+R). - Under your domain, right-click Users and select New > User.
A New Object – User dialog box displays. - Enter a username in the User logon name field and select Next.
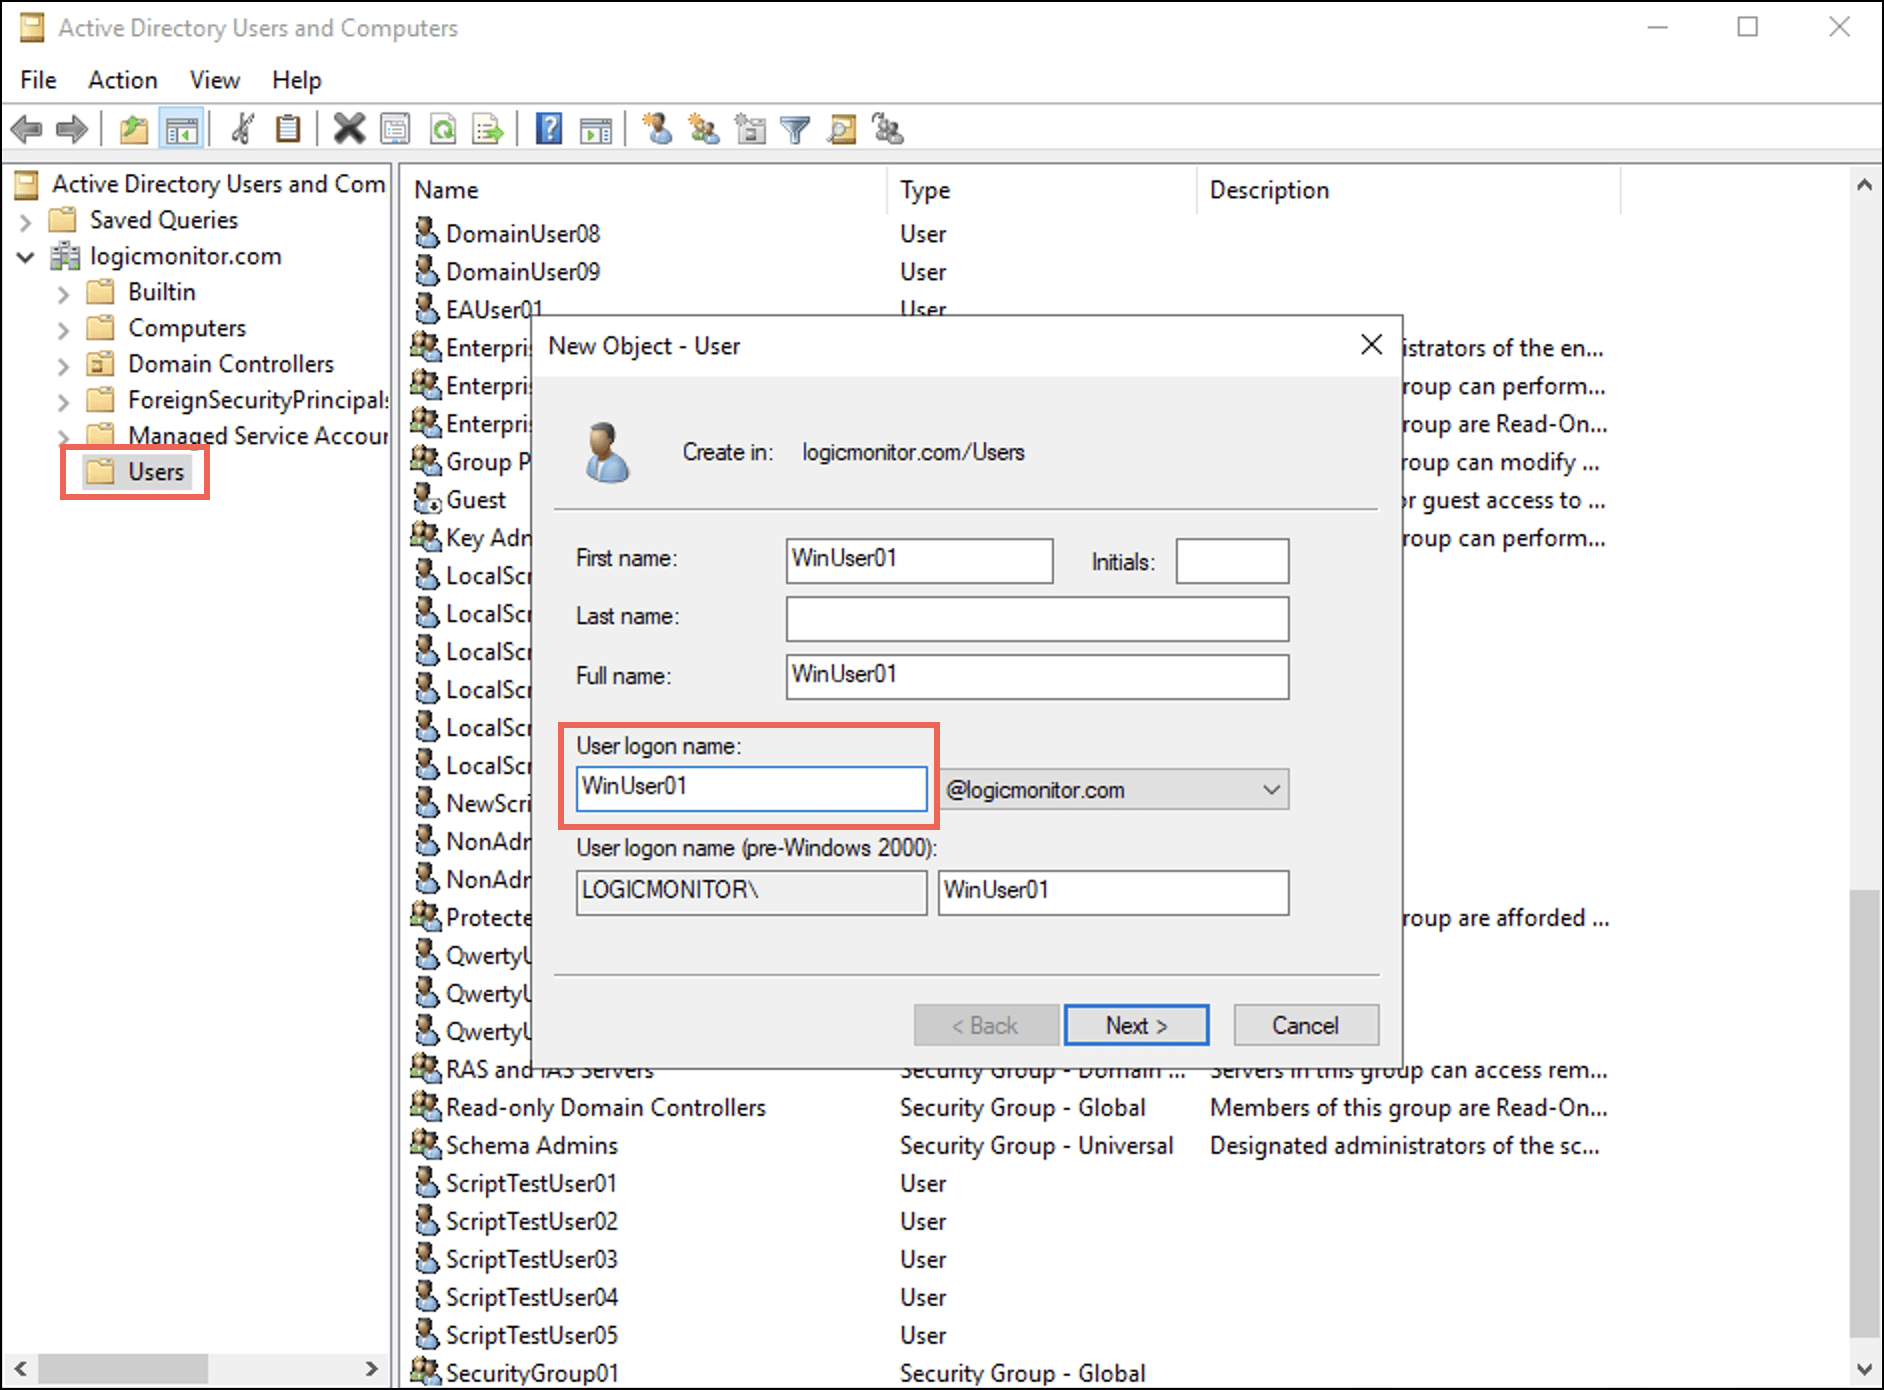
- Set the password and select OK.
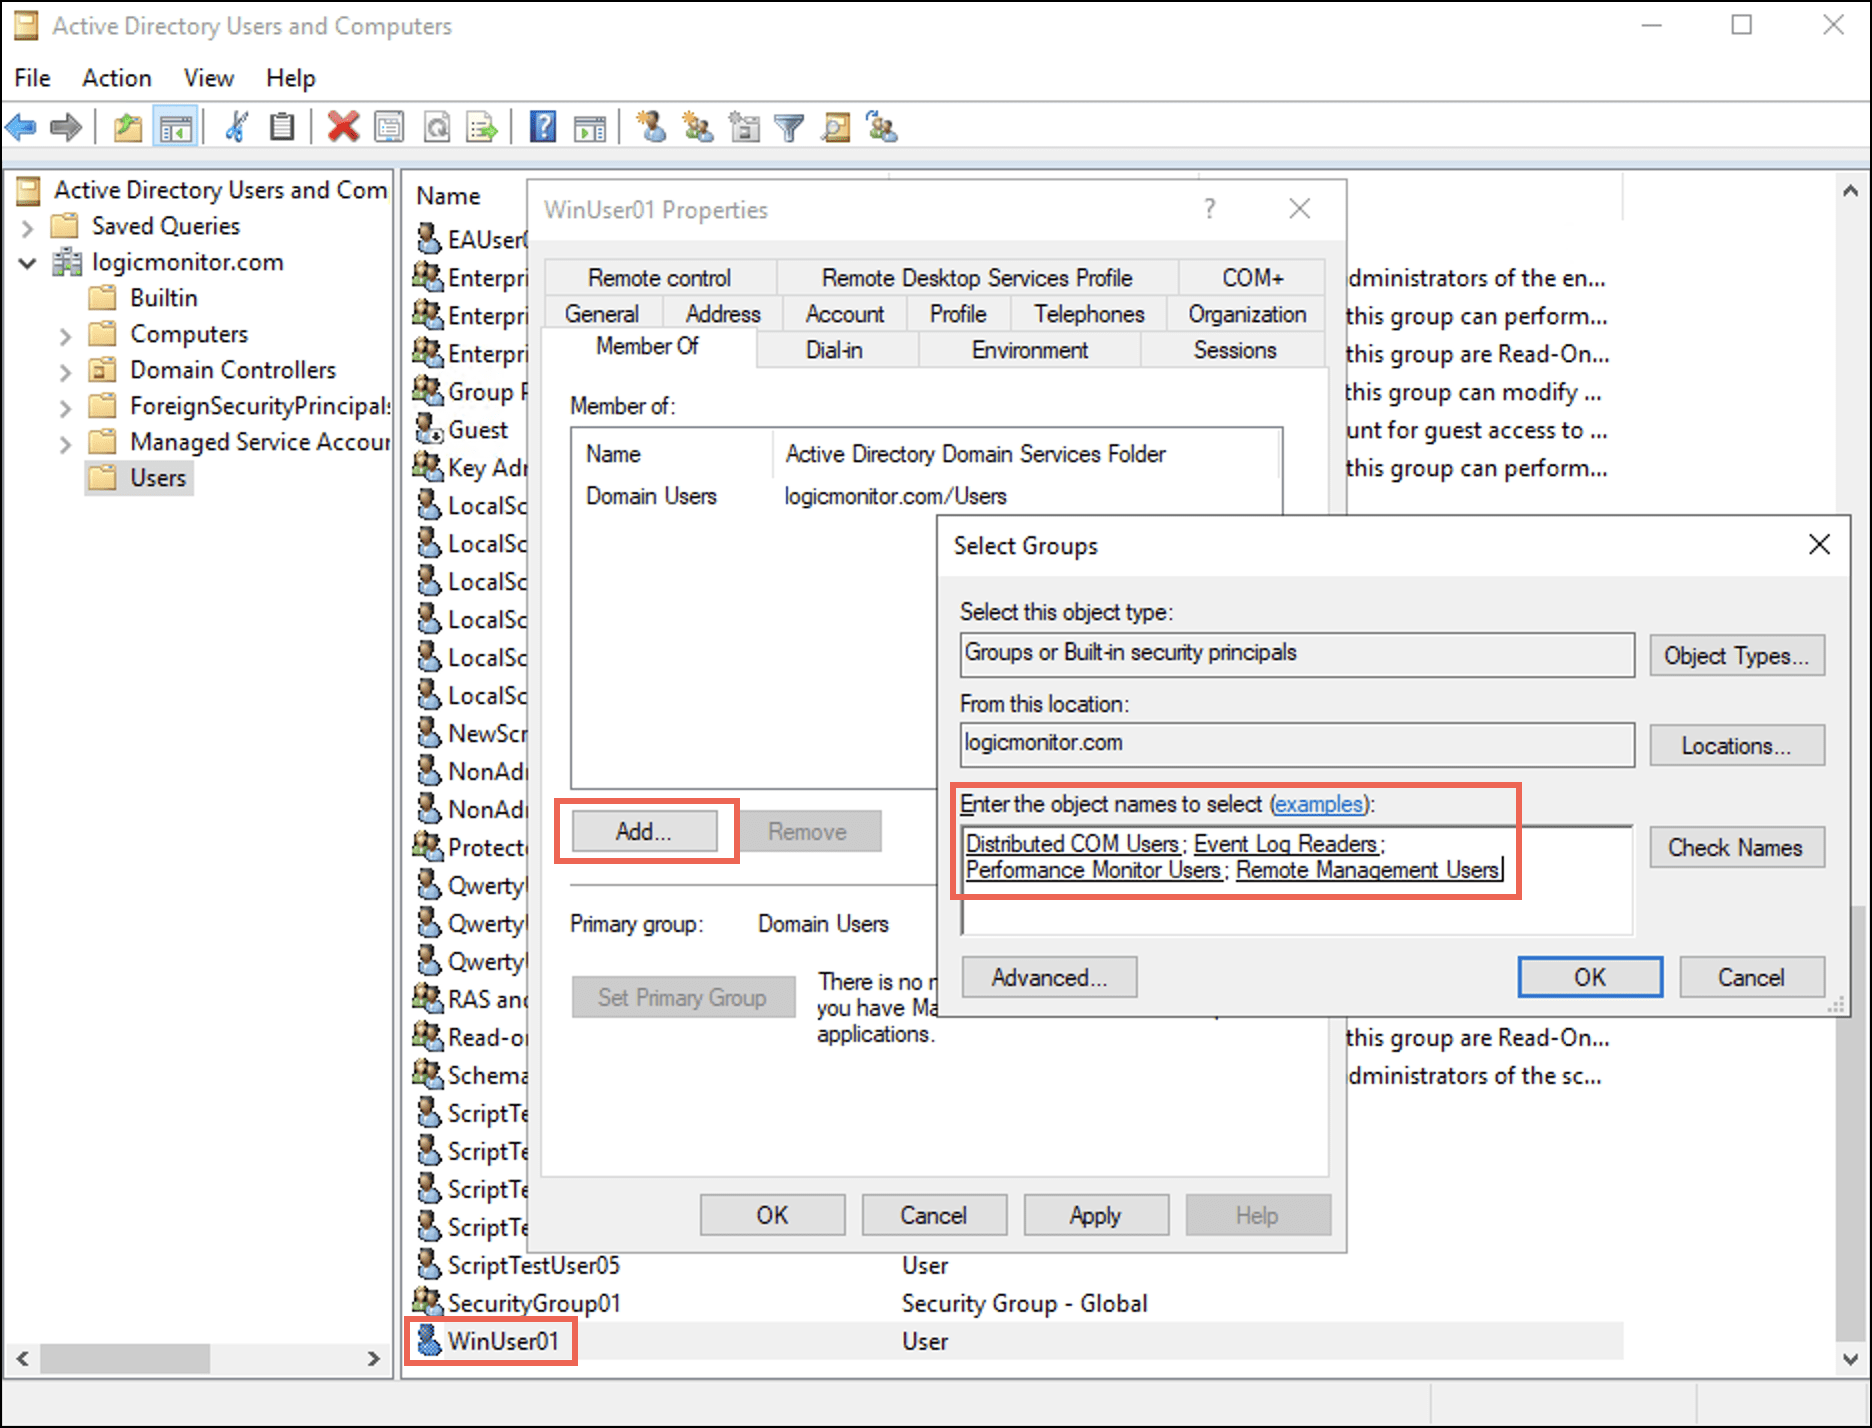
- Double-click the newly created entry of this user.
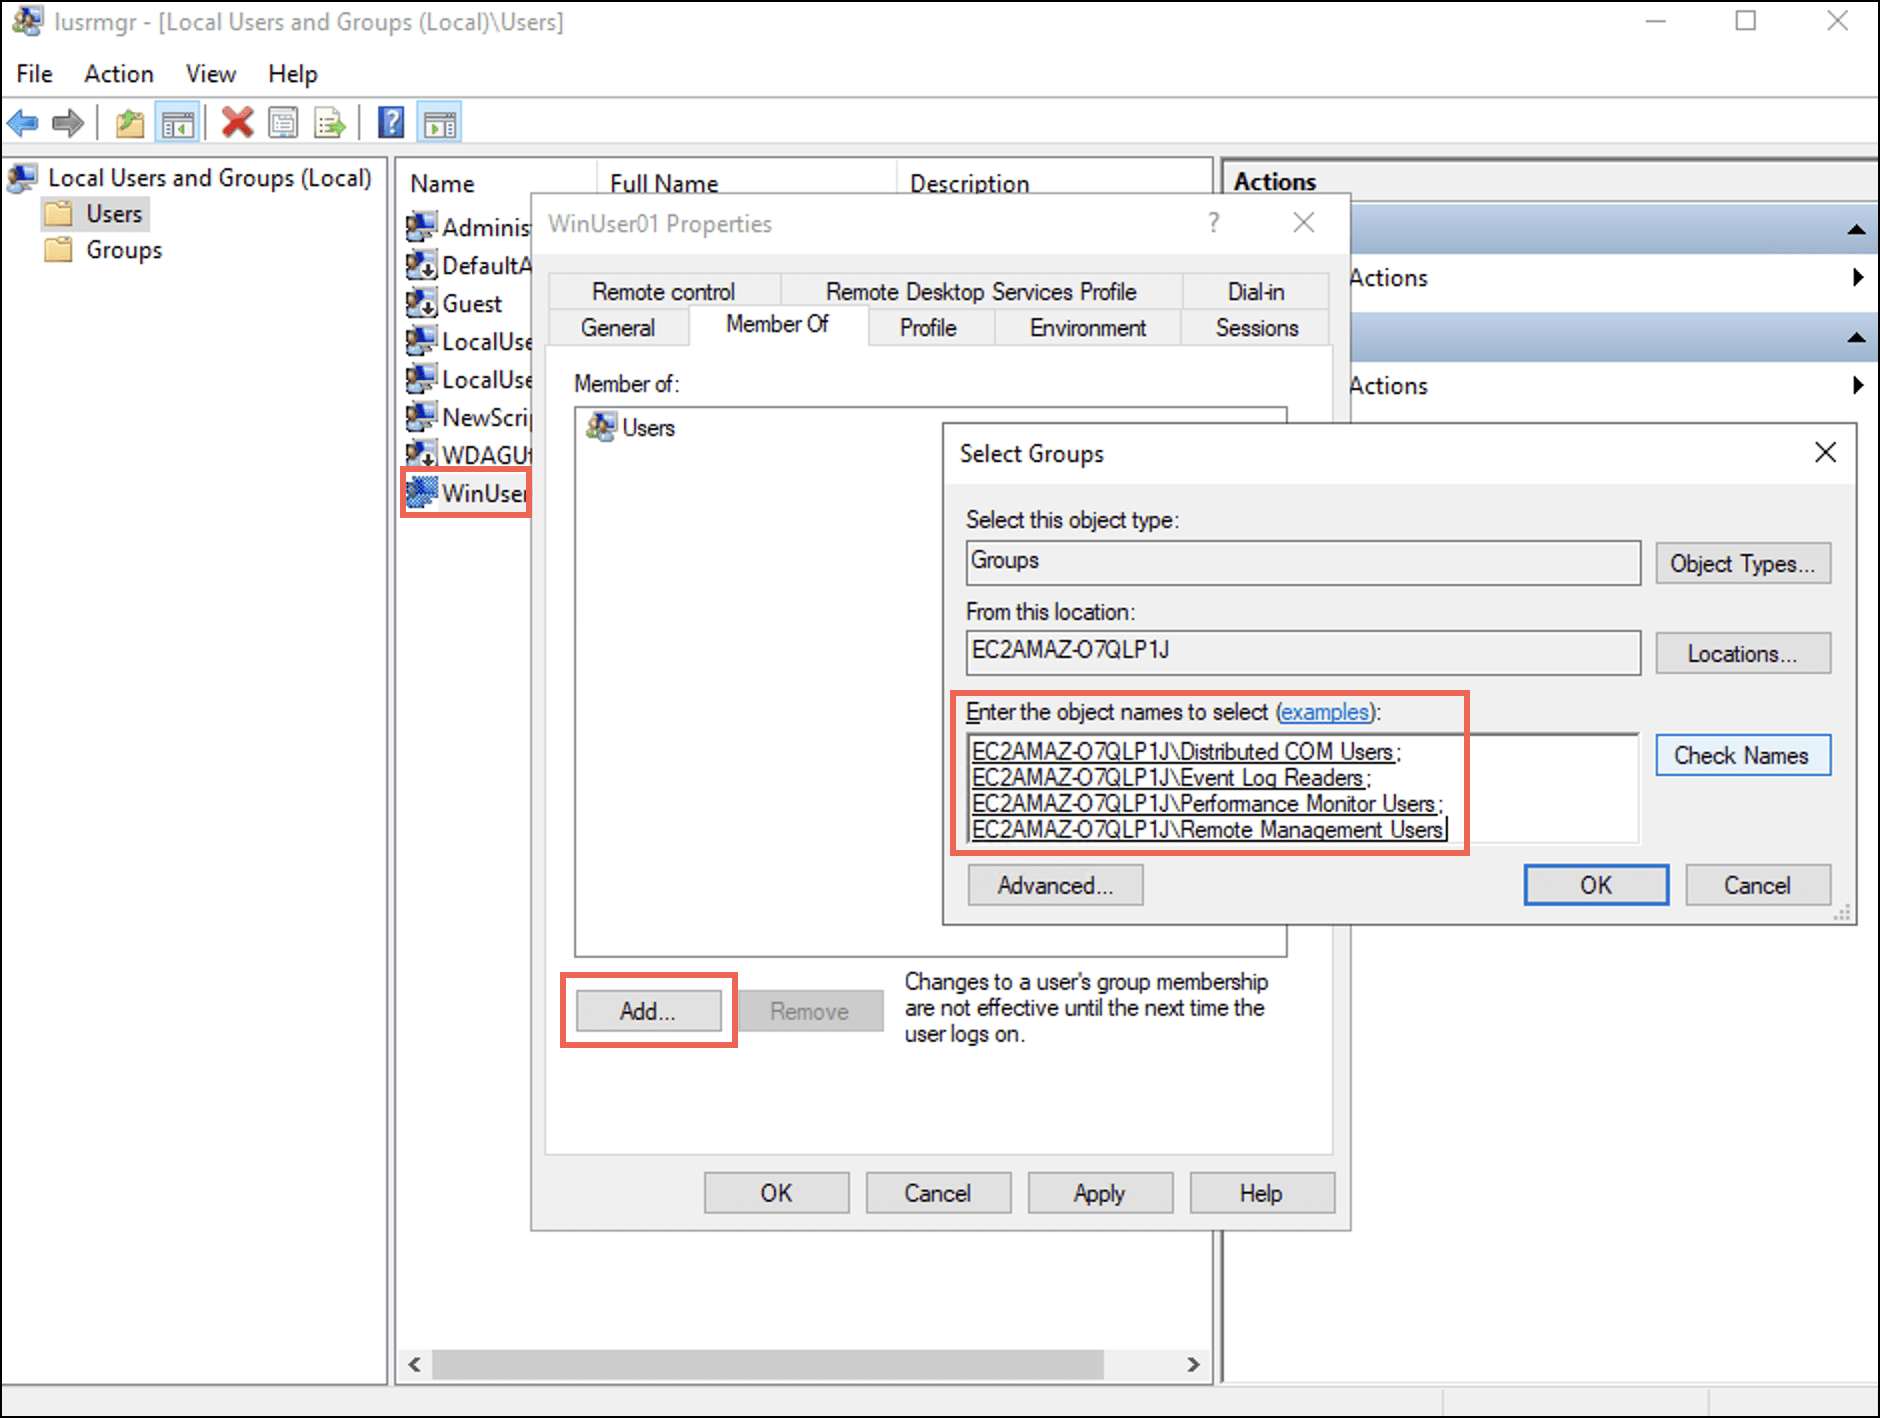
The <username> Properties dialog box displays. - Select the Member Of tab and select Add.
The Select Groups dialog box displays. - Enter the names of the four groups in the Enter the object names to select (examples): field and then select OK.
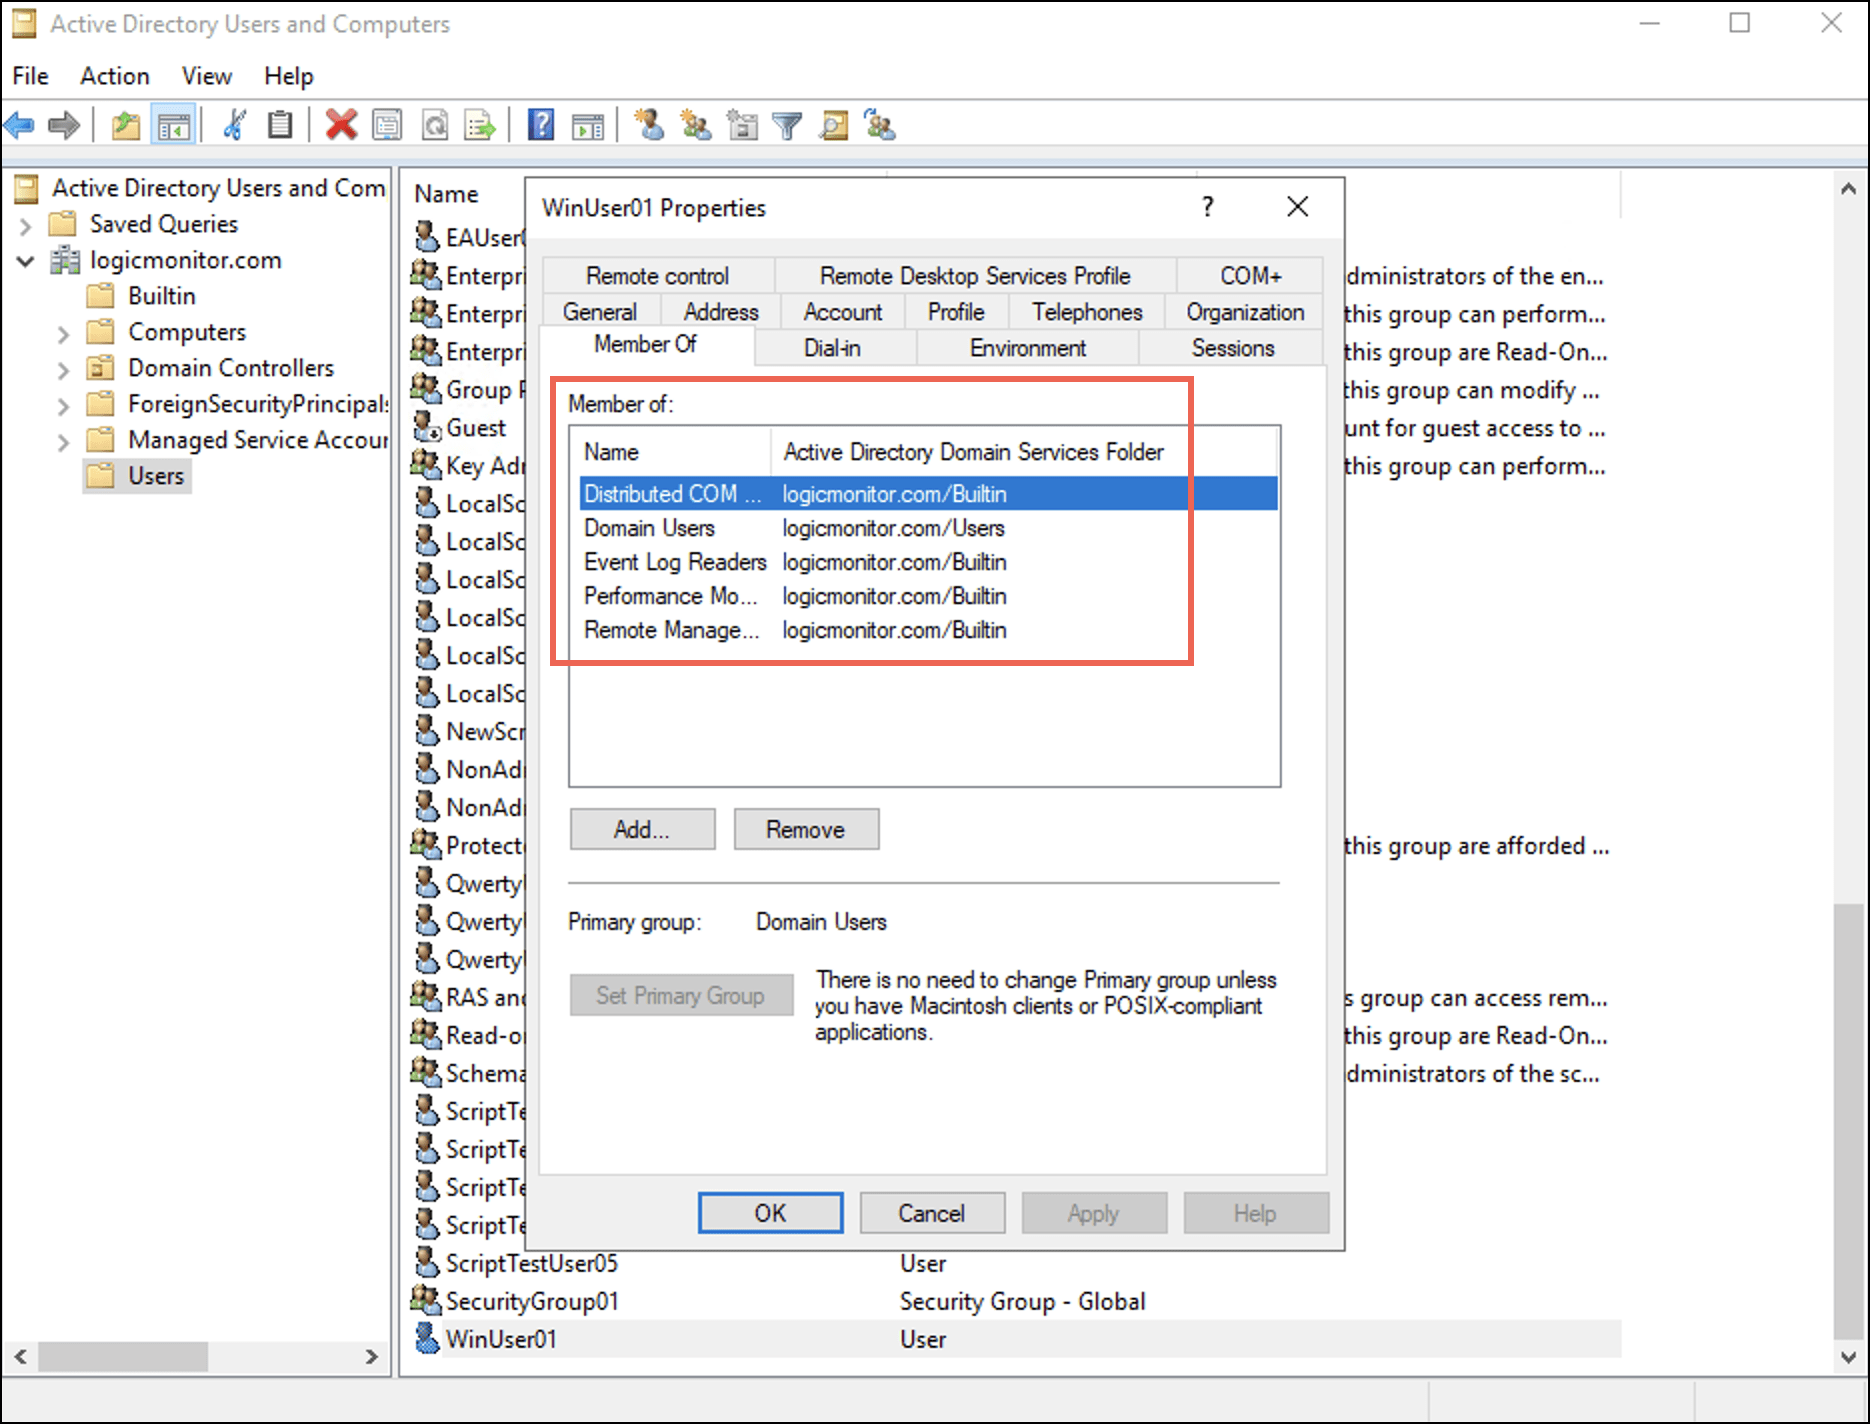
Under the Member Of tab, observe that the user is added to the four groups. - Select Apply and then select OK.
Adding User to Groups in a Non-domain or Local Setup
- From an elevated PowerShell console or cmd.exe, type the command
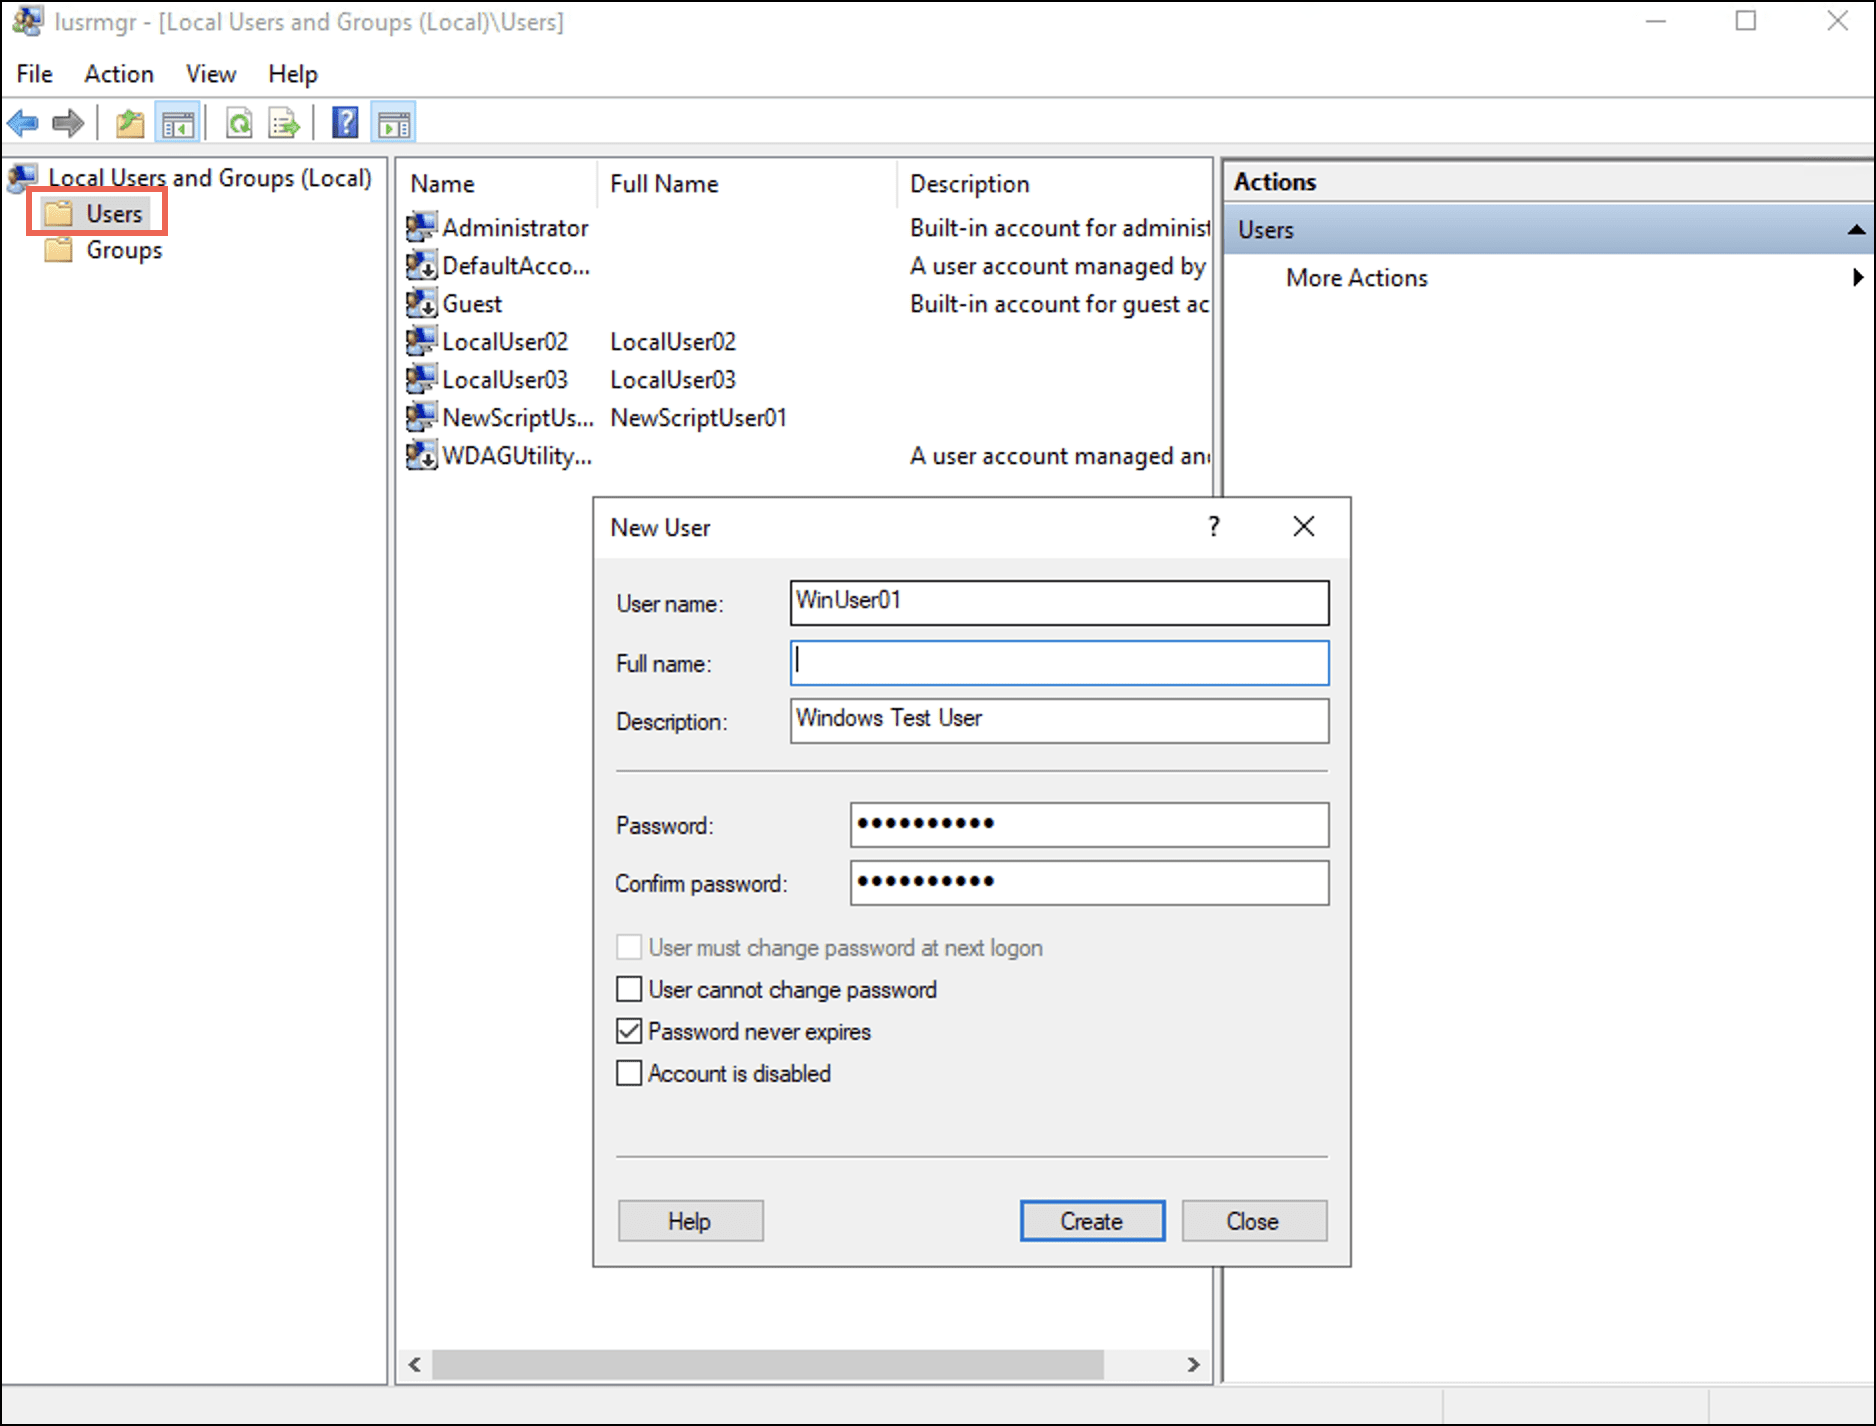
lusrmgrto launch Local Users and Groups.
Alternatively, you can open lusrmgr.msc from the Run window (Win+R). - Right-click the User folder and select New User.
A New User dialog box displays. - Enter a username and password for the new user and select Create.
- Double-click the newly created entry of this user.
The <username> Properties dialog box displays. - Select the Member Of tab and then select Add.
The Select Groups dialog box displays. - Enter names of the four groups in the Enter the object names to select (examples): field and then select OK.
Under the Member Of tab, observe that the user is added to the four groups.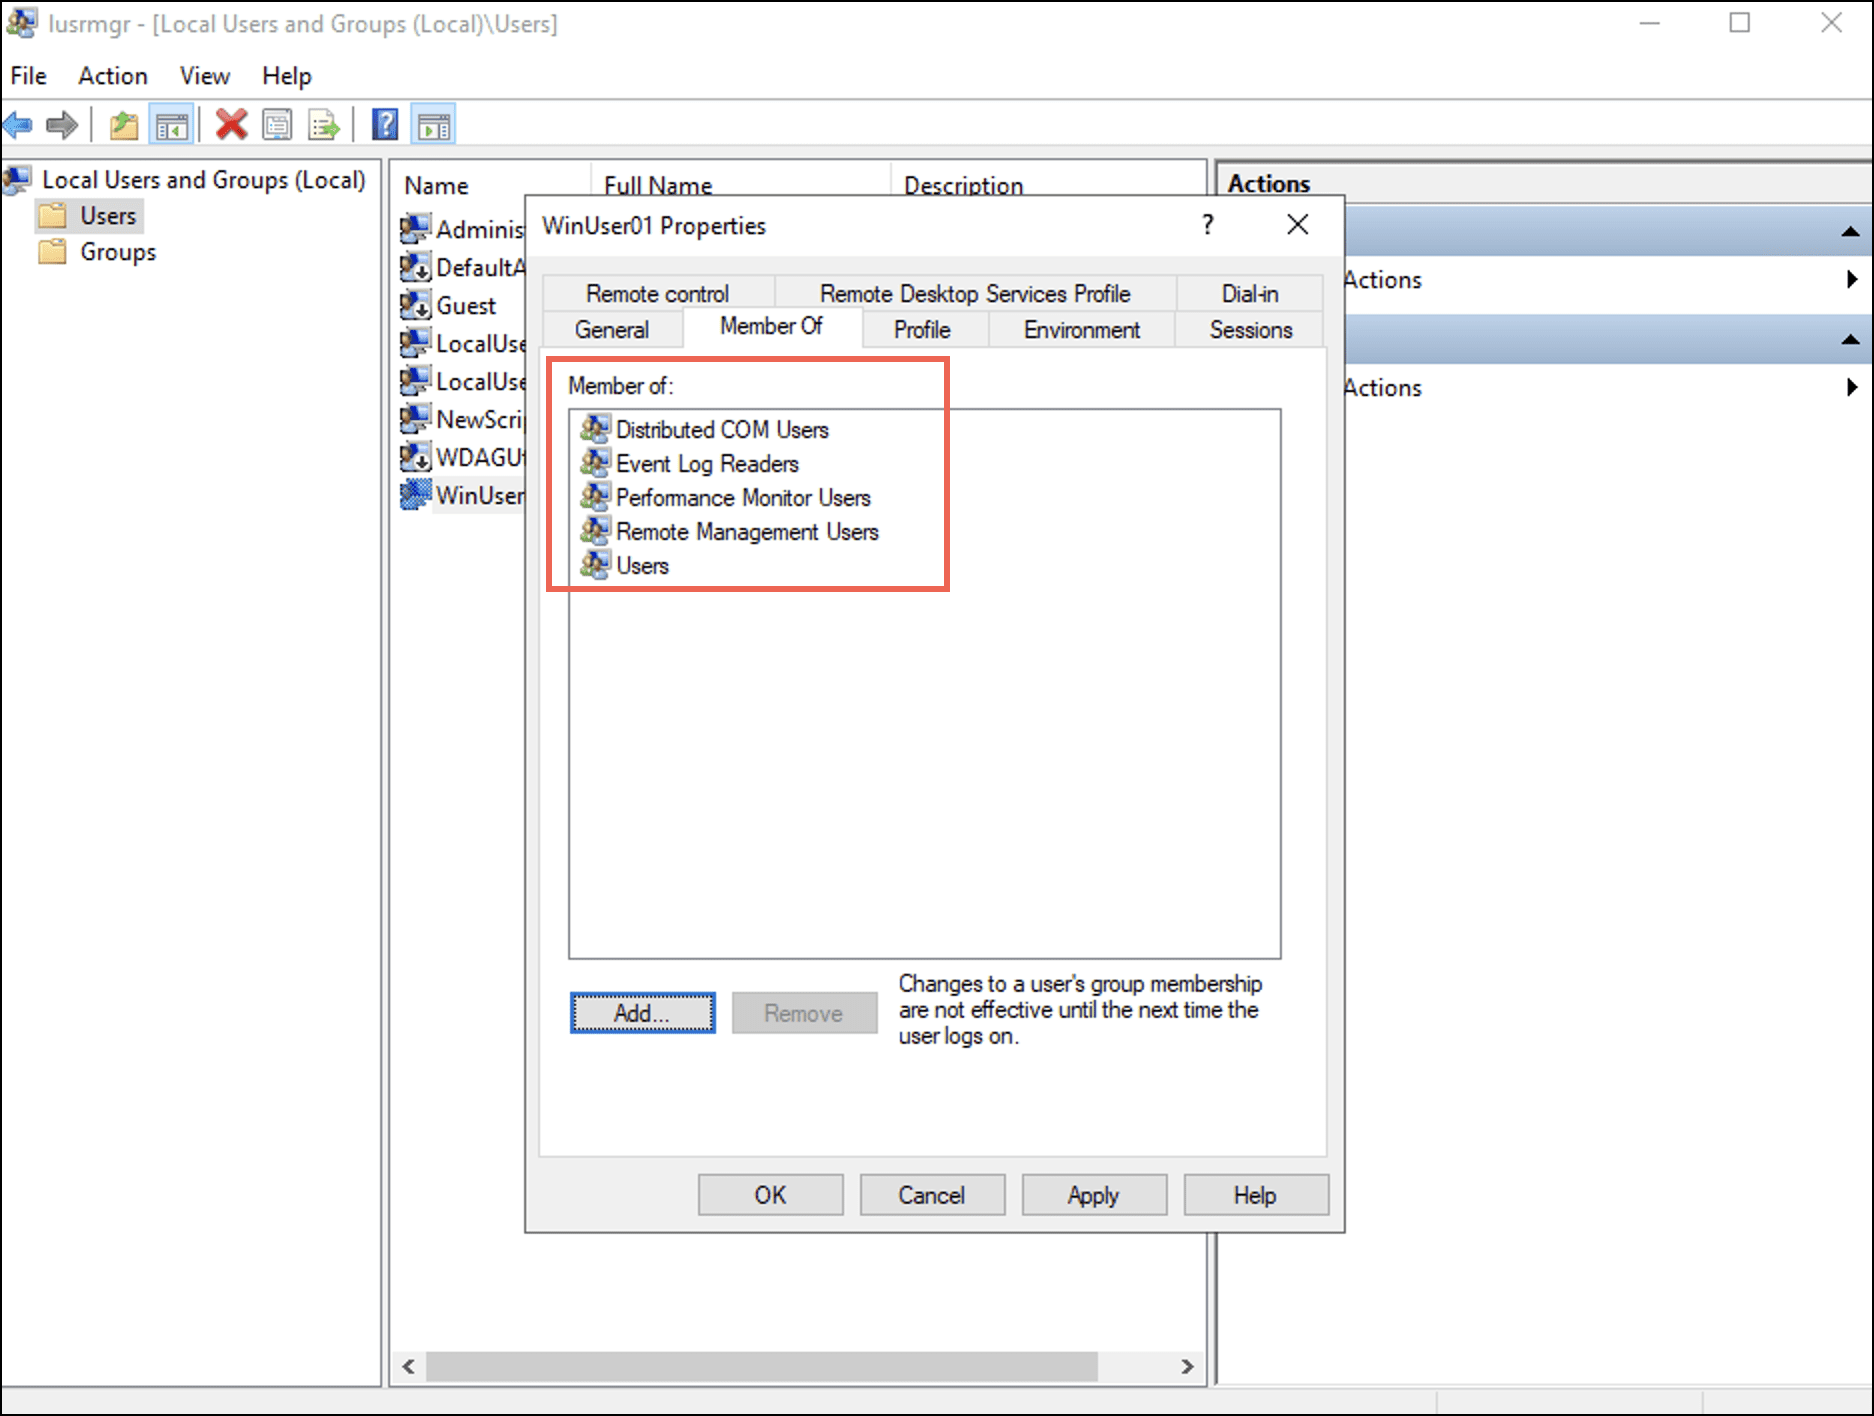
- Select Apply and then select OK.
Granting WMI Namespace Security Rights
- From an elevated PowerShell console or cmd.exe, issue the command
wmimgmtto launch the WMI Management Console.
Alternatively, you can open wmimgmt.msc from the Run window (Win+R). - Right-click WMI Control and select Properties.
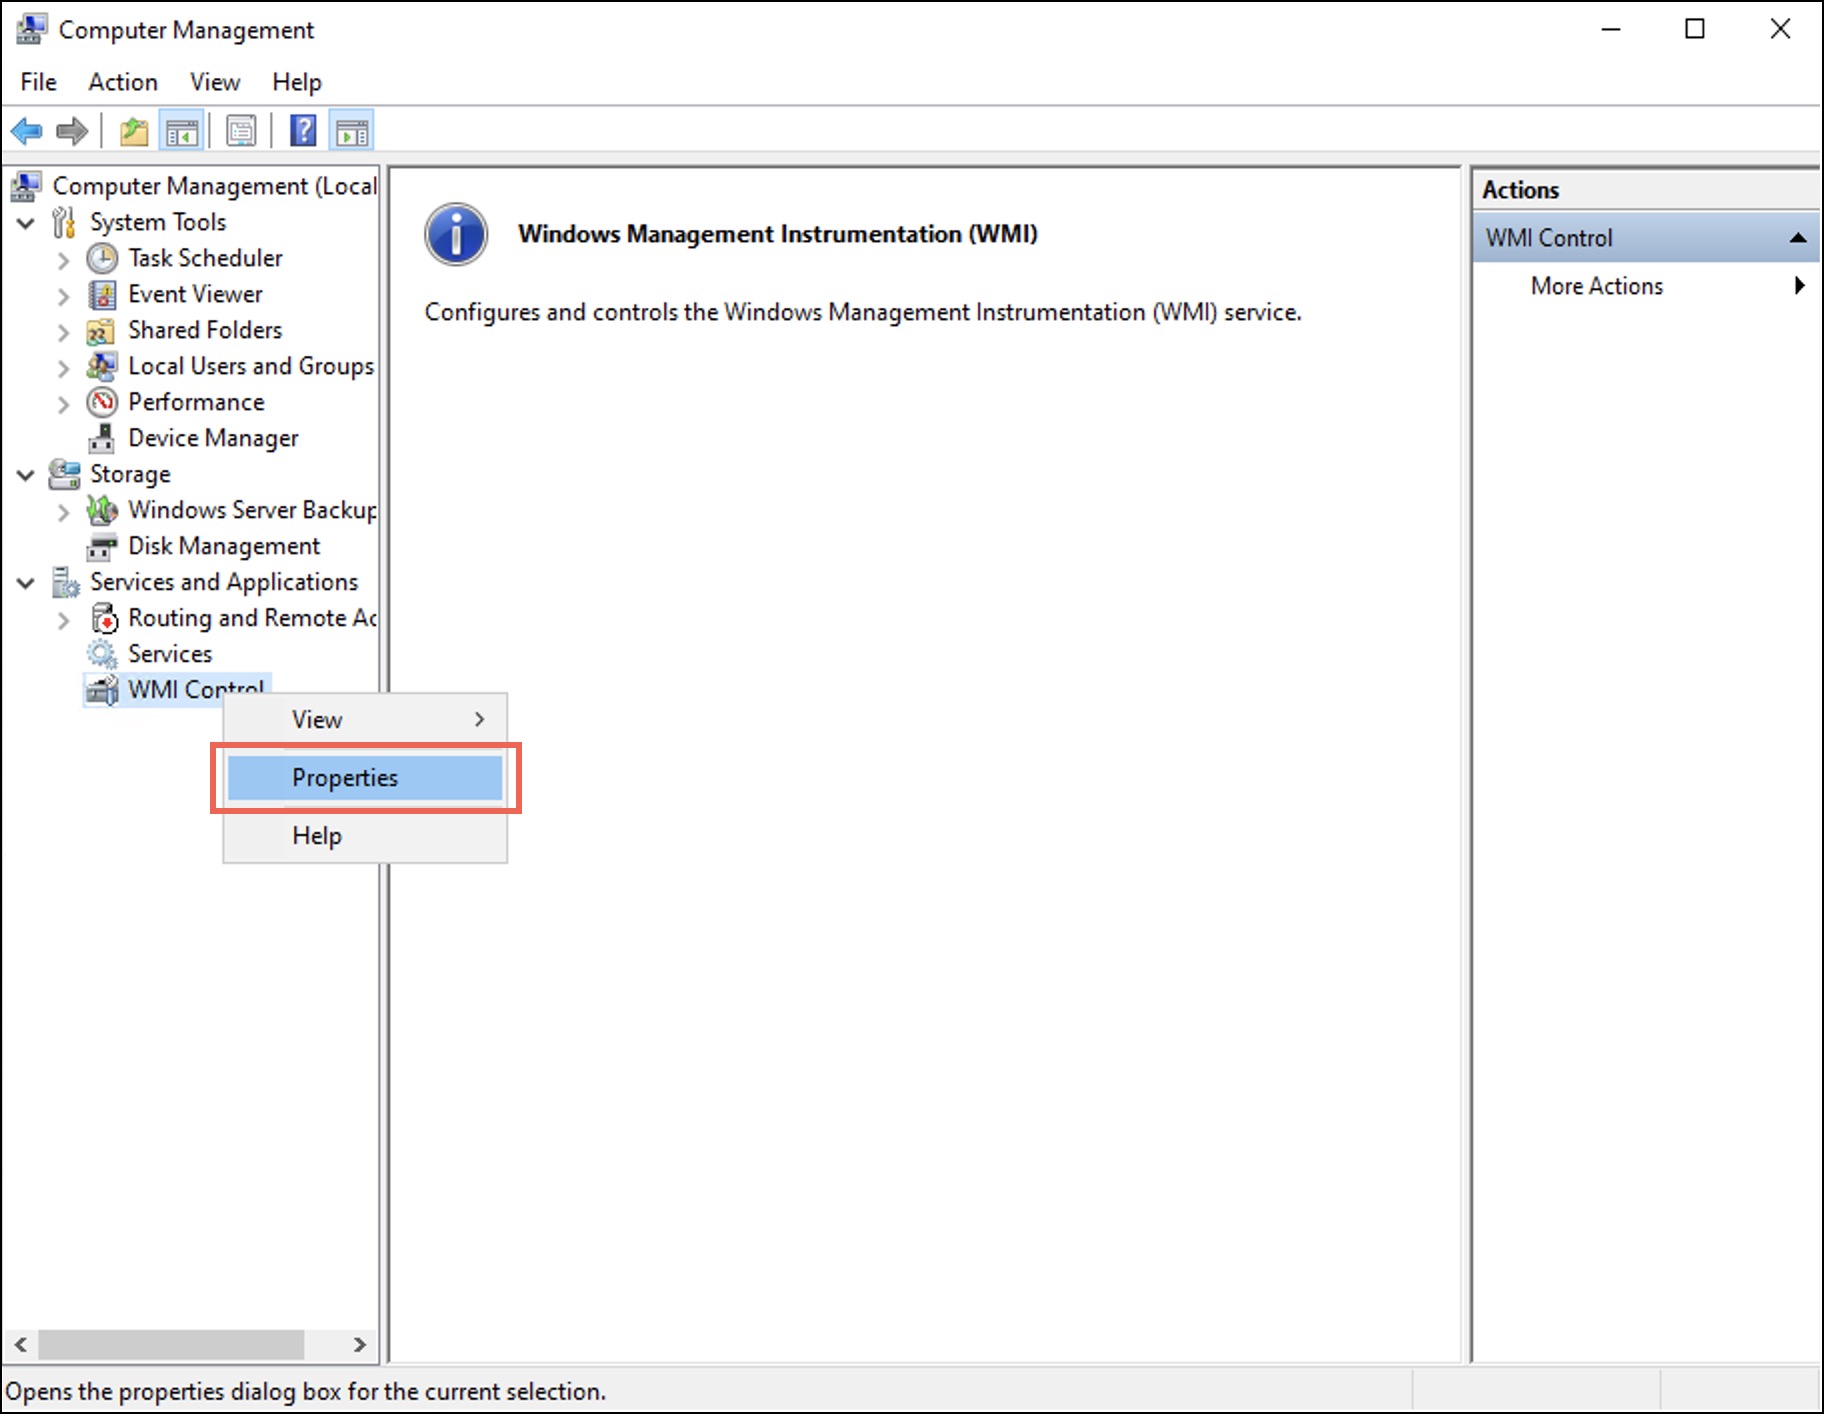
The WMI Control Properties dialog box displays. - Under the Security tab, select the Root folder.
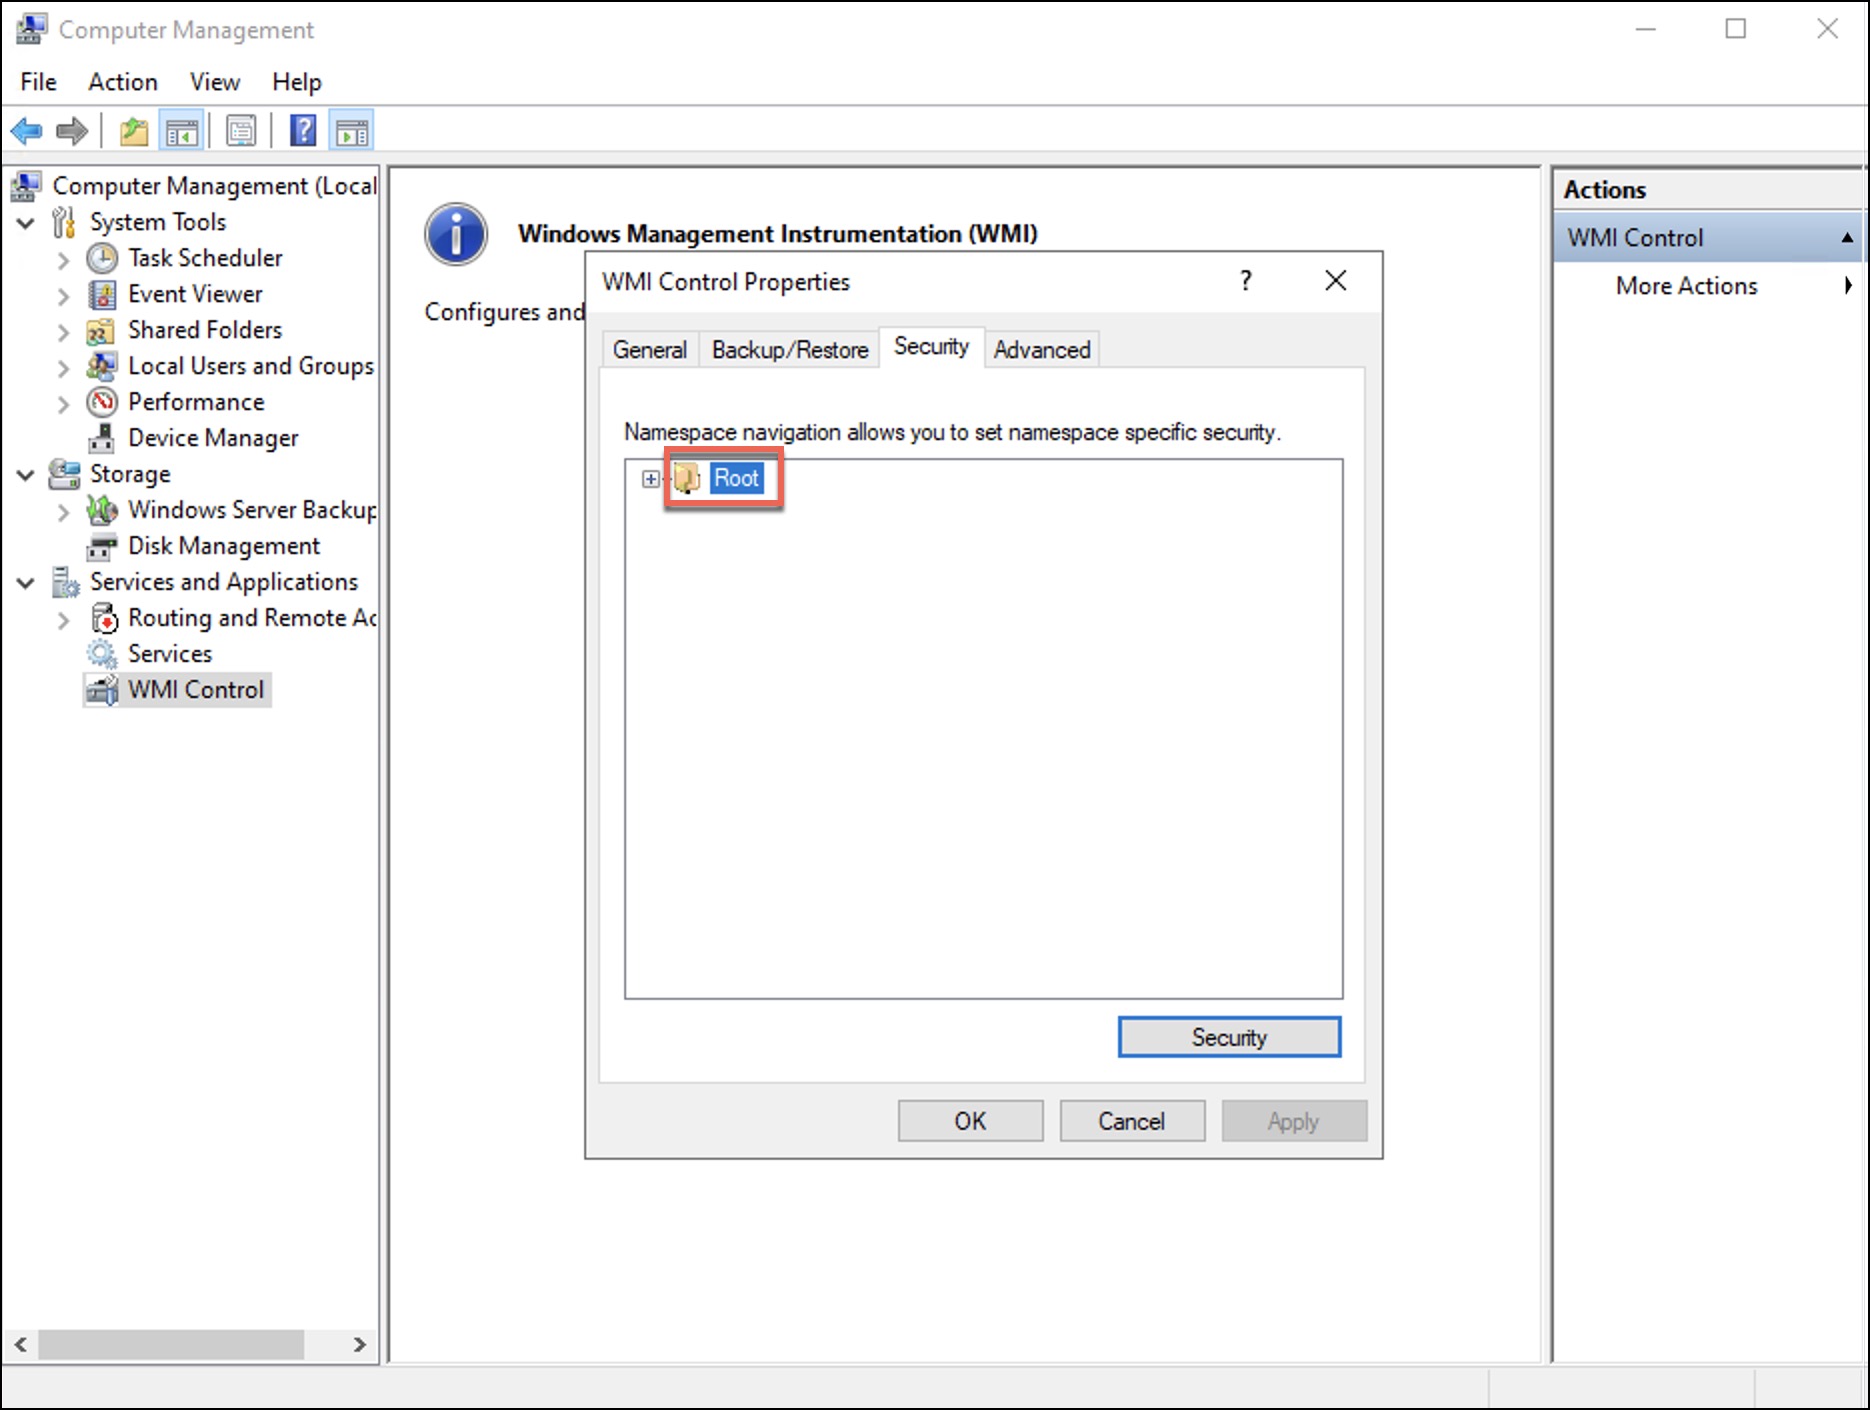
- Select Security.
The Security for Root dialog box displays. - Select Add.

The Select Users, Computers, Service Accounts, or Groups dialog box displays. - Enter the username in the Enter the object names to select (examples): field and then select OK.
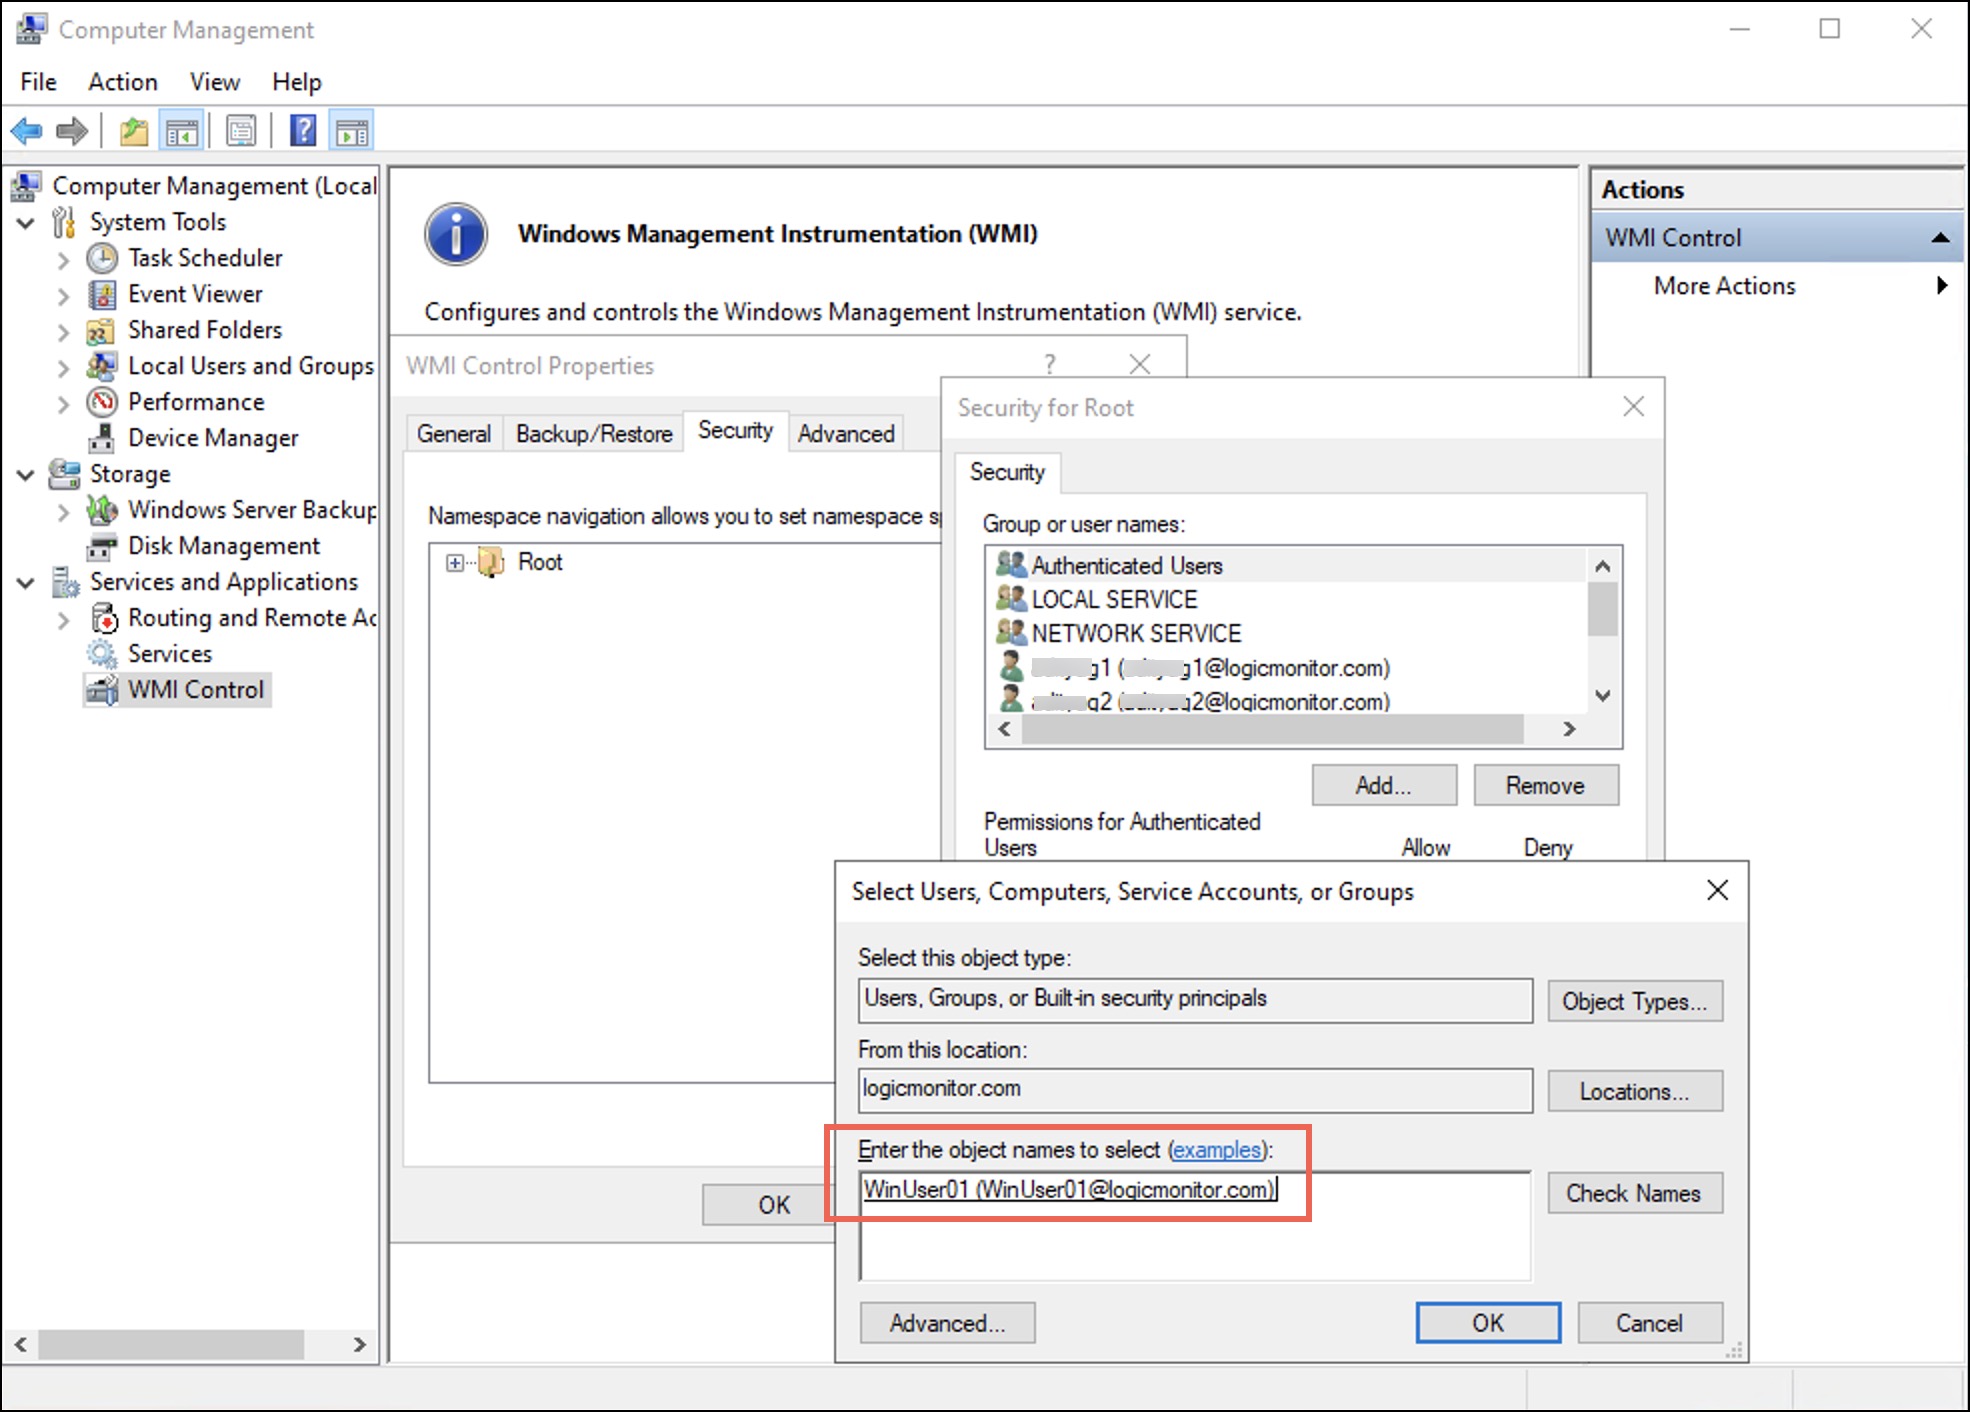
Under the Security tab observe that the user is added to the username list. - Select the user and in the permissions for the selected user, under Allow, select the Enable Account, Remote Enable, and Read Security checkboxes.
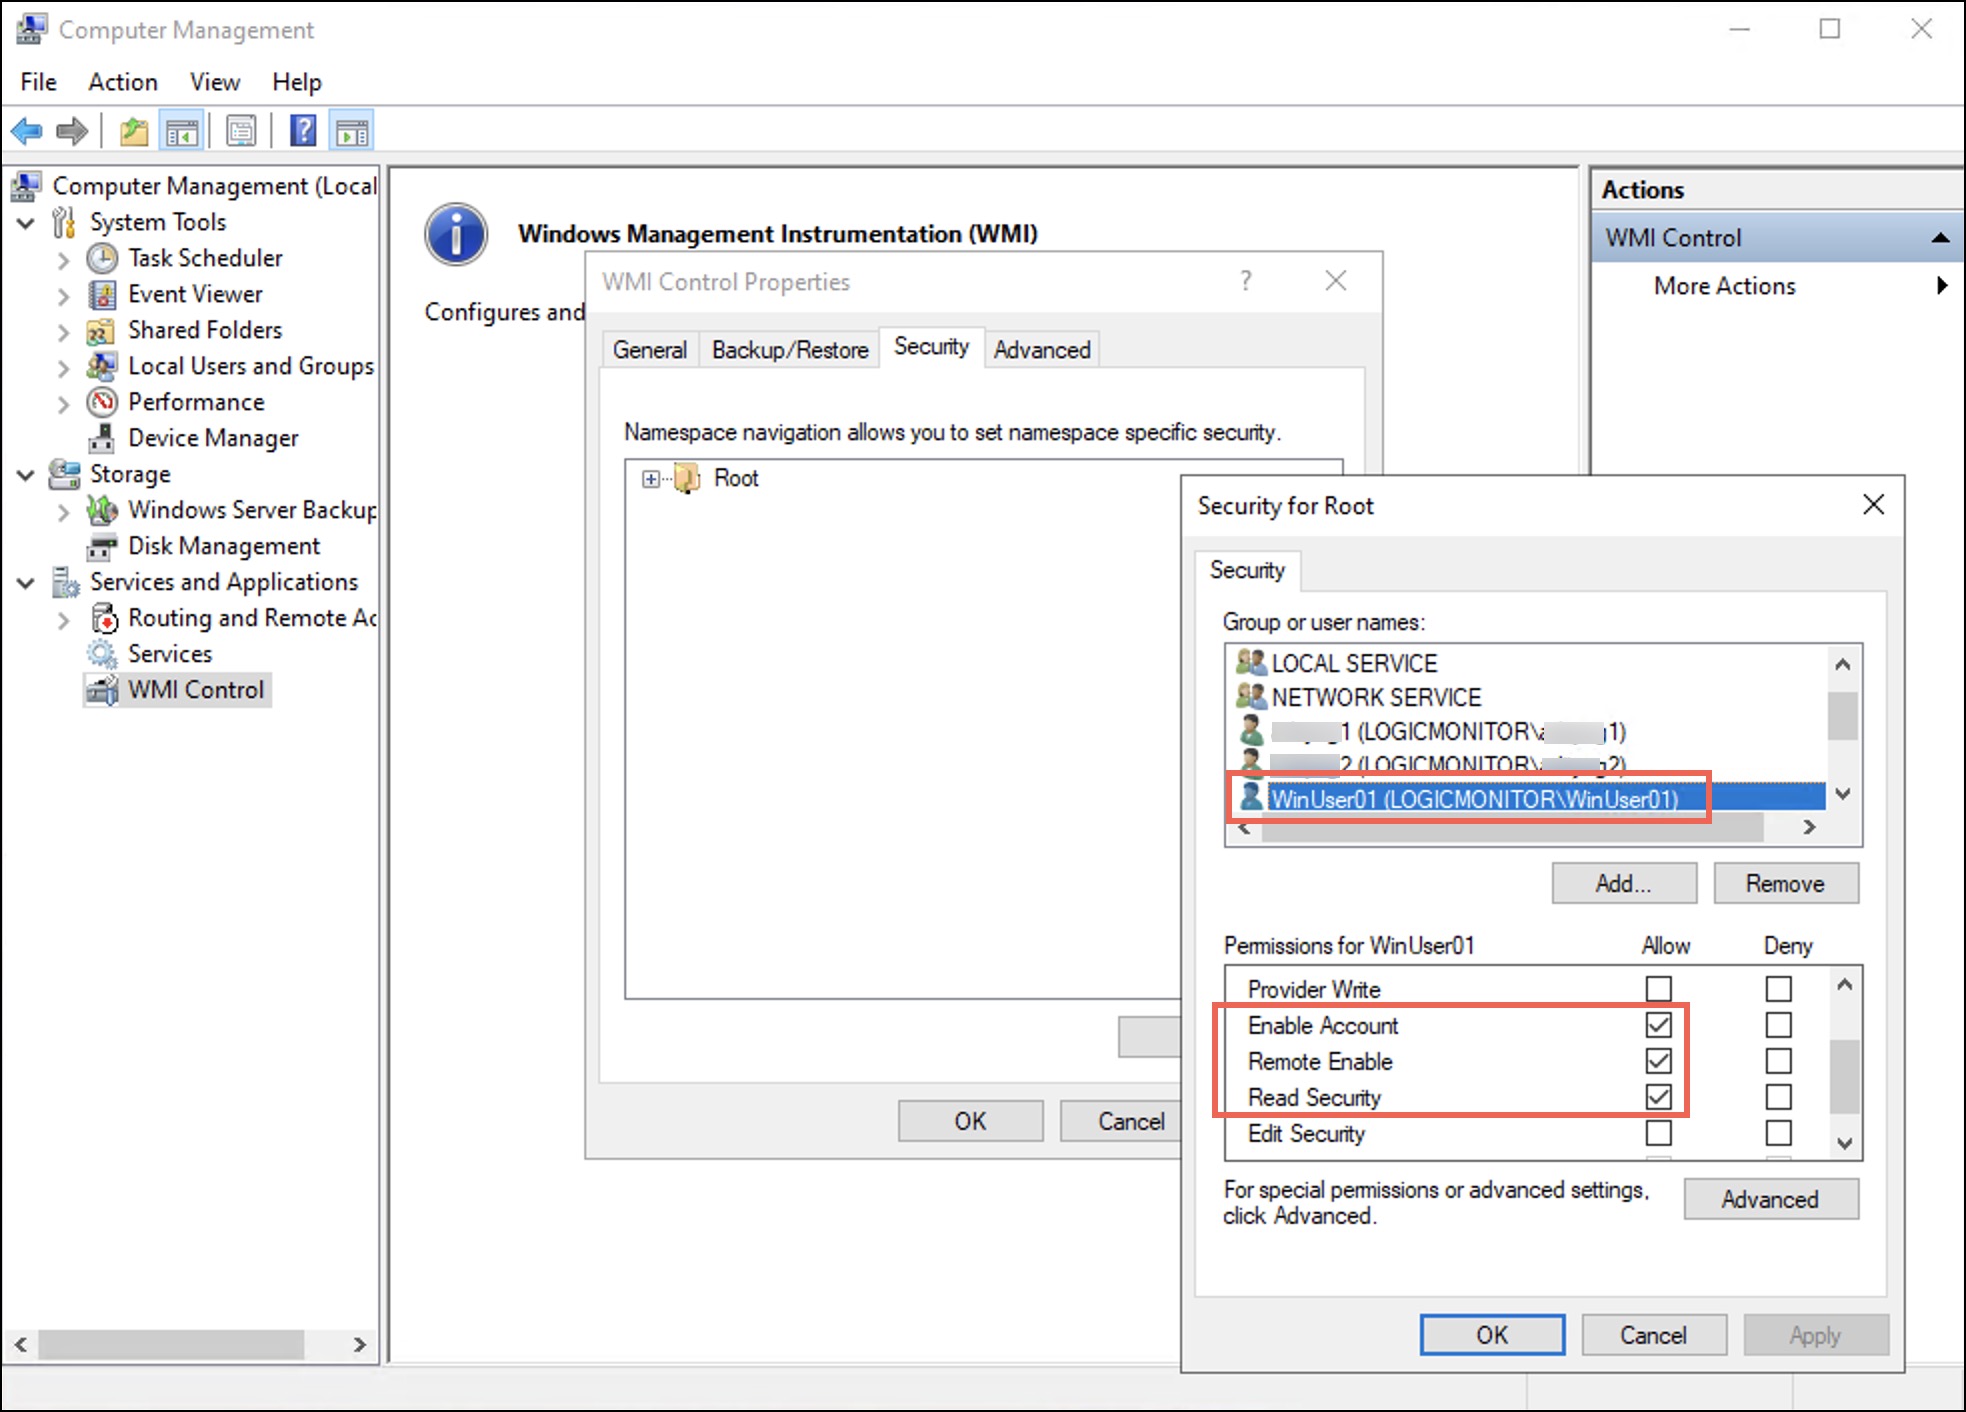
- Select Apply and then select OK.
When considering the principles of Least Privilege, the user gets only the following three permissions to the WMI Namespace. These permissions control access to the WMI namespaces, their associated classes, and instances.
- Enable Account–Controls the ability to enable and disable the WMI provider ensuring that only the authorised entities can control its state.
- Remote Enable–Governs whether remote systems can access and query the WMI provider on the local computer, thus preventing unauthorised remote access.
- Read Security–Enables accounts to view security configurations of the WMI namespace, helps to audit, and ensures efficient management of security settings.
Granting Windows Service Permissions—SDDL Changes
To change the permissions of Service Control Manager (SCManager) and the Win32_services, follow these steps:
- To retrieve the Service ID (SID) of the LogicMonitor user, run the following command in PowerShell:
[wmi] "win32_useraccount.domain='<domainName>',name='<userName>'" - To get the SDDL of the SCManager, run the following command in PowerShell:
sc.exe sdshow SCMANAGER
Sample of the retrieved SDDLD:(A;;CC;;;AU)(A;;CCLCRPRC;;;IU)(A;;CCLCRPRC;;;SU)(A;;CCLCRPWPRC;;;SY)(A;;KA;;;BA)S:(AU;FA;KA;;;WD)(AU;OIIOFA;GA;;;WD) - Create a string to append to the parent SDDL.
You must replace it with the actual SID of the LogicMonitor user.
Syntax :(A;;GR;;;<UserSID>)
Example:(A;;GR;;;S-1-5-21-265800110-2195697097-2714329818-1112) - Append the string next to the
(A;;CCLCRPRC;;;IU)string.D:(A;;CC;;;AU)(A;;CCLCRPRC;;;IU)(A;;GR;;;S-1-5-21-265800110-2195697097-2714329818-1112)(A;;CCLCRPRC;;;SU)(A;;CCLCRPWPRC;;;SY)(A;;KA;;;BA)S:(AU;FA;KA;;;WD)(AU;OIIOFA;GA;;;WD) - Set the new SDDL as the security descriptor of the SCManager.
sc sdset scmanager “D:(A;;CC;;;AU)(A;;CCLCRPRC;;;IU)(A;;GR;;;S-1-5-21-265800110-2195697097-2714329818-1112)(A;;CCLCRPRC;;;SU)(A;;CCLCRPWPRC;;;SY)(A;;KA;;;BA)S:(AU;FA;KA;;;WD)(AU;OIIOFA;GA;;;WD)"
For Win32 services, use the following SDDL format:
"(A;;GR;;;<UserSID>)"
Example
To change the Win32 Services to another service such as AppMgmt service, you must perform all the steps given for changing permissions of the SCManager. You must ensure to replace SCManager with the <serviceName> of the Windows service. For example, the following command displays the security descriptor of the AppMgmt service:
sc.exe sdshow AppMgmtLogicMonitor Service Permissions
LogicMonitor services logicmonitor-agent and logicmonitor-watchdog require additional permissions beyond the generic Read permission. During regular Collector operations, a non-admin service account starts and stops these services. Therefore, a broader ACE (A;;CCLCRPWPRC;;;<UserSID>) is applied to the two services.
Note: LogicMonitor services permission set applies only to LogicMonitor services and not to general Windows services.
Automating Non-admin Configuration
Instead of manually performing the configuration steps, you can run a PowerShell script Windows_NonAdmin_Config.ps1 to automate the non-admin configuration process. This script is available from EA Collector 35.400 onwards.
Note:
- The script is bundled with the Windows collector installer.
- After installing the collector, go to \LogicMonitor\Agent\bin.
- The path has the
Windows_NonAdmin_Config.ps1script. You must copy and paste the script to individual domain devices. - The
Windows_NonAdmin_Config.ps1script works for both the domain and non-domain setups. - You can check the detailed logs at
%appdata%\LogicMonitor\Logslocation.
To automate the non-admin configuration process, follow these steps:
- Open a PowerShell session as administrator, and change the path to the script location \LogicMonitor\Agent\bin.
- For the domain based setup, to run the script, pass the UserName parameter in the DomainName\UserName format.
.\Windows_NonAdmin_Config -add -UserName logicmonitor\DomainUser101
For the non-domain setup, use the following format:
.\Windows_NonAdmin_Config -add -UserName DomainUser101Rolling back to Administrator User
To roll back to admin configuration, follow these steps:
- Open a PowerShell session as non-admin, and go to the script location \LogicMonitor\Agent\bin.
- For the domain based setup, run the following script:
.\Windows_NonAdmin_Config -remove -UserName logicmonitor\QueryUser101For the non-domain based setup, run the following script:
.\Windows_NonAdmin_Config -remove -UserName QueryUser101
Migrating Admin to Non-admin User for Collector Service Account
This section explains how to convert a Windows user to non-admin and grant the required permissions to query data.
During Collector installation, if you have used Collector Service Account credentials then the Collector is running under the admin user. You can convert the admin user to non-admin user using the Windows_NonAdmin_Config.ps1 script. For example, if your Collector username is LogicMonitor, use the following command to convert it to non-admin. You can add the domain name if it is a domain based setup.
.\Windows_NonAdmin_Config -add -UserName LogicMonitorAutomating Script Execution using GPO
To automate script execution through GPO, you must create a GPO policy and add tasks to the GPO policy. You must then restart the domain machine.
Creating GPO Policy
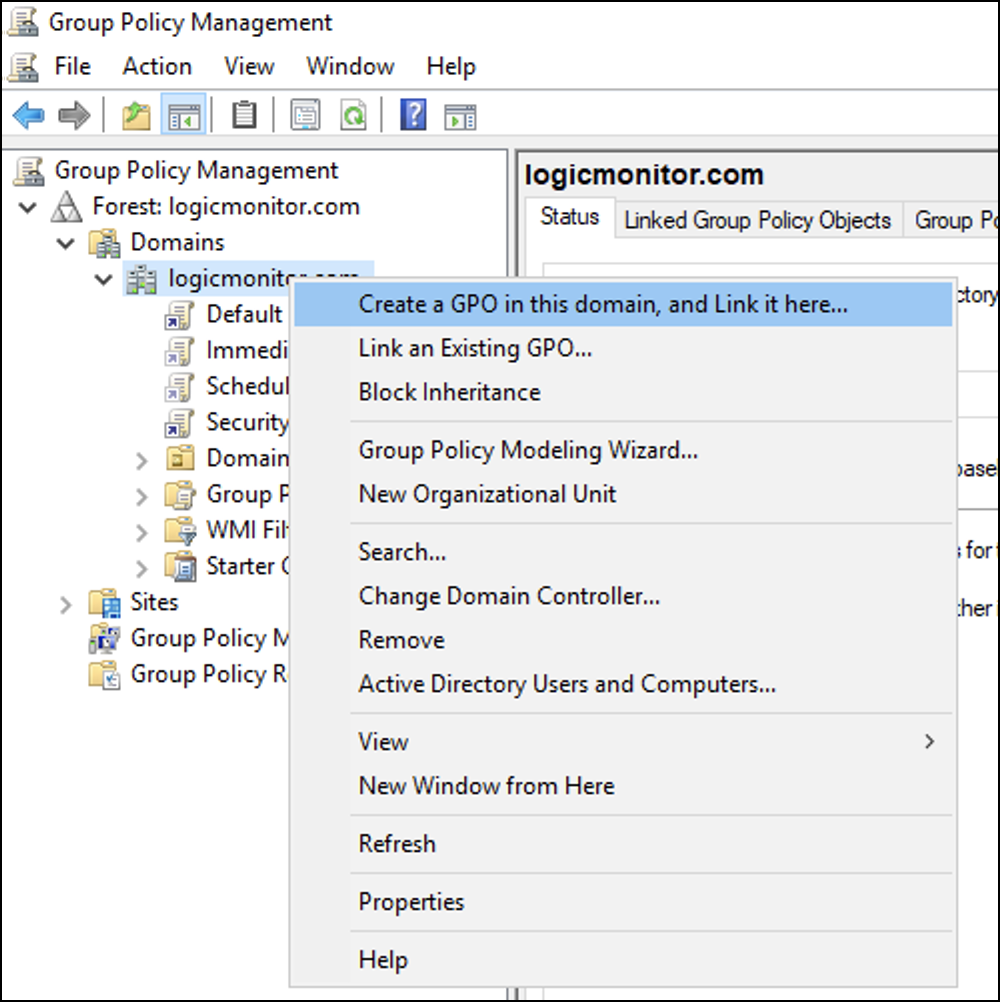
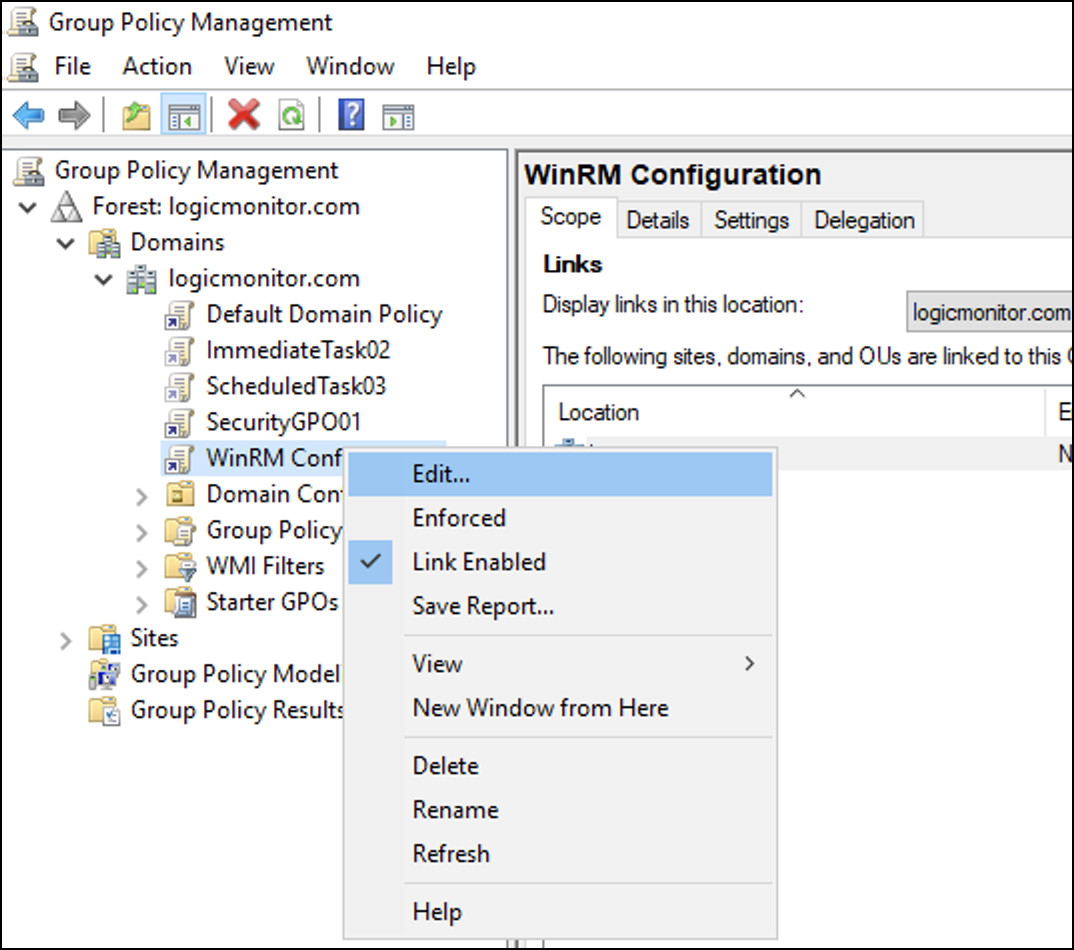
- Navigate to Server Manager > Tools > Group Policy Management.
- Right-click the domain you want to use and select Create a GPO in this domain, and Link it here…
- Enter a name for the new GPO policy and then select OK.
The Source Starter GPO remains (none).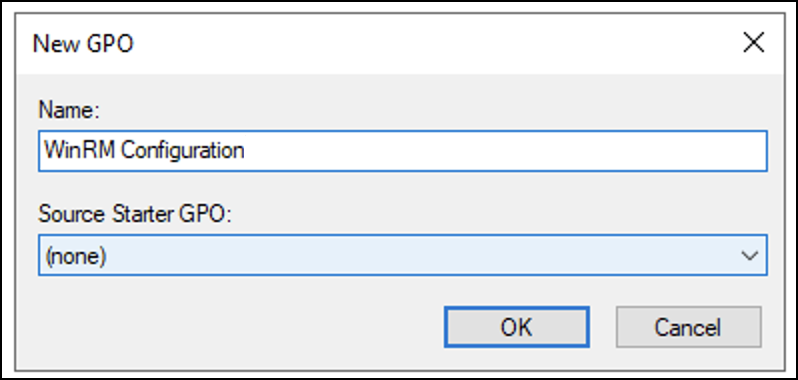
- Right-click the newly created GPO policy and select Edit to add tasks.
Adding Tasks to GPO Policy
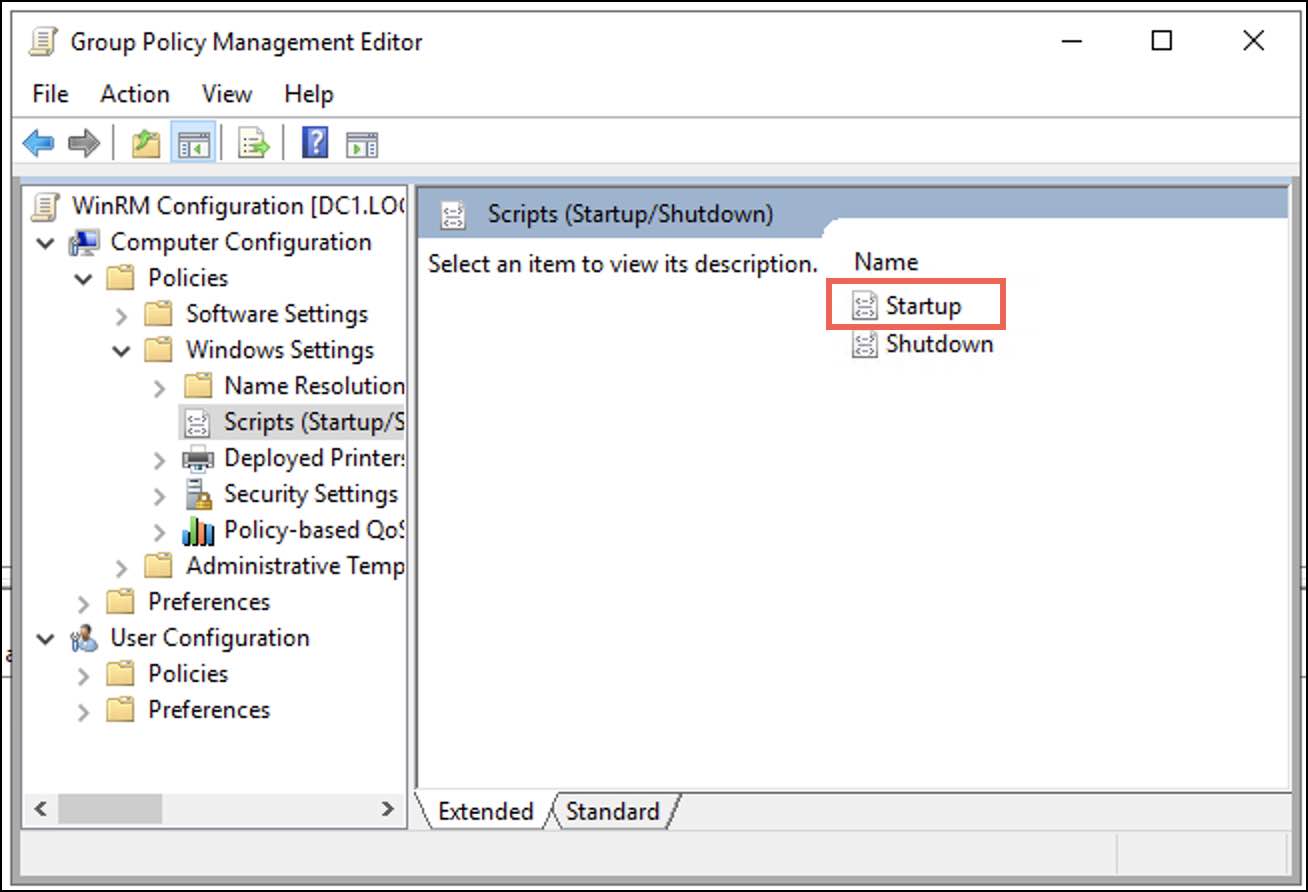
- In the Group Policy Management Editor, navigate to Computer Configuration > Policies > Windows Settings > Scripts (Startup / Shutdown) and select Startup.
A Startup Properties dialogue box displays. - Under the Scripts tab, select Add.
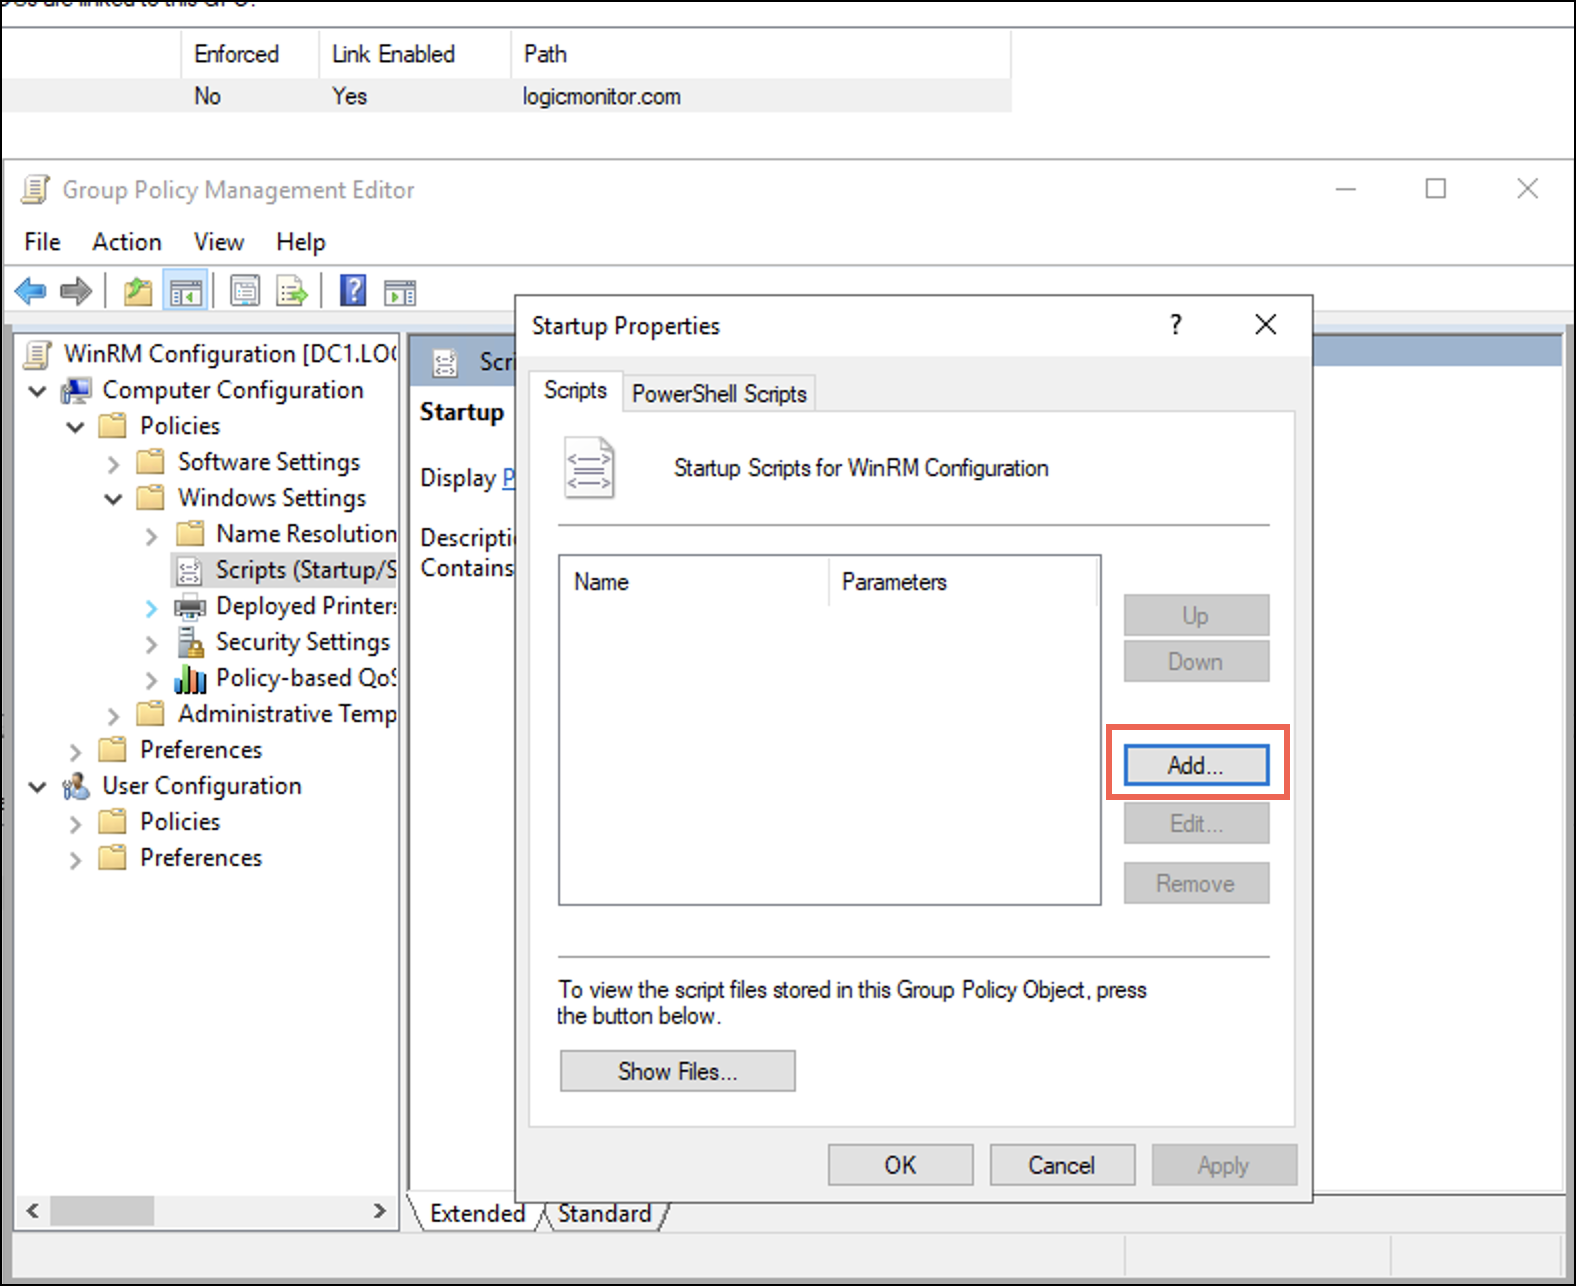
An Add a Script dialogue displays. - On the Add a Script dialogue, enter the following details:
- In the Script Name field, browse for the PowerShell.exe path.
Typically, the path isC:\Windows\System32\WindowsPowerShell\v1.0\Powershell.exeNote: If the path differs, browse for the specific folder where you have placed thePowershell.exe. - In the Script Parameters field, enter the following parameters to the script:
-Noninteractive -ExecutionPolicy Bypass -Noprofile -file \\<IP_Address_of_DC>\netlogon\Windows_NonAdmin_Config.ps1 -add -UserName logicmonitor\DomainUser01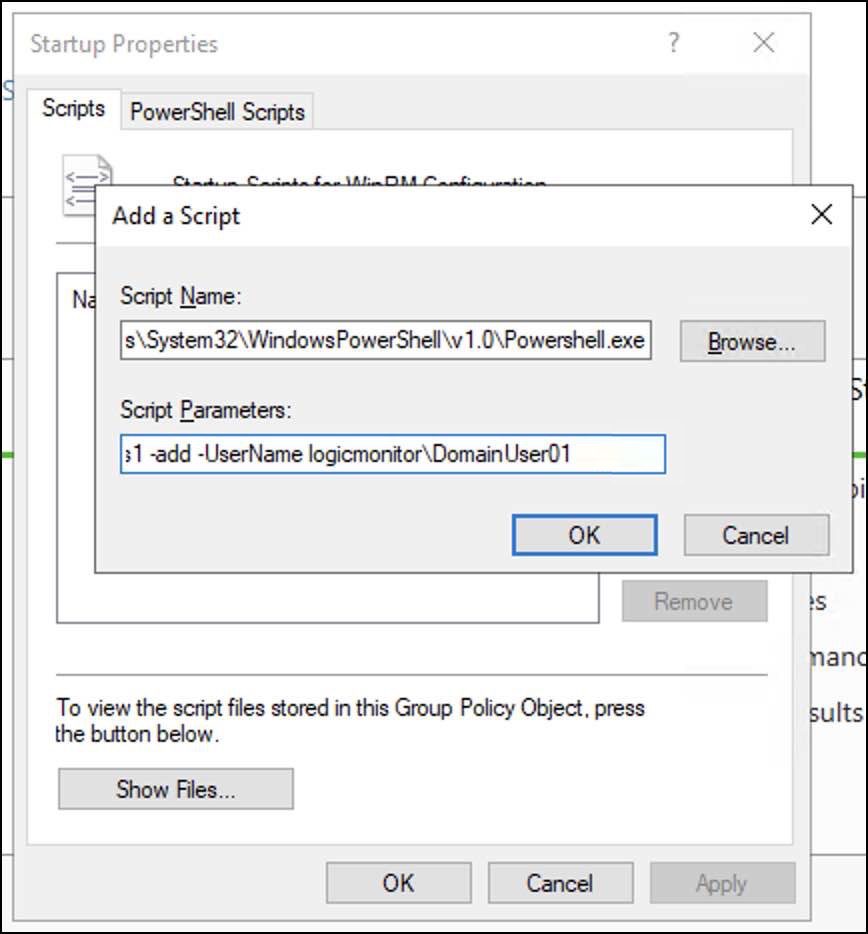
- In the Script Name field, browse for the PowerShell.exe path.
- Select OK and then select Apply.
Restarting Domain Machine
- Open the PowerShell terminal and run
gpupdate/force.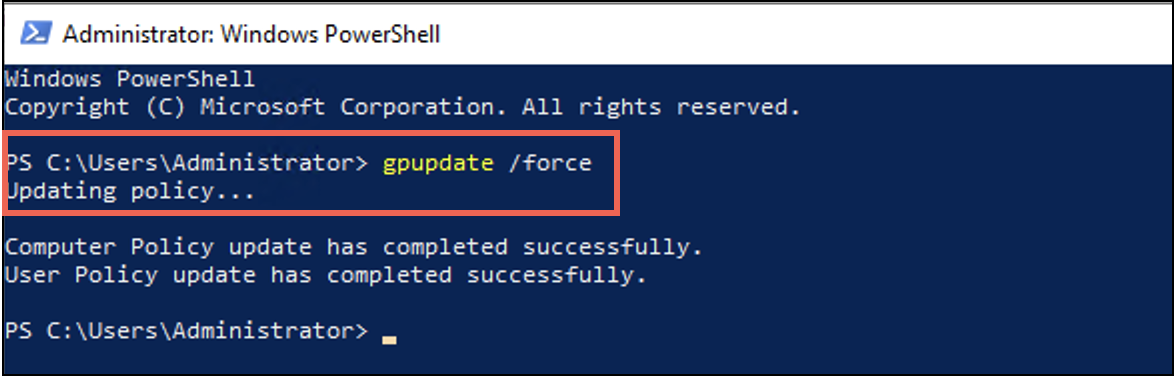
- When the user policy is successfully updated, restart the domain machines.
