LogicMonitor Roles
Last updated on 02 May, 2025Roles are sets of permissions and configurations that determine how a user interacts with the LogicMonitor platform, as well as what functionality they can access. After a role is created, it can be assigned to a user to enable that user with the permissions defined by the role.
By default, LogicMonitor provides the following standard roles:
- Administrator—Use this role to assign manage as well as security-sensitive permissions to all areas of the platform.
- Manager—Use this role to assign almost the same level of permissions as the administrator role without the security-sensitive permissions.
- Ackonly—Use this role to assign view, acknowledge, and SDT permissions for alerts for all hosts and websites. It also includes permissions for managing device dashboards and creating private dashboards.
Note: The ackonly role includes both individual and group permissions. This allows you to assign SDT or acknowledge by the group, not just the manager role.
- Readonly—Use this role to assign view permissions to all areas of the platform. The role does not provide the ability to make changes to the platform except for creating private dashboards.
If a user is assigned multiple roles, the effective permissions for that user are the sum of the privileges of each role. For example, if one assigned role provides view only permissions to all resources, but another assigned role provides manage permissions to all resources, the user will have view and manage permissions for all resources. If yet another assigned role provides view permissions for all dashboards, but no permissions for resources, the user will maintain manage permissions for all resources and additionally gain view permissions for all dashboards.
When you create a role, you use a wizard in your LogicMonitor portal to add the role to your portal and configure additional settings, such as adding the role to a group or making a custom link available to users assigned the role. For example, you could provide users a link that directs them to an internal knowledge base or other reference they may need.
Role Permission Sets in LogicMonitor
When you create a new role in LogicMonitor, you add the sets of permissions to the role that you want the user to have. The following table describes the role permission sets available when creating a role:
| Role Permission Set | Description |
| Dashboards | You can establish the level of dashboard permissions that users assigned this role can have. You can assign view or manage permissions for all dashboards found within a dashboard group or subgroup. Subgroups inherit permissions specified for a parent group. |
| Resources | You can establish the level of resource permissions that users assigned this role can have. You can assign view, acknowledge, SDT, and threshold permissions to all devices or services found within a resource group. In addition, manage and remote session permissions are available for device groups and subgroups. |
| Logs & Traces | The Logs & Traces permissions provide access to LM Logs and to view the Traces page. |
| Websites | You can establish the level of website permissions that users assigned this role can have. You can assign view, acknowledge, SDT, or manage permissions to all websites found within a website group or subgroup. |
| Saved Maps | You can establish the level of permissions that users can have for the Mapping page. |
| Reports | You can establish the level of report permissions that users can have. You can assign view or manage permissions to all reports found within a report group. |
| Modules | You can manage permissions for Exchange and My Module Toolbox. In addition, you can manage the permissions provided by Access Groups to give users granular controls of Modules. |
Settings Permissions
Under the Settings area of the Add Role dialog, establish the level of permissions that users assigned this role will have for the various configurations and features available from the Settings page.
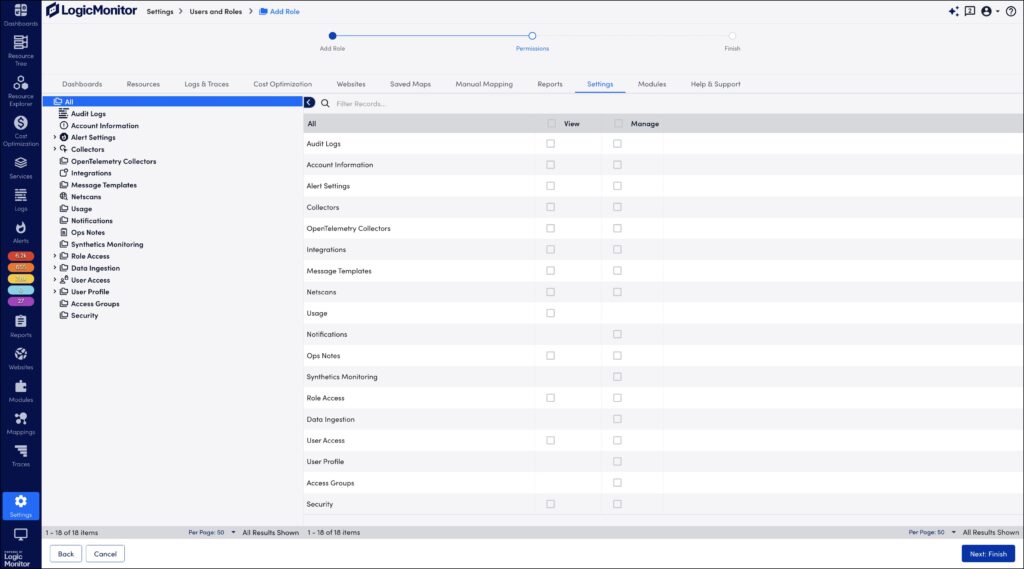
Note: If you don’t provide view permissions for at least one setting, the Settings page will be hidden for users with this role.
Access Groups
The Manage permissions for Access Groups allow users assigned to this role to perform the create, view, update, and delete (CRUD) operations of Access Groups. You can navigate to Settings > Users and Roles > Access Groups to perform the CRUD operations. For more information, see Access Group Permissions.
Access Logs
Access Logs permissions allow users assigned this role to view, filter, download, and report on the data stored in the platform’s Audit Logs.
Account Information
Account Information permissions allow users assigned this role to view or manage the account information and account-wide settings established for your portal.
Alert Settings
Alert Settings permissions are broken into five categories. You can individually assign view or manage permissions for configurations relating to alert dependency (i.e. root cause analysis), alert rules, escalation chains, external alerting, and recipient groups. In order to configure alert rules for a resource or website, a user must have view permissions for that resource or website.
Collectors
Collectors settings allow you to assign view or manage permissions to all Collectors found within a Collector group.
- View. View permissions provide the ability to view all Collectors within a selected group, as well as add devices or websites to those Collectors.Note: To give a user permission to assign devices/websites to a group of Collectors, but not to view the Collectors themselves, assign view rights to the Collector group and, from the User account, uncheck the Settings option available under the View Permission heading. It’s important to note that this will hide the Settings page altogether and disrupt the user’s ability to view or manage other setting areas.
- Manage. Manage permissions provide the ability to view, edit, and delete all Collectors within a Collector group, as well as perform all actions associated with Collectors available from the Settings page.
If you check the View or Manage option for the overall Collectors category, you’re setting that level of permissions not only for all current existing Collector groups, but for all future Collector groups as well.
Integrations
Integrations permissions allow users assigned this role to view or manage integrations (pre-built or custom) with external ticketing and team collaboration systems.
Message Templates
Message Templates permissions allow users assigned this role to view or manage the global templates in place for alert messages and new user messages.
NetScans
NetScans permissions allow users assigned this role to view or manage NetScans, which are configured processes that direct LogicMonitor Collectors to periodically look for and automatically discover devices in your network.
Ops Notes
Ops Notes permissions allow users assigned this role to view or manage Ops Notes, which are time-stamped annotations that display in your resource or website graphs.
The level of permissions granted here determine access to Ops Notes both from the Settings page and the Resources/Websites page. You must have at least view permissions for a resource/website group in order to enter ops notes for it or one of its members.
Role Access
Expand the Role Access setting to assign view permissions to all roles found within a particular role group. The ability to create and manage roles is intended for administrators only; therefore, manage permissions can only be assigned as a whole to all role groups (i.e. manage permissions cannot be assigned to roles on a per-group basis).
Note: View permissions are required here in order to create new users.
User Access
Expand the User Access setting to assign view or manage permissions to all users found within a user group. View permissions for users are required in order to add users to recipient groups, add users/user groups as alert recipients as part of escalation chains, or deliver reports to users.
Manage permissions provide the ability to create new users and manage single sign-on settings and are generally intended for administrator accounts.
User Profile
If you don’t give manage permissions to User Access settings, you’ll be provided the option to additionally assign manage permissions to two User Profile settings, which allow users to:
- Edit basic user account information (e.g. name, password, time zone, contact information) by clicking on their usernames in the upper right corner of the LogicMonitor UI
- Create API tokens
Help/Support Permissions
Under the Help & Support area of the Add Role dialog, establish the level of access to support and help documentation that users assigned this role will have.
Support Type
There are several types of support you can make available to users assigned this role.
- Documentation. If view permissions are given for Documentation, a “Support” link displays in the upper right of the top navigation bar for users assigned this role. When clicked, the “Support” link opens an inline search window titled “Support Guide” that provides access to LogicMonitor’s support articles and development guides. Depending upon other support access provided to the user, the Support Guide window may also feature a “Contact Support” link at its bottom with one or more of the following available actions:
- Chat with an Engineer. This allows users to launch a live chat from within the platform.
- Support Request. This allows users to submit a support ticket.
- Feedback. This allows users to submit platform feedback.
- Training. If view permissions are given for Training, a “Training” link displays in the upper right corner of the top navigation bar for all users assigned this role. The “Training” link allows users to enroll in the LogicMonitor Certified Professional (LMCP) Exam, as discussed in LogicMonitor Certified Professional Exam Information.
For more information on the support resources available to users, see Accessing Support Resources.
Custom Help Link
In addition to LogicMonitor’s built-in Support and Training links, you can also display custom help links for internal sites. You also have the option to add a custom help link and label if you’d like to give users direct access to an internal help site.
If Documentation is enabled by the role, then the label for this link will be displayed under the “Contact Support” link found at the bottom of the Support Guide window. If Documentation is not enabled by the role (i.e. users cannot view inline documentation), then clicking the “Support” link will take the user directly to the URL specified for the custom link.
Requirements for Adding a Role
To add a role, you need a user assigned “Role Access” in the Settings Role permissions.
Adding a Role
- In LogicMonitor, navigate to Settings > Users and Roles.
- Select the Roles tab.
The Roles table is displayed with role groups and roles. - Select Add Role Options, and then select Add Role.
The Add Role wizard is displayed to walk you through adding a role to your portal. - In the Name field, enter a name for the role.
Note: Role names cannot include the operators and comparison functions used by LogicMonitor’s datapoint expression syntax. For more information, see Complex Datapoints.
- To add a description to the role, enter a description in the Description field.
- In the Role Group field, enter the name of an existing group that you want this role to belong to.
If your environment does not use role groups, or if the group does not exist, you can leverage the default role group (“@default”) for the role.
In addition, you can use the default group to leave the role ungrouped.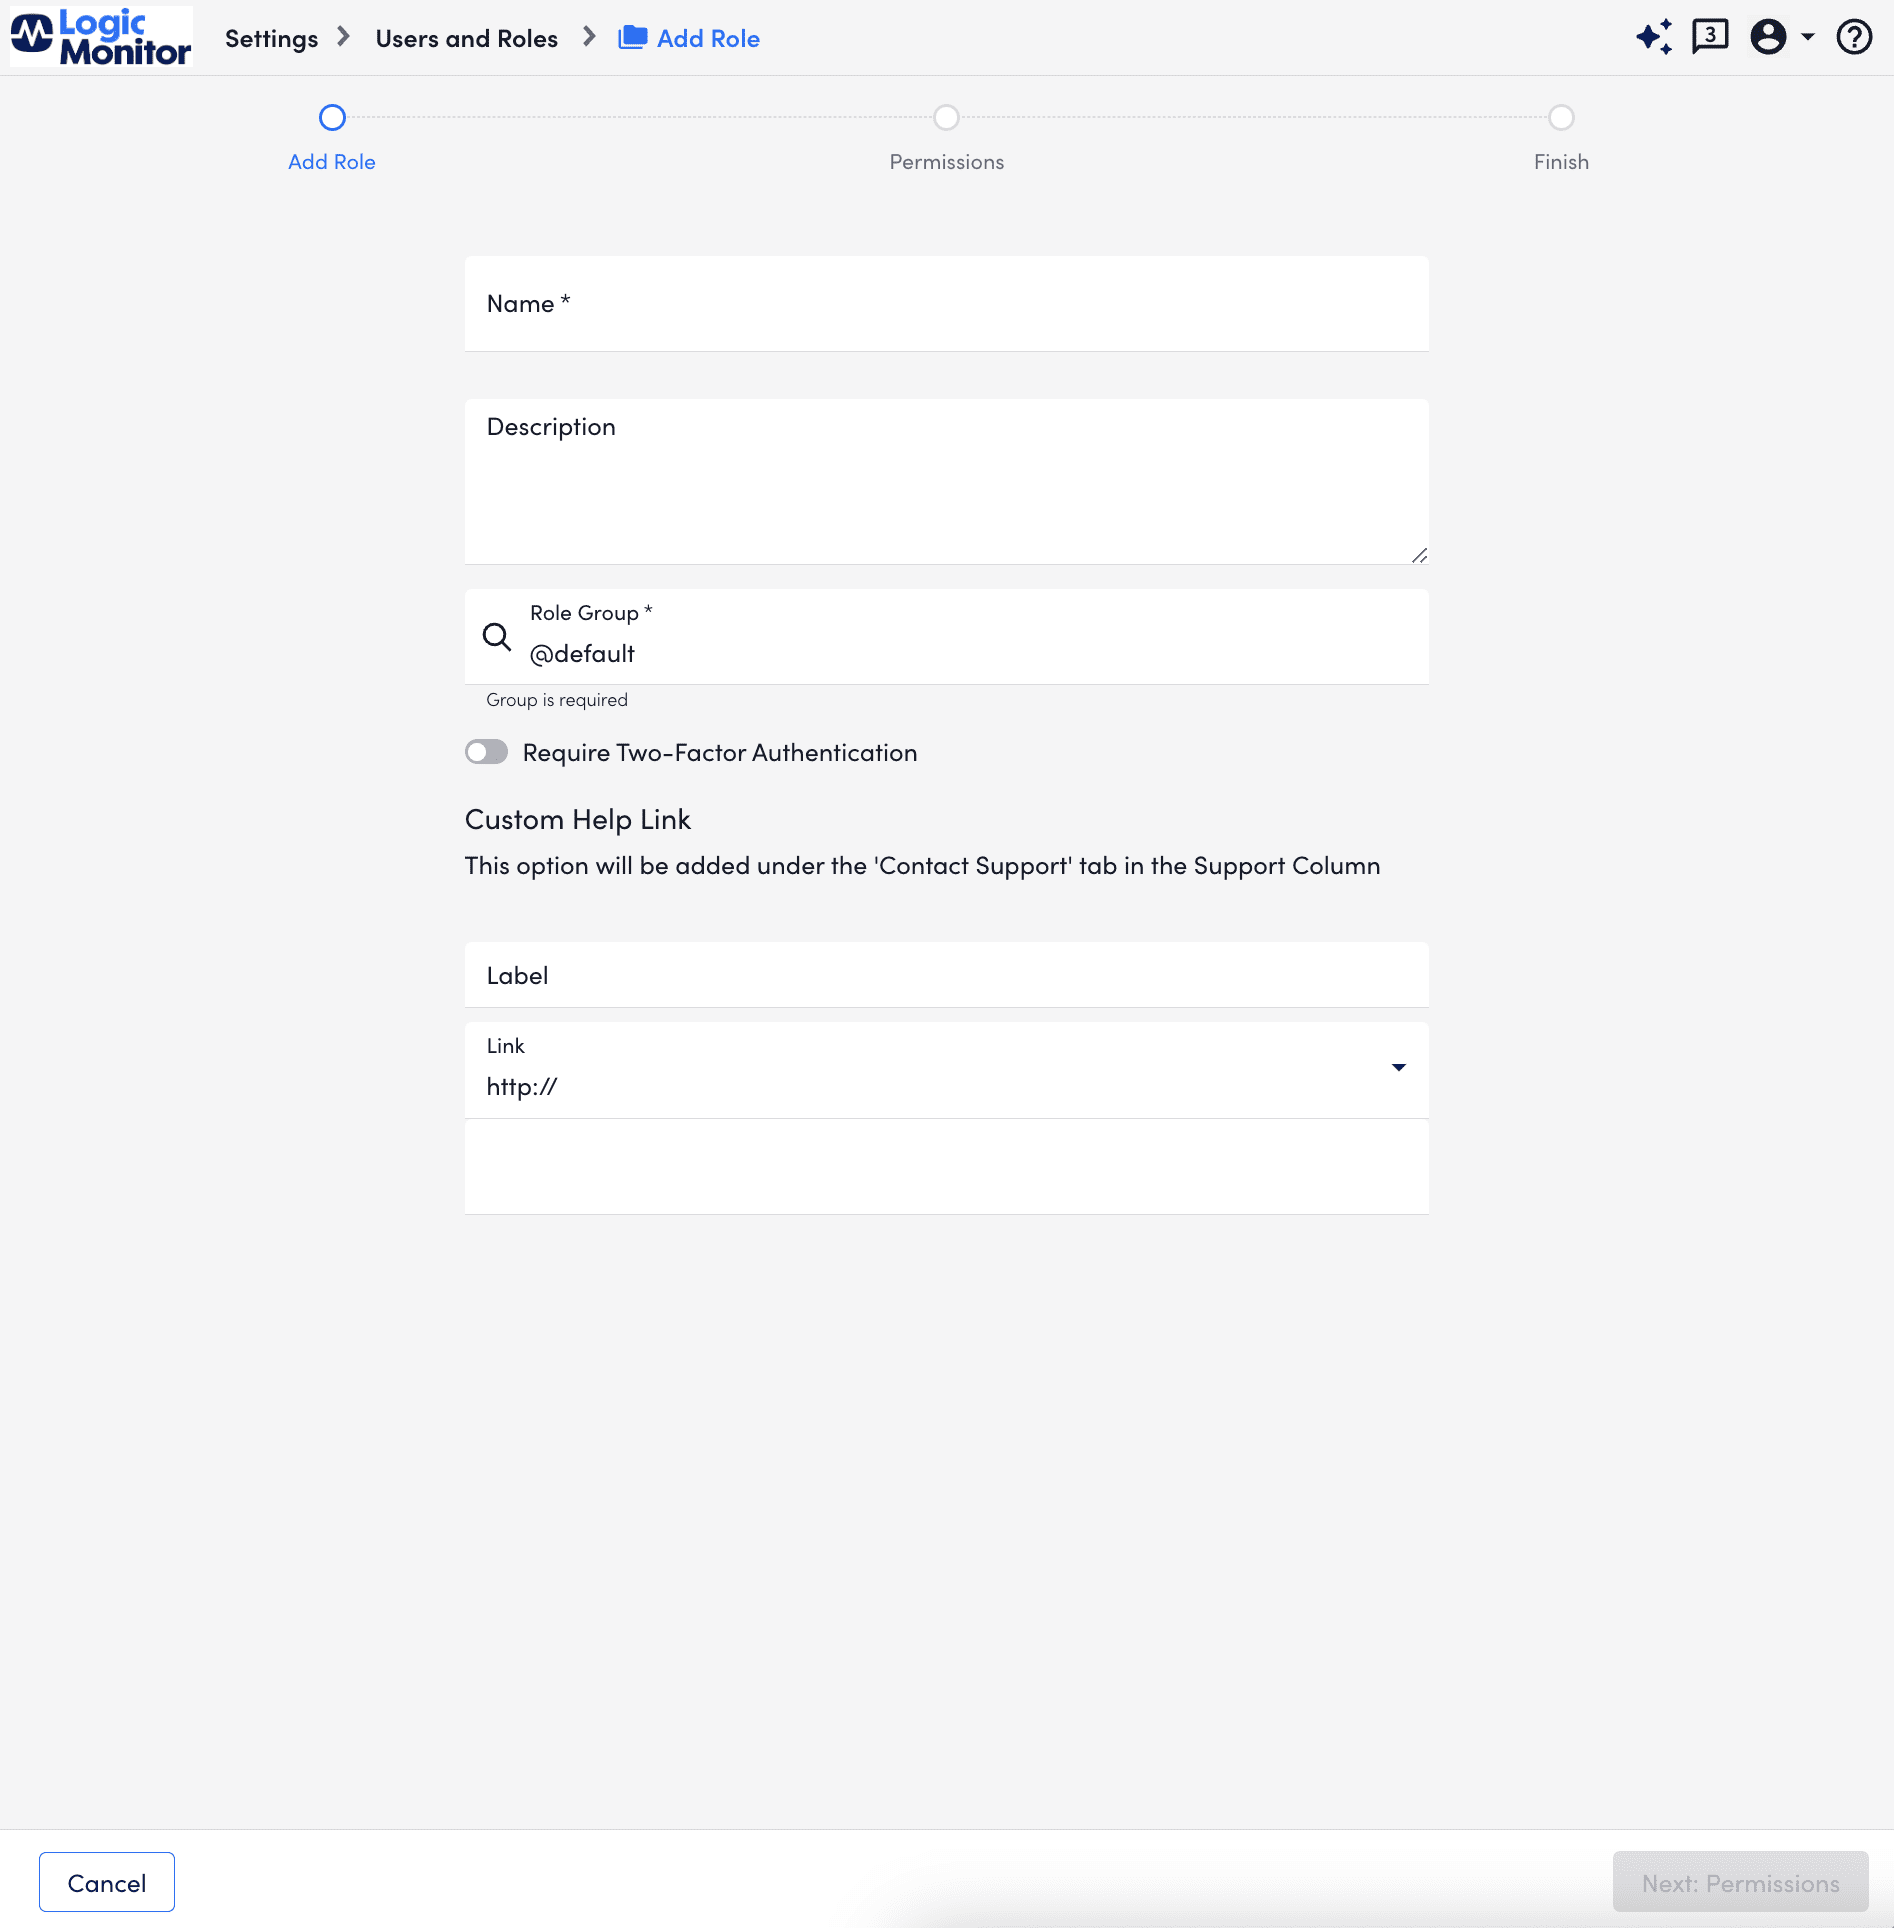
- To enforce two-factor authentication for users assigned this role, toggle the Require Two-Factor Authentication switch.
For more information, see Two-Factor Authentication in Security Settings. - To add a custom link, do the following:
- In the Label field, enter a label that you want to display in your portal. For example, this can be a description of the custom link you want to add.
The label is displayed as a title to your link. - From the Link dropdown, select “http://” or “https://” depending on the link you want to add, and then enter the URL in the text field.
- In the Label field, enter a label that you want to display in your portal. For example, this can be a description of the custom link you want to add.
- Select Next: Permissions, and configure the applicable role permissions you want a user assigned this role to have.
For more information see Role Permission Sets in LogicMonitor. - Select Next: Finish.
The final step in the Add Role wizard is displayed. From this step, you can add the newly created role to a role group or a user.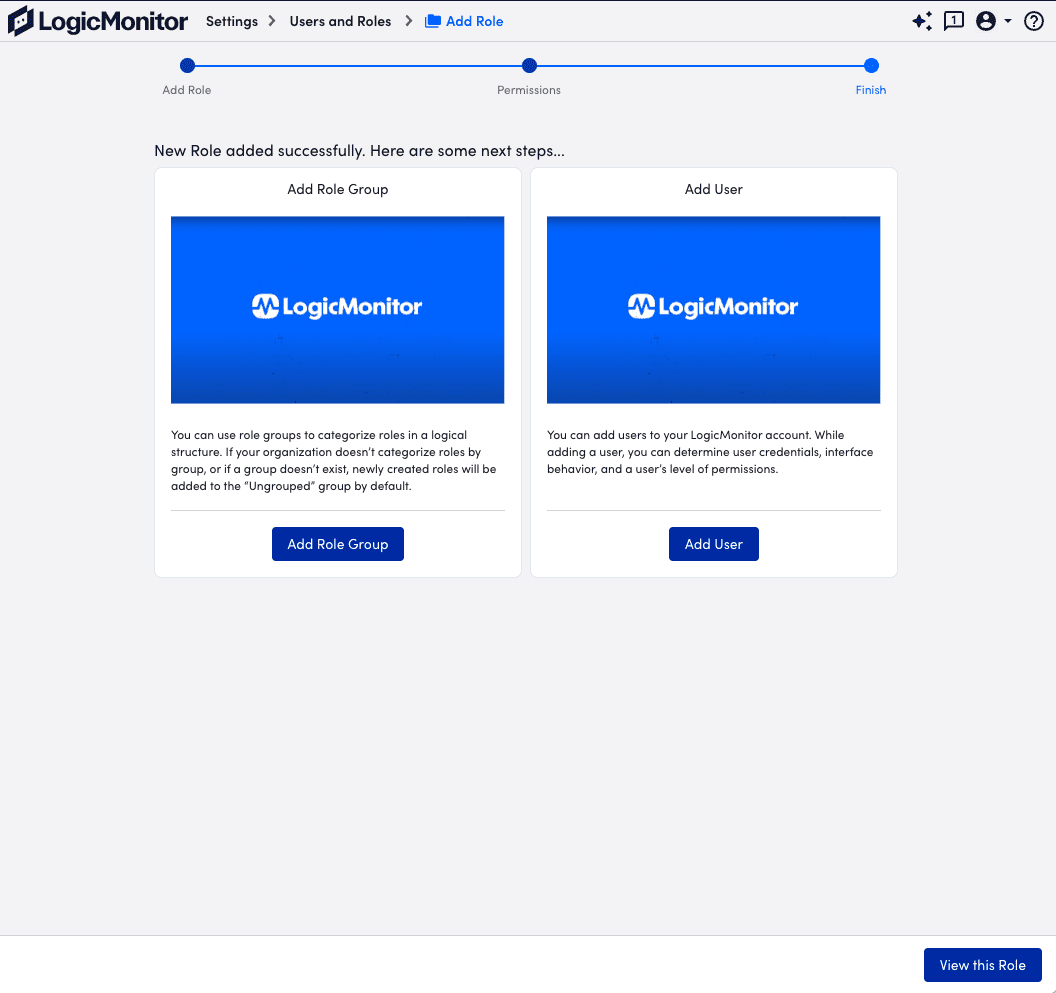
In addition, you can select View this Role to view the role in the Roles table where you can manage the role.